


vue3.0、ts、pinia、vite七七八八汇总

cat ‘不是内部或外部命令…’ 用type代替cat

https://github.com/sunniejs/vue-h5-template
JS
最新的ECMAScript标准定义了8种数据类型:
- 7种原始类型:
Boolean
Null
Undefined
Number
Biglnt
String
Symbol - 和 Object
原始值:除Object以外的所有类型都是不可变的(值本身无法被改变)。
ts
1、基本数据类型
// 原始数据类型: Boolean;Null;Undefined;Number;BigInt;String;Symbol

let isDone: boolean = false

// es6 中 number还支持二进制和八进制
let age: number = 10
let binaryNumber: number = 0b1111

// 字符串类型,也可使用es6中的模板字符串
let firstName: string = 'wly'
let message: string = `hello, ${firstName}`

// undefinde 和 null 所有类型的子类型
let u: undefined = undefined
let n: null = null

// undefined类型可以赋值给number类型的变量[官方这么讲,但是我码出来就是报错,暂时还未知]
let num: number = undefined

// any类型
let notSure: any = 4
notSure = 'maybe a string'
notSure = false
notSure.myName  // 在任意值上访问任何属性都是允许的
notSure.getName()  // 也允许调用任何方法
2、数组Array和元组Tuple
// 数组
let arrOfNumbers: number[] = [1,2,3]  //定义数字类型的数组
arrOfNumbers.push(4)

function test() {
    console.log(arguments) //arguments 是一个对应于传递给函数的参数的类数组对象。

}

function func1(a, b, c) {
    console.log(arguments[0])  // 1
    console.log(arguments[1])  // 2
    console.log(arguments[2])  // 3
}
func1(1, 2, 3)

// 元组Tuple 声明几个类型就能写几个,不能多写少些
let user: [string, number] = ['wly', 123]
user.push(12)  //但是可以push,push的值只能是string、number-联合类型
3、interface接口
// 定义一个接口 IPerson
interface IPerson {
    readonly id: number;  //readonly只读属性
    name: string;
    age?: number;  //?可选属性,这一项可有可无,否则不可多项和少项
}

// 定义一个变量viking, 他的类型是IPerson
let viking: IPerson = {
    id: 1,
    name: 'viking'
}
4、函数
// 约定输入,约定输出
function add(x: number, y: number): number {
    return x + y
}

let result = add(1, 2)

// z是个可选参数
const add2 = (x: number, y: number, z?: number): number => {
    if(typeof z === 'number') {
        return x + y + z
    } else  {
        return x + y
    }
}

// 函数本身的类型,注意在函数类型里面返回类型是个箭头
const add3: (x: number, y: number, z?: number) => number = add2

// 接口里面返回类型是个冒号
interface ISum {
    (x: number, y: number, z?:number): number
}
let add4: ISum = add2
5、类型推论、联合类型、类型断言、类型守卫
let str = 'str'

// union types-联合类型 中间用竖线来分割
let umberOrString: number | string
umberOrString = 1
umberOrString.toString()  // 只能访问此联合类型里共有的属性或方法

// type assertions-类型断言 as作为关键字-当编辑器无法判断我的代码,但是本人很清楚,我把它成string,你也可以用string方法
function getLength(input: string | number): number {
    const str = input as string
    if(str.length) {
        return str.length
    } else {
        const number = input as number
        return number.toString().length
    }
}

//type guard-类型守卫 在不同条件的分支里面,智能缩小范围,降低代码出错
function getLength2(input: string | number): number {
    if(typeof input === 'string') {
        return input.length
    } else {
        return input.toString().length
    }
}
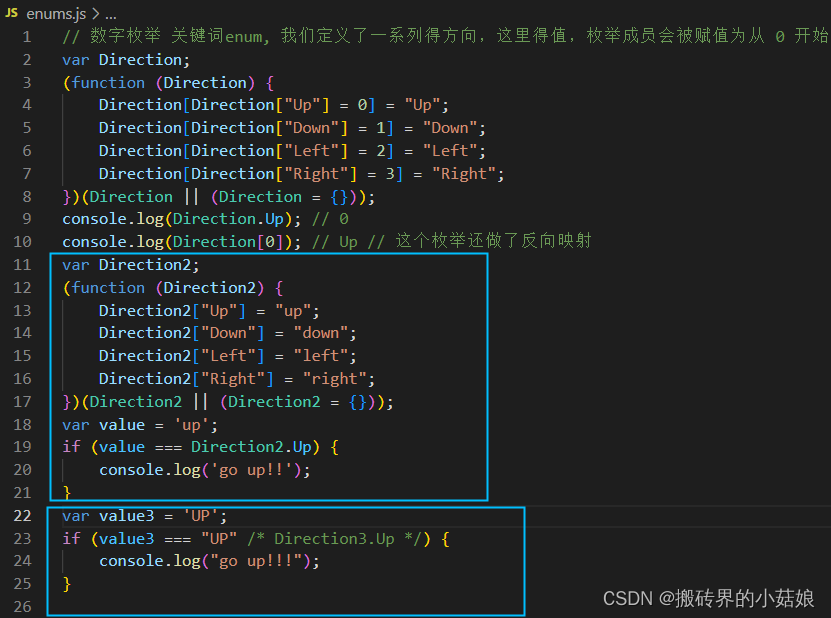
6、枚举
// 数字枚举 关键词enum, 我们定义了一系列得方向,这里得值,枚举成员会被赋值为从 0 开始递增的数字
enum Direction {
    Up,
    Down,
    Left,
    Right
}
console.log(Direction.Up)  // 0
console.log(Direction[0])  // Up // 这个枚举还做了反向映射

enum Direction2 {
    Up = 'up',
    Down = 'down',
    Left = 'left',
    Right = 'right'
}
const value = 'up'
if(value === Direction2.Up) {
    console.log('go up!!')
}

// 常量枚举
const enum Direction3 {
    Up = 'UP',
    Down = 'DOWN',
    Left = 'LEFT',
    Right = 'RIGHT'
}
const value3 = 'UP'
if(value3 === Direction3.Up) {
    console.log("go up!!!")
}// An highlighted block
var foo = 'bar';
注意字符串枚举跟常量枚举最本质得区分就是js中,字符串枚举只会执行Direction3.Up,其余在Direction3得其他属性值都不会执行
7、泛型
function echo<T>(arg: T):T {
    return arg
}
// const str: string = 'str'
// const result = echo(str)

const result1 = echo(123)

function swap<T, U>(tuple: [T, U]):[U, T] {
    return [tuple[1], tuple[0]]
}
const result2 = swap(['string', 123])


// 约束泛型
function echoWithArr<T>(arg: T[]):T[] {
    console.log(arg.length)
    return arg
}
const arrs = echoWithArr([1, 2, 3])


interface IWithLength {
    length: number
}
function echoWithArrLength<T extends IWithLength>(arg: T): T {
    return arg
}
const str = echoWithArrLength('str')
const obj = echoWithArrLength({ length: 10, width: 10 })
const arr2 = echoWithArrLength([1, 2, 3])
echoWithArrLength(13)  // number里面没有length属性,所以报错


// 类的公有类型(public)和私有类型(private)
class Queue<T> {
    private data: T[] = [];
    push(item: T) {
        return this.data.push(item)
    }
    pop() {
        return this.data.shift()
    }
}
const queue = new Queue<number>()
queue.push(1)
const popedValue = queue.pop()
if(popedValue) {
    console.log(popedValue.toFixed())
}


// 泛型和interface
interface KeyPair<T, U> {
    key: T
    value: U
}
let kp1: KeyPair<number, string> = {key: 1, value: 'string'}
let kp2: KeyPair<string, number> = {key: 'str', value: 2}
let arr: number[] = [1, 2, 3]
let arrTwo: Array<number> = [1, 2, 3]
8、类型别名 和 交叉类型
// 类型别名 和 交叉类型

import { type } from "os"

let sum: (x: number, y: number) => number
const result = sum(1, 2)
type PlustType = (x: number, y: number) => number
let sum2: PlustType
const result2 = sum2(2,3)

// 支持联合类型
type StringOrNumber = string | number
let result3: StringOrNumber = '123'
result3 = 123

const str: 'name' = 'name'
const number: 1 = 1

// 字符串字面量
type Direcions = 'Up' | 'Down' | 'Left' | 'Right'
let toWhere: Direcions = 'Left'

// 交叉类型
interface IName {
    name: string
}
type IPerson = IName & {age: number}
let person: IPerson = {name: '123', age: 123}
9、声明文件
(1) axios.d.ts //注.d.ts固定写法
注:这两个文件需要同时在编辑器中打开,不然axio会报错
// 它里面没有任何的实际实现代码,只有类型声明
// 只有类型 - 比如 interface,funciton 或者 class 等等

// declare function axios(url: string): string
interface IAxios {
    get: (url: string) => string;
    post: (url: string, data: any) => string
}
declare const axios: IAxios  // declare 声明类型
declaration-files.ts
// axios('test.url')
axios.get('url')
axios.post('url', {name: 'viking'})
(2) 引入第三方声明文件
npm i axios
declaration-files.ts
import axios from 'axios'
axios.get('ulr')
axios.post('url', {name: 'viking'})
(3)声明文件-小例子 计算器
//第一种
// caculator.d.ts
type IOperator = 'plus' | 'minus'
type ICalculator = (operator: IOperator, numbers: number[]) => number
declare const calculator: ICalculator
// declaration-files.ts
calculator('minus', [1,2])
// 第二种
// caculator.d.ts
type IOperator = 'plus' | 'minus'
interface ICalculator {
	(operator: IOperator, numbers: number[]): number;
	plus: (numbers: number[]) => number;
	minus: (numbers: number[]) => number;
}
declare const calculator: ICalculator
export default calculator // 也可以使用es6
// declaration-files.ts
import calculator from './calculator'
calculator.minus([1,3])
将第二种的caculator.d.ts代码,挪到node_modules下的@types中创建文件夹caculator里面建立文件index.d.ts里面(作为模块来使用)
// declaration-files.ts
import calculator from 'calculator'
10、内置类型
const a: Array<number> = [1, 2, 3]
// 大家可以看到这个类型,不同的文件中有多处定义,但是它们都是 内部定义的一部分,然后根据不同的版本或者功能合并在了一起,一个interface 或者 类多次定义会合并在一起。这些文件一般都是以 lib 开头,以 d.ts 结尾,告诉大家,我是一个内置对象类型欧
const date: Date = new Date()
date.getTime()
const reg = /abc/
// 我们还可以使用一些 build in object,内置对象,比如 Math 与其他全局对象不同的是,Math 不是一个构造器。Math 的所有属性与方法都是静态的。
reg.test('abc')

Math.pow(2, 2)

// DOM 和 BOM 标准对象
// document 对象,返回的是一个 HTMLElement
let body: HTMLElement = document.body
// document 上面的query 方法,返回的是一个 nodeList 类型
let allList = document.querySelectorAll('li')
allList.keys()

//当然添加事件也是很重要的一部分,document 上面有 addEventListener 方法,注意这个回调函数,因为类型推断,这里面的 e 事件对象也自动获得了类型,这里是个 mouseEvent 类型,因为点击是一个鼠标事件,现在我们可以方便的使用 e 上面的方法和属性。
document.addEventListener('click', (e) => {
    e.preventDefault()
})


interface IPerson {
    name: string,
    age: number
}
let viking: IPerson = { name: 'viking', age: 20 }
type IPartial = Partial<IPerson>
let viking2: IPartial = { name: 'viking'}
type IOmit = Omit<IPerson, 'name'>  // IPerson name属性忽略掉
let viking3: IOmit = { age: 20 }
11、配置文件
{
  "files": ["test.ts", "test2.d.ts"],
  "compilerOptions": {
    "outDir": "./output",
    "module": "ESNext",
    "target":"ES5",
    "declaration": true
  }
vue 3.0
vue-ui 图形化界面创捷项目
vite脚手架 不同于vue-cli的创新
// vue 3.0推荐vscode种volar插件,注将原来vetur禁掉
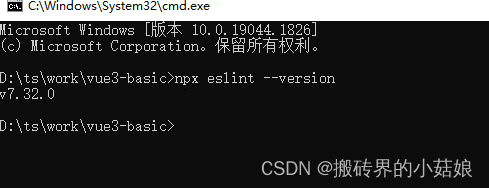
// 查看项目下的eslint版本
在这里插入图片描述
vite:https://cn.vitejs.dev/
vscode中之前用的插件是vetur,vue3.0用的插件是volar
ref
// 注:ref定义变量读取的时候写法是 该变量名.value
<template>
  <h1>{{ count }}</h1>
  <button @click="increase">ddddd</button>
  <h2>{{ double }}</h2>
</template>

<script lang="ts">
// ref 是一个函数,它接受一个参数,返回的是一个神奇的 响应式对象。我们初始化的这个0作为参数包裹到这个对象中去,在未来可以检测到改变并作出对应的响应
import  { defineComponent, ref, computed } from 'vue';
export default defineComponent({
  name: 'App',
  setup() {
    const count = ref(0)
    const double = computed(() => {
      return count.value * 2
    })
    const increase = () => {
      count.value++
    }
    return {
      count,
      increase,
      double
    }
  }
});
</script>

<style></style>
isRef
检查某个值是否为ref,返回值是类型判断,意味着是类型守卫
import { ref, isRef } from 'vue'
const count = ref(0)
console.log(isRef(count)) // true
unRef
如果参数是ref,则返回内部值,否则返回参数本身。
相当于count = unRef(count) ? count.value : count 的语法糖
import { ref, unRef } from 'vue'
const count = ref(0)
console.log(unRef(count)) // 返回0 ,其实是count.value的值

const count1 = 1
console.log(unRef(count1)) // 返回1
toValue() 适用于3.3+
将值、refs或getters规范化为值。与unref()类似,不同的是此函数也会规范化getter函数。如果参数是一个getter,它将会调用并返回它的返回值。
可以在组合式函数中使用,用来规范化一个可以是值、ref或getter的参数。
toValue(1)  // 1
toValue(ref(1))  // 1
toValue(() => 1)  // 1
toRef
可以将值、refs 或 getters 规范化为 refs (3.3+)。
也可以基于响应式对象上的一个属性,创建一个对应的 ref。这样创建的 ref 与其源属性保持同步:改变源属性的值将更新 ref 的值,反之亦然。
const state = reactive({
	foo: 1,
	bar: 2
})
// 双向ref,会与源属性同步
const fooRef = toRef(state, 'foo')
const handleData = () => {
	// 更改该ref会更新源属性
	fooRef.value++
	console.log(fooRef.value) // 2
	console.log(state.foo) // 2

	// 更改源属性也会更改该ref
	state.foo++
	console.log(fooRef.value) // 3
	console.log(state.foo) // 3
}
当toRef与组件props结合使用
const props = defineProps(/*...*/)
// 将'props.foo'转换为ref,然后传入
// 一个组合式函数
useSomeFeature(toRef(props, 'foo'))
// getter语法一推荐在3.3+版本使用
useSomeFeature(toRef(() => props.foo))
toRefs
将一个响应式对象转换为一个普通对象,这个普通对象的每个属性都指向源对象相应属性的ref。每个单独的ref都是使用toRef() 创建的。
const state = reactive({
	foo: 1,
	bar: 2
})
const stateAsRefs = toRefs(state)
const handleData = () => {
	state.foo++
	console.log(stateAsRefs.foo.value)  // 2
	stateAsRefs.foo.value++
	console.log(state.foo)  // 3
}
reactive
使用ref还是reactive可以选择准则
(1)就像刚才的原生javascript的代码一样,像你平常写普通的js代码选择原始类型和对象类型一样来选择使用ref还是reactive
(2)所有场景使用reactive,但要记得使用toRefs保证reactive
对象属性保持响应性
<template>
  <h1>{{ count }}</h1>
  <button @click="increase">ddddd</button>
  <h2>{{ double }}</h2>
</template>

<script lang="ts">
import  { defineComponent, computed, reactive, toRefs } from 'vue';
interface DataProps {
  count: number;
  double: number;
  increase: () => void
}
export default defineComponent({
  name: 'App',
  setup() {
    const data: DataProps = reactive({
      count: 0,
      increase: () => {
        data.count++
      },
      double: computed(() => data.count * 2)
    })
    const refData = toRefs(data)
    return {
      ...refData
    }
  }
});
</script>

<style>
</style>
ref:原始类型(number, string, boolean, undefined, null)和对象都可以进行相应的数据做响应式处理
const ref1 = ref(0)  //ok
const ref2 = ref({ a: 0 })  //ok

// ref可以处理原始类型的值,对于引用类型值也可。如果ref函数传递一个对象,那么这个对象要通过reactive()这个方法将其转换成深层次的响应式对象,换句话来说也就是内部本质还是调用了reactive()方法
reactive:该方法是不允许传递原始类型的值,它并没有和ref一样检测到原始类型之后进行做对应的转换
const reactive1 = reactive(0)  // not ok
const reactive2 = reactive({ a: 0 })  //ok

// reactive1这种写法不会报错,页面也能渲染出来,但是没有办法改变它,失去了意义,对于reactive只能是对象最主要的原因在于在vue内部的相应式的实现,是依据proxy实现的,但是proxy不适用于基本类型数据
ref和reactive区别: ref对于基本类型和引用类型都可以,但是reactive只适用于引用类型
数据访问方式中ref:无论是原始类型还是对象,访问数据都需要通过.value的形式进行,更新数据的话也是通过.value
const ref1 = ref(0)
console.log(ref1.value)  // 0
const ref2 = ref({ a: 0 })
console.log(ref2.value.a)  // 0
ref1.value = 1
console.log(ref1.value)  // 1

<div>{{ ref1 }}</div>
数据访问方式中reactive:由于是proxy代理的对象数据,可以直接更新和访问数据
const reactive1 = reactive({ num : 0})
console.log(reactive1.num)  // 0
TS类型:ref
import  { ref, Ref } from 'vue'
const ref1: Ref<number> = ref(0)
TS类型:reactive
import { reactive } from 'vue'
const reactive1: { num: number } = reactive({ num: 0 })
watch监听方式:ref
const ref1 = ref(0)
watch(ref1, () => {
	console.log("changed")
})
// 注:ref中原始类型数据,这样写没啥问题当ref1.value改变时能被监听到
// 但如果是对象则需要深度监听才能监听到深层
const ref2 = ref({ a: 1 })
watch(ref2, () => {
	console.log('changed ref2')
}, { deep: true })
watch监听方式:reactive
const reactive1 = reactive({ a: 1 })
watch(reactive1, () => {
	console.log('changed reactive1')
})
ref和reactive总结:
- 响应式原始值,就使用ref(),注是原始值
- 响应式对象,层级不深,使用ref也可
- 响应式可变对象,并且对象层级较深,使用reactive
生命周期
vue 2.0 -> vue 3.0
beforeCreate -> use setup()
created -> use setup()
beforeMount -> onBeforeMount - 注册一个钩子,在组件被挂载之前被调用
mounted -> onMounted - 注册一个回调函数,在组件挂载完成后执行
beforeUpdate -> onBeforeUpdate - 注册一个钩子,在组件即将因为响应式状态更变而更新其DOM树之前调用
updated -> onUpdated - 注册一个回调函数,在组件因为响应式状态变更更新其DOM树之后调用
beforeDestroy -> onBeforeUnmount - 注册一个钩子,在组件实例被卸载之前调用
destroyed -> onUnmounted - 注册一个回调函数,在组件实例被卸载之后调用

activated -> onActivated - 注册一个回调函数,若组件实例是 <KeepAlive> 缓存树的一部分,当组件被插入到 DOM 中时调用。这个钩子在服务器端渲染期间不会被调用。
deactivated -> onDeactivated - 注册一个回调函数,若组件实例是 <KeepAlive> 缓存树的一部分,当组件从 DOM 中被移除时调用。这个钩子在服务器端渲染期间不会被调用。
errorCaptured -> onErrorCaptured - 注册一个钩子,在捕获了后代组件传递的错误时调用

//调试 debugger钩子函数
onRenderTracked - 注册一个调试钩子,当组件渲染过程中追踪到响应式依赖时调用。
onRenderTriggered - 注册一个调试钩子,当响应式依赖的变更触发了组件渲染时调用。
onServerPrefetch - 注册一个异步函数,在组件实例在服务器上被渲染之前调用。
watch
watch数据源可以是ref(包括计算属性)、响应式对象、getter函数、或多个数据源组成的数组
1、ref值微基本类型
const simplePerson = ref('张三')

// 情景一
// 数据源为RefImpl
watch(simplePerson, (newVal, oldVal) => {
    console.log("simplePerson==", newVal)  // 张三
}, {
    immediate: true
})
// 情景二
// 数据源为'张三'
watch(simplePerson.value, (newVal, oldVal) => {  //非法数据源,监听不到且控制台告警
    console.log("simplePerson.value==", newVal)  // undefined
}, {
    immediate: true
})
2、ref值为引用类型
ref值为引用类型,等价于:person.value = reactive({name: ‘张三’})
// 2、ref值为引用类型,等价于:person.value = reactive({name: '张三'})
const person = ref({
    name: '张三'
})

// 情景三
// 数据源为RefImpl,但是.value才是响应式对象,所以要加deep
watch(person, (newVal, oldVal) => {
    console.log("person==", newVal) // Proxy {name: '张三'}
}, {
    immediate: true,
    deep: true  // 必须设置,否则监听不到内部变化
})
// 情景四
// 数据源为响应式对象
watch(person.value, (newVal, oldVal) => {
    console.log('person.value==', newVal)  // Proxy {name: '张三'}
}, {
    immediate: true
})
// 情景五
//数据源为'张三'
watch(person.value.name, (newVal, oldVal) => {  // 非法数据源,监听不到且控制警告
    console.log('person.value.name==', newVal)  // undefined
}, {
    immediate: true
})
// 情景六
// 数据源为getter函数,返回基本类型
watch(
    () => person.value.name,
    (newVal, oldVal) => {
        console.log("person.value.name==getter函数=", newVal)  // '张三'
    }
, {
    immediate: true
})

watch(() => unref(person), (newVal, oldVal) => {
	console.log(newVal.name)  // 张三
}, {
	immediate: true
})
3、ref值包含嵌套的引用类型
ref值包含嵌套的引用类型,等价于:complexPerson.value = reactive({name: ‘张三’, info: {age: 18}})
const complexPerson = ref({name: '张三', info: {age: 18}})

// 情景七
// 数据源为响应式对象(在vue3中状态都是默认深层响应式的)
watch(complexPerson.value.info, (newVal, oldVal) => {
    console.log("complexPerson.value.info===", newVal)  // Proxy {age: 18}
},{
    immediate: true
})
// 情景八
// 数据源为getter函数,返回相应式对象
watch(
    () => complexPerson.value.info,
    (newVal, oldVal) => {
        console.log("complexPerson.value.info=getter函数==", newVal)  // Proxy {age: 18}
    }
, {
    immediate: true,
})
// 情景九
watch(() => unref(complexPerson),(newVal, oldVal) => {
	console.log(newVal.name) // 张三
}, {immediate: true}
)
4、reactive
const reactivePerson = reactive({name: '张三', info: {age: 18}})

// 情景九
// 数据源为响应式对象
watch(reactivePerson, (newVal) => {
    console.log("reactivePerson==", newVal)  // Proxy {name: '张三', info: {age: 18}}
},{
    immediate: true
})
总结:
1、在Vue3中状态都是默认深层响应式的(情景七),嵌套的引用类型在取值(get)时一定是返回Proxy响应式对象
2、watch数据源为响应式对象时(情景四、七、九),会隐式的创建一个深层侦听器,不需要再显示设置deep: true
3、情景三和情景八两种情况下,必须显示设置deep: true,强制转换为深层侦听器
4、情景五和情景七对比下,虽然写法完全相同,但是如果属性值为基本类型时是监听不到的,尤其是ts类型声明为any时,ide也不会提示告警,导致排查问题比较费力
5、所以精确的ts类型声明很重要,否则经常会出现莫名其妙的watch不生效的问题
6、ref值为基本类型时通过get\set拦截实现响应式;ref值为引用类型时通过将.value属性转换为reactive响应式对象实现;
7、deep会影响性能,而reactive会隐式的设置deep: true,所以只有明确状态数据结构比较简单且数据量不大时使用reactive,其他一律使用ref
watch、watchEffect
watch、watchEffect区别:
(1)、执行时机:watchEffect是立即执行的,在页面加载时会主动执行一次,来收集依赖;而watch是惰性地执行副作用,它不会立即执行,但可以配置immediate,使其主动触发。
(2)、参数不同:watchEffect只需传递一个回调函数,不需要传递侦听的数据,它会在页面加载时主动执行一次,来收集依赖;而watch至少要有两个参数(第三个参数是配置项),第一个参数是侦听的数据,第二个参数是回调函数。
(3)、结果不同:watchEffect获取不到更改前的值;而watch可以获取更改前和更改后的值。
// 侦听一个单一源
// (1)、直接侦听一个ref
const count = ref(0)
watch(count, (count, prevCount) => {  // 基本类型写法
	/**...*/
},{immediate: true})  // watch是惰性地执行副作用,它不会立即执行,但可以配置 immediate,使其主动触发
// (2)、侦听一个getter
const state = reactive({ count: 0 })
watch(() => state.count, (count, prevCount) => {  //watch引用类型写法
})

// watchEffect
const bb = reactive({ count: 0 })
watchEffect(() => {
	console.log(bb.count)
})


 // watch 简单应用
    watch(data, () => {
      document.title = 'update' + data.count
    })
    // watch的两个参数,代表新的值和旧的值
    watch(refData.count, (newValue, oldValue) => {
      console.log("oldValue=",oldValue)
      console.log("newValue", newValue)
      document.title = 'update' + data.count
    })
    // watch多个值,返回的也是多个值的数组
    watch([greetings, data], (newValue, oldValue) => {
      console.log("oldValue", oldValue)
      console.log("newValue", newValue)
      document.title = 'updated' + greetings.value + data.count
    })
    // 使用greetings的写法watch reactive 对象中的一项
    watch([greetings, () => data.count], (newValue, oldValue) => {
      console.log('oldValue', oldValue)
      console.log("newValue", newValue)
      document.title = 'updated' + greetings.value + data.count
    })
hooks
vue3的hooks函数相当于vue2的mixin,不同在与hooks是函数
vue3的hooks函数可以提高代码的复用性,可以在不同组件中利用hooks函数
例:
1、在src目录下创建一个hooks文件夹
2、创建文件名.ts
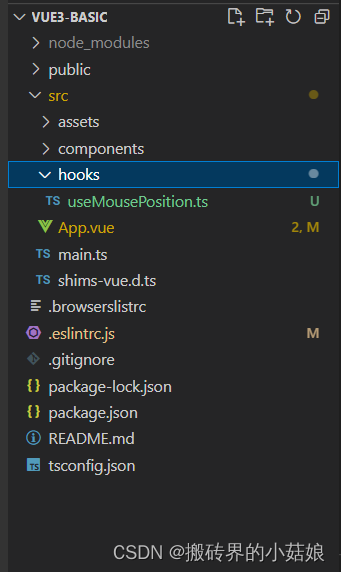
useMousePosition.ts
import { ref, onMounted, onUnmounted} from 'vue'
function useMousePosition() {
    const x = ref(0)  // x绑定响应式数据
    const y = ref(0)
    const updateMouse = (e: MouseEvent) => {
      x.value = e.pageX
      y.value = e.pageY
    }
    onMounted(() => {
      document.addEventListener('click', updateMouse)
    })
    onUnmounted(() => {
        document.removeEventListener('click', updateMouse)
    })
    return {x, y}
}
export default useMousePosition
在***.vue中
<template>
  <div>
    <h1>x{{x}}</h1>
    <h1>y{{y}}</h1>
  </div>
</template>

<script lang="ts">
import  { defineComponent,ref, computed, reactive, toRefs, watch, onMounted, onUnmounted} from 'vue';
import useMousePostion from './hooks/useMousePosition'
export default defineComponent({
  name: 'App',
  setup() {
    const { x, y } = useMousePostion()
    return {
      x,
      y
    }
  }
});
</script>
reactive版本
import { reactive, toRefs, onMounted, onUnmounted } from 'vue'
interface UseMouse {
    x: number,
    y: number
}
function useMousePosition() {
    const useMouse: UseMouse = reactive({
        x: 0,
        y: 0
    })
    const updateMouse = ((e: MouseEvent) => {
        useMouse.x = e.pageX
        useMouse.y = e.pageY
    })
    onMounted(() => {
        document.addEventListener('click', updateMouse)
    })
    onUnmounted(() => {
        document.removeEventListener('click', updateMouse)
    })
    return {
        ...toRefs(useMouse)
    }
}
export default useMousePosition
vue3中单文件组件
一、相比普通script语法的优势
script setup>是在单文件组件(SFC)中使用组合式API的编译时语法糖。相比于普通的
- 更少的样板内容,更简洁的代码
- 使用纯TypeScript声明props和抛出事件
- 更好的运行时性能(其模板会被编译成与其同一作用域的渲染函数,没有任何的中间代理)
- 更好的IDE类型推断性能(减少语言服务器从代码中抽离型的工作)
二、基本语法
// 需要将setup attribute添加到<script>代码块上
<script setup>
  console.log('hello script setup')
</script>
// 里面的代码会被编译成组件setup()函数的内容。这意味着与普通的<script>只在组件被首次引入的时候执行一次不同,<script setup>中的代码会在每次组件实例被创建的时候执行
顶层的绑定会被暴露给模板
// 当使用 <script setup> 的时候,任何在<script setup>声明的顶层的绑定(包括变量、函数声明,以及import引入的内容)都能在模板中直接使用

<template>
	<div @click="log">{{ msg }}</div>
</template>
<script setup>
// 变量
const msg = 'hello!'

// 函数
function log() {
  console.log(msg)
}
</script>
// import 导入的内容也会以同样的方式暴露。意味着可以在模板表达式中直接使用导入的helper函数,并不需要通过methods选项来暴露它
<script setup>
	import { capitalize } from './helper'
</script>
<template>
	<div>{{ capitalize('hello') }}</div>
</template>
三、响应式
// 响应式状态需要明确使用响应式API来创建。和setup()函数中返回值一样,ref值在模板中使用的时候会自动解包

<template>
	<div @click="count++">{{ count }}</div>
</template>
<script setup>
import { ref } from 'vue'
const count = ref(0)
</script>
四、使用组件
// <script setup>范围里的值也能被直接座位自定义组件的标签名使用
<template>
	<ChildrenComponent />
</template>
<script setup>
	import ChildrenComponent from './ChildrenComponent.vue'
</script>
动态组件
// 由于组件被引用为变量而不是作为字符串来注册的,在<script setup>中要使用动态组件的时候,就应该使用动态的:is来绑定
<template>
	<component :is="Foo"/>
	<component :is="someCondition ? Foo : Bar"/>
</template>
<script setup>
	import Foo from './Foo.vue'
	import Bar from './Bar.vue'
	const someCondition = true
</script>
递归组件
// 一个单文件组件可以通过它的文件名被其自己所引用。例如: 名为FooBar.vue的组件可以在其模板中用<FooBar/>引用它自己
// 请注意这种方式相比import导入的组件优先级更低。如果有命名的import导入和组件的推断名冲突了,可以使用import别名导入
import { FooBar as FooBarChild } from './components'
命名空间组件
// 可以使用带点的组件标记,例如<Foo.Bar>来引入嵌套在对象属性中的组件。这在需要从文件中导入多个组件的时候非常有用
<template>
	<Form.Input>
		<Form.label>label</Form.label>
	</Form.Input>
</template>
<script setup>
	import * as form './from-components'
</script>
五、defineProps 和 defineEmits
不需要引入
// 在<script setup>中必须使用defineProps和defineEmits API来声明props 和 emits,他们具备完整的类型推断并且在<script setup>中直接可用的
<script setup>
	const props = defineProps({
		foo: String
	})
	const emit = defineEmits(['change', 'delete'])
</script>
// defineProps 和 defineEmits 都是只在<script setup>中才能使用得编译器宏。他们不需要导入且会随着<script setup>处理过程一同被编译掉
// defineProps 接收与props 选项相同得值,defineEmits也接收emits选项相同得值
// defineProps 和 defineEmits 在选项传入后,会提供恰当得类型推断
// 传入到defineProps 和 defineEmits 得选项会从setup中提升到模块得范围。因此,传入得选项不能引用在setup范围中声明得局部变量。这样做会引起编译错误。
``````javascript
// 子组件中
<template>
    <div @click="tableChange('21d32332')">
        dfd {{ businessTableUuid }}
    </div>
</template>
<script setup>
import { defineProps, defineEmits } from 'vue'
const props = defineProps({
    businessTableUuid: {
        type: String,
        required: true
    },
})
const emit = defineEmits(['update:businessTableUuid'])
// const businessTableUuid = ref('')
// const businessTableFieldUuid = ref('')

const tableChange = (businessTableUuid) => {
    emit('update:businessTableUuid', businessTableUuid) // 注意:update:businessTableUuid之间没有空格
}
</script>


// 父组件中
// 在vue3.0中 v-model:businessTableUuid代替了vue2.0中:businessTableUuid.sync
<template>
	<div>
        <Home2 v-model:businessTableUuid="businessTableUuid"></Home2>
    </div>
</template>
<script setup>
import { onMounted, nextTick, watch, watchEffect, ref, reactive, defineExpose } from "vue";
const businessTableUuid = ref('ddfff')
</script>
六、defineExpose
// 使用<script setup>得组件是默认关闭得,也即通过模板ref或者$parent获取到得组件得公开实例,不会暴露任何在<script setup>中声明得绑定
// 为了在<script setup>组件中明确暴露出去得属性,使用defineExpose编译器宏

//父组件引用子组件得事件或值
//子组件中
<script setup>
	import { ref, defineExpose } from 'vue'
	const count = ref(100)
	function changeCount() {
    	count.value = count.value + 1
	}
	defineExpose({
		count,
		changeCount
	})
</script>

//父组件中
<children ref="child"/>
const child = ref(null)
function getExposes() {
    console.log("getExposes==",child.value.count)
}
// 当父组件通过模板ref的方式获取到当前组件的实例,(ref会和在普通实例中一样被自动解包)
七、provide 和 inject
通过provide和inject可以把数据传递给N个层级的子组件,比如A组件用了B组件,B组件用了C组件,可以把组件直接从A传给C组件,vue2使用computed来实现响应,而vue3中provide使用ref或者reactive定义的变量即可实现响应式。
父组件
<HomeA></HomeA>
import { ref, provide } from 'vue'
import HomeA from './homeA.vue'
const tryy = ref({
    info: 'this is important information',
    title: '这是重要的信息'
})
provide('sendTryy', tryy)
A组件 正常引入 b组件,其余不做啥操作
B组件
const userInfo = inject(['sendTryy'])
// 读取改操作等
八、useSlots 和 useAttrs
// 在<script setup>使用slots 和 attrs 的情况应该是罕见的,可以在模板中通过$slots和$attrs来访问它们,可以分别用useSlots 和 useAttrs 两个辅助函数
<script setup>
	import { useSlots, useAttrs } from 'vue'
	const slots = useSlots()
	const attrs = useAttrs()
</script>
// useSlots 和 useAttrs与setupContext.slots 和 setupContext.attrs等价值,同样也能在普通的组合式API中使用
九、顶层await
// <script setup>中可以使用顶层await。结果代码会被编译成async setup()
<script setup>
	const post = await fetch('/api/post/1').then(r => r.json())
</script>
// await的表达式会自动编译成在await之后保留当前组件实例上下文的格式
// async setup()必须与Suspense组合使用,Suspensen目前还是处于实验阶段的特性
十、css
动态绑定css v-bind()
<template>
	<div>123</div>
</template>
<script setup>
import { ref } from 'vue'
const theme = ref({
	color: 'red'
})
</script>
<style lang="less" scoped>
div {
	color: v-bind('theme.color')
}
</style>
:deep深度选择器
<style scoped>
.a :deep(.b) {
}
</style>
:slotted插槽选择器
修改插槽过来的组件的样式
<style scoped>
:slotted(.box) {
	color: blue
}
</style>
:global全局选择器
全局样式: 通常新建一个style标签,不加scoped,:global就是一种解决方案
<style lang="less" scoped>
:global(.box) {
	color: red;
}
</style>
混合使用局部与全局样式
<style>
/* 全局样式 */
</style>
<style scoped>
/* 局部样式 */
</style>
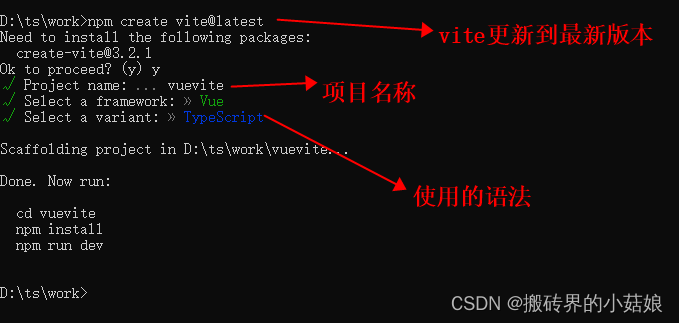
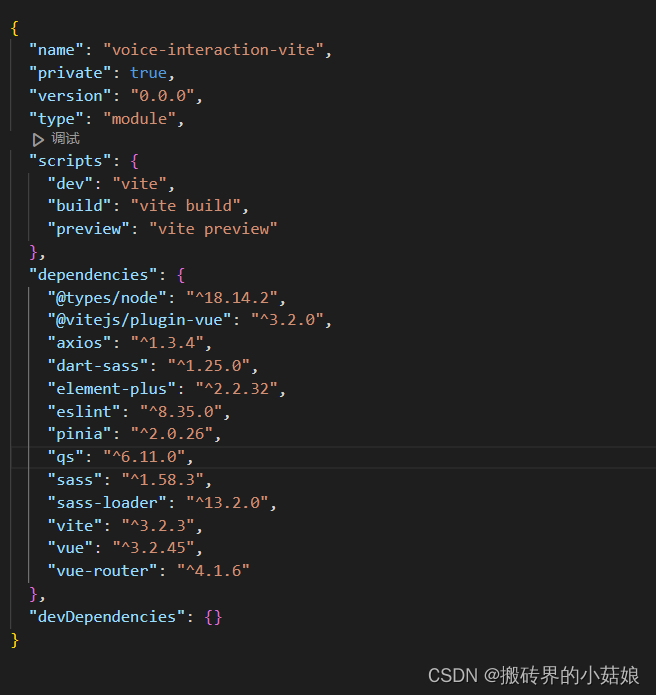
vite+vue3.0+ts+pinia项目搭建
eslint安装
npm install eslint
npx eslint --init  // eslint初始化

//  根目录下创建 .eslintrc.js
module.exports = {
    "env": {
        "browser": true,
        "es2021": true
    },
    "extends": [
        "eslint:recommended",
        "plugin:vue/vue3-essential",
        "plugin:@typescript-eslint/recommended"
    ],
    "overrides": [
    ],
    "parser": "vue-eslint-parser",
    "parserOptions": {
        "parser":"@typescript-eslint/parser",
        "ecmaVersion": "latest",
        "ecmaFeatures": {
            jsx: true
        }
    },
    "plugins": [
        "vue",
        "@typescript-eslint"
    ],
    "rules": {
        'space-before-function-paren': 0,
        'no-console': 0,
    }
}


npm install prettier eslint-config-prettier

// 其中process报错解决方法是
npm i @types/node
// 在vite.config.ts中添加
import { defineConfig } from 'vite'
import vue from '@vitejs/plugin-vue'

// https://vitejs.dev/config/
export default defineConfig({
  plugins: [vue()],
  define: {
    'process.env': {}  // 新添加的部分
  }
})
router安装
// https://router.vuejs.org/zh/introduction.html
npm install vue-router

// 在src文件夹下创建router文件夹里面文件名为index.ts
/**
 * createRouter 这个为创建路由的方法
 * createWebHashHistory 这个就是vue2中路由的模式,这里的是hash模式,这个还可以是createWebHistory等
 * RouteRecordRaw 这个为要添加的路由记录,也可以说是routes的ts类型
 */
import { createRouter, createWebHashHistory } from 'vue-router';
const routes = [
    {
        path: '',  // 重定向。默认首页是加载home组件
        redirect: '/home'
    },
    {
        path: '/home',
        name: 'home',
        component: () => import('@/views/home.vue'),
        meta: {
            title: '首页'
        }
    },
    {
        // 匹配所有路径  vue2使用*   vue3使用/:pathMatch(.*)*或/:pathMatch(.*)或/:catchAll(.*)
        path: '/:pathMatch(.*)*',
        name: '404',
        component: () => import('@/views/404.vue')
    }
]
const router = createRouter({
    history: createWebHashHistory(),  // hash模式:createWebHashHistory,history模式:createWebHistory
    routes: routes
})
export default router


//main.ts中的文件
import { createApp } from 'vue'
import './style.css'
import App from './App.vue'
import router from './router'  // 添加的router

const app = createApp(App)
app.use(router)  // 添加的router
app.mount('#app')
组件
https://cn.vuejs.org/guide/introduction.html#api-styles
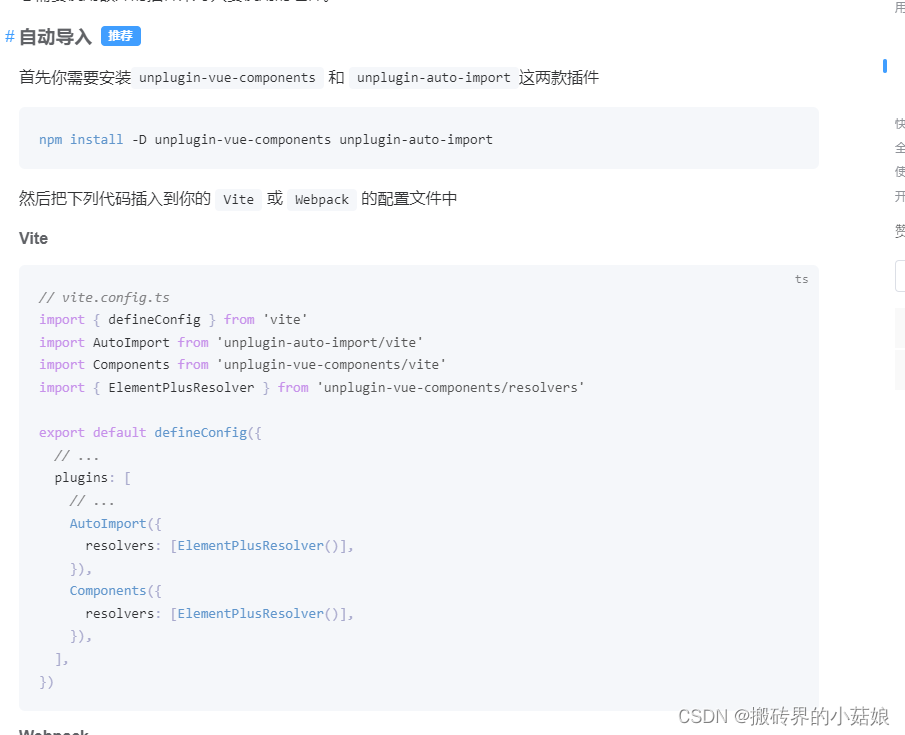
element组件库安装,注意vue3.0不适用于element-ui,用的是element-plus
并且注意 import ‘element-plus/dist/index.scss’
各种报错
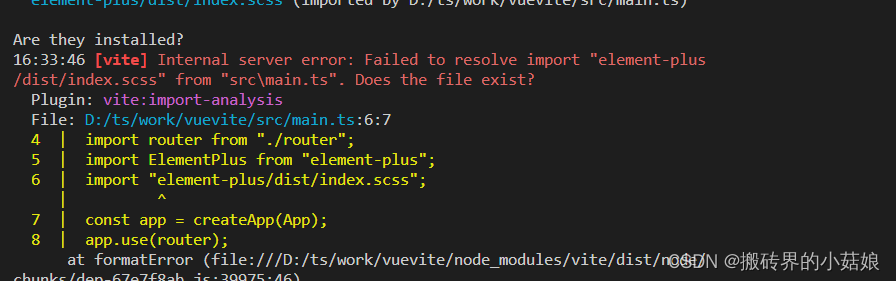
此时耐着性子往下看文档,在vite.config.ts中添加相关内容,并且将 import 'element-plus/dist/index.scss’去除
模块路径
// 在tsconfig.json文件的“compilerOptions”中
{
  "compilerOptions": {
  	……
    "paths": {
      "@/*": [
        "src/*"
      ]
    }
  },
……
}


// 在tsconfig.node.json的文件"compilerOptions"下添加
{
  "compilerOptions": {
  	……
    "allowSyntheticDefaultImports": true
  }
}


// 在vite.config.js文件中
……
import path from 'path'  // 不按照上述修改 tsconfig.node.json 文件会报错
export default defineConfig({
  plugins: [
    vue(),
    ……
  ],
  resolve: {
    alias: {
      '~': path.resolve(__dirname, './node_modules/'),
      '@': path.resolve(__dirname, './src'),
      api: path.resolve('./src/api'),
      components: path.resolve('./src/components'),
      views: path.resolve('./src/views'),
      router: path.resolve('./src/router'),
    }
  }
})
pinia
https://pinia.vuejs.org/zh/getting-started.html
之前使用vuex进行状态管理,那么pinia相对于一个类似于的插件,是新一代轻量级状态管理插件
npm install pinia

// 安装完成后再src下创建文件夹strore,下再创建index.ts
// index.ts内容如下:
import { defineStore } from 'pinia'
import { ref, computed } from 'vue'
// defineStore()的返回值进行任意命名,最好使用store的名字,同时以`use`开头且以`Store`(比如`useUserStore`、`useIndexStore`)
// 第一个参数是你的应用中 Store 的唯一 ID。

// // 写法一
export const useCounterStore = defineStore('counter', {
  // 相当于vue的data
  state: () => {
    return {
        count: 1,
        userList: [] as UserInfo[],
        user: null as UserInfo | null
    }
  },
  // 相当于vue的computed,在getters中使用了this则必须手动指定返回值类型,否则类型推导不出来
  getters: {
    double: (state) => state.count * 6
  },
  // 相当于vue的methods,在actions中不能使用箭头函数,因为箭头函数绑定外部this
  actions: {
    increment() {
        this.count++
    }
  }
})

// // 写法二
// // ref() 就是state属性
// // computed() 就是getters
// // function() 就是actions
export const useCounterStore = defineStore('counter', () => {
    const count = ref(1)
    const double = computed(() => {
        return count.value * 6
    })
    function increment() {
        count.value++
    }
    return {count, double, increment}
})

// 在正常页面应用store
import { storeToRefs } from 'pinia';
import { useCounterStore } from '@/store/index'  // 引入store内容
const store = useCounterStore()
// `count`是响应式refs
// 这也将由插件添加的属性创建refs
// 同时会跳过任何action或非响应式(非ref响应式)属性
const { count, double } = storeToRefs(store)
function rest() {
    store.$reset()  // 重置 state
}
function changeStateValue() {
    store.$patch((state: any) => {
        state.userList.push({
            name: 'hahaha',
            age: 20
        })
        state.count = 100
    })
}
// $subscribe()方法侦听state及变化,相当于watch()
// { detached: true }作为第二个参数,当该组件被卸载时,它将自动删除
store.$subscribe((mutation: any, state: any) => {
    console.log("mutation, state=====",mutation, state.count)
}, {
    detached: true
})
<el-button class="header-nav-btn" @click="() => store.increment()">{{double}}注册{{count}}</el-button>
<el-button @click="rest">重置</el-button>
<el-button @click="changeStateValue">更改state</el-button>
<div>userList值:{{userList}}</div>
import legacy from “@vitejs/plugin-legacy”;兼容低版本浏览器
问题:
在使用vue3.2和vite2.0+开发一个移动端H5,测试时发现很多低版本的安卓手机浏览器出现白屏的现象,而ios机型基本上是好的,原因是很多低版本浏览器并不支持原生ESM导入的方式,下面给出解决方案:
兼容原生ESM的浏览器:
默认情况下,Vite 的目标浏览器是指能够 支持原生 ESM script 标签 和 支持原生 ESM 动态导入 的。作为参考,Vite 使用这个 browserslist 作为查询标准:

Chrome >=87
Firefox >=78
Safari >=13
Edge >=88
解决方案
通过插件 @vitejs/plugin-legacy 来自动生成传统浏览器的 chunk 及与其相对应 ES 语言特性方面的 polyfill。兼容版的 chunk 只会在不支持原生 ESM 的浏览器中进行按需加载。
安装: npm install @vitejs/plugin-legacy
在vite.config.js中
import { defineConfig } from 'vite'
import vue from '@vitejs/plugin-vue'
import dns from 'dns'
dns.setDefaultResultOrder('verbatim')

import { resolve } from 'path'  // vite版本不支持commonJs所以不能写成const path = require('path')
import legacy from "@vitejs/plugin-legacy";  // 新增!!!!!!!!!!!!

export default defineConfig({
  // publicPath: './',
  plugins: [vue(),
  legacy({   // 新增!!!!!!!!!!!!
    targets: [
      "Android > 39",
      "Chrome >= 60",
      "Safari >= 10.1",
      "iOS >= 10.3",
      "Firefox >= 54",
      "Edge >= 15",
      "ie >= 11",
    ],
    additionalLegacyPolyfills: ["regenerator-runtime/runtime"],
  })
  ],
  define: {
    'process.env': {}
  },
  resolve: {
    alias: {
      '~': resolve(__dirname, './node_modules/'),
      '@': resolve(__dirname, './src'),
      'assets': resolve(__dirname, './src/assets'),
      'components': resolve(__dirname, './src/components'),
      'common': resolve(__dirname, './src/common'),
      'api': resolve(__dirname, './src/api'),
      'views': resolve(__dirname, './src/views'),
      'styles': resolve(__dirname, './src/styles'),
      'store': resolve(__dirname, './src/store'),
    }
  },
  server: {
    proxy: {
      '/columns': {
        target: 'http://apis.sss.com/api/',
        changeOrigin: true
      },
    },
  },
})
axios
注:该内容还未对api进行封装,后续再来补充
npm install axios

// 在src下创建api文件夹,创建两个子文件index.ts和http.ts
// index.ts
import { http } from './http'
import { ref } from 'vue'

export const dataLoading = ref(true)
export const getData = async () => {
  const errorMsg = ref('')
  const result = ref([])
  dataLoading.value = true
  await http
    .get('/xxxxx/getData') // 待访问的服务接口
    .then((res) => {
      dataLoading.value = false
      result.value = res.data
      errorMsg.value = ''
    })
    .catch((err) => {
      dataLoading.value = false
      result.value = []
      errorMsg.value = err.message
    })
  return {
    result,
    errorMsg
  }
}

// https.ts
import axios from 'axios'

const env = process.env.NODE_ENV // 此处调用process会报错,在后配置项解决
const apis = {
  production: 'http://localhost:8480',
  staging: 'http://localhost:8480',
  development: 'http://localhost:8480'
}

const vueAPI = apis[env as keyof typeof apis]
export const http = axios.create({
  baseURL: `${vueAPI}/api`,
  timeout: 10000,
  headers: {
    accept: 'application/json',
    'Content-Type': 'application/json'
  }
})

// 请求拦截
http.interceptors.request.use(
  function (request) {
    console.log('🚀 ~ 发送请求:', request)
    return request
  },
  function (error) {
    console.log('🚀 ~ 发送请求-错误:', error.message)
    return Promise.reject(error)
  }
)

// 返回拦截
http.interceptors.response.use(
  function (response) {
    console.log('🚀 ~ 接收请求:', response)
    return response
  },
  function (error) {
    console.log('🚀 ~ 接收请求-错误:', error.response)
    return Promise.reject(error)
  }
)
axios封装
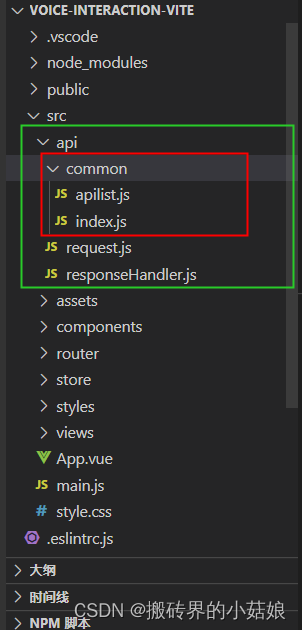
request.js
import axios from "axios";
import qs from 'qs';
import responseHandler from './responseHandler';
let myAxios = axios.create({
    baseURL: '/',
    timeout: 6000
})

myAxios.interceptors.request.use((config) => {
    config.headers['content-type'] = 'application/json',
    config.headers['X-Powered-By'] = 'Express'
    return config
}),(err) => {
    console.log('err===', err)
}

/**
 * 普通post请求
 * @param url
 * @param params
 * @returns {*}
 */
export const post = async (url, params) => {
    const res = await myAxios.post(url, qs.stringify(params), {
      headers: {
        "Content-Type": "application/x-www-form-urlencoded"
      }
    });
    return responseHandler(res);
};

 /**
 * json格式的Post请求
 * @param url
 * @param params
 * @returns {*}
 */
export const postJson = async (url, params) => {
    const res = await myAxios.post(url, params, {
      headers: {
        "Content-Type": "application/json"
      }
    });
    return responseHandler(res);
};

export const get = async (url, params) => {
    const res = await axios.get(url, {
      params
    });
    return responseHandler(res);
};

export const getParams = async function(url, params = {}) {
    let res = await axios.get(url, {
      params
    });
    return responseHandler(res);
};

 /**
 * json格式的PUT请求
 * @param url
 * @param params
 * @returns {*}
 */
export const putJson = async (url, params) => {
    const res = await axios.put(url, params, {
      headers: {
        "Content-Type": "application/json"
      }
    });
    return responseHandler(res);
};

/**
 * 普通delete请求
 * @param url
 * @param params
 * @returns {*}
 */
export const deleteParameters = async (url, params) => {
    console.log("url, params",url, params)
    const res = await axios.delete(url + '/' + params, {
      headers: {
        "Content-Type": "application/x-www-form-urlencoded"
      }
    });
    return responseHandler(res);
};
responseHandler.js
export default function(res) {
    const originData = res.data || {}
    return new Promise(resolve => {
    // return new Promise((resolve, reject) => {
        // if(originData.code === 200) {
        //     resolve(originData)
        // } else {
        //     reject(originData)
        // }
        resolve(originData)
    })
}
apilist.js
export default {
    login: '/api/v1.0/account/login',
}
index.js
import urls from './apilist'
import { postJson, get } from '../request'
function login(params) {
    return postJson(urls.login, params)
}
export default {
    login
}
标签中使用
import apis from '../api/common/index';
const res = await apis.login({})
vue3 h5 与安卓、ios通信
// utils.js
// app与vue之间的传值方法
import dsBridge from 'dsbridge'
// import vueCookie from 'vue-cookie'

const NativeAPP = {
  /**
   * 获取系统类型 (根据userAgent判断)
   * IOS 苹果
   * ANDROID 安卓
   * UNKOWN 未知
   */
  getOSType: function() {
    var u = navigator.userAgent
    var isAndroid = u.indexOf('Android') > -1 || u.indexOf('Adr') > -1 //android终端
    var isiOS = !!u.match(/\(i[^;]+;( U;)? CPU.+Mac OS X/) //ios终端
    if (isAndroid) {
      return 'ANDROID'
    } else if (isiOS) {
      return 'IOS'
    } else {
      return 'UNKOWN'
    }
  },
  /**
   * android系统js桥接口设置
   * @param {Object} callback 桥接口回调函数 桥接方式固定写法
   */
  setUpAndroidBridge: function(callback) {
    if (window.WebViewJavascriptBridge) {
      return callback(window.WebViewJavascriptBridge)
    } else {
      document.addEventListener(
        'WebViewJavascriptBridgeReady',
        function() {
          return callback(window.WebViewJavascriptBridge)
        },
        false
      )
    }
  },
  /**
   * IOS系统js桥接口设置
   * @param {Object} callback 桥接口回调函数 桥接方式固定写法
   */
  setUpIOSBridge: function(callback) {
    if (window.WebViewJavascriptBridge) {
      return callback(window.WebViewJavascriptBridge)
    }
    if (window.WVJBCallbacks) {
      return window.WVJBCallbacks.push(callback)
    }
    window.WVJBCallbacks = [callback]
    var WVJBIframe = document.createElement('iframe')
    WVJBIframe.style.display = 'none'
    WVJBIframe.src = 'https://__bridge_loaded__'
    document.documentElement.appendChild(WVJBIframe)
    setTimeout(function() {
      document.documentElement.removeChild(WVJBIframe)
    }, 0)
  },
  /**
   * Android和IOS 统一桥接口
   */
  setUpBridge: function(action, data, resultCallback) {
    var osType = this.getOSType() //获取系统类型
    console.log('=======setUpBridge=======', osType)
    //按系统类型 分别执行原生交互
    if (osType == 'IOS') {
      //苹果手机交互方式 消息体为字面量对象(json格式): action 代表执行的动作 data 代表传递的数据
      this.setUpIOSBridge(function(bridge) {
        return bridge.callHandler(action, data, function(response) {
          if (typeof resultCallback == 'function') {
            resultCallback(response)
          }
        })
      })
    } else if (osType == 'ANDROID') {
      //安卓手机交互方式
      return dsBridge.call(action, data, function(response) {
        if (typeof resultCallback == 'function') {
          resultCallback(response)
        }
      })
    } else {
      //其他类型
      //安卓手机交互方式
      console.error('未知的platform')
      return dsBridge.call(action, data, function(response) {
        if (typeof resultCallback == 'function') {
          resultCallback(response)
        }
      })
    }
  },
  registerBridge: function(action, resultCallback) {
    var osType = this.getOSType() //获取系统类型
    console.log('=======registerBridge=======', osType)
    //按系统类型 分别执行原生交互
    if (osType == 'IOS') {
      //苹果手机交互方式
      this.setUpIOSBridge(function(bridge) {
        bridge.registerHandler(action, resultCallback)
      })
    } else if (osType == 'ANDROID') {
      //安卓手机交互方式
      dsBridge.register(action, resultCallback)
    } else {
      console.error('未知的platform')
      //其他类型
      //安卓手机交互方式
      dsBridge.register(action, resultCallback)
    }
  },
  getToken: function() {
    // let token = vueCookie.get('TOKEN')
    // if (token) {
    //   return token
    // }
    const token = this.setUpBridge('pay.getToken', {})
    return token ? token : ''
  },
  getTokenIOS: function(data, resultCallback) {
    this.setUpBridge('pay.getToken', data, resultCallback)
  },
  onTokenInvalid: function() {
    console.log('pay.onTokenInvalid')
    return this.setUpBridge('pay.onTokenInvalid', {})
  },
  getMiguExpiration: function(data, resultCallback) {
    this.setUpBridge('pay.getMiguExpiration', data, resultCallback)
  },
  callAliAppPay: function(data) {
    console.log(data)
    this.setUpBridge('pay.callAliAppPay', data)
  },
  callWXAppPay: function(data) {
    console.log(data)
    this.setUpBridge('pay.callWXAppPay', data)
  },
  webViewPageGoback: function() {
    this.setUpBridge('pay.goback')
  },
  showLoading: function() {
    this.setUpBridge('pay.showLoading')
  },
  closeLoading: function() {
    this.setUpBridge('pay.dismissLoading')
  },
  sendMail: function(data) {
    this.setUpBridge('pay.sendMail', data)
  },
  voiceCopyCb: function(method, data, resultCallback) {
    this.setUpBridge(`voiceCopy.${method}`, data, resultCallback)
  },
  voiceCopy: function(method, data) {
    const result = this.setUpBridge(`voiceCopy.${method}`, data)
    console.log(result)
    return result ? result : '{}'
  },
  flowShopIOS: function(method, data, resultCallback) {
    this.setUpBridge(`flow.${method}`, data, resultCallback)
  },
  getAppVersionIOS: function(data, resultCallback) {
    this.setUpBridge('getAppVersion', data, resultCallback)
  },
  flowPageGobackIOS: function() {
    this.setUpBridge('goBack')
  },
  flowPageGoback: function() {
    console.log('flow', window.flow)
    window.flow.goBack()
  },
  wakeupSettingCb: function(method, data, resultCallback) {
    this.setUpBridge(`wakeupSetting.${method}`, data, resultCallback)
  },
  wakeupSetting: function(method, data) {
    this.setUpBridge(`wakeupSetting.${method}`, data)
  }
}

export default NativeAPP
import NativeAPP from '@/utils/NativeApp'
NativeAPP.getTokenIOS('', function(token) {
	self.$store.dispatch('setCookie', `TOKEN=${token}`)
	self.fetchSpuDetail()
})
pinyin-pro拼音插件
https://npmmirror.com/package/pinyin-pro
node: 14.21.1 ;@vue/cli 5.0.4
为什么vue3的响应式优于vue2响应式
- vue2的响应式是基于Object.defineProperty实现的(Object.defineProperty只对初始对象里的属性有监听作用,而对新增的属性无效,需要用$set)
- Vue3的相应式是基于ES6的Proxy实现的
vue2中Object.defineProperty
function reactive(obj, key, value) {
	Object.defineProperty(data, key, {
		get() {
			// 进行读取
			return value
		},
		set(val) {
			// 进行相关操作
			if(value !== val) {
				value = val
			}
		}
	})
}
const data = {
	name: 'hh',
	age: 1
}
Object.keys(data).forEach(key => reactive(data, key, data[key]))
console.log(data.name)  // 访问name属性 hh
data.name = 'hh1'
console.log(data.name)  // 访问name属性 hh1


//在data中加个属性sex
data.sex = '男'
console.log(data.sex)  // 男
data.sex = '女'
console.log(data.sex)  // 男
// 这里暴露了Object.defineProperty弊端,data新增了sex属性,进行访问和设置,但是不会触动get和set。Object.defineProperty只对初始对象里的属性有监听作用,而对新增的属性无效,所以vue2中对象新增属性的修改需要使用vue.$set
vue3:响应式原理核心Proxy弥补vue2Object.defineProperty的弊端
const data = {
	name: 'hh',
	age: 1
}
function reactive(target) {
	const handler = {
		get(target, key, receiver) {
			return Reflect.get(target, key, receiver)
		},
		set(target, key, value, receiver) {
			Reflect.set(target, key, value, receiver)
		}
	}
	return new Proxy(target, handler)
}
const proxyData = reactive(data)
console.log(proxyData.name)  // 访问name属性 hh
proxyData.name = 'hh1'
console.log(proxyData.name)  // hh1

//(看看弥补的弊端后)
proxyData.sex = '男'
console.log(proxyData.sex)  // 访问sex属性 男
proxyData.sex = '女'
console.log(proxyData.sex)  // 访问sex属性 女
实现ref
在vue3中这么使用ref
let num = ref(5)
console.log(num.value)  // 5
// 实现ref,可以通过reactive方法
function ref(initValue) {
	return reactive({
		value: initValue
	})
}
Proxy和Reflect
Proxy对象用于创建一个对象的代理,从而实现基本操作的拦截和自定义(如属性查找,赋值,枚举,函数调用等)
(个人理解其实与defineProperty最本质的区别就是defineProperty对象插入新的值后需要$set方法来时视图更新,而Proxy不需要)
Proxy相对于defineProperty(),有以下特性:
- Proxy是对整个对象的代理,而Object.defineProperty只能是代理某个属性。
- 对象上新增属性或者数组新增元素,Proxy可以监听到,Object.defineProperty不能。(最直观的vue2中数组对象新增用$set())
- 若对象内部属性要全部递归代理,Proxy可以只在调用的时候递归,而Object.defineProperty需要一次完成所有递归,性能比Proxy差
- Proxy不兼容IE,Object.defineProperty不兼容IE8及以下
- Proxy使用上比Object.defineProperty方便
const person = { name: 'hh', age: 22 }
const proxyPerson = new Proxy(person, {
	get(target, key, receiver) {
		console.log(target)  // 原来的person
		console.log(key)  // 属性名
		console.log(receiver)  // 代理后的proxyPerson
	},
	set(target, key, value, receiver) {
		console.log(target)  // 原来的person
		console.log(key)  // 属性名
		console.log(value)  // 设置的值
		console.log(receiver)  // 代理后的proxyPerson
	}
})
proxyPerson.name  // 访问属性触发get方法
proxyPerson.name = 'hh1'  // 设置属性值触发set方法
// 页面调用
import NativeAPP from '@/utils/NativeApp'
NativeAPP.getTokenIOS('', function(token) {
	self.$store.dispatch('setCookie', `TOKEN=${token}`)
	self.fetchSpuDetail()
})
Reflect
相关网址
// vue 3.0
https://cn.vuejs.org/guide/introduction.html
// vue-router
https://router.vuejs.org/zh
// vuex
https://vuex.vuejs.org/zh/
// axios
https://github.com/axios/axios#global-axios-defaults
// vue-h5-template
https://sunniejs.github.io/vue-h5-template/
// 推荐一个基于Vue 的 H5 快速开发模板
https://www.codenong.com/j5e612ee2518825492a7/


 4971
4971


 被折叠的 条评论
为什么被折叠?
被折叠的 条评论
为什么被折叠?
 到【灌水乐园】发言


