


目录
PIL & pyplot
from PIL import Image
import matplotlib.pyplot as plt
from torchvision import transforms

# PIL打开图片
img_PIL = Image.open("data/style/cat.jpg")
print(img_PIL)
print(type(img_PIL))
# img_PIL.show()  # 调用os system自带的browser来显示图片
# plt.imshow(img_PIL)
# plt.show()

# plt打开图片
img_plt = plt.imread("data/style/cat.jpg")
print(img_plt.shape)
print(type(img_plt))
# plt.imshow(img_plt)
# plt.show()

可以看到plt打开的图片格式为 HxWxC 且数据类型为numpy.ndarray,并不是张量形式,所以 plt 打开的图片也要用transforms.ToTensor 来转化为张量。
因为PIL打开的图片并不是张量的形式,所以需要transforms.ToTensor()来转换为张量
transforms.ToTensor
convert a
PIL Imageornumpy.ndarrayto tensor
Converts a PIL Image or numpy.ndarray (H x W x C) in the range [0, 255] to a torch.FloatTensor of shape (C x H x W) in the range [0.0, 1.0]
# PIL打开图片
img_PIL = Image.open("data/style/cat.jpg")
img_PIL = transforms.ToTensor()(img_PIL)
print(img_PIL.shape)
# output:torch.Size([3, 940, 940])

# plt打开图片
img_plt = plt.imread("data/style/cat.jpg")
img_plt = transforms.ToTensor()(img_plt)
print(img_plt.shape)  # torch.Size([3, 940, 940])
print(type(img_plt))  # <class 'torch.Tensor'>
输出为 ( C × H × W ) (C \times H\times W) (C×H×W)
或者用transforms.Compose打包transforms.ToTensor()
transform = transforms.Compose([transforms.ToTensor()])

# PIL打开图片
img_PIL = Image.open("data/style/cat.jpg")
img_PIL = transform(img_PIL)
print(img_PIL.shape)
# output:torch.Size([3, 940, 940])
torch.unsqueeze(input,dim,out=None)
在指定位置添加维度
# plt打开图片
img_plt = plt.imread("data/style/cat.jpg")
img_plt = transform(img_plt)
print(img_plt.shape)
print(type(img_plt))

# 在指定的维度上插入1维
img_plt = img_plt.unsqueeze(2)
print(img_plt.shape)
print(type(img_plt))

通常的使用方法是img = transform(img).unsqueeze(0)
transform = transforms.Compose([transforms.ToTensor()])
# plt打开图片
img_plt = plt.imread("data/style/cat.jpg")
print(img_PIL.shape)
print(type(img_PIL))
# img_plt = transforms.ToTensor()(img_plt)
img_plt = transform(img_plt)

img_plt = img_plt.unsqueeze(0)

print(img_plt.shape)
print(type(img_plt))

unsqueeze(0)就是在最外层增加了一个维度。
unqueeze()这个函数主要是对数据维度进行扩充, 起到升维的作用,方便后续图像处理可以更好地批处理。这是应该是因为网络的接收输入是一个mini-batch,image unsqueeze后第一个维度是留给batch_size的
torch.squeeze(input, dim=None, out=None)
去除那些维度大小为1的维度
不传入dim时,则删除所有大小为1的维度
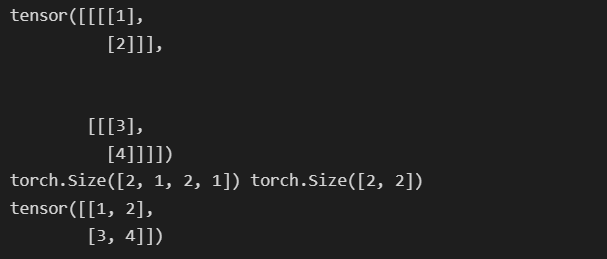
import torch
b = torch.tensor([[[[1],[2]]],[[[3],[4]]]])
print(b)
print(b.size(),b.squeeze().size())
print(b.squeeze())
传入dim时,仅在给定尺寸中进行挤压操作
x = torch.zeros(2, 1, 2, 1, 2)

# dim0的维度为2,所以挤压后不变,
# squeeze(0)表示如果dim0的维度为1则删除dim0
print(x.size(),x.squeeze(0).size())

print(x.size(),x.squeeze(1).size(),x.squeeze(1).size())

# 不影响x的原来的形状
print(x.shape)

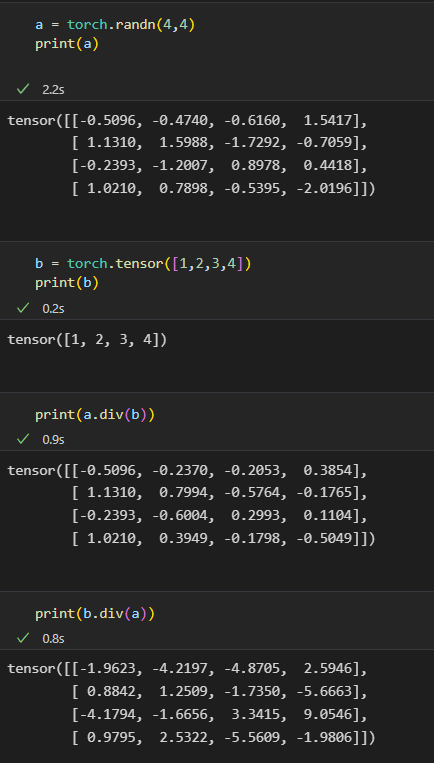
torch.div
张量和标量做逐元素除法
或者两个可广播的张量之间做逐元素除法


 被折叠的 条评论
为什么被折叠?
被折叠的 条评论
为什么被折叠?
 到【灌水乐园】发言


