


NetCore自带容器通过构造方法注入一旦类多了显得比较臃肿不方便,当然你也可以在构造函数中注入一个类似IocManager即Ioc管理器的类,然后通过lambda表达式来实现对类的依赖。你也可以通过实现Autofac基础的关于特性的属性注入的方式,不过这种只能在Controller上进行,不能深入到其他类。NetCore中并不能通过特性的方式完成对值的注入。NetCore中提供的拦截器一般都是Filter,它只能拦截到Controller,如果我们想拦截其他类,这个时候首先可以想到Castle,使用Castle做拦截不方便比较繁琐。
大家都知道Autofac是替换NetCore自带容器的一个比较舒服的第三方容器。这里我结合Autofac实现了你只需要通过一个特性就能实现依赖注入以及注入值。通过Autofac+Castle+AspectCore实现你需要通过一个特性就可以实现拦截,而不需要任何其他多余的配置。
下面我就开始为大家介绍我自己开发的NUGET包OpenDeepSpace.Autofac.Autowired,如何使用它,以及可以在哪些方面来使用它。下文全部以Net5.0项目为例。
**以下的内容不再使用且包存在问题。请在NuGet上搜索最新的OpenDeepSpace.NetCore.Autofacastle包,整个实现原理和使用方式都有较大变化,该包项目github地址:OpenDeepSpace.NetCore.Autofacastle,使用方法请参照Wiki
gitee地址:OpenDeepSpace.NetCore.Autofacastle
**
在NetCore项目中引入使用它
在NetCore项目的Program.cs文件中IHostBuilder中通过UseAutofac()方法即完成引入
Host.CreateDefaultBuilder(args)
                .ConfigureWebHostDefaults(webBuilder =>
                {
                    webBuilder.UseStartup<Startup>();
                }).UseAutofac();
在UseAutofac这个方法里面你可以传入一个AutofacAutowiredModule类的实例,如果不传递会默认有一个。
这个AutofacAutowiredModule实例后面你可以通过RegisterAssemblies()方法添加程序集,不添加默认会扫描整个项目下所有程序集。通过AddAutowiredSelectors()传入一个集合的Func<Type,bool>的委托可以指定哪些类或哪些包下面自动注入类,而不需要写任何特性即可完成,这个在后面我还会提到。
Host.CreateDefaultBuilder(args)
                .ConfigureWebHostDefaults(webBuilder =>
                {
                    webBuilder.UseStartup<Startup>();
                }).UseAutofac(
                new AutofacAutowiredModule().
                RegisterAssemblies(null).AddAutowiredSelectors(new List<Func<Type, bool>>() {
                    t=>t.Namespace==typeof(Startup).Namespace//表示类所在的命名空间为Startup类的命名空间的类中所有字段属性自动依赖注入
                })
                );
利用包中各种特性以及接口实现类的依赖类注入
1.利用包中的一些特性和接口实现注入类到Autofac容器(当然你也可以不使用它,使用NetCore提供IServiceCollection来注入也是一样的都是兼容的),本人建议你使用我的这些特性和接口来完成注入。
你可以通过实现ITransientDependency/IScopedDependency/ISingletonDependency接口分别对应三种生命周期注入,或标记TransientDependencyAttribute/ScopedDependencyAttribute/SingletonDependencyAttribute这三种特性也能完成自动注入
2.利用包中Autowired实现类的依赖。通过AddAutowiredSelectors()方法添加满足添加的类自动注入,可以实现不需要使用Autowired特性即可对满足条件的类下面的所有属性和字段自动注入,如果某些字段和属性或类你不需要自动注入可以通过添加NotAutowired特性即可完成,比较灵活方便。
类的统一注入到Autofac容器中
通过ITransientDependency/IScopedDependency/ISingletonDependency接口实现对应生命周期类的注入
下面我分别通过实现这几个生命周期接口以及直接通过NetCore自带的IServiceCollection分别注入几种不同的生命周期
分别实现三个ITransientDependency/IScopedDependency/ISingletonDependency接口生命周期的类,这些类会自动注入不再需要使用NetCore的AddTransient,AddScoped,AddSingleton添加。
通过实现接口的方式注入如果有实现多个接口以及集成相应的基类,依次会注册实现类自身,相应的实现类作为基类服务,相应的实现类作为接口服务(排除ITransientDependency/IScopedDependency/ISingletonDependency这三个接口,即不会把某个实现类注册为服务为这三个接口的实现类)
public interface ITransientServiceOne
    {

        public void TestTransientServiceOne();

    }
    /// <summary>
    /// 通过实现ITransientDependency接口注入Transient生命周期类
    /// </summary>
    public class TransientServiceOne : ITransientServiceOne, ITransientDependency
    {

        private int i = 0;

        public void TestTransientServiceOne()
        {
            Console.WriteLine($"实现ITransientDependency接口注入的类{this.GetType().FullName}:{i++}");
        }
    }

public interface IScopedServiceOne
    {

        public void TestScopedServiceOne();

    }
/// <summary>
    /// 通过实现IScopedDependency接口注入Scoped生命周期类
    /// </summary>
    public class ScopedServiceOne : IScopedServiceOne, IScopedDependency
    {

        private int i = 0;

        public void TestScopedServiceOne()
        {
            Console.WriteLine($"实现IScopedDependency接口注入的类{this.GetType().FullName}:{i++}");
        }
    }
public interface ISingletonServiceOne
    {

        public void TestSingletonServiceOne();

    }
    /// <summary>
    /// 通过实现ISingletonDependency接口注入Singleton生命周期类
    /// </summary>
    public class SingletonServiceOne : ISingletonServiceOne, ISingletonDependency
    {

        private int i = 0;

        public void TestSingletonServiceOne()
        {
            Console.WriteLine($"实现ISingletonDependency接口注入的类{this.GetType().FullName}:{i++}");
        }
    }
通过IServiceCollection注入
public interface INetCoreTransientServiceOne
    {

        public void TestNetCoreTransientServiceOne();

    }
    /// <summary>
    /// netcore自带容器注入Transient生命周期的类
    /// </summary>
    public class NetCoreTransientServiceOne : INetCoreTransientServiceOne
    {

        private int i = 0;

        public void TestNetCoreTransientServiceOne()
        {
            Console.WriteLine($"通过netcore自带容器注入Transient的类{this.GetType().FullName}:{i++}");
        }
    }
    public interface INetCoreScopedServiceOne
    {

        public void TestNetCoreScopedServiceOne();

    }
    /// <summary>
    /// netcore自带容器注入Scoped生命周期的类
    /// </summary>
    public class NetCoreScopedServiceOne : INetCoreScopedServiceOne
    {

        private int i = 0;

        public void TestNetCoreScopedServiceOne()
        {
            Console.WriteLine($"通过netcore自带容器注入Scoped的类{this.GetType().FullName}:{i++}");
        }
    }
    public interface INetCoreSingletonServiceOne
    {

        public void TestNetCoreSingletonServiceOne();

    }
    /// <summary>
    /// netcore自带容器注入Singleton生命周期的类
    /// </summary>
    public class NetCoreSingletonServiceOne : INetCoreSingletonServiceOne
    {

        private int i = 0;

        public void TestNetCoreSingletonServiceOne()
        {
            Console.WriteLine($"通过netcore自带容器注入Singleton的类{this.GetType().FullName}:{i++}");
        }
    }
//Startup.cs添加相应生命周期的服务
services.AddTransient<INetCoreTransientServiceOne, NetCoreTransientServiceOne>();
            services.AddScoped<INetCoreScopedServiceOne, NetCoreScopedServiceOne>();
            services.AddSingleton<INetCoreSingletonServiceOne, NetCoreSingletonServiceOne>();
运行结果如下
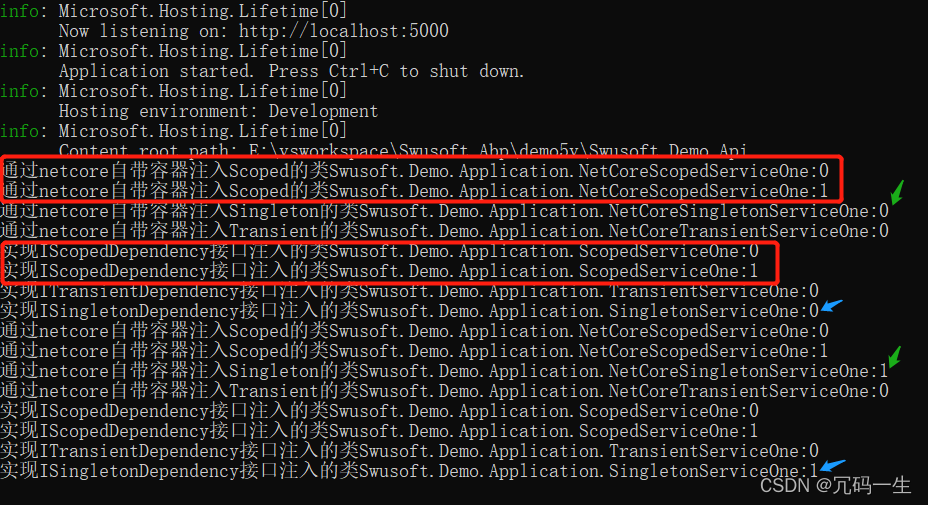
通过结果可以看到NetCore自带容器注入的和通过实现我的接口注入相应生命周期的类都是可以的,兼容的无影响
通过TransientDependencyAttribute/ScopedDependencyAttribute/SingletonDependencyAttribute这三个特性完成对类的注入
通过这三个特性完成对相应生命周期的注入比上面以接口注入更加的灵活。
首先我们来看一下这三个特性中有哪些属性可以使用和设置。
| 属性 | 类型 | 说明 |
|---|---|---|
| AsServices | Type[] | 作为某些服务可以多个服务 |
| IsReplaceService | bool | 是否替换服务,主要与下面的ReplaceServices结合替换某些服务 |
| ReplaceServices | Type[] | 替换服务 |
| AutoActivate | bool | 是否自动装载,只在SingletonDependencyAttribute中存在,表示是否自动装载单例服务即程序启动过程中自动装载实例化 |
下面我分别举一个例子
public interface ITransientAttrServiceOne
    {

        public void TestTransientAttrServiceOne();
    }
    /// <summary>
    /// 通过TransientDependencyAttribute特性注入Transient生命周期类
    /// </summary>
    [TransientDependency(AsServices =new[] { typeof(ITransientServiceOne)},IsReplaceService =true,ReplaceServices =new[] { typeof(ITransientServiceOne)})]
    public class TransientAttrServiceOne : ITransientAttrServiceOne,ITransientServiceOne

    {

        private int i = 0;

        public void TestTransientAttrServiceOne()
        {
            Console.WriteLine($"通过TransientDependencyAttribute特性注入的类{this.GetType().FullName}:{i++}");
        }

        public void TestTransientServiceOne()
        {
            Console.WriteLine($"通过AsServices指定为ITransientServiceOne服务,并替换该服务{i++}");
        }
    }
    public interface IScopedAttrServiceOne
    {

        public void TestScopedAttrServiceOne();
    }
/// <summary>
    /// 通过ScopedDependencyAttribute特性注入Scoped生命周期类
    /// </summary>
    [ScopedDependency]
    public class ScopedAttrServiceOne : IScopedAttrServiceOne
    {

        private int i = 0;

        public void TestScopedAttrServiceOne()
        {
            Console.WriteLine($"通过ScopedDependencyAttribute特性注入的类{this.GetType().FullName}:{i++}");
        }
    }
    public interface ISingletonAttrServiceOne
    {

        public void TestSingletonAttrServiceOne();
    }
    /// <summary>
    /// 通过SingletonDependencyAttribute特性注入Singleton生命周期类
    /// </summary>
    [SingletonDependency(AutoActivate =true)]
    public class SingletonAttrServiceOne : ISingletonAttrServiceOne
    {

        private int i = 0;

        public SingletonAttrServiceOne()
        {
            Console.WriteLine($"{this.GetType().Name}随程序启动自动装载初始化实例");
        }

        public void TestSingletonAttrServiceOne()
        {
            Console.WriteLine($"通过SingletonDependencyAttribute特性注入的类{this.GetType().FullName}:{i++}");
        }
    }
运行结果如下:

从运行结果中,我们可以看到在第一行输出了SingletonAttrServiceOne随程序启动自动装载初始化,这是使用了单例特性里面的AutoActivate属性为true,我们可以看到替换服务成功了,以及AsServices也成功了。
以上案例的测试Controller代码如下:
/// <summary>
    /// 生命周期测试
    /// </summary>
    [Route("api/[controller]/[action]")]
    [ApiController]
    public class LifeCycleController : ControllerBase
    {

        private INetCoreTransientServiceOne netCoreTransientServiceOne;
        private INetCoreScopedServiceOne netCoreScopedServiceOne;
        private INetCoreSingletonServiceOne netCoreSingletonServiceOne;

        private ITransientServiceOne transientServiceOne;
        private IScopedServiceOne scopedServiceOne;
        private ISingletonServiceOne singletonServiceOne;

        private ITransientServiceOne transientReplaceServiceOne;
        private IScopedAttrServiceOne scopedAttrServiceOne;
        private ISingletonAttrServiceOne singletonAttrServiceOne;


        public LifeCycleController(INetCoreTransientServiceOne netCoreTransientServiceOne,
            INetCoreScopedServiceOne netCoreScopedServiceOne,
            INetCoreSingletonServiceOne netCoreSingletonServiceOne,
            ITransientServiceOne transientServiceOne,
            IScopedServiceOne scopedServiceOne,
            ISingletonServiceOne singletonServiceOne, ITransientServiceOne transientReplaceServiceOne, IScopedAttrServiceOne scopedAttrServiceOne, ISingletonAttrServiceOne singletonAttrServiceOne)
        {
            this.netCoreTransientServiceOne = netCoreTransientServiceOne;
            this.netCoreScopedServiceOne = netCoreScopedServiceOne;
            this.netCoreSingletonServiceOne = netCoreSingletonServiceOne;
            this.transientServiceOne = transientServiceOne;
            this.scopedServiceOne = scopedServiceOne;
            this.singletonServiceOne = singletonServiceOne;
            this.transientReplaceServiceOne = transientReplaceServiceOne;
            this.scopedAttrServiceOne = scopedAttrServiceOne;
            this.singletonAttrServiceOne = singletonAttrServiceOne;
        }

        [HttpGet]
        public void Test()
        {
            netCoreScopedServiceOne.TestNetCoreScopedServiceOne();
            netCoreScopedServiceOne.TestNetCoreScopedServiceOne();
            netCoreSingletonServiceOne.TestNetCoreSingletonServiceOne();
            netCoreTransientServiceOne.TestNetCoreTransientServiceOne();
            scopedServiceOne.TestScopedServiceOne();
            scopedServiceOne.TestScopedServiceOne();
            transientServiceOne.TestTransientServiceOne();
            singletonServiceOne.TestSingletonServiceOne();
        }

        [HttpGet]
        public void Test2()
        {
            transientReplaceServiceOne.TestTransientServiceOne();
            scopedAttrServiceOne.TestScopedAttrServiceOne();
            scopedAttrServiceOne.TestScopedAttrServiceOne();
            singletonAttrServiceOne.TestSingletonAttrServiceOne();
        }


    }
从这个Controller中我们可以看到NetCore自带的构造参数注入类比较臃肿。在介绍完我基于接口和特性注入相应的生命周期的类之后。我将为大家隆重推出依赖注入类的相应特性以及使用方式。
类的依赖注入
1.可以使用Autowired特性完成在某个类中注入某个类
Autowired可以使用在类上 字段上 属性上
如果使用在类上,该类下面所有字段属性都会自动注入,如果某个字段或属性不需要自动注入可以使用NotAutowired特性
| 属性 | 类型 | 说明 |
|---|---|---|
| ImplementationType | Type | 以某个实现类注入,使用在单接口多实现,我们指定这个使用某个类注入 |
2.可以通过在UseAutofac()传递的AutofacAutowiredModule实例中AddAutowiredSelectors添加对满足条件的类不需要使用Autowired特性自动对类里面的字段属性完成注入,如果该类中某个字段或属性不需要注入,我们可以使用NotAutowired特性
使用Autowired特性完成类的依赖注入
如果要在Controller中使用Autowired注入特性,需要把Controller注册为服务,需要在Startup.cs中添加如下语句:
services.AddControllers().AddControllersAsServices();
例子如下:
/// <summary>
    /// 自动注入测试
    /// </summary>
    [Route("api/[controller]/[action]")]
    [ApiController]
    [Autowired]//在类上使用Autowired 以下属性字段全部会自动注入
    public class AutowiredController : ControllerBase
    {

        private INetCoreTransientServiceOne netCoreTransientServiceOne { get; set; }
        private INetCoreScopedServiceOne netCoreScopedServiceOne;
        private INetCoreSingletonServiceOne netCoreSingletonServiceOne;

        private ITransientServiceOne transientServiceOne;
        private IScopedServiceOne scopedServiceOne;
        private ISingletonServiceOne singletonServiceOne;

        private ITransientServiceOne transientReplaceServiceOne;
        private IScopedAttrServiceOne scopedAttrServiceOne;
        private ISingletonAttrServiceOne singletonAttrServiceOne;


        [HttpGet]
        public void Test()
        {
            netCoreScopedServiceOne.TestNetCoreScopedServiceOne();
            netCoreScopedServiceOne.TestNetCoreScopedServiceOne();
            netCoreSingletonServiceOne.TestNetCoreSingletonServiceOne();
            netCoreTransientServiceOne.TestNetCoreTransientServiceOne();
            scopedServiceOne.TestScopedServiceOne();
            scopedServiceOne.TestScopedServiceOne();
            transientServiceOne.TestTransientServiceOne();
            singletonServiceOne.TestSingletonServiceOne();
        }

        [HttpGet]
        public void Test2()
        {
            transientReplaceServiceOne.TestTransientServiceOne();
            scopedAttrServiceOne.TestScopedAttrServiceOne();
            scopedAttrServiceOne.TestScopedAttrServiceOne();
            singletonAttrServiceOne.TestSingletonAttrServiceOne();
        }


    }

    /// <summary>
    /// 通过TransientDependencyAttribute特性注入Transient生命周期类
    /// </summary>
    [TransientDependency(AsServices =new[] { typeof(ITransientServiceOne)},IsReplaceService =true,ReplaceServices =new[] { typeof(ITransientServiceOne)})]
    public class TransientAttrServiceOne : ITransientAttrServiceOne,ITransientServiceOne

    {

        [Autowired]//在字段上的自动注入
        private readonly IScopedAttrServiceOne _service;

        private int i = 0;

        public void TestTransientAttrServiceOne()
        {
            Console.WriteLine($"通过TransientDependencyAttribute特性注入的类{this.GetType().FullName}:{i++}");
        }

        public void TestTransientServiceOne()
        {
            Console.WriteLine($"通过AsServices指定为ITransientServiceOne服务,并替换该服务{i++}");
            _service.TestScopedAttrServiceOne();
        }
    }
使用Autowired完成单接口多实现的注入
如果一个接口由多个类实现,如果不使用ImplementationType指定使用哪个类注入,默认是最后注入的那个实现作为自动注入。
例子如下:
/// <summary>
    /// 这是一个升级的ScopedServiceOne
    /// </summary>
    public class ScopedServiceOneUp : IScopedServiceOne, IScopedDependency
    {

        private int i = 0;

        public void TestScopedServiceOne()
        {
            Console.WriteLine($"实现IScopedDependency接口注入的类{this.GetType().FullName}:{i++}");
        }
    }

//使用ImplementationType指定类

[Autowired(ImplementationType = typeof(ScopedServiceOne))]
 private IScopedServiceOne scopedServiceOne;
 [Autowired(ImplementationType =typeof(ScopedServiceOneUp))]
 private IScopedServiceOne scopedServiceOneUp;
运行结果如下:

基于筛选器的自动注入
通过添加筛选器可以对满足条件的类不必使用Autowired特性自动对类下面的字段属性完成注入。
public static IHostBuilder CreateHostBuilder(string[] args) =>
            Host.CreateDefaultBuilder(args)
                .ConfigureWebHostDefaults(webBuilder =>
                {
                    webBuilder.UseStartup<Startup>();
                }).UseAutofac(
                new AutofacAutowiredModule().
                RegisterAssemblies(null).AddAutowiredSelectors(new List<Func<Type, bool>>() {
                    t=>t.Namespace==typeof(Startup).Namespace,//与Startup类一个命名空间下的类中依赖自动注入
                    t=>t.BaseType==typeof(ControllerBase)//基类是ControllerBase的类中的依赖自动注入
                })

                );
对xxxOption选项的直接注入支持
Option选项在NetCore项目的开发中也用的非常多,这里我也集成了对Option选项的注入支持。注意Options的动态注入在动态泛型中不支持
这里我使用SmsOption来举例,这是一个发送短信的选项,
选项Option的注入有以下四种方式
第一种通过IOptions注入,然后通过lambda表达式获取xxxOption。
第二种通过直接xxxOption注入,注意这里我应用了约定优于配置,必须是以Option结尾才能判定为是注入Option选项。
第三种方式通过Autowired特性指定ImplementationType为IOptions,实现Option注入。
第四种方式通过IocManager实现对Option的注入。
个人推荐第三种。
/// <summary>
    /// 短信Option
    /// </summary>
    public class SmsOption
    {

        public string Host { get; set; }
    }

//在appsettings.development.json中添加如下内容
"Sms": {

    "Host": "www.opendeepspace.com"

  }
//在Startup.cs中配置SmsOption
//注入SmsOption
 services.Configure<SmsOption>(Configuration.GetSection("Sms"));

//如果要使用IocManager 这个一般用在不能注入的类中获取实例 需要在Startup.cs中Configure方法中加入如下语句:
//初始化IocManager容器 用于在不能使用注入的类中使用
IocManager.InitContainer(app.ApplicationServices.GetAutofacRoot());

//各种方式注入Option
//注入Option的方式有以下四种
        /// <summary>
        /// 第一种使用Autowired注入IOptions<xxx>
        /// 然后在使用lambda表示式取value值
        /// </summary>
        [Autowired]
        private IOptions<SmsOption> smsOptions { get; set; }
        private SmsOption smsOptionOne => smsOptions.Value;

        /// <summary>
        /// 第二种使用约定方式 即xxxOption结尾的使用Autowired特性将会被认为是注入Option选项
        /// </summary>
        [Autowired]
        private SmsOption smsOption { get; set; }

        /// <summary>
        /// 第三种方式 使用Autowired特性的指定ImplementationType方式
        /// </summary>
        [Autowired(ImplementationType =typeof(IOptions<SmsOption>))]
        private SmsOption smsOptionTwo { get; set; }

        /// <summary>
        /// 使用IocManager获取Option
        /// </summary>
        private SmsOption smsOptionThree => IocManager.Resolve<IOptions<SmsOption>>().Value;
各种注入运行结果如下:

循环依赖的注入支持
支持循环依赖注入,就是两个类之间相互依赖注入,即两个类互相依赖。
使用NotAutowired特性不依赖注入
NotAutowired特性一般与Autowired特性或基于筛选器的自动注入结合在一起使用,可使用在类上 属性 字段上
使用方式如下:
[NotAutowired]//
 private INetCoreTransientServiceOne netCoreTransientServiceOne { get; set; }
[NotAutowired]
    public class AutowiredController : ControllerBase{}
支持在不能注入类中获取依赖类的实例
要使用IocManager,首先必须在Startup的Configure方法中添加如下语句:
//初始化IocManager容器 用于在不能使用注入的类中使用
IocManager.InitContainer(app.ApplicationServices.GetAutofacRoot());
比如在拓展类/在ActionFilter中不能使用自动注入,那么此时就可以使用IocManager获取依赖类
代码如下:
public class FilterOne : IActionFilter
    {

		//解析某个实现
        private IServiceProvider serviceProvider=>IocManager.Resolve<IServiceProvider>();
        //单接口多实现的指定实现类解析
        IGuidGenerator GuidGenerator=>IocManager.Resolve<IGuidGenerator>(typeof(SequentialGuidGenerator));

        public void OnActionExecuted(ActionExecutedContext context)
        {

        }

        public void OnActionExecuting(ActionExecutingContext context)
        {

        }
    }
Value特性实现配置文件中值/对象的注入
使用Value特性实现配置文件中的值的注入,目前支持三种配置文件的读取以及值的注入分别是json、xml、ini。还支持工程处于不同环境的值的自动切换配置。
新添加的xml ini文件需要选择为始终复制或较新复制
这里你可以直接通过value特性,实现appsettings.json等文件中的对象/值类型的注入
默认读取配置文件中的值注入
默认标记Value特性,读取appsettings.json配置文件
指定配置文件路径的值注入

基于不同环境的值的注入
基于不同环境可以通过{env}来自动识别,结合IHostEnvironment
方法拦截横切处理通过特性的方式实现Aop
分为类拦截和接口拦截两种:
类拦截需要为虚方法
接口拦截需要是实现某个接口的方法才能拦截
ClassIntercept特性用于当某个类实现了例如IDispose接口会被认为是基于接口拦截实际应该是类拦截,那么我们可以使用ClassIntercept标记为类拦截。
切面拦截处理分为以下几种特性
| 拦截特性 | 说明 |
|---|---|
| MethodBeforeIntercept | 方法调用前拦截 |
| MethodAfterIntercept | 方法调用后拦截,无论方法执行过程中是否出现异常都会执行 |
| MethodAroundIntercept | 围绕方法处理 方法前后都拦截 |
| MethodAfterReturnIntercept | 方法正常执行后拦截执行 |
| MethodAfterThrowIntercept | 方法执行出现异常后执行 |
每个拦截特性中可以设置的属性
| 属性 | 类型 | 说明 |
|---|---|---|
| Order | uint | 执行顺序 与下面的GroupName结合使用 一个GroupName上面的五种拦截特性构成一个拦截面 这个就是指定拦截面的执行顺序 数值越小越优先 |
| GroupName | string | 组名 |
可以使用多组拦截面对方法进行拦截,采用中间件加委托的方式。
被拦截的类如果没有注入到容器,会自动被注入到Transient生命周期,如果想要改变生命周期可以使用上面的类注入接口特性等,获取也可以使用NetCore中的IServiceCollection注入也可以设置为相应的生命周期
整个拦截执行顺序过程如下:
一个拦截面的执行过程:

多个拦截面的执行过程,根据Order的顺序号越低越优先执行

横切拦截使用例子如下
/// <summary>
    /// 方法调用前记录日志
    /// </summary>
    public class LogBefore : MethodBeforeIntercept
    {
        public override Task Before(InterceptContext interceptorContext)
        {
            Console.WriteLine($"方法前执行{interceptorContext.TargetMethod}");
            return Task.CompletedTask;
        }
    }
    /// <summary>
    /// 方法执行后执行
    /// </summary>
    public class LogAfter : MethodAfterIntercept
    {
        public override async Task After(InterceptContext interceptContext, object result)
        {
            Console.WriteLine($"方法后无论是否异常都执行{interceptContext.TargetMethod},返回值{result}");
            await Task.CompletedTask;
        }
    }
public class LogAfterReturn : MethodAfterReturnIntercept
    {
        public override async Task AfterReturn(InterceptContext interceptContext, object result)
        {
            Console.WriteLine($"方法正常执行后:{interceptContext.TargetMethod},{result}");

            await Task.CompletedTask;
        }
    }
/// <summary>
    /// 环绕方法执行
    /// </summary>
    public class LogAround : MethodAroundIntercept
    {
        public override async Task OnInvocation(InterceptContext interceptContext, Func<InterceptContext, Task> next)
        {
            Console.WriteLine($"环绕前执行{interceptContext.TargetMethod}");
            await next(interceptContext);//执行目标方法

            //出现异常 这里将不会执行
            Console.WriteLine($"环绕后执行{interceptContext.TargetMethod}");
        }
    }
/// <summary>
    /// 方法执行出现异常的拦截
    /// </summary>
    public class LogThrow : MethodAfterThrowIntercept
    {
        public override async Task AfterThrows(InterceptContext interceptContext, Exception exception)
        {
            Console.WriteLine($"方法执行异常:{interceptContext.TargetMethod},异常:{exception.Message}");

            await Task.CompletedTask;
        }
    }

/// <summary>
    /// 类拦截服务
    /// </summary>
    [LogBefore]
    [ClassIntercept]
    public class ClassInterceptService : /*IScopedDependency,*/IDisposable
    {
        [Autowired]
        private readonly ILogger<ClassInterceptService> logger;

        //[Autowired]
        //private readonly ClassInterceptServiceTwo classInterceptService;

        private int i = 0;

        public ClassInterceptService()
        {

        }

        [LogBefore]
        public virtual void  ClassInterceptTest()
        {
            //classInterceptService.TestTwo();

            Console.WriteLine($"一个类拦截服务,生命周期:{i++}");
        }

        [LogBefore]
        [Log2Before]
        [LogAfter]
        [LogAfterReturn]
        [LogAround]
        [LogThrow]
        public virtual void ClassInterceptTwo()
        {
            Console.WriteLine("测试类拦截Two");

            //throw new NotImplementedException("异常了额");
        }

        [LogBefore]
        [LogAfter]
        [LogAfterReturn]
        [LogAround]
        [LogThrow]
        public virtual void ClassInterceptException()
        {
            Console.WriteLine("方法出现异常了");
            throw new Exception();
        }

        public void Dispose()
        {

        }
    }
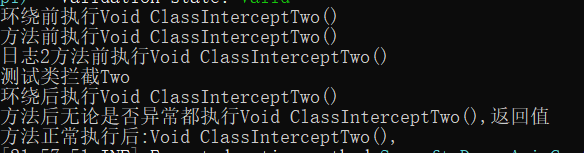
这样即可完成拦截
运行结果如下:
基于拦截点的拦截
可以不用再每个类上都打上拦截特性,而是直接通过一个拦截类实现拦截,可以通过*号来模糊匹配命名空间,类,返回值,方法实现统一的拦截
InterceptPoint指定拦截点
对InterceptPoint指定的类中的方法指定特性完成拦截
| 拦截特性 | 说明 |
|---|---|
| AroundIntercept | 方法前后拦截 注意对应的方法必须包含InterceptContext interceptContext, Func<InterceptContext,Task> next这两个参数 |
| BeforeIntercept | 方法前拦截 |
| AfterIntercept | 方法后拦截无论是否正常执行 |
| AfterReturnIntercept | 方法正常返回后拦截 可以指定返回值的参数名称用来接收参数 |
| AfterThrowIntercept | 方法异常后拦截 可以指定参数名称来接受异常 |
拦截点表达式配置
拦截点表达式模仿springaop中的execution。
拦截点表达式模式如下:
intercept(返回参数类型 命名空间 类名 方法名 (方法参数类型))
intercept()里面包含具体的拦截体
拦截体部分:返回参数类型 命名空间 类名 方法名 (方法参数) ,每一个之间都有一个空格注意仅一个严格控制
| 返回参数 | |
|---|---|
| 示例 | 说明 |
| * | 任意返回值类型 |
| system.void | 指定返回值类型(一定要完全名,不区分大小写) |
| 命名空间/类名/方法 | |
|---|---|
| 示例 | 说明 |
| * | 任意命名空间 |
| test.* | 以test开头的命名空间/类 |
| *.test | 以test结尾的命名空间/类 |
| *.test.* | 包含test的命名空间/类 |
| 方法参数类型 | |
|---|---|
| 示例 | 说明 |
| () | 空参数 |
| (…) | 任意参数 |
| (*) | 任意一个参数 |
| (*,*) | 任意两个参数,逗号分隔,多个参数一次类推 |
| system.int32 | 具体参数,完全名不区分大小写 |
| (*,system.int32) | 第一个参数任意,第二个参数具体,一次类推其他 |
| 几个拦截表达式的示例 | |
|---|---|
| 示例 | 说明 |
| intercept(* * * * (…)) | 任意返回值任意命名空间任意类任意方法任意参数 |
| intercept(* * * * ()) | 任意返回值任意命名空间任意类任意方法空参数 |
| intercept(system.void * * * (…)) | void返回值的任意命名空间任意方法任意参数 |
/// <summary>
    /// 日志拦截点
    /// </summary>
    [InterceptPoint("intercept(system.string * ClassInterceptServiceTwo * (..)) ")]
    public class LoggerInterceptPoint
    {

        [AroundIntercept]
        public async Task Around(InterceptContext interceptContext, Func<InterceptContext,Task> next)
        {
            Console.WriteLine("InterceptPoint环绕前");
            await next(interceptContext);
            Console.WriteLine("InterceptPoint环绕后");
        }

        [BeforeIntercept]
        public void Before()
        {
            Console.WriteLine("InterceptPoint方法前");

        }

        [AfterIntercept]
        public void After()
        {
            Console.WriteLine("InterceptPoint方法后无论是否正常返回");

        }

        [AfterReturnIntercept(ReturnValue = "value1")]
        public void AfterReturn(object value1)
        {
            Console.WriteLine($"InterceptPoint方法执行正常返回{value1}");
        }

        [AfterThrowIntercept(Throwing = "ex1")]
        public void Throwing(Exception ex1)
        {
            Console.WriteLine("InterceptPoint方法异常执行");
        }
    }
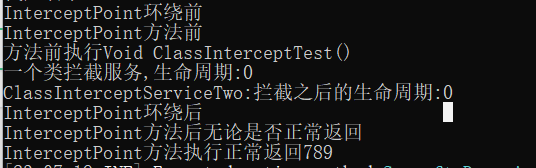
执行情况如下:
NotIntercept特性即不拦截
这个特性主要结合配置拦截点进行使用,如果你拦截点的范围设置比较大,但是你又想这个拦截点下某些类不被拦截可以使用该特性
NotInterceptSelectors不被拦截的筛选器
主要配合拦截点 任意返回值任意命名空间任意类任意参数类型 的优化拦截使用。比如某些命名空间开头或某些特殊的类在拦截点设置为任意时,你又不需要拦截的某些类的情况下使用。
UseAutofac(new AutofacAutowiredModule().AddNotInterceptSelectors(new List<Func<Type, bool>>() {

    t=>t.Assembly.GetName().FullName.StartsWith("Swusoft.Wy")
}))
基于拦截点的拦截注意问题
如果你在项目中配置某个拦截点为 任意返回值任意命名空间任意类任意参数类型都会被这个拦截点所拦截那么这里有可能在使用Autowired注入特性的时候,某些自己程序中写的类会不能使用Autowired注入并且有可能会出现程序异常,这个时候你可以通过使用Autowired特性或者NetCore自带的构造方法注入 IServiceProvider或IServiceScopeFactory或使用IocManager来获取相应的类即可解决
例如我这里的一个全局审计日志的记录

如果你需要使用,可以通过在NuGet上搜索OpenDeepSpace.Autofac.Autowired在NetCore项目中使用,最新版本Net6.0的6.3.2和Net3.1的3.4.2版本中完整支持
使用中出现的问题欢迎给位在评论区指出,让我修正,感谢


 1131
1131


 被折叠的 条评论
为什么被折叠?
被折叠的 条评论
为什么被折叠?
 到【灌水乐园】发言


