


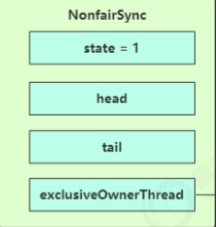
构造器:
使用的锁:
有两种实现,公平锁和非公平锁

abstract static class Sync extends AbstractQueuedSynchronizer {
默认是非公平锁的实现
    public ReentrantLock() {
        sync = new NonfairSync();
    }
无线程加锁时的加锁方法:
final void lock() {
            if (compareAndSetState(0, 1))//尝试加锁
                setExclusiveOwnerThread(Thread.currentThread());//成功后就将当前线程改为自己
            else//失败
                acquire(1);
        }

有竞争时的线程加锁方法
 public final void acquire(int arg) {
        if (!tryAcquire(arg) &&//在此重试加锁
            acquireQueued(addWaiter(Node.EXCLUSIVE), arg))//尝试加入阻塞队列
            selfInterrupt();
    }

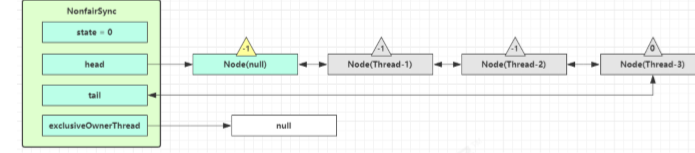
Thread-1 执行了
- CAS 尝试将 state 由 0 改为 1,结果失败
- 进入 tryAcquire 逻辑,这时 state 已经是1,结果仍然失败
- 接下来进入 addWaiter 逻辑,构造 Node 队列
- 图中黄色三角表示该 Node 的 waitStatus 状态,其中 0 为默认正常状态
- Node 的创建是懒惰的
- 其中第一个 Node 称为 Dummy(哑元)或哨兵,用来占位,并不关联线程
加入阻塞队列的方法
    final boolean acquireQueued(final Node node, int arg) {
        boolean failed = true;
        try {
            boolean interrupted = false;
            for (;;) {
                final Node p = node.predecessor();
                if (p == head && tryAcquire(arg)) {//前驱是头结点(由于虚拟节点的存在),就再次尝试一次获取锁
                    setHead(node);//设为头结点
                    p.next = null; // help GC
                    failed = false;
                    return interrupted;
                }
                if (shouldParkAfterFailedAcquire(p, node) &&//这里要循环两次(详见下方)
                    parkAndCheckInterrupt())
                    interrupted = true;
            }
        } finally {
            if (failed)
                cancelAcquire(node);
        }
    }
当前线程进入 acquireQueued 逻辑
- acquireQueued 会在一个死循环中不断尝试获得锁,失败后进入 park 阻塞
- 如果自己是紧邻着 head(排第二位),那么再次 tryAcquire 尝试获取锁,当然这时 state 仍为 1,失败
- 进入 shouldParkAfterFailedAcquire 逻辑,将前驱 node,即 head 的 waitStatus 改为 -1,这次返回 false(改为-1,意味着他有责任唤醒我,这是第一次循环)

- shouldParkAfterFailedAcquire 执行完毕回到 acquireQueued ,再次 tryAcquire 尝试获取锁,当然这时 state 仍为 1,失败
- 当再次进入 shouldParkAfterFailedAcquire 时,这时因为其前驱 node 的 waitStatus 已经是 -1,这次返回 true (第二次循环,那么就真的要阻塞了)
- 进入 parkAndCheckInterrupt, Thread-1 park(灰色表示)
 private final boolean parkAndCheckInterrupt() {
        LockSupport.park(this);//暂停当前线程
        return Thread.interrupted();
    }

释放锁(不公平):
首先看释放锁的方法
public void unlock() {
        sync.release(1);
    }
    public final boolean release(int arg) {
        if (tryRelease(arg)) {
            Node h = head;
            if (h != null && h.waitStatus != 0)//头结点不为空且需要唤醒下一个节点
                unparkSuccessor(h);//恢复阻塞的线程运行,阻塞的代码在上面的第二次循环**acquireQueued** 处。。。再一次进入for时,如果没有和他竞争的线程,就可以获取锁了,并退出阻塞方法的循环
            return true;
        }
        return false;
    }

     protected final boolean tryRelease(int releases) {
            int c = getState() - releases;
            if (Thread.currentThread() != getExclusiveOwnerThread())
                throw new IllegalMonitorStateException();
            boolean free = false;
            if (c == 0) {
                free = true;
                setExclusiveOwnerThread(null);
            }
            setState(c);
            return free;
        }
获取锁不公平的体现:
- 当前队列不为 null,并且 head 的 waitStatus = -1,进入 unparkSuccessor 流-程
- 找到队列中离 head 近的一个 Node(没取消的),unpark 恢复其运行,本例中即为 Thread-1
- 回到 Thread-1 的 acquireQueued 流程
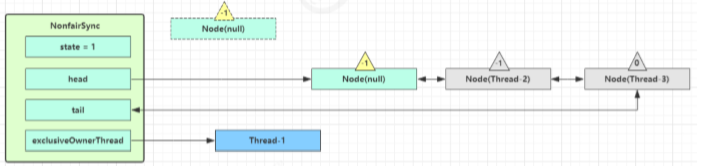
如果加锁成功(没有竞争),会设置
- exclusiveOwnerThread 为 Thread-1,state = 1
- head 指向刚刚 Thread-1 所在的 Node,该 Node 清空 Thread
- 原本的 head 因为从链表断开,而可被垃圾回收
(不公平来了)如果这时候有其它线程来竞争(非公平的体现),例如这时有 Thread-4 来了
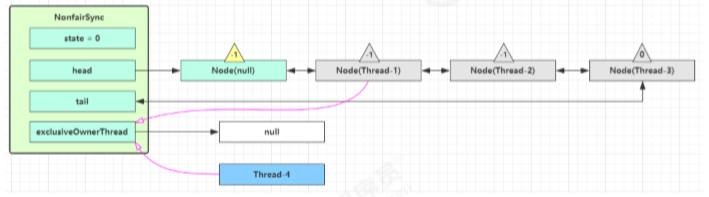
如果不巧又被 Thread-4 占了先
- Thread-4 被设置为 exclusiveOwnerThread,state = 1
- Thread-1 再次进入 acquireQueued 流程,获取锁失败,重新进入 park 阻塞
可重入原理:
再次回顾一下非公平锁的加锁方法:
		final void lock() {
            if (compareAndSetState(0, 1))
                setExclusiveOwnerThread(Thread.currentThread());
            else
                acquire(1);
        }

		public final void acquire(int arg) {
	        if (!tryAcquire(arg) &&
	            acquireQueued(addWaiter(Node.EXCLUSIVE), arg))
	            selfInterrupt();
	    }

        protected final boolean tryAcquire(int acquires) {
            return nonfairTryAcquire(acquires);
        }
我们详细了解nonfairTryAcquire方法:
final boolean nonfairTryAcquire(int acquires) {
            final Thread current = Thread.currentThread();

            int c = getState();
            // 如果还没有获得锁
            if (c == 0) {
            // 尝试用 cas 获得, 这里体现了非公平性: 不去检查 AQS 队列
                if (compareAndSetState(0, acquires)) {
                    setExclusiveOwnerThread(current);
                    return true;
                }
            }
             // 如果已经获得了锁, 线程还是当前线程, 表示发生了锁重入
            else if (current == getExclusiveOwnerThread()) {
            // state++
                int nextc = c + acquires;
                if (nextc < 0) // overflow
                    throw new Error("Maximum lock count exceeded");
                setState(nextc);
                return true;
            }
             // 获取失败, 回到调用处
            return false;
        }
释放锁时会有相应判断:
        protected final boolean tryRelease(int releases) {
         // state--
            int c = getState() - releases;
            if (Thread.currentThread() != getExclusiveOwnerThread())
                throw new IllegalMonitorStateException();
            boolean free = false;
             // 支持锁重入, 只有 state 减为 0, 才释放成功
            if (c == 0) {
                free = true;
                setExclusiveOwnerThread(null);
            }
            setState(c);
            return free;
        }
可打断原理:
在此模式下,即使它被打断,仍会驻留在 AQS 队列中,一直要等到获得锁后方能得知自己被打断了
 private final boolean parkAndCheckInterrupt() {
         // 如果打断标记已经是 true, 则 park 会失效
         LockSupport.park(this);
         // interrupted 会清除打断标记
         return Thread.interrupted();
}

final boolean acquireQueued(final Node node, int arg) {
        boolean failed = true;
        try {
            boolean interrupted = false;
            for (;;) {
                final Node p = node.predecessor();
                if (p == head && tryAcquire(arg)) {
                    setHead(node);
                    p.next = null; // help GC
                    failed = false;
                     // 还是需要获得锁后, 才能返回打断状态
                    return interrupted;
                }
                if (shouldParkAfterFailedAcquire(p, node) &&
                    parkAndCheckInterrupt())
                    // 如果是因为 interrupt 被唤醒, 返回打断状态为 true
                    interrupted = true;
            }
        } finally {
            if (failed)
                cancelAcquire(node);
        }
    }
可打断模式:
    private void doAcquireInterruptibly(int arg)
        throws InterruptedException {
        final Node node = addWaiter(Node.EXCLUSIVE);
        boolean failed = true;
        try {
            for (;;) {
                final Node p = node.predecessor();
                if (p == head && tryAcquire(arg)) {
                    setHead(node);
                    p.next = null; // help GC
                    failed = false;
                    return;
                }
                if (shouldParkAfterFailedAcquire(p, node) &&
                    parkAndCheckInterrupt())
                      // 在 park 过程中如果被 interrupt  这时候抛出异常, 而不会再次进入 for (;;)
                    throw new InterruptedException();
            }
        } finally {
            if (failed)
                cancelAcquire(node);
        }
    }
公平锁实现:
 // 与非公平锁主要区别在于 tryAcquire 方法的实现
protected final boolean tryAcquire(int acquires) {
            final Thread current = Thread.currentThread();
            int c = getState();
            if (c == 0) {
             // 先检查 AQS 队列中是否有前驱节点, 没有才去竞争
                if (!hasQueuedPredecessors() &&
                    compareAndSetState(0, acquires)) {
                    setExclusiveOwnerThread(current);
                    return true;
                }
            }
            else if (current == getExclusiveOwnerThread()) {
                int nextc = c + acquires;
                if (nextc < 0)
                    throw new Error("Maximum lock count exceeded");
                setState(nextc);
                return true;
            }
            return false;
        }
    }


    public final boolean hasQueuedPredecessors() {
        // The correctness of this depends on head being initialized
        // before tail and on head.next being accurate if the current
        // thread is first in queue.
        Node t = tail; // Read fields in reverse initialization order
        Node h = head;
        Node s;
         // h != t 时表示队列中有 Node
        return h != t &&
         // (s = h.next) == null 表示队列中还有没有老二
            ((s = h.next) == null ||
             // 或者队列中老二线程不是此线程
             s.thread != Thread.currentThread());
    }
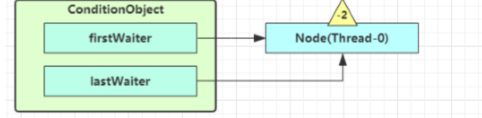
条件变量实现(await)
public final void await() throws InterruptedException {
            if (Thread.interrupted())
                throw new InterruptedException();
                //在condition队列中添加该线程的节点
            Node node = addConditionWaiter();
            //释放所有锁(锁重入也会一起释放完)
            int savedState = fullyRelease(node);
            int interruptMode = 0;
            while (!isOnSyncQueue(node)) {
            //停下
                LockSupport.park(this);
                if ((interruptMode = checkInterruptWhileWaiting(node)) != 0)
                    break;
            }
            if (acquireQueued(node, savedState) && interruptMode != THROW_IE)
                interruptMode = REINTERRUPT;
            if (node.nextWaiter != null) // clean up if cancelled
                unlinkCancelledWaiters();
            if (interruptMode != 0)
                reportInterruptAfterWait(interruptMode);
        }


private Node addConditionWaiter() {
            Node t = lastWaiter;
            // If lastWaiter is cancelled, clean out.
            if (t != null && t.waitStatus != Node.CONDITION) {
                unlinkCancelledWaiters();
                t = lastWaiter;
            }
             // 创建一个关联当前线程的新 Node, 添加至队列尾部
            Node node = new Node(Thread.currentThread(), Node.CONDITION);
            if (t == null)
                firstWaiter = node;
            else
                t.nextWaiter = node;
            lastWaiter = node;
            return node;
        }
条件变量(sigal)
  public final void signal() {
  			//只有当前运行的线程才能调用signal
            if (!isHeldExclusively())
                throw new IllegalMonitorStateException();
            Node first = firstWaiter;
            if (first != null)
                doSignal(first);
        }

  private void doSignal(Node first) {
            do {
            // 已经是尾节点了
                if ( (firstWaiter = first.nextWaiter) == null)
                    lastWaiter = null;
                first.nextWaiter = null;
            } while (
					 // 将等待队列中的 Node 转移至 AQS 队列, 不成功且还有节点则继续循环
					!transferForSignal(first) &&
					 // 队列还有节点
                     (first = firstWaiter) != null);
        }


 final boolean transferForSignal(Node node) {
        /*
         * If cannot change waitStatus, the node has been cancelled.
         */
 // 如果状态已经不是 Node.CONDITION(-2), 说明被取消了
        if (!compareAndSetWaitStatus(node, Node.CONDITION, 0))
            return false;
		 // 加入 AQS 队列尾部
        Node p = enq(node);
        int ws = p.waitStatus;
         // 上一个节点被取消
        if (ws > 0 ||
// // 上一个节点不能设置状态为 Node.SIGNAL
	!compareAndSetWaitStatus(p, ws, Node.SIGNAL))
			 // unpark 取消阻塞, 让线程重新同步状态
            LockSupport.unpark(node.thread);
        return true;
    }


 158
158


 被折叠的 条评论
为什么被折叠?
被折叠的 条评论
为什么被折叠?
 到【灌水乐园】发言


