


单元测试简述
开发人员在完成功能模块后,如何证明自己通过了自测,测试方法是怎样的。单元测试跟覆盖率则是一个很好的答案。其实开发过程中,大多数时间在做测试以调整代码,单元测试相比较postman,它集成在代码中,当其他研发人员拿到代码后可以快速的运行以验证结果,也能清晰的知道你的测试思路,每个单元测试的通过是迈向完整功能的重要一步。
测试思路:这个就要看你是乐观主义还是悲观主义者
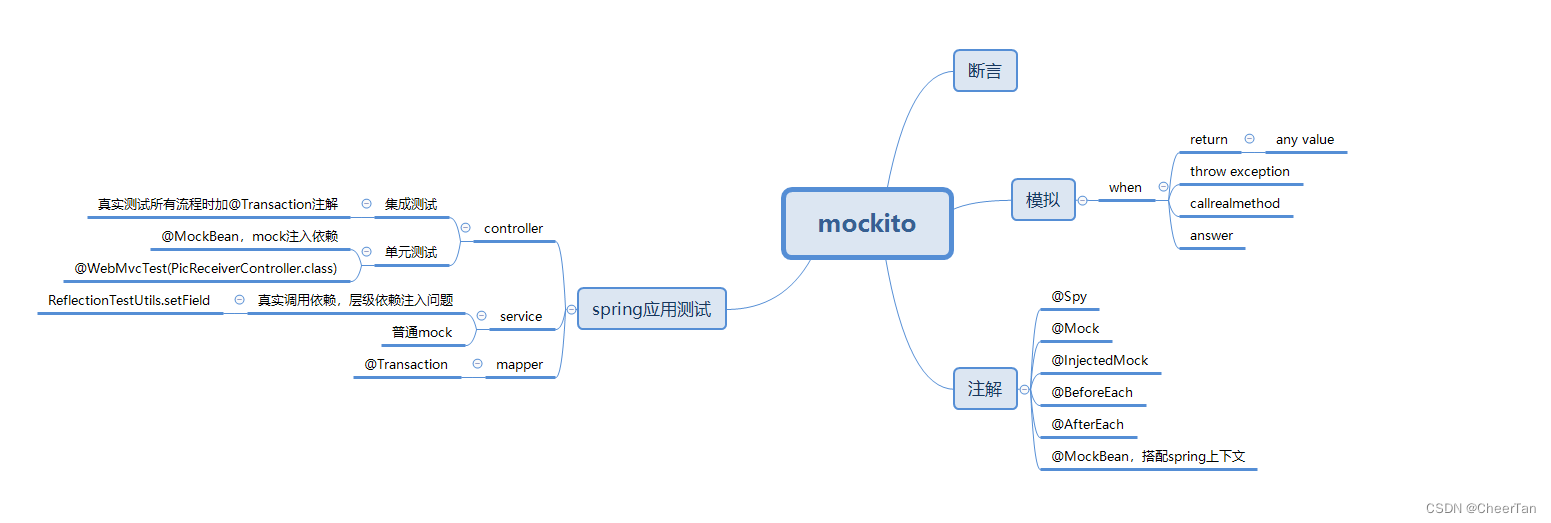
乐观主义的人会在完成controller后,最后再跑全流程,而悲观主义的人认为自己每一层代码都可能会出问题,先写一层测一层,但不变的是越往上层写,程序功能会变的更复杂,意味着你需要mock的对象会越多,要把握白盒测试的一个重要原则:做单元测试不需要spring上下文,即让spring来给你自动装载bean,需要的bean用mock替代,而当你写集成测试的时候,要去掉mock,确保每个方法有被调到。
知识图谱
创建Test
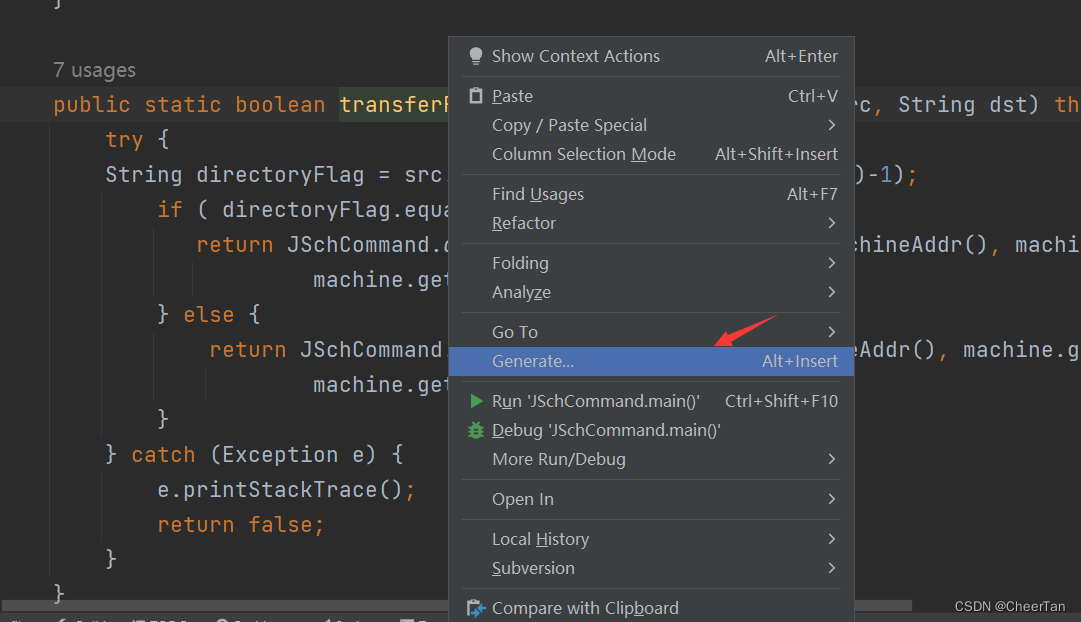
如果使用的是IDEA在方法里右击generate就可以快速生成test
在test目录可以看到生成的测试文件,此处以Mock Random为例进行介绍,
 @Test
    public void testWrongDst() {
    	//mock一个random类
        Random random = Mockito.mock(Random.class);
       //对特定方法nextInt()模拟返回为2,如果不做这个模拟返回,默认返回值为类型的初始值,如int则为0
        Mockito.when(random.nextInt()).thenReturn(2);
        assertEquals(2, random.nextInt());
        assertEquals(3, random.nextInt());
        //验证random方法的被调用,带times的方法可以验证该方法被调用的次数
        Mockito.verify(random).nextInt();
        Mockito.verify(random, Mockito.times(1)).nextInt();

    }
如果上述代码里mock random是所有测试都需要用到,配合@Mock的注解,将其放到@Before里,即每个用例的初始化动作
 @Mock
    private Random random;
@Before
    public void init() {
    	//如果是新版本mockito,则用的是openMocks,而不是initMocks
        MockitoAnnotations.initMocks(this);
        }
为特定输入抛出指定异常,要校验异常的产生需要利用try catch进行捕获校验,如果是void方法需要用到doThrow
 Mockito.when(schCommand.transferFiles(machine, "/root", "dst")).thenThrow(new RuntimeException());
        try {
            schCommand.transferFiles(machine, "/root", "dst");
        } catch (Exception ex) {
            assertTrue(ex instanceof RuntimeException);
        }
mock静态方法
mockito 3.4版本后可以使用mock静态方法
前提pom导入:
<dependency>
            <groupId>org.mockito</groupId>
            <artifactId>mockito-inline</artifactId>
            <version>4.6.0</version>
            <scope>test</scope>
        </dependency>
public class MD5Util {
public static String toHexString(byte[] data) {
        StringBuilder r = new StringBuilder(data.length * 2);
        for (byte b : data) {
            r.append(hexCode[(b >> 4) & 0xF]);
            r.append(hexCode[(b & 0xF)]);
        }
        return r.toString();
    }
}
测试代码
MockedStatic<MD5Util> md5UtilMockedStatic = Mockito.mockStatic(MD5Util.class);
            md5UtilMockedStatic.when(()-> MD5Util.toHexString(any())).thenReturn("mymock");
            System.out.println(MD5Util.toHexString(any()));
when使用方法
when后有4种处理情况,前三种的作用正如字面意思相对简单,都是根据触发条件执行相应动作,
- thenThrow,抛出指定异常
- thenCallRealMethod,调用mock对象的真实方法
- thenReturn,返回指定内容
- thenAnswer,根据不同入参可以做多个返回
thenAnswer相比较之前三种,它可以称为是返回和抛异常的结合体,它可以根据输入的值多少,做对应的返回(返回具体值或者抛出异常),可适配多个测试数据。先来看看when中的核心—条件判断,测试的方法请求入参可能是一个复合型的入参,如包含请求对象和字符串,这类该怎么根据请求对象的不同来做不同的mock,直接来看例子
所测对象
public class CreateSomething {
    public String doIt(ReceiveBody receiveBody, String user) {
        return receiveBody.getErrorCode();
    }

    public boolean find(String thing) {
        return true;
    }
}
入参对象
@Data
public class ReceiveBody {
    private String errorMsg;
    private String errorCode;
    private ReceiveData data;
}
主要测试的是doIt方法,如果想根据特定的ReceiveBody 入参做不同的返回,那可以先创建一个特定测试对象,再使用when进行指定返回,这里主要使用到的是ArgumentsMatchers,可根据该关键词去查询相应资料,其中切记需要用eq()来做匹配条件,而不是直接放置一个receiveBody,当在when里混用any()跟具体值时,会出现lnvalid use of argument matchers
//错误使用方法
Mockito.when(createSomething.doIt("mywords", anyString())).thenReturn("done");
//正确使用方法,需要搭配eq()
Mockito.when(createSomething.doIt(eq("mywords"), anyString())).thenReturn("done");
ReceiveBody receiveBody =  new ReceiveBody();
receiveBody.setErrorCode("200");
Mockito.when(createSomething.doIt(eq(receiveBody), anyString())).thenReturn("done");
如果想根据第二个String类型的入参进行指定返回,则只需这样,将对象用any()替代:
Mockito.when(createSomething.doIt(any(), eq("real"))).thenCallRealMethod();
最后来讲下thenAnswer,在answer方法里,可获取入参参数进行条件判断,再返回不同条件下的返回值,这样的好处是不用写很多thenReturn还有thenThrow
@Test
    void checkWhen() {
        ReceiveBody receiveBody =  new ReceiveBody();
        ReceiveBody secondBody =  new ReceiveBody();
        receiveBody.setErrorCode("200");
        secondBody.setErrorCode("second");
        Mockito.when(createSomething.find(anyString())).thenReturn(false);
        Assertions.assertFalse(createSomething.find("me"));
        Mockito.when(createSomething.doIt(eq(receiveBody), anyString())).thenReturn("done");
        Mockito.when(createSomething.doIt(any(), eq("real"))).thenCallRealMethod();
        Assertions.assertEquals("done", createSomething.doIt(receiveBody, "user"));
        Assertions.assertEquals("second", createSomething.doIt(secondBody, "real"));
        Mockito.when(createSomething.doIt(any(), anyString())).thenAnswer(new Answer<String>() {
            @Override
            public String answer(InvocationOnMock invocationOnMock) throws Throwable {
                Object[] args = invocationOnMock.getArguments();
                ReceiveBody rb = (ReceiveBody)args[0];
                String param = (String)args[1];
                if (param.equals("third")) {
                    return "third";
                }
                else if (param.equals("throw")) {
                    throw new RuntimeException("throw by answer");
                } else {
                    return "answer";
                }
            }
        });
        try {
            createSomething.doIt(receiveBody, "throw");
        } catch (Exception e) {
            Assertions.assertTrue(e instanceof RuntimeException);
        }
        Assertions.assertEquals("third", createSomething.doIt(receiveBody, "third"));
        Assertions.assertEquals("answer", createSomething.doIt(new ReceiveBody(), "any"));
    }
除thenAnswer可以集成多个返回外,跟return还有一个执行的区别
Public class User {
  public String getName() {
    return this.name;
  }
}

 // This is the test class which will test the User class
public class UserTest {

  private String dummyName() {
    System.out.println(" #dummyName called");
    return "Java";
 }

@Test
public void thenReturnTest() throws Exception {
  Tester mock = Mockito.mock(User.class);

  System.out.println("------ Using: thenReturn------ ");
  Mockito.when(mock.getName()).thenReturn(dummyName());

  System.out.println(" -- method calls");
  System.out.println("Call.1 : " + mock.getName());
  System.out.println("Call.2 : " + mock.getName());
  }

@Test
public void thenAnswerTest() throws Exception {
  Tester mock = Mockito.mock(User.class);

  System.out.println("------ Using: thenAnswer------ ");
  Mockito.when(mock.getName()).thenAnswer(i -> dummyName());

  System.out.println(" -- method calls");
  System.out.println("Call.1 : " + mock.getName());
  System.out.println("Call.2 : " + mock.getName());
  }
}
输出
—— Using: thenReturn——
— #dummyName called
— method calls
Call.1 : Java
Call.2 : Java
—— Using: thenAnswer——
— method calls
— #dummyName called
Call.1 : Java
— #dummyName called
Call.2 : Java
return的dummyName方法,它是在未实际调用前就去调用了,因为它是作为一个mock值进行返回,要事先存在,而answer的dummyName却调用了两次,因为它的核心内容是去执行mock的操作,来一次他就调用一遍。
controller层测试
核心步骤参照spring官网给出的,十分详细:testing-web
注意:测试controller的时候,一样要打上@Transaction的注解,这样的好处就是测试的时候不会往数据库里真实插数据,保证每次用例可以重复执行,不然当用例失败的时候清理数据也是很大的工作量。
controller
package com.example.testingweb;

import org.springframework.stereotype.Controller;
import org.springframework.web.bind.annotation.RequestMapping;
import org.springframework.web.bind.annotation.ResponseBody;

@Controller
public class HomeController {

	@RequestMapping("/")
	public @ResponseBody String greeting() {
		return "Hello, World";
	}

}
测试代码,这里一定要注意的是@Test必须是junit5,org.junit.jupiter.api.Test,如果你用的是4,就会出现mockMvc空指针的错误,不信你可以试试
package com.example.testingweb;

import static org.hamcrest.Matchers.containsString;
import static org.springframework.test.web.servlet.request.MockMvcRequestBuilders.get;
import static org.springframework.test.web.servlet.result.MockMvcResultHandlers.print;
import static org.springframework.test.web.servlet.result.MockMvcResultMatchers.content;
import static org.springframework.test.web.servlet.result.MockMvcResultMatchers.status;

import org.junit.jupiter.api.Test;

import org.springframework.beans.factory.annotation.Autowired;
import org.springframework.boot.test.autoconfigure.web.servlet.AutoConfigureMockMvc;
import org.springframework.boot.test.context.SpringBootTest;
import org.springframework.test.web.servlet.MockMvc;

@SpringBootTest
@AutoConfigureMockMvc
public class TestingWebApplicationTest {

	@Autowired
	private MockMvc mockMvc;

	@Test
	public void shouldReturnDefaultMessage() throws Exception {
		this.mockMvc.perform(get("/")).andDo(print()).andExpect(status().isOk())
				.andExpect(content().string(containsString("Hello, World")));
	}
}
因为加了springbootTest的注解,它创建了整个项目的spring bean,你可以自由的使用,但是如果你只想测试该controller,屏蔽掉一些依赖的注入呢,可以用以下的方法:@WebMvcTest(PicReceiverController.class),值得注意的是,一旦如此你就要为该controller类的依赖做mock注入, @MockBean private HelloService service;,再结合mockito中的when,对mock对象做特定的返回即可,这里一样可以做个实验,没有了SpringBootTest注解,再试试Autowired HelloService ,运行起来看下结果。
@WebMvcTest(PicReceiverController.class)
public class HelloControllerTest {

    @Autowired
    private MockMvc mockMvc;

    @MockBean
    private HelloService service;

    @Test
    public void shouldReturnDefaultMessage() throws Exception {
        this.mockMvc.perform(get("/greet")).andDo(print()).andExpect(status().isOk())
                .andExpect(content().string(containsString("Hello, World")));
        this.mockMvc.perform(get("/hello")).andDo(print()).andExpect(status().isOk())
                .andExpect(content().string(containsString("Hello, World")));
        #如果上述代码无法运行,使用下面的代码,value()是准确匹配,value(containsString())是返回包含,结合jsonpath
        mockMvc.perform(MockMvcRequestBuilders.get("/shop/{id}", 1))
               .andExpect(MockMvcResultMatchers.jsonPath("$.data.name", containsString("餐厅")))
               .andExpect(MockMvcResultMatchers.jsonPath("$.data.name").value("大关"))
               .andExpect(MockMvcResultMatchers.jsonPath("$.data.area").value(containsString("大")));


    }
}
数据层测试
一般写完mapper后,增删改查是逃不过的校验,如果真实往数据库里插难免会造成脏数据,springboot提供了很好的测试方法,只需要在测试类里加上@Transaction的注解,就能实现事务回滚,执行完用例不管结果如何,测试数据会自动回滚,不会在实际数据库里产生脏数据。
mapper接口:
import org.apache.ibatis.annotations.*;
import java.util.List;

@Mapper
public interface MachineMapper {


    /**
     *  machine_id BIGINT    COMMENT 'machneId' ,
     *     machine_user VARCHAR(32)    COMMENT '用户' ,
     *     machine_password VARCHAR(32)    COMMENT '' ,
     *     machine_addr VARCHAR(32)    COMMENT '' ,
     *     machine_name VARCHAR(32)    COMMENT '' ,
     *     port INT    COMMENT ''
     *
     *
     *     private  Long machineId;
     *
     *     private String machineUser;
     *
     *     private  String machinePassword;
     *
     *     private  String machineAddr;
     *
     *
     *     private String machineName;
     *     private Integer port;
     */

    @Select("select * from  machine  where machine_name  like  CONCAT('%',#{machineName},'%') ")
    List<Machine> findMachineByName(String  machineName);

    @Select("select * from  machine  where machine_addr  =  #{machineAddr} ")
    Machine findMachineByMachineAddr(String  machineAddr);

    @Select("select * from  machine  where machine_id  =  #{machineId} ")
    Machine findMachineByMachineId(Long  machineId);


    @InsertProvider(type = MachineProvider.class, method = "addMachine")
    @Options(useGeneratedKeys=true, keyProperty="machineId", keyColumn="machine_id")
    int addMachine(Machine machine);

    @UpdateProvider(type = MachineProvider.class, method = "updateMachine")
    int updateMachine(Machine machine);

    @DeleteProvider(type = MachineProvider.class, method = "deleteMachine")
    int deleteMachine(Long machineId);

}
实现类
import org.apache.ibatis.jdbc.SQL;
import java.util.Date;

public class MachineProvider {
    /**
     * @todo
     * insert into data
     */

    public String addMachine(Machine machine) {
        String machineAddr = machine.getMachineAddr();
        String machineName = machine.getMachineName();
        String machinePassword = machine.getMachinePassword();
        String machineUser = machine.getMachineUser();
        Integer port = machine.getPort();
        return new SQL() {
            {
                INSERT_INTO("machine");
                if (machineAddr != null) {
                    VALUES("machine_addr","#{machineAddr}");
                }
                if (machineName != null) {
                    VALUES("machine_name", "#{machineName}");
                }
                if (machinePassword != null) {
                    VALUES("machine_password", "#{machinePassword}");
                }
                if (machineUser != null) {
                    VALUES("machine_user", "#{machineUser}");
                }
                if (port != null) {
                    VALUES("port", "#{port}");
                }

                Date now = new Date();
                machine.setCreatedTime(now);
                machine.setUpdatedTime(now);
                VALUES("created_time", "#{createdTime}");
                VALUES("updated_time", "#{updatedTime}");

            }

        }.toString();
    }


    public String updateMachine(Machine machine) {
        String machineAddr = machine.getMachineAddr();
        String machineName = machine.getMachineName();
        String machinePassword = machine.getMachinePassword();
        String machineUser = machine.getMachineUser();
        Integer port = machine.getPort();
        return new SQL() {
            {
                UPDATE("machine");
                if (machineAddr != null) {
                    SET("machine_addr = #{machineAddr}");
                }
                if (machineName != null) {
                    SET("machine_name = #{machineName}");
                }
                if (machinePassword != null) {
                    SET("machine_password = #{machinePassword}");
                }
                if (machineUser != null) {
                    SET("machine_user = #{machineUser}");
                }
                if (port != null) {
                    SET("port = #{port}");
                }

                Date now = new Date();
                machine.setUpdatedTime(now);
                SET("updated_time=#{updatedTime}");
                WHERE("machine_id = #{machineId}");
            }
        }.toString();
    }


    public String deleteMachine(Long machineId) {
        return new SQL() {
            {
                DELETE_FROM("machine");
                WHERE("machine_id = #{machineId}");
            }
        }.toString();
    }

}
测试代码:
import org.junit.jupiter.api.Assertions;
import org.junit.jupiter.api.Test;
import org.springframework.beans.factory.annotation.Autowired;
import org.springframework.boot.test.context.SpringBootTest;
import org.springframework.transaction.annotation.Transactional;

/**
 * @author Cheertan
 * @date 2022-11-14
 */

@SpringBootTest
@Transactional
public class MapperTest {

    @Autowired
    private MachineMapper machineMapper;

    @Test
    void insertTest() {
        Machine machine = new Machine();
        machine.setMachineAddr("192.168.119.203");
        machine.setMachineName("testMyself");
        machine.setMachineUser("admin");
        machine.setMachinePassword("ps");
        machine.setPort(22);
        this.machineMapper.addMachine(machine);
        Machine result = machineMapper.findMachineByMachineAddr("192.168.119.203");
        Assertions.assertEquals("testMyself", result.getMachineName());
        machine.setMachineName("update");
        this.machineMapper.updateMachine(machine);
        Assertions.assertEquals("update", this.machineMapper.findMachineByName("update").get(0).getMachineName() );
        Assertions.assertEquals(1, this.machineMapper.deleteMachine(result.getMachineId()));
    }

    @Test
    void findTest() {
        Machine result = machineMapper.findMachineByMachineAddr("192.168.119.203");
        Assertions.assertNull(result);
    }

}
上述代码测试了增删改查,如果你怀疑数据回滚的真实性,可以把insertTest中的删除数据代码删除,结合findTest就可以知道是否回滚了。
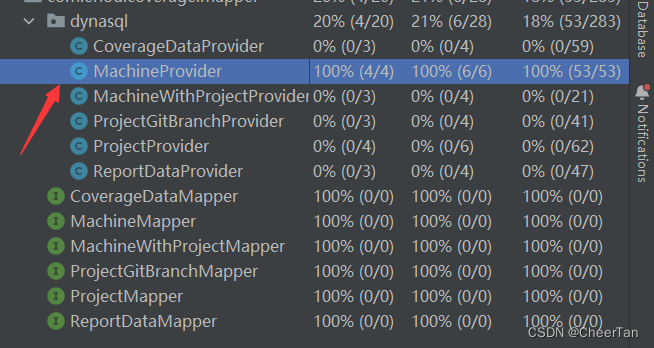
一个好的单元测试的基本目标:语句覆盖率达到70%;核心模块的语句覆盖率和分支覆盖率都要100%,结合idea工具可以直观的看到自己的覆盖率情况。当然覆盖率高并不代表代码质量就高,毕竟代码写的越少,越容易得到高覆盖率,核心还是在于代码实现功能的时候是否把各个方面都考虑到了,单元测试只是辅助验证,如果测试设计得当也能促进代码改进,知道哪些是欠考虑的。

service层测试
service层往往单类会依赖许多其他的类方法,此时就要用到InjectMocks和mock注解的搭配使用,还是来看例子比较直观,代码里依赖了一个MachineMapper ,在测试service的时候,我们并不关注mapper的实际执行,所以要将其mock,通过when的方式赋值mapper的返回,而测试对象MachineServiceImpl 的启动又依赖于MachineMapper ,此时InjectMocks就大显身手了
@Service
@Slf4j
public class MachineServiceImpl  implements MachineService {

    @Autowired

    private MachineMapper machineMapper;
    @Override
    public List<Machine> addMachineList(List<Machine> machineList) {

        List<Machine> machines= new ArrayList<>();
        for(Machine machine : machineList){

            try{

                int i = machineMapper.addMachine(machine);
                machines.add(machine);

            }catch (Exception e){
                e.printStackTrace();
                log.error("入库 {} 失败 ", JSONObject.toJSONString(machine));
            }


        }
             return   machines;

    }
}
测试代码:
public class MachinceServiceTest {

    private Machine machine;

    @InjectMocks
    private MachineServiceImpl machineService;
    @Mock
    private MachineMapper machineMapper;

    @Before
    public void init() {
        machine = new Machine();
        machine.setMachineAddr("192.168.444.11");
        machine.setMachineUser("mytester");
        machine.setMachinePassword("testjava");
        machine.setPort(22);
        MockitoAnnotations.initMocks(this);
    }

    @Test
    public void testAdd() throws Exception {
        ArrayList<Machine> machines =  new ArrayList<>();
        machines.add(machine);
//        Mockito.when(machineMapper.addMachine(any())).thenReturn(1);
        Mockito.when(machineMapper.addMachine(any())).thenThrow(new RuntimeException("homemade"));
        try {
            List<Machine> result = machineService.addMachineList(machines);
        } catch (Exception e) {
            e.printStackTrace();
        }
    }

}
上述的演示显得有些简单,因为service依赖的mapper并不依赖其他对象,假如有这样一个场景,A是最高应用层,注入了B,而B又注入了C,大多数时候,我们Mock了B,对其打桩返回给A,但假如在特定场景下,我们想让B真实的执行一下方法进行返回,此时就需要依赖C,这时候该怎么处理,答案是ReflectionTestUtils.setField()方法。
举个例子:
@Service
public class FirstService {
    public String greet() {
        System.out.println("hello it's me");
        return "this is first";
    }
}

@Service
public class SecondService {
    @Autowired
    private FirstService firstService;
    public String hey() {
        return this.firstService.greet();
    }
}

@Service
public class ThirdService {
    @Autowired
    private SecondService secondService;

    public String say() {
        return (this.secondService.hey());
    }
}
以上ThirdService是我们真正想要测试的,测试ThirdService.say方法的时候,我想让他真正的调用SecondService的hey方法,而SecondService又依赖于FirstService的注入,所以用ReflectionTestUtils.setField(secondService, “firstService”, firstService);给他加上即可,这时候你可以对FirstService greet()方法进行mock,也可以像我一样,也让他去调自己真实的方法,FirstService并没有依赖于任何对象,所以他可以成功被执行,那么如果FirstService也依赖一个ZeroService呢,这个问题就交给你来尝试啦。
injectedmock教程,提到了多依赖的问题
reflection-test-utils教程
public class ThirdServiceTest {

    @Mock
    private FirstService firstService;


    @Mock
    private SecondService secondService;


    @InjectMocks
    private ThirdService thirdService;

    @BeforeEach
    void init() {

        MockitoAnnotations.initMocks(this);
    }

    @Test
    void serviceTest() {
        Mockito.when(secondService.hey()).thenCallRealMethod();
        Mockito.when(firstService.greet()).thenCallRealMethod();
        ReflectionTestUtils.setField(secondService, "firstService", firstService);
        String r = thirdService.say();
        System.out.println(r);
    }


}
相比较ReflectionTestUtils.setField(),还有一个更为优雅的方式,加一个注解:@ExtendWith(MockitoExtension.class)
import org.junit.jupiter.api.BeforeEach;
import org.junit.jupiter.api.Test;
import org.junit.jupiter.api.extension.ExtendWith;
import org.mockito.InjectMocks;
import org.mockito.Mock;
import org.mockito.MockitoAnnotations;
import org.mockito.Spy;
import org.mockito.junit.jupiter.MockitoExtension;

import static org.junit.jupiter.api.Assertions.*;
@ExtendWith(MockitoExtension.class)
class ThirdServiceTest {

    @InjectMocks
    private ThirdService thirdService;

    @Mock
    private FirstService firstService;

    @InjectMocks
    @Spy
    private SecondService secondService;


    @BeforeEach
    void init() {
        MockitoAnnotations.openMocks(this);
    }


    @Test
    void say() {
        System.out.println(thirdService.say());
    }
}
打上@Spy,@Mock的对象可以注入到任何加了@InjectMocks注解的地方,此处firstService注入了secondService,因为secondService加了@spy注解,它可以注入到thirdService中
参看此文:谈一谈单元测试
集成测试
这里要起到的效果就是替代postman,所有服务参与测试,从controller作为入口去测试,当然你也可能只是想测试一下controller,其他依赖则需要mock出来,可以参看这里的代码:邱明JAVAEE课程代码
报错:
java.lang.NullPointerException
    at com.alibaba.druid.support.http.WebStatFilter.doFilter(WebStatFilter.java:94)
    at org.springframework.test.web.servlet.setup.PatternMappingFilterProxy.doFilter(PatternMappingFilterProxy.java:101)
    at org.springframework.mock.web.MockFilterChain.doFilter(MockFilterChain.java:134)
    at org.springframework.boot.actuate.trace.WebRequestTraceFilter.doFilterInternal(WebRequestTraceFilter.java:108)
    at org.springframework.web.filter.OncePerRequestFilter.doFilter(OncePerRequestFilter.java:107)
    ……
加上以下注解即可:@SpringBootTest(webEnvironment = SpringBootTest.WebEnvironment.RANDOM_PORT)
SpringBootTest注解默认使用 webEnvironment = WebEnvironment.MOCK,它是不会对Filter、Servlet进行初始化的。
显示设置 webEnvironment 如下即可:
@SpringBootTest(webEnvironment = SpringBootTest.WebEnvironment.RANDOM_PORT)
import com.alibaba.fastjson.JSONObject;
import com.erlou.coverage.entity.Machine;
import com.erlou.coverage.service.MachineService;
import org.junit.jupiter.api.Test;
import org.springframework.beans.factory.annotation.Autowired;
import org.springframework.boot.test.autoconfigure.web.servlet.AutoConfigureMockMvc;
import org.springframework.boot.test.context.SpringBootTest;
import org.springframework.test.web.servlet.MockMvc;
import org.springframework.test.web.servlet.result.MockMvcResultMatchers;
import org.springframework.transaction.annotation.Transactional;
import java.util.ArrayList;
import java.util.List;

import static org.springframework.test.web.servlet.request.MockMvcRequestBuilders.post;
import static org.springframework.test.web.servlet.result.MockMvcResultMatchers.content;
import static org.hamcrest.CoreMatchers.is;
/**
 * @author Cheertan
 * @date 2022-11-14
 */
@SpringBootTest(webEnvironment = SpringBootTest.WebEnvironment.RANDOM_PORT)
@AutoConfigureMockMvc
@Transactional
public class MachineControllerTest {
    @Autowired
    private MachineService machineService;

    @Autowired
    private MockMvc mockMvc;

    @Test
    void addMachineListTest() throws Exception{
        Machine machine = new Machine();
        machine.setMachineAddr("192.168.119.203");
        machine.setMachineName("testMyself");
        machine.setMachineUser("admin");
        machine.setMachinePassword("ps");
        machine.setPort(22);
        List<Machine> machineList = new ArrayList<>();
        machineList.add(machine);

        String transferRequestJson = JSONObject.toJSONString(machineList);
        String response = this.mockMvc.perform(post("/coverage/addMachineList").contentType("application/json;charset=UTF-8")
                        .content(transferRequestJson))
                .andExpect(content().contentType("application/json"))
                .andExpect(MockMvcResultMatchers.jsonPath("$.errorMsg", is("success")))
                .andReturn().getResponse().getContentAsString();
        System.out.println(response);
    }
}
这里用到了MockMvcResultMatchers.jsonPath(“$.errorMsg”, is(“success”)),更多的使用教程参看这里:
spring jsonpath
@MockBean,@Mock,@InjectMocks区别
看完上述的代码,可能你会有疑惑,MockBean跟InjectMocks同样是mock依赖注入,有何不同
@MockBean要跟@Autowired配合用,意味着要启动spring
而@InjectMocks跟@Mock配合用时,它并不需要spring,记住下面两句话
Usually when you are unit testing, you shouldn’t initialize Spring context. So remove Autowiring.
Usually when you do integration testing, you should use real dependencies. So remove mocking.
其他教程
以上写的测试代码大的框架可以直接用idea中的testme插件一键生成
多测试参数教程
spring官方提供了很详细的从controller到mapper的测试教程,在以下列表里去找寻自己对应的特定章节即可Testing


 643
643


 被折叠的 条评论
为什么被折叠?
被折叠的 条评论
为什么被折叠?
 到【灌水乐园】发言


