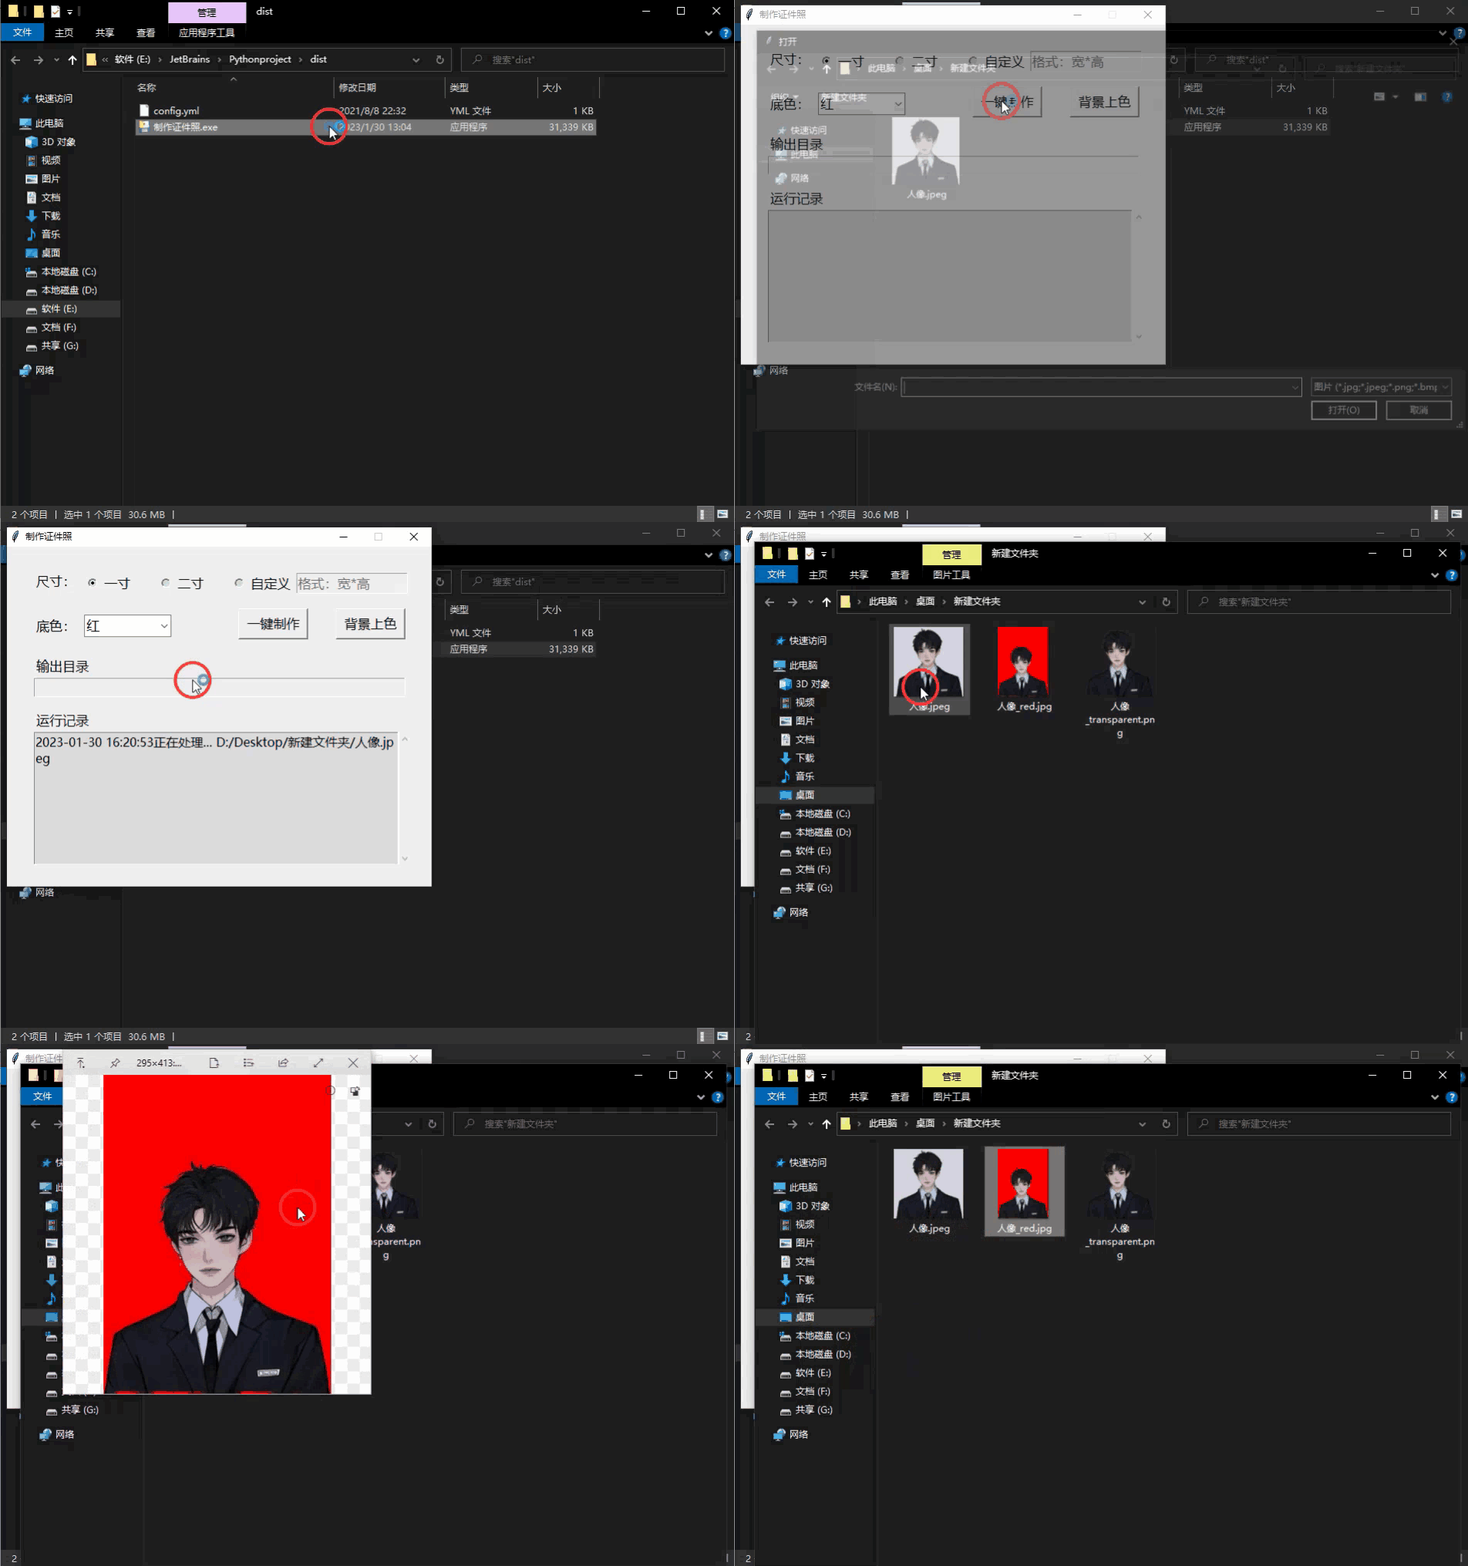
很多人可能不信,啥脚本啊 居然能赚这么多,那么今天就给大家详细的介绍一下咱们今天要分享的这个脚本究竟是啥,在工作和生活中,我们有时需要上传证件照,比如办理入职,办理各种证件。现在市面上也有很多软件,但是每次动辄几元/张的价格让我望而却步,接下来我们就使用python自己制作一款工具。五毛一张的证件照,你整不觉得贵了吧?两毛一张呢?所以今天这个Python脚本大家都可以拿去用,同事,朋友不都可以免费整吗!

思路很简单
第一步抠图。抠出照片中的人像,可以直接使用云服务api,例如:百度云、腾讯云等,本文使用了腾讯云二分类人像分隔服务。进入控制台,云产品,人体分析,二分类人像分隔
第二步添加底色。给人像图片空白处添加需要的背景颜色
第三步绘制界面。给程序绘制一个操作界面

如果像上图一键制作出来的图片有瑕疵,可以将后缀为transparent.png的透明人像进行裁剪,然后再进行背景上色。使用背景上色功能必须是透明人像PNG图片
代码细节就不一一给大家分享讲解了!
所以还是贴上今天脚本的全部代码吧!~
#!/usr/bin/env python
#需要视频讲解教程加下Q群:712623775
# -*- coding:utf-8 -*-
# File:bda.py
from tencentcloud.common import credential
from tencentcloud.common.profile.client_profile import ClientProfile
from tencentcloud.common.profile.http_profile import HttpProfile
from tencentcloud.common.exception.tencent_cloud_sdk_exception import TencentCloudSDKException
from tencentcloud.bda.v20200324 import bda_client, models
import base64
import yaml
import os
from PIL import Image, ImageChops
from io import BytesIO


# 人像分割
def ta(out_path, image_path, secret_id, secret_key):
    try:
        # 实例化一个认证对象,入参需要传入腾讯云账户secretId,secretKey,此处还需注意密钥对的保密
        # 密钥可前往https://console.cloud.tencent.com/cam/capi网站进行获取
        cred = credential.Credential(secret_id, secret_key)
        # 实例化一个http选项,可选的,没有特殊需求可以跳过
        httpProfile = HttpProfile()
        httpProfile.endpoint = "bda.tencentcloudapi.com"

        # 实例化一个client选项,可选的,没有特殊需求可以跳过
        clientProfile = ClientProfile()
        clientProfile.httpProfile = httpProfile
        # 实例化要请求产品的client对象,clientProfile是可选的
        client = bda_client.BdaClient(cred, "ap-shanghai", clientProfile)

        # 实例化一个请求对象,每个接口都会对应一个request对象
        req = models.SegmentPortraitPicRequest()
        with open(image_path, 'rb') as f:
            image = f.read()
            # 图片base64数据
            image_base64 = str(base64.b64encode(image), encoding='utf-8')
        req.Image = image_base64

        # 返回的resp是一个SegmentPortraitPicResponse的实例,与请求对象对应
        resp = client.SegmentPortraitPic(req)

        data = resp.ResultImage
        new_path = os.path.splitext(out_path)[0] + "_transparent.png"
        with open(new_path, 'wb') as f:
            f.write(base64.b64decode(data))
        return base64.b64decode(data)

    except TencentCloudSDKException as err:
        print(err)


def get_secret_data():
    """
    方法一:
    将密钥存储在本地yaml文件中,同级目录下config.yml
    """
    # 打开yaml文件
    with open("config.yml", 'r', encoding="utf-8") as file:
        file_data = file.read()
        # 将字符串转化为字典或列表
        data = yaml.load(file_data, Loader=yaml.FullLoader)
    """
    方法二:
    如果想要确保密钥安全,可以设置系统环境变量方式存储密钥
    ①变量名:TENCENTCLOUD_API_ID
    变量值:你的腾讯云账户secretId
    ②变量名:TENCENTCLOUD_API_KEY
    变量值:你的腾讯云账户secretKey
    """
    # data = {'secret_id': os.getenv('TENCENTCLOUD_API_ID'),
    #         'secret_key': os.getenv('TENCENTCLOUD_API_KEY')}
    return data


def crop_image(im):
    ''' 裁剪图片边缘空白 '''
    bg = Image.new(mode='RGBA', size=im.size)
    bbox = ImageChops.difference(im, bg).getbbox()
    if bbox:
        return im.crop(bbox)
    return im


def im_add(color, size, img, out_path):
    """ 合并底色背景和人像 """
    # 裁剪空白
    fore = crop_image(img)
    # 获取人像和背景底色宽高
    w, h = fore.size
    w1, h1 = size[0], size[1]
    # 缩放人像到合适大小
    if w > w1:
        h = int(w1/w*h)
        w = w1
    person = fore.resize((w, h))
    # 分离图片
    r, g, b, a = person.split()
    # 创建底色背景图片
    bg_img = Image.new(mode="RGBA", size=size, color=color)
    # 将处理后的人像粘贴到底色背景上
    bg_img.paste(person, (0, abs(h-h1)), mask=a)
    new_path = os.path.splitext(out_path)[0] + "_" + color + ".jpg"
    bg_img.convert('RGB').save(new_path)


def im_online(color, size, file, out_path):
    try:
        config = get_secret_data()
        img_b64 = ta(out_path, file, config['secret_id'], config['secret_key'])
        # 将base64转成Image对象
        img = BytesIO(img_b64)
        img = Image.open(img).convert('RGBA')
        im_add(color, size, img, out_path)
        return "制作完成"
    except Exception as err:
        return err


def im_offline(color, size, file, out_path):
    try:
        img = Image.open(file).convert('RGBA')
        im_add(color, size, img, out_path)
        return "背景上色完成"
    except Exception as err:
        return err
腾讯云账号配置,config.yml
# -*- coding: utf-8 -*-
secret_id: 你的腾讯云账户secretId
secret_key: 你的腾讯云账户secretKey
界面及接口调用,制作证件照.py
#!/usr/bin/env python
# -*- coding:utf-8 -*-
# File:制作证件照.py

import tkinter as tk
import tkinter.colorchooser as tc
from tkinter import ttk
import platform
import os
import tkinter.filedialog as tf
import bda
import re
import time


class MyGUI(object):
    def __init__(self, init_window_name):
        self.init_root = init_window_name

    # 界面组件
    def init_window(self, width, height):
        screen_width = self.init_root.winfo_screenwidth()  # 获取屏幕宽度
        screen_height = self.init_root.winfo_screenheight() - 50  # 获取屏幕(减去任务栏)高度
        menu_x = int((screen_width - width) / 2)
        menu_y = int((screen_height - height) / 2)
        self.init_root.geometry("%sx%s+%s+%s" % (width, height, menu_x, menu_y))
        self.init_root.resizable(0, 0)
        self.init_root.title("制作证件照")

        size_label = tk.Label(self.init_root, text="尺寸:", font=("微软雅黑", 13, ""))
        size_label.place(x=35, y=30)
        # 单选框
        frm = tk.Frame(self.init_root)
        self.checkSize = tk.IntVar()
        self.checkSize.set(0)
        size_text1 = tk.Radiobutton(frm, text='一寸', font=("微软雅黑", 13, ""), variable=self.checkSize,
                                    command=self.size_choose, value=0)
        size_text2 = tk.Radiobutton(frm, text='二寸', font=("微软雅黑", 13, ""), variable=self.checkSize,
                                    command=self.size_choose, value=1)
        size_text3 = tk.Radiobutton(frm, text='自定义', font=("微软雅黑", 13, ""), variable=self.checkSize,
                                    command=self.size_choose, value=2)
        size_text1.grid(row=0, column=0)
        size_text2.grid(row=0, column=1, padx=30)
        size_text3.grid(row=0, column=2)
        frm.place(x=100, y=30)
        self.size_text = tk.Entry(self.init_root, width=14, font=("微软雅黑", 13, ""))
        self.size_text.insert(0, "格式:宽*高")
        self.size_text.configure(state=tk.DISABLED)
        self.size_text.place(x=375, y=34)

        color_label = tk.Label(self.init_root, text="底色:", font=("微软雅黑", 13, ""))
        color_label.place(x=35, y=88)
        # 下拉框
        self.value = tk.StringVar(self.init_root)
        self.combox = ttk.Combobox(
            self.init_root,
            font=("微软雅黑", 13, ""),
            width=9,
            state="readonly",
            textvariable=self.value,
            values=["红", "白", "蓝", "自定义"],
        )
        self.combox.current(0)
        self.combox.place(x=100, y=88)
        self.combox.bind("<<ComboboxSelected>>", self.color_fnc)
        self.custom_color = tk.Label(self.init_root, width=5, font=("微软雅黑", 13, ""))

        btn = tk.Button(root, text="一键制作", width=8, font=("微软雅黑", 13, ""), command=self.fastboot)
        btn.place(x=300, y=80)

        btn = tk.Button(root, text="背景上色", width=8, font=("微软雅黑", 13, ""), command=self.colour)
        btn.place(x=426, y=80)

        output_label = tk.Label(self.init_root, text="输出目录", font=("微软雅黑", 13, ""))
        output_label.place(x=35, y=140)
        self.output_text = tk.Entry(self.init_root, width=53, state=tk.DISABLED, font=("微软雅黑", 12, ""), cursor="arrow", bg="#DCDCDC")
        self.output_text.place(x=35, y=170)  # 输出框
        self.output_text.bind("<Double-Button-1>", self.double)

        log_label = tk.Label(self.init_root, text="运行记录", font=("微软雅黑", 13, ""))
        log_label.place(x=35, y=210)
        frm1 = tk.Frame(self.init_root)
        # 滚动条
        sbar = tk.Scrollbar(frm1)
        sbar.pack(side=tk.RIGHT, fill=tk.Y)
        self.log_text = tk.Text(frm1, yscrollcommand=sbar.set, state=tk.DISABLED,
                           width=52, height=8, font=("微软雅黑", 12, ""), bg="#DCDCDC")
        self.log_text.pack()  # 日志框
        sbar.config(command=self.log_text.yview)
        frm1.place(x=35, y=240)

    # 功能函数
    def size_choose(self):
        checksize = self.checkSize.get()
        if checksize == 2:
            self.size_text.configure(state=tk.NORMAL)
            self.size_text.delete(0, tk.END)
        else:
            self.size_text.delete(0, tk.END)
            self.size_text.insert(0, "格式:宽*高")
            self.size_text.configure(state=tk.DISABLED)

    set_color = "red"
    def color_fnc(self, *agrs):
        global set_color
        checkcolor = self.value.get()
        if checkcolor == "自定义":
            set_color = tc.askcolor()[1]
            if set_color is None:
                self.combox.current(0)
                self.custom_color.place_forget()
                return True
            self.custom_color.place(x=220, y=88)
            self.custom_color.config(bg=set_color)
        else:
            self.custom_color.place_forget()

    def double(self, *args):
        fp = self.output_text.get()
        if fp is None or fp == "":
            return
        systemType = platform.system()  # 获取系统类型
        if 'Windows' in systemType:  # 判断以下当前系统类型
            fp = fp.replace("/", "\\")  # win系统下,有时`/`路径打不开
            os.startfile(fp)

    def write_log(self, msg):
        self.log_text['state'] = tk.NORMAL
        current_time = time.strftime('%Y-%m-%d %H:%M:%S', time.localtime(time.time()))
        msg = str(current_time) + "" + str(msg) + '\n'
        self.log_text.insert(tk.END, msg)
        self.log_text['state'] = tk.DISABLED

    def choose_value(self):
        global size, color
        err = 1
        # 尺寸选择
        checksize = self.checkSize.get()
        if checksize == 0:
            size = (295, 413)
        elif checksize == 1:
            size = (413, 579)
        else:
            if re.match(r'\d+[*](\d+)$', self.size_text.get()) is None:
                self.write_log("请按照格式正确填写尺寸")
                err = 0
            else:
                w, h = self.size_text.get().split("*")
                size = (int(w), int(h))
        checkcolor = self.value.get()
        if checkcolor == "红":
            color = "red"
        elif checkcolor == "白":
            color = "white"
        elif checkcolor == "蓝":
            color = "blue"
        else:
            color = set_color
        return err

    def fastboot(self):
        err = self.choose_value()
        if err == 0:
            return True
        files = tf.askopenfilenames(filetypes=[("图片", "*.jpg"),
                                               ("图片", "*.jpeg"),
                                               ("图片", "*.png"),
                                               ("图片", "*.bmp")])
        for file in files:
            self.write_log("正在处理... " + file)
            self.init_root.update()  # 用于更新tkinter组件或组件属性
            out = file
            tip = bda.im_online(color, size, file, out)
            self.write_log(tip)
            self.output_text['state'] = tk.NORMAL
            self.output_text.delete(0, tk.END)
            self.output_text.insert(0, os.path.split(file)[0])
            self.output_text['state'] = tk.DISABLED

    def colour(self):
        err = self.choose_value()
        if err == 0:
            return True
        files = tf.askopenfilenames(filetypes=[("图片", "*.png")])
        for file in files:
            self.write_log("正在处理... " + file)
            self.init_root.update()  # 用于更新tkinter组件或组件属性
            out = file
            tip = bda.im_offline(color, size, file, out)
            self.write_log(tip)
            self.output_text['state'] = tk.NORMAL
            self.output_text.delete(0, tk.END)
            self.output_text.insert(0, os.path.split(file)[0])
            self.output_text['state'] = tk.DISABLED


if __name__ == '__main__':
    root = tk.Tk()
    MyGUI(root).init_window(550, 440)
root.mainloop()程序打包,自定义打包后的程序图标,-i 图标路径
pyinstaller -w -F 制作证件照.py到这里就完美的结束了,需要完整的项目思路讲解教学视频可关注下方小卡片哦!


 1万+
1万+


 被折叠的 条评论
为什么被折叠?


