


目录
1、查看linux内核版本。(使用 root 权限登录 Centos ):
11-3、如果有 daemon.json 文件,修改即可,如果没有,以下命令操作保存后会自动生成此文件。
前置条件
Docker 是一个开源的商业产品,有两个版本:社区版(Community Edition,缩写为 CE)和企业版(Enterprise Edition,缩写为 EE)。企业版包含了一些收费服务,个人开发者一般用不到。下面的介绍都针对社区版。
Docker CE 的安装请参考官方文档, 我们这里以CentOS为例:Docker 要求 CentOS 系统的内核版本高于 3.10
前置知识
1、docker是个大容器,先下载安装。
2、docker中可以使用docker命令安装images(镜像),可以是java,nginx,rabbitMQ等等待运行程序。
3、把image用docker命令运行起来后,意味着image(镜像)进到一个container(容器)中运行了,即container1里运行着nginx,container2中运行着nacos等等。docker中运行着多个container
一、安装命令
1、查看linux内核版本。(使用 root 权限登录 Centos ):
uname -r
[root@iZgia1btkivmb2Z ~]# uname -r #查看linux内核版本
3.10.0-957.21.3.el7.x86_64         #结果
[root@iZgia1btkivmb2Z ~]# 2、确保yum包更新到最新:
yum -y update
[root@iZgia1btkivmb2Z ~]# yum -y update
已加载插件:fastestmirror
Loading mirror speeds from cached hostfile
正在解决依赖关系
--> 正在检查事务
---> 软件包 GeoIP.x86_64.0.1.5.0-13.el7 将被 升级
---> 软件包 GeoIP.x86_64.0.1.5.0-14.el7 将被 更新
......
完毕!
[root@iZgia1btkivmb2Z ~]#3、卸载旧版本(如果安装过旧版本的话):
sudo yum remove -y docker*
[root@iZgia1btkivmb2Z ~]# sudo yum remove -y docker*
已加载插件:fastestmirror
参数 docker* 没有匹配
不删除任何软件包
[root@iZgia1btkivmb2Z ~]# 4、安装需要的软件包
yum-util 提供yum-config-manager功能,另外两个是devicemapper驱动依赖的:
yum install -y yum-utils
[root@iZgia1btkivmb2Z ~]# yum install -y yum-utils
已加载插件:fastestmirror
Loading mirror speeds from cached hostfile
正在解决依赖关系
--> 正在检查事务

完毕!
[root@iZgia1btkivmb2Z ~]# 5、设置yum源,并更新 yum 的包索引
sudo yum-config-manager --add-repo http://mirrors.aliyun.com/docker-ce/linux/centos/docker-ce.repo
[root@iZgia1btkivmb2Z ~]# sudo yum-config-manager --add-repo http://mirrors.aliyun.com/docker-ce/linux/centos/docker-ce.repo
已加载插件:fastestmirror
adding repo from: http://mirrors.aliyun.com/docker-ce/linux/centos/docker-ce.repo
grabbing file http://mirrors.aliyun.com/docker-ce/linux/centos/docker-ce.repo to /etc/yum.repos.d/docker-ce.repo
repo saved to /etc/yum.repos.d/docker-ce.repo
[root@iZgia1btkivmb2Z ~]#
yum makecache fast
[root@iZgia1btkivmb2Z ~]# yum makecache fast
已加载插件:fastestmirror
Loading mirror speeds from cached hostfile
......
元数据缓存已建立
[root@iZgia1btkivmb2Z ~]#6、查看所有仓库中所有docker版本,并选择特定版本安装
yum list docker‐ce ‐‐showduplicates | sort ‐r
[root@iZgia1btkivmb2Z ~]# yum list docker-ce --showduplicates | sort -r
已加载插件:fastestmirror
可安装的软件包
Loading mirror speeds from cached hostfile
docker-ce.x86_64            3:20.10.9-3.el7                     docker-ce-stable
docker-ce.x86_64            3:20.10.8-3.el7                     docker-ce-stable
docker-ce.x86_64            3:20.10.7-3.el7                     docker-ce-stable
docker-ce.x86_64            3:20.10.6-3.el7                     docker-ce-stable
[root@iZgia1btkivmb2Z ~]# 7、安装docker
yum install -y docker-ce-3:19.03.9-3.el7.x86_64
[root@iZgia1btkivmb2Z ~]# yum install -y docker-ce-3:19.03.9-3.el7.x86_64
已加载插件:fastestmirror
Loading mirror speeds from cached hostfile
正在解决依赖关系
--> 正在检查事务
---> 软件包 docker-ce.x86_64.3.19.03.9-3.el7 将被 安装

完毕!
[root@iZgia1btkivmb2Z ~]#
8、启动docker
systemctl start docker
[root@iZgia1btkivmb2Z ~]# systemctl start docker 9、设置开机自动启动
systemctl enable docker
10、查看版本信息:
(有client和service两部分表示docker安装启动都成功了 )
docker version
[root@iZgia1btkivmb2Z ~]# docker version
Client: Docker Engine - Community
 Version:           20.10.16
 API version:       1.40
 Go version:        go1.17.10
 Git commit:        aa7e414
 Built:             Thu May 12 09:19:45 2022
 OS/Arch:           linux/amd64
 Context:           default
 Experimental:      true

Server: Docker Engine - Community
 Engine:
  Version:          19.03.9
  API version:      1.40 (minimum version 1.12)
  Go version:       go1.13.10
  Git commit:       9d988398e7
  Built:            Fri May 15 00:24:05 2020
  OS/Arch:          linux/amd64
  Experimental:     false
 containerd:
  Version:          1.6.4
  GitCommit:        212e8b6fa2f44b9c21b2798135fc6fb7c53efc16
 runc:
  Version:          1.1.1
  GitCommit:        v1.1.1-0-g52de29d
 docker-init:
  Version:          0.18.0
  GitCommit:        fec3683
[root@iZgia1btkivmb2Z ~]#
11、配置docker镜像加速器
11-1 登录阿里云
(https://cr.console.aliyun.com/#/accelerator):这部分不清楚可以自行查阅如何获得镜像加速器地址等问题,红框内为可用镜像加速器地址,之后会用到。
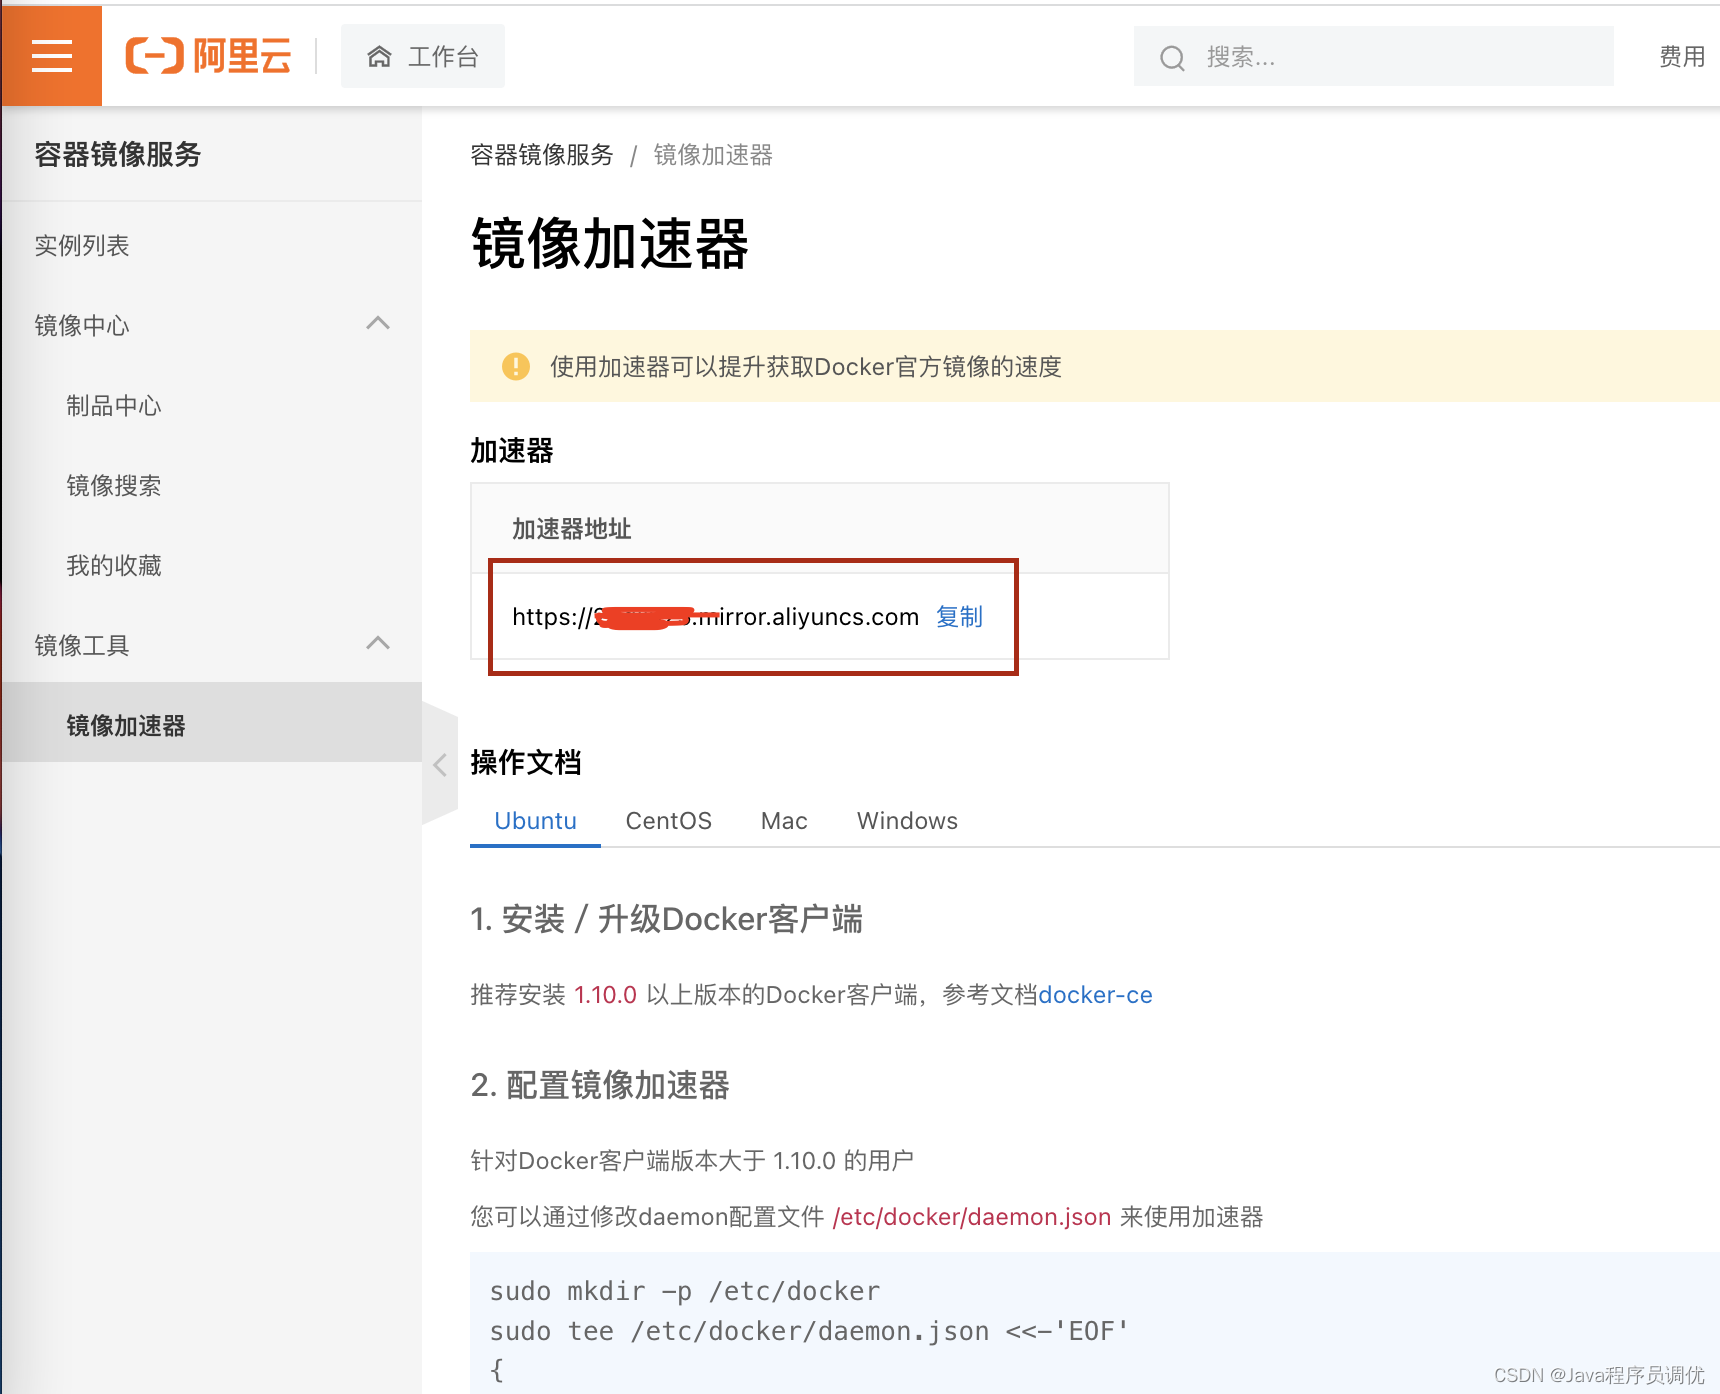
11-2、修改linux中docker配置文件
cd /etc/docker
[root@iZgia1btkivmb2Z ~]# cd /etc/docker11-3、如果有 daemon.json 文件,修改即可,如果没有,以下命令操作保存后会自动生成此文件。
[root@iZgia1btkivmb2Z docker]# ls #查看文件
[root@iZgia1btkivmb2Z docker]# ls
key.json                  #没有指定文件
[root@iZgia1btkivmb2Z docker]#
vim daemon.json
[root@iZgia1btkivmb2Z docker]# vim daemon.json
因为我这里是新建,所以执行上述命令后文件内容为空,直接写入以下内容后,
:wq 就可以
{
        "registry-mirrors": ["https://xxxx.mirror.aliyuncs.com"]
}
12、重启docker
systemctl daemon‐reload
systemctl restart docker
[root@iZgia1btkivmb2Z docker]# ls
daemon.json  key.json
[root@iZgia1btkivmb2Z docker]# systemctl daemon-reload
[root@iZgia1btkivmb2Z docker]# systemctl restart docker
13、卸载docker
1 、yum remove ‐y docker*
2 、 rm ‐ rf / etc / systemd / system / docker . service . d3 、 rm ‐ rf / var / lib / docker4 、 rm ‐ rf / var / run / docker
二、下载镜像
1、下载Java8
docker pull nginx:latest
[root@iZgia1btkivmb2Z docker]# docker pull nginx:latest
latest: Pulling from library/nginx
a2abf6c4d29d: Pull complete
a9edb18cadd1: Pull complete
589b7251471a: Pull complete
186b1aaa4aa6: Pull complete
b4df32aa5a72: Pull complete
a0bcbecc962e: Pull complete
Digest: sha256:0d17b565c37bcbd895e9d92315a05c1c3c9a29f762b011a10c54a66cd53c9b31
Status: Downloaded newer image for nginx:latest
docker.io/library/nginx:latest
[root@iZgia1btkivmb2Z docker]#
2、查看已下载
docker images
[root@iZgia1btkivmb2Z docker]# docker images
REPOSITORY   TAG       IMAGE ID       CREATED        SIZE
nginx        latest    605c77e624dd   4 months ago   141MB
java         8         d23bdf5b1b1b   5 years ago    643MB
[root@iZgia1btkivmb2Z docker]#
以上列表含义如下
- REPOSITORY: 镜像所属仓库名称。- TAG: 镜像标签。默认是 latest,表示最新。其它就是类似版本号- IMAGE ID: 镜像 ID,表示镜像唯一标识。- CREATED: 镜像创建时间。- SIZE: 镜像大小。
3、删除镜像
docker rmi java
三、运行容器
1、运行命令:
docker run -d -p 8088:80 nginx
命令解释
-d 表示后台运行
-P 表示随机端口映射-p 表示指定端口映射,有以下四种格式。-- ip:宿主机端口:容器端口-- ip::容器里程序运行的端口号-- 宿主机端口:容器端口-- 容器端口-name 为运行此镜像的容器起个名字--net 表示指定网络模式,该选项有以下可选参数:--net=bridge 默认选项 ,表示连接到默认的网桥。--net=host 容器使用宿主机的网络。--net=container:NAME-or-ID 告诉 Docker让新建的容器使用已有容器的网络配置。--net=none 不配置该容器的网络,用户可自定义网络配置。
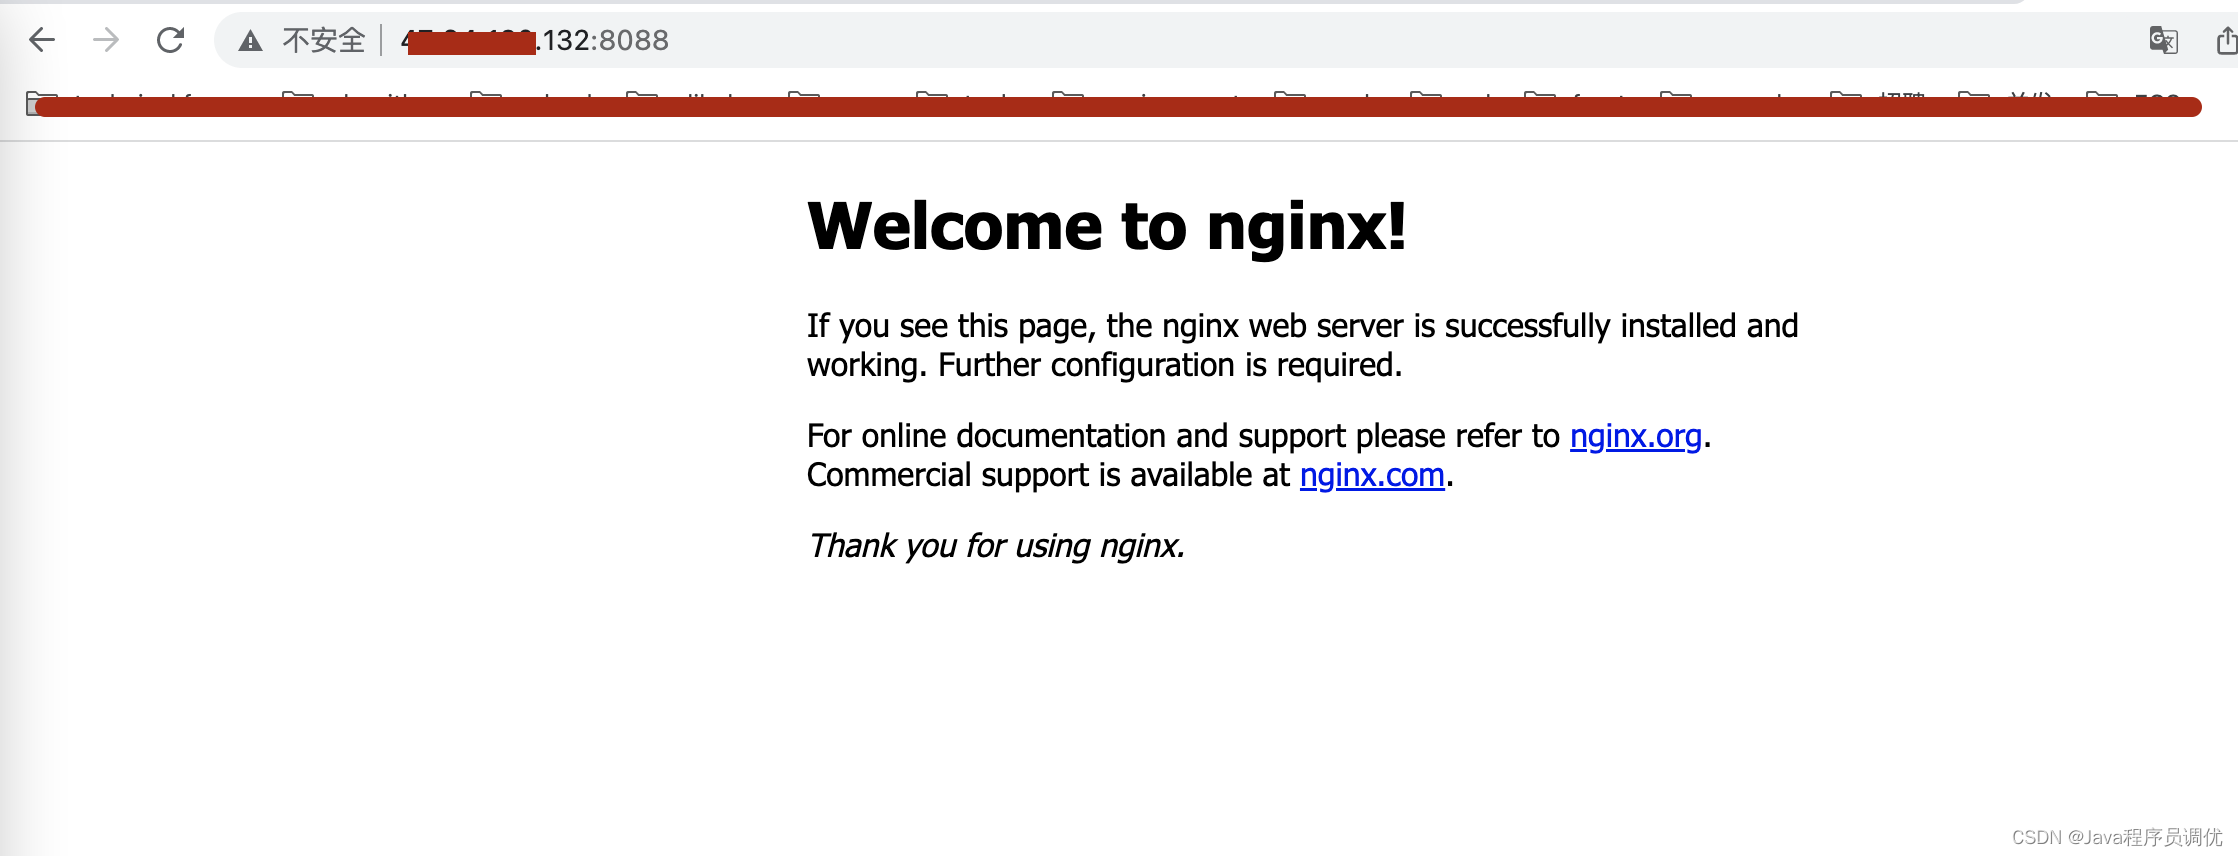
[root@iZgia1btkivmb2Z docker]# docker run -d -p 8088:80 nginx
9ada1539319b6c521d7640d339c032b33176513b74690652b70ae7df9fcb7b75
[root@iZgia1btkivmb2Z docker]#
打开浏览器,输入http://ip:8088 访问可见如下:
2、列出/查看container
docker ps
[root@iZgia1btkivmb2Z docker]# docker ps
CONTAINER ID   IMAGE     COMMAND                  CREATED          STATUS          PORTS                  NAMES
9ada1539319b   nginx     "/docker-entrypoint.…"   23 minutes ago   Up 23 minutes   0.0.0.0:8088->80/tcp   xenodochial_babbage
[root@iZgia1btkivmb2Z docker]#
如需列出所有container(包括已停止的container),可使用-a参数。
该列表包含了7列,含义如下
- CONTAINER_ID: 表示容器 ID。- IMAGE: 表示镜像名称。- COMMAND: 表示启动容器时运行的命令。- CREATED: 表示容器的创建时间。- STATUS: 表示容器运行的状态。UP表示运行中, Exited表示已停止。- PORTS: 表示容器对外的端口号。- NAMES: 表示容器名称。该名称默认由 Docker自动生成,也可使用 docker run命令的--name选项自行指定。
3、停止容器
3-1、普通停止
docker stop xxxxx(container_id容器ID)
[root@iZgia1btkivmb2Z docker]# docker stop 9ada1539319b
9ada1539319b
[root@iZgia1btkivmb2Z docker]#
3-2、强制停止
docker kill xxxx(container_id容器id)
4、 重启已停止运行的容器
docker start 容器id
5、删除容器
docker rm 容器id
四、查看容器信息
1、查看容器所有信息
docker inspect 容器id
[root@iZgia1btkivmb2Z docker]# docker inspect 7ce21a1ff474
[
    {
        "Id": "7ce21a1ff4745db8b7e0da73b91dcfc26e48ffd35b7be0ab84d22c33252e9c7e",
        "Created": "2022-05-14T12:12:03.021684936Z",
        "Path": "/docker-entrypoint.sh",
        "Args": [
            "nginx",
            "-g",
            "daemon off;"
        ],
        "State": {
            "Status": "running",
            "Running": true,
            "Paused": false,
......
2、查看容器日志
docker container logs 容器id
[root@iZgia1btkivmb2Z docker]# docker container logs 7ce21a1ff474
/docker-entrypoint.sh: /docker-entrypoint.d/ is not empty, will attempt to perform configuration
/docker-entrypoint.sh: Looking for shell scripts in /docker-entrypoint.d/
/docker-entrypoint.sh: Launching /docker-entrypoint.d/10-listen-on-ipv6-by-default.sh
10-listen-on-ipv6-by-default.sh: info: Getting the checksum of /etc/nginx/conf.d/default.conf
10-listen-on-ipv6-by-default.sh: info: Enabled listen on IPv6 in /etc/nginx/conf.d/default.conf
/docker-entrypoint.sh: Launching /docker-entrypoint.d/20-envsubst-on-templates.sh
/docker-entrypoint.sh: Launching /docker-entrypoint.d/30-tune-worker-processes.sh
/docker-entrypoint.sh: Configuration complete; ready for start up
2022/05/14 12:12:03 [notice] 1#1: using the "epoll" event method
2022/05/14 12:12:03 [notice] 1#1: nginx/1.21.5
2022/05/14 12:12:03 [notice] 1#1: built by gcc 10.2.1 20210110 (Debian 10.2.1-6)
2022/05/14 12:12:03 [notice] 1#1: OS: Linux 3.10.0-957.21.3.el7.x86_64
2022/05/14 12:12:03 [notice] 1#1: getrlimit(RLIMIT_NOFILE): 1048576:1048576
2022/05/14 12:12:03 [notice] 1#1: start worker processes
2022/05/14 12:12:03 [notice] 1#1: start worker process 30
2022/05/14 12:12:03 [notice] 1#1: start worker process 31
[root@iZgia1btkivmb2Z docker]#
3、查看容器里进程
docker top 容器id
[root@iZgia1btkivmb2Z docker]# docker top 7ce21a1ff474
UID                 PID                 PPID                C                   STIME               TTY                 TIME                CMD
root                3937                3920                0                   20:12               ?                   00:00:00            nginx: master process nginx -g daemon off;
101                 3986                3937                0                   20:12               ?                   00:00:00            nginx: worker process
101                 3987                3937                0                   20:12               ?                   00:00:00            nginx: worker process
[root@iZgia1btkivmb2Z docker]#
4、进到容器中
docker exec ‐it 容器id /bin/bash
[root@iZgia1btkivmb2Z docker]# docker exec -it 7ce21a1ff474 /bin/bash
root@7ce21a1ff474:/# ls
bin  boot  dev  docker-entrypoint.d  docker-entrypoint.sh  etc  home  lib  lib64  media  mnt  opt  proc  root  run  sbin  srv  sys  tmp  usr  var
root@7ce21a1ff474:/#
5、容器内安装指令
1 apt‐get update
2 apt ‐ get install vim #安装vim3 apt ‐ get install iputils ‐ ping #安装 ping4 apt ‐ get install net ‐ tools #安装 ifconfig
四、总结
以上内容为docker的基础安装使用。


 692
692


 被折叠的 条评论
为什么被折叠?
被折叠的 条评论
为什么被折叠?
 到【灌水乐园】发言


