


简介
- 优势:
- 解耦:请求通过mq提高容错性,
- 异步提速:请求到mq,直接返回给客户端,剩下的mq处理
- 削峰填谷:请求到mq客户端慢慢处理
理解

- broker:rabbitmq服务器
- connection:tcp长连接
- channel:connection开销大,轻量级,可复用
- vhost:虚拟主机,相当于mysql中的数据库
- exchange:根据不同的分发规则将消息分发到队列,有不同类型
- queue:队列
- binding:路由器与队列的连接,包含routing key保存在路由器中,作为分发依据
安装
- 上传文件3.6.5版本及安装包
- 安装Erlang
rpm -iUvh erlang-18.3-1.el7.centos.x86_64.rpm - 安装socat
rpm -iUvh socat-1.7.3.2-1.1.el7.x86_64.rpm - 如果报错依赖监测失败先安装tcp_wrappers
yum install tcp_wrappers -y再次安装socat - 安装rabbitmq
rpm -iUvh rabbitmq-server-3.6.5-1.noarch.rpm - 开启管理界面
rabbitmq-plugins enable rabbitmq_management - 修改配置文件
vim /usr/lib/rabbitmq/lib/rabbitmq_server-3.6.5/ebin/rabbit.apploopback_users 中的 <<“guest”>>,只保留guest - 启动服务
systemctl start rabbitmq-server - 创建一个用户,登陆web端地址
ip:15672
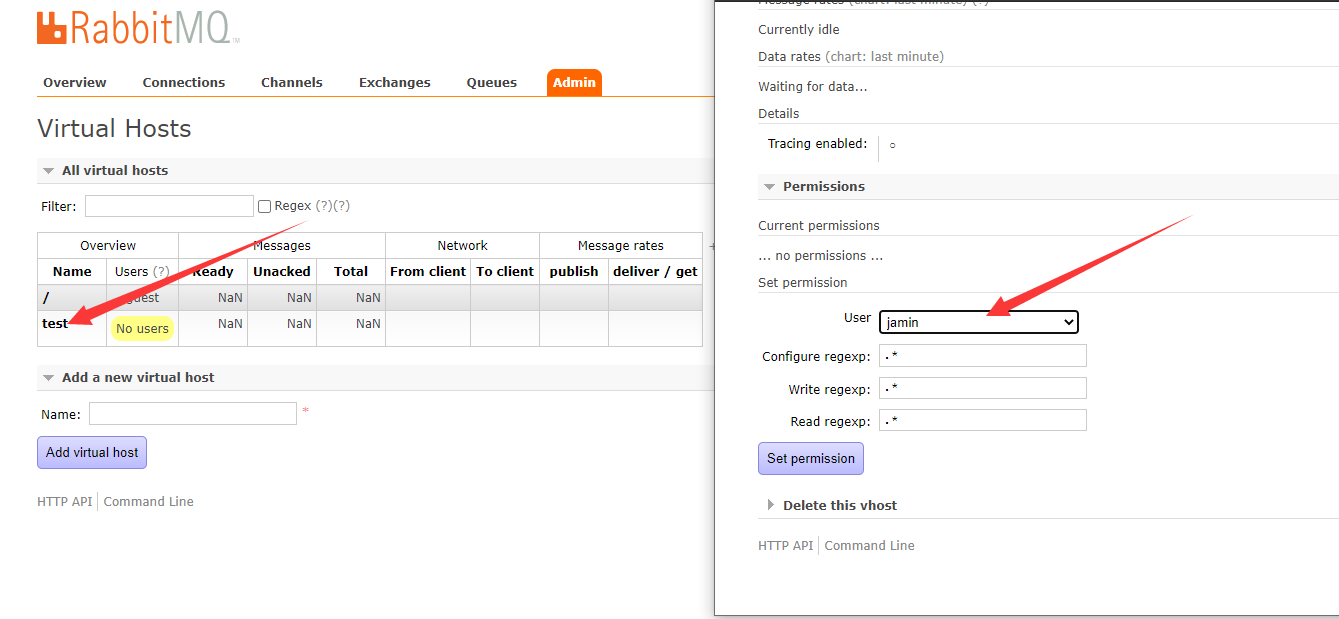
- 创建一个虚拟机
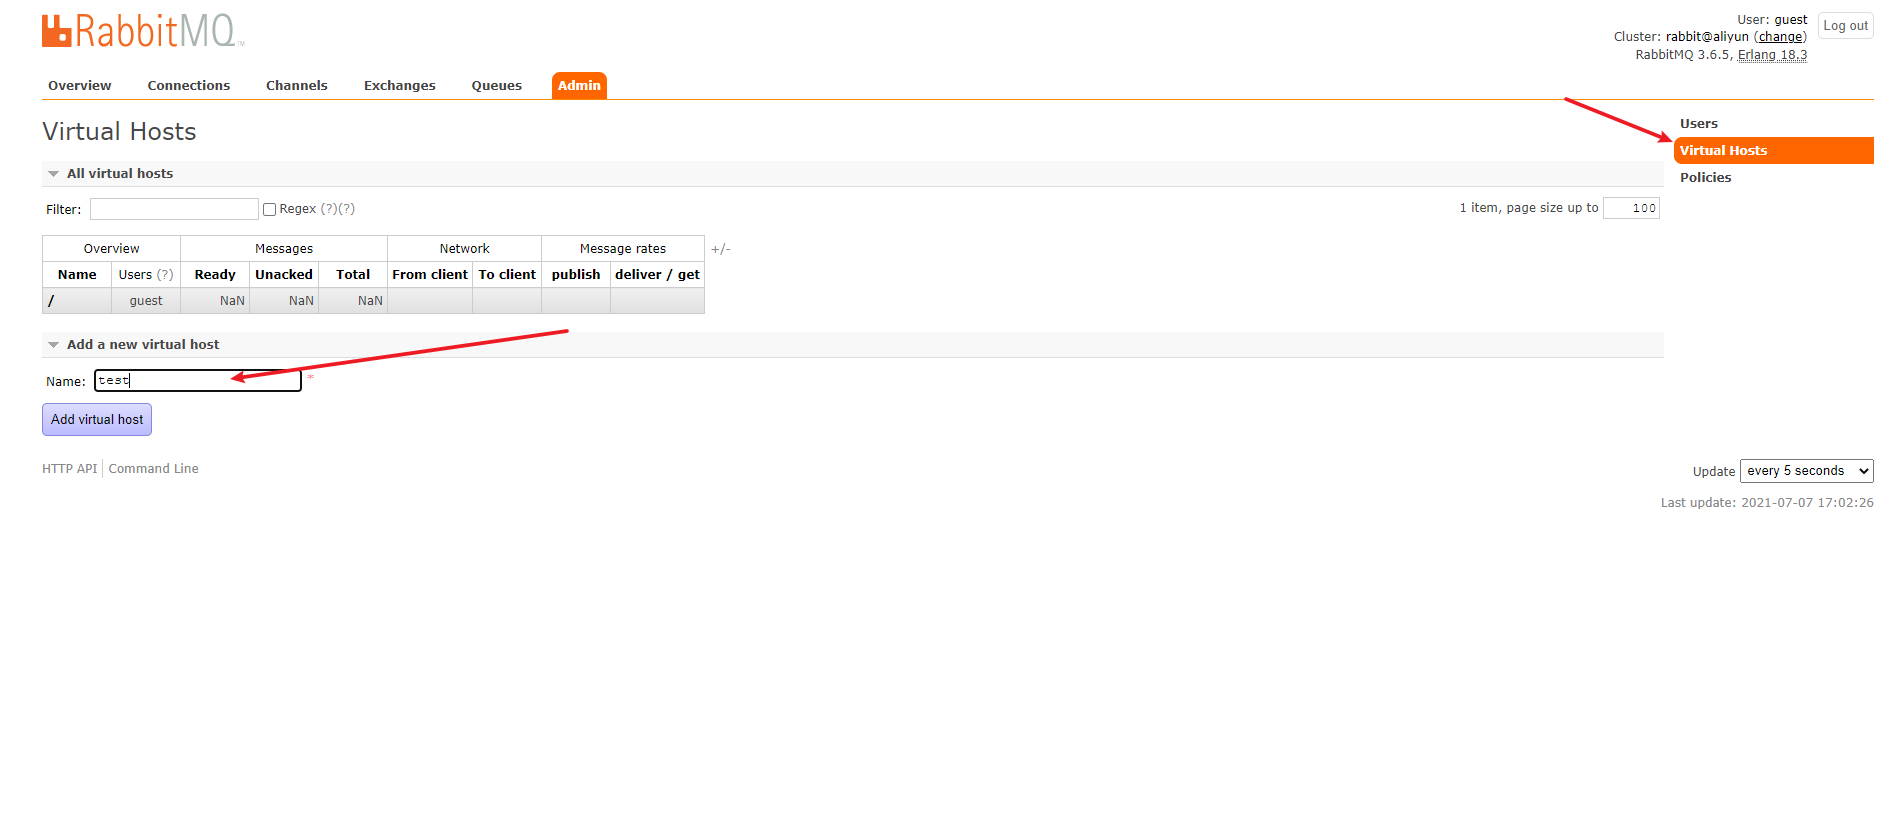
- 赋予权限
不同模式
- 配置读取工具类
public class PropertiesUtil {
	private static Logger logger = LoggerFactory.getLogger(PropertiesUtil.class);

	/**
	 * 文件读取获取Properties
	 *
	 * @param filePath
	 * @return {@link Properties}
	 * @author Jamin
	 * @date 2021/7/7 15:08
	 */
	public static Properties getProperties(String filePath) {
		Properties prop = new Properties();
		InputStream in = null;
		try {
			File file = new File(filePath);
//          直接读取文件
			if (file.canRead()) {
				in = new BufferedInputStream(new FileInputStream(file));
//          从当前路径中获取文件流
			} else {
				in = PropertiesUtil.class.getClassLoader().getResourceAsStream(filePath);
			}
			if (in != null) {
				prop.load(in);
			}
		} catch (IOException e) {
			logger.error(e.getMessage(), e);
		} finally {
			try {
				if (in != null) {
					in.close();
				}
			} catch (IOException e) {
				logger.error(e.getMessage(), e);
			}
		}
		return prop;
	}

}
- 连接工具类
public class RabbitMqUtil {
	/**
	 * 读取配置文件获取连接
	 *
	 * @param
	 * @return {@link com.rabbitmq.client.Connection}
	 * @author Jamin
	 * @date 2021/7/7 17:14
	 */
	public static Connection getConnection() throws IOException, TimeoutException {
		//加载配置文件
		Properties properties = PropertiesUtil.getProperties("passwd.properties");
		ConnectionFactory connectionFactory = new ConnectionFactory();
		//基础信息
		connectionFactory.setHost(properties.getProperty("rabbitmq.host"));
		connectionFactory.setPort(Integer.parseInt(properties.getProperty("rabbitmq.port")));
		connectionFactory.setUsername(properties.getProperty("rabbitmq.userName"));
		connectionFactory.setPassword(properties.getProperty("rabbitmq.passwd"));
		connectionFactory.setVirtualHost(properties.getProperty("rabbitmq.vhost"));
		//创建连接
		Connection connection = connectionFactory.newConnection();
		return connection;
	}
}
- helloworld(发送接收)
		public class RabbitMqProduct {

	public static void main(String[] args) throws IOException, TimeoutException {
		//获取连接
		Connection connection = RabbitMqUtil.getConnection();
		//获取通道
		Channel channel = connection.createChannel();
		/**
		 * 队列名称,没有自动创建
		 * 是否持久化
		 * 是否独占,其他连接不能访问
		 * 是否自动删除
		 * 其他参数
		 */
		channel.queueDeclare("测试队列", false, false, false, null);
		String msg = "测试消息";
		channel.basicPublish("", "测试队列", null, msg.getBytes());
		System.out.println("=======发送成功=======");
		channel.close();
		connection.close();
	}
}
public class RabbitMqConsumer {
    public static void main(String[] args) throws IOException, TimeoutException {
        Connection connection = RabbitMqUtil.getConnection();
        final Channel channel = connection.createChannel();
         channel.basicConsume("测试队列", false, new DefaultConsumer(channel) {
            public void handleDelivery(java.lang.String consumerTag, Envelope envelope, AMQP.BasicProperties properties, byte[] body) throws IOException {
                System.out.println("消息内容为==========>" + new String(body));
                System.out.println("==========id======>" + envelope.getDeliveryTag());
                //确认消息已经接受,消息id,是否确认以前的消息
                channel.basicAck(envelope.getDeliveryTag(), false);
            }
        });
    }

}
-
workqueues模式(1生产对多消费者)
- 代码
public class workQueuesProduct {
    public static void main(String[] args) throws IOException, TimeoutException {
        //获取连接
        Connection connection = RabbitMqUtil.getConnection();
        //获取通道
        Channel channel = connection.createChannel();
        /**
         * 声明一个队列
         * 队列名称,没有自动创建
         * 是否持久化
         * 是否独占,其他连接不能访问
         * 是否自动删除
         * 其他参数
         */
        channel.queueDeclare("工作队列", false, false, false, null);
        for (int i = 0; i < 99; i++) {
            String msg = "测试消息"+i;
            channel.basicPublish("", "工作队列", null, msg.getBytes());
        }
        System.out.println("=======发送完毕=======");
        channel.close();
        connection.close();
    }
}
public class workQueuesConsumerOne { public static void main(String[] args) throws IOException, TimeoutException { Connection connection = RabbitMqUtil.getConnection(); final Channel channel = connection.createChannel(); //声明队列 channel.queueDeclare("工作队列", false, false, false, null); //同时只消费1个,知道消费者确认消息 // channel.basicQos(1); channel.basicConsume("工作队列", false, new DefaultConsumer(channel){ @Override public void handleDelivery(String consumerTag, Envelope envelope, AMQP.BasicProperties properties, byte[] body) throws IOException { // try { // Thread.sleep(200); // } catch (InterruptedException e) { // e.printStackTrace(); // } System.out.println("消息内容为==========>" + new String(body)); //确认消息已经接受,消息id,是否确认以前的消息 channel.basicAck(envelope.getDeliveryTag(), false); } }); } } - 解析
- 默认使用平分的策略,例如99个消息,共有3个消费者,平均每个消费者消费33个
channel.basicQos(1)意思当前的确认消费完后再消费其他的
- 代码
-
发布订阅模式(可视化页面创建交换机名为发布订阅交换机 类型为FANOUT)
- 代码
public class Publisher {
    public static void main(String[] args) throws IOException, TimeoutException {
        Connection connection = RabbitMqUtil.getConnection();
        Channel channel = connection.createChannel();
        //创建一个交换机广播模式
        //channel.exchangeDeclare("发布订阅交换机", BuiltinExchangeType.FANOUT);
        //发布到交换机
        channel.basicPublish("发布订阅交换机", "", null, "消息".getBytes());
        channel.close();
        connection.close();
        System.out.println("消息发送成功");
    }
}
public class SubscriberOne { public static void main(String[] args) throws IOException, TimeoutException { Connection connection = RabbitMqUtil.getConnection(); Channel channel = connection.createChannel(); //声明队列 channel.queueDeclare("one队列",false,false,false,null); //将队列与交换机绑定 channel.queueBind("one队列","发布订阅交换机",""); //收消息 channel.basicConsume("one队列",true,new DefaultConsumer(channel){ @Override public void handleDelivery(String consumerTag, Envelope envelope, AMQP.BasicProperties properties, byte[] body) throws IOException { System.out.println("消息======>one=============>"+new String(body)); } }); } } - 解析
- 发布订阅模式与工作队列模式
- 工作队列模式消费者对消息是竞争关系而发布订阅模式是共享
- 创建路由,队列与交换机绑定后会消息会从路由同步到队列
- 发布订阅模式与工作队列模式
- 代码
-
路由模式(可视化页面创建交换机名为路由模式交换机 类型为direct)
- 代码
public class RouterProduct {
    public static void main(String[] args) throws IOException, TimeoutException {
        Connection connection = RabbitMqUtil.getConnection();
        Channel channel = connection.createChannel();
        //指定direct模式
        channel.basicPublish("路由模式交换机","key1",null,"key1消息1".getBytes());
        channel.basicPublish("路由模式交换机","key1",null,"key1消息2".getBytes());
        channel.basicPublish("路由模式交换机","key2",null,"key2消息".getBytes());
        channel.close();
        connection.close();

    }
}
public class RouteConsumerOne { public static void main(String[] args) throws IOException, TimeoutException { Connection connection = RabbitMqUtil.getConnection(); Channel channel = connection.createChannel(); //创建队列 channel.queueDeclare("路由模式队列1",false,false,false,null); //交换机队列绑定 channel.queueBind("路由模式队列1","路由模式交换机","key1"); //消费队列 channel.basicConsume("路由模式队列1",true,new DefaultConsumer(channel){ @Override public void handleDelivery(String consumerTag, Envelope envelope, AMQP.BasicProperties properties, byte[] body) throws IOException { System.out.println("消费者1=====>"+new String(body)); } }); } }public class RouteConsumerTwo { public static void main(String[] args) throws IOException, TimeoutException { Connection connection = RabbitMqUtil.getConnection(); Channel channel = connection.createChannel(); channel.queueDeclare("路由模式队列2",false,false,false,null); channel.queueBind("路由模式队列2","路由模式交换机","key2"); channel.basicConsume("路由模式队列2",true,new DefaultConsumer(channel){ @Override public void handleDelivery(String consumerTag, Envelope envelope, AMQP.BasicProperties properties, byte[] body) throws IOException { System.out.println("消费者2=====>"+new String(body)); } }); } } - 解析
- 路由模式就是比发布订阅模式分的更细,同一个交换机下可根据不同的路由key去发送,不同的路由key也可以绑定不同的队列
- 代码
-
topic模式
- 代码:
public class TopicProduct {
    public static void main(String[] args) throws IOException, TimeoutException {
        Connection connection = RabbitMqUtil.getConnection();
        Channel channel = connection.createChannel();
        //创建一个交换机topic模式
        // channel.exchangeDeclare("topic交换机", BuiltinExchangeType.TOPIC);
        HashMap<String, String> map = new HashMap<String, String>(12);
        map.put("china.anhui.hefei.weather","合肥的天气情况");
        map.put("china.anhui.wuhu.weather","芜湖的天气情况");
        map.put("china.jiangsu.nanjing.weather","南京的天气情况");
        map.put("china.jiangsu.suzhou.weather","苏州的天气情况");
        map.put("china.anhui.hefei.news","合肥的新闻情况");
        map.put("china.jiangsu.nanjing.news","南京的天气情况");
        map.entrySet().forEach(map1->{
            try {
                //发布到交换机    指定routingkey
                channel.basicPublish("topic交换机", map1.getKey(), null, map1.getValue().getBytes());
            } catch (IOException e) {
                e.printStackTrace();
            }
        });
        channel.close();
        connection.close();
        System.out.println("消息发送成功");
    }
}
public class TopicConsumerOne { public static void main(String[] args) throws IOException, TimeoutException { Connection connection = RabbitMqUtil.getConnection(); Channel channel = connection.createChannel(); //创建队列 // channel.queueDeclare("topicTwo",false,false,false,null); channel.queueDeclare("topicOne",false,false,false,null); //topic交换机 绑定交换机路由key // channel.queueBind("topicTwo","topic交换机","#.weather"); channel.queueBind("topicOne","topic交换机","china.anhui.hefei.*"); channel.basicConsume("topicOne",new DefaultConsumer(channel){ @Override public void handleDelivery(String consumerTag, Envelope envelope, AMQP.BasicProperties properties, byte[] body) throws IOException { System.out.println("========消息========>"+new String(body)); } }); } } - 解析
- 路由模式属于对routekey精准匹配,topic模式属于可以使用通配符匹配
- #routingkey一般使用一个或多个词组成,使用.进行分割,#匹配一个或多个词,*匹配一个词
- 代码:
-
总结5种模式

-
确认
- 代码
public class ConfirmProduct {
	public static void main(String[] args) throws IOException, TimeoutException {
		Connection connection = RabbitMqUtil.getConnection();
		Channel channel = connection.createChannel();
		//创建一个交换机topic模式
		// channel.exchangeDeclare("topic交换机", BuiltinExchangeType.TOPIC);
		HashMap<String, String> map = new HashMap<String, String>(12);
		map.put("china.anhui.hefei.weather", "合肥的天气情况");
		map.put("china.anhui.wuhu.weather", "芜湖的天气情况");
		map.put("china.jiangsu.nanjing.weather", "南京的天气情况");
		map.put("china.jiangsu.suzhou.weather", "苏州的天气情况");
		map.put("china.anhui.hefei.news", "合肥的新闻情况");
		map.put("china.jiangsu.nanjing.news", "南京的新闻情况");
		//开启监听
		channel.confirmSelect();
		/**
		 * 发送到rabbitmq回调
		 */
		channel.addConfirmListener(new ConfirmListener() {
			/**
			 * 发送成功回调
			 * @param deliveryTag
			 * @param multiple
			 * @throws IOException
			 */
			@Override
			public void handleAck(long deliveryTag, boolean multiple) throws IOException {
				System.out.println("发送成功的消息ID========>" + deliveryTag);
			}

			/**
			 *发送失败回调
			 * @param deliveryTag
			 * @param multiple
			 * @throws IOException
			 */
			@Override
			public void handleNack(long deliveryTag, boolean multiple) throws IOException {
				System.out.println("发送失败的消息ID========>" + deliveryTag);
			}
		});
		/**
		 * 发送到队列失败回调
		 */
		channel.addReturnListener((replyCode, replyText, exchange, routingKey, properties, body) -> {
			System.err.println("===========未可达===========>" + new String(body));
		});
		map.entrySet().forEach(map1 -> {
			try {
				//发布到交换机    指定routingkey  mandatory指定为true
				channel.basicPublish("confirm交换机", map1.getKey(), true, null, map1.getValue().getBytes());
			} catch (IOException e) {
				e.printStackTrace();
			}
		});
		// channel.close();
		// connection.close();
		System.out.println("消息发送成功");
	}
}
public class ConfirmConsumerOne { public static void main(String[] args) throws IOException, TimeoutException { Connection connection = RabbitMqUtil.getConnection(); Channel channel = connection.createChannel(); //创建队列 channel.queueDeclare("confirmOne", false, false, false, null); //topic交换机 绑定交换机路由key channel.queueBind("confirmOne", "confirm交换机", "china.anhui.hefei.*"); channel.basicConsume("confirmOne", new DefaultConsumer(channel) { @Override public void handleDelivery(String consumerTag, Envelope envelope, AMQP.BasicProperties properties, byte[] body) throws IOException { System.out.println("========消息========>" + new String(body)); } }); } } - 解析
- confirm:是否能够发送到指定的交换机
- return:是否能够发送到队列
- 代码
spring整合rabbitmq
依赖
<dependency>
    <groupId>org.springframework</groupId>
    <artifactId>spring-context</artifactId>
    <version>5.1.7.RELEASE</version>
</dependency>
<dependency>
    <groupId>org.springframework.amqp</groupId>
    <artifactId>spring-rabbit</artifactId>
    <version>2.1.8.RELEASE</version>
</dependency>
<dependency>
    <groupId>junit</groupId>
    <artifactId>junit</artifactId>
    <version>4.12</version>
</dependency>
<dependency>
    <groupId>org.springframework</groupId>
    <artifactId>spring-test</artifactId>
    <version>5.1.7.RELEASE</version>
</dependency>
生产者
- 生产者配置文件
<?xml version="1.0" encoding="UTF-8"?>
<beans xmlns="http://www.springframework.org/schema/beans"
       xmlns:xsi="http://www.w3.org/2001/XMLSchema-instance"
       xmlns:context="http://www.springframework.org/schema/context"
       xmlns:rabbit="http://www.springframework.org/schema/rabbit"
       xsi:schemaLocation="http://www.springframework.org/schema/beans
       http://www.springframework.org/schema/beans/spring-beans.xsd
       http://www.springframework.org/schema/context
       https://www.springframework.org/schema/context/spring-context.xsd
       http://www.springframework.org/schema/rabbit
       http://www.springframework.org/schema/rabbit/spring-rabbit.xsd">
    <!--    加载配置文件-->
    <context:property-placeholder location="classpath:rabbitmq.properties"/>
    <rabbit:connection-factory id="connectionFactory" host="${rabbitmq.host}" port="${rabbitmq.port}"
                               username="${rabbitmq.userName}" password="${rabbitmq.passwd}"
                               virtual-host="${rabbitmq.vhost}"/>
    <!--    管理创建交换机-->
    <rabbit:admin connection-factory="connectionFactory"/>
    <!--    bean名称   队列名称 是否自动创建-->
    <rabbit:queue id="spring_queue" name="spring_queue" auto-declare="true"/>
    <!--广播-->
    <rabbit:queue id="spring_fanout_queue_1" name="spring_fanout_queue_1" auto-declare="true"/>
    <rabbit:queue id="spring_fanout_queue_2" name="spring_fanout_queue_2" auto-declare="true"/>
    <!--交换机 bean名称 交换机名称   自动创建-->
    <rabbit:fanout-exchange id="spring_fanout_exchange" name="spring_fanout_exchange" auto-declare="true">
        <rabbit:bindings>
            <rabbit:binding queue="spring_fanout_queue_1"/>
            <rabbit:binding queue="spring_fanout_queue_2"/>
        </rabbit:bindings>
    </rabbit:fanout-exchange>
    <!--    路由模式-->
    <rabbit:queue id="spring_direct_queue_1" name="spring_direct_queue_1" auto-declare="true"/>
    <rabbit:queue id="spring_direct_queue_2" name="spring_direct_queue_2" auto-declare="true"/>
    <rabbit:direct-exchange id="spring_direct_exchange" name="spring_direct_exchange" auto-declare="true">
        <rabbit:bindings>
            <rabbit:binding queue="spring_direct_queue_1" key="key1"/>
            <rabbit:binding queue="spring_direct_queue_2" key="key2"/>
        </rabbit:bindings>
    </rabbit:direct-exchange>
    <!--topic模式-->
    <rabbit:queue id="spring_topic_queue_1" name="spring_topic_queue_1" auto-declare="true"/>
    <rabbit:queue id="spring_topic_queue_2" name="spring_topic_queue_2" auto-declare="true"/>
    <rabbit:queue id="spring_topic_queue_3" name="spring_topic_queue_3" auto-declare="true"/>
    <rabbit:topic-exchange name="spring_topic_exchange">
        <rabbit:bindings>
            <rabbit:binding pattern="#.weather" queue="spring_topic_queue_1"/>
            <rabbit:binding pattern="china.anhui.hefei.*" queue="spring_topic_queue_2"/>
            <rabbit:binding pattern="ah.hefei.*" queue="spring_topic_queue_3"/>
        </rabbit:bindings>
    </rabbit:topic-exchange>
    <!--定义rabbitTemplate对象操作可以在代码中方便发送消息-->
    <rabbit:template id="rabbitTemplate" connection-factory="connectionFactory"/>
</beans>
- 生产者
@RunWith(SpringJUnit4ClassRunner.class)
@ContextConfiguration(locations = "classpath:spring-rabbitmq-producer.xml")
public class Producter {
    @Autowired
    RabbitTemplate rabbitTemplate;

    /**
     * hello world
     */
    @Test
    public void testHelloWorld() {
        rabbitTemplate.convertAndSend("spring_queue", "hello world spring....");
    }

    /**
     * 广播模式
     */
    @Test
    public void fanout() {
        rabbitTemplate.convertAndSend("spring_fanout_exchange", "", "hello world spring....");
    }

    /**
     * 路由模式
     *
     * @author jaminye
     * @date 2021/7/17 下午3:11
     */
    @Test
    public void direct() {
        rabbitTemplate.convertAndSend("spring_direct_exchange", "key1", "key1消息1");
        rabbitTemplate.convertAndSend("spring_direct_exchange", "key1", "key1消息2");
        rabbitTemplate.convertAndSend("spring_direct_exchange", "key2", "key2消息1");
    }

    /**
     * 主题模式
     *
     * @author jaminye
     * @date 2021/7/17 下午3:11
     */
    @Test
    public void topic() {
        Map<String, String> map = new HashMap<String, String>(12);
        map.put("china.anhui.hefei.weather", "合肥的天气情况");
        map.put("china.anhui.wuhu.weather", "芜湖的天气情况");
        map.put("china.jiangsu.nanjing.weather", "南京的天气情况");
        map.put("china.jiangsu.suzhou.weather", "苏州的天气情况");
        map.put("china.anhui.hefei.news", "合肥的新闻情况");
        map.put("china.jiangsu.nanjing.news", "南京的天气情况");
        map.forEach((key, value) -> {
            rabbitTemplate.convertAndSend("spring_topic_exchange", key, value);
        });
    }
}
消费者
- 配置文件
<?xml version="1.0" encoding="UTF-8"?>
<beans xmlns="http://www.springframework.org/schema/beans"
       xmlns:xsi="http://www.w3.org/2001/XMLSchema-instance"
       xmlns:context="http://www.springframework.org/schema/context"
       xmlns:rabbit="http://www.springframework.org/schema/rabbit"
       xsi:schemaLocation="http://www.springframework.org/schema/beans
       http://www.springframework.org/schema/beans/spring-beans.xsd
       http://www.springframework.org/schema/context
       https://www.springframework.org/schema/context/spring-context.xsd
       http://www.springframework.org/schema/rabbit
       http://www.springframework.org/schema/rabbit/spring-rabbit.xsd">
    <!--    加载配置文件-->
    <context:property-placeholder location="classpath:rabbitmq.properties"/>
    <!--    连接管理器-->
    <rabbit:connection-factory id="connectionFactory" host="${rabbitmq.host}" port="${rabbitmq.port}"
                               username="${rabbitmq.userName}" password="${rabbitmq.passwd}"
                               virtual-host="${rabbitmq.vhost}"/>
    <!--注入一个监听器-->
    <bean id="springQueueListener1" class="cn.jaminye.SpringQueueListener1"/>
    <bean id="springQueueListener2" class="cn.jaminye.SpringQueueListener2"/>
    <bean id="fanoutListener1" class="cn.jaminye.FanoutListener1"/>
    <bean id="fanoutListener2" class="cn.jaminye.FanoutListener2"/>
    <bean id="directListener1" class="cn.jaminye.DirectListener1"/>
    <bean id="directListener2" class="cn.jaminye.DirectListener2"/>
    <bean id="topicListener1" class="cn.jaminye.TopicListener1"/>
    <bean id="topicListener2" class="cn.jaminye.TopicListener2"/>

    <rabbit:listener-container connection-factory="connectionFactory" auto-declare="true">
        <!--        指定监听器与队列的名称-->
        <rabbit:listener ref="springQueueListener1" queue-names="spring_queue"/>
        <rabbit:listener ref="springQueueListener2" queue-names="spring_queue"/>
        <rabbit:listener ref="fanoutListener1" queue-names="spring_fanout_queue_1"/>
        <rabbit:listener ref="fanoutListener2" queue-names="spring_fanout_queue_2"/>
        <rabbit:listener ref="directListener1" queue-names="spring_direct_queue_1"/>
        <rabbit:listener ref="directListener2" queue-names="spring_direct_queue_2"/>
        <rabbit:listener ref="topicListener1" queue-names="spring_topic_queue_1"/>
        <rabbit:listener ref="topicListener2" queue-names="spring_topic_queue_2"/>
    </rabbit:listener-container>
</beans>
2.消费者监听器
public class DirectListener1 implements MessageListener {
    @Override
    public void onMessage(Message message) {
        System.out.println(this.getClass().getName()+"========"+new String(message.getBody()));
    }
}
springboot整合rabbitmq
配置文件
spring:
  rabbitmq:
    host: 127.0.0.1
    port: 5672
    virtual-host: test
    username: jamin
    password: 123456
生产者
配置文件
@Configuration
public class RabbitMqConfig {

	/**
	 * 声明交换机
	 *
	 * @return
	 */
	@Bean
	public Exchange exchange() {
		return ExchangeBuilder.topicExchange("springboot-exchange").build();
	}

	/**
	 * 声明队列
	 *
	 * @return
	 */
	@Bean
	public Queue queue() {
		return QueueBuilder.durable("springboot-queue").build();
	}

	/**
	 * 绑定队列与交换机
	 *
	 * @param queue
	 * @param exchange
	 * @return
	 */
	@Bean
	public Binding binding(@Autowired Queue queue, @Autowired Exchange exchange) {
		return BindingBuilder.bind(queue).to(exchange).with("springboot.*").noargs();
	}
}
发送
@SpringBootTest
class SpringbootRabbitmqProductApplicationTests {

	@Autowired
	RabbitTemplate rabbitTemplate;

	@Test
	void contextLoads() {
		rabbitTemplate.convertAndSend("springboot-exchange", "springboot.1", "springboot消息");
	}
}
消费者
@Component
public class RabbitMqListener {
	/**
	 * 监听队列
	 *
	 * @param message 消息
	 * @author Jamin
	 * @date 2021/7/18 10:56
	 */
	@RabbitListener(queues = "springboot-queue")
	public void listener(Message message) {
		System.out.println(message);
	}
}
高级特性
生产者确认机制
- 连接配置
<!--  confirm-type 三种 none  CORRELATED simple(结合waitForConfirms限制时间) -->
    <rabbit:connection-factory id="connectionFactory" host="${rabbitmq.host}" port="${rabbitmq.port}"
                               username="${rabbitmq.userName}" password="${rabbitmq.passwd}"
                               virtual-host="${rabbitmq.vhost}" confirm-type="CORRELATED"/>
<!--springboot-->
spring.rabbitmq.publisher-confirm-type: correlated
- 代码
	@org.junit.Test
	public void testConfirm() throws InterruptedException {
		rabbitTemplate.setConfirmCallback((correlationData, ack, cause) -> {
			if (ack) {
				System.out.println("消息到达");
			} else {
				System.out.println("消息未到达======原因:==>" + cause + "=====message=====");
			}
		});
		//是否开启retuen
		rabbitTemplate.setMandatory(true);
		rabbitTemplate.setReturnsCallback(returnedMessage -> {
			//消息内荣
			System.out.println(new String(returnedMessage.getMessage().getBody()));
			//回退原因
			System.out.println(returnedMessage.getReplyText());
		});
		rabbitTemplate.convertAndSend("confirm_exchange", "key1", "消息可靠性质");
		Thread.sleep(10000L);
	}
消费者确认机制
- 配置文件
 <!--  acknowledge none不需要确认 manual手动确认 auto自动   prefetch一次行缓存多少消息   -->
    <rabbit:listener-container connection-factory="connectionFactory" acknowledge="manual" prefetch="10">
        <rabbit:listener ref="ackListener" queue-names="ack_queue"/>
    </rabbit:listener-container>
<!--springboot-->
spring.rabbitmq.listener.direct.acknowledge-mode=manual
spring.rabbitmq.listener.direct.prefetch=10
- 代码
@Component
public class AckListener implements ChannelAwareMessageListener {
	@Override
	public void onMessage(Message message, Channel channel) throws Exception {
		try {
			System.out.println(new String(message.getBody()));
			/*业务处理*/
			Thread.sleep(6000L);
			//确认消息    是否签收前面的消息
			channel.basicAck(message.getMessageProperties().getDeliveryTag(), false);
		} catch (Exception ex) {
			//单个消息拒签          消息id 是否重新入队列             从获取时间到拒签时间不能太长,太长拒签不了
			channel.basicReject(message.getMessageProperties().getDeliveryTag(), false);
			//支持多个消息拒签          消息id  是否拒签前面的消息     是否重新入队列
			// channel.basicNack(message.getMessageProperties().getDeliveryTag(), false, false);
		}
	}
}
ttl
- 配置文件
 <!--自动过期队列-->
    <rabbit:queue id="ttl_queue" name="ttl_queue" auto-declare="true">
        <rabbit:queue-arguments>
            <!-- 时间范围内没有被消费删除时间   消费未确认不会删除       -->
            <entry key="x-message-ttl" value="20000" value-type="java.lang.Integer"/>
            <!--          时间范围内没有消费者队列自动删除时间-->
            <!--                        <entry key="x-expires" value="20000" value-type="java.lang.Integer"/>-->
        </rabbit:queue-arguments>
    </rabbit:queue>
    <rabbit:topic-exchange name="ttl_exchange">
        <rabbit:bindings>
            <rabbit:binding pattern="ttl.*" queue="ttl_queue"></rabbit:binding>
        </rabbit:bindings>
    </rabbit:topic-exchange>
<!--    springboot方式-->
<!--    return QueueBuilder.durable("springboot-queue").expires(1).ttl(1).build();-->
- 代码
	public void testTtl() throws InterruptedException {
		rabbitTemplate.convertAndSend("ttl_exchange","ttl.1","队列自动删除");
		rabbitTemplate.convertAndSend("ttl_exchange","ttl.1",message ->{
			//单个消息设置过期时间      到时间不会被删除在消费时判断过期不会返回会删除
			message.getMessageProperties().setExpiration("10000");
			return message;
		} );
	}
- 总结
- 队列设置x-message-ttl消息到时间不消费会被删除,被消费但未确认的不会删除
- 队列x-expires队列到时间没有消费者会自动干掉这个队列
- 消息的Expiration,这个不会到时间干掉而是在消费时检查这个消息是否有效,无效删除
死信队列

- 配置文件
    <!---*********************************死信队列开始*********************************************-->
    <!--    正常队列-->
    <rabbit:queue name="test_queue_dlx" id="test_queue_dlx">
        <rabbit:queue-arguments>
            <!--            指定死信交换机-->
            <entry key="x-dead-letter-exchange" value="dlx_exchange"/>
            <!--            指定死信队列路由key-->
            <!--            <entry key="x-dead-letter-routing-key" value="dlx.hehe"/>-->
            <!--            超时时间-->
            <entry key="x-message-ttl" value="10000" value-type="java.lang.Integer"/>
            <!--            最大长度-->
            <entry key="x-max-length" value="10" value-type="java.lang.Integer"/>
        </rabbit:queue-arguments>
    </rabbit:queue>
    <!--    正常交换机-->
    <rabbit:topic-exchange name="test_exchange_dlx">
        <rabbit:bindings>
            <rabbit:binding pattern="test.dlx.#" queue="test_queue_dlx"></rabbit:binding>
        </rabbit:bindings>
    </rabbit:topic-exchange>


    <!--    死信队列-->
    <rabbit:queue name="dlx_queue" id="dlx_queue"/>
    <!--    死信队列交换机 交换机类型不限制-->
    <!--<rabbit:topic-exchange name="dlx_exchange">
        <rabbit:bindings>
            <rabbit:binding pattern="dlx.#" queue="dlx_queue"/>
        </rabbit:bindings>
    </rabbit:topic-exchange>-->
    <rabbit:fanout-exchange name="dlx_exchange">
        <rabbit:bindings>
            <rabbit:binding queue="dlx_queue"/>
        </rabbit:bindings>
    </rabbit:fanout-exchange>
    <!---*********************************死信队列结束*********************************************-->
//springboot方式
/**
	 * 正常的队列
	 *
	 * @return
	 */
	@Bean
	public Queue testQueueDlx() {
		//设置死信交换机 过期时间   最大长度
		return QueueBuilder.durable("test_queue_dlx0").deadLetterExchange("dlx_exchange0").ttl(10000).maxLength(10).build();
	}

	/**
	 * 正常的交换机
	 *
	 * @return
	 */
	@Bean
	public Exchange testExchangeDlx() {
		return ExchangeBuilder.topicExchange("test_exchange_dlx0").build();
	}

	/**
	 * 正常队列交换机绑定
	 *
	 * @param queue
	 * @param exchange
	 * @return
	 */
	@Bean
	public Binding testQueueDlxBinding(@Qualifier("testQueueDlx") Queue queue, @Qualifier("testExchangeDlx") Exchange exchange) {
		return BindingBuilder.bind(queue).to(exchange).with("test.dlx.#").noargs();
	}

	/**
	 * 死信队列
	 *
	 * @return
	 */
	@Bean
	public Queue dlxQueue() {
		return QueueBuilder.durable("dlx_queue0").build();
	}

	/**
	 * 死信交换机
	 *
	 * @return
	 */
	@Bean
	public FanoutExchange dlxExchange() {
		return ExchangeBuilder.fanoutExchange("dlx_exchange0").build();
	}

	/**
	 * 死信交换机队列绑定
	 *
	 * @param queue
	 * @param exchange
	 * @return
	 */
	@Bean
	public Binding bindingDlx(@Qualifier("dlxQueue") Queue queue, @Qualifier("dlxExchange") FanoutExchange exchange) {
		return BindingBuilder.bind(queue).to(exchange);
	}
- 解析
- 消息进入死信队列的条件
- 超时未消费
- 被拒收且不返回到队列
- 队列长度超出
- 延时队列是基于死信队列,例如普通队列设置30分钟超时,那么你直接去取死信队列中的数据,那么就是延时半小时的消息
- 消息进入死信队列的条件


 169
169


 被折叠的 条评论
为什么被折叠?
被折叠的 条评论
为什么被折叠?
 到【灌水乐园】发言


