


JDBC
JDBC
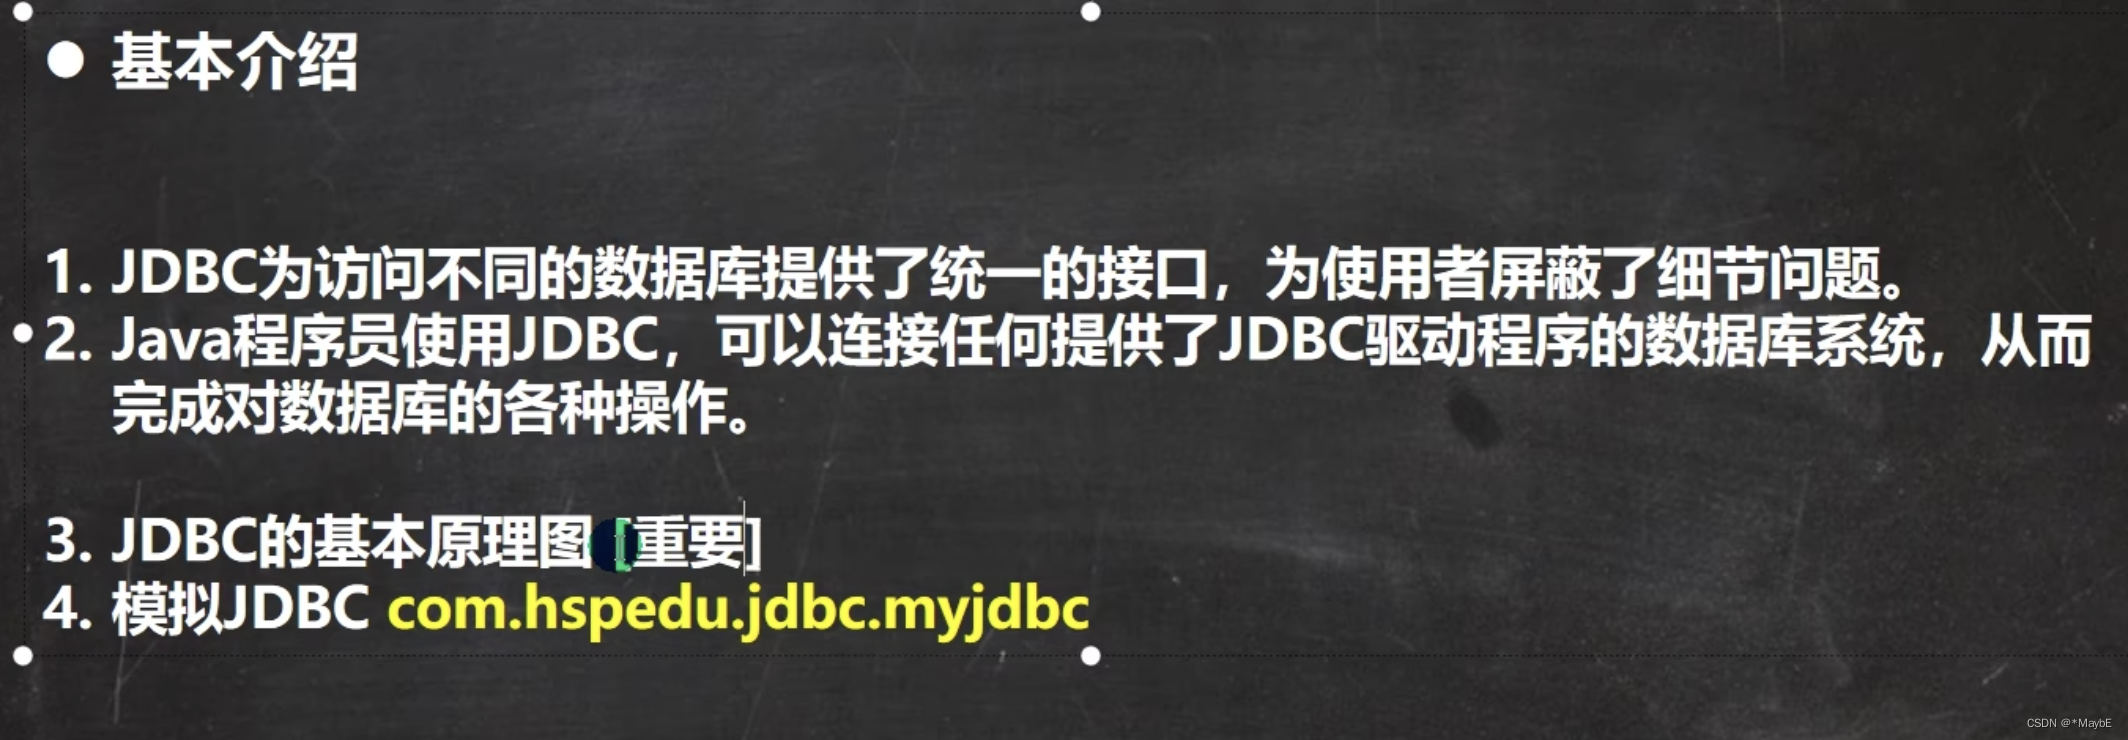
jdbc概述
### jdbc原理图
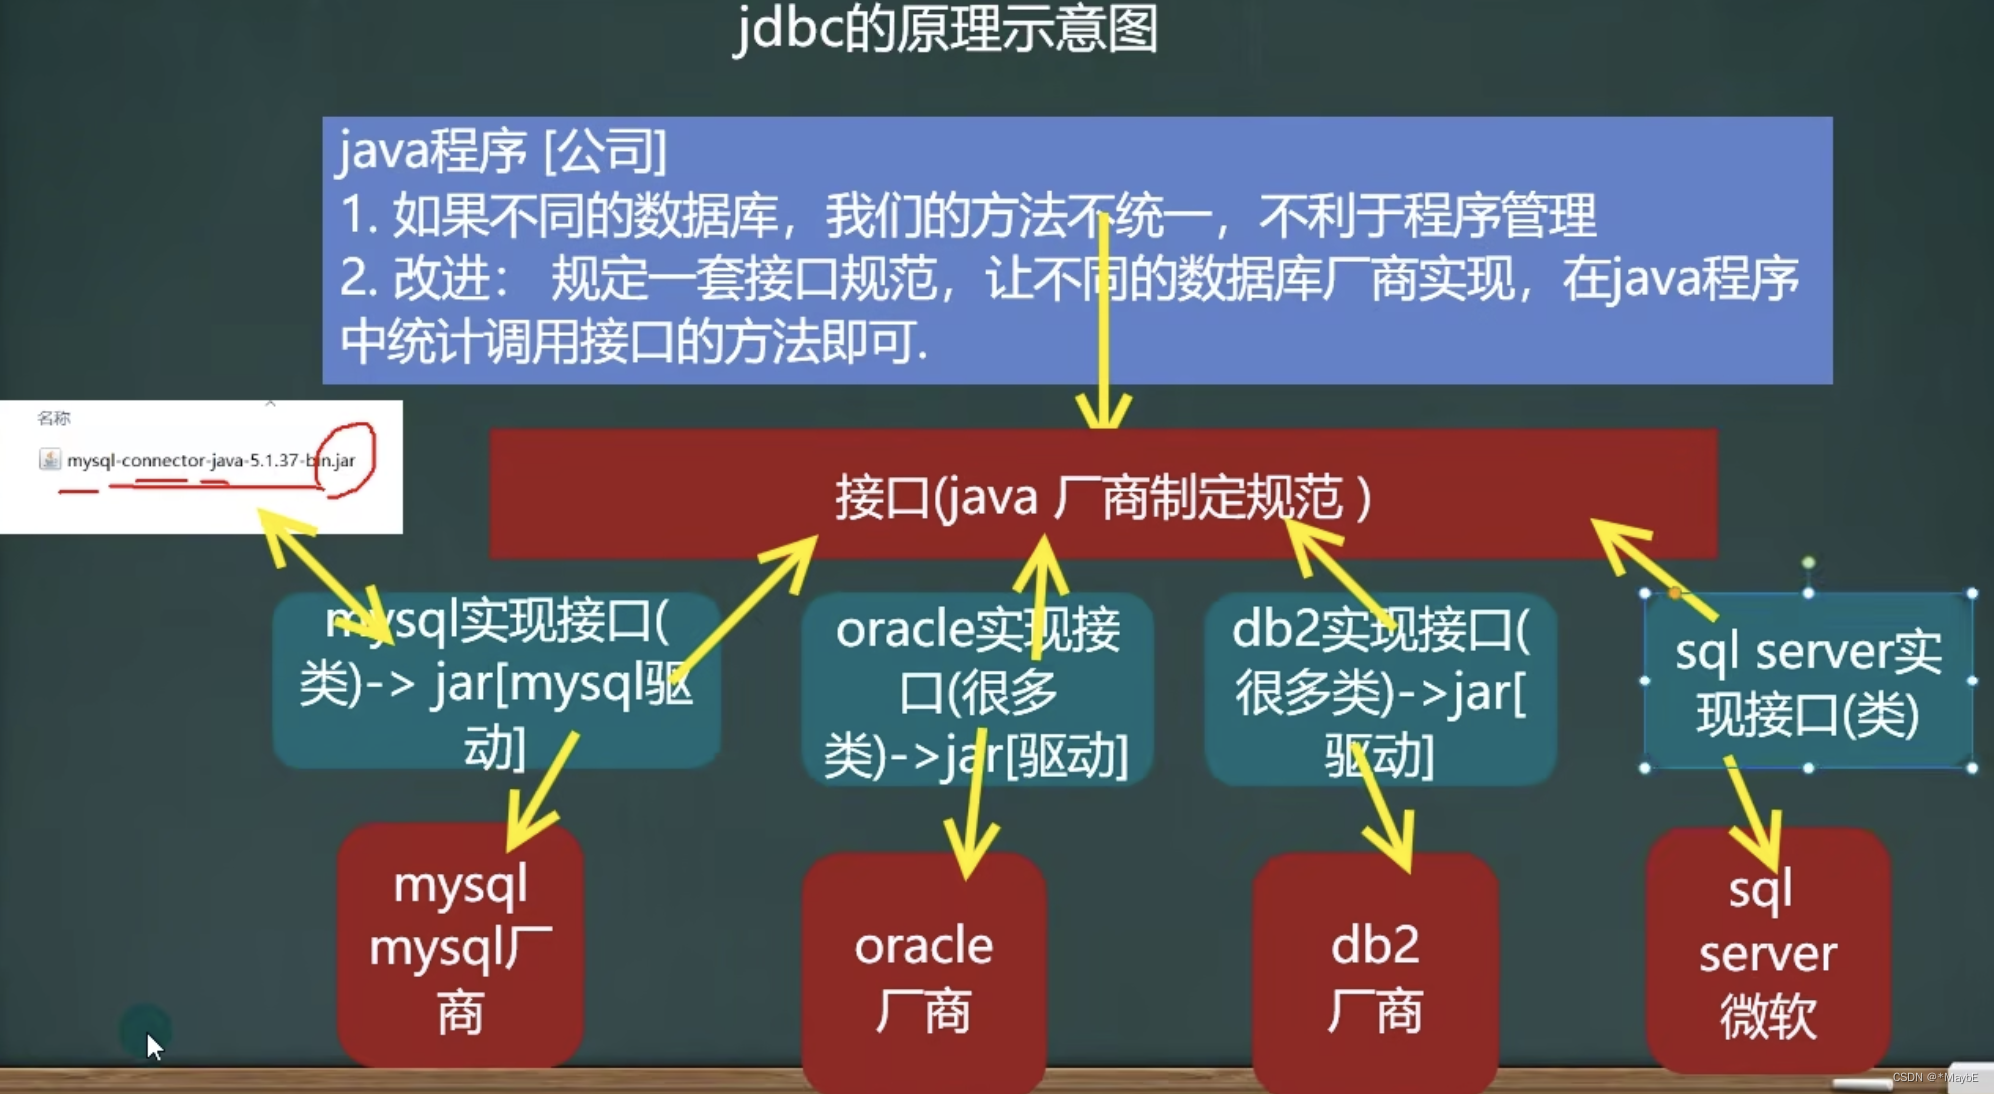
jdbc模拟实现
public interface JdbcInterface {
    //连接
    public Object getConnection();
    //crud
    public void curd();
    //关闭连接
    public void close();
}
public class MysqlJdbcImpl implements JdbcInterface {
    @Override
    public Object getConnection() {
        System.out.println("得到了mysql的连接");
        return null;
    }

    @Override
    public void curd() {
        System.out.println("完成mysql的增删改查");
    }

    @Override
    public void close() {
        System.out.println("关闭mysql连接");
    }
}
public class OracleJdbcImpl implements JdbcInterface{
    @Override
    public Object getConnection() {
        System.out.println("得到了oracle的连接");
        return null;
    }

    @Override
    public void curd() {
        System.out.println("完成oracle的增删改查");
    }

    @Override
    public void close() {
        System.out.println("关闭oracle连接");
    }
}
public class TestJdbc {
    public static void main(String[] args) {
        //完成对mysql的操作
        JdbcInterface jdbcInterface = new MysqlJdbcImpl();
        jdbcInterface.getConnection();//通过接口来调用实现类
        jdbcInterface.curd();
        jdbcInterface.close();
        //完成对oracle的操作
        jdbcInterface = new OracleJdbcImpl();
        jdbcInterface.getConnection();//通过接口来调用实现类
        jdbcInterface.curd();
        jdbcInterface.close();

    }
}
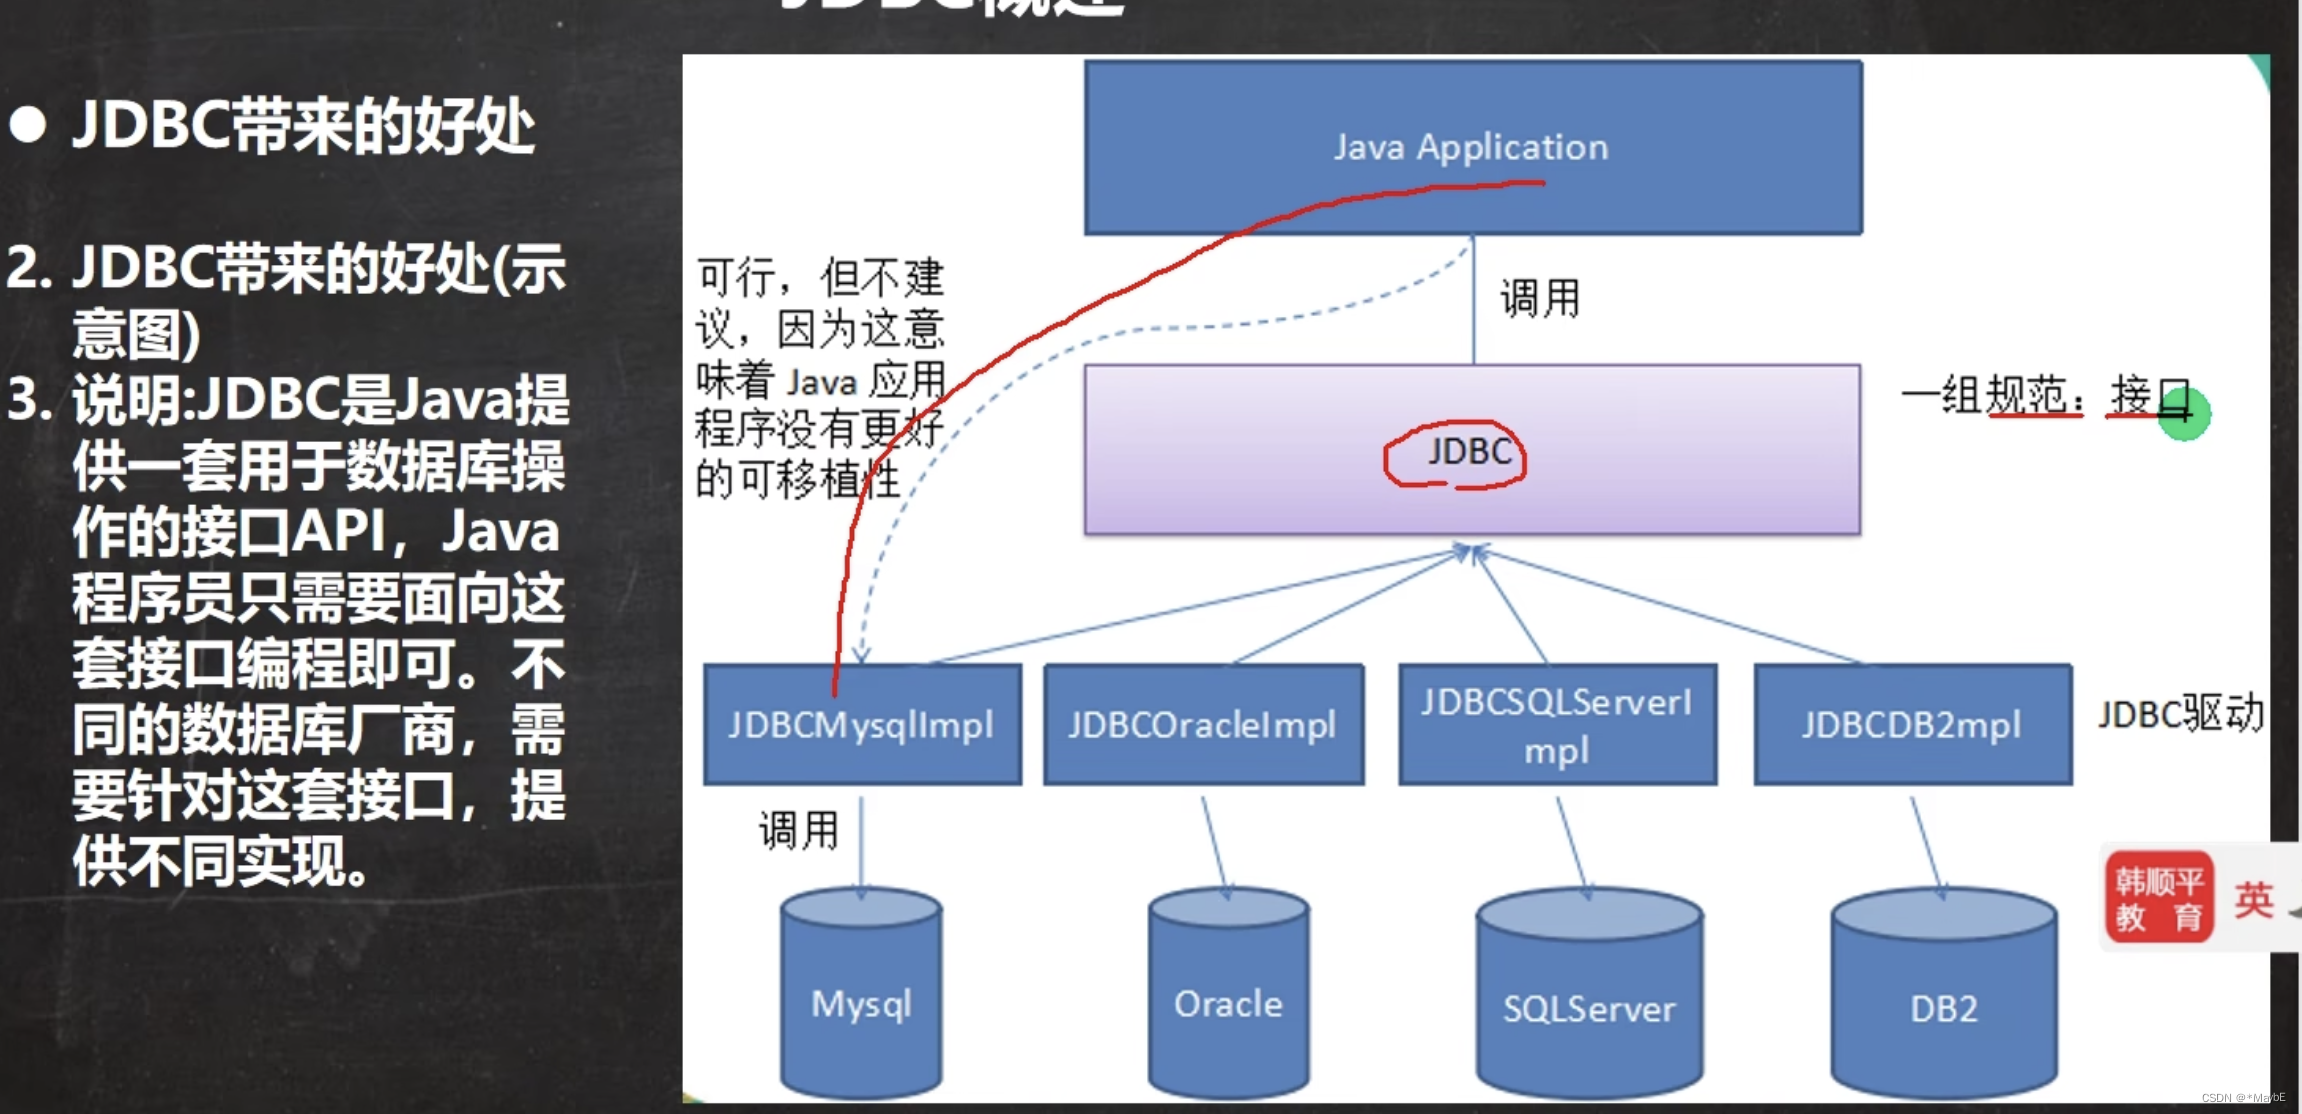
jdbc带来的好处
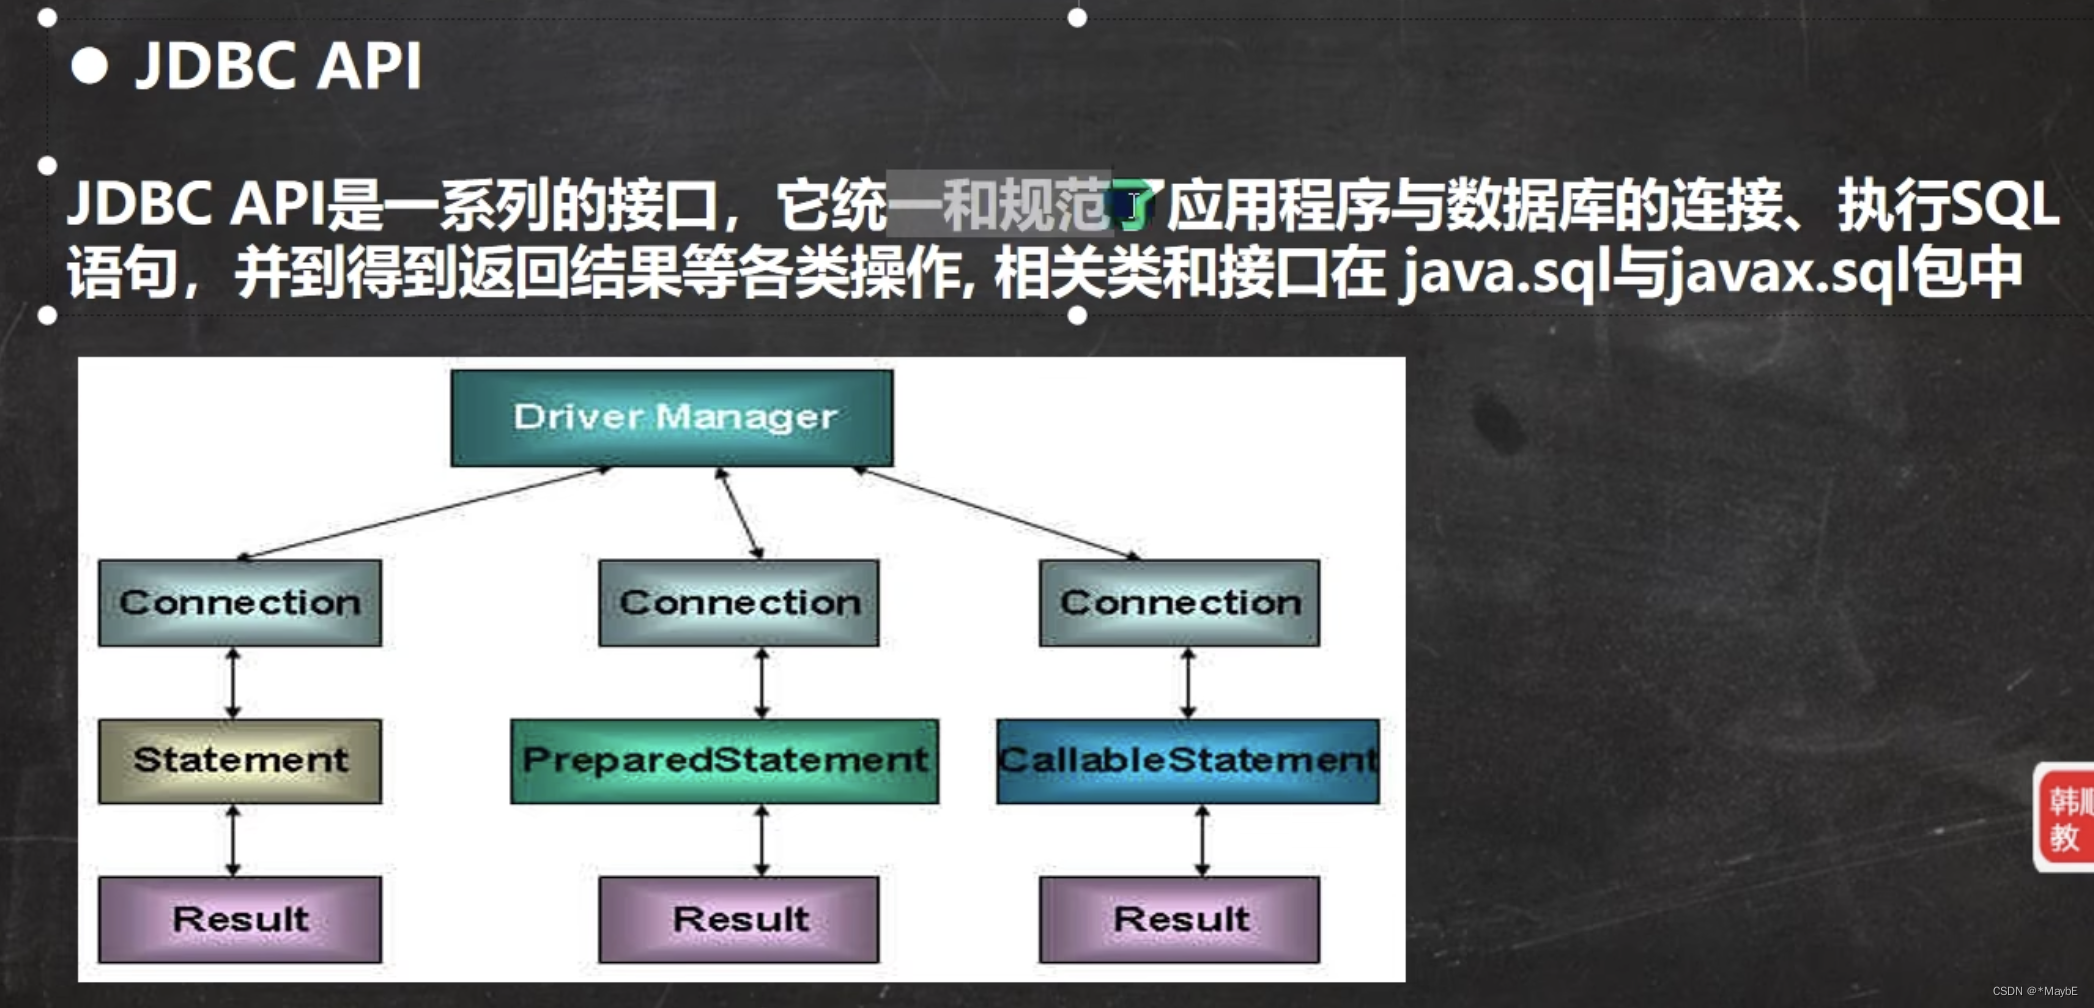
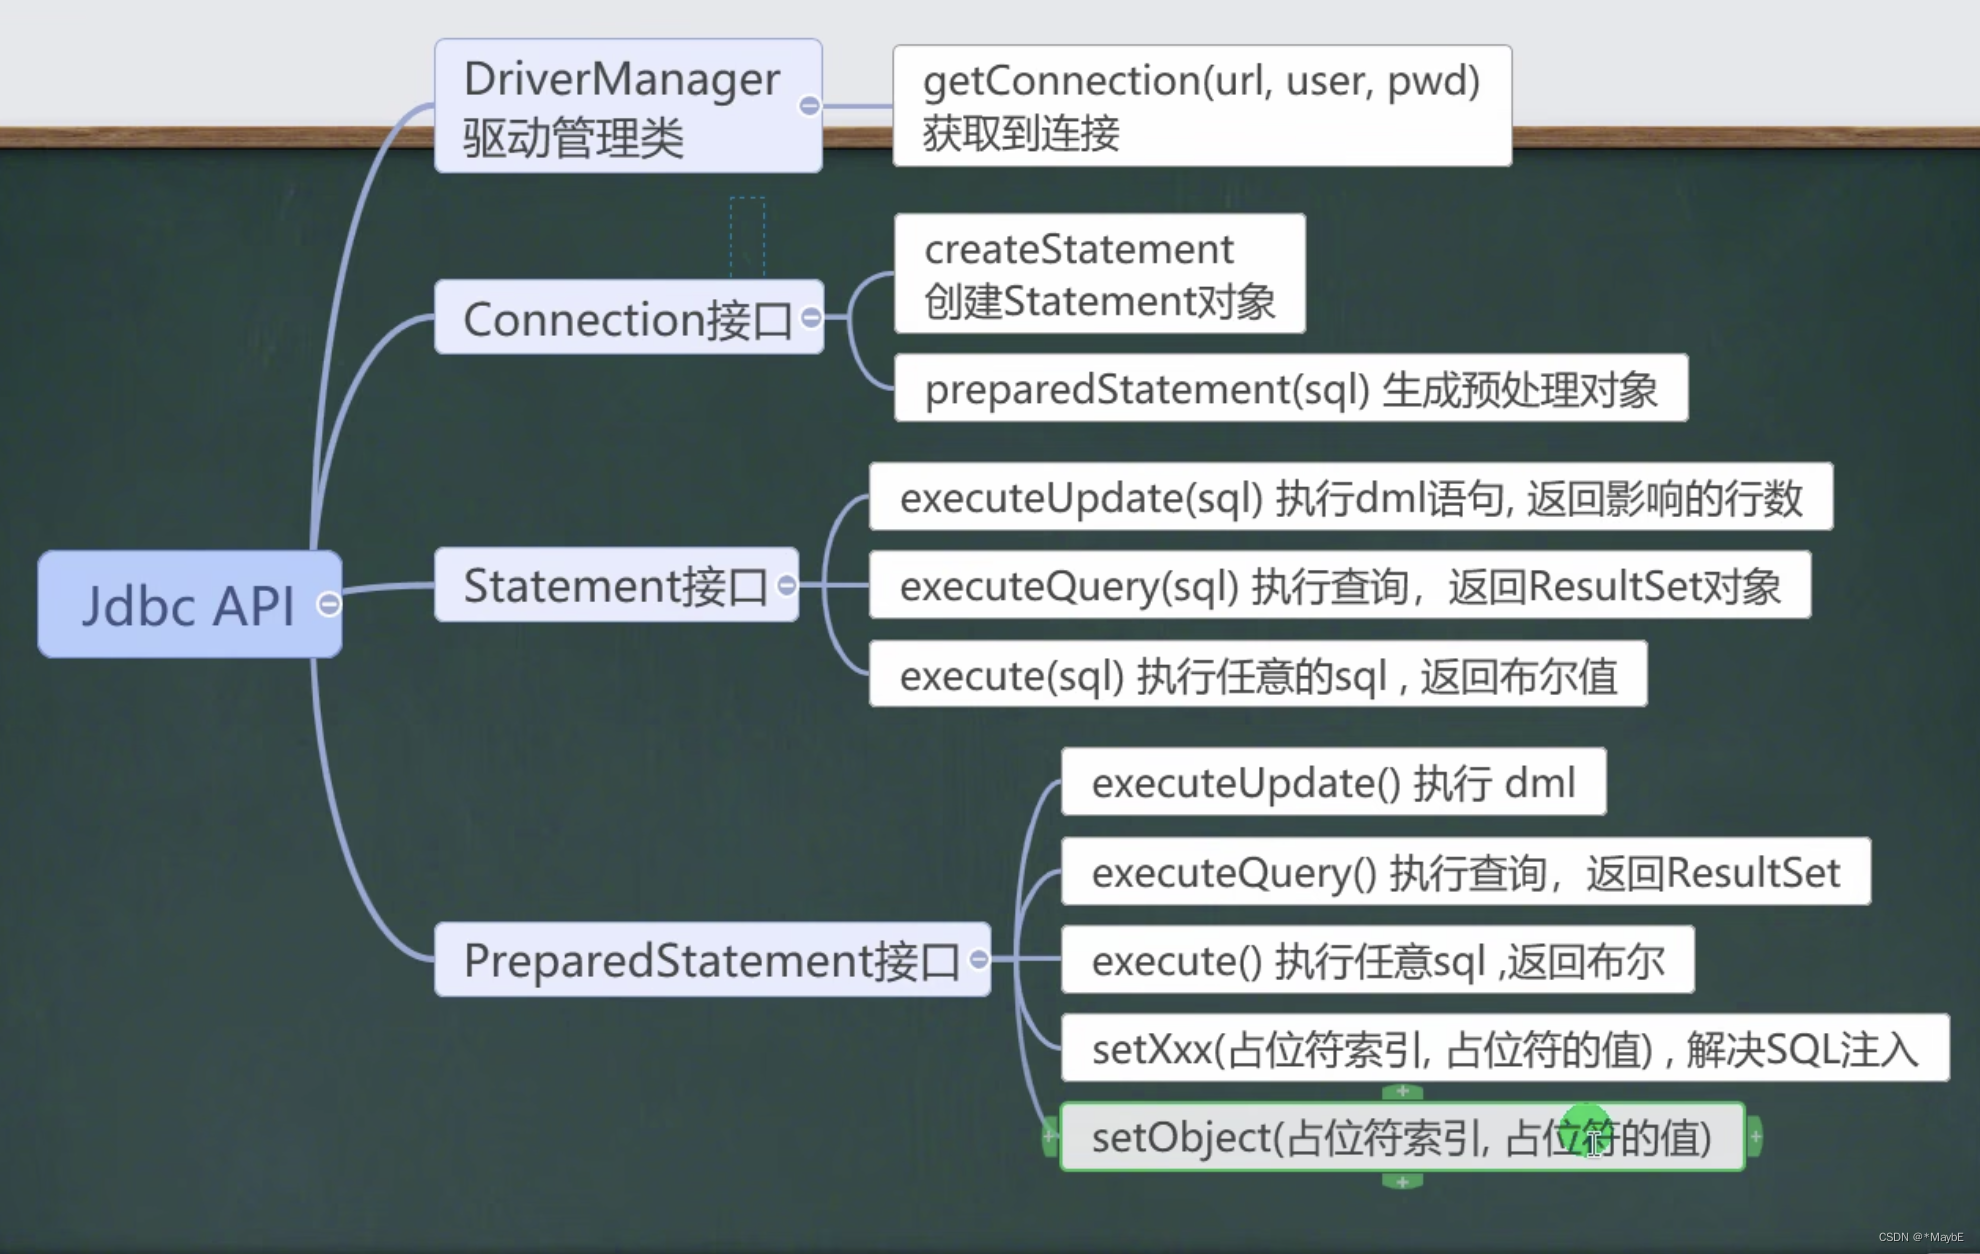
jdbc的api
JDBC快速入门
jdbc的编写步骤:
- 注册驱动-加载Driver类
- 获取连接-得到Connection
- 执行增删改查-发送SQL给mysql执行
- 释放资源-关闭相关连接
jdbc第一个程序
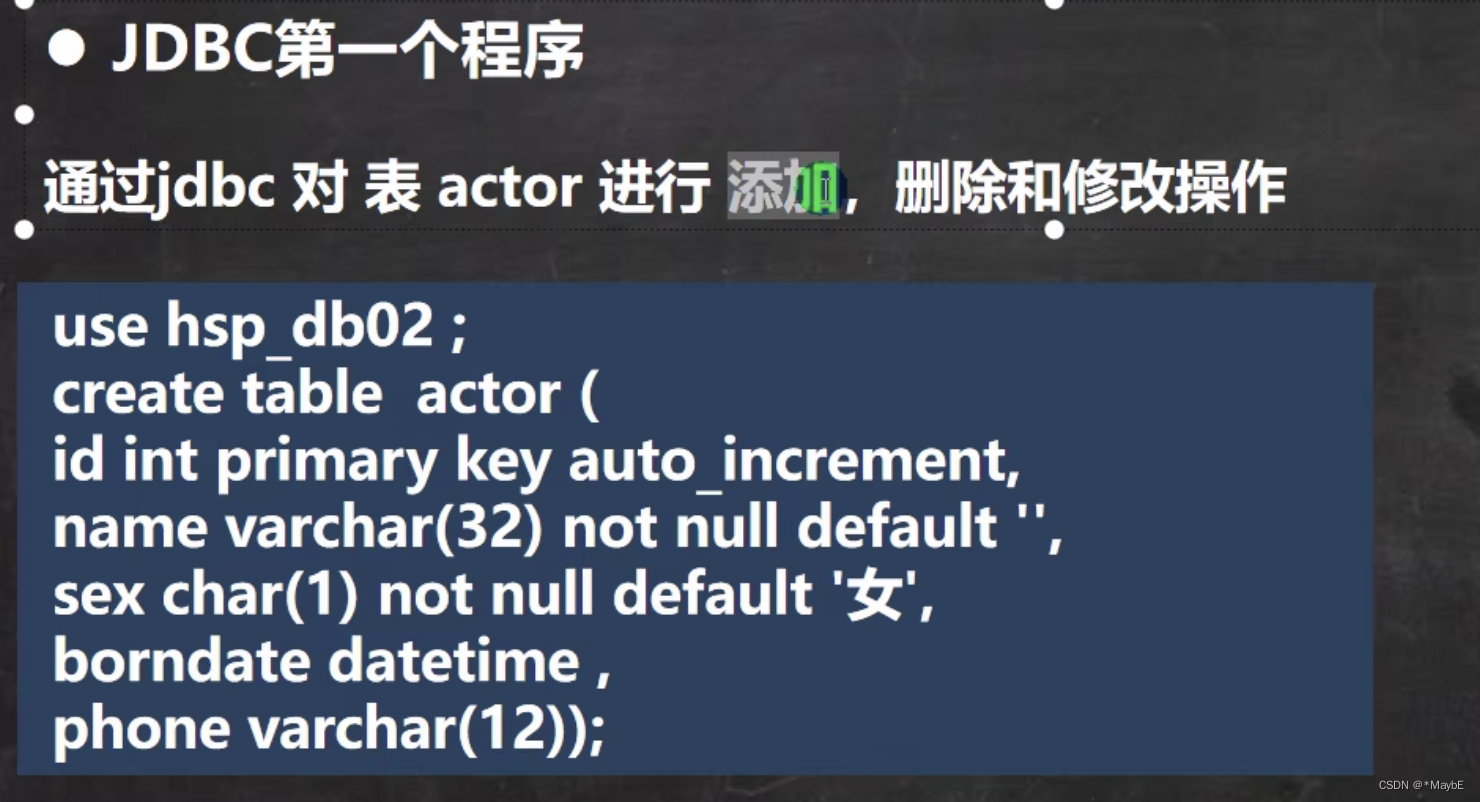
注意:
- executeUpdate()方法用于insert,delete或者update,返回int类型,表示影响的行数
- executeQuery()方法执行select查询,并返回ResultSet
package com.bijing.jdbc;

import com.mysql.cj.jdbc.Driver;

import java.sql.Connection;
import java.sql.SQLException;
import java.sql.Statement;
import java.util.Properties;

/**
 * @author 毕晶
 * @date 2022/7/22 8:43 PM
 * 这是第一个jdbc程序,完成简单的操作
 */
public class Jdbc01 {
    public static void main(String[] args) throws SQLException {
        //在idea中导入mysql的connector(官网可以下,选择独立平台)
        //1.注册驱动
        Driver driver = new Driver();//创建driver对象

        //2.得到连接
        //(1)jdbc:mysql://写法固定,表示通过jdbc的方式连接mysql
        //(2)localhost 主机,也可以是ip地址
        //(3)3306表示mysql监听的端口
        //(4)for_jdbc表示连接到哪个数据库
        //(5)mysql的本质就是前面学的socket连接
        String url = "jdbc:mysql://localhost:3306/for_jdbc";
        // 将用户名和密码放到Properties对象中
        Properties properties = new Properties();
        //user和password根据数据库用户名和密码
        properties.setProperty("user","root");
        properties.setProperty("password","root1234");
        Connection connect = driver.connect(url, properties);

        //3.执行语句
//        String sql = "insert into actor values(null,'刘德华','男','1970-11-11','110');";
        String sql = "update actor set name = '周星驰' where id=1;";
        //得到statement对象用于执行sql语句并返回生成结果的对象
        Statement statement = connect.createStatement();
        int rows = statement.executeUpdate(sql);//如果是dml语句,返回的就是影响的行数
        System.out.println(rows>0?"成功":"失败");
        //4.关闭连接
        statement.close();
        connect.close();
    }
}
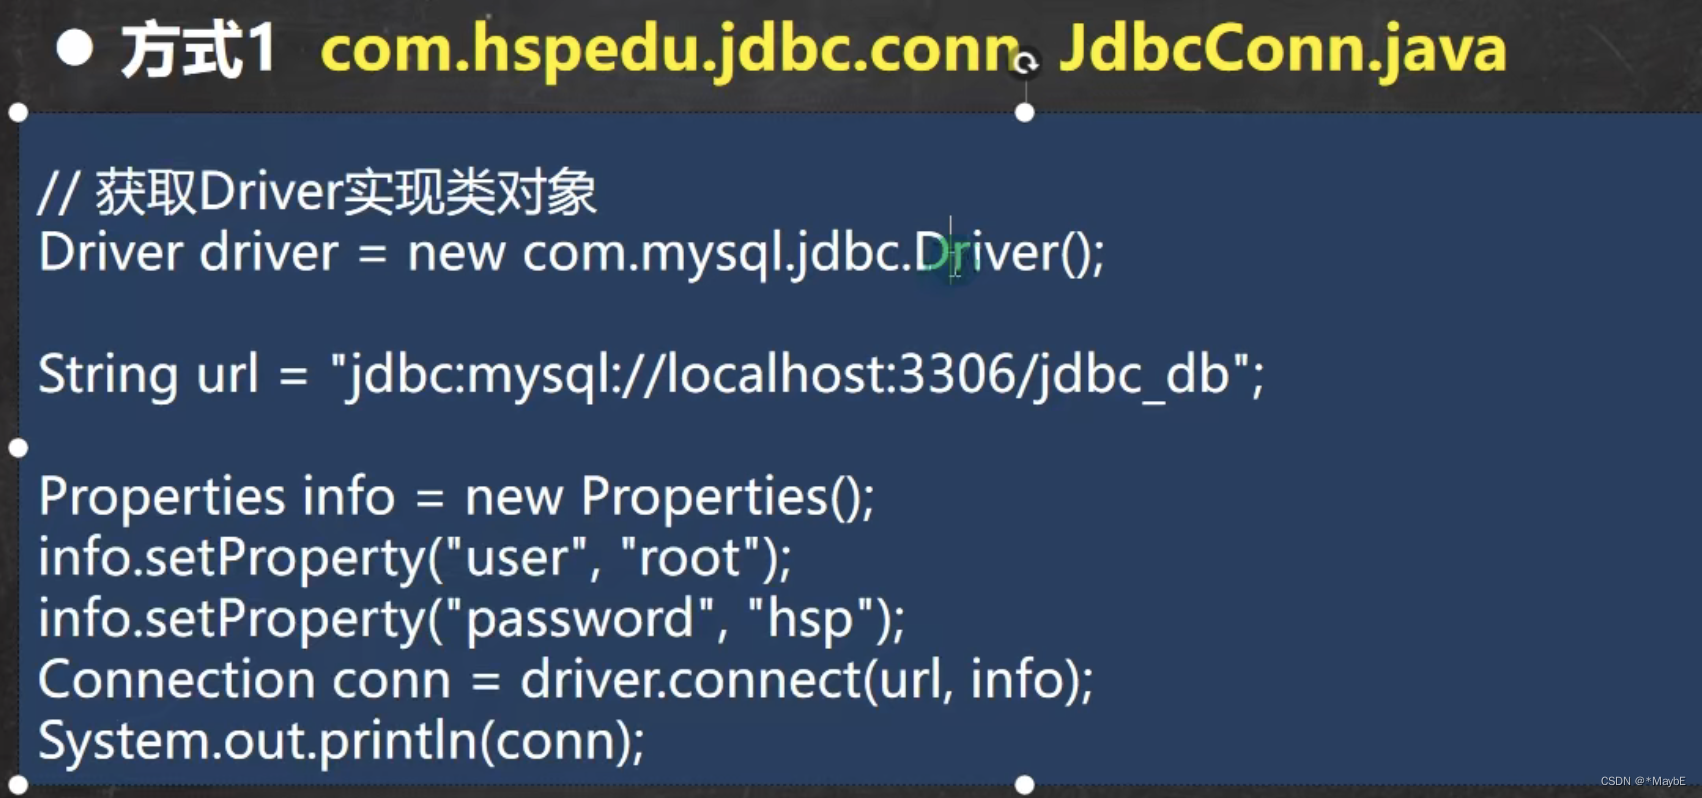
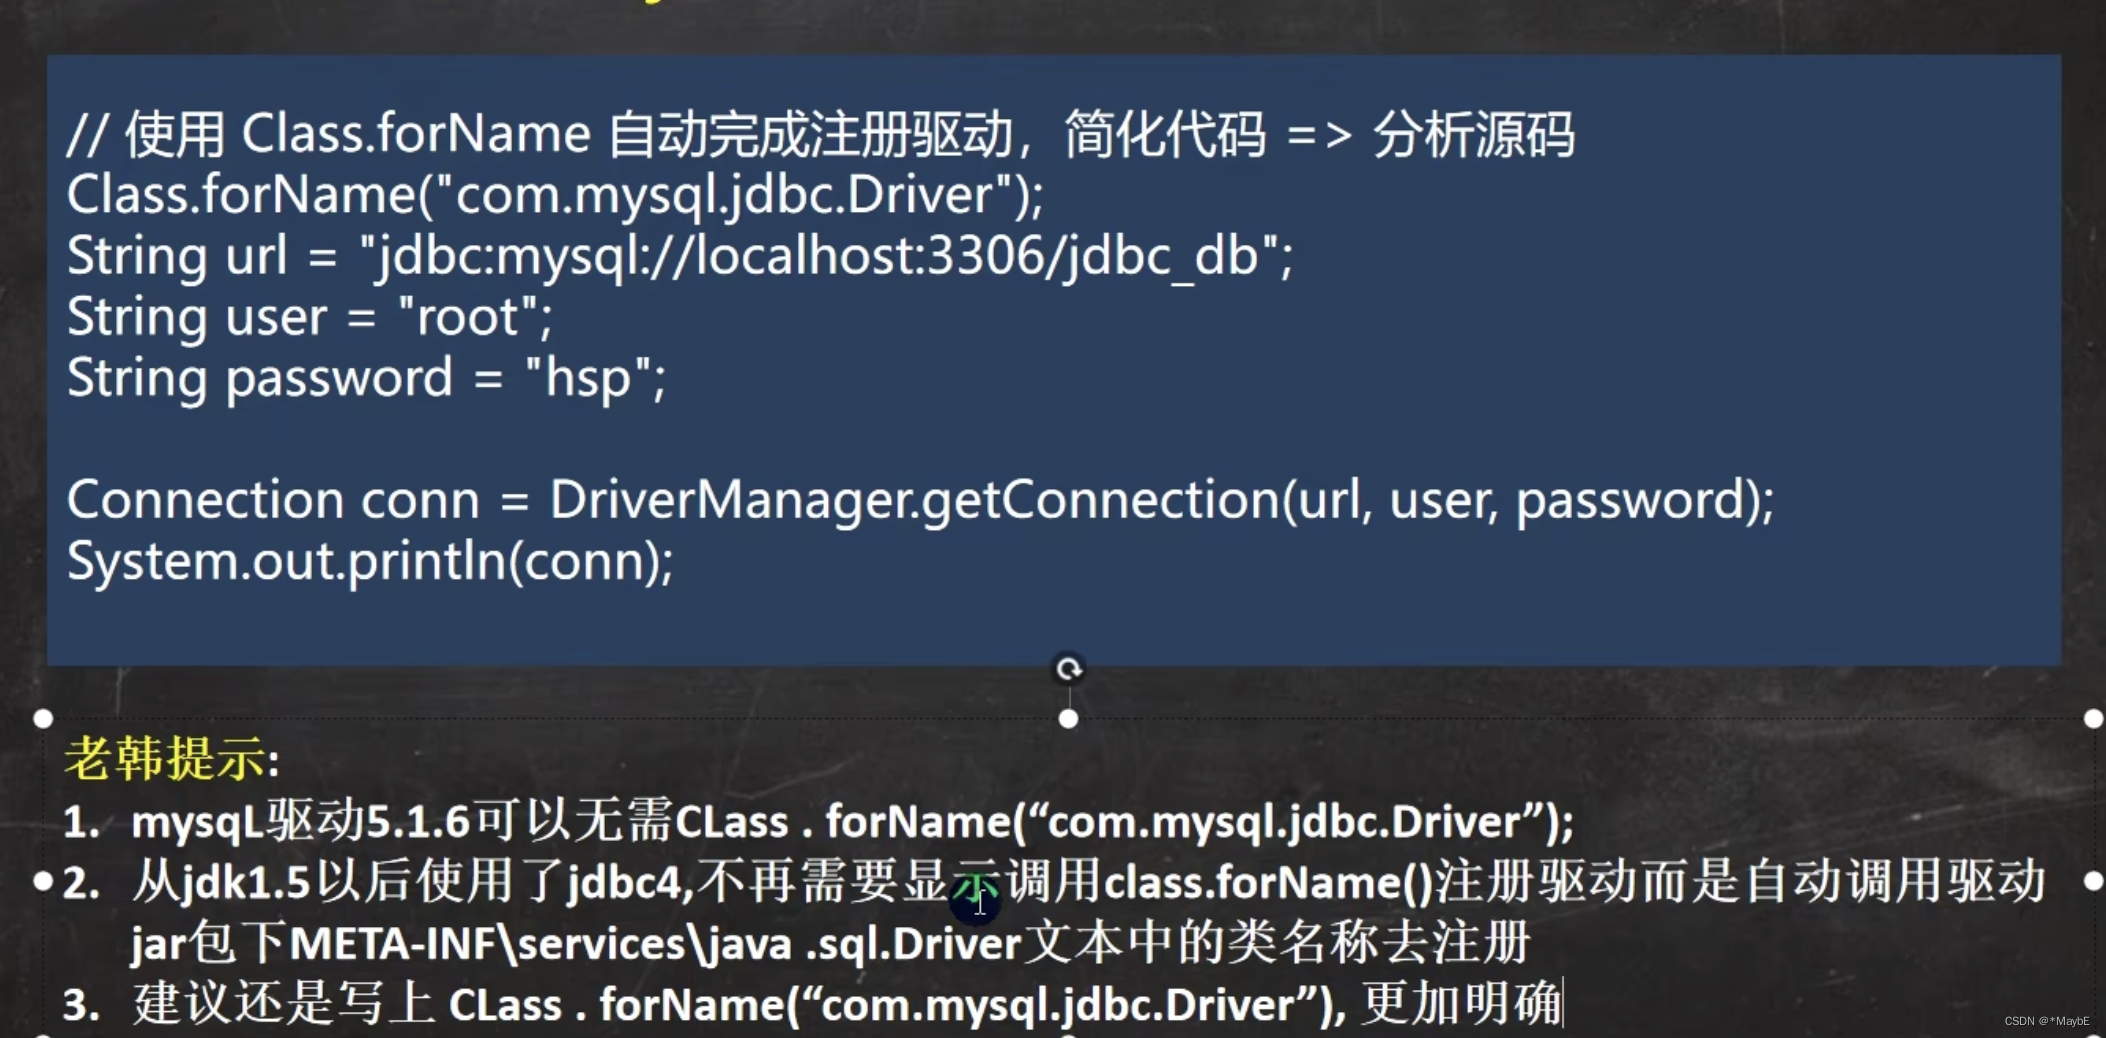
连接数据库的5种方式
方式一:静态加载
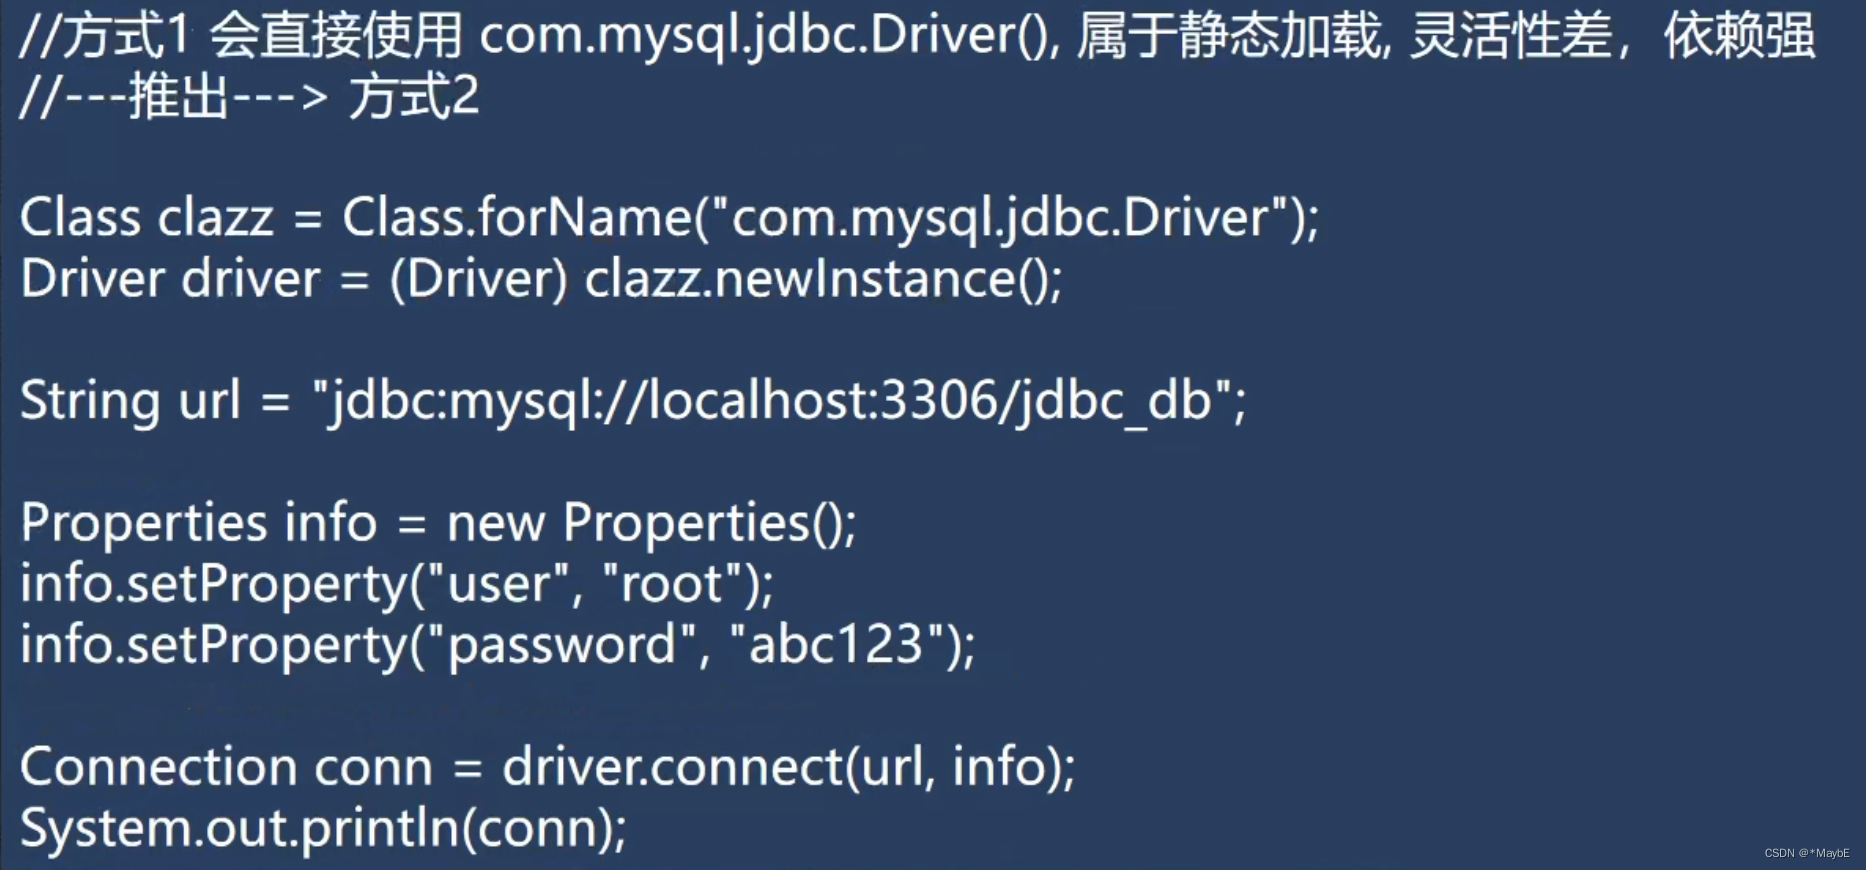
方式二:动态加载,反射
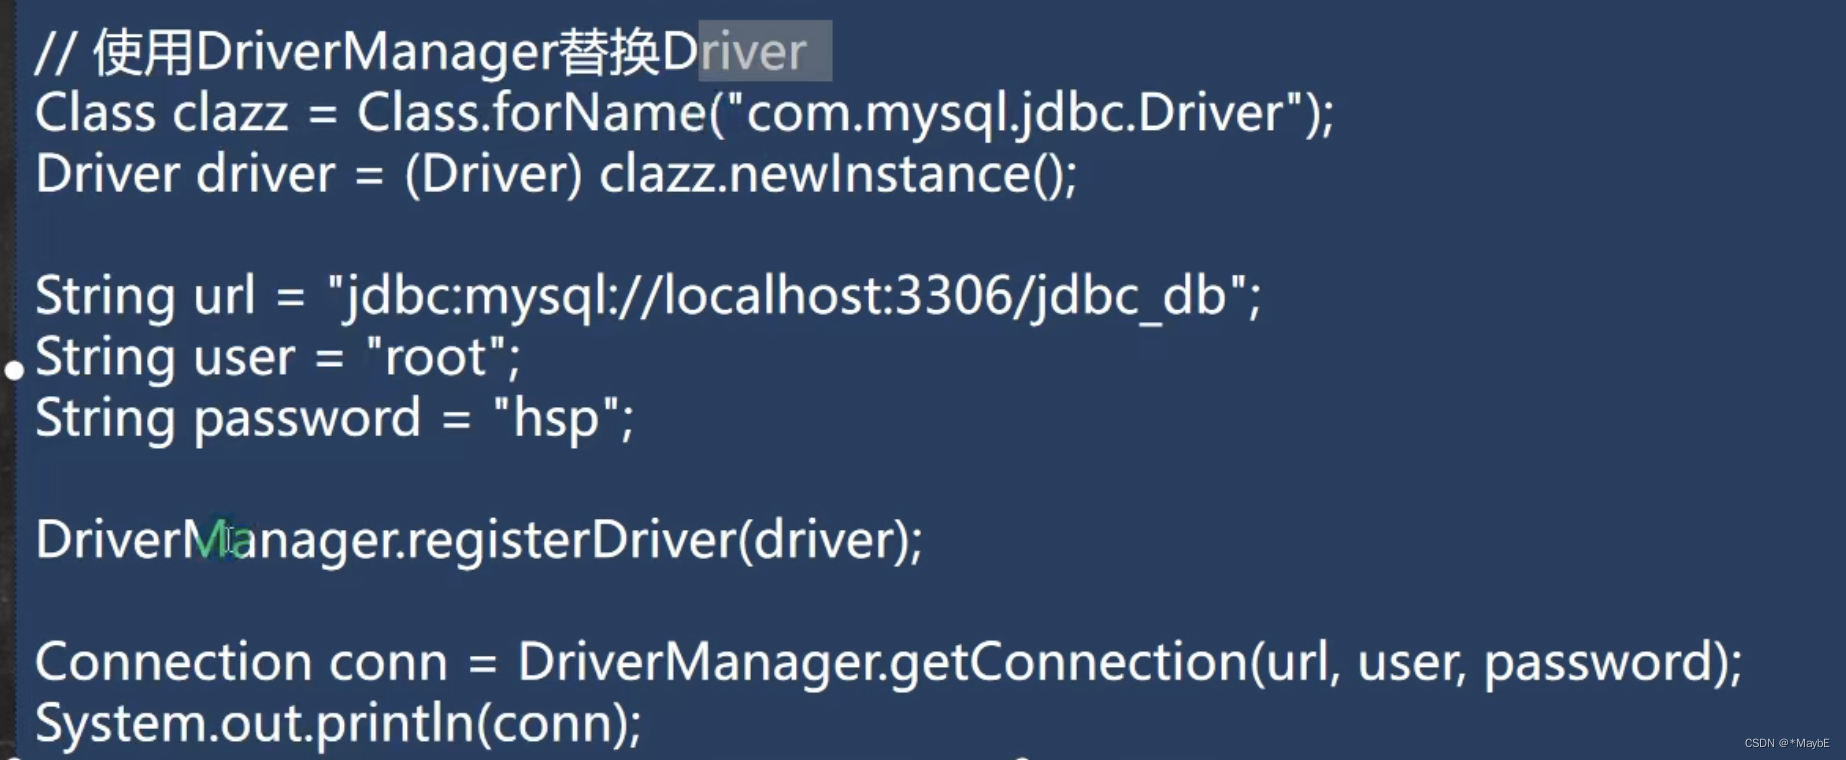
方式三:使用DriverManager替换Driver
方式四:DriverManager
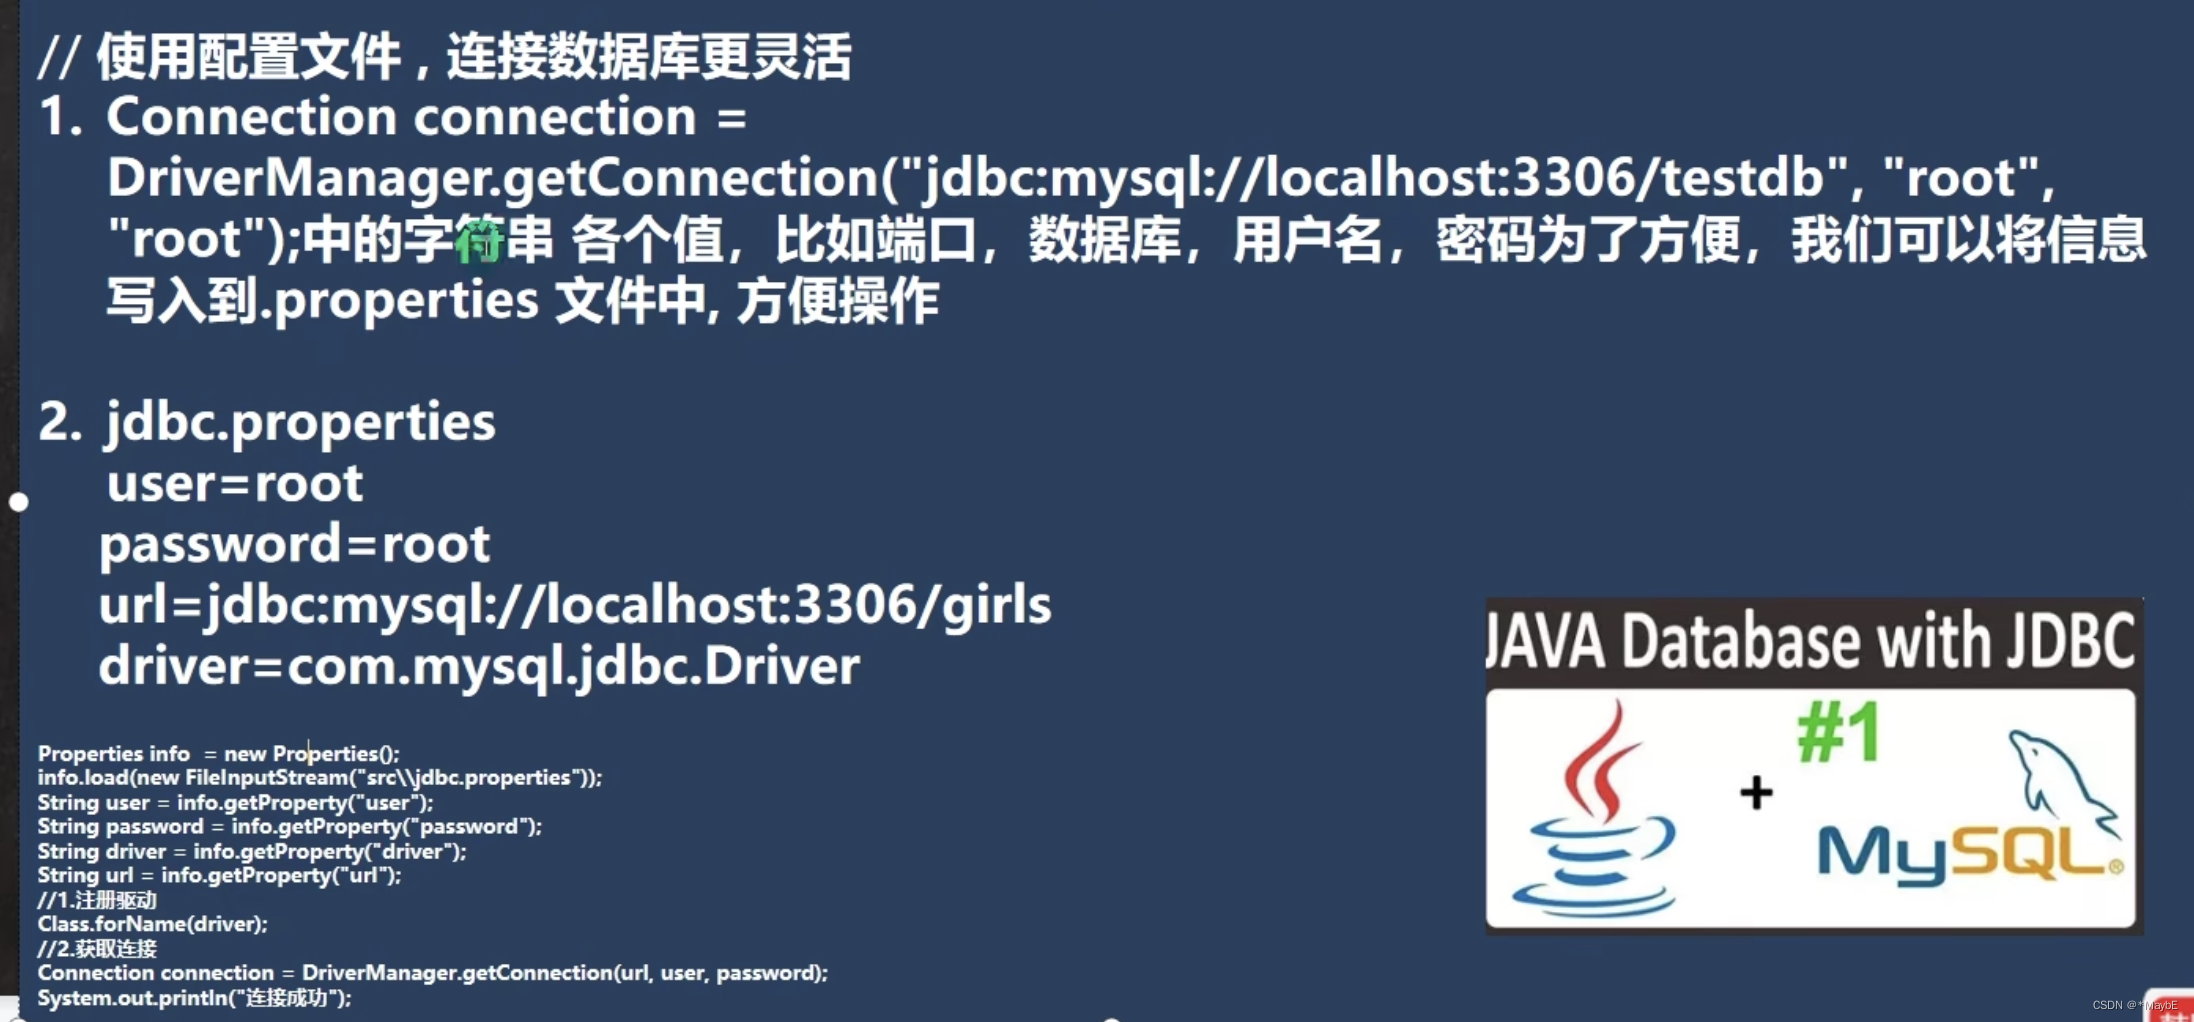
方式五:
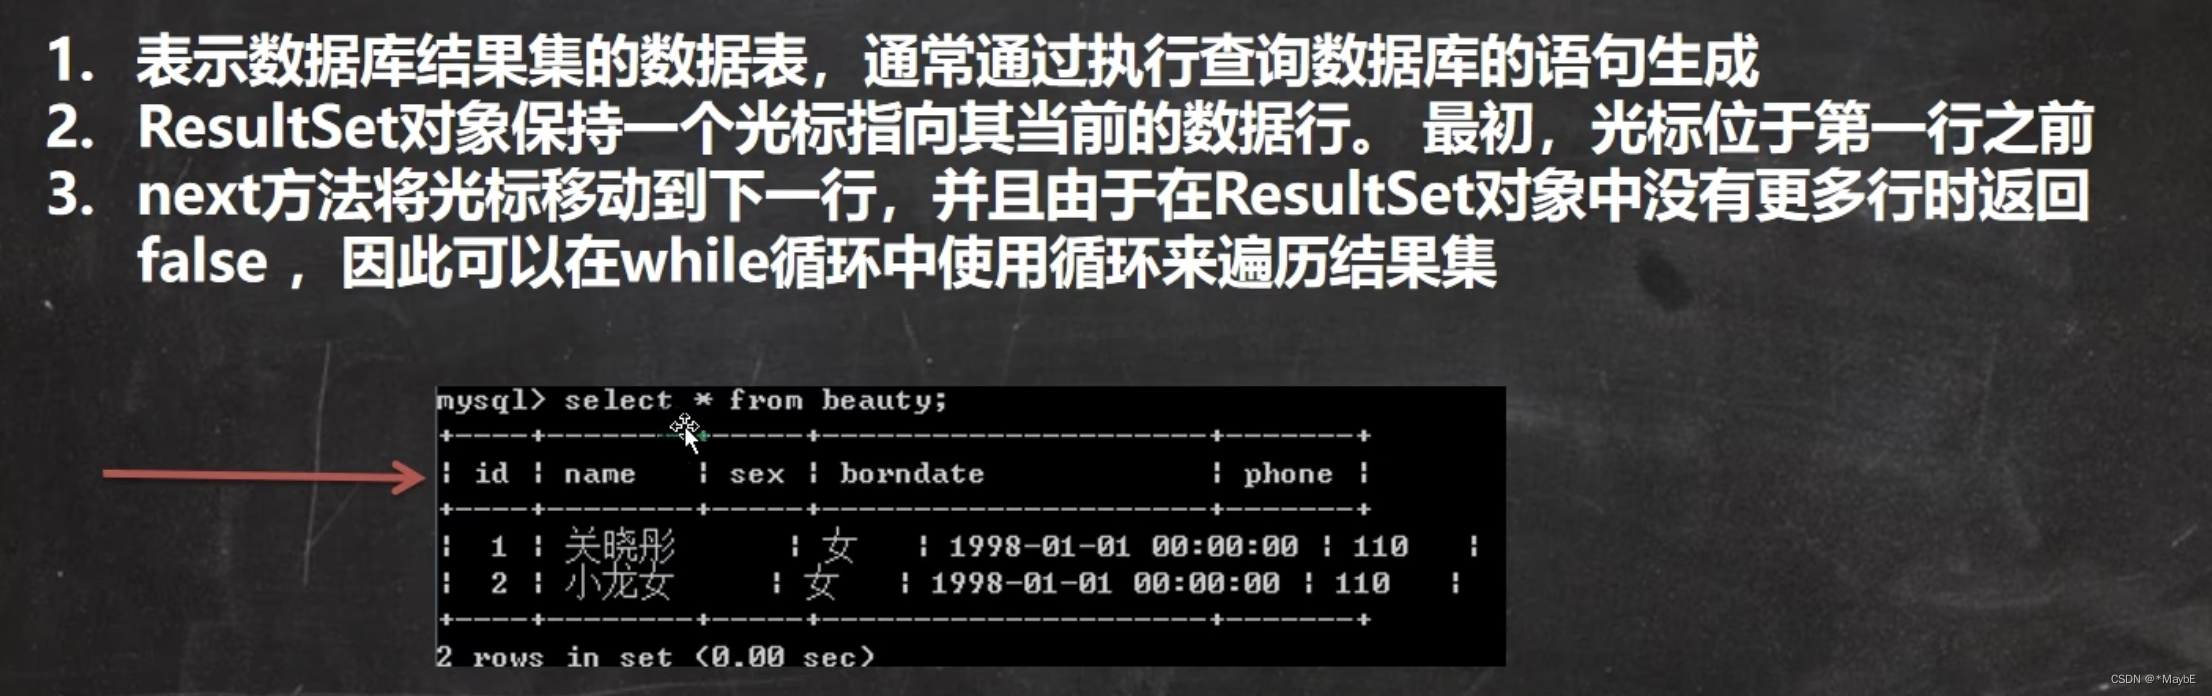
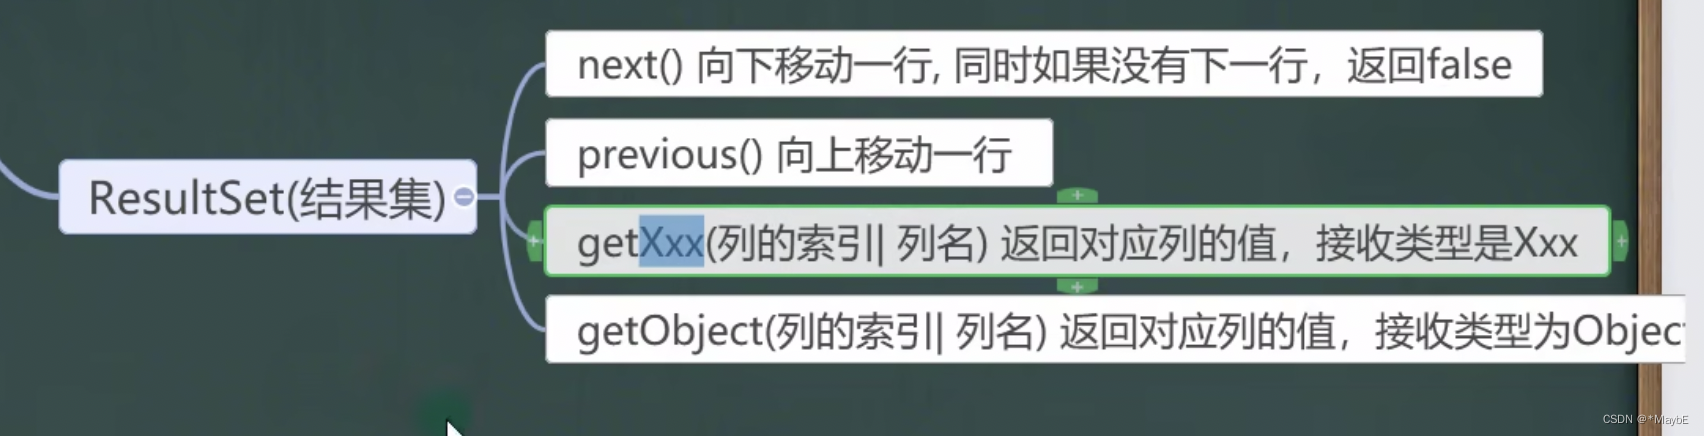
ResultSet(结果集)
基本介绍
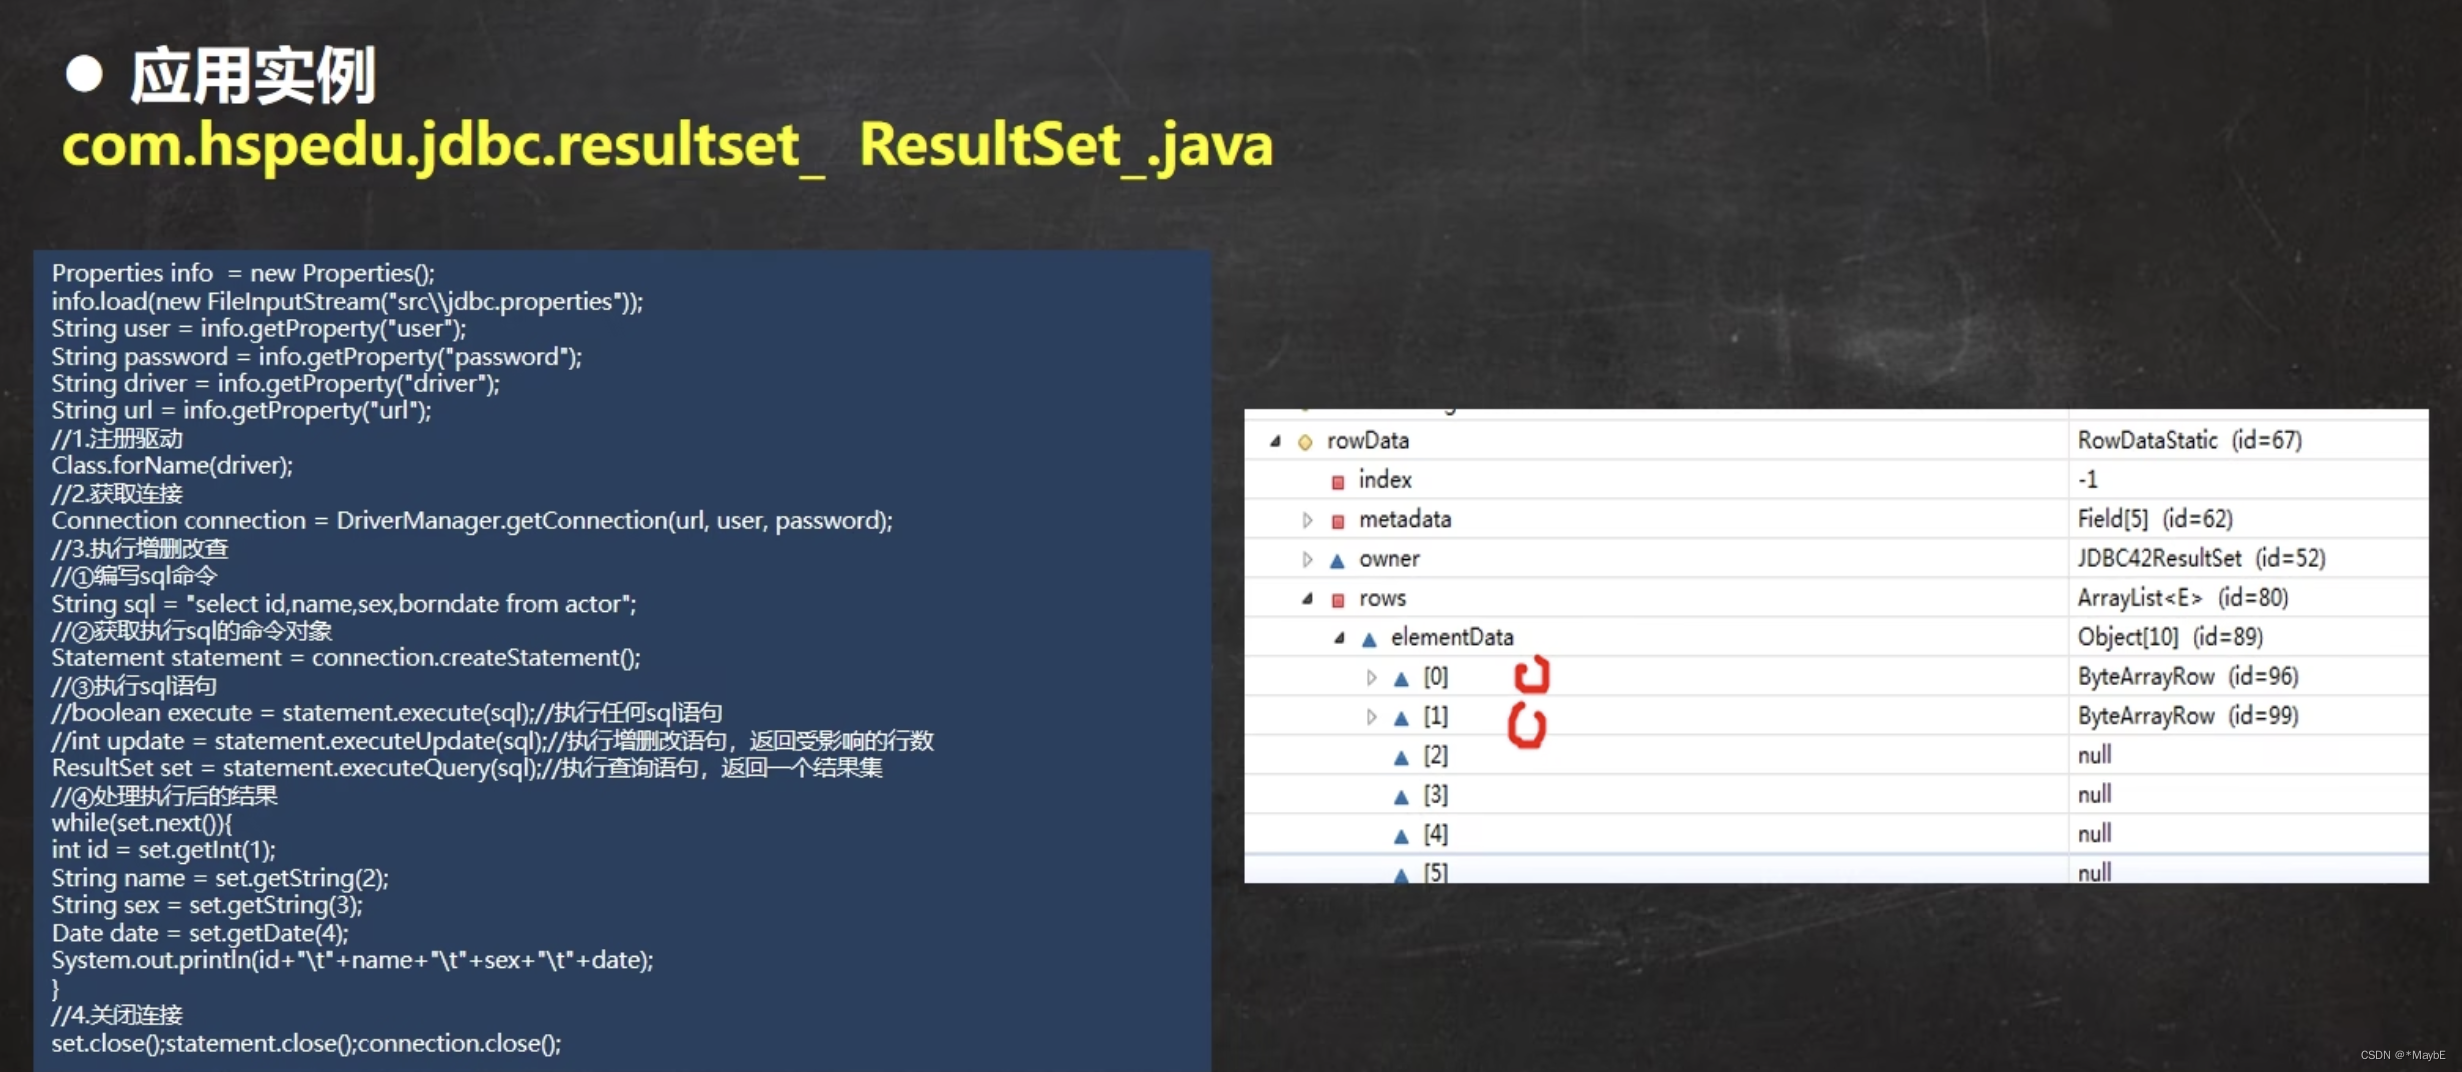
案例
package com.bijing.jdbc.resultset_;

import java.io.FileInputStream;
import java.sql.*;
import java.util.Properties;

/**
 * @author 毕晶
 * @date 2022/7/23 8:10 PM
 * 演示select语句返回一个resultSet,并取出结果
 */
@SuppressWarnings({"all"})
public class ResultSet_ {
    public static void main(String[] args) throws Exception {
        //自动注册驱动并获得网络连接
        Properties properties = new Properties();
        properties.load(new FileInputStream("./src/jdbc.properties"));
        String url = properties.get("url").toString();
        String user = properties.get("user").toString();
        String password = properties.get("password").toString();
        Connection connection = DriverManager.getConnection(url, user, password);
        String sql = "SELECT id,name,sex,bordate FROM actor;";
        Statement statement = connection.createStatement();
        //executeUpdate()方法用于insert,delete或者update,返回int类型,表示影响的行数
        //executeQuery()方法执行select查询,并返回ResultSet对象
        ResultSet resultSet = statement.executeQuery(sql);
        //使用while循环取出数据
        while (resultSet.next()) {//next方法会让光标下移,如果没有更多行返回false
            int id = resultSet.getInt(1);//获取该行的第一列
            String name = resultSet.getString(2);//获取改行的第二列
            String gender = resultSet.getString(3);//获取第三列
            Date date = resultSet.getDate(4);//获取第四列
            System.out.println(id + "\t" + name + "\t" + gender + "\t" + date);
        }
        resultSet.close();
        statement.close();
        connection.close();
    }

}
源码
Statement
基本介绍
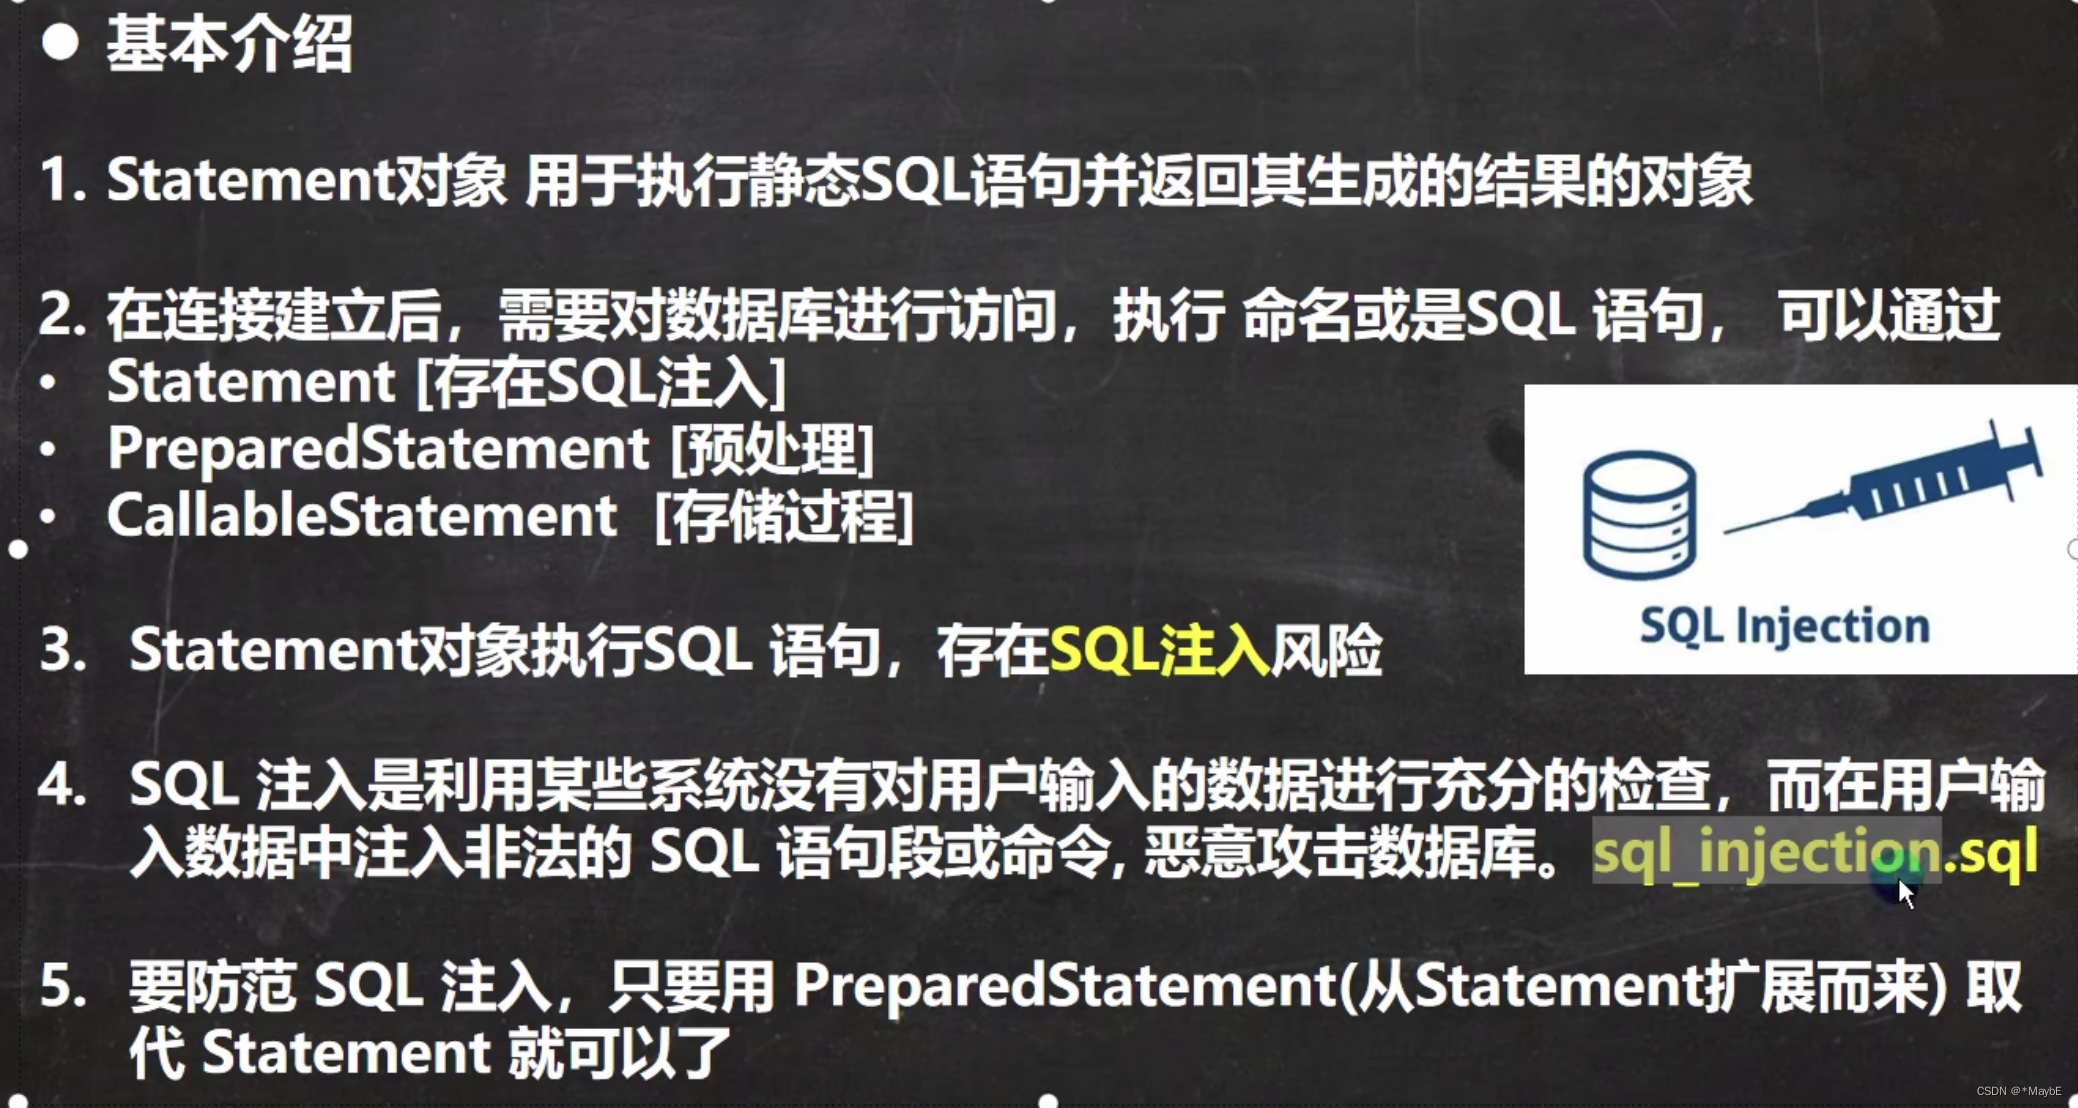
sql注入
-- 用户名: 1' or 密码: or '1'='1
SELECT *
FROM admin
WHERE name = '1'
   OR '
  AND pwd = '
   OR '1' = '1';
package com.bijing.jdbc.statement_;

import java.io.FileInputStream;
import java.sql.Connection;
import java.sql.DriverManager;
import java.sql.ResultSet;
import java.sql.Statement;
import java.util.Properties;
import java.util.Scanner;

/**
 * @author 毕晶
 * @date 2022/7/24 2:46 PM
 * 演示sql注入问题
 */
@SuppressWarnings({"all"})
public class Statement_ {
    public static void main(String[] args) throws Exception {
        //用户输入用户名和密码
        Scanner scanner = new Scanner(System.in);
        System.out.println("请输入管理员名字:");//1' or
        String admin_name = scanner.nextLine();
        System.out.println("请输入管理员密码:");// or '1'='1
        String admin_pwd = scanner.nextLine();
        Class.forName("com.mysql.cj.jdbc.Driver");
        Properties properties = new Properties();
        properties.load(new FileInputStream("./src/jdbc.properties"));
        String url = properties.get("url").toString();
        String user = properties.get("user").toString();
        String password = properties.get("password").toString();
        Connection connection = DriverManager.getConnection(url, user, password);
        String sql = "SELECT name,pwd FROM admin WHERE name = '" + admin_name + "' AND  pwd = '" + admin_pwd + "'";
        Statement statement = connection.createStatement();
        ResultSet resultSet = statement.executeQuery(sql);
        System.out.println(resultSet.next() ? "登录成功" : "登录失败");
        resultSet.close();
        statement.close();
        connection.close();

    }
}
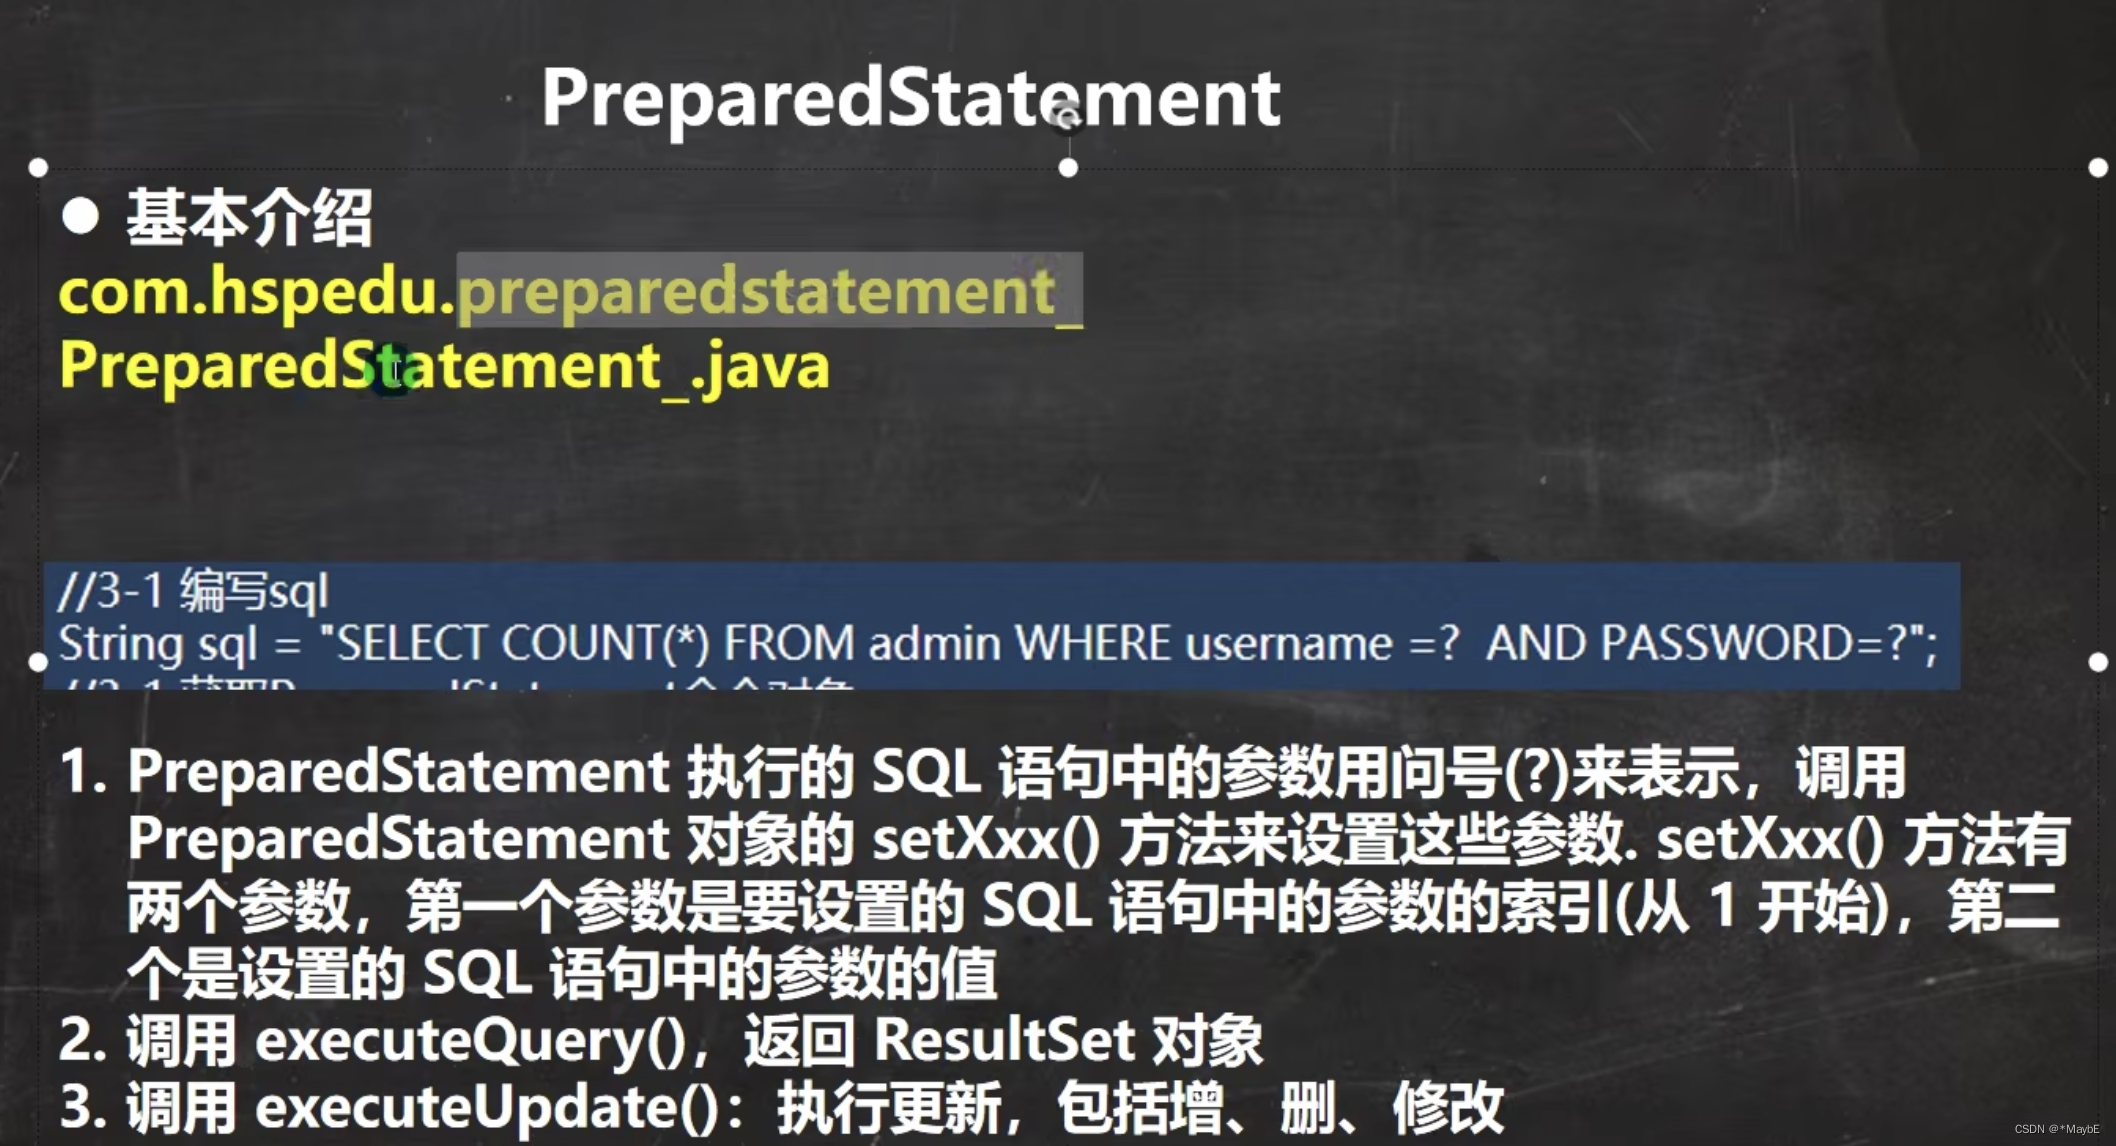
PreparedStatement
基本介绍
好处

预处理查询
package com.bijing.jdbc.preparedstatement_;

import java.io.FileInputStream;
import java.sql.Connection;
import java.sql.DriverManager;
import java.sql.PreparedStatement;
import java.sql.ResultSet;
import java.util.Properties;
import java.util.Scanner;

/**
 * @author 毕晶
 * @date 2022/7/24 3:14 PM
 */
@SuppressWarnings({"all"})
public class PreparedStatement_ {
    public static void main(String[] args) throws Exception {
        //用户输入用户名和密码
        Scanner scanner = new Scanner(System.in);
        System.out.println("请输入管理员名字:");//1' or
        String admin_name = scanner.nextLine();
        System.out.println("请输入管理员密码:");// or '1'='1
        String admin_pwd = scanner.nextLine();
        Class.forName("com.mysql.cj.jdbc.Driver");
        Properties properties = new Properties();
        properties.load(new FileInputStream("./src/jdbc.properties"));
        String url = properties.get("url").toString();
        String user = properties.get("user").toString();
        String password = properties.get("password").toString();
        Connection connection = DriverManager.getConnection(url, user, password);
        String sql = "SELECT name,pwd FROM admin WHERE name = ? AND pwd = ?;";
        //返回的是一个实现了PreparedStatement接口的类的一个对象
        PreparedStatement preparedStatement = connection.prepareStatement(sql);
        preparedStatement.setString(1, admin_name);
        preparedStatement.setString(2, admin_pwd);
        ResultSet resultSet = preparedStatement.executeQuery();
//        ResultSet resultSet = preparedStatement.executeQuery(sql);这样会报错,除非sql中不含占位符
        System.out.println(resultSet.next() ? "登录成功" : "登录失败");
        resultSet.close();
        preparedStatement.close();
        connection.close();
    }
}
预处理dml
class insert_ {
    public static void main(String[] args) throws Exception {
        Scanner scanner = new Scanner(System.in);
        System.out.println("请输入管理员名字:");
        String admin_name = scanner.nextLine();
        System.out.println("请输入管理员密码:");
        String admin_pwd = scanner.nextLine();
        Class.forName("com.mysql.cj.jdbc.Driver");
        Properties properties = new Properties();
        properties.load(new FileInputStream("./src/jdbc.properties"));
        String url = properties.get("url").toString();
        String user = properties.get("user").toString();
        String password = properties.get("password").toString();
        Connection connection = DriverManager.getConnection(url, user, password);
		String sql = "INSERT INTO admin VALUES (?,?);";
//        String sql2 = "UPDATE admin SET name = ? , pwd = ? WHERE name = 'jack'";
//        String sql3 = "DELETE FROM admin WHERE name = ? AND pwd = ?;";        //返回的是一个实现了PreparedStatement接口的类的一个对象
        PreparedStatement preparedStatement = connection.prepareStatement(sql);
        preparedStatement.setString(1, admin_name);
        preparedStatement.setString(2, admin_pwd);
        int rows = preparedStatement.executeUpdate();
        System.out.println(rows > 0 ? "成功" : "失败");
        preparedStatement.close();
        connection.close();
    }
}
api小结
封装JDBCUtils工具类
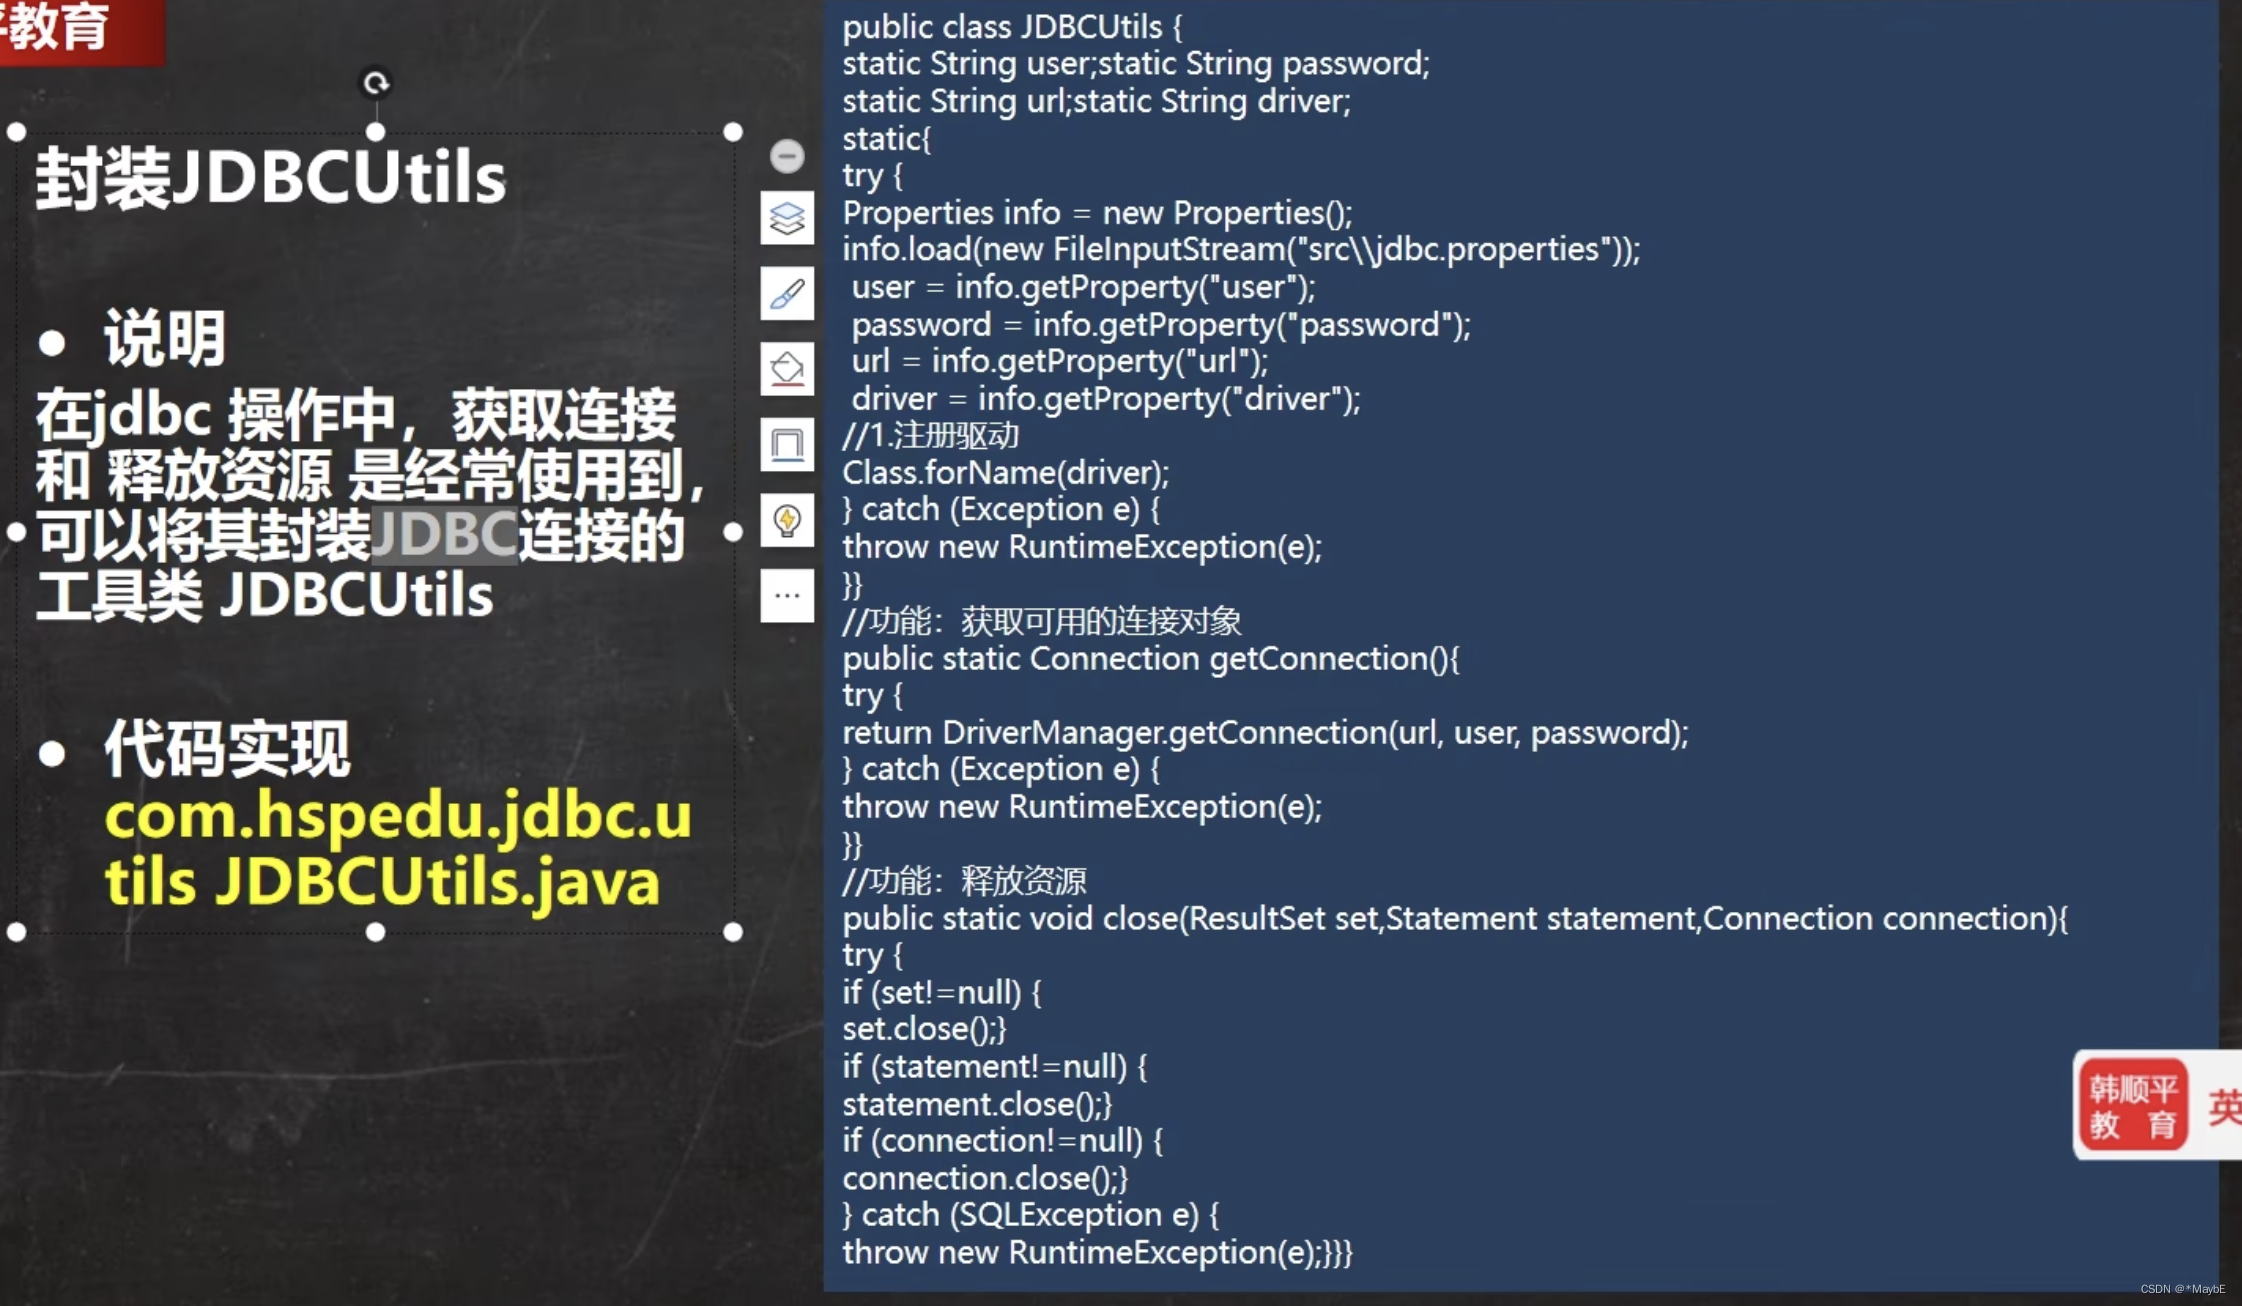
使用工具类
package com.bijing.jdbc.utils;

import org.junit.jupiter.api.Test;

import java.sql.Connection;
import java.sql.PreparedStatement;
import java.sql.ResultSet;
import java.sql.SQLException;

/**
 * @author 毕晶
 * @date 2022/7/24 7:03 PM
 * 演示如何使用
 */
public class JDBCUtilsUse {

    @Test
    public void testDML() {
        //1.得到连接
        Connection connection = null;
        //2.sql
        String sql = "UPDATE admin SET pwd  = ? WHERE name =?;";
        PreparedStatement preparedStatement = null;
        try {
            connection = JDBCUtils.getConnection();
            preparedStatement = connection.prepareStatement(sql);
            preparedStatement.setString(1, "123");
            preparedStatement.setString(2, "mary");
            int rows = preparedStatement.executeUpdate();
            System.out.println(rows > 0 ? "成功" : "失败");
        } catch (SQLException e) {
            e.printStackTrace();
        }

        //3.关闭
        JDBCUtils.close(null, preparedStatement, connection);

    }

    @Test
    public void testQuery() throws Exception {
        Connection connection = JDBCUtils.getConnection();
        String sql = "SELECT name,pwd FROM admin WHERE pwd = ?";
        PreparedStatement preparedStatement = connection.prepareStatement(sql);
        preparedStatement.setString(1, "123");
        ResultSet resultSet = preparedStatement.executeQuery();
        while (resultSet.next()) {
            String name = resultSet.getString("name");
            String pwd = resultSet.getString("pwd");
            System.out.println(name + "\t" + pwd);
        }
        JDBCUtils.close(resultSet, preparedStatement, connection);
    }


}
JDBC中的事务

转账的案例
package com.bijing.jdbc.transaction;

import com.bijing.jdbc.utils.JDBCUtils;
import org.junit.jupiter.api.Test;

import java.sql.Connection;
import java.sql.PreparedStatement;
import java.sql.SQLException;

/**
 * @author 毕晶
 * @date 2022/7/24 7:50 PM
 * 演示jdbc中的事务
 */
public class Transaction_ {
    public static void main(String[] args) {

    }

    @Test
    public void noTransaction() {
        //操作转账
        //1.得到连接
        Connection connection = null;
        //2.sql
        String sql = "UPDATE account SET balance = balance-100 WHERE name = ?;";
        String sql2 = "UPDATE account SET balance = balance+100 WHERE name = ?;";
        PreparedStatement preparedStatement = null;
        try {
            connection = JDBCUtils.getConnection();//在默认情况下connection是默认自动提交
            preparedStatement = connection.prepareStatement(sql);
            preparedStatement.setString(1, "马云");
            int rows = preparedStatement.executeUpdate();//执行一次就提交一次
            System.out.println(rows > 0 ? "成功" : "失败");

            int i = 1 / 0;//抛个异常

            preparedStatement = connection.prepareStatement(sql2);
            preparedStatement.setString(1, "马化腾");
            rows = preparedStatement.executeUpdate();
            System.out.println(rows > 0 ? "成功" : "失败");
        } catch (SQLException e) {
            e.printStackTrace();
        }

        //3.关闭
        JDBCUtils.close(null, preparedStatement, connection);

    }

    @Test
    public void useTransaction() {
        //操作转账
        //1.得到连接
        Connection connection = null;
        //2.sql
        String sql = "UPDATE account SET balance = balance-100 WHERE name = ?;";
        String sql2 = "UPDATE account SET balance = balance+100 WHERE name = ?;";
//        Savepoint point1 = null;
        PreparedStatement preparedStatement = null;
        try {
            connection = JDBCUtils.getConnection();//在默认情况下connection是默认自动提交
            connection.setAutoCommit(false);//这边开启事务
//            point1 = connection.setSavepoint("a");
            preparedStatement = connection.prepareStatement(sql);
            preparedStatement.setString(1, "马云");
            int rows = preparedStatement.executeUpdate();//执行一次就提交一次
            System.out.println(rows > 0 ? "成功" : "失败");

//            int i = 1 / 0;//抛个异常

            preparedStatement = connection.prepareStatement(sql2);
            preparedStatement.setString(1, "马化腾");
            rows = preparedStatement.executeUpdate();
            System.out.println(rows > 0 ? "成功" : "失败");
            connection.commit();//成功执行了多条语句就提交
        } catch (SQLException e) {
            //在捕获到异常的时候进行撤销操作
            try {
                System.out.println("发生异常撤销执行的sql");
                connection.rollback();
//                connection.rollback(point1);
            } catch (SQLException ex) {
                ex.printStackTrace();
            }
            e.printStackTrace();
        }

        //3.关闭
        JDBCUtils.close(null, preparedStatement, connection);

    }
}
批处理
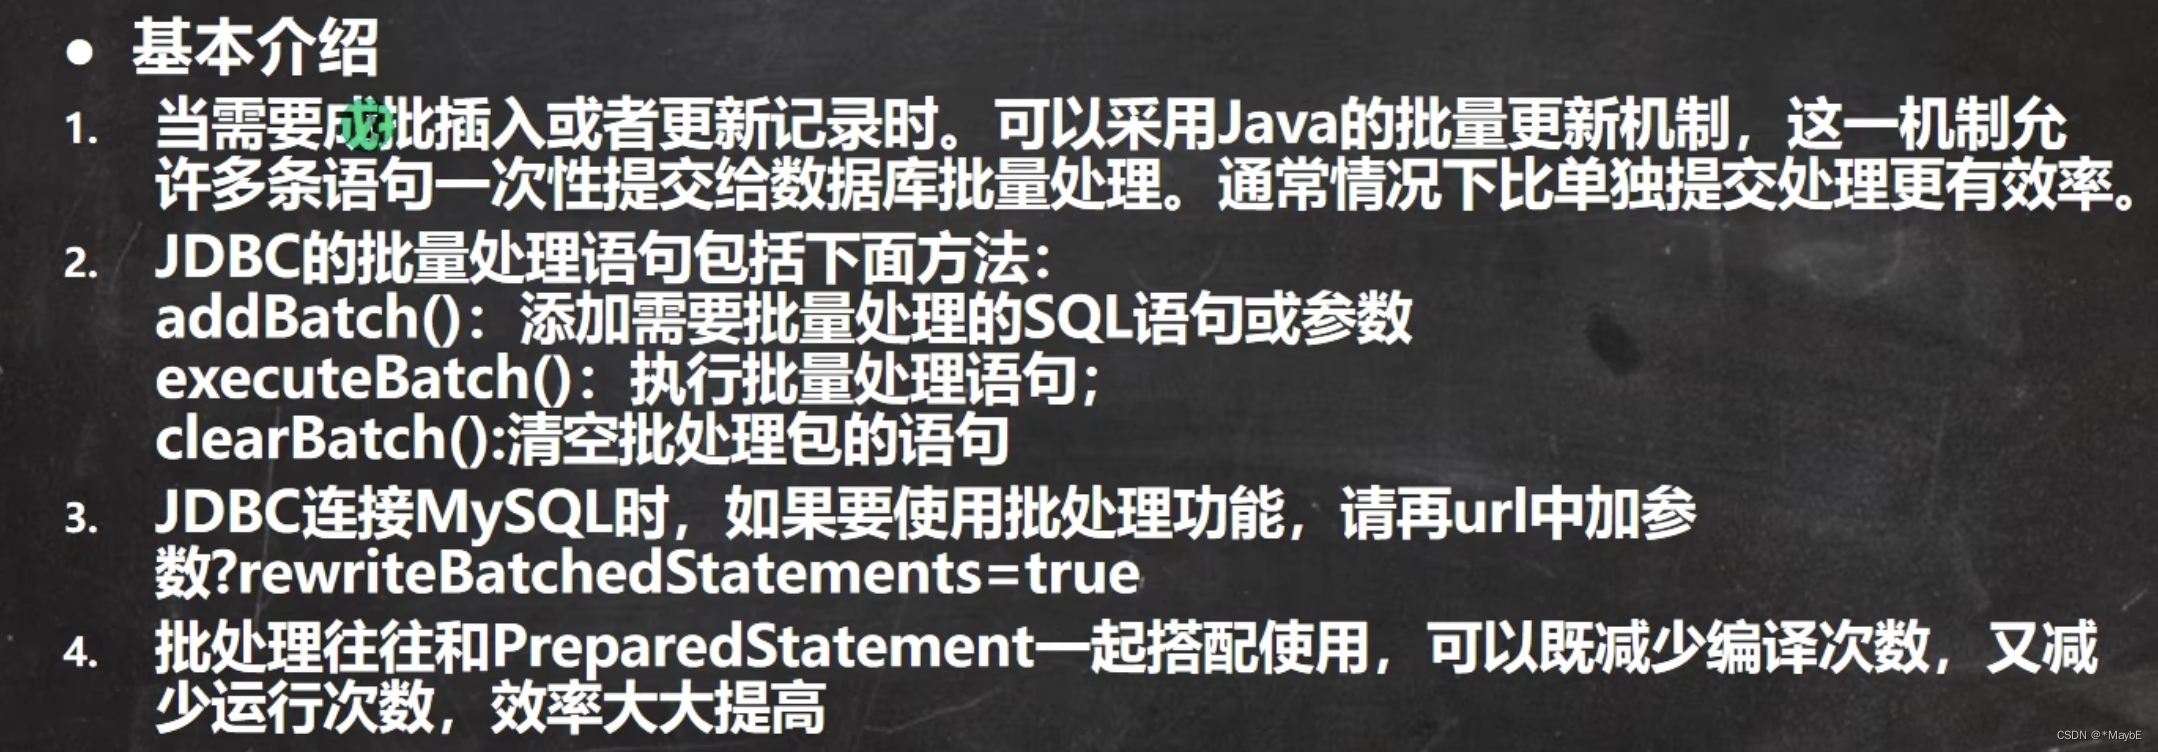
案例
package com.bijing.jdbc.batch;

import com.bijing.jdbc.utils.JDBCUtils;
import org.junit.jupiter.api.Test;

import java.sql.Connection;
import java.sql.PreparedStatement;

/**
 * @author 毕晶
 * @date 2022/7/24 8:19 PM
 * 演示java的批处理
 */
public class Batch_ {
    //传统方法,添加50000条数据到admin2
    @Test
    public void noBatch() throws Exception {
        Connection connection = JDBCUtils.getConnection();
        String sql = "INSERT INTO admin2 VALUES (NULL,?,?)";
        PreparedStatement preparedStatement = connection.prepareStatement(sql);
        System.out.println("开始执行");
        long start = System.currentTimeMillis();
        for (int i = 0; i < 5000; i++) {
            preparedStatement.setString(1, "jack" + i);
            preparedStatement.setString(2, "666");
            preparedStatement.executeUpdate();
        }
        System.out.println("结束执行");
        long end = System.currentTimeMillis();
        System.out.println("传统方式用时:" + (end - start));
        JDBCUtils.close(null, preparedStatement, connection);
    }

    //使用批量的方式
    @Test
    public void useBatch() throws Exception {
    //   jdbc.properties中的  url=jdbc:mysql://localhost:3306/for_jdbc?rewriteBatchedStatements=true
        Connection connection = JDBCUtils.getConnection();
        String sql = "INSERT INTO admin2 VALUES (NULL,?,?)";
        PreparedStatement preparedStatement = connection.prepareStatement(sql);
        System.out.println("开始执行");
        long start = System.currentTimeMillis();
        for (int i = 0; i < 5000; i++) {
            preparedStatement.setString(1, "jack" + i);
            preparedStatement.setString(2, "666");
            //将sql语句添加到批处理的包中
            preparedStatement.addBatch();
            //当有1000条记录的时候再批量执行
            if ((i + 1) % 1000 == 0) {
                preparedStatement.executeBatch();
                //执行完再清空下batch
                preparedStatement.clearBatch();
            }
        }
        System.out.println("结束执行");
        long end = System.currentTimeMillis();
        System.out.println("批量方式用时:" + (end - start));
        JDBCUtils.close(null, preparedStatement, connection);
    }
}
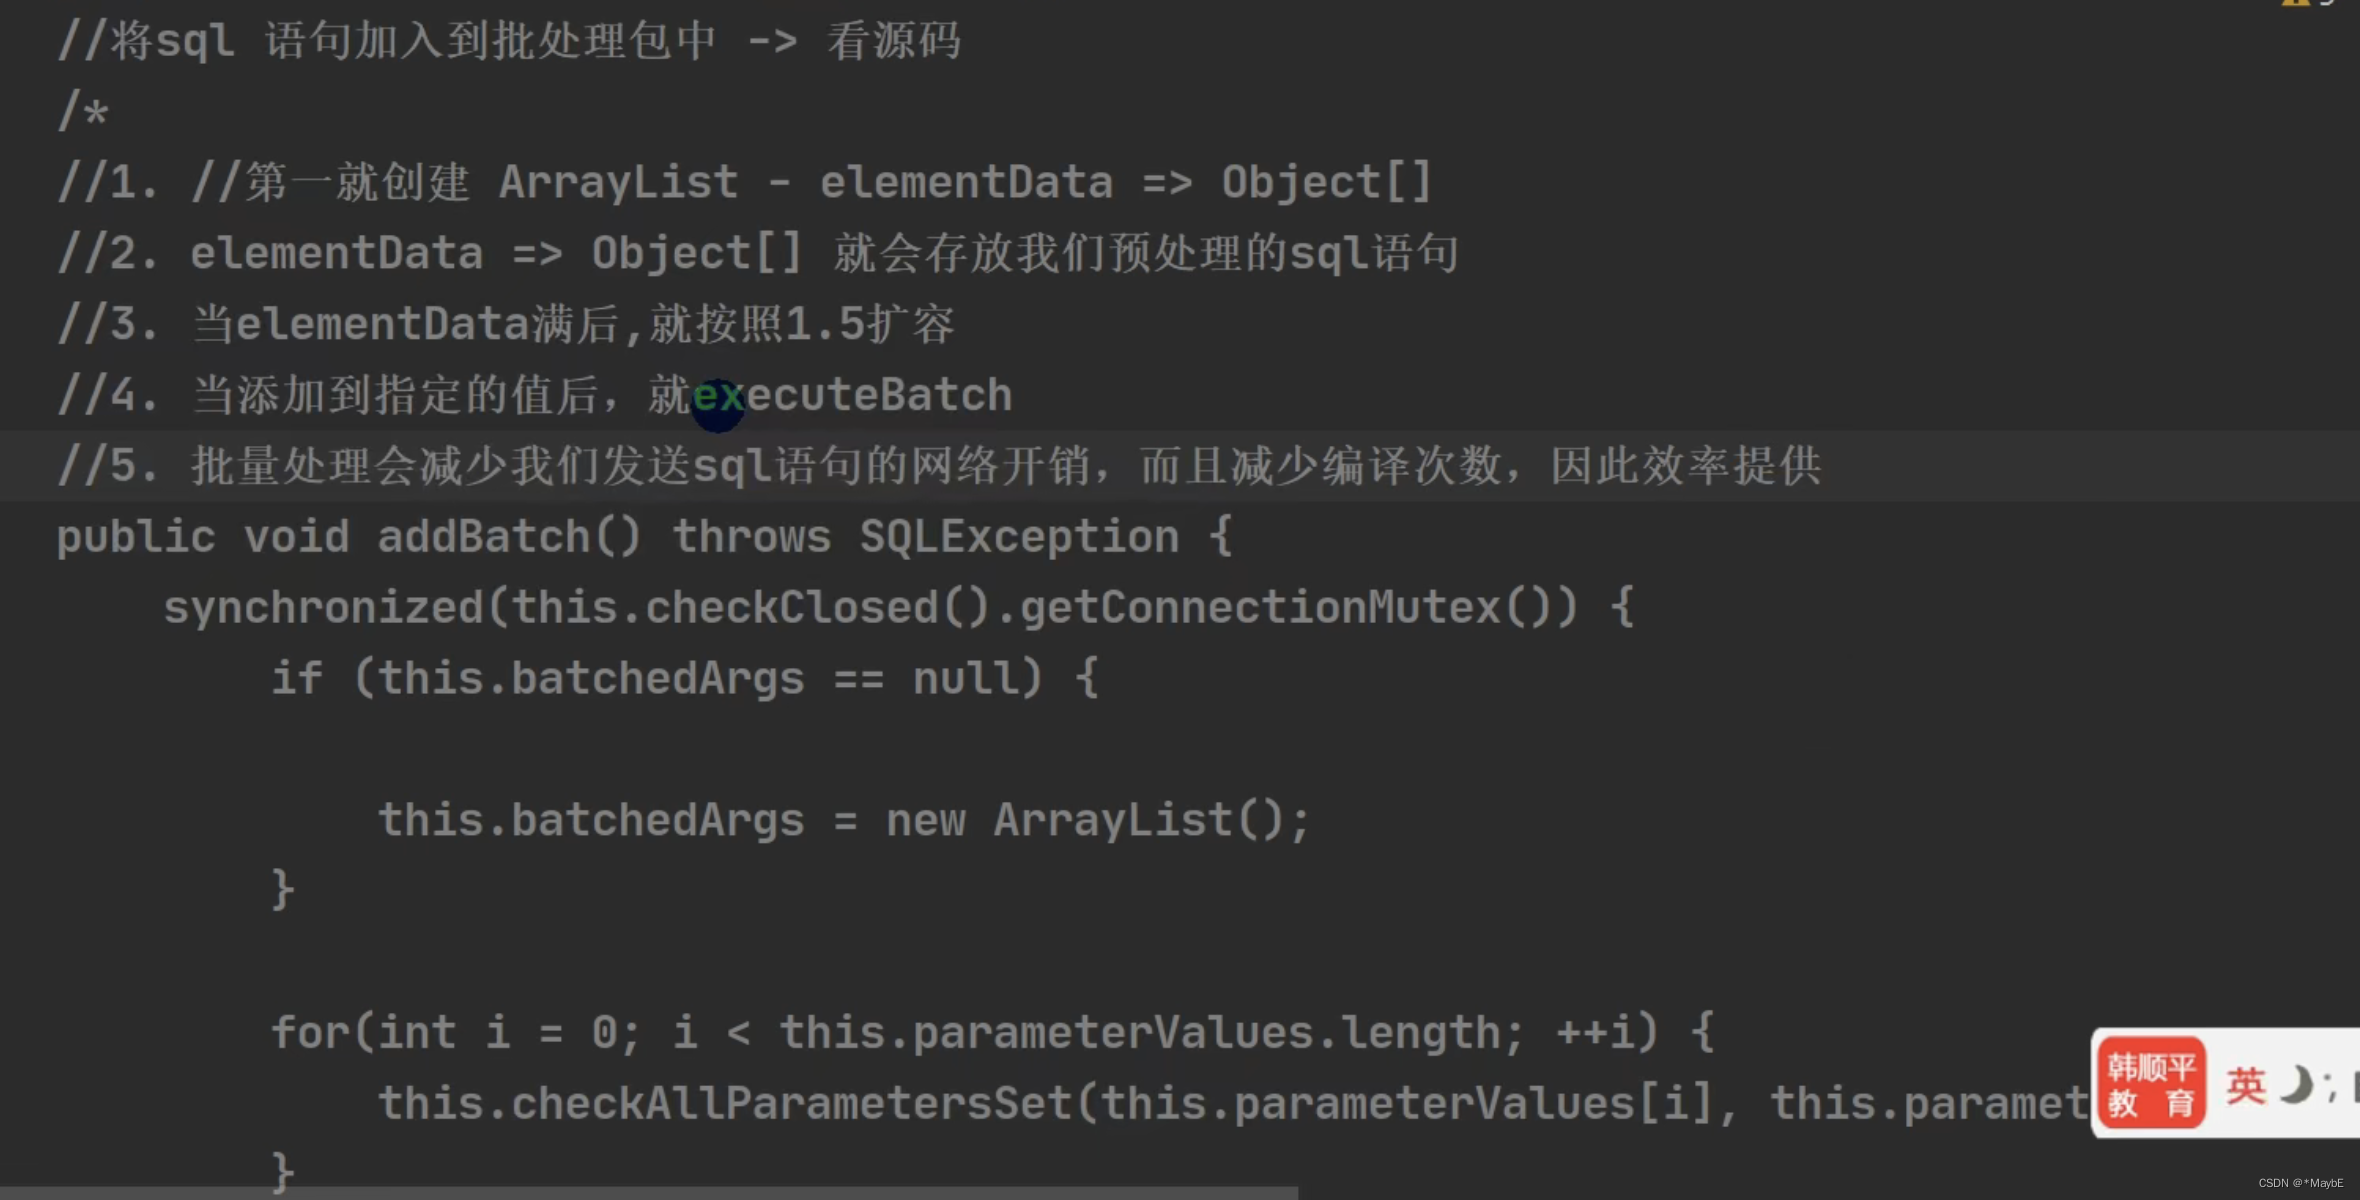
批处理的源码分析
数据库连接池

基本介绍
期间连接池中的连接和数据库没有断开,断开的是用户和连接池的连接
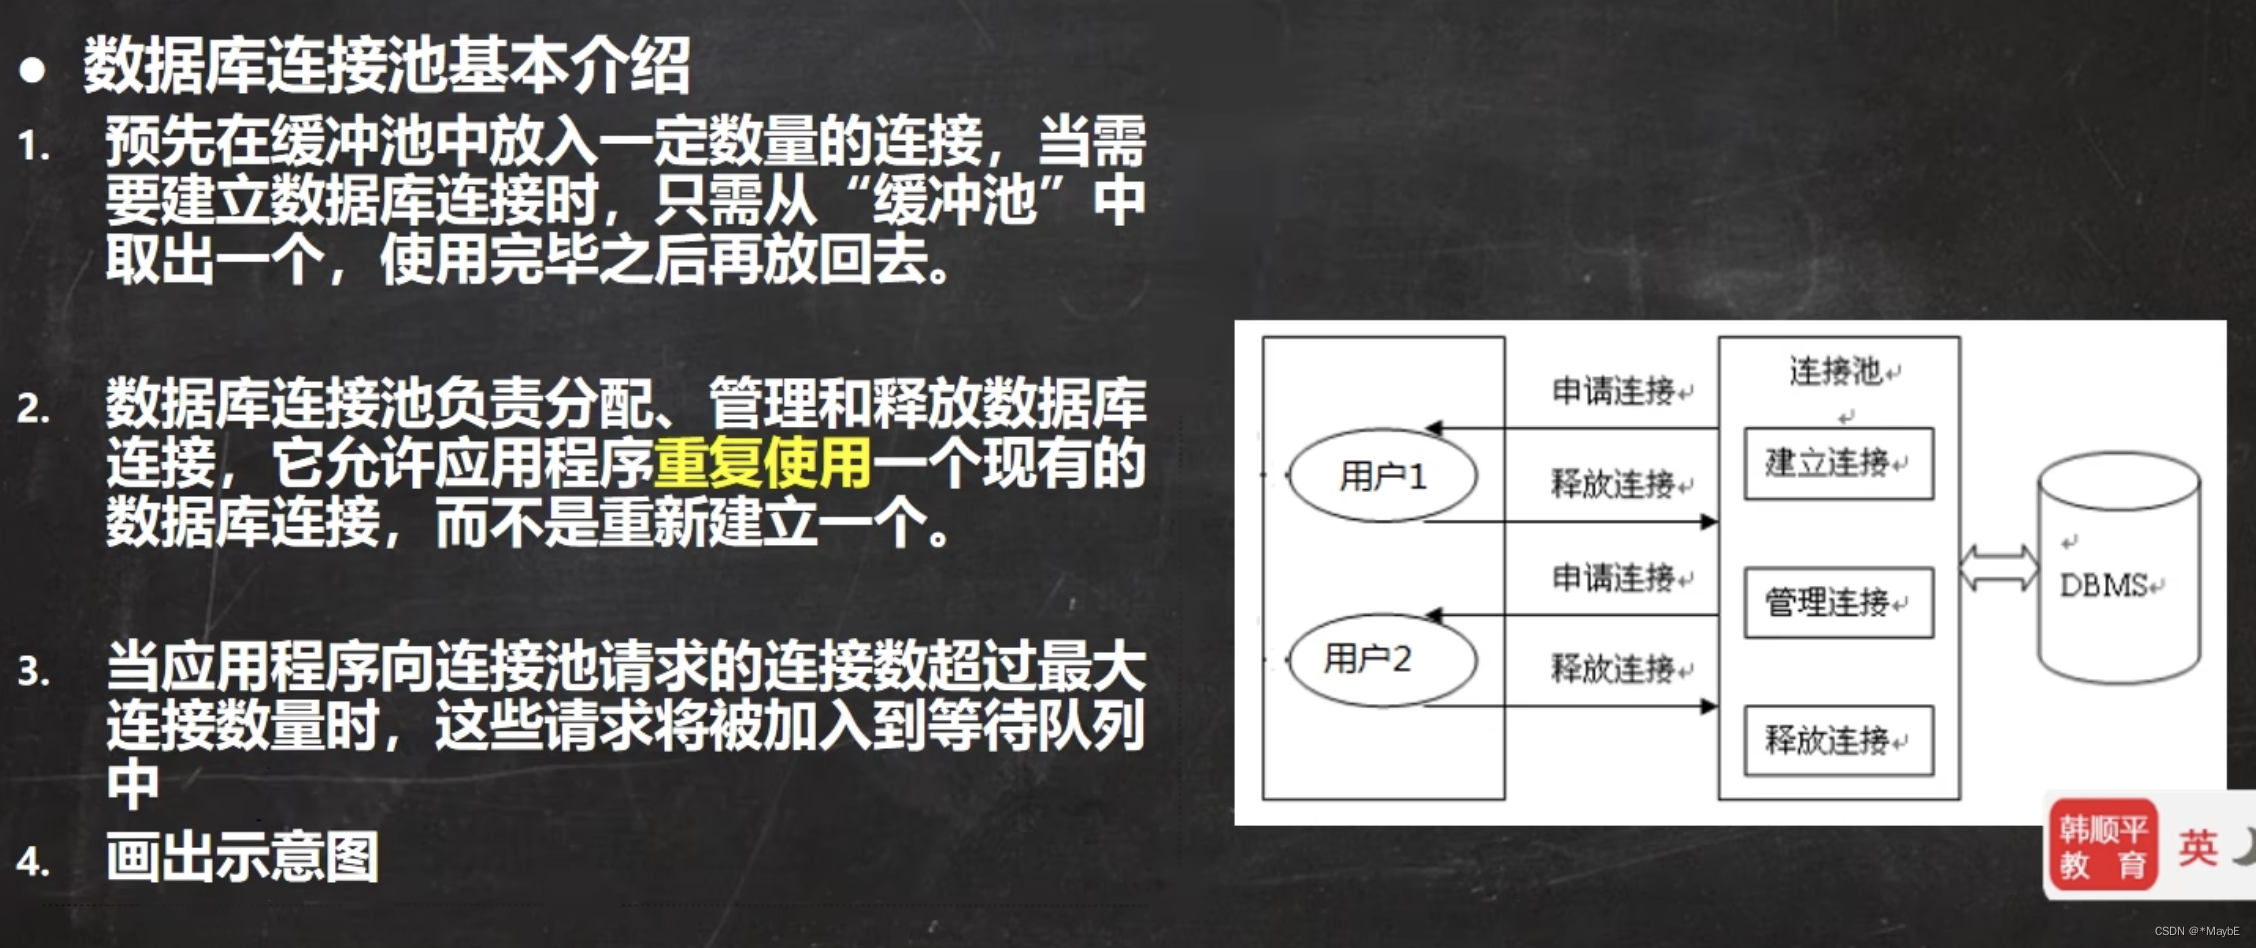
示意图

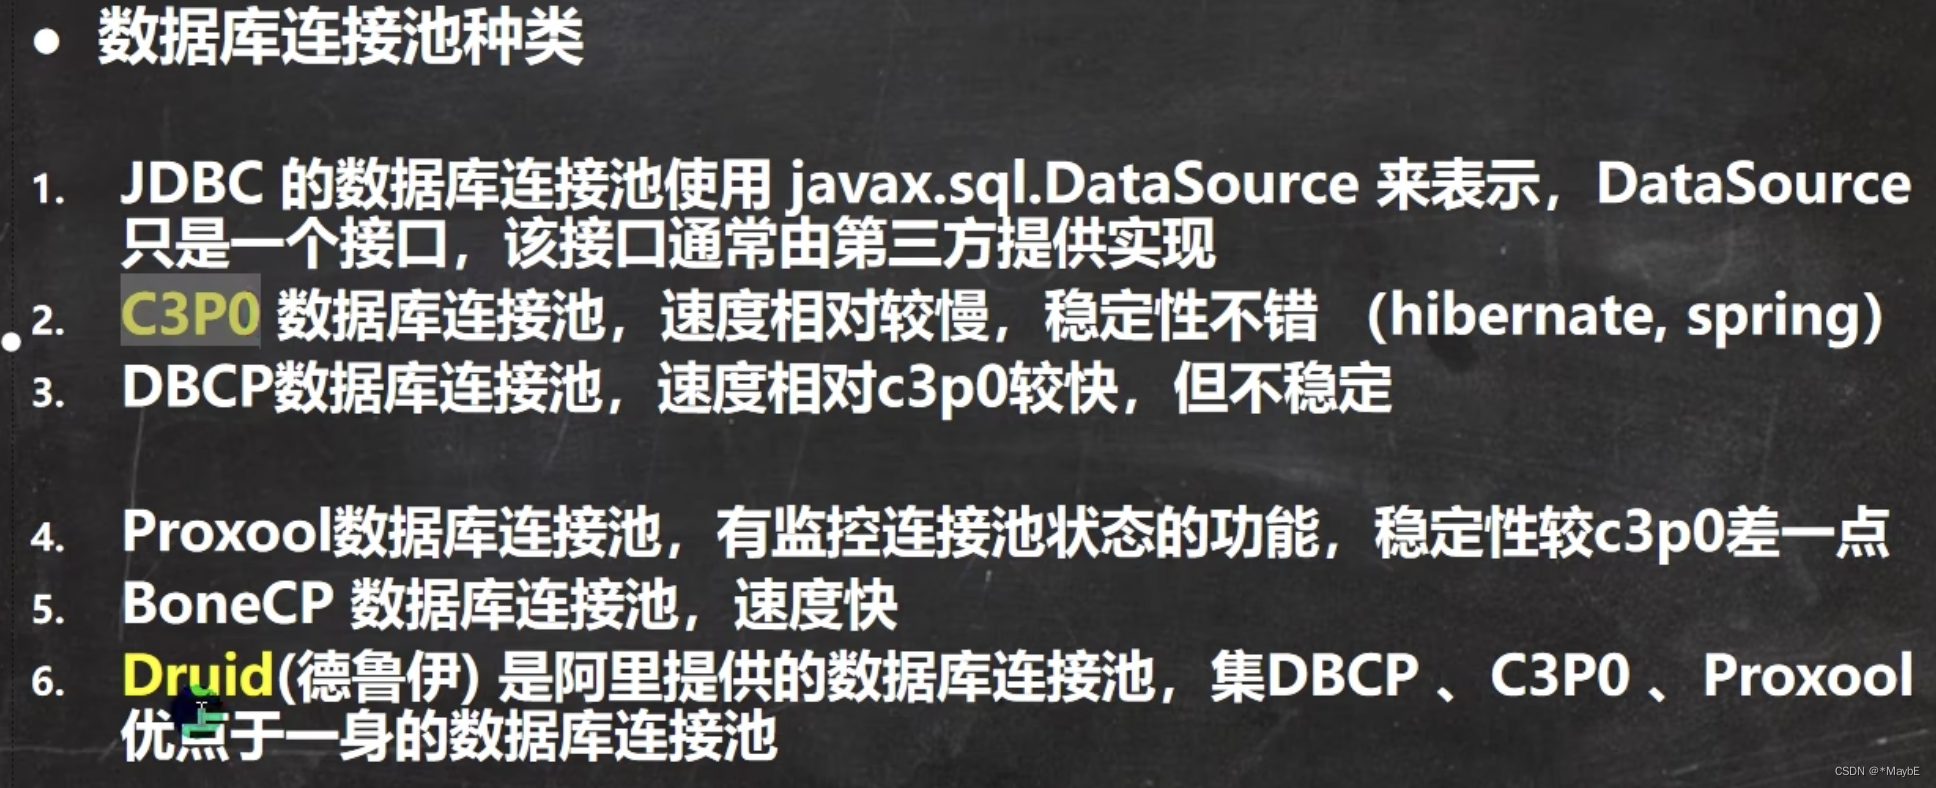
数据库连接池的种类
java_C3P0连接方式
package com.bijing.jdbc.databaseSource;

import com.mchange.v2.c3p0.ComboPooledDataSource;
import org.junit.jupiter.api.Test;

import java.io.FileInputStream;
import java.sql.Connection;
import java.util.Properties;

/**
 * @author 毕晶
 * @date 2022/7/25 2:14 PM
 * 演示C3P0的使用
 */
public class C3P0_ {

    @Test
    //方式一:相关参数在程序中指定user,url,password等
    public void testC3P0_01() throws Exception {
        //1.创建一个数据源对象
        ComboPooledDataSource comboPooledDataSource = new ComboPooledDataSource();
        //2.通过配置文件获取相关信息
        Properties properties = new Properties();
        properties.load(new FileInputStream("./src/jdbc.properties"));
        String user = properties.getProperty("user");
        String password = properties.getProperty("password");
        String url = properties.getProperty("url");
        String driver = properties.getProperty("driver");
        //给数据源 comboPooledDataSource设置相关的参数
        //注意:连接管理是由comboPooledDataSource 来管理
        comboPooledDataSource.setDriverClass(driver);
        comboPooledDataSource.setJdbcUrl(url);
        comboPooledDataSource.setUser(user);
        comboPooledDataSource.setPassword(password);
        //设置初始化连接数
        comboPooledDataSource.setInitialPoolSize(10);
        //设置最大连接数
        comboPooledDataSource.setMaxPoolSize(50);
        Connection connection = comboPooledDataSource.getConnection();//这个方法就是从DataSource接口实现的
        System.out.println("连接成功");
        connection.close();
    }

    //第二种方式 使用配置文件模板来实现的
    @Test
    //1.将C3P0 提供的c3p0-config.xml拷贝到src目录下
    //2.该文件指定了连接数据库和连接数据库连接池的相关参数
    public void testC3P0_02() throws Exception {
            //这边的for_jdbc是xml文件中指定的数据库
        ComboPooledDataSource comboPooledDataSource = new ComboPooledDataSource("for_jdbc");
        Connection connection = comboPooledDataSource.getConnection();
        System.out.println("连接成功");
        connection.close();
    }
}
<?xml version="1.0" encoding="utf-8"?>
<c3p0-config>

  <default-config>
    <!--驱动类-->
    <property name="driverClass">com.mysql.cj.jdbc.Driver</property>
    <property name="jdbcUrl">jdbc:mysql://localhost:3306/for_jdbc</property>
    <property name="user">root</property>
    <property name="password">root1234</property>

    <property name="initialPoolSize">5</property>
    <property name="maxPoolSize">10</property>
    <property name="checkoutTimeout">3000</property>
  </default-config>
  <!--  数据源名称,代表连接池-->
  <named-config name="for_jdbc">
  </named-config>
</c3p0-config>
java_德鲁伊连接池
实例:
package com.bijing.jdbc.druid;

import com.alibaba.druid.pool.DruidDataSourceFactory;
import org.junit.jupiter.api.Test;

import javax.sql.DataSource;
import java.io.FileInputStream;
import java.sql.Connection;
import java.util.Properties;

/**
 * @author 毕晶
 * @date 2022/7/25 3:26 PM
 * 测试druid的使用
 */
public class Druid {

    @Test
    public void testDruid() throws Exception {
        //1.加入druid的jar包
        //2.加入配置文件druid.properties,将该文件拷贝至项目的src目录
        //3.创建Properties对象,读取配置文件
        Properties properties = new Properties();
        properties.load(new FileInputStream("./src/druid.properties"));
        //4.创建一个指定参数的数据库连接池
        DataSource dataSource = DruidDataSourceFactory.createDataSource(properties);
        long start = System.currentTimeMillis();
        for (int i = 0; i < 5000; i++) {
            Connection connection = dataSource.getConnection();
            connection.close();
        }
        long end = System.currentTimeMillis();
        System.out.println("连接成功,用时:" + (end - start));

    }
}
druid.properties
#驱动加载
driverClassName=com.mysql.cj.jdbc.Driver
#注册驱动
url=jdbc:mysql://localhost:3306/for_jdbc?rewriteBatchedStatements=true
#连接数据库的用户名
username=root
#连接数据库的密码
password=root1234
#属性类型的字符串,通过别名的方式配置扩展插件, 监控统计用的stat 日志用log4j 防御sql注入:wall
filters=stat
#初始化时池中建立的物理连接个数。
initialSize=2
#最大的可活跃的连接池数量
maxActive=300
#获取连接时最大等待时间,单位毫秒,超过连接就会失效。配置了maxWait之后,缺省启用公平锁,并发效率会有所下降, 如果需要可以通过配置useUnfairLock属性为true使用非公平锁。
maxWait=60000
#连接回收器的运行周期时间,时间到了清理池中空闲的连接,testWhileIdle根据这个判断
timeBetweenEvictionRunsMillis=60000
minEvictableIdleTimeMillis=300000
#用来检测连接是否有效的sql,要求是一个查询语句。
validationQuery=SELECT 1
#建议配置为true,不影响性能,并且保证安全性。 申请连接的时候检测,如果空闲时间大于timeBetweenEvictionRunsMillis, 执行validationQuery检测连接是否有效。
testWhileIdle=true
#申请连接时执行validationQuery检测连接是否有效,做了这个配置会降低性能。设置为false
testOnBorrow=false
#归还连接时执行validationQuery检测连接是否有效,做了这个配置会降低性能,设置为flase
testOnReturn=false
#是否缓存preparedStatement,也就是PSCache。
poolPreparedStatements=false
#池中能够缓冲的preparedStatements语句数量
maxPoolPreparedStatementPerConnectionSize=200
DruidUtils(工具类)
package com.bijing.jdbc.utils;

import com.alibaba.druid.pool.DruidDataSourceFactory;

import javax.sql.DataSource;
import java.io.FileInputStream;
import java.sql.Connection;
import java.sql.ResultSet;
import java.sql.Statement;
import java.util.Properties;

/**
 * @author 毕晶
 * @date 2022/7/25 3:56 PM
 * 基于druid数据库连接池的工具类
 */
public class DruidUtils {
    private static DataSource ds;

    //在静态代码块完成对ds的初始化
    static {
        Properties properties = new Properties();
        try {
            properties.load(new FileInputStream("./src/druid.properties"));
            ds = DruidDataSourceFactory.createDataSource(properties);
        } catch (Exception e) {
            e.printStackTrace();
        }
    }

    //编写getConnection方法
    //注意,connection是一个接口,这边的实现方式是druid方式的,它的close()和mysql的jdbc中的不一样,
    public static Connection getConnection() throws Exception {
        return ds.getConnection();
    }

    //关闭连接,不是真正的断开数据库连接池和数据库的连接,而是把java程序和数据库连接池的连接放回到连接池(断开的是java程序对连接池中的连接的引用)

    public static void close(ResultSet resultSet, Statement statement, Connection connection) {
        try {
            if (resultSet != null) {
                resultSet.close();
            }
            if (statement != null) {
                statement.close();
            }
            if (connection != null) {
                connection.close();
            }
        } catch (Exception e) {
            throw new RuntimeException(e);
        }
    }
}
使用
package com.bijing.jdbc.utils;

import org.junit.jupiter.api.Test;

import java.sql.Connection;
import java.sql.PreparedStatement;
import java.sql.ResultSet;

/**
 * @author 毕晶
 * @date 2022/7/25 7:13 PM
 * 演示DruidUtils的使用
 */
public class DruidUtilsUse {
    @Test
    public void druidUtilsUse() throws Exception {
        Connection connection = DruidUtils.getConnection();
        String sql = "SELECT name,pwd FROM admin WHERE pwd = ?;";
        PreparedStatement preparedStatement = connection.prepareStatement(sql);
        preparedStatement.setString(1, "123");
        ResultSet resultSet = preparedStatement.executeQuery();
        while (resultSet.next()) {
            System.out.println(resultSet.getString("name") + "\t" + resultSet.getString("pwd"));
        }
        DruidUtils.close(resultSet, preparedStatement, connection);
    }
}
Apache–DBUtils
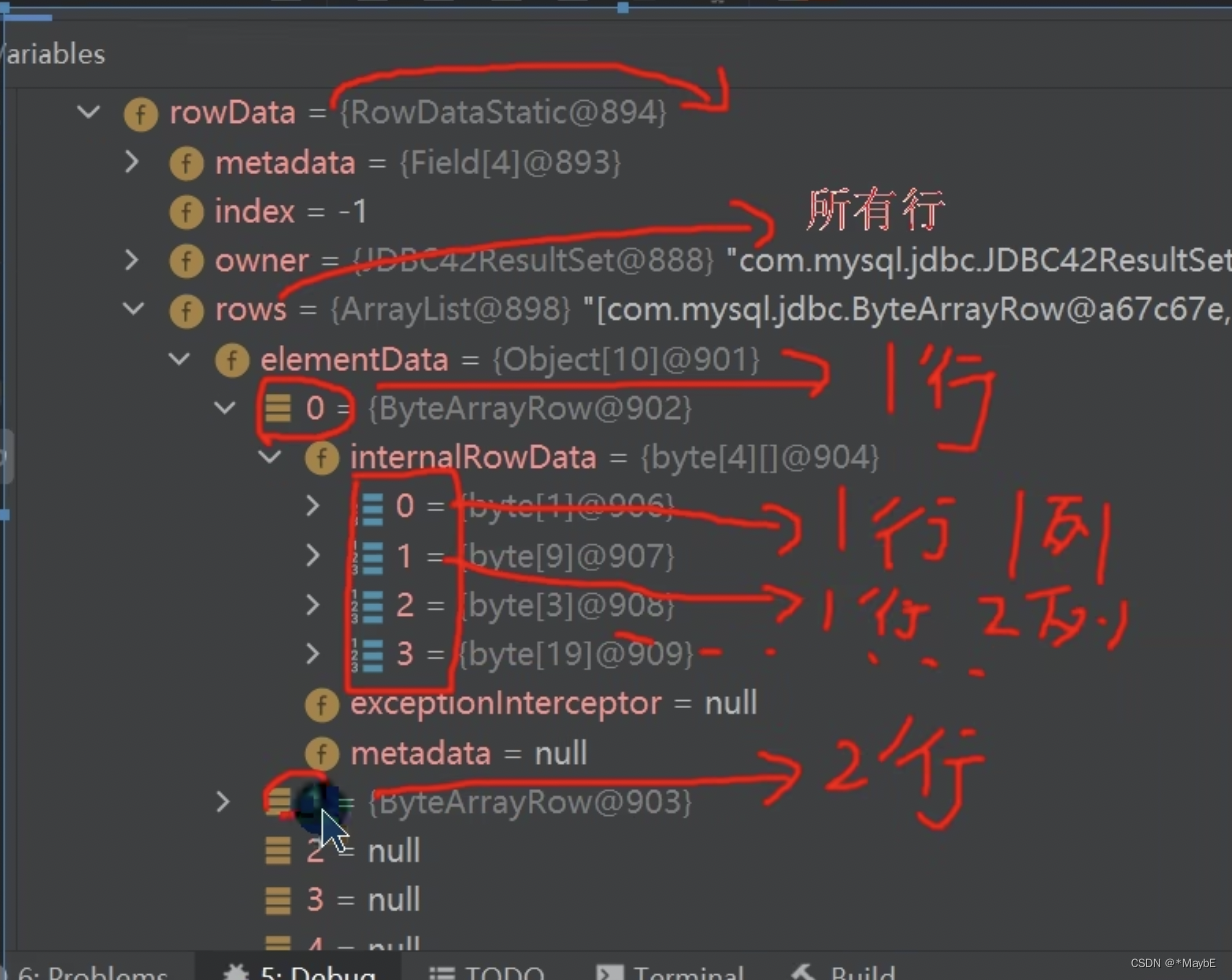
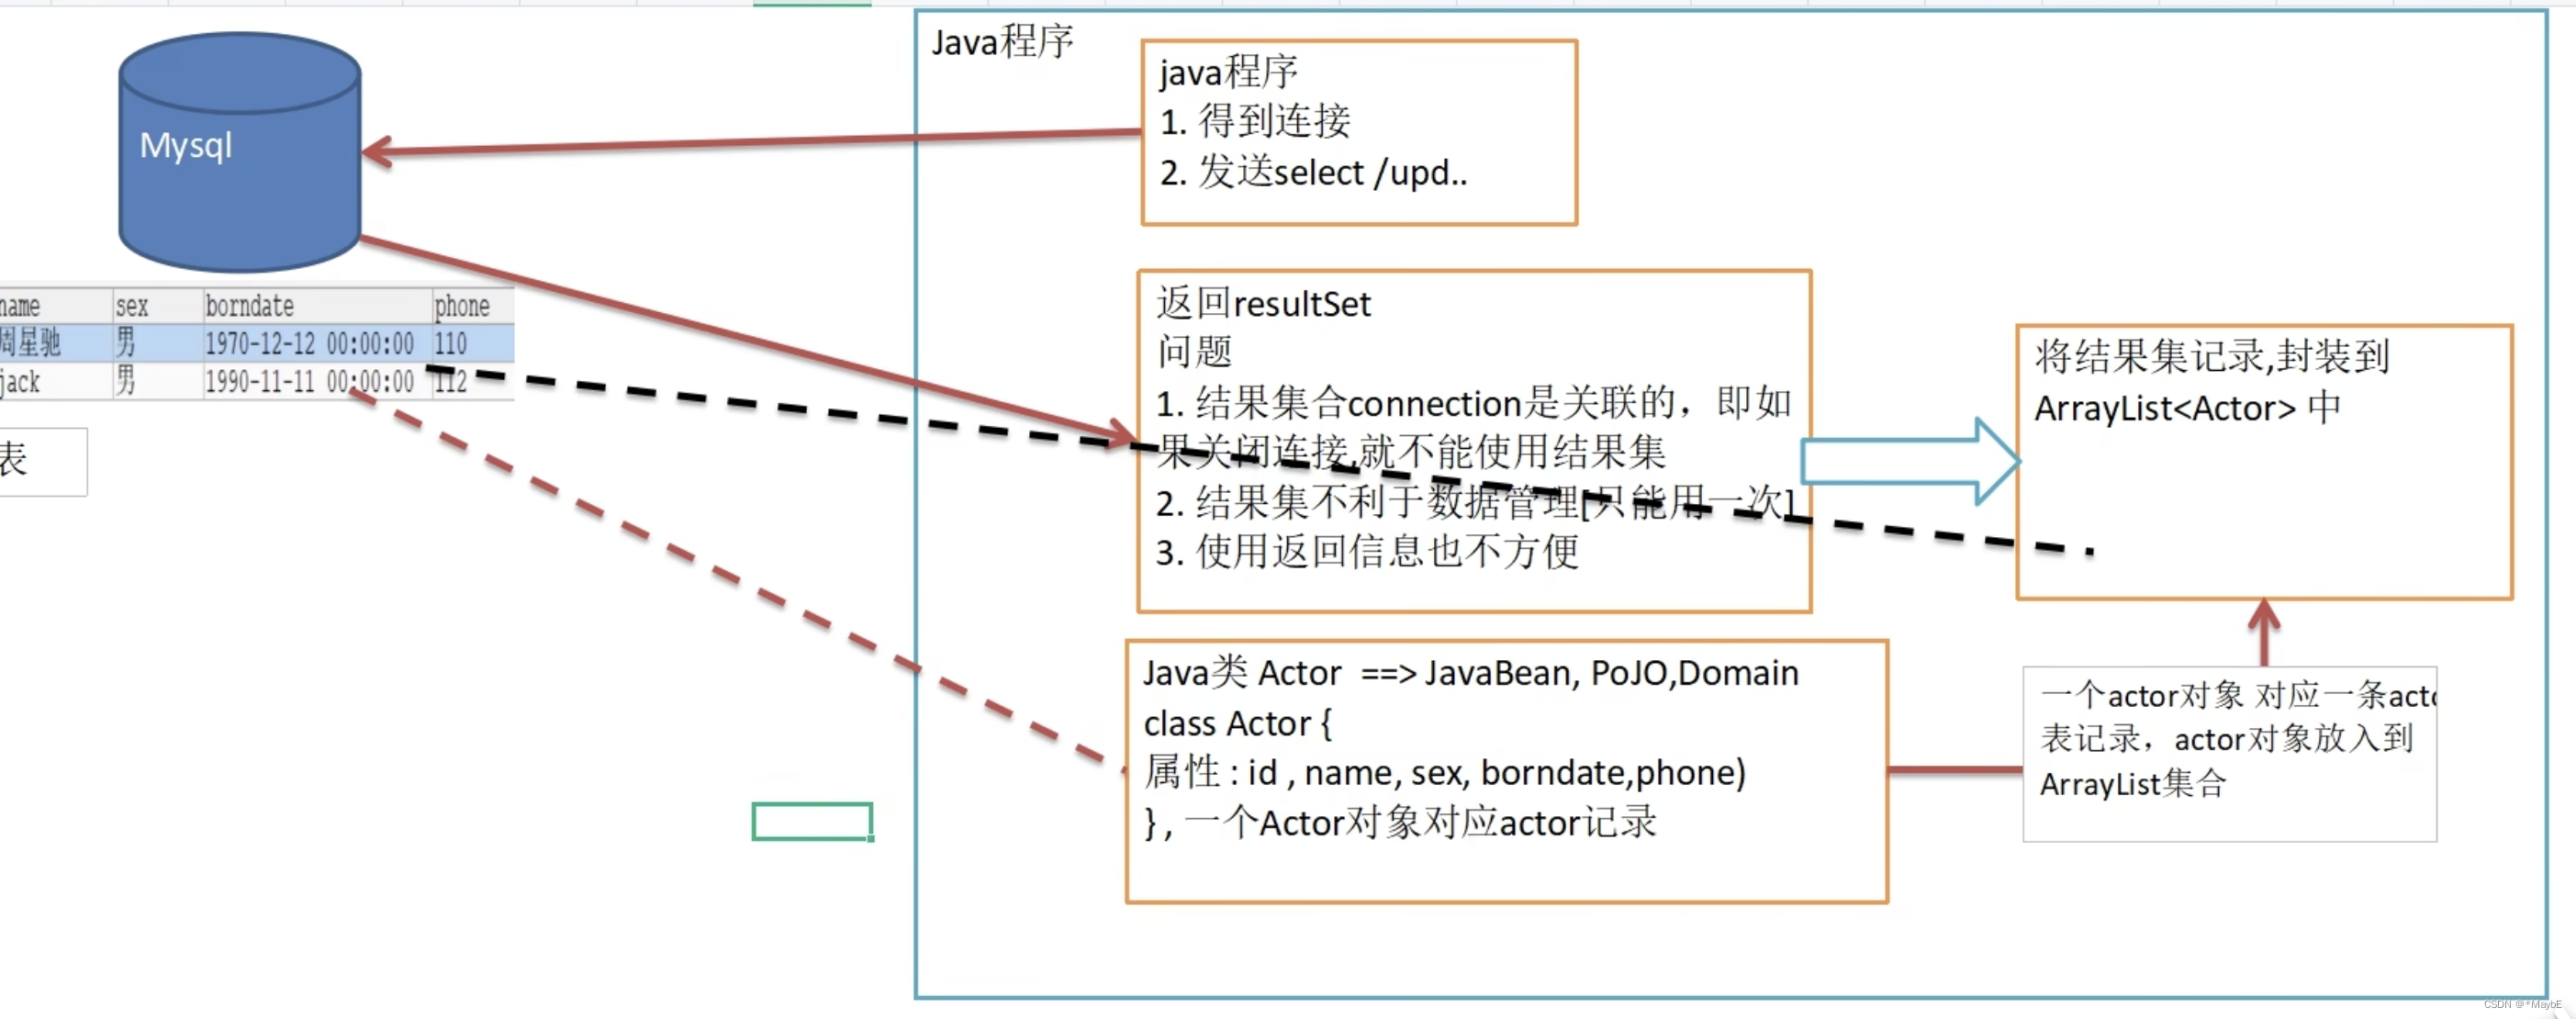
ResultSet的问题分析图
土办法封装
//使用土办法来解决ResultSet =>封装到ArrayList中
    @Test  //(@Test只对public void 有效)
    public ArrayList<Actor> testSelect() throws Exception {
        Connection connection = DruidUtils.getConnection();
        String sql = "SELECT id,name,sex,bordate,phone FROM actor WHERE id>= ?;";
        PreparedStatement preparedStatement = connection.prepareStatement(sql);
        preparedStatement.setInt(1, 0);
        ResultSet resultSet = preparedStatement.executeQuery();

        //使用集合接收ResultSet记录转成Actor对象
        ArrayList<Actor> actors = new ArrayList<Actor>();

        while (resultSet.next()) {
            int id = resultSet.getInt("id");
            String name = resultSet.getString("name");
            String sex = resultSet.getString("sex");
            Date bordate = resultSet.getDate("bordate");
            String phone = resultSet.getString("phone");
            //把得到的resultSet记录封装到Actor对象中,然后添加到集合中
            actors.add(new Actor(id, name, sex, bordate, phone));

//            System.out.println(id + "\t"
//                    + name + "\t" + sex + "\t"
//                    + bordate + "\t"
//                    + phone);

        }
        DruidUtils.close(resultSet, preparedStatement, connection);
        for (Actor actor : actors) {
            System.out.println(actor.getId() + "\t"
                    + actor.getName() + "\t" + actor.getSex() + "\t"
                    + actor.getBordate() + "\t"
                    + actor.getPhone());
        }
        return actors;//因为ArrayList和ResultSet没有任何关联,所以该集合可以返回和使用
    }
//和数据库中的actor表相对应
class Actor {//Javabean,POJO,Domain对象
    private Integer id;
    private String name;
    private String sex;
    private Date bordate;
    private String phone;

    public Actor() {//一定要给一个无参的构造器(反射需要)
    }

    public Actor(Integer id, String name, String sex, Date bordate, String phone) {
        this.id = id;
        this.name = name;
        this.sex = sex;
        this.bordate = bordate;
        this.phone = phone;
    }

    public Integer getId() {
        return id;
    }

    public void setId(Integer id) {
        this.id = id;
    }

    public String getName() {
        return name;
    }

    public void setName(String name) {
        this.name = name;
    }

    public String getSex() {
        return sex;
    }

    public void setSex(String sex) {
        this.sex = sex;
    }

    public Date getBordate() {
        return bordate;
    }

    public void setBordate(Date bordate) {
        this.bordate = bordate;
    }

    public String getPhone() {
        return phone;
    }

    public void setPhone(String phone) {
        this.phone = phone;
    }
}
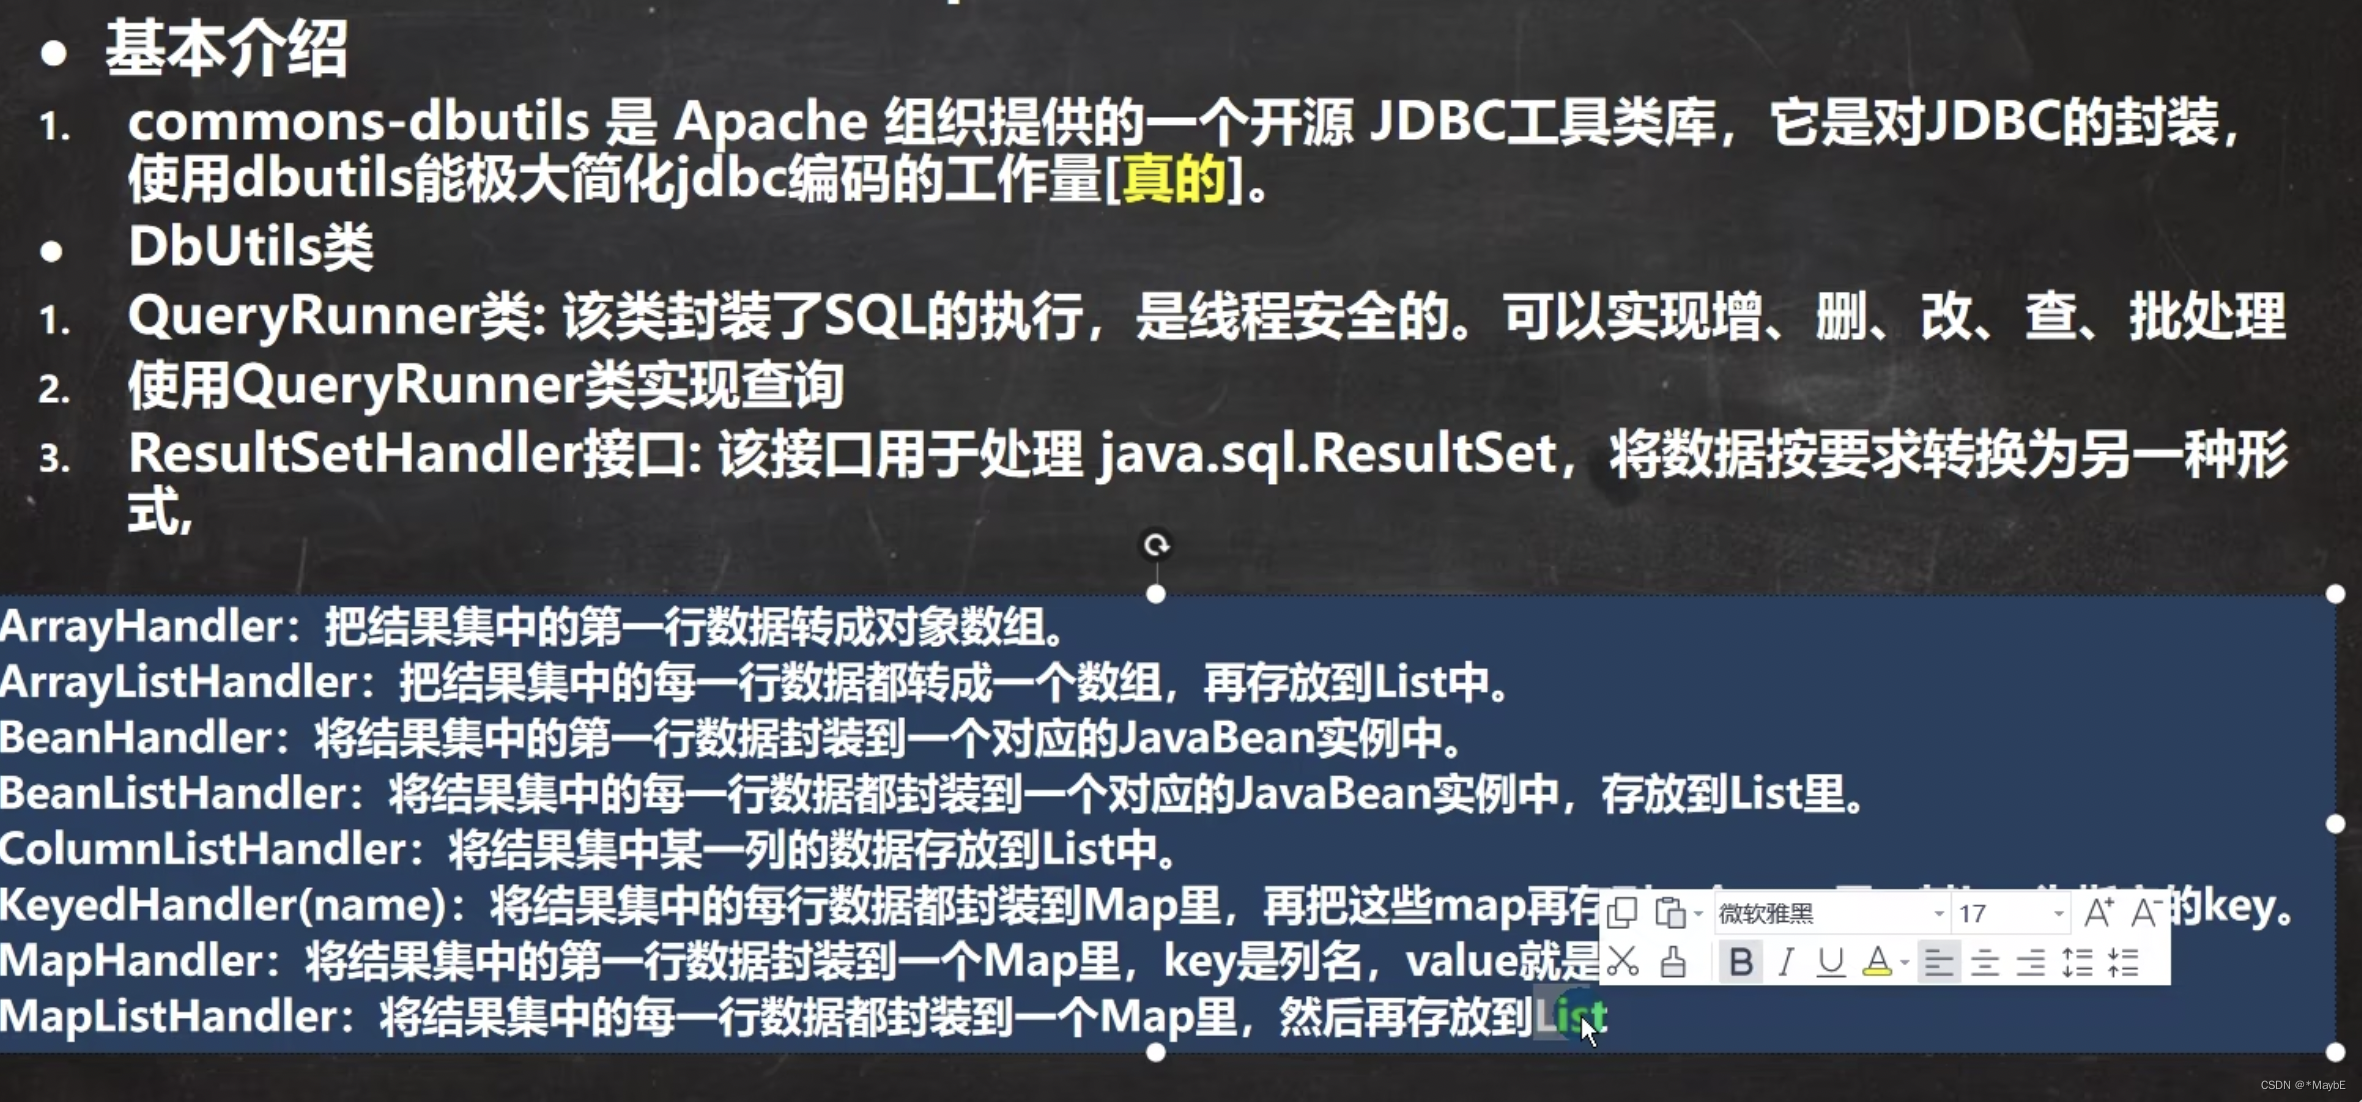
DBUtils的基本介绍
实例
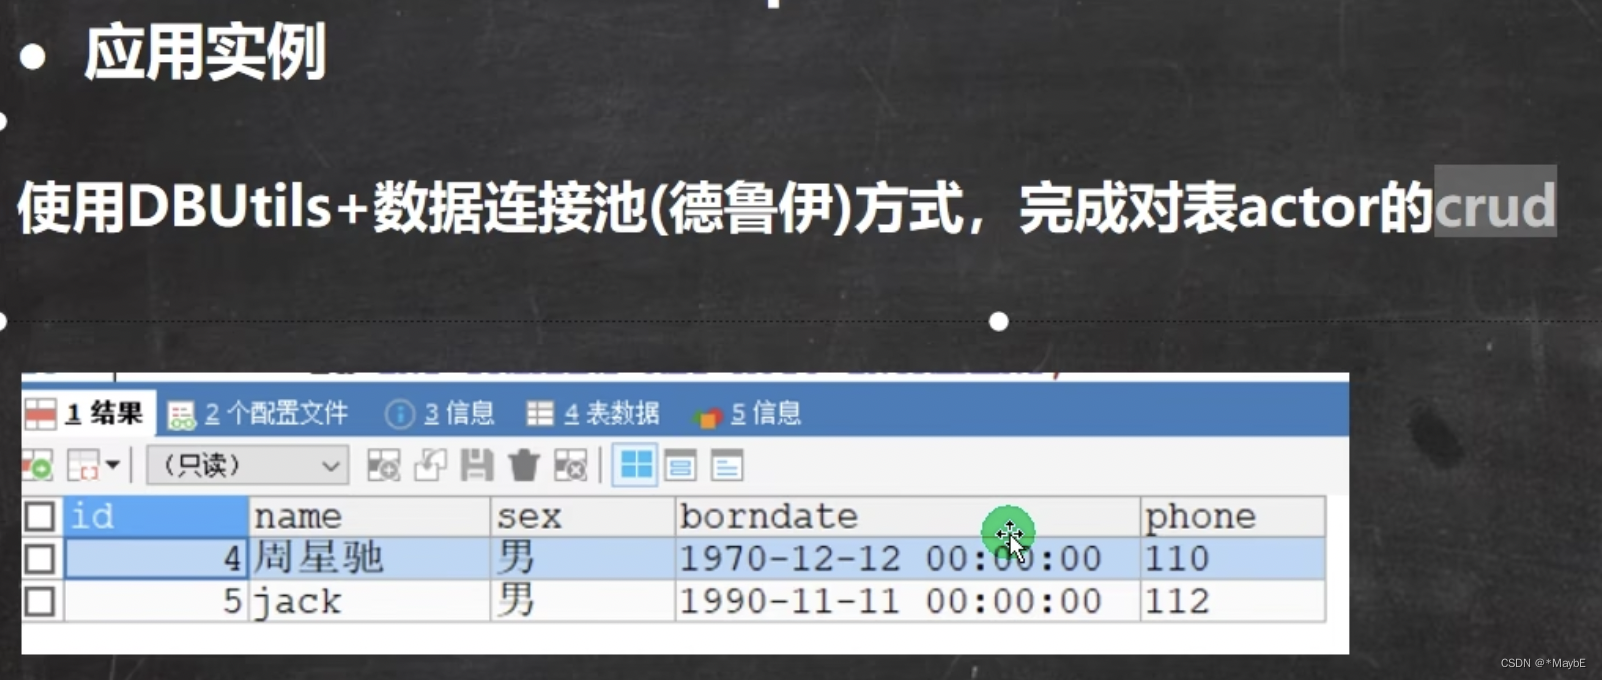
查询
package com.bijing.jdbc.druid;

import bean.Actor;
import com.bijing.jdbc.utils.DruidUtils;
import org.apache.commons.dbutils.QueryRunner;
import org.apache.commons.dbutils.handlers.BeanHandler;
import org.apache.commons.dbutils.handlers.BeanListHandler;
import org.apache.commons.dbutils.handlers.ScalarHandler;
import org.junit.jupiter.api.Test;

import java.sql.Connection;
import java.util.List;

/**
 * @author 毕晶
 * @date 2022/7/25 8:25 PM
 */
public class UseDBUtils_ {
    //使用Apache-DBUtils工具类+druid的方式完成对标的curd操作
    @Test
    public void testQuery() throws Exception {
        //1.得到连接
        Connection connection = DruidUtils.getConnection();
        //2.使用DBUtils类和接口,线引入DBUtils相关的jar
        //3.创建QueryRunner
        QueryRunner queryRunner = new QueryRunner();
        //4.就可以执行相关的方法返回ArrayList结果集
        String sql = "SELECT id,name,sex,bordate,phone FROM actor WHERE id>= ?;";
        //解读
        //(1)query方法就是执行一个sql语句,得到一个ResultSet结果集,并封装到一个ArrayList集合中去
        //(2)返回集合
        //(3)参数connection:连接,sql:执行的sql语句,
        // new BeanListHandler<>(Actor.class):将resultSet->actor对象->ArrayList,底层使用反射机制获取actor属性,进行封装
        //参数中的1对应这占位符?注意:类型...params 代表可变参数params

        List<Actor> actors = queryRunner.query(connection, sql, new BeanListHandler<>(Actor.class), 1);
        for (Actor actor : actors) {
            System.out.println(actor.toString());
        }
        DruidUtils.close(null, null, connection);
    }

    @Test//单个对象
    public void testQuerySingle() throws Exception {
        Connection connection = DruidUtils.getConnection();
        QueryRunner queryRunner = new QueryRunner();
        String sql = "SELECT * FROM actor WHERE id = ?";
        //因为是单个对象,所以使用BeanHandler,返回单个对象
        Actor actor = queryRunner.query(connection, sql, new BeanHandler<>(Actor.class), 3);
        System.out.println(actor.toString());
    }

    @Test//单行单列
    public void testScalar() throws Exception {
        Connection connection = DruidUtils.getConnection();
        QueryRunner queryRunner = new QueryRunner();
        String sql = "SELECT name FROM actor WHERE id = ?";
        Object obj = queryRunner.query(connection, sql, new ScalarHandler(), 1);
        System.out.println(obj);
        DruidUtils.close(null, null, connection);
    }

}
增删改
  //演示Apache-dbutils + druid完成dml(update,insert,delete)
    @Test
    public void testDML() throws Exception {
        Connection connection = DruidUtils.getConnection();
        QueryRunner queryRunner = new QueryRunner();
//        String sql = "INSERT INTO actor VALUES (NULL,'成龙','男','1950-5-5','123')";
        String sql = "UPDATE actor SET name=?,phone =? WHERE name = ?";
        int rows = queryRunner.update(connection, sql, "张学友", "123", "周润发");
        System.out.println(rows > 0 ? "成功" : "对表无影响");
        DruidUtils.close(null, null, connection);
    }
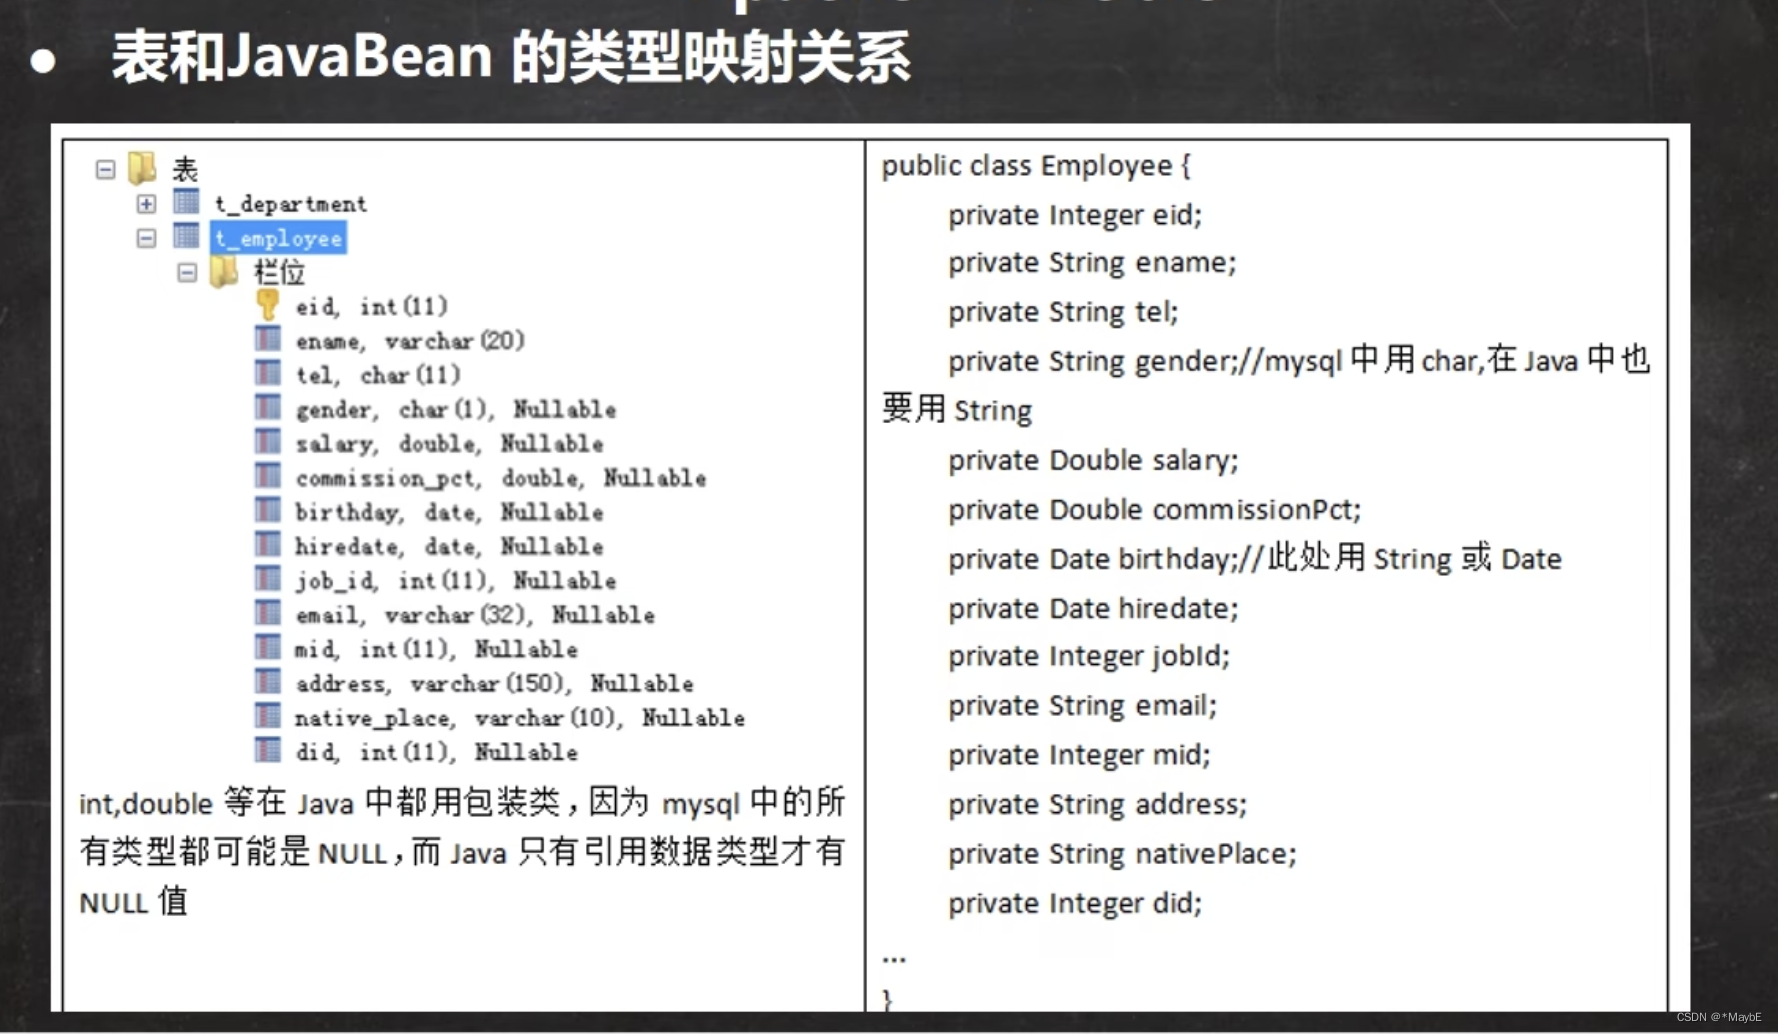
表和javaBean类型映射关系
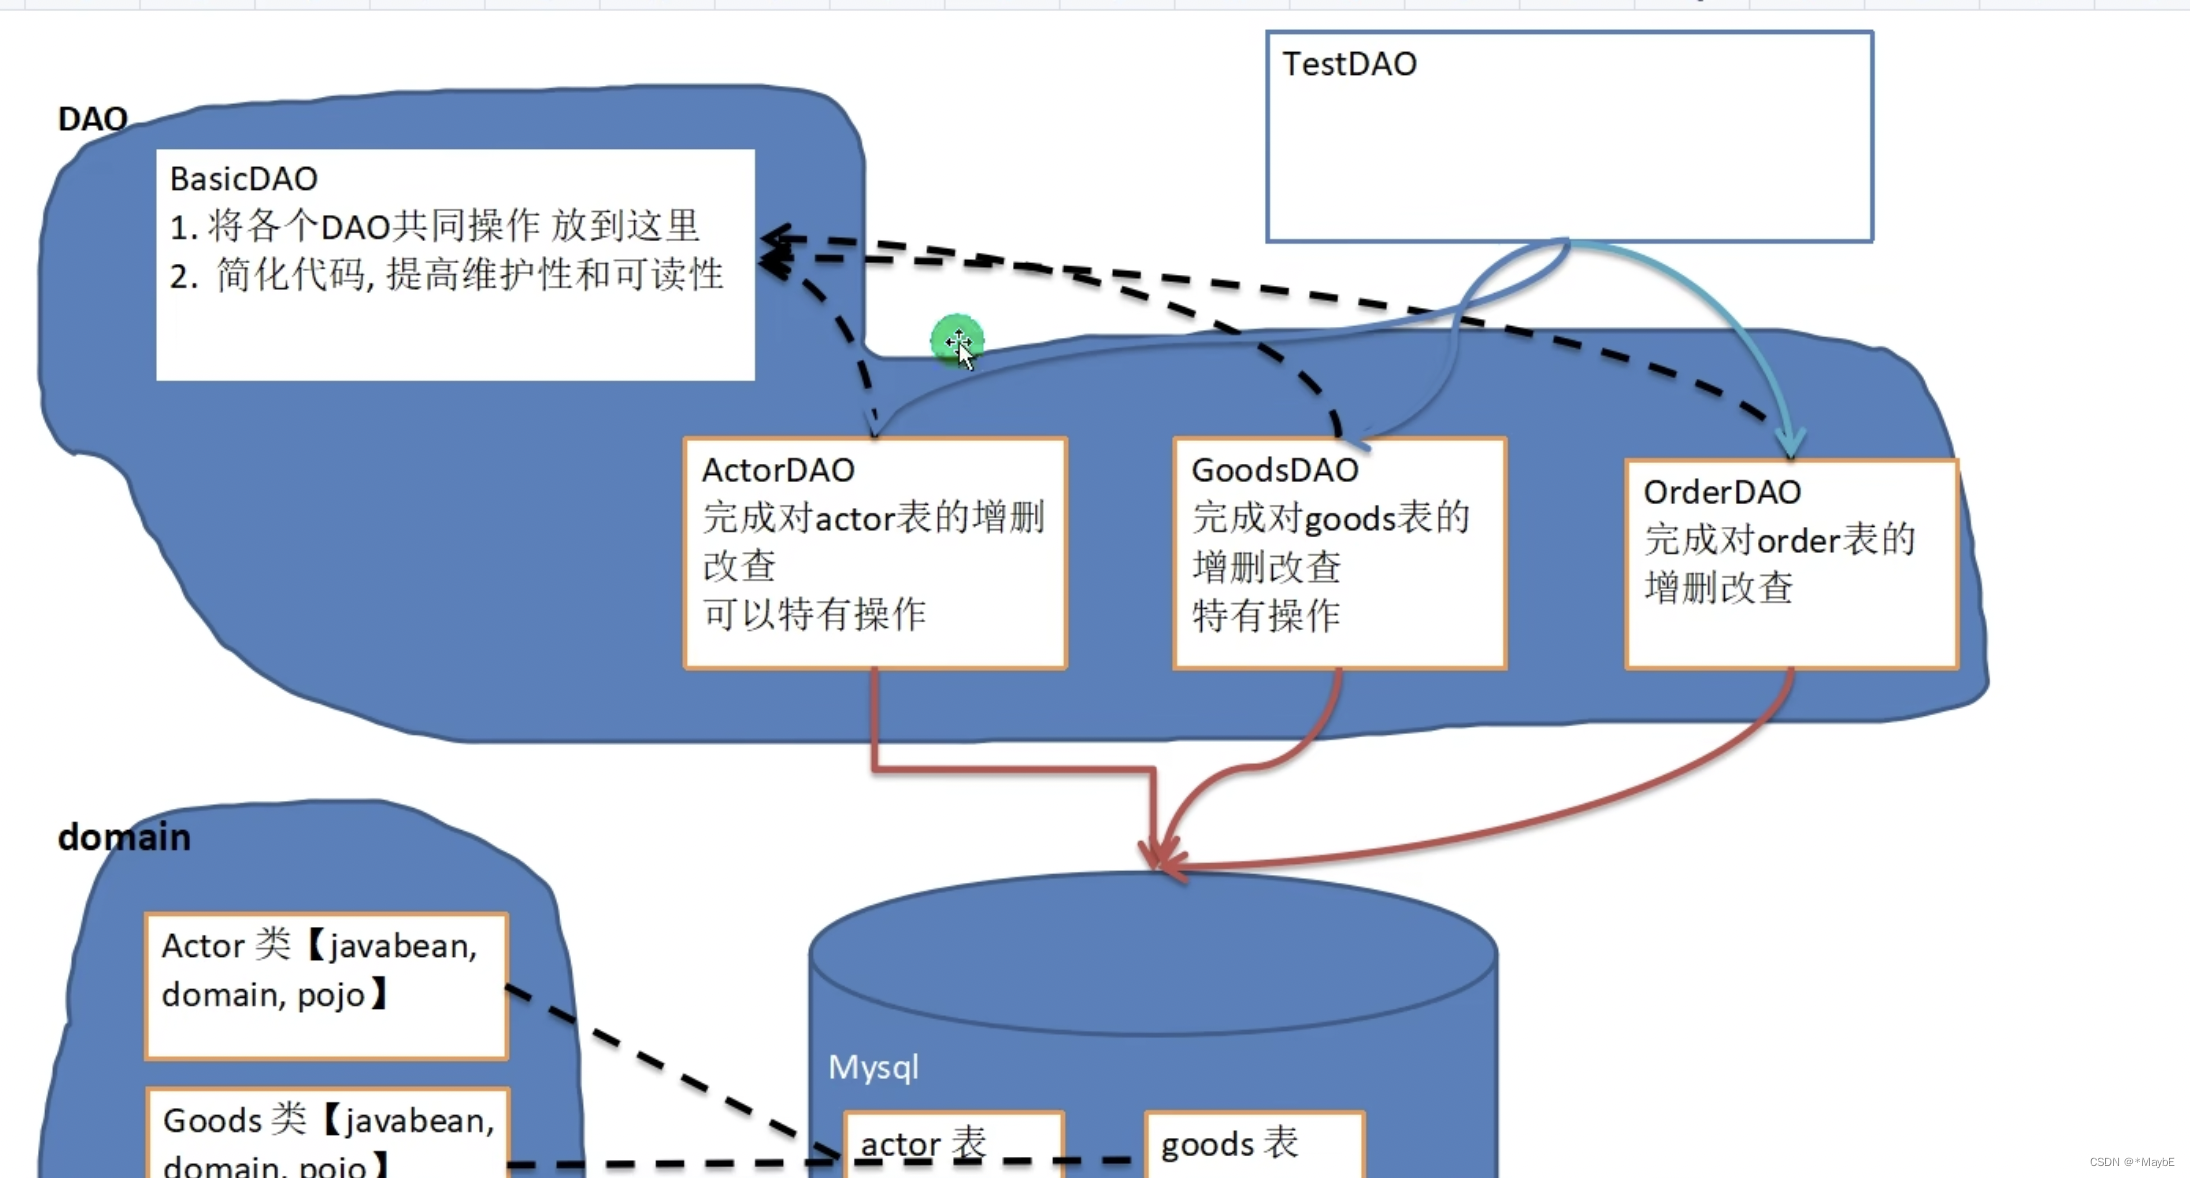
DAO和增删改查通用方法-BasicDao
apache–dbutils + druid存在的问题
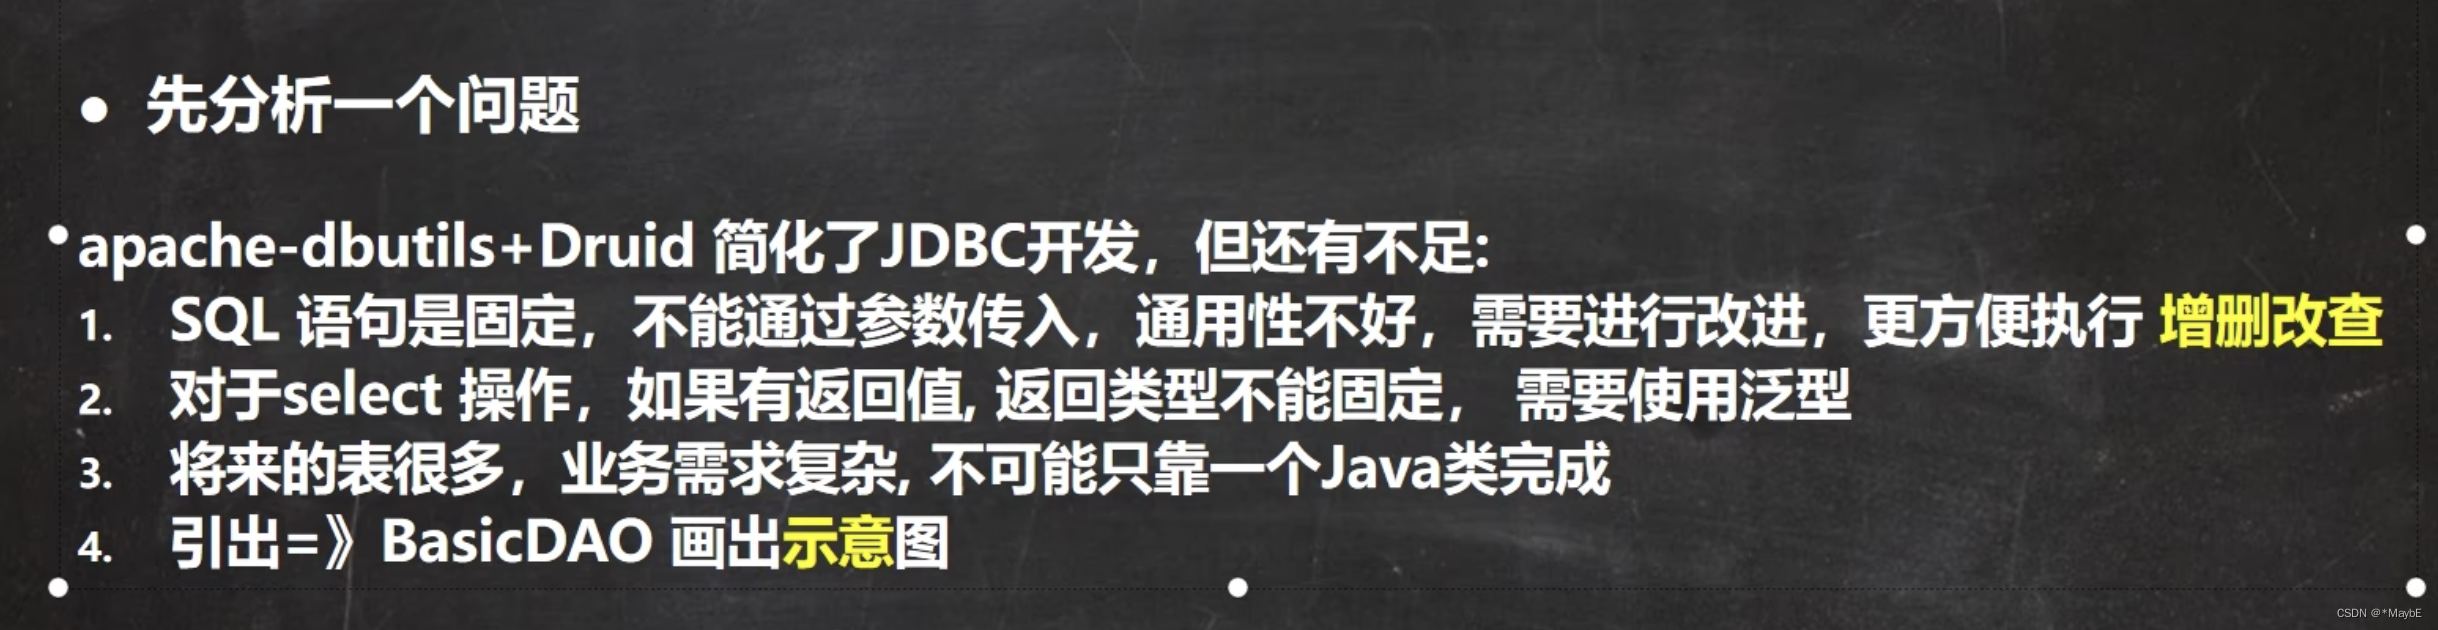
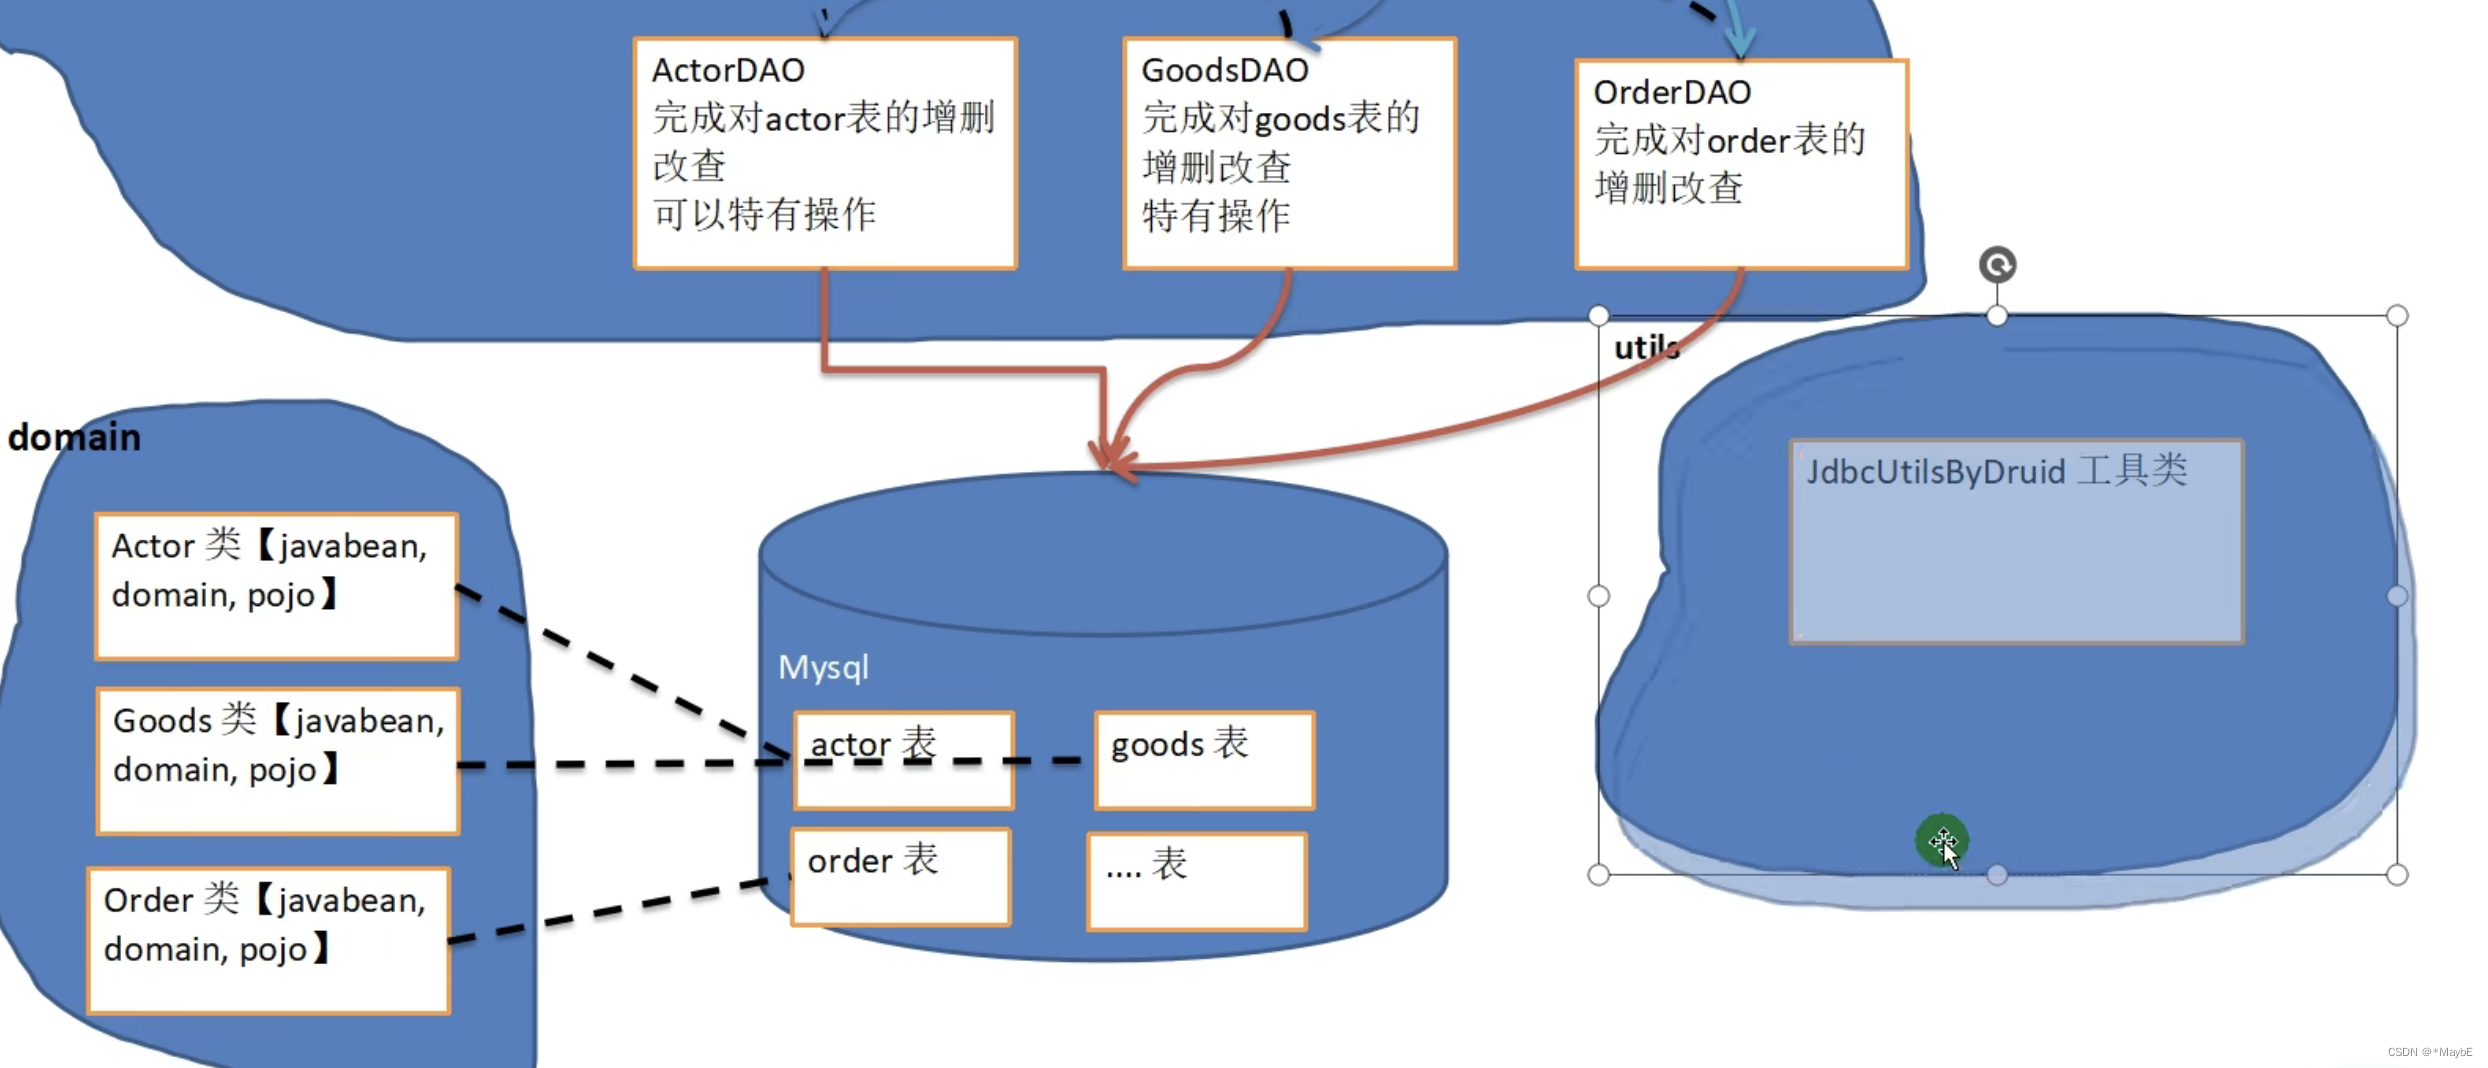
基本说明


 409
409


 被折叠的 条评论
为什么被折叠?
被折叠的 条评论
为什么被折叠?
 到【灌水乐园】发言


