


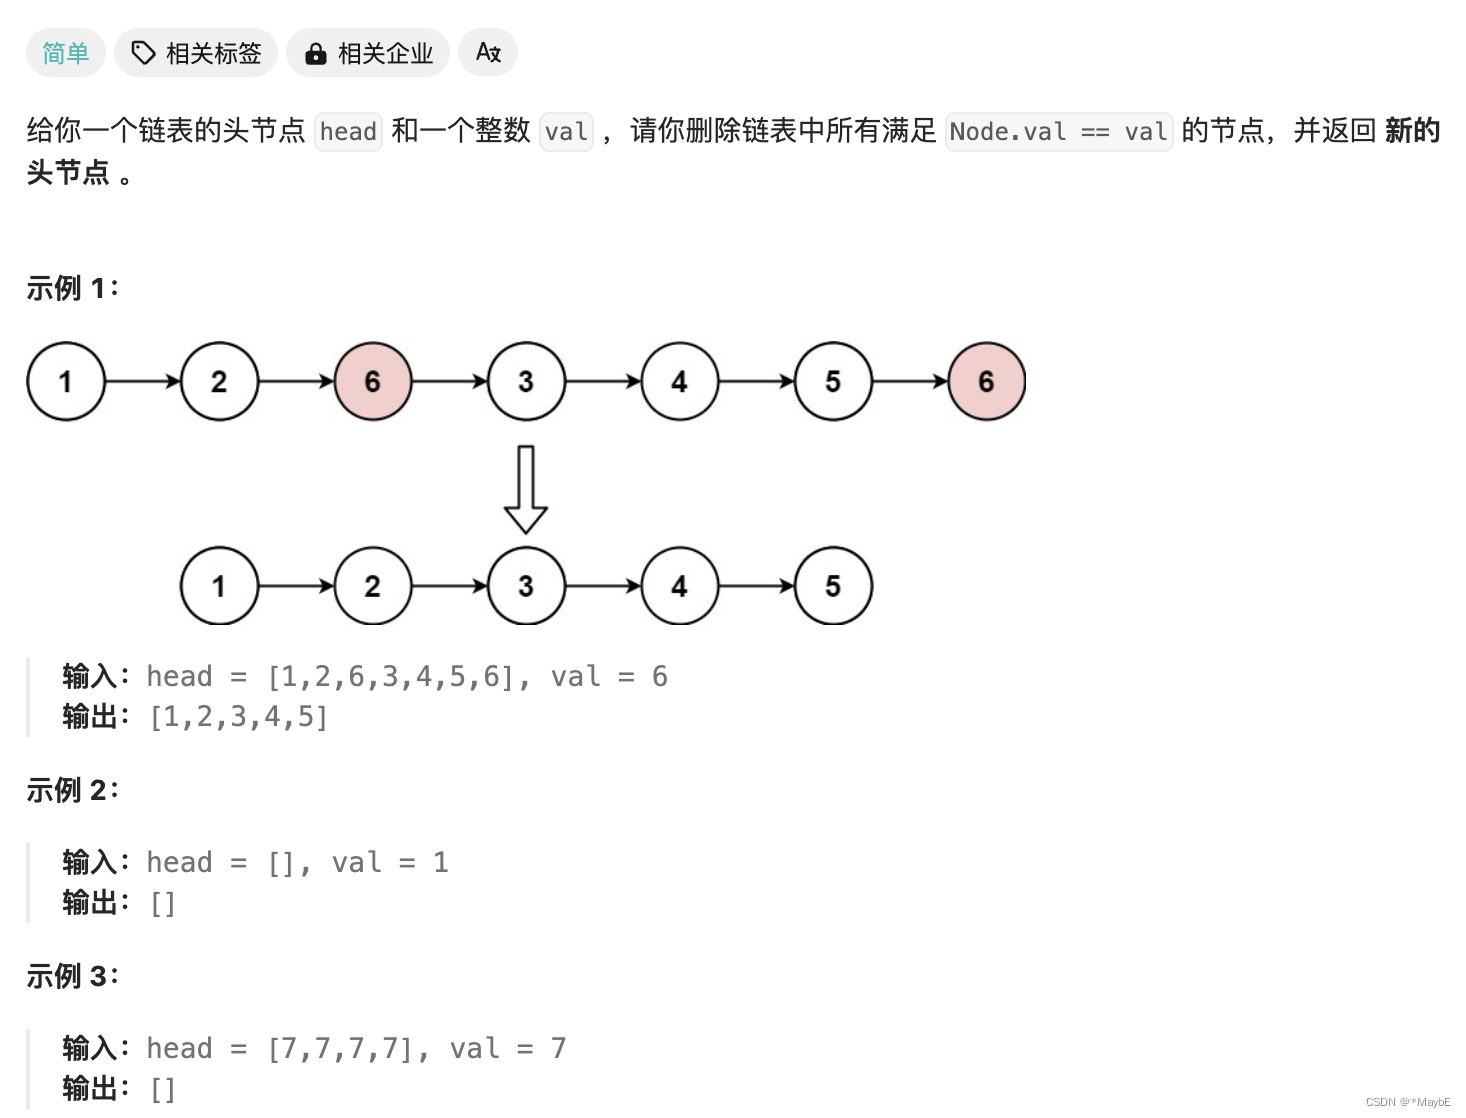
203.移除链表元素
题目链接: 203.移除链表元素
文档讲解:代码随想录
状态:没做出来,做题的时候定义了一个cur指针跳过了目标val遍历了一遍链表,实际上并没有删除该删的节点。
错误代码:
    public ListNode removeElements(ListNode head, int val) {
        ListNode sentinel = new ListNode();
        sentinel.next = head;
        ListNode cur = sentinel;
        while (cur.next != null) {
            ListNode next = cur.next;
            if (next.val == val) {
                // 这里是错误的,cur 被设置为 next.next,直接跳过了 next 节点。但这并没有实际从链表中删除 next 节点,它仍然存在于链表中。
                // 如果 next.next 是 null,则 cur 被设置为 null,导致后续的 cur.next 会抛出空指针异常
                cur = next.next;
            } else {
                cur = next;
            }
        }
        return sentinel.next;
    }
思路:定义一个ListNode类型的cur指针,遍历链表,遇到等于目标val的节点,通过修改节点的next实现删除元素。因为NodeList是引用类型,所以当cur从虚拟头节点出发时,修改cur中的引用会影响虚拟头节点后面的值,从而实现删除操作。
题解
    public ListNode removeElements(ListNode head, int val) {
        // 创建一个哨兵节点,简化边界情况的处理
        ListNode sentinel = new ListNode();
        sentinel.next = head;
        ListNode cur = sentinel;
        // 遍历链表
        while (cur.next != null) {
            ListNode next = cur.next;
            // 如果下一个节点的值等于指定值
            if (next.val == val) {
                // 应该通过修改cur.next来删除next节点
                cur.next = next.next;
            } else {
                // 否则,继续向后遍历
                cur = next;
            }
        }
        // 返回处理后的链表头节点
        return sentinel.next;
    }
什么时候使用虚拟头节点?
虚拟头节点(哨兵节点)主要解决了由于头节点可能为空或者需要特别处理而导致的额外操作。
如果在使用虚拟头节点后仍然从 head 节点出发,那么虚拟头节点的定义就失去了意义。
所以,当定义了虚拟头节点(哨兵节点)后,一般情况下,遍历操作中的 cur(当前节点)都从虚拟头节点出发。这是因为虚拟头节点是为了简化处理头节点的特殊情况而引入的,从虚拟头节点开始遍历,可以统一处理所有节点(包括原本的头节点),避免了额外的边界条件检查。
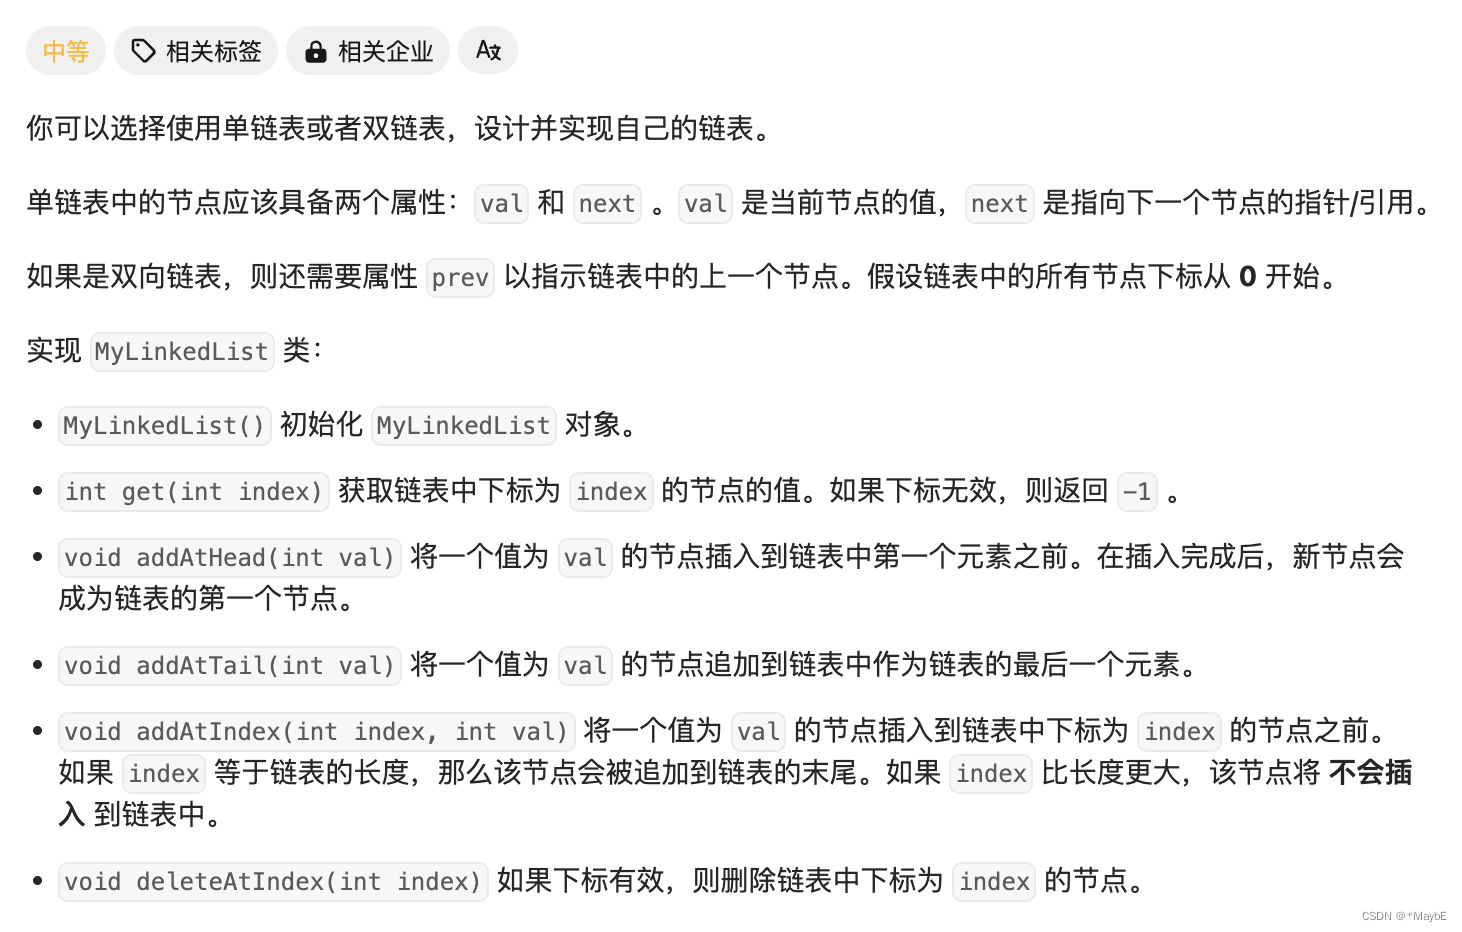
707.设计链表
题目链接:707.设计链表
文档讲解:代码随想录
状态:没做出来(使用了双向链表,没有使用虚拟头节点,结果一堆边界问题。。。)
题解
单向链表+虚拟头节点题解
public class MyLinkedList {

    private ListNode dummy; // 虚拟节点
    private int size;       // 链表的长度

    /** 初始化链表 */
    public MyLinkedList() {
        dummy = new ListNode(0);
        size = 0;
    }

    /** 获取链表中下标为 index 的节点的值,如果下标无效则返回 -1 */
    public int get(int index) {
        if (index < 0 || index >= size) {
            return -1;
        }

        ListNode current = dummy.next;
        for (int i = 0; i < index; i++) {
            current = current.next;
        }
        return current.val;
    }

    /** 在链表头部插入值为 val 的节点 */
    public void addAtHead(int val) {
        ListNode newHead = new ListNode(val);
        newHead.next = dummy.next;
        dummy.next = newHead;
        size++;
    }

    /** 在链表尾部追加值为 val 的节点 */
    public void addAtTail(int val) {
        ListNode newTail = new ListNode(val);
        ListNode current = dummy;
        while (current.next != null) {
            current = current.next;
        }
        current.next = newTail;
        size++;
    }

    /** 在链表中下标为 index 的节点之前插入值为 val 的节点 */
    public void addAtIndex(int index, int val) {
        if (index < 0 || index > size) {
            return;
        }
// 注意:不是ListNode current = dummy.next;
// 简而言之,ListNode cur = dummy; 确保了在插入节点时,从链表的头节点开始遍历,而不是跳过头节点。
// 例如index=0,则是dummy.next = newNode
        ListNode current = dummy;
        for (int i = 0; i < index; i++) {
            current = current.next;
        }
        ListNode newNode = new ListNode(val);
        newNode.next = current.next;
        current.next = newNode;
        size++;
    }

    /** 删除链表中下标为 index 的节点 */
    public void deleteAtIndex(int index) {
        if (index < 0 || index >= size) {
            return;
        }

        ListNode current = dummy;
        for (int i = 0; i < index; i++) {
            current = current.next;
        }
        current.next = current.next.next;
        size--;
    }

    static class ListNode {
        int val;
        ListNode next;

        // 节点构造函数
        public ListNode(int val) {
            this.val = val;
        }
    }
}
双向链表无虚拟头节点题解(不推荐)
class MyLinkedList {

    ListNode head;

    static class ListNode {
        int val;
        ListNode pre;
        ListNode next;

        public ListNode() {
        }

        public ListNode(int val, ListNode pre, ListNode next) {
            this.val = val;
            this.pre = pre;
            this.next = next;
        }

        @Override
        public String toString() {
            return "ListNode{" +
                    "val=" + val +
                    ", pre=" + pre +
                    ", next=" + next +
                    '}';
        }
    }

    public MyLinkedList() {
        head = null;
    }

    public int get(int index) {
        if (index < 0 || head == null) {
            return -1;
        }
        ListNode cur = head;
        while (index > 0 && cur != null) {
            cur = cur.next;
            index--;
        }
        return (cur == null) ? -1 : cur.val;
    }

    public void addAtHead(int val) {
        ListNode node = new ListNode(val, null, head);
        if (head != null) {
            head.pre = node;
        }
        head = node;
    }

    public void addAtTail(int val) {
        ListNode node = new ListNode(val, null, null);
        ListNode cur = head;
        while (cur.next != null) {
            cur = cur.next;
        }
        cur.next = node;
        node.pre = cur;

    }

    public void addAtIndex(int index, int val) {
        if (index < 0) {
            return;
        }
        if (index == 0) {
            addAtHead(val);
            return;
        }
        ListNode cur = head;
        while (index > 1 && cur != null) {
            cur = cur.next;
            index--;
        }
        if (cur == null) {
            return;
        }
        ListNode node = new ListNode(val, cur, cur.next);
        if (cur.next != null) {
            cur.next.pre = node;
        }
        cur.next = node;
    }

    public void deleteAtIndex(int index) {
        if (index < 0 || head == null) {
            return;
        }
        if (index == 0) {
            head = head.next;
            if (head != null) {
                head.pre = null;
            }
            return;
        }
        ListNode cur = head;
        while (index > 0 && cur != null) {
            cur = cur.next;
            index--;
        }
        if (cur == null) {
            return;
        }
        if (cur.pre != null) {
            cur.pre.next = cur.next;
        }
        if (cur.next != null) {
            cur.next.pre = cur.pre;
        }
    }
}
206.反转链表

题目链接: 206.反转链表
文档讲解:代码随想录
状态:没做出来,明明很简单的题,为啥没做出来呢。。。。。想着用dummy节点,dummy->1->2->3… dummy->2->1->3… dummy->3->2->1->…,这个dummy的next一直在变。。。
思路:

题解
    public ListNode reverseList(ListNode head) {
        // 初始化前一个节点为null
        ListNode prev = null;
        // 当前节点从head开始
        ListNode curr = head;

        while (curr != null) {
            // 暂时保存下一个节点
            ListNode next = curr.next;
            // 当前节点的next指向前一个节点
            curr.next = prev;
            // 移动前一个节点到当前节点
            prev = curr;
            // 移动当前节点到下一个节点
            curr = next;
        }
        // 最后prev将指向新的头节点
        return prev;
    }
总结反思
为啥做题的时候总是有很多乱七八糟的思路,自己找的还总是最差的那种呢。。。。
链表题解的两个技巧
遇到链表相关的题,无论问题是什么,先要想想是不是可以用上以下的两个技巧。
- 哨兵节点:哨兵节点是一个非常常用的链表技巧,在处理链表边界问题的场景下,可以减少我们代码的复杂度。
主要解决的问题如下:- 处理完一条链表后,需要返回这个链表的头结点。我们在一开始的时候使用哨兵节点(dummy),让它的 next 节点指向 head 节点。最后 return 时直接返回 dummy.next 即可。
- 在对链表进行插入或删除节点时,使用哨兵节点可以简化删除 head 节点或者向 head 前插入节点时的处理逻辑。因为头节点没有前驱节点,这就导致对其的增删需要额外操作。
- 在某些遍历链表的时候,可能会需要同时记录 pre 节点。当你从 head 节点开始遍历时,head 是没有 pre 节点的(为null)。而此时引用哨兵节点,相当于帮助 head 节点初始化了一个 pre 节点,可以方便的解决 pre 节点为空的问题。
为啥反转链表这道题不用虚拟头结点呢?
对于反转链表的操作,无论是递归还是迭代方法,都集中在反转节点的指针上,而不涉及节点的插入或删除操作。因此,反转链表的核心在于调整指针的方向,而不是处理节点的前驱节点或边界条件。这也是为什么在反转链表时,虚拟头节点并不能带来实际的简化。
- 双指针:其实不止是链表,对于数组题来说,也是非常好用的技巧。
双指针的主要用法有以下几种:- 两个指针在两条链表上行走:这种方法通常用于合并两个有序链表、找到两个链表的交点等问题。
- 快慢指针,同时前进:快慢指针通常用于检测链表中是否存在环,或者找到链表的中间节点等情况。
- 前后指针,前指针先走 n 步,之后两个指针同时前进:这种方法常用于找到链表的倒数第 n 个节点,或者解决某些数组问题。
- 一个指针用来迭代遍历链表,另一个指针用来记录:在链表操作中,常常需要用一个指针来迭代遍历链表,另一个指针用来记录节点,例如 pre 和 cur;cur 和 next;pre、cur 和 next。


 1465
1465

 被折叠的 条评论
为什么被折叠?
被折叠的 条评论
为什么被折叠?
 到【灌水乐园】发言


