


Vue 前端路由基础
何为路由?
在现代前端开发中,路由是非常重要的一环。但路由到底是什么呢?
对于前后端来说,路由就是URL到函数的映射。通俗地来说,这是从路由的实现原理上来解释路由的(就好比计算机网络中的路由器)。
前端路由应用场景:
前端路由更多地应用在单页面富应用上, 也即SPA(single page web application)
路由的不同发展阶段:
1.后端渲染阶段(如JSP网页设计)
2.前后端分离阶段(Ajax等技术)
3.前端路由阶段
前端路由主要有的实现方案:
1.Hash
2.history API
前端路由的基本实现原理:
1.Hash
打开浏览器控制台,输入:
location.hash = 'home'

结果显示网页URL已经发生改变,但是未发生页面刷新,即未发生新的请求。
2.History
打开浏览器控制台,输入:
history.pushState({},'','home')

结果同样显示网页URL已经发生改变,但是未发生页面刷新,即未发生新的请求。
通过Vue-CLI来创建项目:
vue create [项目文件名称]
在根目录下创建Components文件夹,其文件夹下创建两个vue文件:
Home.vue:
<template>
  <div>
    <h1>我是Home页标题</h1>
    <p>我是Home页段落</p>
  </div>
</template>

<script>
  export default {
    name: "Home"
  }
</script>

<style scoped>

</style>
About.vue:
<template>
  <div>
    <h1>我是About页标题</h1>
    <p>我是About页段落</p>
  </div>
</template>

<script>
  export default {
    name: "About"
  }
</script>

<style scoped>

</style>
创建router文件夹以及相应目录下的index.js文件,index.js内容为:
// 配置路由相关信息
import { createRouter, createWebHistory } from 'vue-router'
import Home from '../components/Home'
import About from '../components/About'

// 配置相关路由映射信息
const routes = [
 {
    // 默认缺省值
    path:"/",
    // 重定向到/home的路径下
    redirect: '/home'
  },
  {
    path: '/home',
    name: 'Home',
    component: Home
  },
  {
    path: '/about',
    name: 'About',
    component: About
  }
]

// 创建前端路由对象
const router = createRouter({
  // 采用History方式实现前端路由
  history: createWebHistory(process.env.BASE_URL),
  routes
})

// 将router对象传入实例中
export default router
修改App.vue内容:
<template>
  <div id="app">
    <!-- replace不会留下浏览历史(和history.pushState有关) -->
    <router-link  to="/home" repalce active-class="active"><button class="font">首页</button></router-link>
    <router-link  to="/about" replace active-class="active"><button class="font">关于</button></router-link>
  </div>
  <router-view></router-view>
</template>

<script>
  export default{
    name:'App'
  }
</script>

<style>
  .font{
    font-size: 20px;
  }
  .active .font{
    color:red;
  }
</style>
main.js文件保持不变
启动服务:
npm run serve


同时还有另一种方式(通过修改App.vue)也能达到类似以上的效果:
<template>
  <div id="app">
    <button class="font" @click="homeClick">首页</button>
    <button class="font" @click="aboutClick">关于</button>
  </div>
  <router-view></router-view>
</template>

<script>
  export default{
    name:'App',
    methods:{
      homeClick(){
        // this.$router.push('/home')
        this.$router.replace('/about')
      },
      aboutClick(){
        // this.$router.push('/about')
        this.$router.replace('/about')
      }
    }
  }
</script>

<style>
  .font{
    font-size: 20px;
    color:blue;
  }
</style>
一个简单的前端路由就完成了。
动态路由
为了满足某种模式匹配到的所有路由,全都映射到相同组件的需求。这个时候就需要动态路由匹配。例如,我们有一个 User 组件,对于所有 ID 各不相同的用户,都要使用这个组件来渲染。
User.vue:
<template>
  <div>
    <h1>用户 {{$route.params.userId}} 界面</h1>
    <p >你好,{{userId}}。</p>
  </div>
</template>

<script>
  export default {
    name: "User",
    computed:{
      userId(){
        // 返回当前激活路由的用户ID
        return this.$route.params.userId
      }
    }
  }
</script>

<style scoped>

</style>
在index.js的routes数组中添加如下路由路径:
  {
    path:'/user/:userId', // 这里':'后面的userId要和$route.userId一致
    name: 'userId',
    component: User
  }
修改App.vue:
<template>
  <div id="app">
    <button class="font" @click="homeClick">首页</button>
    <button class="font" @click="aboutClick">关于</button>
    <button class="font" @click="userClick">用户界面</button>
  </div>
  <router-view></router-view>
</template>

<script>
  export default{
    name:'App',
    data(){
      return {
        user:'Tomcat'
      }
    },
    methods:{
      homeClick(){
        // this.$router.push()
        this.$router.replace('/home')
      },
      aboutClick(){
        // this.$router.push()
        this.$router.replace('/about')
      },
      userClick(){
        // 动态决定路由路径
        this.$router.replace('/user/'+this.user)
      }
    }
  }
</script>

<style>
  .font{
    font-size: 20px;
    color:blue;
  }
</style>
npm run serve 启动,显示如下结果:

注:以上使用了ElementPlus添加组件效果
路由懒加载
当打包构建应用时,JavaScript包会变得非常大,影响页面加载,之所以如此,是因为它是一次性将所有组件的JavaScript代码全部打包的。但是如果我们能把不同的路由对应的组件分割成不同的代码块,然后当路由被访问的时候在加载对应组件,这样响应速度就会变得更加迅速。
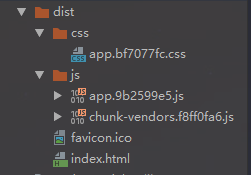
在懒加载之前,项目打包的目录结构为:
修改index.js,即可为懒加载:
// import Home from '../components/Home'
// import About from '../components/About'
// import User from '../components/User'
const Home = () => import('../components/Home')
const About = () => import('../components/About')
const User = () => import('../components/User')
重新用npm run build打包,项目结构为:
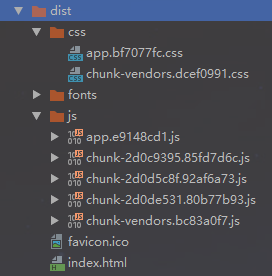
三个chunk文件代表具有三个路由组件
嵌套路由
通俗地说,就是一个路径映射一个组件,该组件继续进行路径映射组件
分别创建组件HomeBook.vue和HomeMusic.vue:
<template>
  <div>
    <ul>
      <li v-for="book in books" class="font">书籍名称:{{book.name}},书籍价格:{{book.price}}</li>
    </ul>
  </div>

</template>

<script>
  export default {
    name: "HomeBook",
    data(){
      return {
        books:[{name:"三体I",price:101.5},
          {name:"三体II",price:202.5},
          {name:"三体III",price:303.5}]
      }
    }
  }
</script>

<style scoped>
  .font {
    font-size:20px;
    color:dodgerblue;
  }
</style>
<template>
  <div>
    <ul>
      <li v-for="m in music" class="font">音乐:{{m}}</li>
    </ul>
  </div>
</template>

<script>
  export default {
    name: "HomeMusic",
    data(){
      return {
        music:['游京','麻雀','亦是此间少年']
      }
    }
  }
</script>

<style scoped>
  .font{
    font-size:20px;
    color:dodgerblue;
  }
</style>
index.js:
// 配置路由相关信息
import { createRouter, createWebHistory } from 'vue-router'
// 懒加载方式
const Home = () => import('../components/Home')
const HomeBook = () => import('../components/HomeBook')
const HomeMusic = () => import('../components/HomeMusic')
const About = () => import('../components/About')
const User = () => import('../components/User')


// 配置相关路由映射信息
const routes = [
  {
    // 默认路径
    path:"",
    // 重定向到/home的路径下
    redirect: '/home'
  },
  {
    path: '/home',
    name:"Home",
    component: Home,
    children:[
      {
      	// 默认路径
        path:'',
        redirect: '/home/book'
      },
      {
        // 这里记得不能添加'/'
        path:'book',
        name:'Book',
        component:HomeBook
      },
      {
        path:'music',
        name:'Music',
        component:HomeMusic
      }
    ]
  },
  {
    path: '/about',
    name:"About",
    component: About
  },
  {
    path:'/user/:userId',
    name:"UserID",
    component: User
  }
]

// 创建前端路由对象
const router = createRouter({
  // 采用History方式实现前端路由
  history: createWebHistory(process.env.BASE_URL),
  routes
})

// 将router对象传入实例中
export default router
Home.vue:
<template>
  <div>
    <h1>我是Home页标题</h1>
    <p>我是Home页段落</p>
    <el-button type="primary" @click="bookClick" round>书籍</el-button>
    <el-button type="primary" @click="musicClick" round>音乐</el-button>
    <hr/>
    <!-- 别忘记添加视图标签 -->
    <router-view></router-view>
  </div>
</template>

<script>
  export default {
    name: "Home",
    methods:{
      bookClick(){
        this.$router.replace('/home/book')
      },
      musicClick(){
        this.$router.replace('/home/music')
      }
    }
  }
</script>

<style scoped>

</style>
npm run serve显示结果:


传递参数
传递参数主要有两种方式:
1.params
- 配置路由格式:/path/:id
- 传递方式:path+’/’+id(路径后跟上对应的id,字符串拼接)
- 传递后形成的路径:/path/id
- 参数使用:this.$route.params.id
2.query
- 配置路由格式:/path
- 传递方式:key作为传递方式
- 传递后形成的路径:/path?key=…
- 参数使用:this.$route.query.key
App.vue:
<template>
  <div id="app">
    <el-button type="primary" @click="homeClick" plain>首页</el-button>
    <el-button type="primary" @click="aboutClick" plain>关于</el-button>
    <el-button type="primary" @click="profileClick" plain>归档</el-button>
    <el-button type="primary" @click="userClick" plain>用户界面</el-button>
  </div>
  <router-view></router-view>
</template>

<script>
  export default{
    name:'App',
    data(){
      return {
        user:'Tomcat'
      }
    },
    methods:{
      homeClick(){
        // this.$router.push()
        this.$router.replace('/home')
      },
      aboutClick(){
        // this.$router.push()
        this.$router.replace('/about')
      },
      userClick(){
        // 动态决定路由路径
        this.$router.replace('/user/'+this.user)
      },
      profileClick(){
        // replace可以传递对象(query方式)
        this.$router.replace(
            {
              path:'/profile',
              query:{
                name:'张三',
                age:21
          }})
      }
    }
  }
</script>

<style>
</style>
index.js:
// 配置路由相关信息
import { createRouter, createWebHistory } from 'vue-router'
// 懒加载
const Home = () => import('../components/Home')
const HomeBook = () => import('../components/HomeBook')
const HomeMusic = () => import('../components/HomeMusic')
const About = () => import('../components/About')
const User = () => import('../components/User')
const Profile = () => import('../components/Profile')

// 配置相关路由映射信息
const routes = [
  {
    // 默认缺省值
    path:"",
    // 重定向到/home的路径下
    redirect: '/home'
  },
  {
    path: '/home',
    name:"Home",
    component: Home,
    children:[
      {
        path:'',
        redirect: '/home/book'
      },
      {
        // 这里记得不能添加'/'
        path:'book',
        name:'Book',
        component:HomeBook
      },
      {
        path:'music',
        name:'Music',
        component:HomeMusic
      }
    ]
  },
  {
    path: '/about',
    name:"About",
    component: About
  },
  {
    path:'/user/:userId',
    name:"UserID",
    component: User
  },
  {
    path:'/profile',
    name:'Profile',
    component:Profile
  }
]

// 创建前端路由对象
const router = createRouter({
  // 采用History方式实现前端路由
  history: createWebHistory(process.env.BASE_URL),
  routes
})

// 将router对象传入实例中
export default router
Profile.vue:
<template>
  <div>
    <h1>我是Profile界面</h1>
    <h3>我的姓名是:{{$route.query.name}}</h3>
    <h3>我的年龄是:{{$route.query.age}}</h3>
  </div>
</template>

<script>
  export default {
    name: "Profile"
  }
</script>

<style scoped>

</style>
结果显示:

导航(路由)守卫
全局守卫
// 全局路由守卫
router.beforeEach((to,from,next) => {})
router.afterEach((to,from) => {})
修改index.js:
// 配置相关路由映射信息
const routes = [
  {
    // 默认缺省值
    path:"",
    // 重定向到/home的路径下
    redirect: '/home'
  },
  {
    path: '/home',
    name:"Home",
    meta:{
      title:'首页',
    },
    component: Home,
    children:[
      {
        path:'',
        redirect: '/home/book'
      },
      {
        // 这里记得不能添加'/'
        path:'book',
        name:'Book',
        component:HomeBook
      },
      {
        path:'music',
        name:'Music',
        component:HomeMusic
      }
    ]
  },
  {
    path: '/about',
    name:"About",
    meta:{
      title:'关于',
    },
    component: About
  },
  {
    path:'/user/:userId',
    name:"UserID",
    meta:{
      title:'用户',
    },
    component: User
  },
  {
    path:'/profile',
    name:'Profile',
    meta:{
      title:'归档',
    },
    component:Profile
  }
]

// 全局导航守卫(每次组件路由事件发生之前) 前置守卫(guard)
router.beforeEach((to,from,next) =>{
  document.title = to.meta.title; // 这里实现网页标题
  console.log("前置守卫执行");
  next()
})
// 全局导航守卫(每次组件路由事件发生之后) 后置守卫(guard)
router.afterEach((to,from) => {
  console.log("后置守卫执行");
})
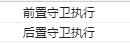
打开浏览器,点击某一路由组件,进入控制台,如下改变:

路由独享守卫
// 路由独享守卫
beforeEnter:(to,from,next){}
修改index.js中routes:
{
    path: '/home',
    name:"Home",
    meta:{
      title:'首页',
    },
    // 独享守卫
    beforeEnter(to,from,next){
      console.log("从路径:",from.fullPath,"到路径:",to.fullPath);
      next();
    },
    component: Home,
    children:[
      {
        path:'',
        redirect: '/home/book'
      },
      {
        // 这里记得不能添加'/'
        path:'book',
        name:'Book',
        component:HomeBook
      },
      {
        path:'music',
        name:'Music',
        component:HomeMusic
      }
    ]
  }
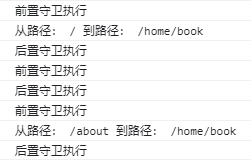
首先进入后,点击关于按钮,最后点击首页按钮,控制台显示为:
组件内守卫
与上方的的守卫差不多
修改User.vue:
<script>
  export default {
    name: "User",
    computed:{
      userId(){
        // 返回当前激活路由的用户ID
        return this.$route.params.userId
      }
    },
    beforeRouteEnter(to,from,next){
      console.log("进入路由组件之前:",from.fullPath,to.fullPath);
      next()
    },
    beforeRouteUpdate(to,from,next){
      console.log("更新路由路径(后面的id)之前:",from.fullPath,to.fullPath);
      next()
    },
    beforeRouteLeave(to,from,next){
      console.log("离开路由组件之前:",from.fullPath,to.fullPath);
      next()
    }
  }
</script>

keep-alive可以使路由组件默认不会立即销毁
meta: {
  keepAlive: true,
  title: '首页'
 }


 2927
2927


 被折叠的 条评论
为什么被折叠?
被折叠的 条评论
为什么被折叠?
 到【灌水乐园】发言


