


Angular技术分享


1.Angular.js VS Angular
两者其实是同一物件的不同版本:
前者的核心是组件另外可以取消双向绑定,在性能上大大提升;
后者是模板功能强大丰富,具有双向数据绑定等等;
- Angular是Google维护的一款开源javaScript框架。
- 在Anguar2.0之前的版本都叫做AngularJS,但在Angular4.0版本后就称Angular,Angular1.5到Angular4.0是完全重写。在1.x版本时使用的方法是引入AngularJS的js文件到网页中,而2.0版本之后就完全不同了。
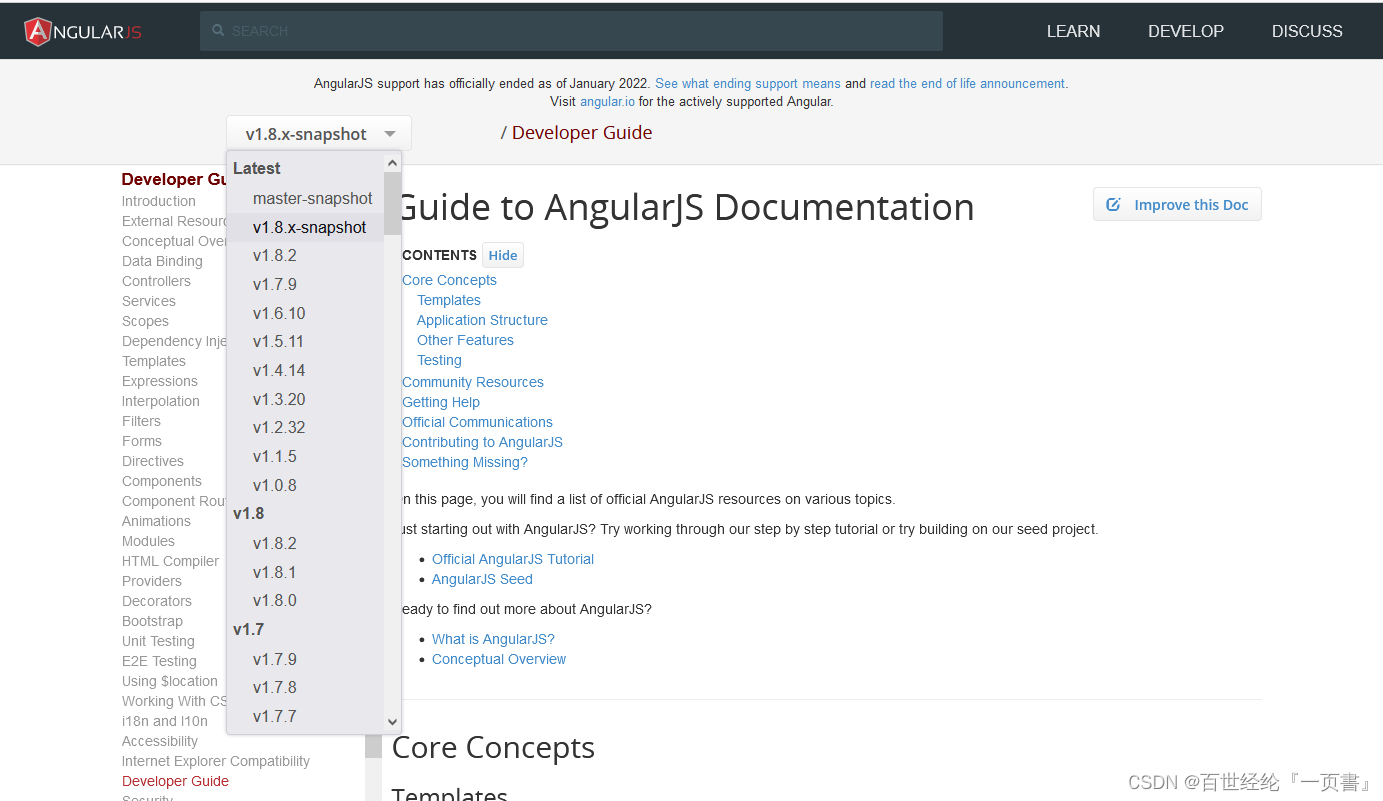
1.1 Angular.js
Angular.js Website: https://docs.angularjs.org/guide .
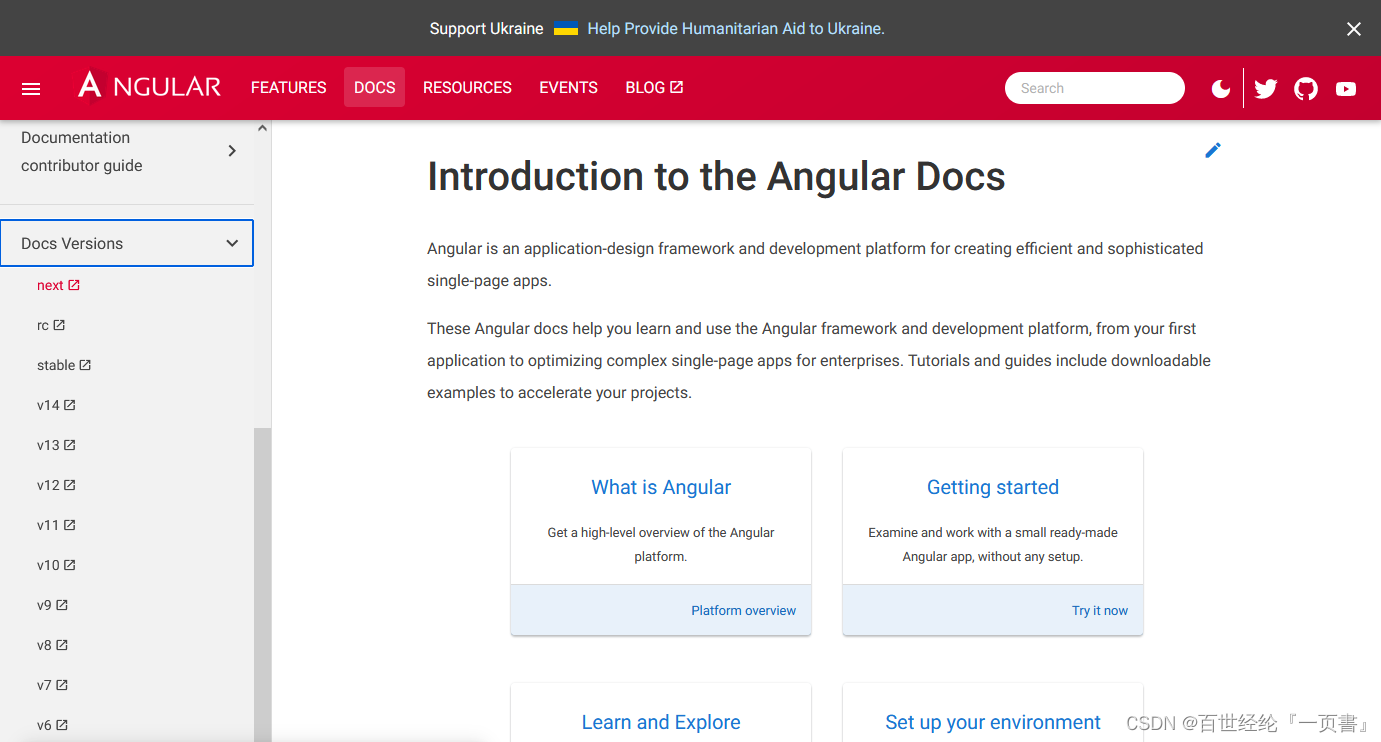
1.2 Angular
Angular Website: https://next.angular.io/docs .
2.Angular Introduction
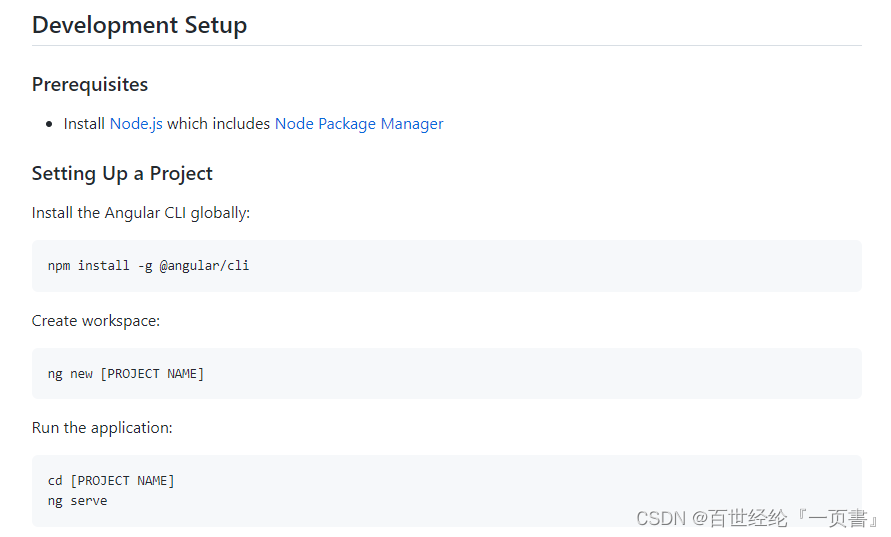
2.1 Install && create project
- npm install -g @angular/cli
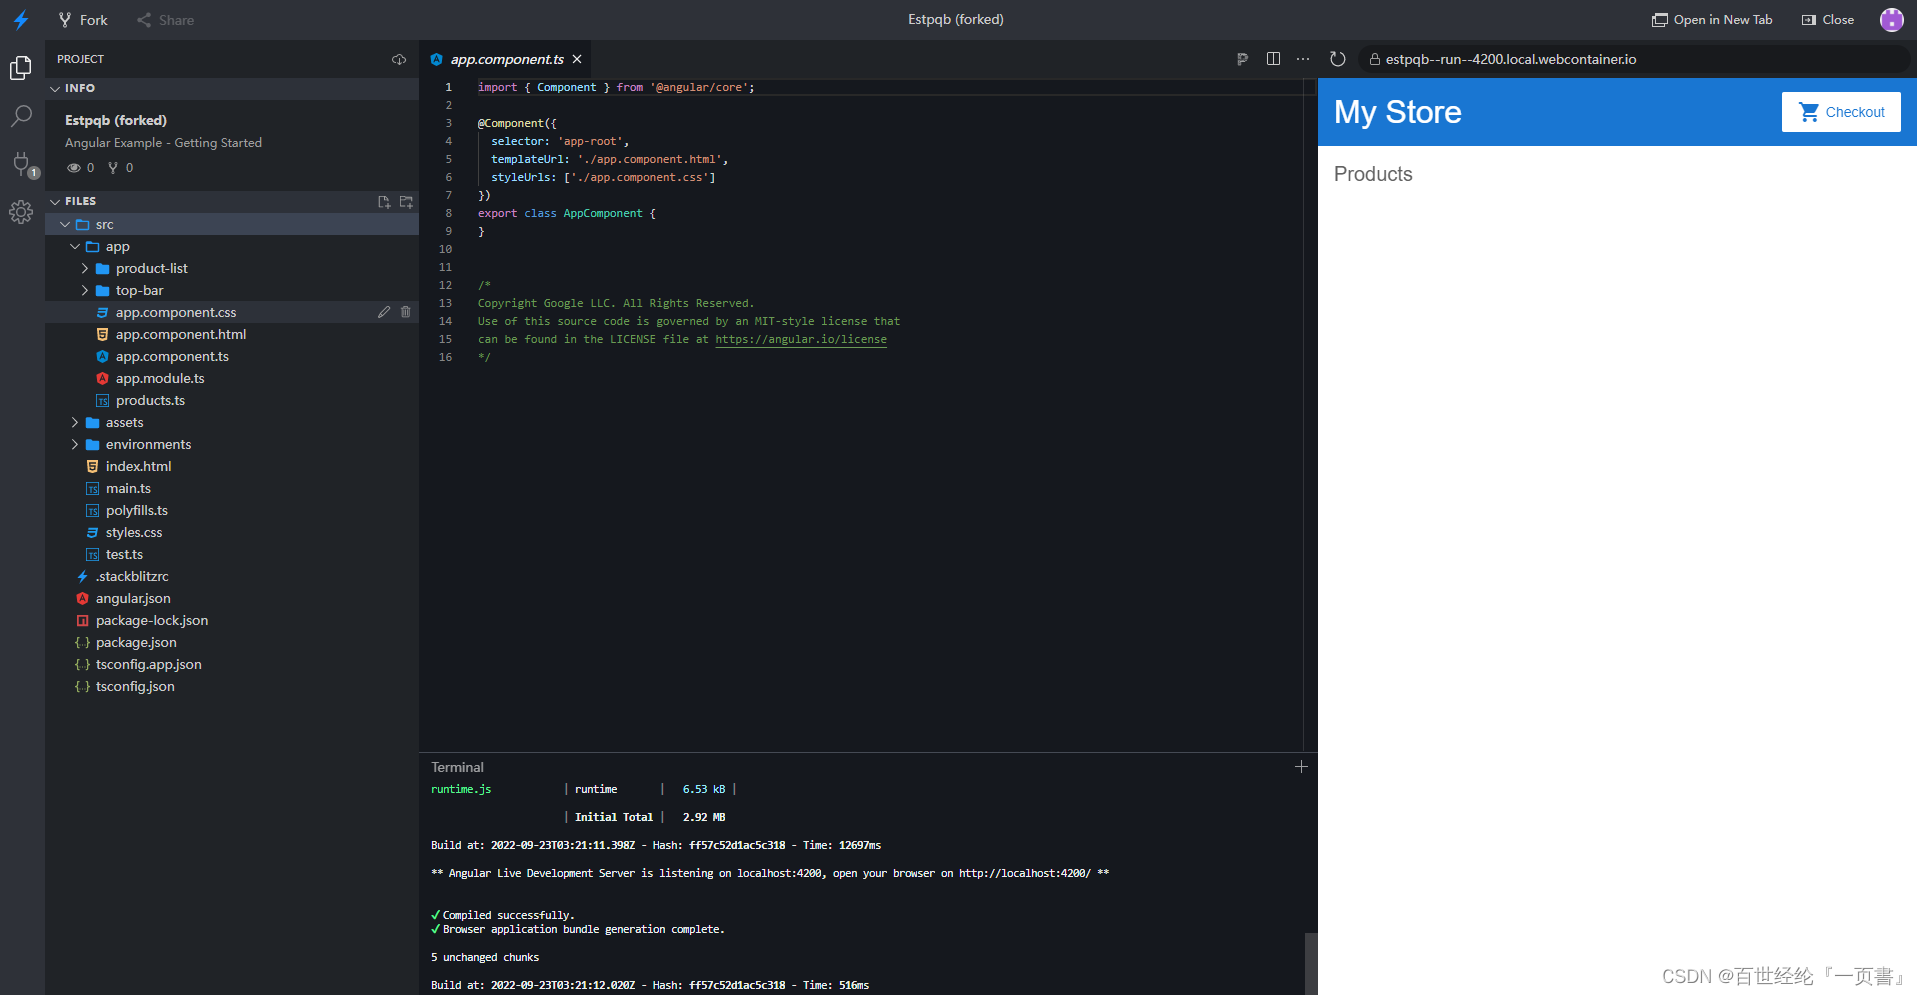
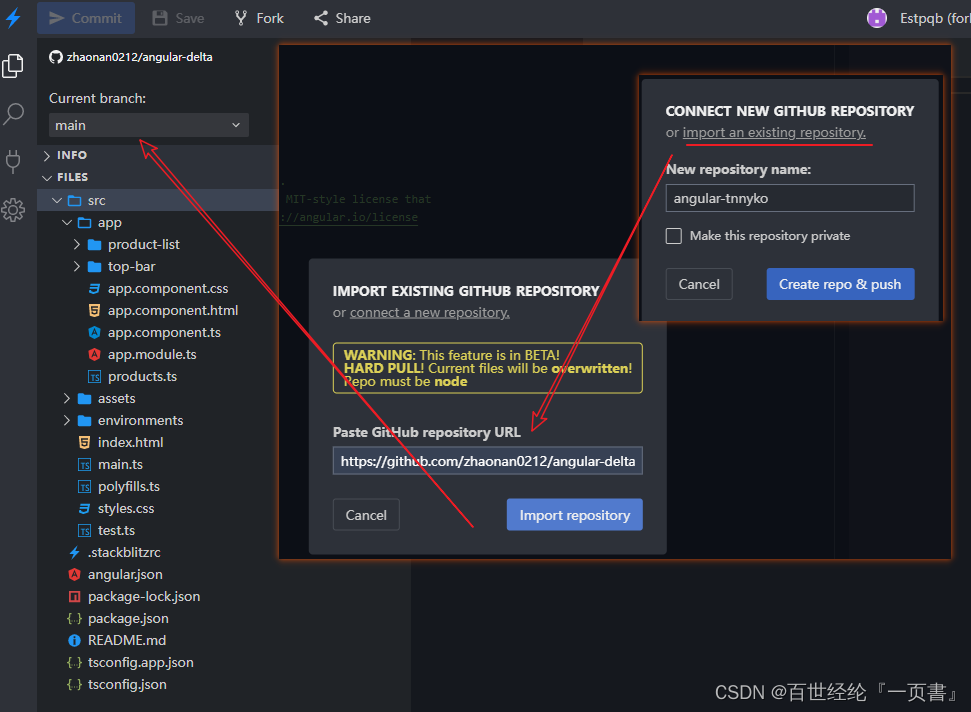
2.2 Creat Project On Stackblitz
- 官方直接建好了project
Angular Website: https://stackblitz.com.
- 非常Nice,登录github,直接保存到自己的repository
第一种选择:new repository
第二种选择:import an existing repository

2.3 Common syntax
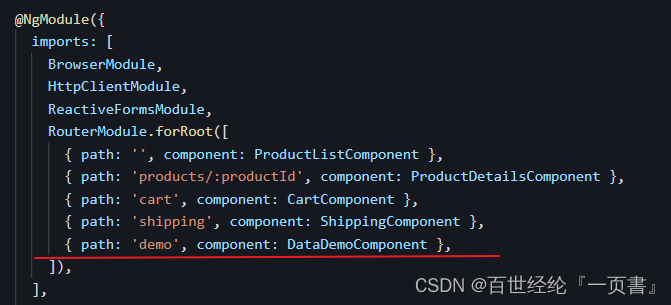
- 在上面的项目中载打开个terminal,执行
ng generate component data-demo
- 在app.module.ts中添加DataDemoComponent的router
- 测试的代码都在下面,包括ts和html
- 声明基本属性的四种方式
没写就代表是public
可以指定数据类型,string、nomber,boolean
any代表任何数据类型
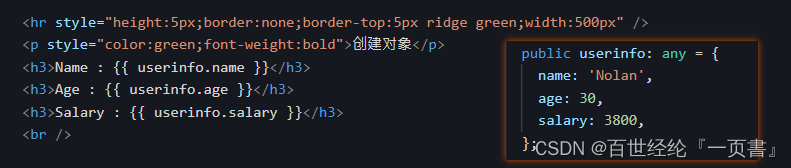
- 声明对象
- 属性赋值[ ]
使用了[ ],意思就是后面的是变数
没有使用[ ],意思就是后面的是字符串
- 定义及解析数组
遍历使用*ngfor
- 判断使用*ngIf
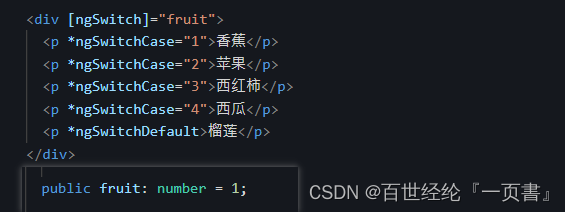
- 另一种判断ngSwitch
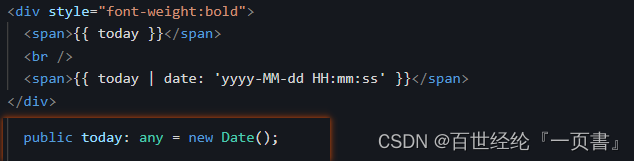
- 管道
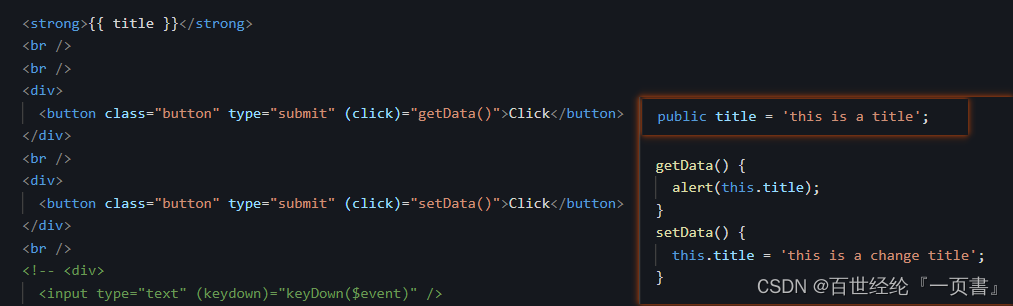
- 事件

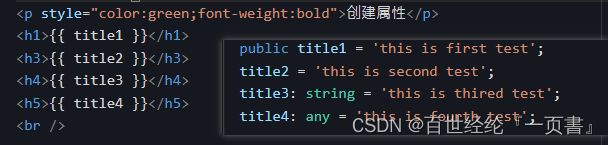


2.3.1 Component.ts
import { Component, OnInit } from '@angular/core';
@Component({
selector: 'app-data-demo',
templateUrl: './data-demo.component.html',
styleUrls: ['./data-demo.component.css'],
})
export class DataDemoComponent implements OnInit {
public title1 = 'this is first test';
title2 = 'this is second test';
title3: string = 'this is thired test';
title4: any = 'this is fourth test';
public userinfo: any = {
name: 'Nolan',
age: 30,
salary: 3800,
};
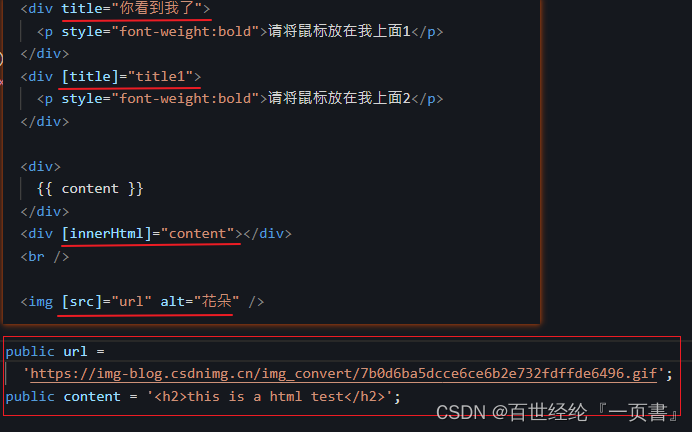
public url =
'https://img-blog.csdnimg.cn/img_convert/7b0d6ba5dcce6ce6b2e732fdffde6496.gif';
public content = '<h2>this is a html test</h2>';
//方式1:定义数组
public arrs = ['1111', '2222', '33333'];
//方式2: 推荐
public list: any[] = ['我是第一个新闻', 222222222222, '我是第三个新闻'];
//方式3:
public items: Array<string> = ['我是第一个新闻', '我是第二个新闻'];
//复杂数组
public cars: any[] = [
{
cate: '宝马',
list: [
{
title: '宝马x1',
price: '20w',
},
{
title: '宝马x2',
price: '25w',
},
],
},
{
cate: '奔驰',
list: [
{
title: '奔驰C1',
price: '20w',
},
{
title: '奔驰C2',
price: '25w',
},
],
},
];
public isDisply: boolean = false;
public imgUrl1 =
'https://img-blog.csdnimg.cn/61c4432e1345455aa98bf70ef1adfc86.gif';
public imgUrl2 =
'https://img-blog.csdnimg.cn/f78a21ac36af4c8695f69d4ec77f623c.gif';
public fruit: number = 1;
public attr = 'orange';
public today: any = new Date();
public title = 'this is a title';
constructor() {
/**
* 也可以重新赋值
*/
this.title4 = 'this is 4th test';
console.log(this.today);
}
ngOnInit(): void {}
getData() {
alert(this.title);
}
setData() {
this.title = 'this is a change title';
}
// keyDown(e){
// console.log(event);
// }
}
2.3.2 Html template
<p style="color:green;font-weight:bold">this is data-demo page!</p>
<br />

<hr style="height:5px;border:none;border-top:5px ridge green;width:500px" />
<p style="color:green;font-weight:bold">创建属性</p>
<h1>{{ title1 }}</h1>
<h3>{{ title2 }}</h3>
<h4>{{ title3 }}</h4>
<h5>{{ title4 }}</h5>
<br />

<hr style="height:5px;border:none;border-top:5px ridge green;width:500px" />
<p style="color:green;font-weight:bold">创建对象</p>
<h3>Name : {{ userinfo.name }}</h3>
<h3>Age : {{ userinfo.age }}</h3>
<h3>Salary : {{ userinfo.salary }}</h3>
<br />

<hr style="height:5px;border:none;border-top:5px ridge green;width:500px" />
<p style="color:green;font-weight:bold">属性赋值[]</p>
<div title="你看到我了">
  <p style="font-weight:bold">请将鼠标放在我上面1</p>
</div>
<div [title]="title1">
  <p style="font-weight:bold">请将鼠标放在我上面2</p>
</div>

<div>
  {{ content }}
</div>
<div [innerHtml]="content"></div>
<br />

<img [src]="url" alt="花朵" />

<hr style="height:5px;border:none;border-top:5px ridge green;width:500px" />
<p style="color:green;font-weight:bold">简单运算</p>
<div>1+2={{ 1 + 2 }}</div>
<div>2*3={{ 2 * 3 }}</div>
<br />

<hr style="height:5px;border:none;border-top:5px ridge green;width:500px" />
<p style="color:green;font-weight:bold">定义数据</p>
<div *ngFor="let arr of arrs">
  {{ arr }}
</div>
<br />
<div *ngFor="let one of list">
  {{ one }}
</div>
<br />
<ul>
  <li *ngFor="let item of items; let key = index">{{ key }} --- {{ item }}</li>
</ul>
<br />
<ul>
  <li *ngFor="let car of cars">
    <p>{{ car.cate }}</p>
    <ol>
      <li *ngFor="let attr of car.list">{{ attr.title }}---{{ attr.price }}</li>
    </ol>
  </li>
</ul>
<br />

<hr style="height:5px;border:none;border-top:5px ridge green;width:500px" />
<p style="color:green;font-weight:bold">判断ngif</p>
<div *ngIf="isDisply">
  <img [src]="imgUrl1" />
</div>
<div *ngIf="!isDisply">
  <img [src]="imgUrl2" />
</div>
<br />

<div [ngSwitch]="fruit">
  <p *ngSwitchCase="1">香蕉</p>
  <p *ngSwitchCase="2">苹果</p>
  <p *ngSwitchCase="3">西红柿</p>
  <p *ngSwitchCase="4">西瓜</p>
  <p *ngSwitchDefault>榴莲</p>
</div>
<br />

<hr style="height:5px;border:none;border-top:5px ridge green;width:500px" />
<p style="color:green;font-weight:bold">ngclass/ngstyle</p>
<div class="red" style="font-weight:bold">this is a test</div>

<div [ngClass]="{ blue: true, red: false }" style="font-weight:bold">
  this is a test
</div>

<div [ngClass]="{ orange: isDisply, red: !isDisply }" style="font-weight:bold">
  This div is test ngClass.
</div>
<br />

<div [ngStyle]="{ color: 'red' }" style="font-weight:bold">
  This div is test ngStyle.
</div>
<div [ngStyle]="{ color: attr }" style="font-weight:bold">
  This div is test ngStyle.
</div>
<br />

<hr style="height:5px;border:none;border-top:5px ridge green;width:500px" />
<p style="color:green;font-weight:bold">管道</p>
<div style="font-weight:bold">
  <span>{{ today }}</span>
  <br />
  <span>{{ today | date: 'yyyy-MM-dd HH:mm:ss' }}</span>
</div>
<br />

<hr style="height:5px;border:none;border-top:5px ridge green;width:500px" />
<p style="color:green;font-weight:bold">事件</p>

<strong>{{ title }}</strong>
<br />
<br />
<div>
  <button class="button" type="submit" (click)="getData()">Click</button>
</div>
<br />
<div>
  <button class="button" type="submit" (click)="setData()">Click</button>
</div>
<br />
<!-- <div>
  <input type="text" (keydown)="keyDown($event)" />
</div> -->
<br />

<hr style="height:5px;border:none;border-top:5px ridge green;width:500px" />
<p style="color:green;font-weight:bold">事件</p>
3.Form
3.1 NgModel
- 直接和对应的属性交互
- 单选的时候使用radio,name属性要相同
- 下拉选项,把遍历的值赋给value
- 多选,要添加一个属性


3.1.1 Html template
// component.ts
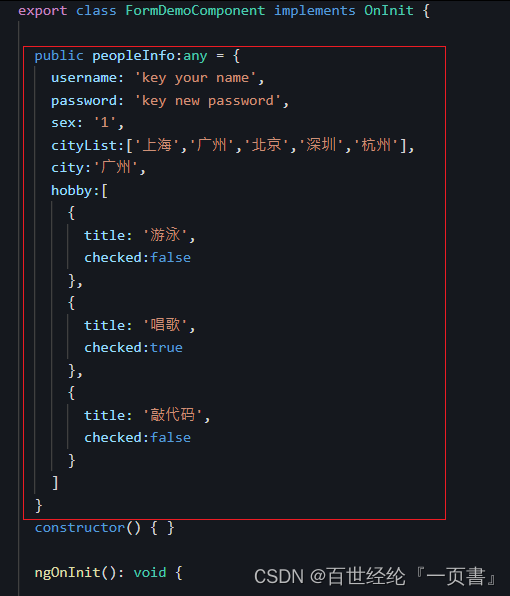
export class FormDemoComponent implements OnInit {
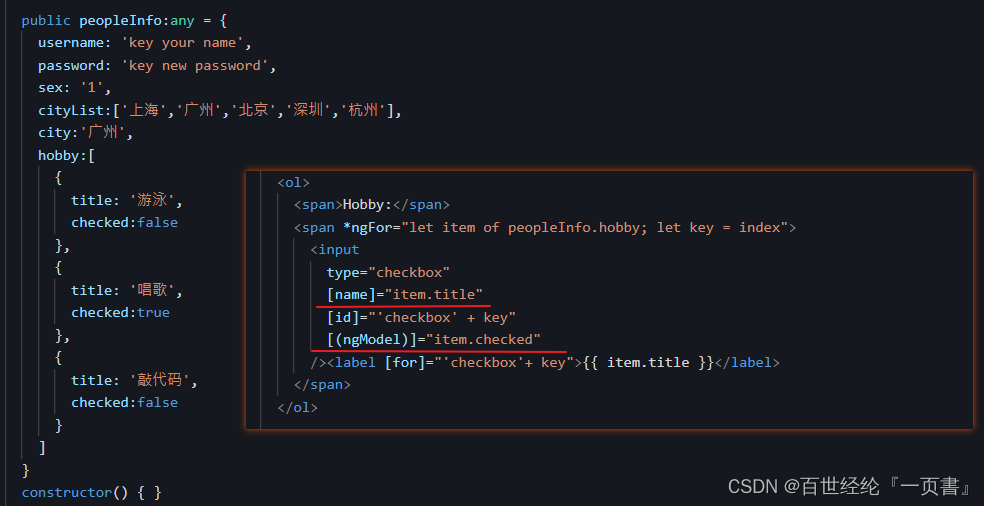
public peopleInfo:any = {
username: 'key your name',
password: 'key new password',
sex: '1',
cityList:['上海','广州','北京','深圳','杭州'],
city:'广州',
hobby:[
{
title: '游泳',
checked:false
},
{
title: '唱歌',
checked:true
},
{
title: '敲代码',
checked:false
}
]
}
constructor() { }
ngOnInit(): void {
}
onSubmit(){
console.log(this.peopleInfo);
}
}
//html.template
<h2>脱单申请表</h2>
<form>
<ul>
<ol>
<span>Name:</span>
<input
type="text"
id="username"
name="username"
[(ngModel)]="peopleInfo.username"
/>
</ol>
<ol>
<span>Password:</span>
<input
type="text"
id="password"
name="password"
[(ngModel)]="peopleInfo.password"
/>
</ol>
<ol>
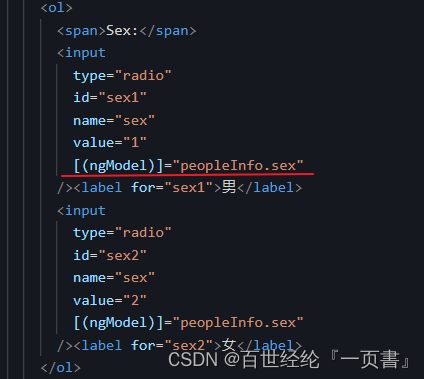
<span>Sex:</span>
<input
type="radio"
id="sex1"
name="sex"
value="1"
[(ngModel)]="peopleInfo.sex"
/><label for="sex1">男</label>
<input
type="radio"
id="sex2"
name="sex"
value="2"
[(ngModel)]="peopleInfo.sex"
/><label for="sex2">女</label>
</ol>
<ol>
<span>Address:</span>
<select id="address" name="address" [(ngModel)]="peopleInfo.city">
<option [value]="item" *ngFor="let item of peopleInfo.cityList">
{{ item }}
</option>
</select>
</ol>
<ol>
<span>Hobby:</span>
<span *ngFor="let item of peopleInfo.hobby; let key = index">
<input
type="checkbox"
[name]="item.title"
[id]="'checkbox' + key"
[(ngModel)]="item.checked"
/><label [for]="'checkbox'+ key">{{ item.title }}</label>
</span>
</ol>
<ol>
<button (click)="onSubmit()">Submit</button>
</ol>
<ol>
<pre>{{ peopleInfo | json }}</pre>
</ol>
</ul>
</form>
3.2 FormControl
- 表单单个属性的时候可以使用


3.3 FormGroup
- 表单多个属性,放入group组里面
- 循环嵌套

3.4 FormBuilder

3.5 Code
//component ts
import { Component, OnInit } from '@angular/core';
import { FormControl,FormGroup } from '@angular/forms';
import { FormBuilder } from '@angular/forms';
import { Validators } from '@angular/forms';

@Component({
  selector: 'app-form-function',
  templateUrl: './form-function.component.html',
  styleUrls: ['./form-function.component.css']
})
export class FormFunctionComponent implements OnInit {

  public name:any= new FormControl('');

  public profileForm:any = new FormGroup({
    firstName: new FormControl(''),
    lastName: new FormControl(''),
  });

  public loginForm:any = new FormGroup({
      username: new FormControl(''),
      password: new FormControl(''),
      address: new FormGroup({
        street: new FormControl(''),
        city: new FormControl(''),
        state: new FormControl(''),
        zip: new FormControl(''),
      })
    });

  public userForm = this.fb.group({
      username: ['',Validators.required],
      password: [''],
      address: this.fb.group({
        street: [''],
        city: [''],
        state: [''],
        zip: ['']
      }),
    });

  constructor(
    private fb: FormBuilder
    ) { }

  ngOnInit(): void {
  }

  updateName(){
    this.name.setValue("Tom");
  }

  onSubmit() {
    // TODO: Use EventEmitter with form value
    console.warn(this.profileForm.value);
  }

  setValue(){
    this.profileForm.patchValue({
      firstName: '路飞',
      lastName: '蒙奇.D',
    });
  }
  setGroupValue(){
    this.loginForm.patchValue({
      username: '蒙奇.D.龙',
      password: '海贼王东海',
      address: {
        street: '33小镇',
        city: '东莞市',
        state: '广东省',
        zip: 570261,
      }
    });
  }
  onGroupSubmit() {
    // TODO: Use EventEmitter with form value
    console.warn(this.loginForm.value);
  }
  setBuilderValue(){
    this.userForm.patchValue({
      username: '蒙奇.D.路飞',
      password: '海贼王南海',
      address: {
        street: '福田区',
        city: '深圳市',
        state: '广东省',
        zip: '570261',
      }
    });
  }
  onBuilderSubmit() {
    // TODO: Use EventEmitter with form value
    console.warn(this.userForm.value);
  }

}


// html template
<hr style="height:5px;border:none;border-top:5px ridge green;width:500px" />
<p style="color:green;font-weight:bold">1.使用FormControl</p>
<table>
  <tr>
    <label for="name">Name: </label>
    <input id="name" type="text" [formControl]="name">
  </tr>
</table>
<br>
<button (click)="updateName()">Update Name</button>
<br>
<pre>{{name.value}}</pre>
<br>


<hr style="height:5px;border:none;border-top:5px ridge green;width:500px" />
<p style="color:green;font-weight:bold">2.使用FormGroup</p>

<form [formGroup]="profileForm" (ngSubmit)="onSubmit()">

  <label for="first-name">First Name: </label>
  <input id="first-name" type="text" formControlName="firstName">

  <label for="last-name">Last Name: </label>
  <input id="last-name" type="text" formControlName="lastName">

  <br>
  <button type="button" (click)="setValue()">SetValue</button>
  <br>
  <br>
  <button type="submit">Submit</button>
</form>
<br>
<br>
<p>Form Value: {{ profileForm.value | json }}</p>
<br>


<hr style="height:5px;border:none;border-top:5px ridge green;width:500px" />
<p style="color:green;font-weight:bold">3.循环嵌套FormGroup</p>

<form [formGroup]="loginForm" (ngSubmit)="onGroupSubmit()">

  <label for="username">username: </label>
  <input id="username" type="text" formControlName="username">

  <label for="password">password: </label>
  <input id="password" type="text" formControlName="password">

  <div formGroupName="address">
    <h2>Address</h2>

    <label for="street">Street: </label>
    <input id="street" type="text" formControlName="street">

    <label for="city">City: </label>
    <input id="city" type="text" formControlName="city">

    <label for="state">State: </label>
    <input id="state" type="text" formControlName="state">

    <label for="zip">Zip Code: </label>
    <input id="zip" type="text" formControlName="zip">
  </div>

  <br>
  <button type="button" (click)="setGroupValue()">SetValue</button>
  <br>
  <br>
  <button type="submit">Submit</button>
</form>
<br>
<p>Form Value: {{ loginForm.value | json }}</p>
<br>


<hr style="height:5px;border:none;border-top:5px ridge green;width:500px" />
<p style="color:green;font-weight:bold">4.FormBuilder</p>

<form [formGroup]="userForm" (ngSubmit)="onBuilderSubmit()">

  <label for="username">username: </label>
  <input id="username" type="text" formControlName="username">

  <label for="password">password: </label>
  <input id="password" type="text" formControlName="password">

  <div formGroupName="address">
    <h2>Address</h2>

    <label for="street">Street: </label>
    <input id="street" type="text" formControlName="street">

    <label for="city">City: </label>
    <input id="city" type="text" formControlName="city">

    <label for="state">State: </label>
    <input id="state" type="text" formControlName="state">

    <label for="zip">Zip Code: </label>
    <input id="zip" type="text" formControlName="zip">
  </div>

  <br>
  <button type="button" (click)="setBuilderValue()">SetValue</button>
  <br>
  <br>
  <button type="submit">Submit</button>
</form>
<br>
<p>Form Value: {{ userForm.value | json }}</p>
<br>
4.LifeCycle
4.1 All LifeCycle
| Hook method | Purpose | Timing |
|---|---|---|
ngOnChanges() | 有父子组件传值,或者修改传输的值就会触发. | Called before ngOnInit() (if the component has bound inputs) and whenever one or more data-bound input properties change.
NOTE:
If your component has no inputs or you use it without providing any inputs, the framework will not call ngOnChanges().
|
ngOnInit() | Angular第一次显示数据绑定和设置指令,组件的输入属性后,初始化指令 | Called once, after the first ngOnChanges(). ngOnInit() is still called even when ngOnChanges() is not (which is the case when there are no template-bound inputs). |
ngDoCheck() | Angular初始化后,可以定义一些客制化操作. See details and example in Defining custom change detection in this document. | Called immediately after ngOnChanges() on every change detection run, and immediately after ngOnInit() on the first run. |
ngAfterContentInit() | 把内容投射进组件之后调用,第一次ngDoCheck( )之后执行,只调用一次。 See details and example in Responding to changes in content in this document. | Called once after the first ngDoCheck(). |
ngAfterContentChecked() | 组件初始化后,定义的一些客制化操作 See details and example in Responding to projected content changes in this document. | Called after ngAfterContentInit() and every subsequent ngDoCheck(). |
ngAfterViewInit() | 视图加载完成后调用,一般就是dom操作,只调用一次. See details and example in Responding to view changes in this document. | Called once after the first ngAfterContentChecked(). |
ngAfterViewChecked() | 视图初始化后,自定义的一些客制化操作 | Called after the ngAfterViewInit() and every subsequent ngAfterContentChecked(). |
ngOnDestroy() | 组件销毁触发声明周期函数. See details in Cleaning up on instance destruction in this document. | Called immediately before Angular destroys the directive or component. |
4.2 Code
// Component ts
import { Component, OnInit } from '@angular/core';
import { Input } from '@angular/core';

@Component({
  selector: 'app-lifecycle',
  templateUrl: './lifecycle.component.html',
  styleUrls: ['./lifecycle.component.css'],
})
export class LifecycleComponent implements OnInit {
  @Input('title') receiveTitle: any;

  public msg: any = '这是一个生命周期函数测试';

  public userInfo: any = '';

  public oldUserInfo: any = '';

  changeMsg() {
    this.msg = '只是变更后的结果';
  }

  constructor() {
    console.log('构造函数执行了');
  }

  ngOnChanges() {
    console.log(
      'ngOnChanges执行了,父子组件传参,参数变更---------------------------'
    );
  }

  ngOnInit(): void {
    console.log(
      'ngOnInit执行啦,Angular第一次显示数据绑定和设置指令、组件的输入属性后,初始化指令'
    );
  }

  ngDoCheck() {
    console.log('ngDoCheck执行啦,自定义一些操作');

    if (this.userInfo != this.oldUserInfo) {
      console.log(`你从 ${this.oldUserInfo}改成 ${this.userInfo}`);
      this.oldUserInfo = this.userInfo;
    } else {
      console.log('暂时没有数据变化');
    }
  }

  ngAfterContentInit() {
    console.log('ngAfterContentInit执行啦,组件初始化,只调用一次');
  }
  ngAfterContentChecked() {
    console.log('ngAfterContentChecked执行啦,组件初始化后的自定义操作');
  }
  ngAfterViewInit() {
    console.log('ngAfterViewInit执行啦,视图件初始化,只调用一次');
  }
  ngAfterViewChecked() {
    console.log('ngAfterViewChecked执行啦,视图初始化后的自定义操作');
  }
  ngOnDestory() {
    console.log(' ngOnDestory执行啦,组件销毁');
  }
}
//html template
<h2>Angular lifecycle works!</h2>
<br />
接收父组件的数据:{{ receiveTitle }}
<br />
<br />
Message is :{{ msg }}
<br />
<br />
<button (click)="changeMsg()">Button</button>
<br />
<br />
<input id="username" name="username" [(ngModel)]="userInfo" />
<pre>{{ userInfo }}</pre>
5.Question
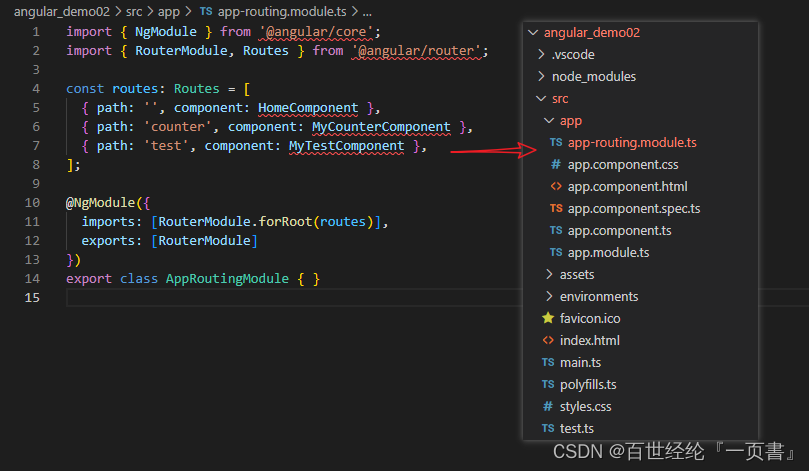
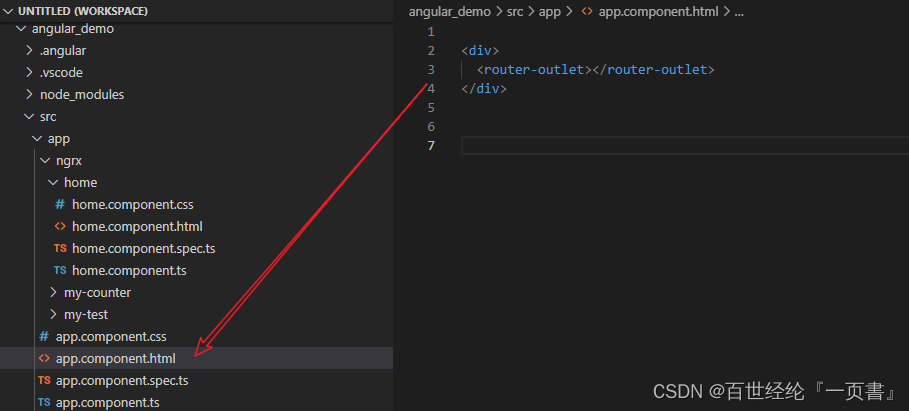
5.1 Setting Router,无法进入对应的Component
- 创建项目
ng new projectName- 创建Component
ng generate component demo/aaa
ng generate component demo/bbb- add router
{ path: ‘a’, component: AAAComponent }将组件加入到路由- Add Button,使用routerLink
- Click Button,Component内容显示在AppComponent的最下面
- Create Component
ng generate component demo/home- 将App.Component.html的内容复制到Home.component.html
图片中的代码不用复制,仍保留在app.component.html- Click Button.Link To Component

6.Awakening
在一秒钟内看到本质的人和花半辈子也看不清一件事本质的人,自然是不一样的命运。


 810
810


 被折叠的 条评论
为什么被折叠?
被折叠的 条评论
为什么被折叠?
 到【灌水乐园】发言


