Android学习-集成百度SDK定位
1.学会配置百度地图开发环境;
2.能够定位到自己的所在位置。
1.配置百度地图
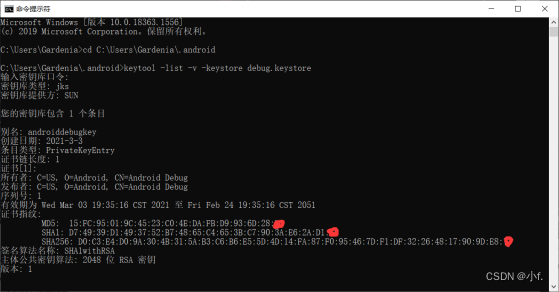
(1)获取sha1
找到自己安装 Android SDK 的位置(默认位置是 C:\用户\用户名 ),该位置下面有一个 .android 文件夹:使用 cmd 命令进入该文件夹下:
(2)获取百度地图密钥(AK)
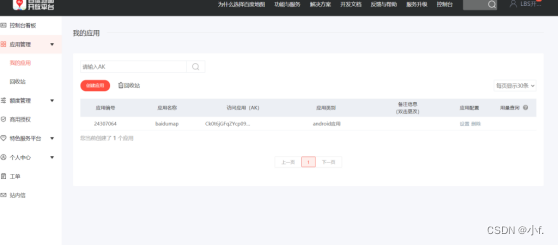
进入百度地图官网,先注册百度账号,然后申请成为开发者,这两步非常简单,就不在此说明。成为开发者之后,点击获取密钥:然后会进入控制台,点击创建应用。(第一次进入时没有任何应用,这里我已经创建了一个应用)创建方法可百度。注意创建包名与项目中包名一致
(3)配置android studio
其实在百度地图官网中有详细的步骤,可参考官网的。
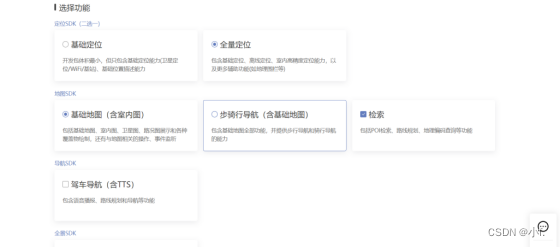
首先,下载开发包:(根据功能需要下载)
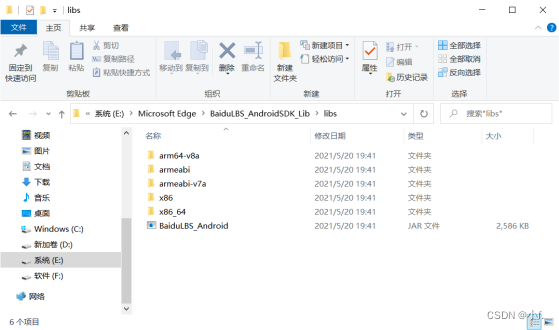
下载后解压目录:
然后在 Android Studio 中进行配置:
①添加jar文件
打开解压后的开发包文件夹,找到 BaiduLBS_Android.jar 文件将其拷贝至工程的 app/libs 目录下:
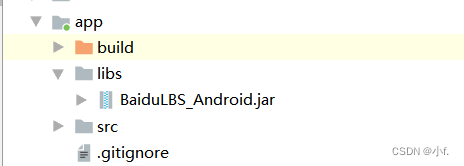
②添加so文件
在src/main/目录下新建 jniLibs 目录(如果您的项目中已经包含该目录不用重复创建),在下载的开发包中拷贝项目中需要的CPU架构对应的so文件文件夹到jniLibs目录.
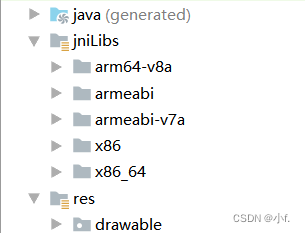
③往工程中添加jar文件
在工程配置中需要将前面添加的jar文件集成到我们的工程中。
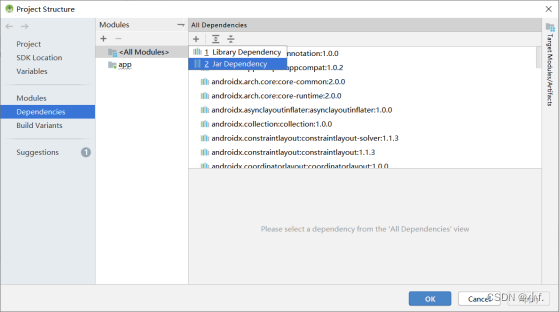
此时会发现在 app 目录的 build.gradle 的 dependencies 块中生成了工程所依赖的jar文件的对应说明,如下所示:
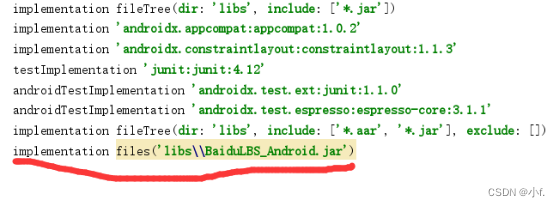
(4)配置应用混淆
打开app目录下的build.gradle文件,在release代码块中添加如下内容(若已经由Android Studio自动生成,则不用手动配置)

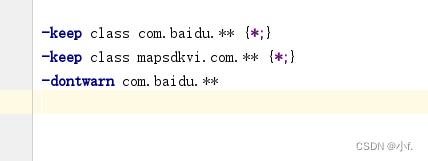
编写混淆文件,打开app目录下的proguard-rules.pro文件,添加如下代码。
- 显示地图
(1)配置 AndroidManifest.xml 文件
<?xml version="1.0" encoding="utf-8"?>
<manifest xmlns:android="http://schemas.android.com/apk/res/android"
    package="com.example.baidumap">
    <!-- 访问网络,进行地图相关业务数据请求,包括地图数据,路线规划,POI检索等 -->
    <uses-permission android:name="android.permission.INTERNET" />
    <!-- 获取网络状态,根据网络状态切换进行数据请求网络转换 -->
    <uses-permission android:name="android.permission.ACCESS_NETWORK_STATE" />
    <!-- 读取外置存储。如果开发者使用了so动态加载功能并且把so文件放在了外置存储区域,则需要申请该权限,否则不需要 -->
    <uses-permission android:name="android.permission.READ_EXTERNAL_STORAGE" />
    <!-- 写外置存储。如果开发者使用了离线地图,并且数据写在外置存储区域,则需要申请该权限 -->
    <uses-permission android:name="android.permission.WRITE_EXTERNAL_STORAGE" />

    <!-- 以下是获取当前位置的权限,也就是需要额外加上的权限 -->
    <!-- 这个权限用于进行网络定位 -->
    <uses-permission android:name="android.permission.ACCESS_COARSE_LOCATION" />
    <!-- 这个权限用于访问GPS定位 -->
    <uses-permission android:name="android.permission.ACCESS_FINE_LOCATION" />
    <application
        android:allowBackup="true"
        android:icon="@mipmap/ic_launcher"
        android:label="@string/app_name"
        android:roundIcon="@mipmap/ic_launcher_round"
        android:supportsRtl="true"
        android:name=".DemoApplication"
        android:theme="@style/AppTheme">
        <meta-data
        android:name="com.baidu.lbsapi.API_KEY"
        android:value="Ck0t6jGFqZYcp09W9tYYNXd7aj3jLTlF" />
        <activity android:name=".MainActivity">
            <intent-filter>
                <action android:name="android.intent.action.MAIN" />

                <category android:name="android.intent.category.LAUNCHER" />
            </intent-filter>
        </activity>

        <service android:name="com.baidu.location.f"
            android:enabled="true"
            android:process=":remote"/>

    </application>


</manifest>
(2)在布局文件中添加地图容器
<?xml version="1.0" encoding="utf-8"?>
<androidx.constraintlayout.widget.ConstraintLayout xmlns:android="http://schemas.android.com/apk/res/android"
    xmlns:app="http://schemas.android.com/apk/res-auto"
    xmlns:tools="http://schemas.android.com/tools"
    android:layout_width="match_parent"
    android:layout_height="match_parent"
    tools:context=".MainActivity">
    <LinearLayout
        android:layout_width="match_parent"
        android:layout_height="match_parent"
        android:orientation="vertical">
        <com.baidu.mapapi.map.MapView
            android:id="@+id/bmapView"
            android:layout_width="match_parent"
            android:layout_height="300dp"
            android:clickable="true" />
        <TextView
            android:id="@+id/text_tishi"
            android:layout_width="match_parent"
            android:layout_height="wrap_content"
            android:text="原始的textView"
            android:layout_marginTop="20dp"
            android:textSize="13sp"
            android:gravity="center"
            android:padding="10dp"/>
    </LinearLayout>
</androidx.constraintlayout.widget.ConstraintLayout>
(3)初始化地图
新建一个自定义的 Application 类 DemoApplication.java,在其onCreate方法中完成SDK的初始化。示例代码如下:
public class DemoApplication extends Application {
    @Override
    public void onCreate() {
        super.onCreate();
        //在使用SDK各组件之前初始化context信息,传入ApplicationContext
        SDKInitializer.initialize(this);
        //自4.3.0起,百度地图SDK所有接口均支持百度坐标和国测局坐标,用此方法设置您使用的坐标类型.
        //包括BD09LL和GCJ02两种坐标,默认是BD09LL坐标。
        SDKInitializer.setCoordType(CoordType.BD09LL);
    }
}
(4)编写mainactivity类代码
public class MainActivity extends AppCompatActivity {
    private MapView mMapView = null;
    private BaiduMap mBaiduMap = null;
    private LocationClient mLocationClient = null;
    private TextView mtextView;
    // 是否是第一次定位
    private boolean isFirstLocate = true;
    // 当前定位模式
    private MyLocationConfiguration.LocationMode locationMode;

    @Override
    protected void onCreate(Bundle savedInstanceState) {
        super.onCreate(savedInstanceState);
        setContentView(R.layout.activity_main);

        //获取地图控件引用
        mMapView = findViewById(R.id.bmapView);
        //获取文本显示控件
        mtextView = findViewById(R.id.text_tishi);
        // 得到地图
        mBaiduMap = mMapView.getMap();
        // 开启定位图层
        mBaiduMap.setMyLocationEnabled(true);
        //定位初始化
        mLocationClient = new LocationClient(this);

        //通过LocationClientOption设置LocationClient相关参数
        LocationClientOption option = new LocationClientOption();
        option.setOpenGps(true); // 打开gps
        option.setCoorType("bd09ll"); // 设置坐标类型
        option.setScanSpan(1000);
        // 可选,设置地址信息
        option.setIsNeedAddress(true);
        //可选,设置是否需要地址描述
        option.setIsNeedLocationDescribe(true);

        //设置locationClientOption
        mLocationClient.setLocOption(option);

        //注册LocationListener监听器
        MyLocationListener myLocationListener = new MyLocationListener();
        mLocationClient.registerLocationListener(myLocationListener);
        //开启地图定位图层
        mLocationClient.start();
    }

    // 继承抽象类BDAbstractListener并重写其onReceieveLocation方法来获取定位数据,并将其传给MapView
    public class MyLocationListener extends BDAbstractLocationListener {
        @Override
        public void onReceiveLocation(BDLocation location) {
            //mapView 销毁后不在处理新接收的位置
            if (location == null || mMapView == null){
                return;
            }

            // 如果是第一次定位
            LatLng ll = new LatLng(location.getLatitude(), location.getLongitude());
            if (isFirstLocate) {
                isFirstLocate = false;
                //给地图设置状态
                mBaiduMap.animateMapStatus(MapStatusUpdateFactory.newLatLng(ll));
            }

            MyLocationData locData = new MyLocationData.Builder()
                    .accuracy(location.getRadius())
                    // 此处设置开发者获取到的方向信息,顺时针0-360
                    .direction(location.getDirection()).latitude(location.getLatitude())
                    .longitude(location.getLongitude()).build();
            mBaiduMap.setMyLocationData(locData);
            // 显示当前信息
            StringBuilder stringBuilder = new StringBuilder();
            stringBuilder.append("\n经度:" + location.getLatitude());
            stringBuilder.append("\n纬度:"+ location.getLongitude());
            stringBuilder.append("\n状态码:"+ location.getLocType());
            stringBuilder.append("\n国家:" + location.getCountry());
            stringBuilder.append("\n城市:"+ location.getCity());
            stringBuilder.append("\n区:" + location.getDistrict());
            stringBuilder.append("\n街道:" + location.getStreet());
            stringBuilder.append("\n地址:" + location.getAddrStr());
            mtextView.setText(stringBuilder.toString());
        }
    }

    @Override
    protected void onResume() {
        mMapView.onResume();
        super.onResume();
    }

    @Override
    protected void onPause() {
        mMapView.onPause();
        super.onPause();
    }

    @Override
    protected void onDestroy() {
        mLocationClient.stop();
        mBaiduMap.setMyLocationEnabled(false);
        mMapView.onDestroy();
        mMapView = null;
        super.onDestroy();
    }

}
3.真机运行
可以使用无线和USB连接电脑的方式在手机上调试程序。在此使用USB的方式,步骤如下:
(1)USB连接电脑,并在手机的 仅充电/传输文件 选项中选择 传输文件。
(2)进入关于手机,然后 连续点击版本号,直到提示当前已是开发者模式。
(3)进入更多设置,打开 允许安装未知来源 的软件。
(4)进入更多设置,进入 开发者模式,然后打开 USB调试 和 USB安装(如果有的话)。
(5)等待电脑自动配置(速度很快)。
(6)然后在 AS (Android Studio)中,选择自己的手机运行即可(AS会自动识别当前手机)
(7)初次运行可能会给手机上安装适配的驱动,安装即可。
(注意给地图开定位权限)
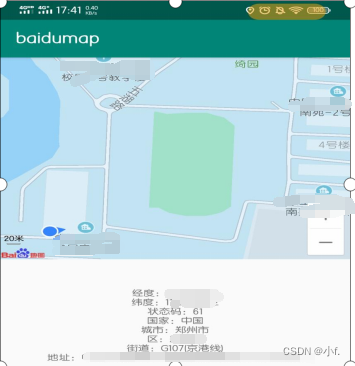
4.运行截图
链接:https://pan.baidu.com/s/1TkEIXF34tHpl5NRhkN3vFA
提取码:vh76


 2770
2770


 被折叠的 条评论
为什么被折叠?


