


微信公众号自动提取资源
案例目录
《微信公众号自动提取资源系统》
1、准备工作、项目搭建、服务器校验
2、接收公众号消息、指定回复内容、配置公众号自动回复
3、查询资源、使用客服消息
项目技术栈介绍
后端:Springboot+mybatisPlus
jdk:1.8以上
数据库:mysql
源码获取地址(以上前后端代码已经全部打包好了)
https://gitee.com/xuxiaofei1996/case-source-code.git
为了方便大家更好的学习,本平台经常分享一些完整的单个功能案例代码给大家去练习,如果本平台没有你要学习的功能案例,你可以联系小编,提供你的小需求给我,我安排我们这边的开发团队免费帮你完成你的案例。
案例描述
此案例是要实现通过给公众号发送不同的指定内容,公众号根据用户发送的信息,在后台提取出相关的资源并回馈给用户。如图:

准备工作
公众号注册
首先我们需要有一个公众号。关于公众号的注册,这里不做详细赘述,具体可参考下面的腾讯官方文档自行注册,这里主要做公众号开发的描述
https://kf.qq.com/faq/120911VrYVrA151009eIrYvy.html
公众号开发文档
在我们开发前,需要登陆微信公众平台,并在开发者工具栏中找到开发者文档。

因为我们首先需要接收到用户给公众号发送的消息,所以我们查看开发者文档中的基础消息能力-接收普通消息部分

因文档中描述公众号会将消息发送至公众号配置的url上,所以我们需要有一个公众号可以访问到的公网ip才可以,比如阿里云或者腾讯云上购买的服务器都可以。

但是我们开发时,使用的是本地环境,我们需要把本地的电脑做一个内网穿透,让公网可以访问到,这时候我们就需要一些工具,如花生壳、Natapp等,此文中我们使用花生壳来做内网穿透。

本地内网穿透
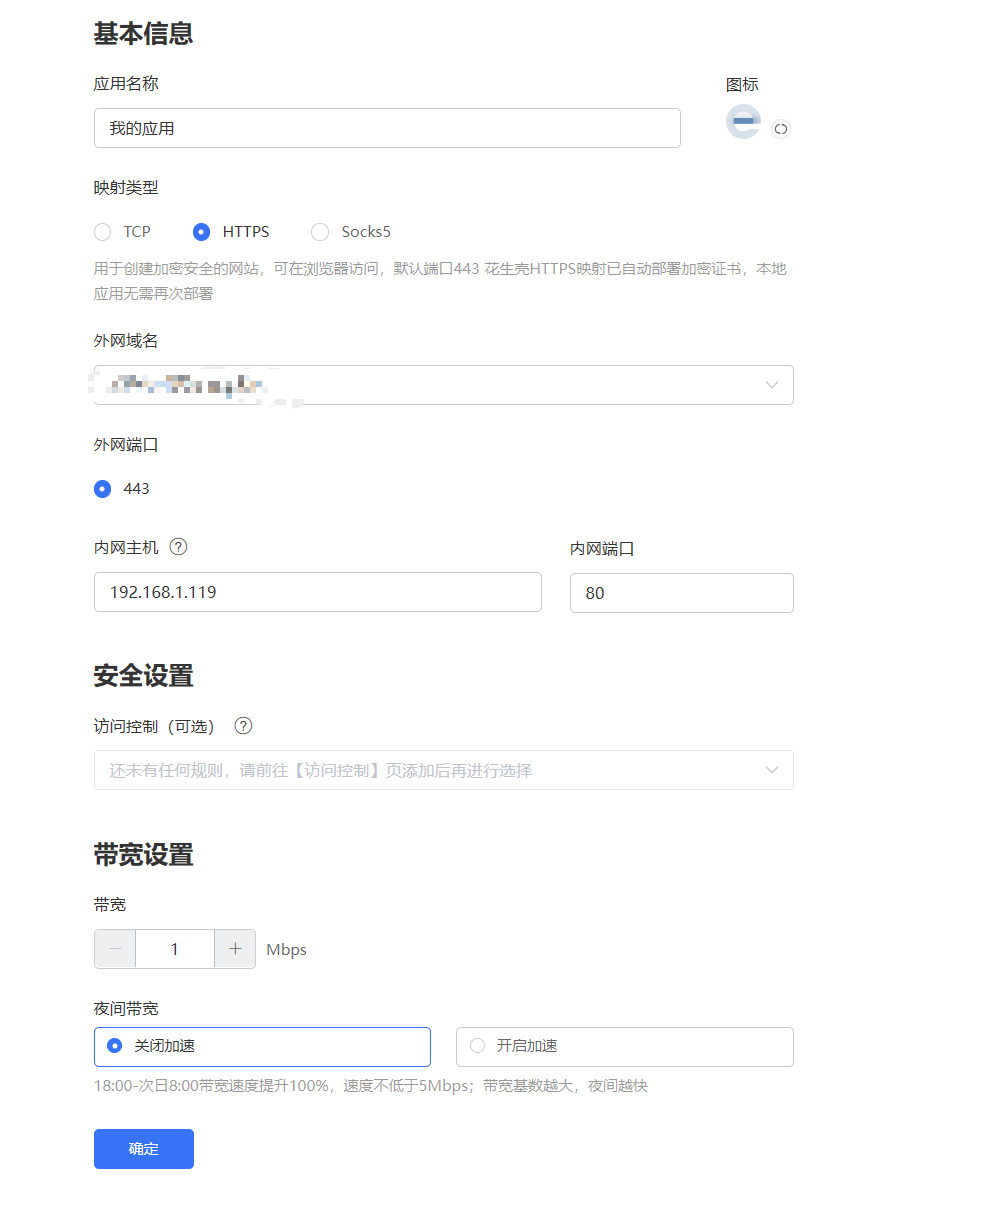
打开并登陆花生壳后,选择添加映射

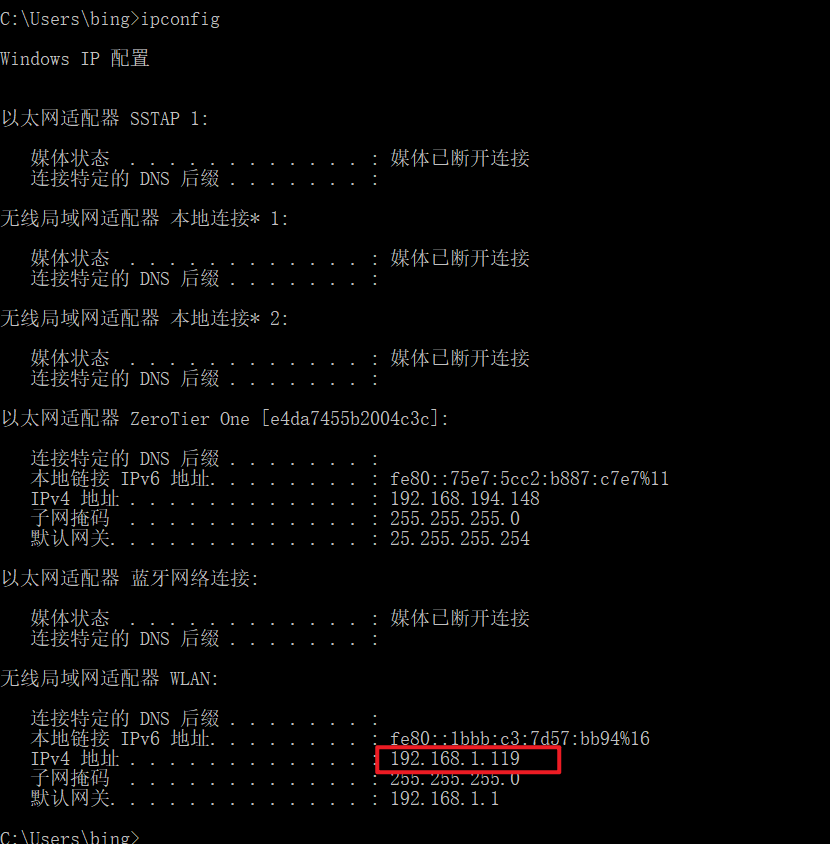
首选查看本地的ip地址,如下所示:192.168.1.119就是我的本机ip
注册花生壳后会给你分配一个外网的ip,如果在你选中https后,没有可以使用的ip,可以在输入信息后购买。填好信息,点击确定就添加成功了。此时访问花生壳给你的外网ip,就相当于访问到了你"本地+你刚刚填写的端口号"上。此时内网穿透就完成了。
公众号服务器配置
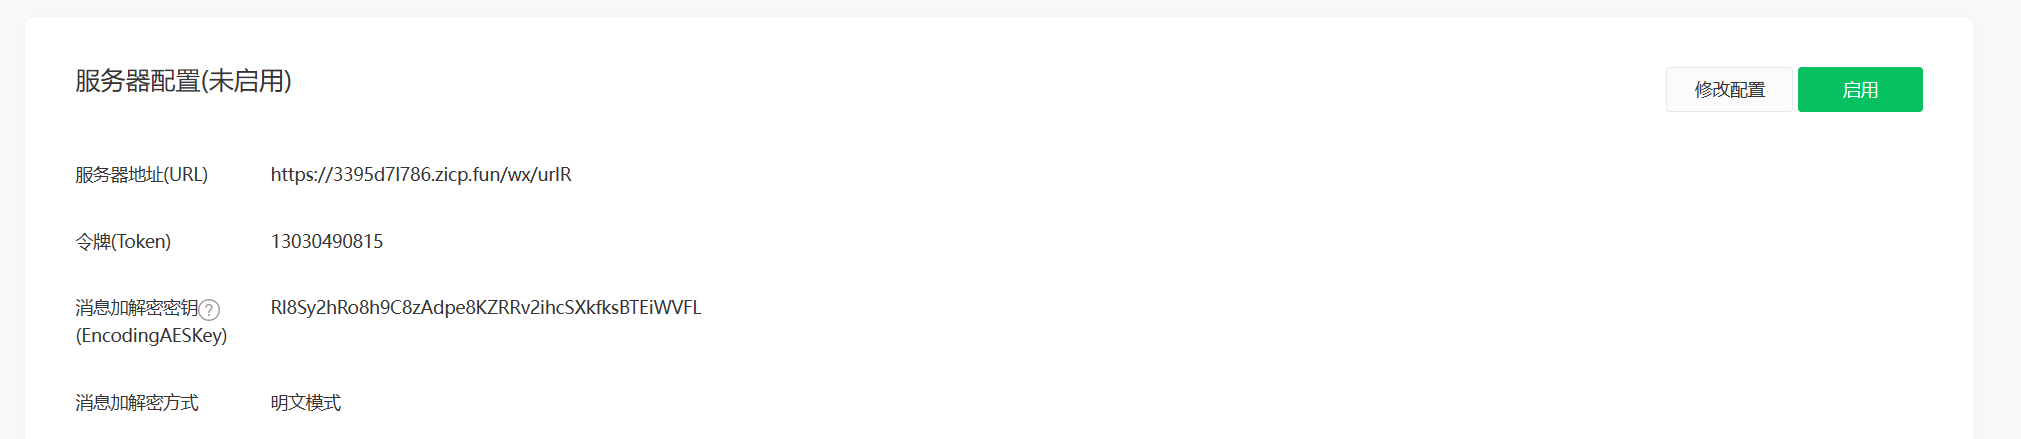
打开公众号的服务器配置

此时需要输入你刚刚配置的url,因为要访问到具体的接口,所以加上一个我们需要访问的路径。token是自己设置的,输入一个自己记得住的即可,EncodingAESKey可以随机生成,点击提交,此时会提示URL请求不通,这是因为我们还没有编写wx/urlR接口。

项目搭建
使用Idea创建maven项目,在pom中引入下面这些依赖。hutool是一个工具类包,里面有各种可以使用的工具类,方便开发使用。
pom.xml
<!--springboot-->
    <parent>
        <groupId>org.springframework.boot</groupId>
        <artifactId>spring-boot-starter-parent</artifactId>
        <version>2.2.6.RELEASE</version>
        <relativePath/>
    </parent>

    <properties>
        <java.version>1.8</java.version>
        <fastjson.version>1.2.31</fastjson.version>
        <sl4j.version>1.7.25</sl4j.version>
        <hutool.version>4.6.8</hutool.version>
    </properties>

    <dependencies>

        <!--springboot-starter-->
        <dependency>
            <groupId>org.springframework.boot</groupId>
            <artifactId>spring-boot-starter</artifactId>
            <exclusions>
                <exclusion>
                    <groupId>org.springframework.boot</groupId>
                    <artifactId>spring-boot-starter-logging</artifactId>
                </exclusion>
            </exclusions>
        </dependency>

        <!--springboot-web-->
        <dependency>
            <groupId>org.springframework.boot</groupId>
            <artifactId>spring-boot-starter-web</artifactId>
            <exclusions>
                <exclusion>
                    <groupId>org.springframework.boot</groupId>
                    <artifactId>spring-boot-starter-logging</artifactId>
                </exclusion>
            </exclusions>
        </dependency>

        <!--hutool工具类引入-->
        <dependency>
            <groupId>cn.hutool</groupId>
            <artifactId>hutool-all</artifactId>
            <version>${hutool.version}</version>
        </dependency>

        <!-- springboot-test-->
        <dependency>
            <groupId>org.springframework.boot</groupId>
            <artifactId>spring-boot-starter-test</artifactId>
            <scope>test</scope>
        </dependency>


        <!--fastJson-->
        <dependency>
            <groupId>com.alibaba</groupId>
            <artifactId>fastjson</artifactId>
            <version>${fastjson.version}</version>
        </dependency>

        <!-- https://mvnrepository.com/artifact/org.springframework/spring-context -->
        <dependency>
            <groupId>org.springframework</groupId>
            <artifactId>spring-context</artifactId>
            <version>5.2.3.RELEASE</version>
        </dependency>


    </dependencies>

    <build>
        <plugins>
            <plugin>
                <groupId>org.springframework.boot</groupId>
                <artifactId>spring-boot-maven-plugin</artifactId>
                <configuration>
                    <excludes>
                        <exclude>
                            <groupId>org.projectlombok</groupId>
                            <artifactId>lombok</artifactId>
                        </exclude>
                    </excludes>
                </configuration>
            </plugin>
        </plugins>
    </build>
将项目端口号配置为80
application.yml
#端口号
server.port=80
服务器校验
校验原理
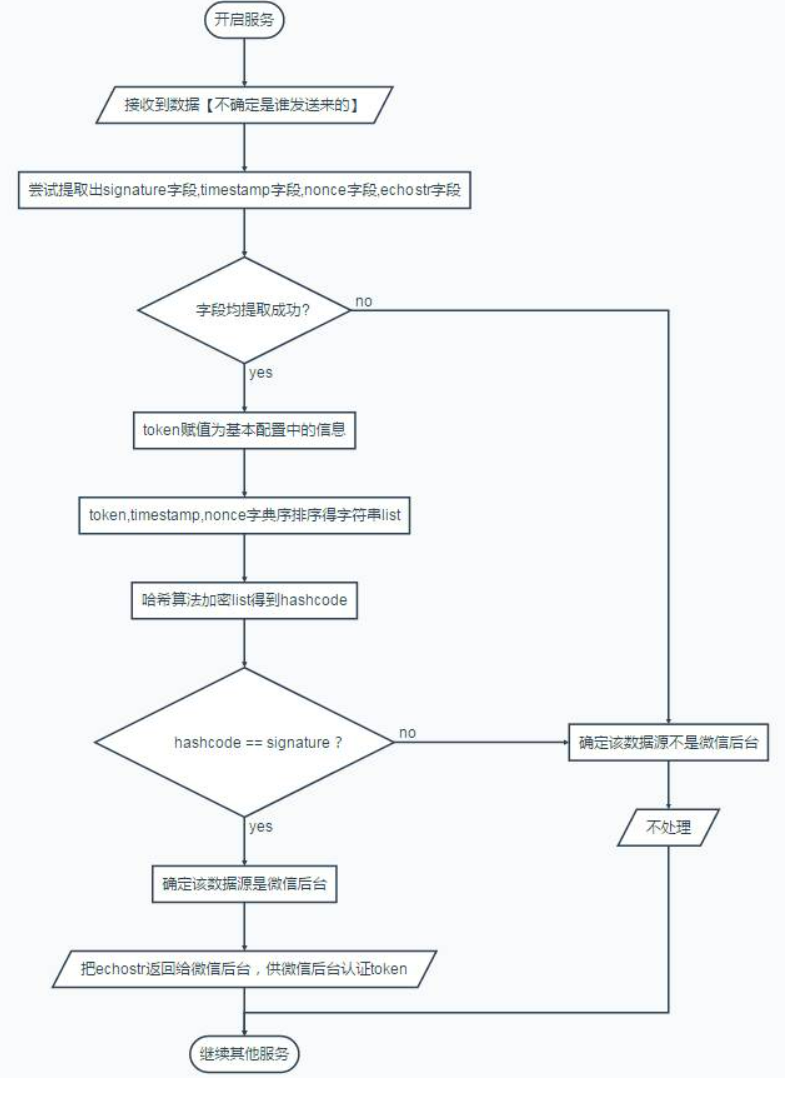
在我们配置微信公众号的服务器配置时,将信息提交时会进行校验。根据官方提供的流程图,我们可以了解大概的服务器校验原理。
接口编写
根据流程图,我们可以编写wx/urlR的接口如下:
WxMessageController.java
@Controller
@RequestMapping("/wx")
public class WxMessageController {


    @RequestMapping(value="/urlR",method= RequestMethod.GET)
    public void index(HttpServletRequest request, HttpServletResponse resp) throws IOException {
        String signature = request.getParameter("signature");
        String timestamp = request.getParameter("timestamp");
        String nonce = request.getParameter("nonce");
        String token = "你的token";
        String echostr = request.getParameter("echostr");
        if (verifyInfo(signature, timestamp, nonce, token)) {
            if (echostr != null) {
                try {
                    resp.getWriter().write(echostr);
                } catch (IOException e) {
                    e.printStackTrace();
                }
            }
        }
    }

    /**
     * 验证消息来源是否来自微信后台
     * @param signature
     * @param timestamp
     * @param nonce
     * @param token
     * @return
     */
    private Boolean verifyInfo(String signature, String timestamp, String nonce,
                              String token) {
        TreeSet<String> set = new TreeSet<String>();
        set.add(token);
        set.add(timestamp);
        set.add(nonce);
        StringBuilder sBuilder = new StringBuilder();
        for (String item : set) {
            sBuilder.append(item);
        }
        String sign = DigestUtils.sha1Hex(sBuilder.toString());
        return signature.equalsIgnoreCase(sign);
    }
}
验证
此时,再次填入服务器配置后,点击提交,验证成功。点击启用后,所有向公众号发送的信息都会发送到/wx/urlR的路径上。
源码获取地址(以上前后端代码已经全部打包好了)
https://gitee.com/xuxiaofei1996/case-source-code.git
为了方便大家更好的学习,本平台经常分享一些完整的单个功能案例代码给大家去练习,如果本平台没有你要学习的功能案例,你可以联系小编,提供你的小需求给我,我安排我们这边的开发团队免费帮你完成你的案例。


 740
740


 被折叠的 条评论
为什么被折叠?
被折叠的 条评论
为什么被折叠?
 到【灌水乐园】发言


