


目录
一、Spring Task是什么?
Spring Task是Spring 3.0后推出的定时任务模块,职责是按周期后台自动执行任务。Spring Task可利用Cron表达式实现灵活的定时处理。
Cron表达式实例:
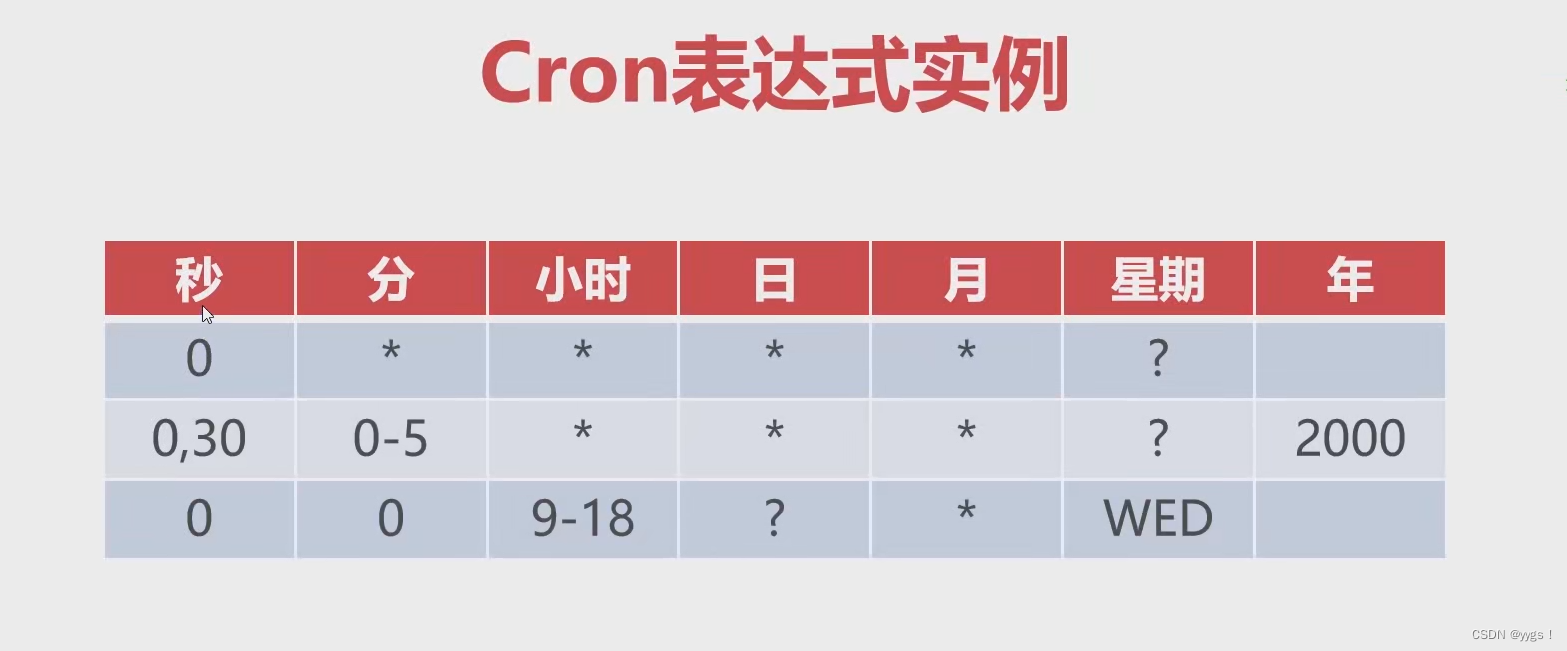
第一行含义:任意年任意月任意日任意小时任意分的0秒执行一次任务,也就是每分钟执行任务。
(写了日期,星期的时候就要用问号替代)(年一般可以不写)
第二行含义:2000年的任意月任意日任意小时的每前0-5分钟的0秒、30秒的时候执行任务。
第三行含义:任意月每周三的9-18小时的0分0秒执行任务(写了星期,日的地方就要用问号替代
二、使用步骤
1.增加依赖
spring Task的依赖被包含在Spring-context中,可以在maven中增加:
    <dependency>
        <groupId>org.springframework</groupId>
        <artifactId>spring-webmvc</artifactId>
        <version>5.3.8</version>
    </dependency>
2.创建子包
在项目下创建task包,task包里创建任务类ComputeTask:
package com.yygs.reader.task;

import org.slf4j.Logger;
import org.slf4j.LoggerFactory;
import org.springframework.scheduling.annotation.Scheduled;
import org.springframework.stereotype.Component;

@Component
public class ComputeTask {
    // 用日志输出记录任务
    Logger logger = LoggerFactory.getLogger(ComputeTask.class);

    // 任务
    @Scheduled(cron = "0 * * * * ?")
    public void updateScore(){
        logger.info("已更新所有图书")
    }
}
在Task类上加@Component 注解加入到IOC容器中.
在任务方法上加@Scheduled 注解,里面的是Cron表达式,最后的年一般不用写.
3.配置applicationContext.xml
使用日志输出需要在applicationContext.xml的表头增加task命名空间,以及在下方开启注解模式:
<?xml version="1.0" encoding="UTF-8"?>
<beans xmlns="http://www.springframework.org/schema/beans"
xmlns:mvc="http://www.springframework.org/schema/mvc"
xmlns:context="http://www.springframework.org/schema/context"
xmlns:xsi="http://www.w3.org/2001/XMLSchema-instance"
xmlns:task="http://www.springframework.org/schema/task"
xmlns:tx="http://www.springframework.org/schema/tx"
xsi:schemaLocation="
http://www.springframework.org/schema/beans
http://www.springframework.org/schema/beans/spring-beans.xsd
http://www.springframework.org/schema/context
http://www.springframework.org/schema/context/spring-context.xsd
http://www.springframework.org/schema/task
http://www.springframework.org/schema/task/spring-task.xsd
http://www.springframework.org/schema/mvc
http://www.springframework.org/schema/mvc/spring-mvc.xsd
http://www.springframework.org/schema/tx
http://www.springframework.org/schema/tx/spring-tx.xsd">
<context:component-scan base-package="com.yygs"/>
<mvc:annotation-driven>
<mvc:message-converters>
<bean class="org.springframework.http.converter.json.MappingJackson2HttpMessageConverter">
<property name="objectMapper">
<bean class="com.yygs.reader.config.CustomObjectMapper"></bean>
</property>
</bean>
<bean class="org.springframework.http.converter.StringHttpMessageConverter">
<property name="supportedMediaTypes">
<list>
<value>application/json;charset=utf-8</value>
</list>
</property>
</bean>
</mvc:message-converters>
</mvc:annotation-driven>
<mvc:default-servlet-handler/>
<!--Mybatis与Spring的整合-->
<!--1、配置数据源-->
<bean id="dataSource" class="com.alibaba.druid.pool.DruidDataSource">
<property name="driverClassName" value="com.mysql.cj.jdbc.Driver"></property>
<property name="url" value="jdbc:mysql://localhost:3306/yygs_reader?useSSL=false&useUnicode=true&characterEncoding=UTF-8&serverTimezone=Asia/Shanghai&allowPublicKeyRetrieval=true"></property>
<property name="username" value="root"></property>
<property name="password" value="abc123456"></property>
<property name="initialSize" value="6"></property>
<property name="maxActive" value="20"></property>
</bean>
<!--2、配置SessionFactoryBean-->
<!--<bean id="sessionFactory" class="org.mybatis.spring.SqlSessionFactoryBean">-->
<bean id="sessionFactory" class="com.baomidou.mybatisplus.extension.spring.MybatisSqlSessionFactoryBean">
<property name="dataSource" ref="dataSource"></property>
<property name="mapperLocations" value="classpath:mappers/*.xml"></property>
<property name="configLocation" value="classpath:mybatis-config.xml"></property>
<!--分页插件,MP 3.4以后的版本需要在SqlSessionFactory中进行设置-->
<property name="plugins">
<array>
<bean class="com.baomidou.mybatisplus.extension.plugins.MybatisPlusInterceptor">
<property name="interceptors">
<list>
<bean class="com.baomidou.mybatisplus.extension.plugins.inner.PaginationInnerInterceptor"></bean>
</list>
</property>
</bean>
</array>
</property>
</bean>
<!--3、配置 Mapper扫描器-->
<bean class="org.mybatis.spring.mapper.MapperScannerConfigurer">
<property name="basePackage" value="com.yygs.reader.mapper"></property>
</bean>
<!--4、配置 mybatis-config.xml-->
<!--定义事务管理-->
<bean id="transactionManager" class="org.springframework.jdbc.datasource.DataSourceTransactionManager">
<property name="dataSource" ref="dataSource"></property>
</bean>
<!--开启注解模式-->
<tx:annotation-driven transaction-manager="transactionManager"></tx:annotation-driven>
<!--验证码-->
<bean id="kaptchaProducer" class="com.google.code.kaptcha.impl.DefaultKaptcha">
<property name="config">
<bean class="com.google.code.kaptcha.util.Config">
<constructor-arg>
<props>
<prop key="kaptcha.border">no</prop>
<prop key="kaptcha.image.width">120</prop>
<prop key="kaptcha.textproducer.font.color">blue</prop>
<prop key="kaptcha.textproducer.font.size">40</prop>
<prop key="kaptcha.textproducer.font.length">4</prop>
</props>
</constructor-arg>
</bean>
</property>
</bean>
<!--启用注解形式的任务功能-->
<task:annotation-driven></task:annotation-driven>
</beans>4.修改logback输出的编码
logback日志输出的时候是按照系统编码输出,windows的操作系统编码是GBK,所有修改logback.xml:
<?xml version="1.0" encoding="UTF-8" ?>
<configuration>
    <appender name="console" class="ch.qos.logback.core.ConsoleAppender">
        <encoder class="ch.qos.logback.classic.encoder.PatternLayoutEncoder">
            <pattern>%d{HH:mm:ss} %-5level [%thread] %logger{30} - %msg%n</pattern>
            <charset>GBK</charset>
        </encoder>
    </appender>
    <root level="DEBUG">
        <appender-ref ref="console"/>
    </root>
</configuration>


 2万+
2万+


 被折叠的 条评论
为什么被折叠?
被折叠的 条评论
为什么被折叠?
 到【灌水乐园】发言


