


 本文详细指导了如何从AOSP源码库拉取、配置参数编译,以及在Pixel7上烧录的过程,包括常见错误的诊断和解决方案,适合对安卓源码有一定了解的技术人员。
【安卓】编译安卓源码AOSP并烧录在pixel7内
1 拉取源码
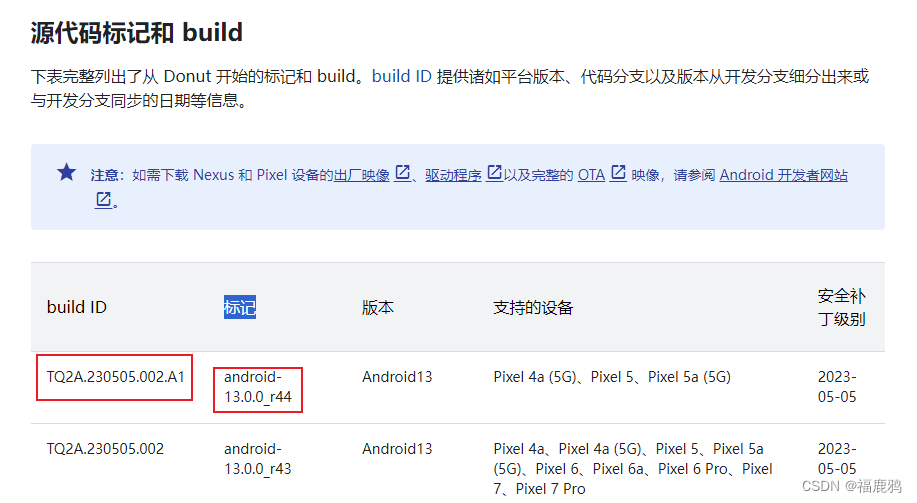
1.1 找到对应安卓分支
https://source.android.google.cn/docs/setup/about/build-numbers?hl=zh-cn#source-code-tags-and-builds
- 手机上查询Build ID:[ 设置-系统-关于手机-版本号 ]
- 通过Build ID 在上述网址中找到对应分支标记
1.2 使用repo工具拉取源码
repo是Google开发的用于管理Android版本库的一个工具,用于拉取/同步不同版本的安卓源码
    # 安装repo工具
    curl https://mirrors.tuna.tsinghua.edu.cn/git/git-repo > /usr/local/bin/repo
    chmod 777 /usr/local/bin/repo

    # 设置国内镜像
    export REPO_URL='https://mirrors.tuna.tsinghua.edu.cn/git/git-repo'

    # 初始化repo
    # 根据1.1分支标记
    repo init -u https://mirrors.tuna.tsinghua.edu.cn/git/AOSP/platform/manifest -b android-13.0.0_r16

    # 开始拉取
    repo sync
    # 当卡住时需要Ctrl + c 终止进程,再重新执行下repo sync ;如果下载过程出现fail ,但下载没卡住,可以不用处理。
2 编译
2.1 过程
# 初始化环境变量
## 执行源码仓库内的脚本自动初始化所需要的环境变量
source build/envsetup.sh

# 选择build 配置,具体见2.1.1
## 方法1
lunch # 展开所有配置列表
29 # 选择对应build 配置的id
## 方法2
lunch aosp_panther-userdebug #直接lunch 对应build 配置的id


# 开始漫长的编译
make -j8
## 编译出错后修改后可以直接重新make -j8

## 编译成功显示
#### build completed successfully (01:40:48 (hh:mm:ss)) ####
2.1.1 lunch参数(build配置)查询
-
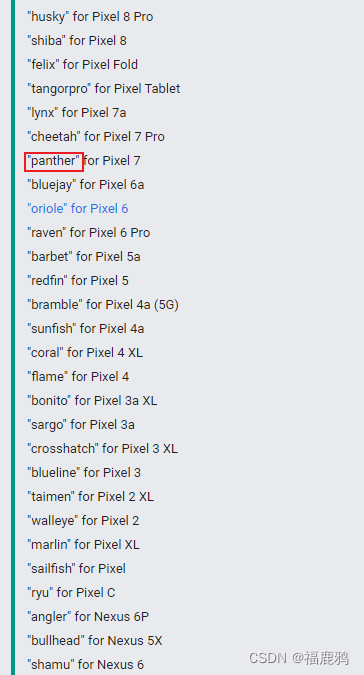
lunch后面跟的参数为设备build 配置:
https://source.android.com/docs/setup/build/running?hl=zh-cn#selecting-device-build -
以上信息不全,可以根据下面链接中对应代号加上前后缀
如我的pixel7代号panther,对应build 配置:aosp_panther-userdebug
https://developers.google.com/android/images
2.2 编译中的问题和解决
报错:ninja failed with: exit status 137
参考:
https://blog.csdn.net/nei504293736/article/details/109628378
https://juejin.cn/post/7158741169001168927
https://blog.csdn.net/u011426115/article/details/116279143
我当时两种方法同时都改了然后重新编译就没遇见了:
-
增大build/soong/java/config/config.go中的JavacHeapSize
pctx.StaticVariable("JavacHeapSize", "2048M") //增大至2048 -
增大交换分区空间(swap)
# 将现有swap移动到主内存,可能需要几分钟
sudo swapoff -a

# 创建新的swap文件,bs×count=最后生成的swap大小,这里设置8G
sudo dd if=/dev/zero of=/swapfile bs=1G count=8

# 设置权限
sudo chmod 0600 /swapfile

# 设置swap
sudo mkswap /swapfile

# 打开swap
sudo swapon /swapfile

# 检查设置是否有效
grep Swap /proc/meminfo # 或者htop看一下

# 设置永久有效
sudo gedit /etc/fstab
# 在末尾行加上
# /swapfile swap swap sw 0 0
报错:error: fopen failed. dumpvars failed with: exit status 1
chmod 777 out/ -R
3 烧录
3.1 过程
# 进入编译结果目录,其中panther为设备代号
cd  out/target/product/panther/

# 连接手机并重启进入bootloader模式
adb reboot bootloader

# 开始烧录
## 中间可能在< waiting for any device >停留一会儿
fastboot flashall -w
3.2 烧录中的问题和解决
报错:fastboot: error: ANDROID_PRODUCT_OUT not set
手动设置一下ANDROID_PRODUCT_OUT环境变量为<path_to_output_directory>
export ANDROID_PRODUCT_OUT=/devdata/Android13Src/out/target/product/panther
echo $ANDROID_PRODUCT_OUT
报错:fastboot: error: could not read android-info.txt
执行烧录命令位置不对
cd out/target/product/panther/
报错:fastboot: error: could not load ‘boot.img’: No such file or directory
环境变量丢失,重新执行source, lunch初始化
source build/envsetup.sh
lunch 29
参考:http://cn.voidcc.com/question/p-ayqmyyjr-qz.html
报错:fastboot “device requires partition vendor_kernel_boot”
旧版adb,fastboot不支持vendor模块
下载新版本adb,fastboot
3.3 烧录成功的输出
烧录成功后有以下输出,并且手机已自动重启
--------------------------------------------
Bootloader Version...: cloudripper-1.0-9894666
Baseband Version.....: g5300g-230323-230525-B-10200345
Serial Number........: 34201FDH2003N4
--------------------------------------------
...
...

Erase successful, but not automatically formatting.
File system type raw not supported.
Rebooting                                          OKAY [  0.001s]
Finished. Total time: 128.547s
4 改写源码后重新编译时的问题和解决
报错:You have tried to change the API from what has been previously approved
报错内容
******************************
You have tried to change the API from what has been previously approved.

To make these errors go away, you have two choices:
   1. You can add '@hide' javadoc comments (and remove @SystemApi/@TestApi/etc)
      to the new methods, etc. shown in the above diff.

   2. You can update current.txt and/or removed.txt by executing the following command:
         m api-stubs-docs-non-updatable-update-current-api

      To submit the revised current.txt to the main Android repository,
      you will need approval.
******************************
解决方法:正式编译前,先自动生成改动后的javadoc
make api-stubs-docs-non-updatable-update-current-api


 3797
3797

 被折叠的 条评论
为什么被折叠?
被折叠的 条评论
为什么被折叠?
 到【灌水乐园】发言


