


参考链接:参考链接: https://zhuanlan.zhihu.com/p/565253278
学习OpenBMc 绕不开 Qemu,QEMU 可以在系统下虚拟一个mechine ,将编译好的mechine 放到 qemu 中运行,在没有硬件支持的情况下,这种仿真环境非常有助于opembmc 的前期开发。
https://www.qemu.org/docs/master/system/arm/aspeed.html
这里是qemu 中关于Aspeed 平台 编译和运行的介绍,可以看到QEMU 支持直接从镜像启动,也可以加载内核和设备树文件启动/。
下面 虚拟i2c 设备 以 Booting the ast2700-evb machine 这个章节的介绍为例:
如果想要虚拟一个i2c 设备,就要修改qemu 中关于 ast2700的配置,就要源码编译后运行。
下载 QEMU
直接下载QEMU 的源码:wget https://download.qemu.org/qemu-9.2.2.tar.xz
解压后得到源码文件
运行ast2700 的话,需要将target 平台设置为arcch64,编译安装
./configure --target-list=aarch64-softmmu
make -j20 && make install
配置自己的Qemu machine
-
hw/arm/aspeed.c
这个文件中保存了Aspeed 中所有相关mechine,在这里添加一个Machine 他继承了Aspeed 通用machine,后面我们在这个配置上继续进行OEM 的修改。
aspeed_machine_ast2700_evb_class_init 这个函数中 定义了mechine 的详细信息
{
        .name          = MACHINE_TYPE_NAME("ast2700-oem"),
        .parent        = TYPE_ASPEED_MACHINE,
        .class_init    = aspeed_machine_ast2700_evb_class_init,
    }
-
aspeed_machine_ast2700_evb_class_init
这个函数中 我们要自定义一个i2c 设备,需要关注这个函数指针:
amc->i2c_init = ast2700_oem_i2c_init;
我们仿照 2700evb 的 模式添加 一个自定义的i2c 初始化函数:
static void ast2700_oem_i2c_init(AspeedMachineState *bmc)
{
    AspeedSoCState *soc = bmc->soc;
    I2CSlave *cpld_mux;

    /* Create the generic DC-SCM hardware */
    qcom_dc_scm_bmc_i2c_init(bmc);

    /* Now create the Firework specific hardware */
    const uint8_t oem_bmc_fruid[] = {
        0x01, 0x00, 0x00, 0x01, 0x00, 0x00, 0x00, 0xfe, 0x01, 0x0e, 0x00, 0x5c,
        0xff, 0xff, 0xff, 0xff, 0xff, 0xff, 0xff, 0xff, 0xff, 0xff, 0xff, 0xff,
        0xff, 0xff, 0xff, 0xff, 0xff, 0xff, 0xff, 0xff, 0xff, 0xff, 0xff, 0xff,
        0xff, 0xff, 0xff, 0xff, 0xff, 0xff, 0xff, 0xff, 0xff, 0xff, 0xff, 0xff,
        0xff, 0xff, 0xff, 0xff, 0xff, 0xff, 0xff, 0xff, 0xff, 0xff, 0xff, 0xff,
        0xff, 0xff, 0xff, 0xff, 0xff, 0xff, 0xff, 0xff, 0xff, 0xff, 0xff, 0xff,
        0xff, 0xff, 0xff, 0xff, 0xff, 0xff, 0xff, 0xff, 0xff, 0xff, 0xff, 0xff,
        0xff, 0xff, 0xff, 0xff, 0xff, 0xff, 0xff, 0xff, 0xff, 0xff, 0xff, 0xff,
        0xff, 0xff, 0xff, 0xff, 0xff, 0xff, 0xff, 0xff, 0xff, 0xff, 0xff, 0xff,
        0xff, 0xff, 0xff, 0xff, 0xff, 0xff, 0xff, 0xff, 0xff, 0xff, 0xff, 0xff,
        0xff, 0xff, 0xff, 0xff, 0xff, 0xff, 0xff, 0xff, 0xff, 0xff, 0xff, 0xff,
    };

    const size_t oem_bmc_fruid_len = sizeof(oem_bmc_fruid);
    /* I2C7 CPLD MUX */
    cpld_mux = i2c_slave_create_simple(aspeed_i2c_get_bus(&soc->i2c, 7), "pca9546", 0x72);
    // DeviceState *dev;
    i2c_slave_create_simple(pca954x_i2c_get_bus(cpld_mux, 0), "pca9548", 0x70); //CPLD0 SSD mux

    // i2c_slave_create_simple(pca954x_i2c_get_bus(cpld_mux, 3), "TYPE_INA226", 0x88); //CPLD3 Voltage sensor
    at24c_eeprom_init_rom(pca954x_i2c_get_bus(cpld_mux, 3), 0x54, 128 * KiB, oem_bmc_fruid, oem_bmc_fruid_len);

    /* LM75 is compatible with TMP105 driver */
    i2c_slave_create_simple(aspeed_i2c_get_bus(&soc->i2c, 0), TYPE_TMP105, 0x4d);

    at24c_eeprom_init_rom(aspeed_i2c_get_bus(&soc->i2c, 8), 0x54, 64 * KiB, oem_bmc_fruid, oem_bmc_fruid_len);
    i2c_slave_create_simple(aspeed_i2c_get_bus(&soc->i2c, 8), TYPE_PCA955X, 0x20);
}
上面代码我们在bus 7 上添加了一个pca9546 的i2c mux,在这个mux 的channel3 上添加了一eeprom,内容固定在 oem_bmc_fruid 中。
aspeed.c 中还有其他machine 添加了其他设备,例如 TYPE_TMP105 等。
到这里,Qemu 里面设备驱动的 虚拟和配置就完成了,我们重新编译 QEMU 的源码 然后安装。
使用这个命令查看 已经存在的 type:qemu-system-aarch64 -machine help

接下来配置openbmc 这边
- dts 里面配置 设备相关的i2c :
&i2c7 {
    status = "okay";
	i2c-switch@72 {
		compatible = "nxp,pca9546";
		reg = <0x72>;
		#address-cells = <1>;
		#size-cells = <0>;
		i2c-mux-idle-disconnect;
		channel_7_0: i2c@0 {
			#address-cells = <1>;
			#size-cells = <0>;
			reg = <0>;
			i2c-switch@70 {
				compatible = "nxp,pca9548";
				reg = <0x70>;
				#address-cells = <1>;
				#size-cells = <0>;

				channel_7_0_0: i2c@0 {
					#address-cells = <1>;
					#size-cells = <0>;
					reg = <0>;
				};

				channel_7_0_1: i2c@1 {
					#address-cells = <1>;
					#size-cells = <0>;
					reg = <1>;
				};
			};
		};

		channel_7_3: i2c@3 {
			#address-cells = <1>;
			#size-cells = <0>;
			reg = <3>;
			eeprom@54 {
				compatible = "atmel,24c02";
				reg = <0x54>;
				pagesize = <16>;
			};
		};
	};
};
注意这里需要在kernel 的config 中使能 pca954x 的驱动。
- 编译 obmc 镜像文件。
运行oem 的QEMU Machine
运行的命令我们参考 QEMU 文档描述中关于Aspeed 2700 的描述:
IMGDIR=ast2700-default
UBOOT_SIZE=$(stat --format=%s -L ${IMGDIR}/u-boot-nodtb.bin)

$ qemu-system-aarch64 -M ast2700-oem \
     -device loader,force-raw=on,addr=0x400000000,file=${IMGDIR}/u-boot-nodtb.bin \
     -device loader,force-raw=on,addr=$((0x400000000 + ${UBOOT_SIZE})),file=${IMGDIR}/u-boot.dtb \
     -device loader,force-raw=on,addr=0x430000000,file=${IMGDIR}/bl31.bin \
     -device loader,force-raw=on,addr=0x430080000,file=${IMGDIR}/optee/tee-raw.bin \
     -device loader,cpu-num=0,addr=0x430000000 \
     -device loader,cpu-num=1,addr=0x430000000 \
     -device loader,cpu-num=2,addr=0x430000000 \
     -device loader,cpu-num=3,addr=0x430000000 \
     -smp 4 \
     -drive file=${IMGDIR}/image-bmc,format=raw,if=mtd \
     -nographic
这里面 -M ast2700-oem 要换成我们自定义的 Machine type。
启动以后 扫描 i2c 设备:
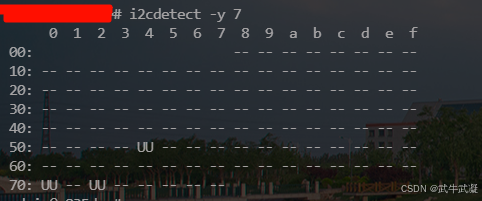
可以看到这几个设备都被内核驱动正确加载了。


 被折叠的 条评论
为什么被折叠?
被折叠的 条评论
为什么被折叠?
 到【灌水乐园】发言


