


提示:内容纯属实战运用,不玩虚的。看明白就可以用在工作中,现学现用。
文章目录
前言
线程池的概念就不长篇大论说了,网上都有,就简单说说线程池有什么用就可以,线程池主要是可以降低资源的消耗,提高响应速度,提高线程的可管理性等等,主要是还要知道怎么使用。下面就是具体的demo使用了哈。
提示:以下是本篇文章正文内容,下面案例可供参考
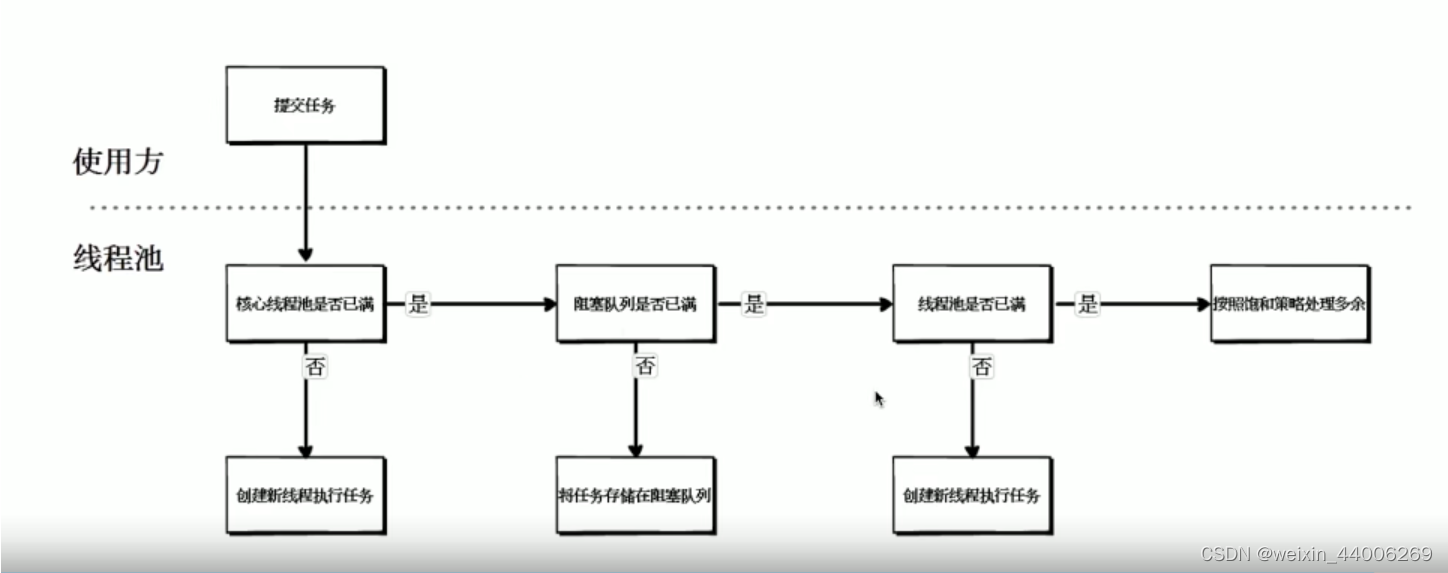
一、线程池的处理流程:
二、线程池可选择的阻塞队列
1.理论:线程池可选择的阻塞队列有:无界队列 有界队列 同步移交队列,同步移交队列是不存储元素的阻塞队列,每隔插入的操作只能等其他线程去调用移除操作才能成功。
2.实操:
1.有界队列:
public void arrayBlockingQueueTest() throws InterruptedException {
		//有界队列,队列容量为界限为10
		ArrayBlockingQueue<Integer> queue = new ArrayBlockingQueue<>(10);
		for (int i = 0; i < 20; i++) {
			queue.put(i);
			System.out.println("向队列中添加值: "+i);
		}
	}
	//输出内容
	向队列中添加值: 0
    向队列中添加值: 1
    向队列中添加值: 2
    向队列中添加值: 3
    向队列中添加值: 4
    向队列中添加值: 5
    向队列中添加值: 6
    向队列中添加值: 7
    向队列中添加值: 8
    向队列中添加值: 9
2.无界队列:
public void linkedBlockingQueueTest() throws InterruptedException {
		LinkedBlockingQueue<Integer> linkedBlockingQueue = new LinkedBlockingQueue<>();
		for (int i = 0; i < 20; i++) {
			linkedBlockingQueue.put(i);
			System.out.println("向队列中添加值: "+i);
		}
	}
3.同步移交队列:
	public void synchronousQueue(){
		//同步移交阻塞队列
		SynchronousQueue<Integer> queue = new SynchronousQueue<>();

		//插入值
		new Thread(()->{
			try {
				queue.put(1);
				System.out.println("插入成功");
			} catch (InterruptedException e) {
				e.printStackTrace();
			}
		}).start();

		//删除值
	new Thread(()->{
		try {
			queue.take();
			System.out.println("删除成功");
		} catch (InterruptedException e) {
			e.printStackTrace();
		}
	}).start();
	}
//当把删除值的那个线程给注释掉在起一下程序就可以看到下面的输出结果,上面的那个插入的线程也会一直在哪里阻塞。
三.线程池可选择的饱和策略
1.AbortPolicy终止策略(默认选择的)
2.DiscardPolicy抛弃策略
3.DiscardOldestPolicy抛弃旧任务策略
4.CallerRunsPolicy调用者运行策略
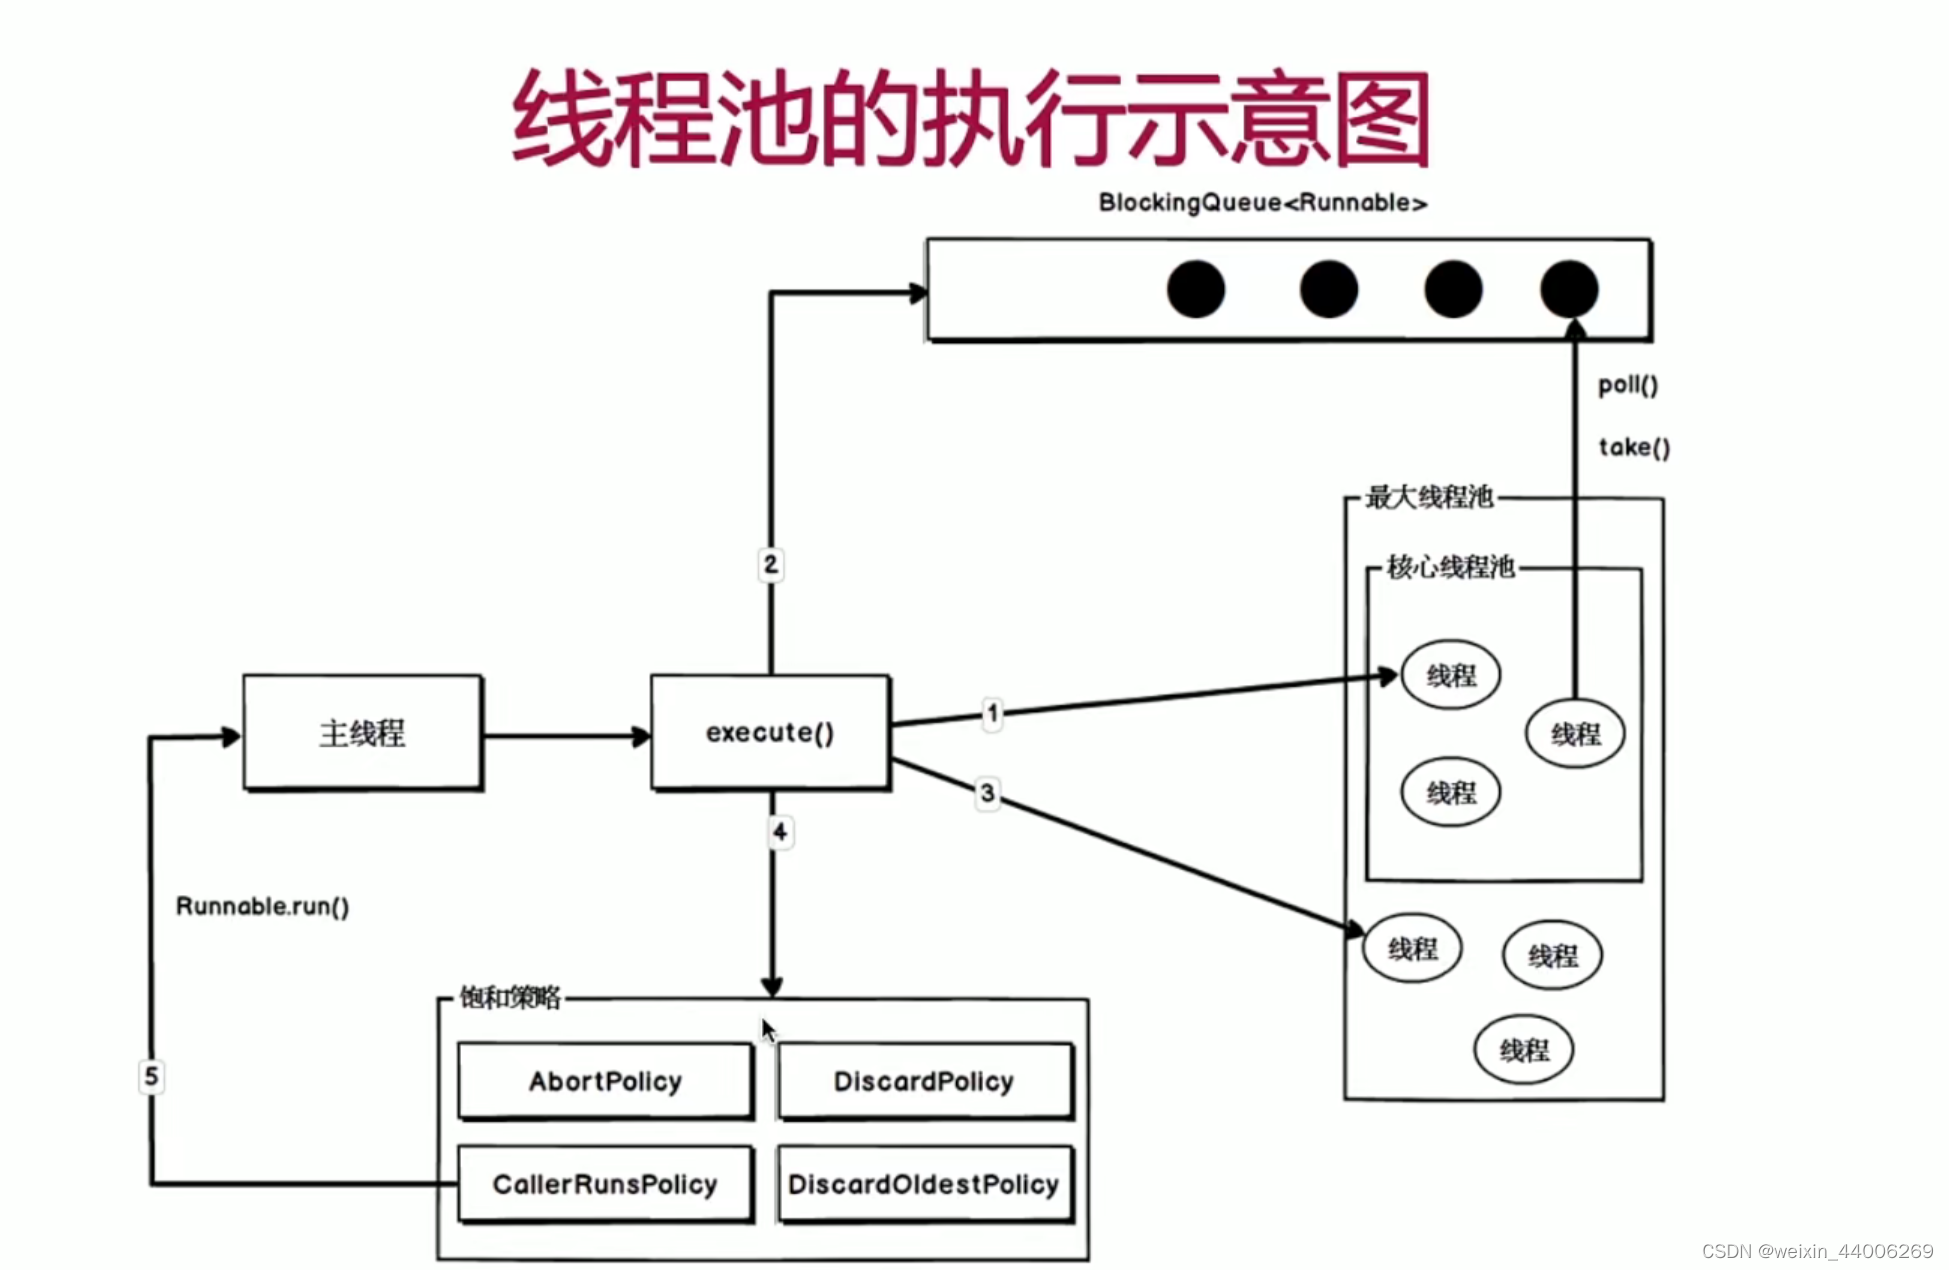
三.线程池的执行示意图(按着数字从小到大的顺序看)
代码如下(示例):
data = pd.read_csv(
    'https://labfile.oss.aliyuncs.com/courses/1283/adult.data.csv')
print(data.head())
该处使用的url网络请求的数据。
三.常用线程池
1.newCachedThreadPool(缓存线程池)
这是有一种可以创建无限个线程数的线程池,一般工作中不会用到。工作中一般用自定义的线程池
	//缓存线程池,线程数量无限大
	public static ExecutorService newCachedThreadPool(){
		return new ThreadPoolExecutor(0,Integer.MAX_VALUE,
				60L,
				TimeUnit.SECONDS,
				new SynchronousQueue<Runnable>());
	}
2.newFixedThreadPool(固定线程池)
线程数量固定的线程池
	public static ExecutorService newFixedThreadPool(int nThreads){
		return new ThreadPoolExecutor(nThreads,nThreads,
				0L,
				TimeUnit.MILLISECONDS,
				new LinkedBlockingQueue<Runnable>());
	}
3.newSingleThreadExecutor(单一线程线程池)
只有一个线程数的线程池
	public static ExecutorService newSingleThreadPool(){
		return new ThreadPoolExecutor(1,1,
				0L,
				TimeUnit.MILLISECONDS,
				new LinkedBlockingQueue<Runnable>());
	}
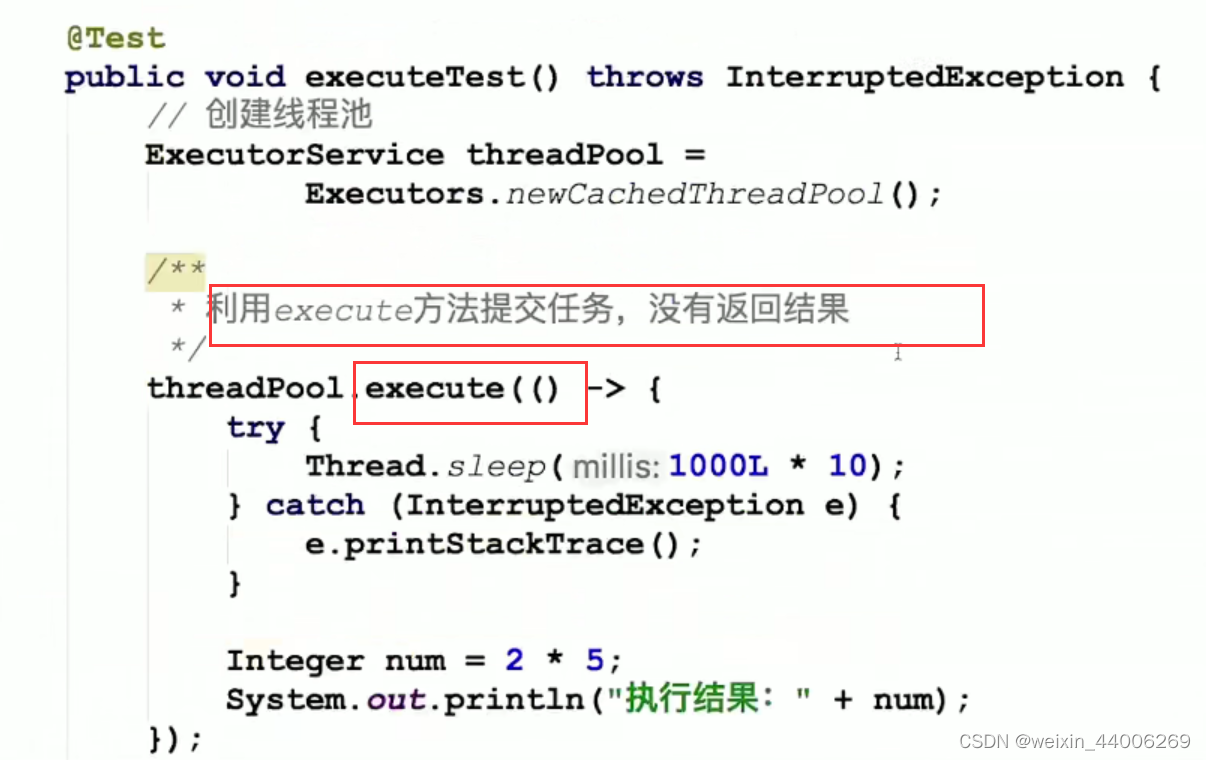
四.向线程池执行任务submit和execute的区别
1.submit返回的是future类型的结果,是阻塞的
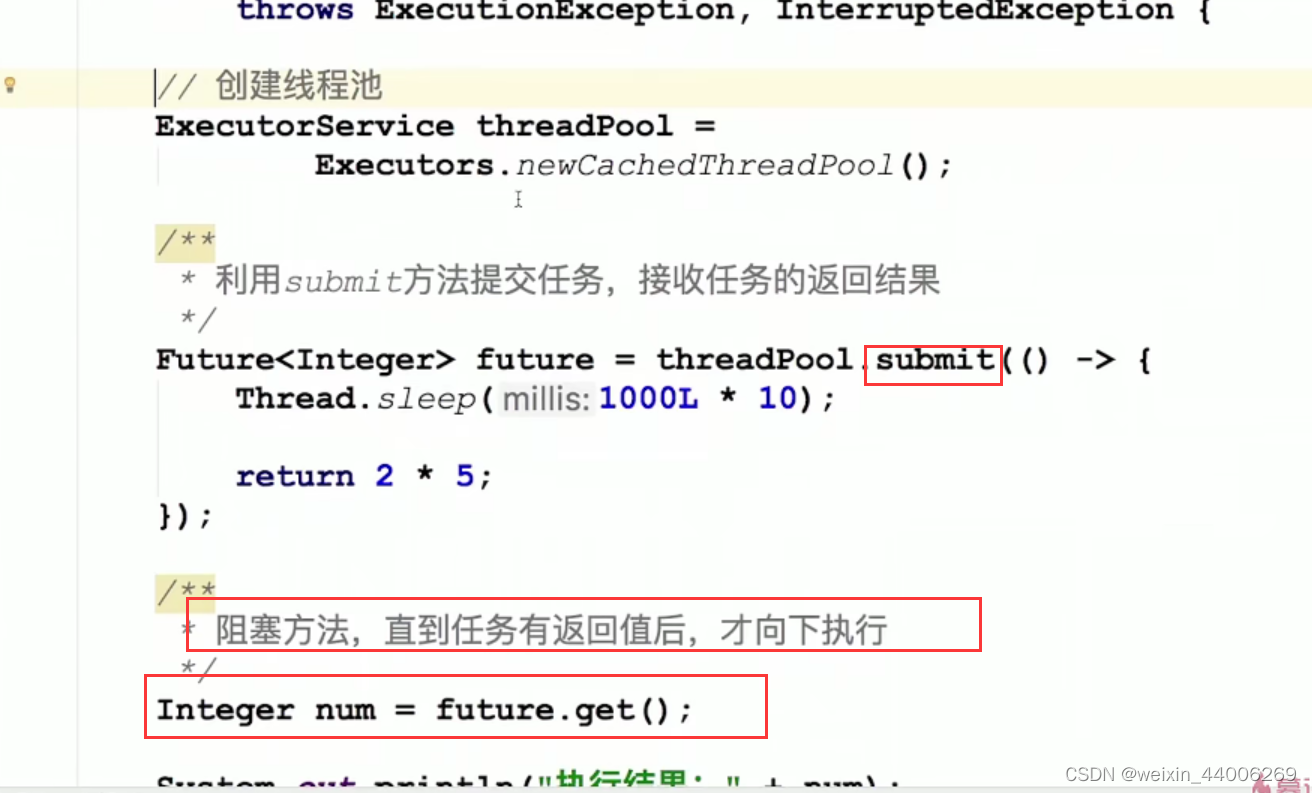
2.execute是没有返回结构的,并且要亲自捕获异常,不像submit方法里面已经帮忙捕获了
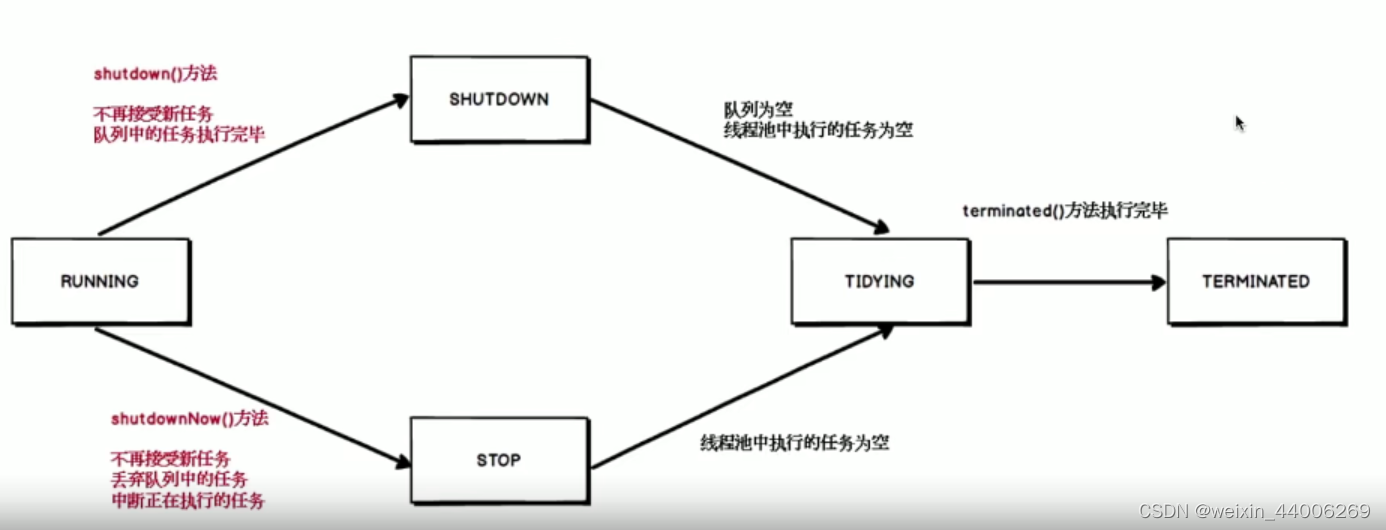
五.线程池的状态
有五种状态,如果调用shutdown()方法,哪线程池就不在接受新的提交任务了,但是会友好的等线程池里面的线程执行完自己的任务之后才平滑的到shutdown,然后等线程池里面的任务执行完之后就转到tindying状态。而shutdownNow()方法就暴力一些,就是强硬的使线程池里面的所有任务都要立刻马上的停止然后转到提到tidying状态。所以有些线程池关闭不当的话,可能会造成线程任务丢失的情况,推荐使用shutdown()方法。
完整Demo
先创建一个task线程实现类:
package com.wu.告别996.线程池;

import lombok.Data;

/**
 * @Author c-lijiwu
 * @Date 2022/12/8 17:20
 */
@Data
public class Task implements Runnable {
	//任务名称
	private String taskName;

	public Task(String taskName) {
		this.taskName = taskName;
	}

	@Override
	public void run() {
		System.out.println("线程["+Thread.currentThread().getName()+"]正在执行["+this.taskName+"]任务。。。");

		try {
			Thread.sleep(5000L);
		} catch (InterruptedException e) {
			e.printStackTrace();
		}
		System.out.println("线程["+Thread.currentThread().getName()+"]已执行完任务["+this.taskName+"]任务。。。");
	}
}
测试各种线程池饱和策略:
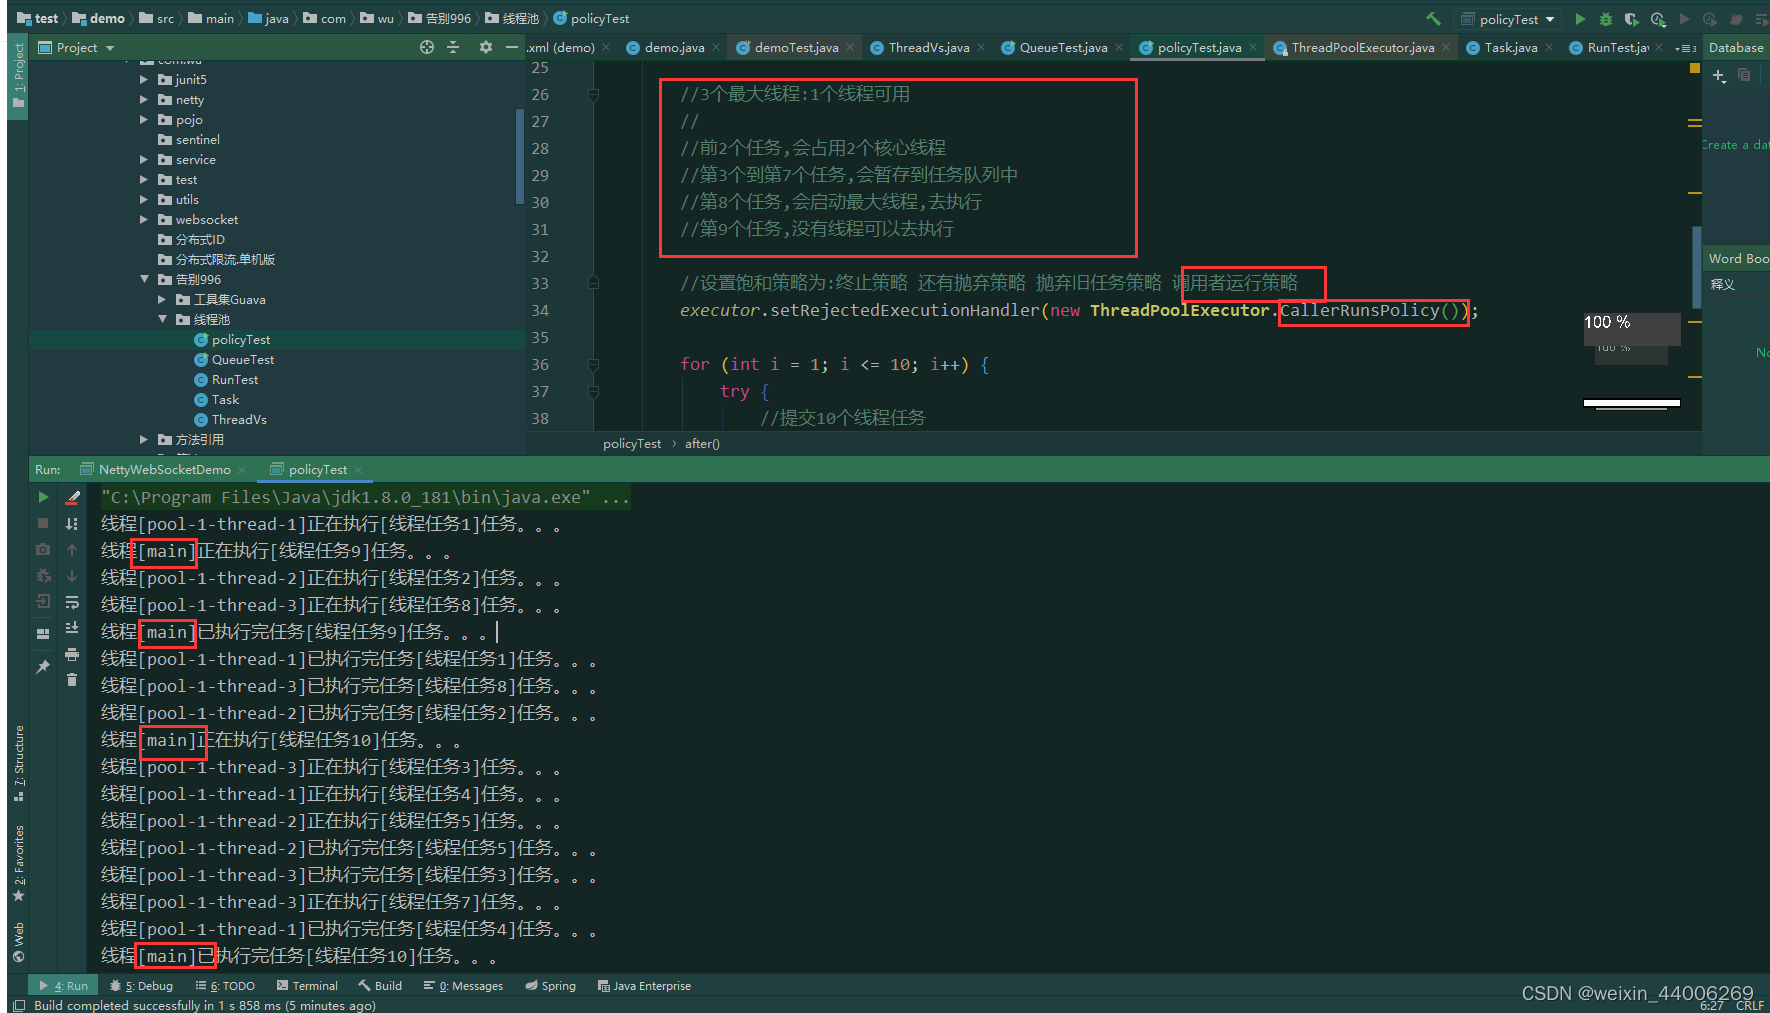
public class policyTest {

	//线程池
	private static ThreadPoolExecutor executor = new ThreadPoolExecutor(
			//核心线程数和最大线程数
			2,3,
			//线程空闲后的存活时间
			60L, TimeUnit.SECONDS,
			//创建一个阻塞队列的类型(有界队列)
			new LinkedBlockingQueue<Runnable>(5)
	);

	public static void main(String[] args) throws InterruptedException {


		//3个最大线程:1个线程可用
		//
		//前2个任务,会占用2个核心线程
		//第3个到第7个任务,会暂存到任务队列中
		//第8个任务,会启动最大线程,去执行
		//第9个任务,没有线程可以去执行

		//设置饱和策略为:终止策略 还有抛弃策略 抛弃旧任务策略 调用者运行策略
		executor.setRejectedExecutionHandler(new ThreadPoolExecutor.CallerRunsPolicy());

		for (int i = 1; i <= 10; i++) {
			try {
				//提交10个线程任务
				executor.execute(new Task("线程任务" + i));
			}catch (Exception e){
				System.err.println(e);
			}
		}
		//关闭线程池
		executor.shutdown();

		Thread.sleep(100000L);
	}
}
运行截图:


总结
学习java并不难,没有捷径可走,唯一的学习方法就是实践实践在实践,就是要动手敲代码。


 843
843


 被折叠的 条评论
为什么被折叠?
被折叠的 条评论
为什么被折叠?
 到【灌水乐园】发言


