


文章目录
一。什么是Liquibase?
liquibase是一个数据库变更的版本控制工具。项目中通过liquibase解析用户编写的liquibase的配置文件,生成sql语句,并执行和记录。执行是根据记录确定sql语句是否曾经执行过,和配置文件里的预判断语句确定sql是否执行。
liquibase开源版使用Apache 2.0协议。
1.liquibase的优点
- 配置文件支持SQL、XML、JSON 或者 YAML
- 版本控制按序执行
- 可以用上下文控制sql在何时何地如何执行。
- 支持schmea的变更
- 根据配置文件自动生成sql语句用于预览
- 可重复执行迁移
- 可插件拓展
- 可回滚
- 可兼容14种主流数据库如oracle,mysql,pg等,支持平滑迁移
- 支持schema方式的多租户(multi-tenant)
2.liquibase的基本概念
changeSet执行sql的并记录、版本控制的最小单元。即每条changeSet生成1条执行记录,版本控制是基于执行记录的。changelog即执行记录。由changeSet执行后产生的记录。记录默认保存在databasechangelog表中,此表由liquibase自动生成。包含id,author,filename,dateexcuted,orderexcuted,exectype,md5sum等字段。
其中md5sum字段是liquibase用来监测数据库表是否发生变化,当数据库数据发生变化时,该字段也会发生变化。所以Liquibase的工作流程简单来说就是先比对md5sum的值是否发生变化,如果发生变化便根据xml文件配置来更新数据库,否则不做任何操作。

databasechangeloglock。liquibase的锁表。liquibase在执行前更新此表的locked为true,执行完liquibase的工作,将locked更新为false,适合集群使用。
3.官网地址
二。SpringBoot整合Liquibase
1.简介
此Demo为SpringBoot整合Liquibase示例,集成了Postgresql和Mysql数据库
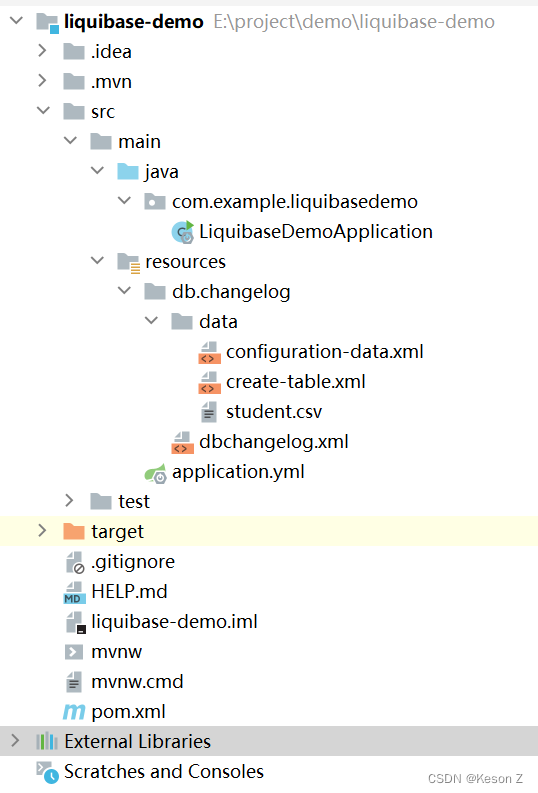
2.项目结构
pom.xml文件如下所示:
<?xml version="1.0" encoding="UTF-8"?>
<project xmlns="http://maven.apache.org/POM/4.0.0" xmlns:xsi="http://www.w3.org/2001/XMLSchema-instance"
         xsi:schemaLocation="http://maven.apache.org/POM/4.0.0 https://maven.apache.org/xsd/maven-4.0.0.xsd">
    <modelVersion>4.0.0</modelVersion>
    <parent>
        <groupId>org.springframework.boot</groupId>
        <artifactId>spring-boot-starter-parent</artifactId>
        <version>2.6.7</version>
        <relativePath/> <!-- lookup parent from repository -->
    </parent>
    <groupId>com.example</groupId>
    <artifactId>liquibase-demo</artifactId>
    <version>0.0.1-SNAPSHOT</version>
    <name>liquibase-demo</name>
    <description>Demo project for Spring Boot</description>
    <properties>
        <java.version>11</java.version>
    </properties>
    <dependencies>
        <dependency>
            <groupId>org.springframework.boot</groupId>
            <artifactId>spring-boot-starter</artifactId>
        </dependency>

        <dependency>
            <groupId>org.springframework.boot</groupId>
            <artifactId>spring-boot-starter-test</artifactId>
            <scope>test</scope>
        </dependency>

        <dependency>
            <groupId>org.springframework.boot</groupId>
            <artifactId>spring-boot-starter-jdbc</artifactId>
        </dependency>

        <!--postgresql数据库依赖-->
        <dependency>
            <groupId>org.postgresql</groupId>
            <artifactId>postgresql</artifactId>
            <version>42.2.18</version>
        </dependency>

        <!--liquibase依赖-->
        <dependency>
            <groupId>org.liquibase</groupId>
            <artifactId>liquibase-core</artifactId>
            <version>4.4.1</version>
        </dependency>

        <!--mysql依赖-->
        <dependency>
            <groupId>mysql</groupId>
            <artifactId>mysql-connector-java</artifactId>
            <scope>runtime</scope>
        </dependency>

    </dependencies>

    <build>
        <plugins>
            <plugin>
                <groupId>org.springframework.boot</groupId>
                <artifactId>spring-boot-maven-plugin</artifactId>
            </plugin>
        </plugins>
    </build>

</project>
application.yml文件配置如下:
server:
  port: 8080
spring:
  application:
    name: liquibase-demo
  datasource:
    url: jdbc:postgresql://localhost:5432/test
    username: postgres
    password: postgres
    driver-class-name: org.postgresql.Driver

#    url: jdbc:mysql://localhost:3306/liquibase?useUnicode=true&characterEncoding=utf-8&useSSL=true&serverTimezone=UTC
#    username: root
#    password: root
#    driver-class-name: com.mysql.cj.jdbc.Driver
  liquibase:
    enabled: true
    change-log: "classpath:/db/changelog/dbchangelog.xml"
dbchangelog.xml内容如下:(dbchangelog.xml为Liquibase的入口)
<?xml version="1.0" encoding="UTF-8"?>
<databaseChangeLog
        xmlns="http://www.liquibase.org/xml/ns/dbchangelog"
        xmlns:xsi="http://www.w3.org/2001/XMLSchema-instance"
        xsi:schemaLocation="http://www.liquibase.org/xml/ns/dbchangelog
	  http://www.liquibase.org/xml/ns/dbchangelog/dbchangelog-4.4.xsd">

<!--  relativeToChangelogFile设置为true时,文件路径为相对dbchangelog.xml的路径  -->
    <include relativeToChangelogFile="true" file="/data/create-table.xml" ></include>
    <include relativeToChangelogFile="true" file="/data/configuration-data.xml" ></include>

</databaseChangeLog>
使用create-table.xml创建相应的table对象,内容如下:
<?xml version="1.0" encoding="UTF-8"?>

<databaseChangeLog
        xmlns="http://www.liquibase.org/xml/ns/dbchangelog"
        xmlns:xsi="http://www.w3.org/2001/XMLSchema-instance"
        xsi:schemaLocation="http://www.liquibase.org/xml/ns/dbchangelog
         http://www.liquibase.org/xml/ns/dbchangelog/dbchangelog-4.4.xsd">

    <changeSet  id="create-student-table"  author="Keson">

        <comment>create-student-table</comment>

        <createTable  tableName="student">
            <column  name="id"  type="int">
                <constraints  primaryKey="true"  nullable="false"/>
            </column>
            <column  name="student_no"  type="varchar(50)">
                <constraints  nullable="false"/>
            </column>
            <column  name="name"  type="varchar(50)">
                <constraints  nullable="false"/>
            </column>
            <column  name="sex"  type="varchar(5)">
                <constraints  nullable="false"/>
            </column>
            <column  name="active"  type="boolean"
                     defaultValueBoolean="true"/>
        </createTable>

    </changeSet>

</databaseChangeLog>
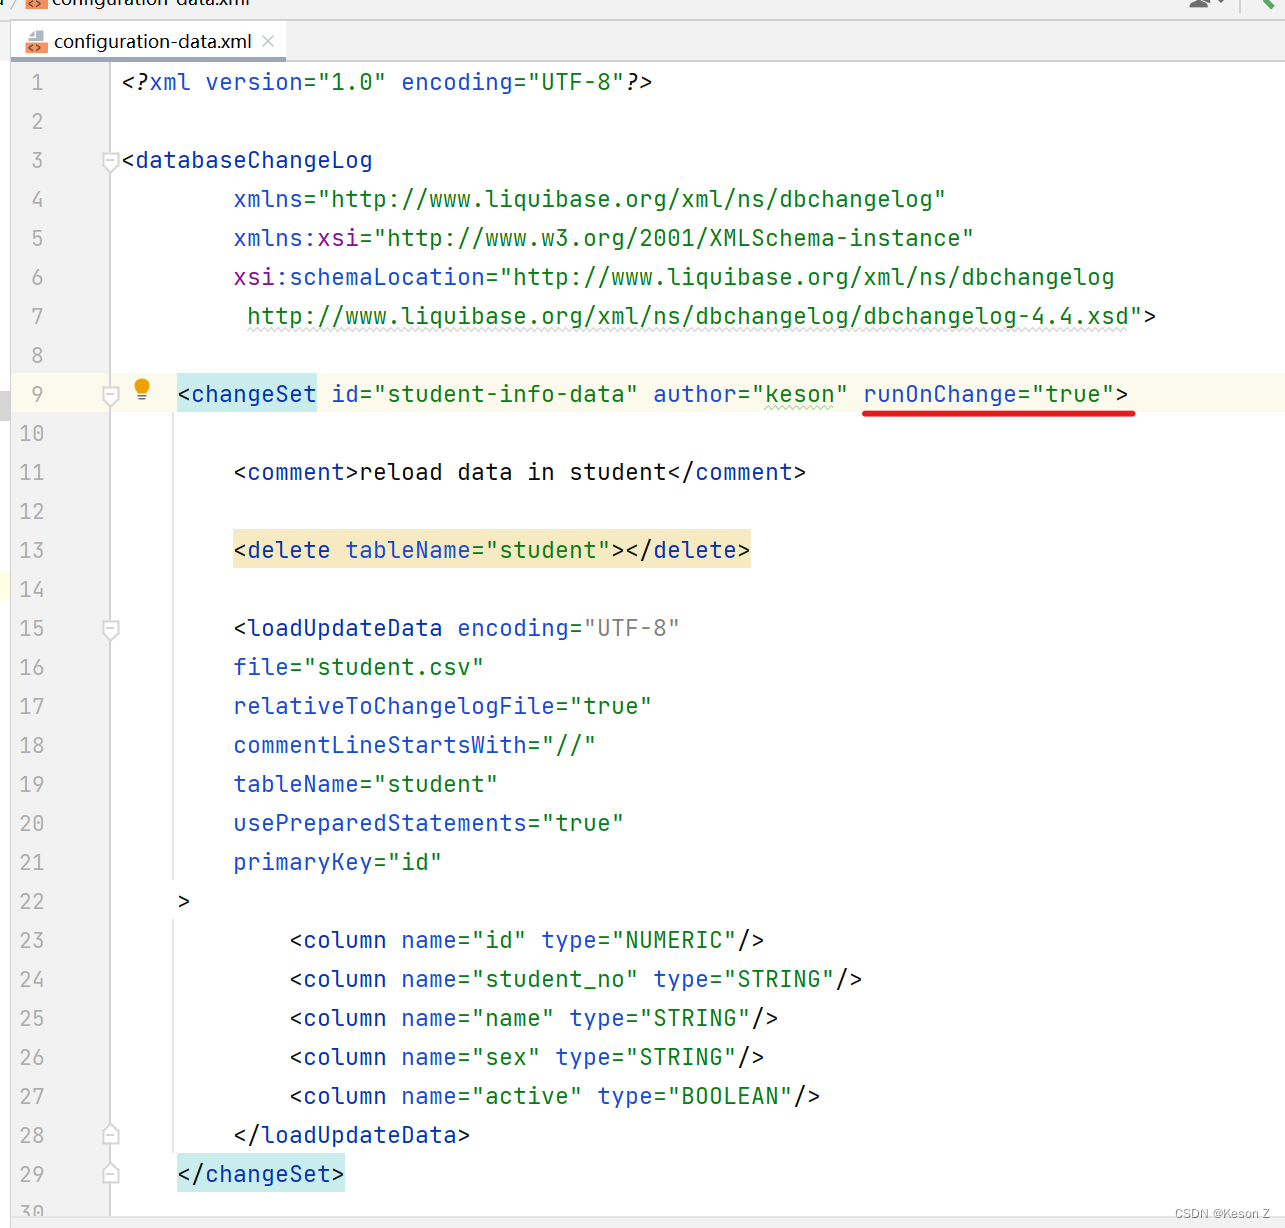
使用configuration-data.xml配置table属性:
<?xml version="1.0" encoding="UTF-8"?>

<databaseChangeLog
        xmlns="http://www.liquibase.org/xml/ns/dbchangelog"
        xmlns:xsi="http://www.w3.org/2001/XMLSchema-instance"
        xsi:schemaLocation="http://www.liquibase.org/xml/ns/dbchangelog
         http://www.liquibase.org/xml/ns/dbchangelog/dbchangelog-4.4.xsd">

    <changeSet id="student-info-data" author="keson" runOnChange="true">

        <comment>reload data in student</comment>

        <delete tableName="student"></delete>

        <loadUpdateData encoding="UTF-8"
        file="student.csv"
        relativeToChangelogFile="true"
        commentLineStartsWith="//"
        tableName="student"
        usePreparedStatements="true"
        primaryKey="id"
    >
            <column name="id" type="NUMERIC"/>
            <column name="student_no" type="STRING"/>
            <column name="name" type="STRING"/>
            <column name="sex" type="STRING"/>
            <column name="active" type="BOOLEAN"/>
        </loadUpdateData>
    </changeSet>

</databaseChangeLog>
使用student.csv存储table数据:
id,student_no,name,sex,active
//student data
1,001,张三,男,true
2,002,李四,男,true
3,003,王五,男,true
4,004,杰西卡,女,true
5,005,米歇尔,女,true
启动类LiquibaseDemoApplication代码如下:
package com.example.liquibasedemo;

import org.springframework.boot.SpringApplication;
import org.springframework.boot.autoconfigure.SpringBootApplication;

@SpringBootApplication
public class LiquibaseDemoApplication {

    public static void main(String[] args) {
        SpringApplication.run(LiquibaseDemoApplication.class, args);
    }

}
3.测试结果
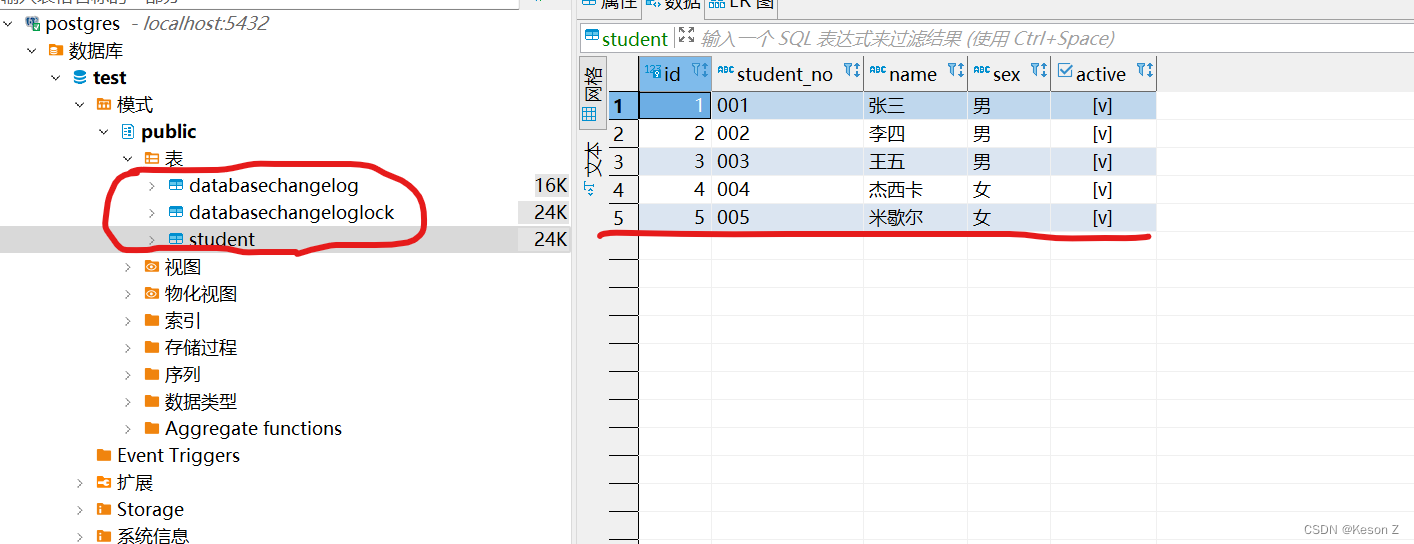
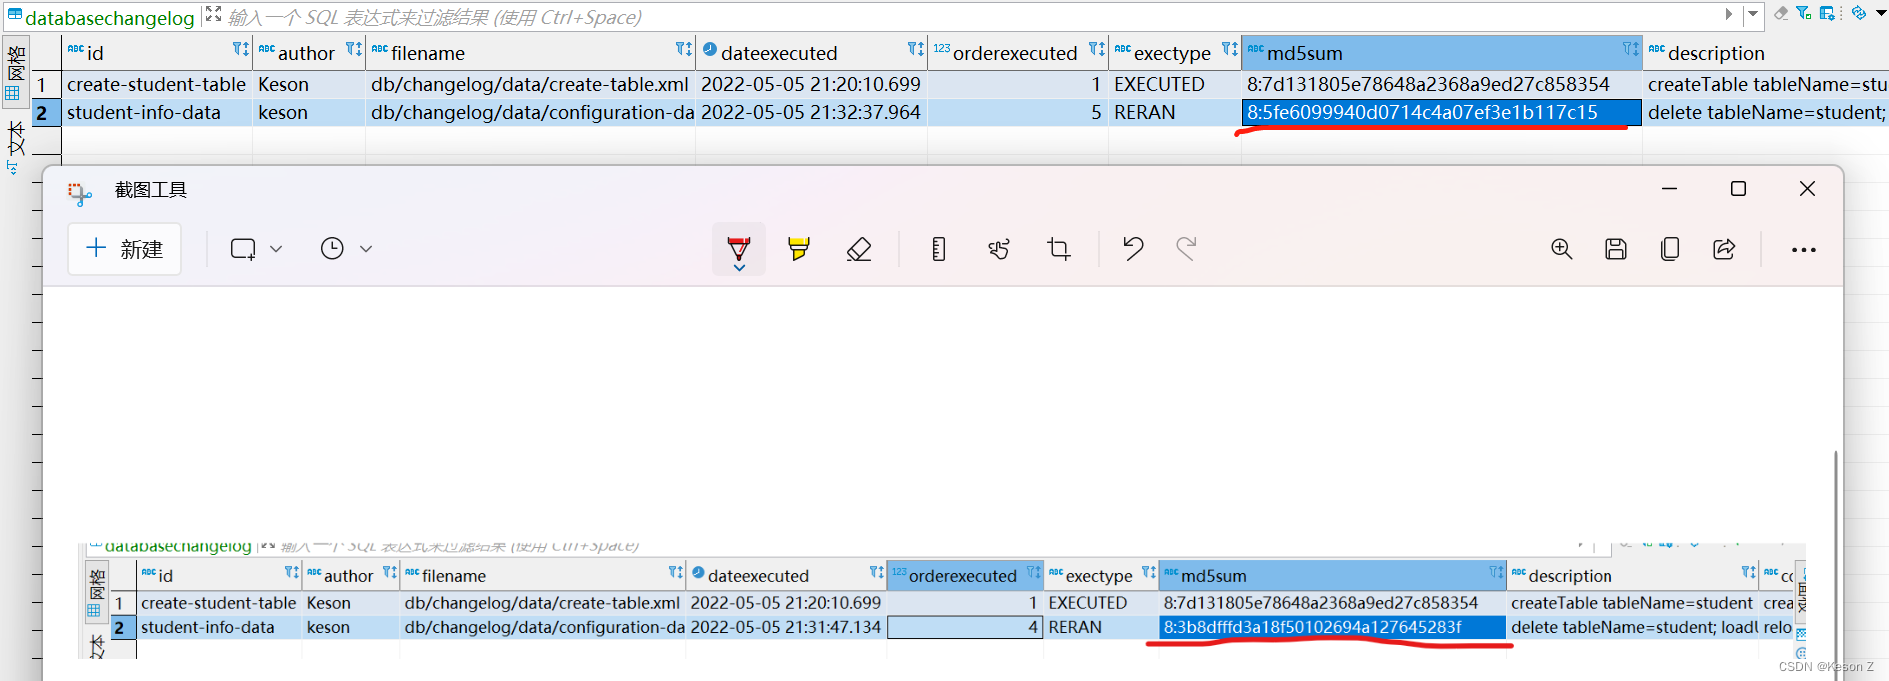
启动成功后,Liquibase数据库新生成了三张表,databasechangelog,databasechangeloglock,student。其中databasechangelog和databasechangeloglock是Liquibase帮我们自动生成的,student是我们自己配置xml文件后生成的:
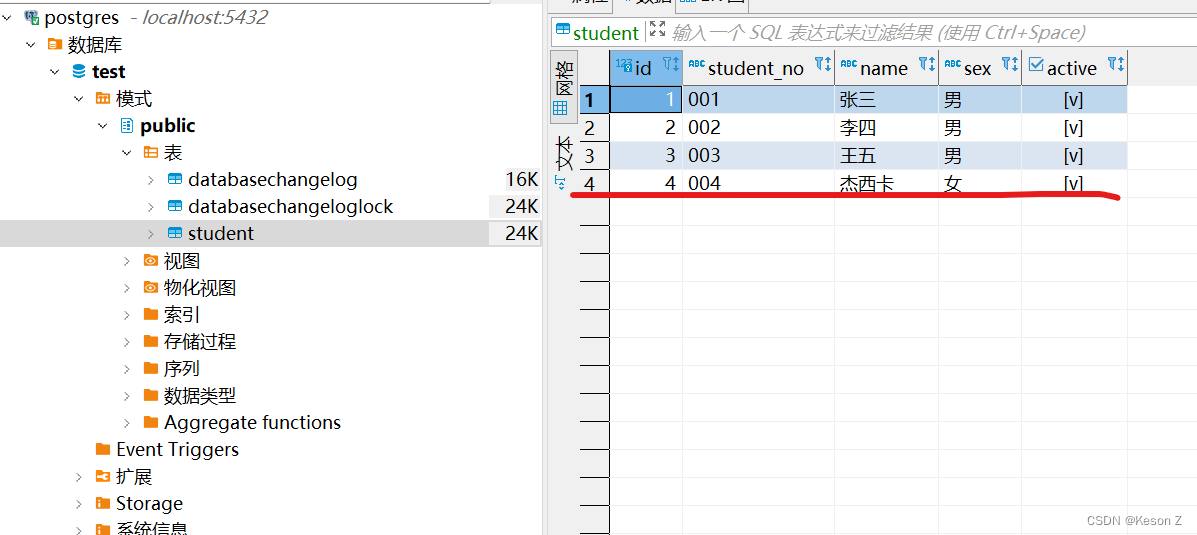
更新student.csv文件,再次启动,发现数据库也出现相应改变:

数据发生变化之后可以发现databasechangelog表中的md5sum的值也发生了变化:
4.特别注意
当runOnChange设置为true时:第一次的时候执行以及当changeSet的内容发生变化时执行。不受MD5校验值的约束。
如果不设置的话,更新数据库操作会校验MD5的值,如果值不同则会报错,提示两次的md5sum值不同,不能使用Liquibase同步更新数据:

5.扩展
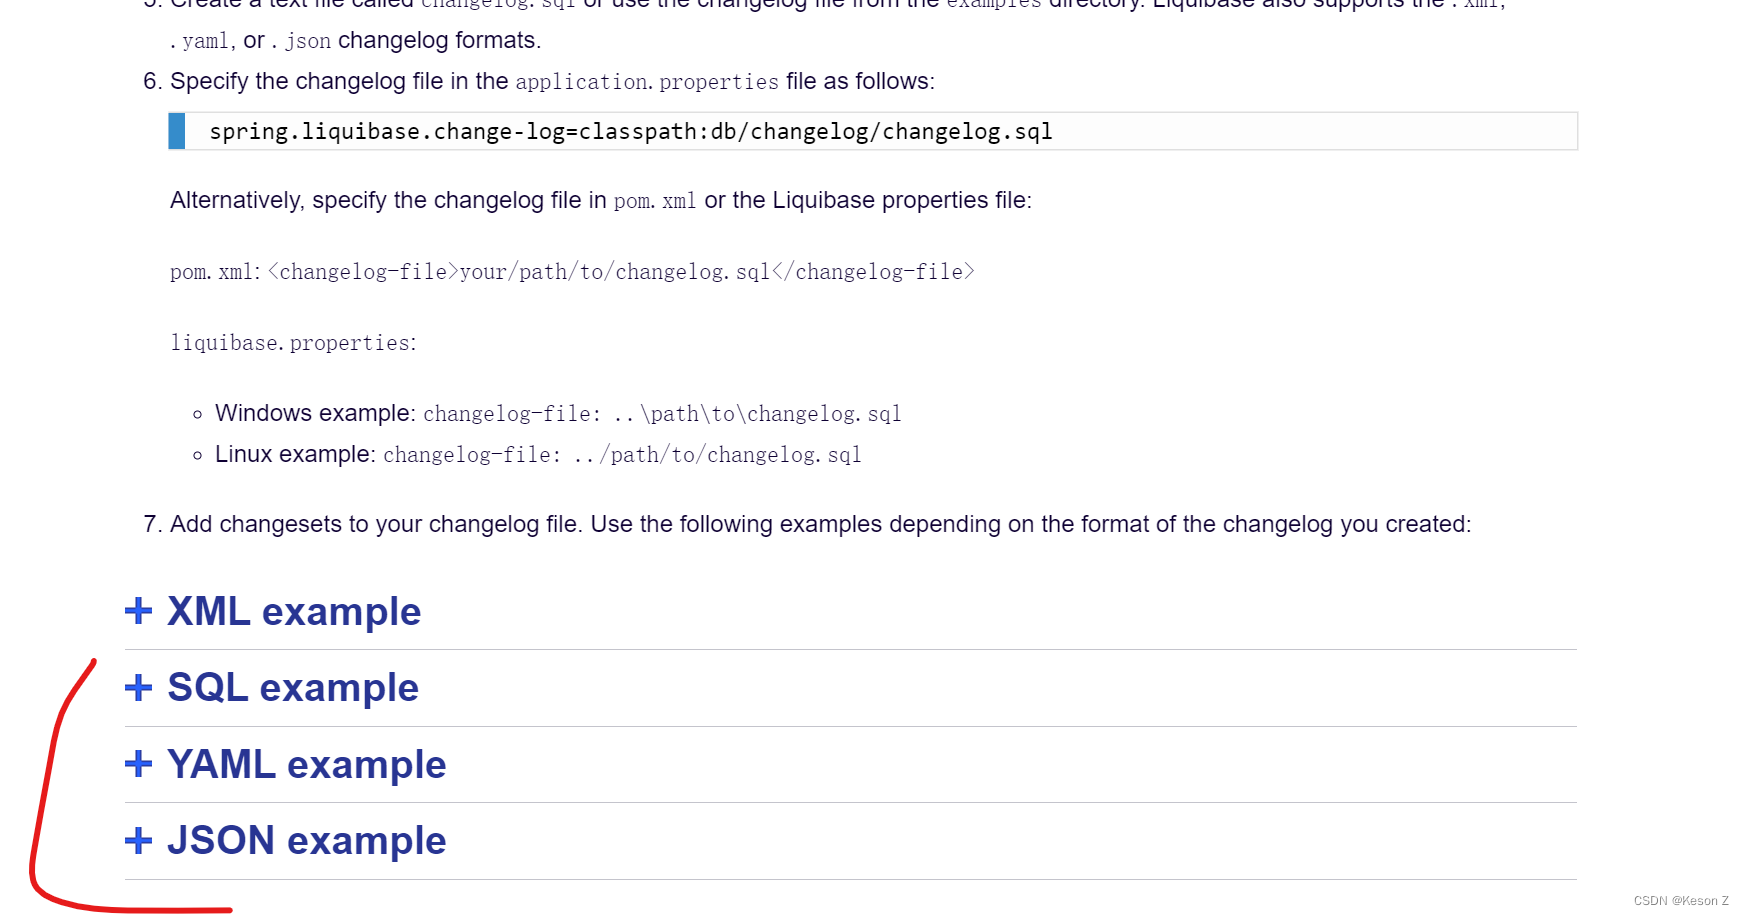
当然除了使用XML文件的形式,你还可以使用YAML,SQL,JSON等文件达到相同的效果,具体实现请参考以下网址:
https://docs.liquibase.com/tools-integrations/springboot/using-springboot-with-maven.html
6.项目地址
https://gitee.com/hair_gel_king/liquibase-demo
三。使用Maven命令来执行Liquibase同步更新数据
1.简介
此Demo为maven项目整合Liquibase示例,集成了Postgresql和Mysql数据库,无启动类,使用mvn liquibase:update命令执行Liquibase同步更新数据
2.项目结构
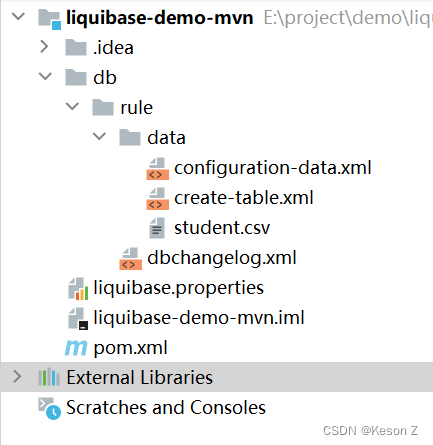
相较于SpringBoot整合Liquibase,不同的文件是增加了一个liquibase.properties配置文件以及pom.xml文件中引入了maven命令插件。
liquibase.properties主要是配置changelog.xml的位置信息以及数据库的连接信息,其内容如下:
changelogFile=db/rule/dbchangelog.xml

driver=org.postgresql.Driver
url=jdbc:postgresql://localhost:5432/test
username=postgres
password=postgres

#driver=com.mysql.cj.jdbc.Driver
#url: jdbc:mysql://localhost:3306/test?useUnicode=true&characterEncoding=utf-8&useSSL=true&serverTimezone=UTC
#username: root
#password: root

verbose=true
pom.xml文件内容如下:
<?xml version="1.0" encoding="UTF-8"?>
<project xmlns="http://maven.apache.org/POM/4.0.0"
         xmlns:xsi="http://www.w3.org/2001/XMLSchema-instance"
         xsi:schemaLocation="http://maven.apache.org/POM/4.0.0 http://maven.apache.org/xsd/maven-4.0.0.xsd">
    <modelVersion>4.0.0</modelVersion>

    <groupId>org.example</groupId>
    <artifactId>liquibase-demo-mvn</artifactId>
    <version>1.0-SNAPSHOT</version>

    <properties>
        <maven.compiler.source>11</maven.compiler.source>
        <maven.compiler.target>11</maven.compiler.target>
        <demo.propertyFile>liquibase.properties</demo.propertyFile>
    </properties>

    <build>
        <plugins>
            <plugin>
                <groupId>org.liquibase</groupId>
                <artifactId>liquibase-maven-plugin</artifactId>
                <version>4.4.1</version>
                <configuration>
                    <propertyFileWillOverride>true</propertyFileWillOverride>
                    <propertyFile>${demo.propertyFile}</propertyFile>
                </configuration>
                <executions>
                    <execution>
                        <phase>process-resources</phase>
                        <goals>
                            <goal>update</goal>
                        </goals>
                    </execution>
                </executions>
                <dependencies>
                    <dependency>
                        <groupId>org.postgresql</groupId>
                        <artifactId>postgresql</artifactId>
                        <version>42.2.18</version>
                    </dependency>
                </dependencies>
            </plugin>
        </plugins>
    </build>

    <dependencies>

        <dependency>
            <groupId>mysql</groupId>
            <artifactId>mysql-connector-java</artifactId>
            <version>6.0.6</version>
        </dependency>

    </dependencies>
</project>
其他文件没有改动,此处省略。
3.测试结果
在项目根目录进入CMD,并使用mvn liquibase:update -Drule.engine.configuration.propertyFile命令启动,后面跟的是liquibase.properties所在的路径信息,如下面我的启动命令:
mvn liquibase:update -Drule.engine.configuration.propertyFile=E:\project\demo\liquibasedemo\liquibase-demo-mvn\liquibase.properties

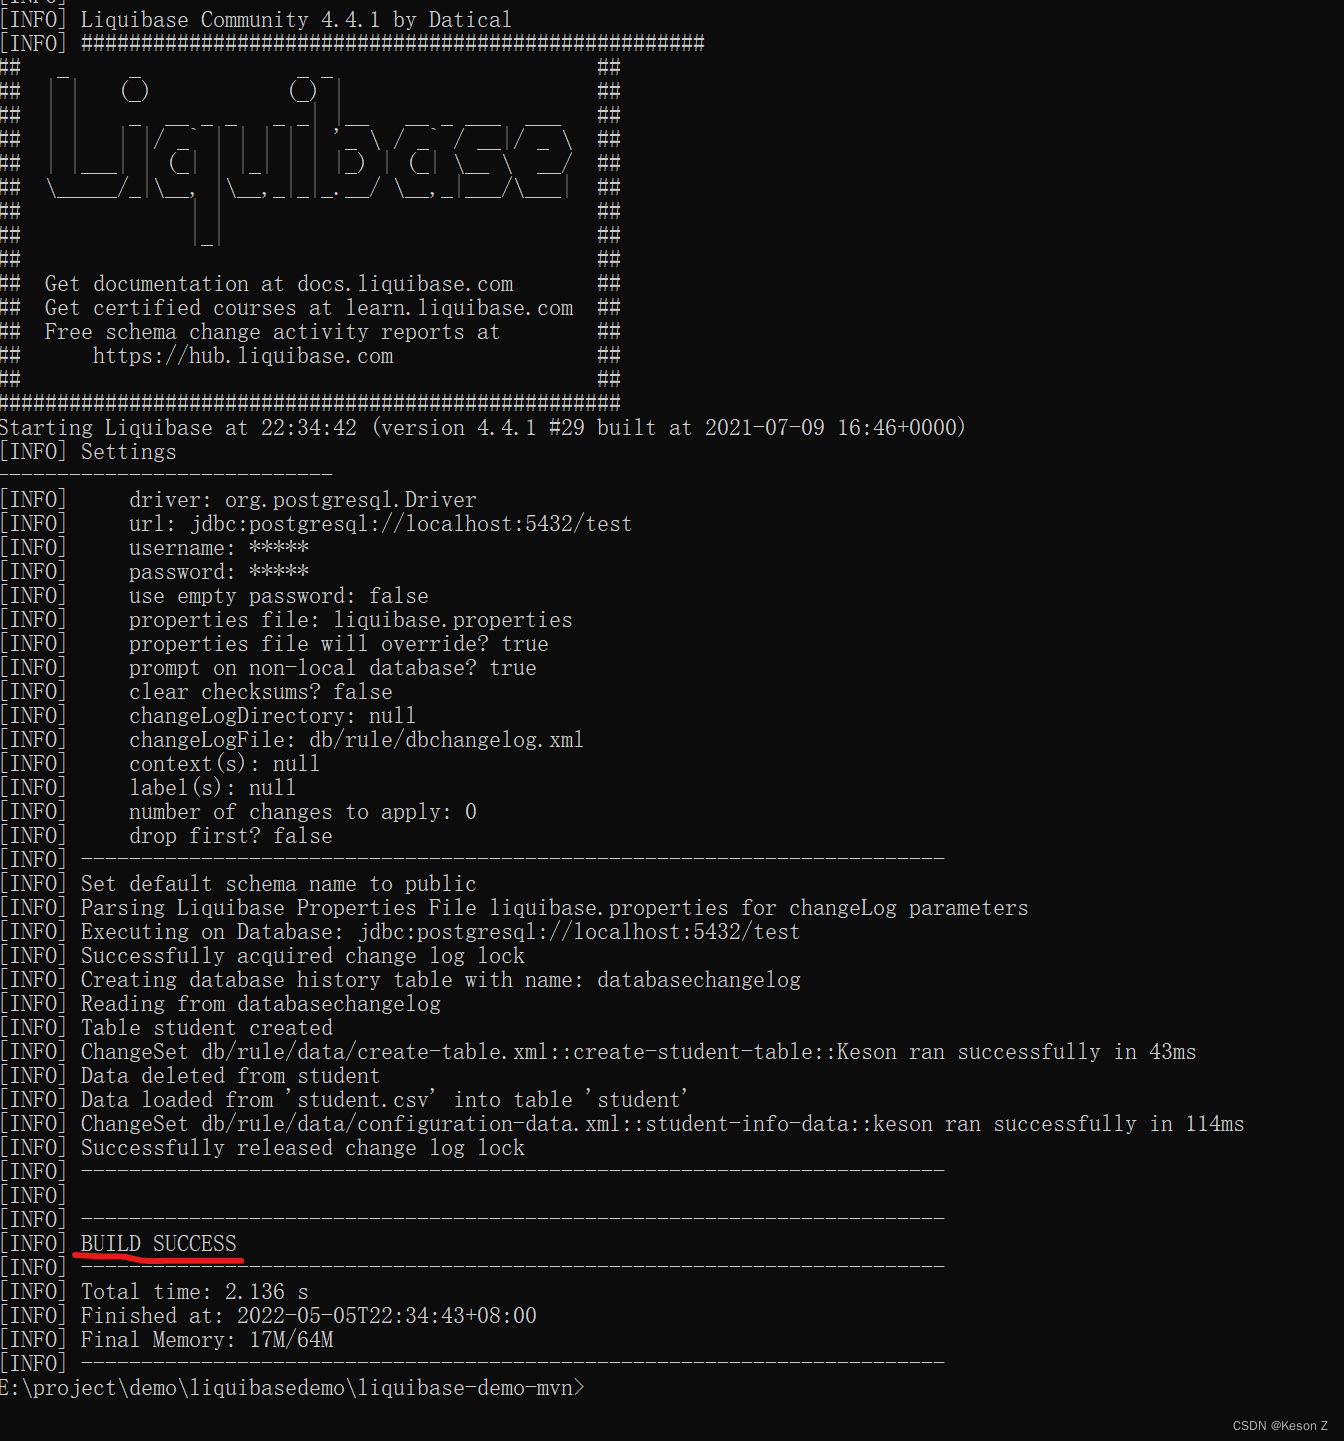
执行成功后能看见build success:
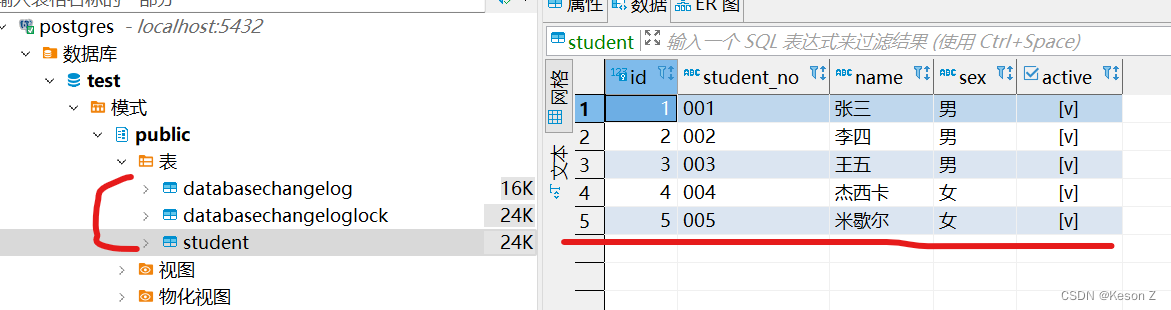
之后数据库就能出现相关table和数据了:
更新student.csv文件,再次执行,发现数据库也出现相应改变:


 1740
1740


 被折叠的 条评论
为什么被折叠?
被折叠的 条评论
为什么被折叠?
 到【灌水乐园】发言


