


文章目录
前言
开发笔记
学习任务
一、查询及导入导出功能实现
以eDoc为例
后端
- 设计表结构,一般固定包含uuid、createdBy、createdTime、updatedBy、updatedTime五个字段

- 通过MyBatisX插件生成实体类,接口和实现类
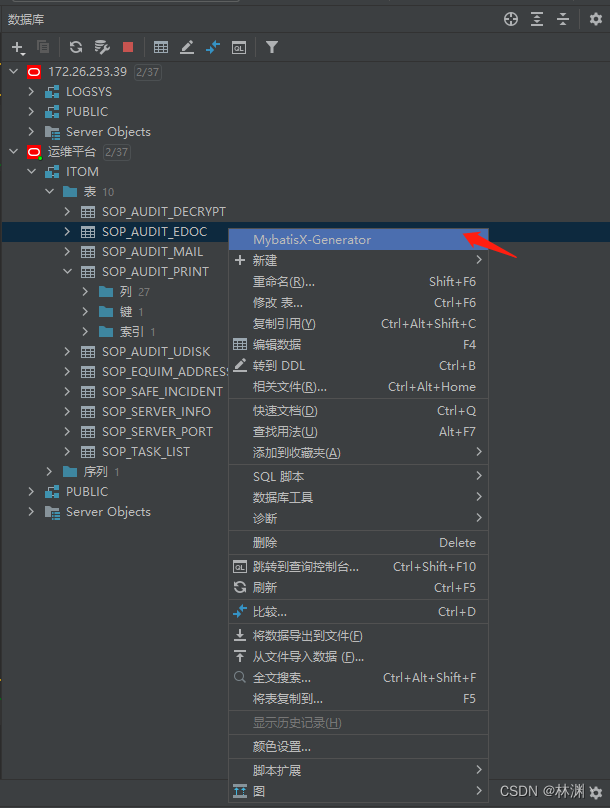
需要替换成自己参数
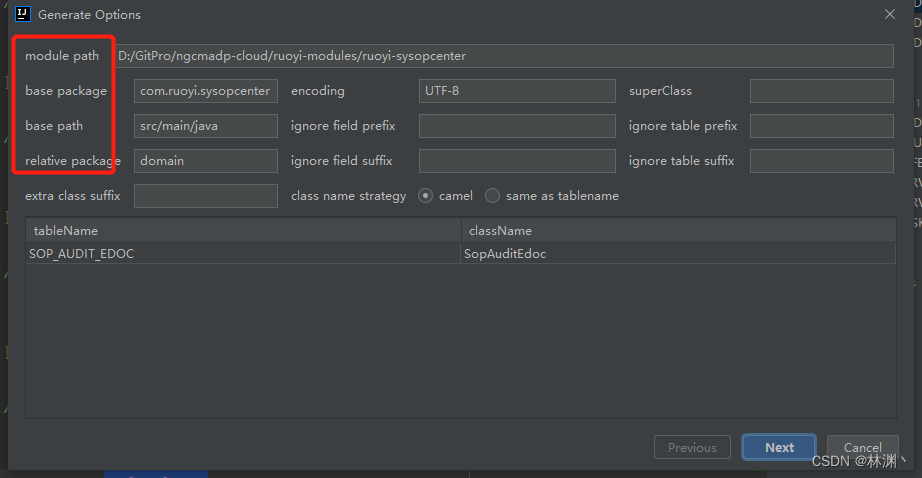
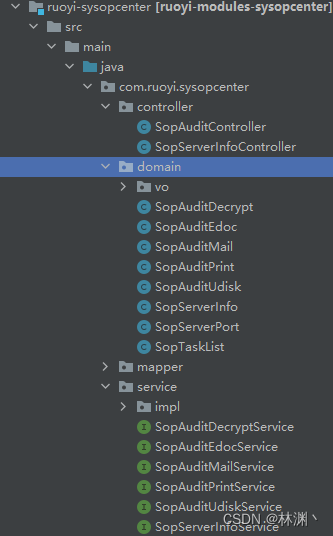
我的对应的目录结构如下
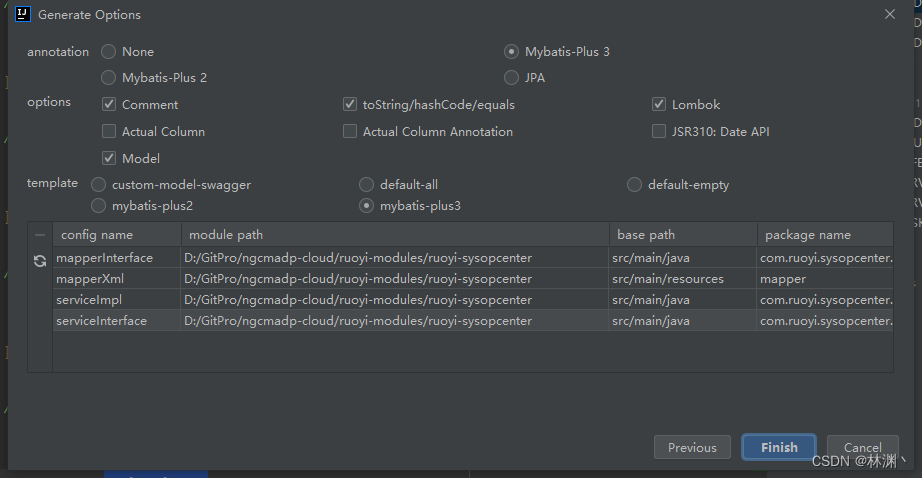
如图选择
- 在实体类上添加对应Excel注解,时间属性需要添加格式化注解
  /**
     * 操作时间
     */
    @Excel(name = "操作时间" ,dateFormat ="yyyy-MM-dd HH:mm:ss")
    @JsonFormat(pattern = "yyyy-MM-dd HH:mm:ss")
    private Date operateTime;

    /**
     * 操作备注
     */
    @Excel(name = "操作备注")
    private String operateComment;
- 新建Controller,查询、导入导出模板如下
    /**
     * 获取edoc列表
     *
     * @param sopAuditEdocInVo
     * @return
     */
    @GetMapping(value = "/edoc/list")
    public TableDataInfo edocInfo(SopAuditEdocInVo sopAuditEdocInVo) {
        startPage();
        QueryWrapper<SopAuditEdoc> queryWrapper = new QueryWrapper<>();
        queryWrapper.lambda()
                .like(StringUtils.isNotEmpty(sopAuditEdocInVo.getParentFolder()), SopAuditEdoc::getParentFolder, sopAuditEdocInVo.getParentFolder())
                .like(StringUtils.isNotEmpty(sopAuditEdocInVo.getOperateItem()), SopAuditEdoc::getOperateItem, sopAuditEdocInVo.getOperateItem())
                .like(StringUtils.isNotEmpty(sopAuditEdocInVo.getDepartment()), SopAuditEdoc::getDepartment, sopAuditEdocInVo.getDepartment())
                .like(StringUtils.isNotEmpty(sopAuditEdocInVo.getOperateType()), SopAuditEdoc::getOperateType, sopAuditEdocInVo.getOperateType())
                .like(StringUtils.isNotEmpty(sopAuditEdocInVo.getOperatorName()), SopAuditEdoc::getOperatorName, sopAuditEdocInVo.getOperatorName())
                .like(StringUtils.isNotEmpty(sopAuditEdocInVo.getIpAddress()), SopAuditEdoc::getIpAddress, sopAuditEdocInVo.getIpAddress())
                .like(sopAuditEdocInVo.getOperateTime() != null, SopAuditEdoc::getOperateTime, sopAuditEdocInVo.getOperateTime())
                .like(StringUtils.isNotEmpty(sopAuditEdocInVo.getOperateComment()), SopAuditEdoc::getOperateComment, sopAuditEdocInVo.getOperateComment())
                .ge(null != sopAuditEdocInVo.getStartTime(), SopAuditEdoc::getOperateTime, sopAuditEdocInVo.getStartTime())
                .le(null != sopAuditEdocInVo.getStartTime(), SopAuditEdoc::getOperateTime, sopAuditEdocInVo.getEndTime())
                .orderByDesc(SopAuditEdoc::getOperateTime);
        List<SopAuditEdoc> list = sopAuditEdocService.list(queryWrapper);
        return getDataTable(list);
    }

    /**
     * edoc数据导出
     *
     * @param response
     * @param sopAuditEdoc
     * @throws IOException
     */
    @Log(title = "审计数据", businessType = BusinessType.EXPORT)
//    @RequiresPermissions("system:edoc:export")
    @PostMapping("/edoc/export")
    public void export(HttpServletResponse response, SopAuditEdoc sopAuditEdoc) {
        List<SopAuditEdoc> list = sopAuditEdocService.list();
        ExcelUtil<SopAuditEdoc> util = new ExcelUtil<SopAuditEdoc>(SopAuditEdoc.class);
        util.exportExcel(response, list, "EDOC数据");
    }


    /**
     * edoc导入
     *
     * @param file
     * @param updateSupport
     * @return
     * @throws Exception
     */
    @Log(title = "EDOC数据", businessType = BusinessType.IMPORT)
    @PostMapping("/edoc/importData")
    public AjaxResult importData(@RequestParam("file") MultipartFile file, boolean updateSupport) throws Exception {
        ExcelUtil<SopAuditEdoc> util = new ExcelUtil<>(SopAuditEdoc.class);
        List<SopAuditEdoc> sopList = util.importExcel(file.getInputStream());
        String operName = SecurityUtils.getUsername();
        String message = sopAuditEdocService.importData(sopList, updateSupport, operName);
        return AjaxResult.success(message);
    }


    /**
     * 导入模板下载
     *
     * @param response
     */
    @PostMapping("/edoc/importTemplate")
    public void importTemplate(HttpServletResponse response) {
        ExcelUtil<SopAuditEdoc> util = new ExcelUtil<>(SopAuditEdoc.class);
        util.importTemplateExcel(response, "EDOC数据");
    }
- 为Service添加相应的导入方法
String importData(List<SopAuditEdoc> sopList, Boolean isUpdateSupport, String operName);
- 在impl实现方法
/**
 * @author ding.weijie
 * @description 针对表【SOP_AUDIT_EDOC(EDOC审计表)】的数据库操作Service实现
 * @createDate 2023-07-07 16:38:25
 */
@Service
public class SopAuditEdocServiceImpl extends ServiceImpl<SopAuditEdocMapper, SopAuditEdoc>
        implements SopAuditEdocService {

    @Autowired
    protected Validator validator;

//    @Autowired
//    private SopAuditEdocMapper sopAuditEdocMapper;

@Override
public String importData(List<SopAuditEdoc> sopList, Boolean isUpdateSupport, String operName) {
    // 检查sopList是否为空或为空列表
    if (StringUtils.isNull(sopList) || sopList.size() == 0) {
        throw new ServiceException("导入用户数据不能为空!");
    }
    int successNum = 0;
    int failureNum = 0;
    StringBuilder successMsg = new StringBuilder();
    StringBuilder failureMsg = new StringBuilder();
    // 遍历sopList中的每个SopAuditEdoc
    for (SopAuditEdoc eDoc : sopList) {
        try {
            // 使用validator验证eDoc
            BeanValidators.validateWithException(validator, eDoc);
            // 设置eDoc的createdBy、createdTime和uuid属性
            eDoc.setCreatedBy(operName);
            eDoc.setCreatedTime(new Date());
            eDoc.setUuid(UUID.randomUUID().toString());
            this.save(eDoc);
            successNum++;
//            successMsg.append("<br/>" + successNum + "、账号 " + eDoc.getUserName() + " 导入成功");
         } catch (Exception e) {
            failureNum++;
//            String msg = "<br/>" + failureNum + "、账号 " + eDoc.getUserName() + " 导入失败:";
//            failureMsg.append(msg + e.getMessage());
//            log.error(msg, e);
        }
    }
    if (failureNum > 0) {
        failureMsg.insert(0, "很抱歉,导入失败!共 " + failureNum + " 条数据格式不正确");
        throw new ServiceException(failureMsg.toString());
    } else {
        successMsg.insert(0, "恭喜您,数据已全部导入成功!共 " + successNum + " 条");
    }
    return successMsg.toString();
 }
}
前端
- 在对应的路径下新建js文件,完善请求路径
import request from '@/utils/request'

export function edocInfo(query) {
  return request({
    url: '/sysopcenter/edoc/list',
    method: 'get',
    params: query
  })
}


// 下载导入模板
export function importTemplate() {
  return request({
    url: '/sysopcenter/edoc/importTemplate',
    method: 'get'
  })
}
- 在对应的路径下创建vue文件
主要介绍对应的几个组件写法
搜索框
  <el-form :model="queryParams" ref="queryForm" size="small" :inline="true" v-show="showSearch" label-width="100px">
      <!-- 搜索 -->
      <el-form-item label="父级文件夹" prop="moduleName">
        <el-input v-model="queryParams.parentFolder" placeholder="请输入父级文件夹" clearable
          @keyup.enter.native="handleQuery" />
      </el-form-item>
      <el-form-item label="操作对象" prop="moduleName">
        <el-input v-model="queryParams.operateItem" placeholder="请输入操作对象" clearable @keyup.enter.native="handleQuery" />
      </el-form-item>
      <el-form-item label="部门" prop="moduleName">
        <el-input v-model="queryParams.department" placeholder="请输入部门" clearable @keyup.enter.native="handleQuery" />

      <el-form-item>
        <el-button type="primary" icon="el-icon-search" size="mini" @click="handleQuery">搜索</el-button>
        <el-button icon="el-icon-refresh" size="mini" @click="resetQuery">重置</el-button>
      </el-form-item>
列表
 <el-table v-loading="loading" :data="edocList">
      <el-table-column label="父级文件夹" align="center" prop="parentFolder" width="280">
      </el-table-column>
      <el-table-column label="操作对象" align="center" prop="operateItem" width="200">
      </el-table-column>
      <el-table-column label="部门" align="center" prop="department" width="80">
      </el-table-column>
    </el-table>
导入对话框
 <!-- 用户导入对话框 -->
    <el-dialog :title="upload.title" :visible.sync="upload.open" width="400px" append-to-body>
      <el-upload ref="upload" :limit="1" accept=".xlsx, .xls" :headers="upload.headers"
        :action="upload.url + '?updateSupport=' + upload.updateSupport" :disabled="upload.isUploading"
        :on-progress="handleFileUploadProgress" :on-success="handleFileSuccess" :auto-upload="false" drag>
        <i class="el-icon-upload"></i>
        <div class="el-upload__text">将文件拖到此处,或<em>点击上传</em></div>
        <div class="el-upload__tip text-center" slot="tip">
          <span>仅允许导入xls、xlsx格式文件。</span>
          <el-link type="primary" :underline="false" style="font-size:12px;vertical-align: baseline;"
            @click="importTemplate">下载模板</el-link>
        </div>
      </el-upload>
      <div slot="footer" class="dialog-footer">
        <el-button type="primary" @click="submitFileForm">确 定</el-button>
        <el-button @click="upload.open = false">取 消</el-button>
      </div>
    </el-dialog>
- 前端方法
 getList() {
        this.loading = true;
        if (null != this.dateRange && '' != this.dateRange) {
          this.queryParams["startTime"] = this.dateRange[0];
          this.queryParams["endTime"] = this.dateRange[1];
        }
        edocInfo(this.queryParams).then(response => {
          this.edocList = response.rows;
          this.total = response.total;
          this.loading = false;
        });
      },
      /** 下载模板操作 */
      importTemplate() {
        this.download('/sysopcenter/edoc/importTemplate', {}, `edoc_template_${new Date().getTime()}.xlsx`)
      },
      /** 导出按钮操作 */
      handleExport() {
        this.download('/sysopcenter/edoc/export', {
          ...this.queryParams
        }, `edoc_${new Date().getTime()}.xlsx`)
      },
      /** 导入按钮操作 */
      handleImport() {
        this.upload.title = "EDOC导入";
        this.upload.open = true;
      },
      // 文件上传中处理
      handleFileUploadProgress(event, file, fileList) {
        console.log("文件");
        console.log(file);
        this.upload.isUploading = true;
      },
      // 文件上传成功处理
      handleFileSuccess(response, file, fileList) {
        this.upload.open = false;
        this.upload.isUploading = false;
        this.$refs.upload.clearFiles();
        this.$alert("<div style='overflow: auto;overflow-x: hidden;max-height: 70vh;padding: 10px 20px 0;'>" + response
          .msg + "</div>", "导入结果", {
            dangerouslyUseHTMLString: true
          });
        this.getList();
      },
      // 提交上传文件
      submitFileForm() {
        this.$refs.upload.submit();
      },
        /** 重置按钮操作 */
      resetQuery() {
        this.resetForm('queryForm')
        // this.queryParams.systemName = ""
        this.queryParams = Object.assign({}, this.originalQuery)
        this.dateRange = []
        this.handleQuery()
      },
      /** 搜索按钮操作 */
      handleQuery() {
        this.queryParams.pageNum = 1
        this.getList()
      },
二、短信发送功能
此短信发送功能是由萍创编写,调用的是阿里云短信服务
- 服务端
其中通用方法实现,调用阿里云服务
	@Override
	public void sendMessageCommon(MessageRequestCache request) {
		//发送前先验证缓存中是否存在
		MessageRequestCache messageRequestCache = new MessageRequestCache();
		messageRequestCache.setTemplateCode(request.getTemplateCode());
		messageRequestCache.setPhoneNumber(request.getPhoneNumber());
		messageRequestCache.setSendType(0);
		verifyMessage(messageRequestCache);
		//发送短信
		System.out.println("短信发送" + request.getPhoneNumber() + request.getContent() + request.getTemplateCode());
		String result = sendSms(request.getPhoneNumber(), request.getContent(), request.getTemplateCode());
		if(StringUtils.isNotNull(result)){
			throw new ServiceException(result);
		}
		//存入缓存
		saveMessageCache(messageRequestCache);
	}
入参
public class MessageRequestCache extends AbstractBaseRequest {
    @ApiModelProperty("发送短信模板code")
    private String templateCode;
    @ApiModelProperty("手机号码")
    private String phoneNumber;
    @ApiModelProperty("发送类型:0-普通短信,1-验证码")
    private Integer sendType;
    @ApiModelProperty("发送短信的内容")
    private String content;
    @ApiModelProperty("发送数量-获取cache使用,不用填")
    private Integer sendCount = 0;
    }
controller层
@RestController
@RequestMapping("/phone/message")
@Api(tags = "短信消息管理")
public class MessageController {
    @Autowired
    private MessageServiceImpl messageService;
	/**
     * 发送短信
     * @Date: 2023/8/28
     **/
    @ApiOperation(value = "发送手机短信消息")
    @RequestMapping(value = "/sendMessage", method = RequestMethod.POST)
    public AjaxResult sendMessage(@RequestBody @Validated MessageRequestCache request) {
        messageService.sendMessageCommon(request);
        return AjaxResult.success();
    }
}
- 业务调用
最外层,拼一个json对象,属性就是短信模板的参数,这里常用一些用户api,获取一些用户信息,如下
Station destinationStation = stationRepository.getById(demand.getDestinationStationId());
	Factory departureFactory = factoryRepository.getById(demand.getDepartureFactoryId());
	Factory destinationFactory = factoryRepository.getById(demand.getDepartureFactoryId());
	String	phoneNumber = destinationStation.getStationPhone();
	JSONObject jsonObject = new JSONObject();
	jsonObject.put("order_id", order.getOrderNumber());
	jsonObject.put("publisher", remoteUserService.getUserInfoByUserId(demand.getCreateBy(), SecurityConstants.INNER).getData().getNickName());
	jsonObject.put("phone_number", remoteUserService.getUserInfoByUserId(demand.getCreateBy(), SecurityConstants.INNER).getData().getPhonenumber());
	String messageContent = String.format("订单%s已经配送完成,需求发布人: %s,联系电话: %s,请尽快运输!",
			jsonObject.getString("order_id"),
			jsonObject.getString("publisher"),
			jsonObject.getString("phone_number"));
	messageCoreService.createMessage(0, 2, jsonObject.toJSONString(), phoneNumber, order.getOrderNumber(), messageContent);
拼接一层message对象
  @Override
    public void createMessage(Integer sign, Integer type, String content, String phoneNumber, String number, String messageContent) {
        PhoneMessageRequest message = new PhoneMessageRequest();
        message.setType(type);
        message.setSign(sign);
        message.setPhoneNumber(phoneNumber);
        message.setContent(content); // 短信发送消息JSON
        message.setMessage(messageContent); //消息动态记录
        message.setNumber(number); //订单号 或 需求单号
        logger.info("正在发送消息给:{}", phoneNumber);
        messageRepository.createNewMessage(message);
    }
又拼了一层message对象(为了记录短信发送日志),最后调用接口,注意,remoteMessageService后的方法就是controller层写的post路径,temp最后转换为message模块的入参,两边类定义一定要一模一样
@Override
public void createNewMessage(PhoneMessageRequest request) {
    log.info("短信消息触发,原始订单编号:{},原始请求参数:{}", request.getNumber(), request.toString());
    Message message = new Message();
    message.setId(LongIdGenerator.generateStringId());
    message.setCreateBy(SecurityUtils.getUserId());
    message.setUpdateBy(SecurityUtils.getUserId());
    message.setCreateTime(LocalDateTime.now());
    message.setUpdateTime(LocalDateTime.now());
    message.setType(request.getType()); // 消息类型 0  订单分配消息  1  订单异常消息  2  订单完成消息
    message.setSign(request.getSign()); // 活动标识 0 创建订单  1 分配订单 2 确认提货  3 确认过磅运输 4  上报异常  5 配送完成
//        message.setUserId(request.getUserId()); // 发送用户ID
    message.setContent(request.getMessage()); // 消息内容
    message.setOrderNumber(request.getNumber()); // 订单编号/需求单号
    message.setRemark(request.getPhoneNumber());//手机号
    boolean result = this.saveOrUpdate(message);

    if (!result) {
        log.info("短信消息记录保存失败,原始订单编号:{},原始请求参数:{}", request.getNumber(), request.toString());
    } else {
        log.info("短信记录成功,原始订单编号:{}", request.getNumber());
    }

    MessageRequestCache messageRequestCache = new MessageRequestCache();
    messageRequestCache.setPhoneNumber(request.getPhoneNumber());
    messageRequestCache.setSendType(0);//0:普通短信,1:验证码
    messageRequestCache.setContent(request.getContent());
    if(request.getType()==0)//订单分配消息
    {
        messageRequestCache.setTemplateCode("SMS_269310092");
    }else if(request.getType()==2)//订单完成消息
    {
        messageRequestCache.setTemplateCode("SMS_462805439");
    }


    ExecutorService pool = Executors.newFixedThreadPool(1);
    pool.execute(new Runnable() {
        @Override
        public void run() {
            //远调发送短信方法
            try {
                com.ruoyi.message.api.domain.dto.MessageRequestCache temp = BeanUtil.copyProperties(messageRequestCache, com.ruoyi.message.api.domain.dto.MessageRequestCache.class);
                remoteMessageService.sendMessage(temp, SecurityConstants.INNER);
            } catch (Exception e) {
                log.info("短信消息发送失败,原始订单编号:{},原始请求参数:{}", request.getNumber(), request.toString());
                throw new ServiceException("短信发送失败");
            } finally {
                pool.shutdown();
            }
        }
    });
}
三、功能点汇总
1.按时间范围查询
- 前端写法:
主要使用el-date-picker组件,详细使用方法可以参考elemnt-UI官网,绑定的值类型定义为数组(dateRange: []),最后再传参前进行分割,注意格式化是必要的
value-format=“yyyy-MM-dd HH:mm:ss”,以下基本就是一个标准写法
 <el-form-item label="操作时间">
   <el-date-picker
           v-model="dateRange"
           value-format="yyyy-MM-dd HH:mm:ss"
           type="datetimerange"
           range-separator="至"
           start-placeholder="开始日期"
           end-placeholder="结束日期"
       >
       </el-date-picker>
 </el-form-item>
调用前分割
this.loading = true
if (null != this.dateRange && '' != this.dateRange) {
    this.queryParams['startTime'] = this.dateRange[0]
    this.queryParams['endTime'] = this.dateRange[1]
}
edocInfo(this.queryParams).then((response) => {
    this.edocList = response.rows
    this.total = response.total
    this.loading = false
})
- 后端写法
定义入参类,添加起止时间属性
@Data
public class SopAuditEdocInVo extends SopAuditEdoc {

    /**
     * 起始时间
     */
    @JsonFormat(pattern = "yyyy-MM-dd HH:mm:ss")
    private Date startTime;
    /**
     * 结束时间
     */
    @JsonFormat(pattern = "yyyy-MM-dd HH:mm:ss")
    private Date endTime;

}
查询条件拼入时间
 @GetMapping(value = "/edoc/list")
    public TableDataInfo edocInfo(SopAuditEdocInVo sopAuditEdocInVo) {
        startPage();
        QueryWrapper<SopAuditEdoc> queryWrapper = new QueryWrapper<>();
        queryWrapper.lambda()
                .ge(null != sopAuditEdocInVo.getStartTime(), SopAuditEdoc::getOperateTime, sopAuditEdocInVo.getStartTime())
                .le(null != sopAuditEdocInVo.getStartTime(), SopAuditEdoc::getOperateTime, sopAuditEdocInVo.getEndTime())
                .orderByDesc(SopAuditEdoc::getOperateTime);
        List<SopAuditEdoc> list = sopAuditEdocService.list(queryWrapper);
        return getDataTable(list);
    }
2.服务间Feign调用
在ruoyi-api模块配置远端服务
@FeignClient(contextId = "remoteMessageService", value = ServiceNameConstants.MESSAGE_SERVICE, fallbackFactory = RemoteMessageFallbackFactory.class)
public interface RemoteMessageService {
    /**
     * 发送短信
     * @param request 消息内容
     * @param source 请求来源
     * @return
     */
    @PostMapping("/phone/message/sendSMS")//其他服务调用地址
    AjaxResult sendSMS(@RequestBody @Validated SaveMessageRequest request, @RequestHeader(SecurityConstants.FROM_SOURCE) String source);
    }
XML文件in方法写法
<if test="orderStatusList != null and orderStatusList.size() > 0" >
  and s.order_status in
  <foreach item="item" index="index" collection="orderStatusList" open="(" separator="," close=")">
      #{item}
  </foreach>
</if>
orderStatusList 为入参,类型是List,forach写法固定,collection属性写入参即可
get和post前后端传参
post请求
前端js中定义
export function postTest(query) {
  return request({
    url: '/sysopcenter/postTest',  // 路径
    method: 'post',
    data: query //参数
  })
}
在vue中引用,先import js中的方法
import {
  postTest,
  getTest
} from "@/api/sysopcenter/audit";

----------------------------------------------

    /** post操作 */
    handlePost() {
      postTest(this.queryParams).then((res) => {
        this.loading = true;
        console.log(res)
        if (res.code === 200) {
          this.loading = false;
          this.$message.success("成功");
        } else {
          this.loading = false;
          this.$message.error("失败");
        }
      });
    },
浏览器请求
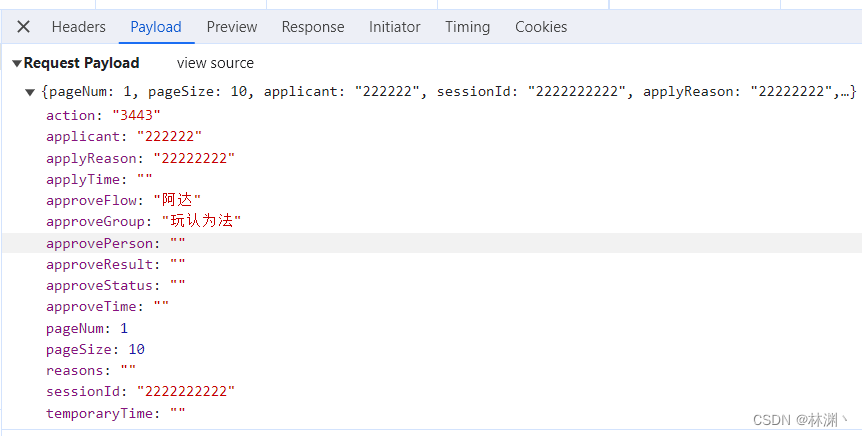
后端接收参数
- 用对象接参
	@PostMapping("/postTest")
	public AjaxResult postTest(@RequestBody SopAuditDecryptInVo sopAuditDecryptInVo) {
			String a = "123";
			return AjaxResult.success();
	}
注意:post请求注解要写@PostMapping(“路径”),用json字符串传参,可以用对象直接获取,加@RequestBody前缀
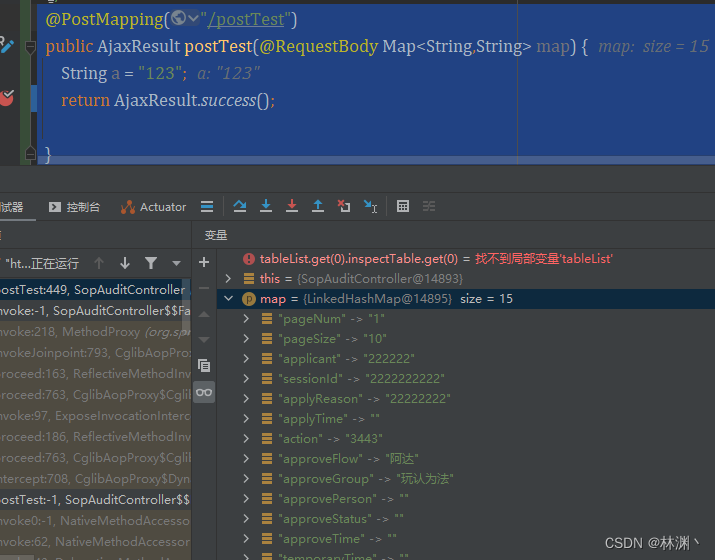
- 用map接参
	@PostMapping("/postTest")
	public AjaxResult postTest(@RequestBody Map<String,String> map) {
			String a = "123";
			return AjaxResult.success();
	}
get请求
前端js定义
注意和post请求的区分,这里参数定义的是params,而post写的是data
export function getTest(query) {
  return request({
    url: '/sysopcenter/getTest',  // 路径
    method: 'get',
    params: query //参数
  })
}
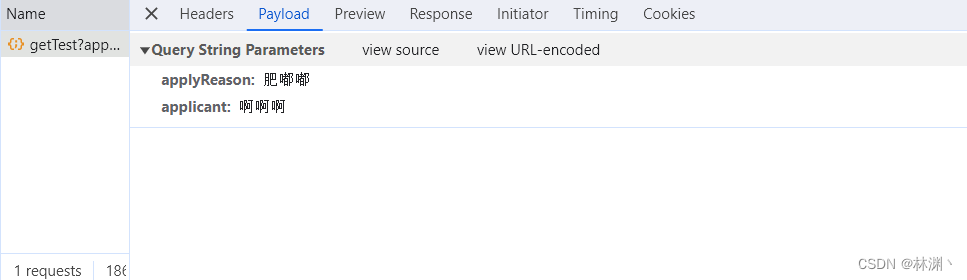
vue中使用
- 直接拼接参数,可以写多个参数,以逗号分隔,会自动拼接到url中
  /** get操作 */
    handleGet() {
      getTest({
        applyReason: this.queryParams.applyReason,
        applicant: this.queryParams.applicant,
      }).then((res) => {
        this.loading = true;
        console.log(res);
        if (res.code === 200) {
          this.loading = false;
          this.$message.success("成功");
        } else {
          this.loading = false;
          this.$message.error("失败");
        }
      });
    },
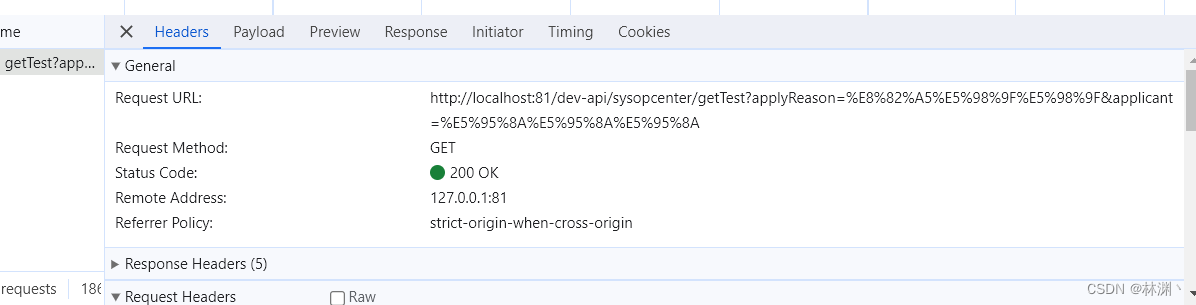
后台接收参数
@RequestParam可写可不写,重点是参数名一致;直接用对象接参数也可,只要对象中有对应的属性。(实测map不可以)
	@GetMapping("/getTest")
	public AjaxResult getTest(@RequestParam  String applyReason,@RequestParam  String applicant) {
		String a = "123";
		return AjaxResult.success();

	}

	@GetMapping("/getTest")
	public AjaxResult getTest(SopAuditDecryptInVo sopAuditDecryptInVo) {
		String a = "123";
		return AjaxResult.success();

	}
直接通过url传参
1、直接手动拼接url
export function getTest(id,name) {
  return request({
    url: '/sysopcenter/getTest?id=' + id+'&name='+name,
    method: 'get',
  })
}
2、Restful风格传递参数,比如:/xxx/ccc/vvv/{参数名}
export function getTest(id) {
  return request({
    url: '/sysopcenter/getTest/' + id,
    method: 'get',
  })
}
后端接收写@PathVariable注解
@GetMapping("/getTest/{id}")
	public AjaxResult getTest(@PathVariable("id" String id)) {
		String a = "123";
		return AjaxResult.success();

	}
注意点
-
form-data、x-www-form-urlencoded:不可以用@RequestBody;可以用@RequestParam
-
application/json:json字符串部分可以用@RequestBody;url中的?后面参数可以用@RequestParam
-
在GET请求中,不能使用@RequestBody。 在POST请求,可以使用@RequestBody和@RequestParam;
-
可以使用多个@RequestParam获取数据,@RequestBody不可以;
-
参数在url中时,使用@PathVariable
-
接口规范为resultful风格时,举个例子:如果要获取某个id下此条问题答案的查询次数的话,则后台就需要动态获取参数,其注解为@PathVariable,并且requestMapping中的value应为value=“/{id}/queryNum”,截图如下:
put请求(UNIApp中)
前端定义接口
export function updatePwd({oldPassword, newPassword}){
	return request(`/system/user/profile/updatePwd?oldPassword=${oldPassword}&newPassword=${newPassword}`, {}, 'put');
}
前端使用接口,此参数为结构体,包含以上属性
updatePwd(this.updPwd).then(res => {
						this.showToast('修改密码成功')
						setTimeout(() => {
							uni.navigateBack();
						}, 1000)
					})
后端接口定义
	@PutMapping("/updatePwd")
    public AjaxResult updatePwd(String oldPassword, String newPassword)
    {
		//逻辑

	}
遇到问题及其解决方案
-
在实体类中添加@Data注解后启动时编译报错 java:找不到符号 getFrom()
- 首先检查是否启用安装lombok插件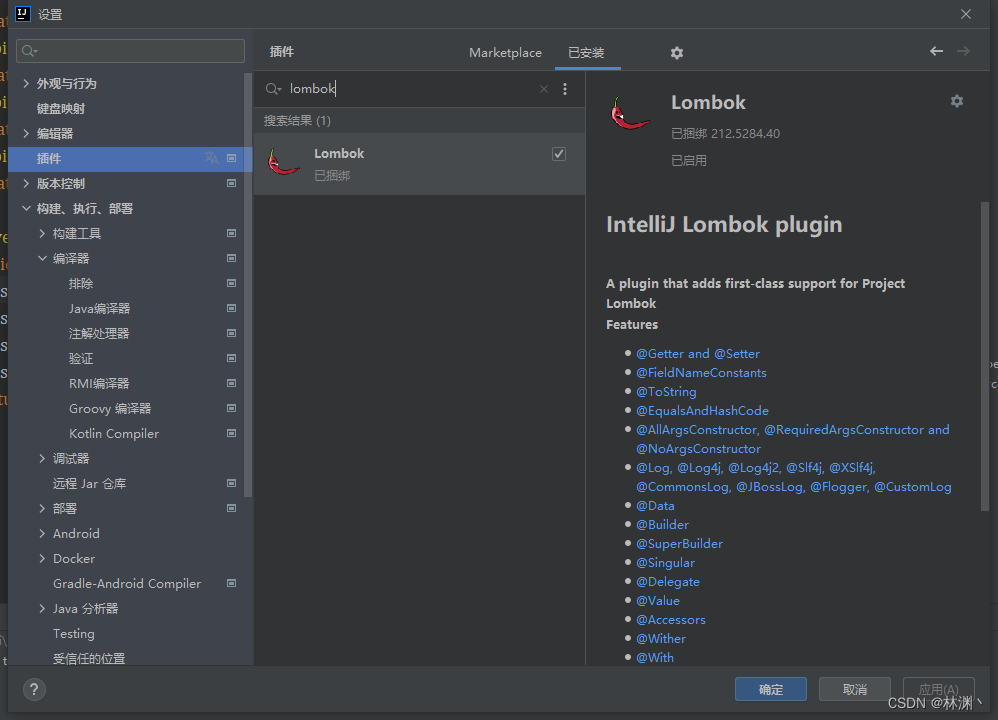
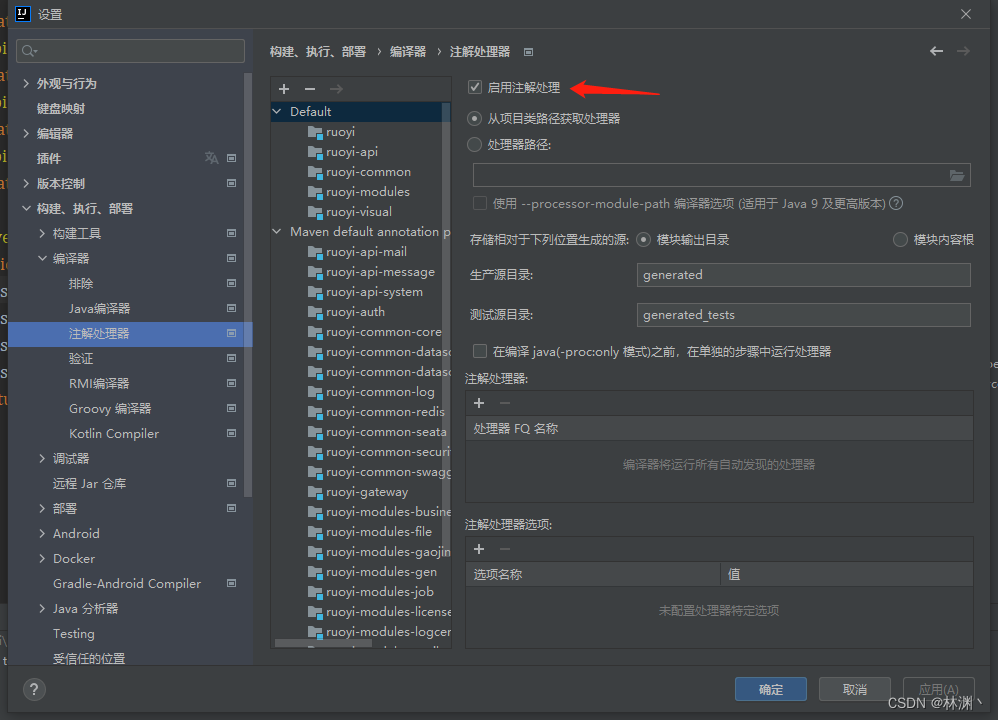
- 检查是否启用注解处理
- 对应的pom文件中,lombok的版本是否一致
- 更新maven依赖
-
启动服务报错,端口被占用appears to have started a thread named [InterruptTimer] but has failed to stop it. This is very likely to create a memory leak. Stack trace of thread
-
检查nacos是否配置了此服务,没有则重新配置

-
检查新的服务的启动配置是否添加了nacos路径
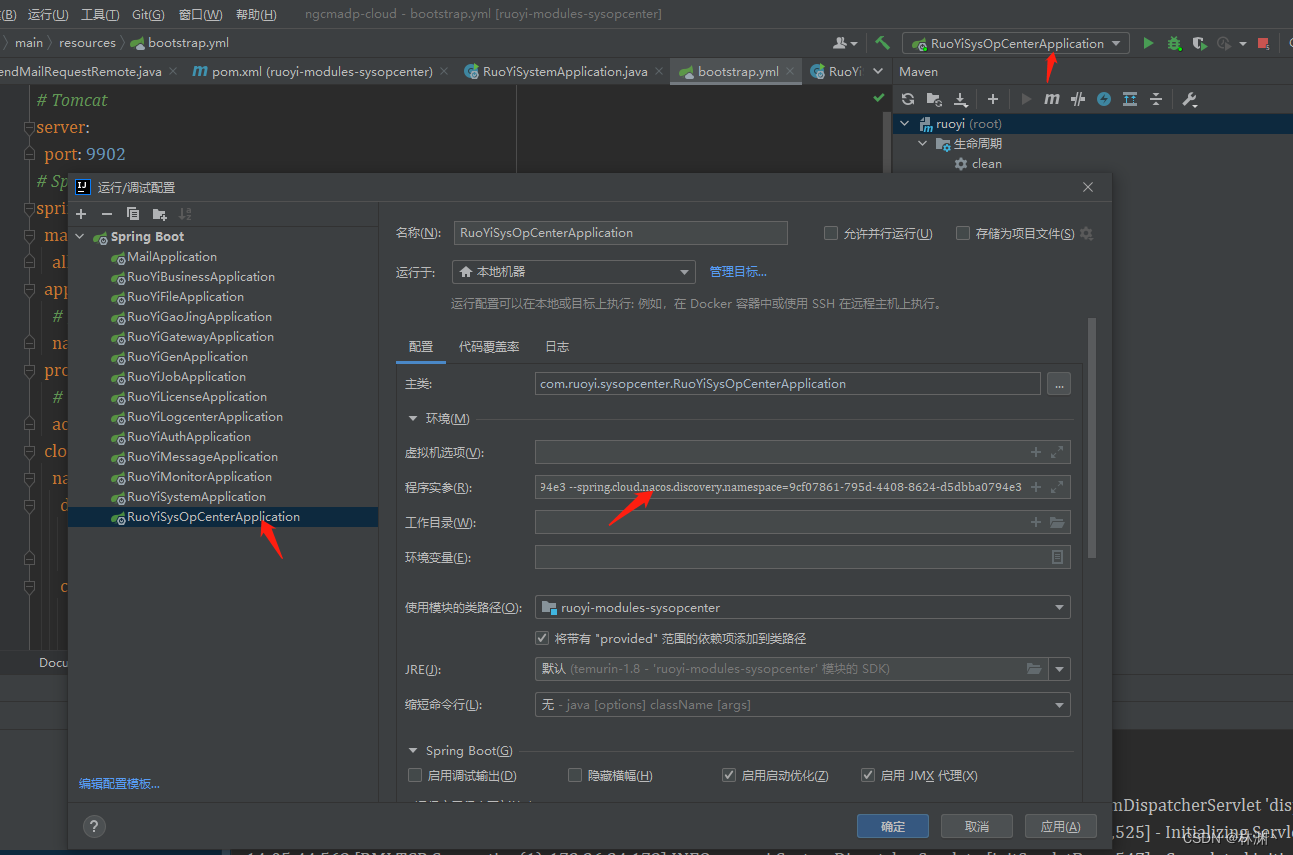
-
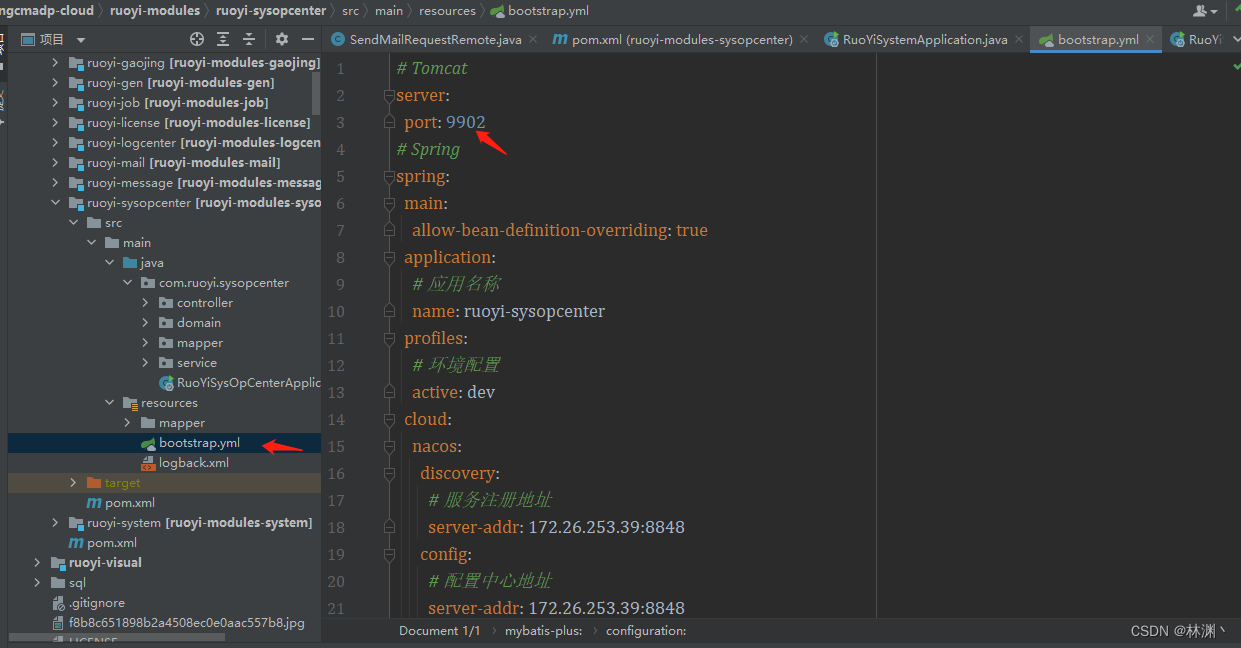
检查bootstrap.yml文件配置的端口号是否冲突
- 前端启动时报This dependency was not found @/api/system/INFO的错误
全文搜索@/api/system/INFO此依赖,检查依赖路径是否正确 - 一直报404 NOT FOUND错误

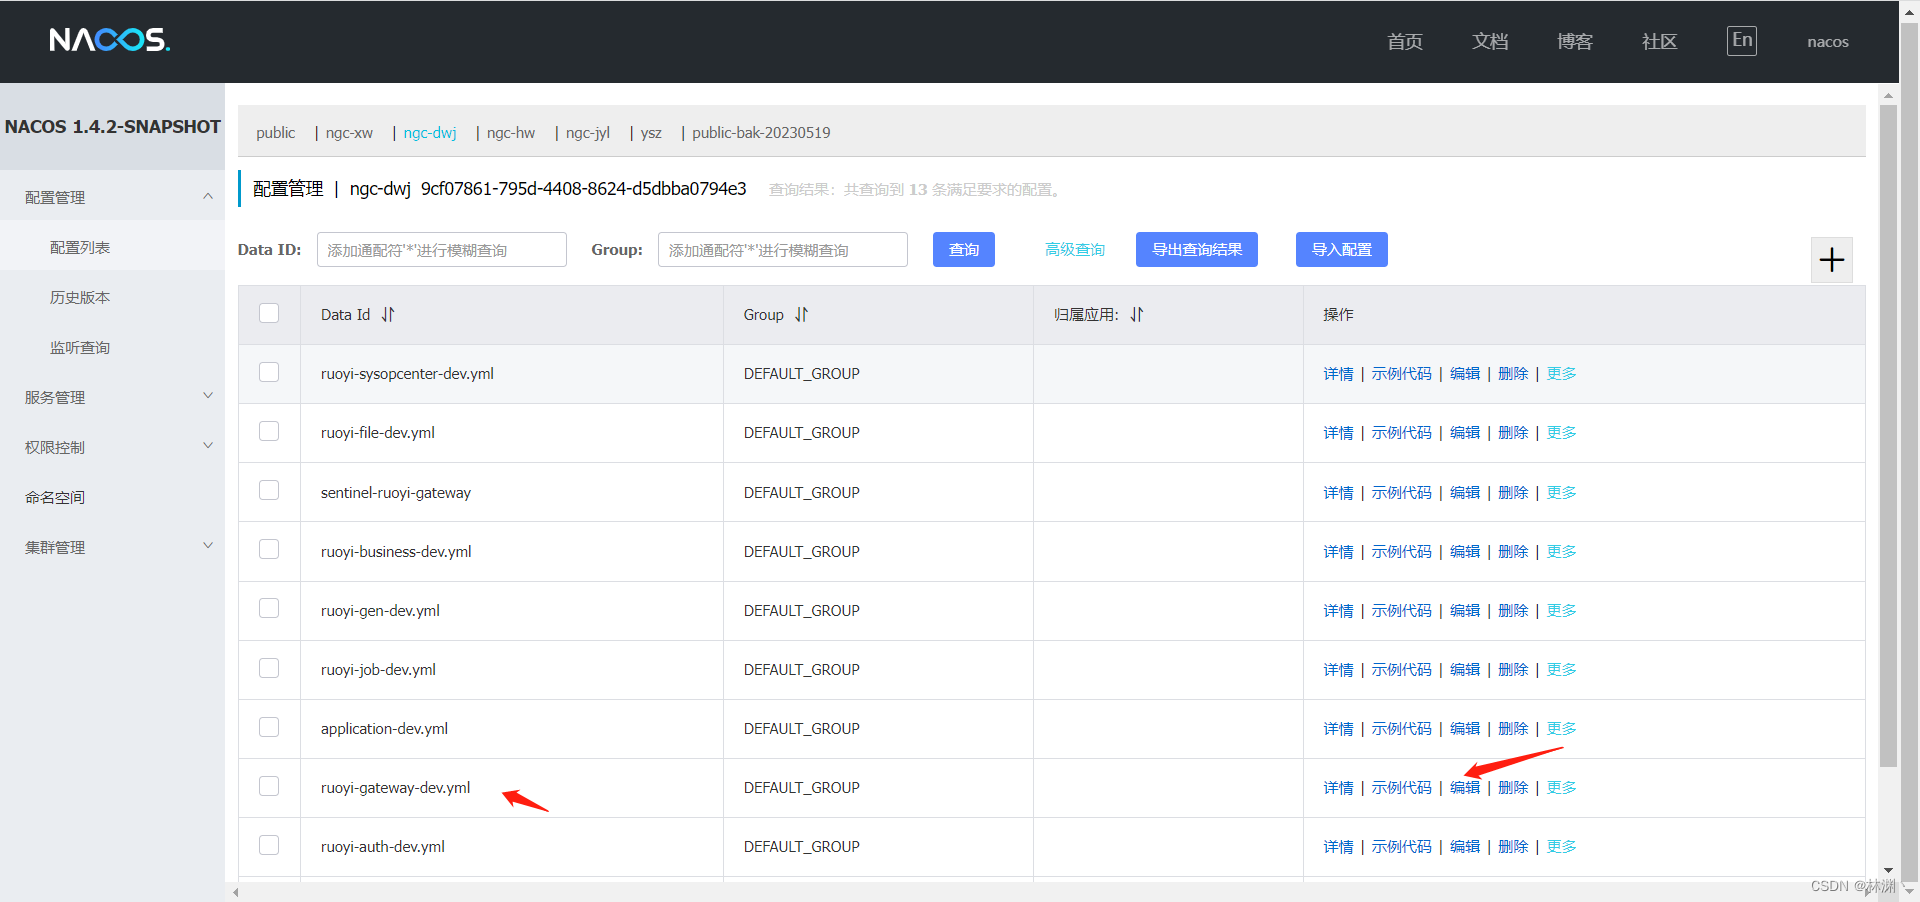
优先检查nacos的gateway服务是否注册了此服务的路径
spring:
  redis:
    host: 172.26.253.18
    port: 6379
    password: NGCrds135
  cloud:
    gateway:
      discovery:
        locator:
          lower-case-service-id: true
          enabled: true
      routes:
        - id: ruoyi-auth
          uri: lb://ruoyi-auth
          predicates:
            - Path=/auth/**
          filters:
        #验证码处理
            - CacheRequestFilter
            - ValidateCodeFilter
            - StripPrefix=1
        #代码生成
        - id: ruoyi-gen
          uri: lb://ruoyi-gen
          predicates:
            - Path=/code/**
          filters:
            - StripPrefix=1
        # 定时任务
        - id: ruoyi-job
          uri: lb://ruoyi-job
          predicates:
            - Path=/schedule/**
          filters:
            - StripPrefix=1
        # 系统模块
        - id: ruoyi-system
          uri: lb://ruoyi-system
          predicates:
            - Path=/system/**
          filters:
            - StripPrefix=1
          # 邮件服务
        - id: ruoyi-mail
          uri: lb://ruoyi-mail
          predicates:
            - Path=/mail/**
          filters:
            - StripPrefix=1
          # 短信服务
        - id: ruoyi-message
          uri: lb://ruoyi-message
          predicates:
            - Path=/message/**
          filters:
            - StripPrefix=1
        # 文件服务
        - id: ruoyi-file
          uri: lb://ruoyi-file
          predicates:
            - Path=/file/**
          filters:
            - StripPrefix=1
        # 业务系统
        - id: ruoyi-business
          uri: lb://ruoyi-business
          predicates:
            - Path=/business/**
          filters:
            - StripPrefix=1
             # 高精业务系统
        - id: ruoyi-gaojing
          uri: lb://ruoyi-gaojing
          predicates:
            - Path=/gaojing/**
          filters:
            - StripPrefix=1
            # 许可证管理模块
        - id: ruoyi-license
          uri: lb://ruoyi-license
          predicates:
            - Path=/license/**
          filters:
            - StripPrefix=1
        # 内部运维模块
        - id: ruoyi-sysopcenter
          uri: lb://ruoyi-sysopcenter
          predicates:
            - Path=/sysopcenter/**
          filters:
            - StripPrefix=1
            # 订单测试服务addby20230324
        - id: order-service
          uri: lb://order-service
          predicates:
            - Path=/order/**
          filters:
            - StripPrefix=1
         # 日志中心 add 20230704 xuwei
        - id: ruoyi-logcenter
          uri: lb://ruoyi-logcenter
          predicates:
            - Path=/logcenter/**
          filters:
            - StripPrefix=1
        # 安全配置
  datasource:
    druid:
      stat-view-servlet:
        enabled: true
        login-username: admin
        login-password: 123456
      initial-size: 5
      min-idle: 5
      max-active: 20
      max-wait: 60000
      time-between-eviction-runs-millis: 60000
      min-evictable-idle-time-millis: 300000
      validation-query: SELECT 1 FROM DUAL
      test-while-idle: true
      test-on-borrow: false
      test-on-return: false
      pool-prepared-statements: true
      max-pool-prepared-statement-per-connection-size: 20
      filters: stat,slf4j
      connection-properties: druid.stat.mergeSql=true;druid.stat.slowSqlMillis=5000;
    dynamic:
      primary: master
      strict: false
      datasource:
        master:
          type: com.alibaba.druid.pool.DruidDataSource
          driverClassName: oracle.jdbc.OracleDriver
          url: jdbc:oracle:thin:@172.26.253.39:1521:orcl
          username: MADPUSER
          password: NGCmadp01#
  mybatis-plus:
    mapper-locations: classpath*:mapper/*.xml
    configuration:
      log-impl: org.apache.ibatis.logging.stdout.StdOutImpl #??sql??
    #    jdbc-type-for-null: varchar
    type-aliases-package: com.ruoyi.**.domain
    global-config:
      db-config:
        logic-delete-field: deleted
        logic-delete-value: "sysdate"
        logic-not-delete-value: "null"
security:
  captcha:
    enabled: true
    type: math
  xss:
    enabled: true
    excludeUrls:
      - /system/notice
      - /gaojing/cases
      - /gaojing/problem
      - /gaojing/cases/*
      - /gaojing/problem/*
      - /gaojing/PRODUCT/INFO
      - /gaojing/NEWS/INFO

  ignore:
    whites:
      - /auth/logout
      - /auth/login
      - /auth/register
      - /auth/registerpass
      - /*/v2/api-docs
      - /csrf
      - /auth/authCode
      - /auth/loginByPhone
      - /auth/recoveryPassword
      - /auth/recoveryPasswordMD5
      - /auth/signInByPhone
      - /auth/getOpenId
      - /auth/registerH5
      - /auth/logonByPhone
      - /gaojing/huijian/*
      - /gaojing/mobile/dealer/search
      - /gaojing/mobile/information/download
      - /gaojing/mobile/solution/download
      - /gaojing/mobile/industry/sample
      - /gaojing/mobile/industry/sample/apply/save
      - /gaojing/mobile/product/list
      - /gaojing/mobile/product/detail
      - /gaojing/mobile/corporate/news
      - /gaojing/mobile/service/center
      - /order/placeOrder/order
      - /gaojing/mobile/corporate/news/search
      - /gaojing/mobile/product/search
      - /message/phone/message/sendAuthCode


version:
  gaojingback: 1.0
  gaojingFront: 1.0
  authBack: 1.0
  authFront: 1.0
  businessBack: 1.0
  businessFront: 1.0
  fileBack: 1.0
  fileFront: 1.0
  genBack: 1.0
  genFront: 1.0
  jobBack: 1.0
  jobFront: 1.0
  mailBack: 1.0
  mailFront: 1.0
  messageBack: 1.0
  messageFront: 1.0
  systemBack: 1.0
  systemFront: 1.0
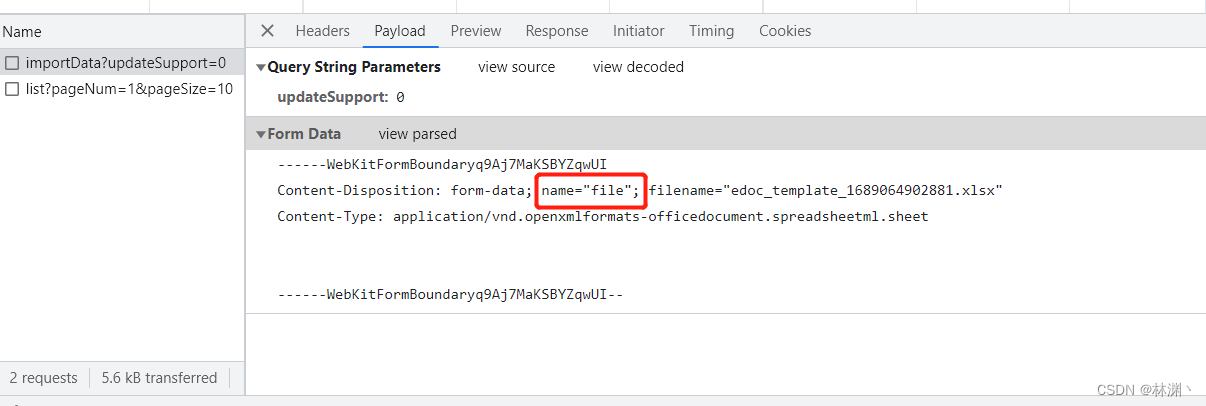
- springBoot上传文件时MultipartFile报null
- 前端传参的参数名和后端形参需要一致

- 加入配置类将传入的file对象转化为MultipartFile类型
import org.springframework.context.annotation.Bean;
import org.springframework.context.annotation.Configuration;
import org.springframework.web.multipart.MultipartResolver;
import org.springframework.web.multipart.commons.CommonsMultipartResolver;


@Configuration
public class UploadConfig {
    //显示声明CommonsMultipartResolver为mutipartResolver
    @Bean(name = "multipartResolver")
    public MultipartResolver multipartResolver() {
        CommonsMultipartResolver resolver = new CommonsMultipartResolver();
        resolver.setDefaultEncoding("UTF-8");
        //resolveLazily属性启用是为了推迟文件解析,以在在UploadAction中捕获文件大小异常
        resolver.setResolveLazily(true);
        resolver.setMaxInMemorySize(40960);
        //上传文件大小 5M 5*1024*1024
        resolver.setMaxUploadSize(5 * 1024 * 1024);
        return resolver;
    }

}
在springboot启动类上加上注解,排除原有的Multipart配置
//排除原有的Multipart配置
@EnableAutoConfiguration(exclude = {MultipartAutoConfiguration.class})
public class Application extends SpringBootServletInitializer {
	public static void main(String[] args) {
		SpringApplication.run(Application.class, args);
	}
}
特别注意Controller接收的时候一定要加上@RequestParam,否则不可用,如下所示:
    @Log(title = "EDOC数据", businessType = BusinessType.IMPORT)
    @PostMapping("/importData")
    public AjaxResult importData(@RequestParam("file") MultipartFile file, boolean updateSupport) throws Exception {
        ExcelUtil<SopAuditEdoc> util = new ExcelUtil<>(SopAuditEdoc.class);
        List<SopAuditEdoc> sopList = util.importExcel(file.getInputStream());
        String operName = SecurityUtils.getUsername();
        String message = sopAuditEdocService.importData(sopList, updateSupport, operName);
        return AjaxResult.success(message);
    }
- 如果说还是不行就可能项目中的file拦截器做了http请求处理或者做了请求转化,如果是因为这个下面解决方式重写方法
(请自行搜索您项目中Filter的拦截类,以下针对自己的项目中的请求)详情见CSDN-springBoot上传文件时MultipartFile报null 空 问题解决方法
- 报错nested exception is org.apache.ibatis.type.TypeException: Could not set parameters for mapping
一般是由于mapper的xml里的sql定义了入参属性,但是并没有拿到相应的值
报错解决方法原文


 4617
4617


 被折叠的 条评论
为什么被折叠?
被折叠的 条评论
为什么被折叠?
 到【灌水乐园】发言


