


一、Docker简介
1.官网
Docker官网: https://www.docker.com/
Docker文档地址:https://docs.docker.com/
Docker仓库地址:https://hub.docker.com/
2.传统虚拟机和容器的对比
传统虚拟机包含一整套完整的计算机结构,而容器则只保存必要的环境,保证最小的轻量化
(1)docker有着比虚拟机更少的抽象层
由于docker不需要Hypervisor(虚拟机)实现硬件资源虚拟化,运行在docker容器上的程序直接使用的都是实际物理机的硬件资源。因此在CPU、内存利用率上docker将会在效率上有明显优势。
(2)docker利用的是宿主机的内核,而不需要加载操作系统OS内核
当新建一个容器时,docker不需要和虚拟机一样重新加载一个操作系统内核。进而避免引寻、加载操作系统内核返回等比较费时费资源的过程,当新建一个虚拟机时,虚拟机软件需要加载OS,返回新建过程是分钟级别的。而docker由于直接利用宿主机的操作系统,则省略了返回过程,因此新建一个docker容器只需要几秒钟。
3.Docker三要素
| 镜像(image) | Docker 镜像(Image)就是一个只读的模板。镜像可以用来创建 Docker 容器,一个镜像可以创建很多容器。 |
|---|---|
| 容器(container) | 容器是用镜像创建的运行实例 |
| 仓库(repository) | 仓库(Repository)是集中存放镜像文件的场所 |
当我们启动镜像文件的时候,会经历下面的判断

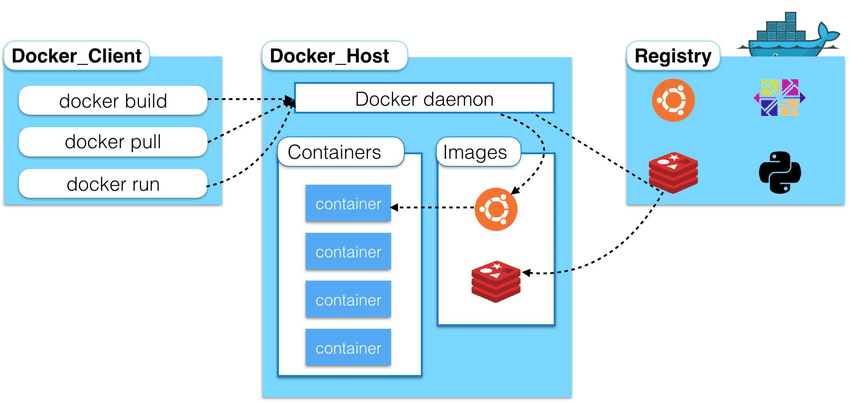
4.Docker平台架构图解
Docker 是一个 C/S 模式的架构,后端是一个松耦合架构,众多模块各司其职


二、Docker安装
1.安装步骤
Centos7安装Docker方式官网地址: https://docs.docker.com/engine/install/centos/
0 安装基础环境
yum -y install gcc
yum -y install gcc-c++

1 安装软件库
yum install -y yum-utils

2 设置稳定的存储库
(国外仓库)yum-config-manager --add-repo https://download.docker.com/linux/centos/docker-ce.repo
(阿里云仓库)yum-config-manager --add-repo http://mirrors.aliyun.com/docker-ce/linux/centos/docker-ce.repo

3 更新yml软件包索引
(官网没有推荐,自己配置的)
yum makecache fast

4 安装Docker引擎(可能有点慢)
yum install -y docker-ce docker-ce-cli containerd.io

5 安装完成之后查看版本
docker version

6 启动
systemctl start docker
2.配置阿里云镜像加速
1)登录阿里云平台,登录个人账号,然后进入控制台,搜索 容器镜像服务

2)获取自己的阿里云镜像加速地址

3)按照下文的方式配置即可

4)配置步骤
1 创建配置文件目录
mkdir -p /etc/docker

2 配置压缩地址(将内容写入到文件中)
tee /etc/docker/daemon.json <<-'EOF'
{
  "registry-mirrors": ["https://bc0ogk7n.mirror.aliyuncs.com"]
}
EOF

3 重新加载配置文件
systemctl daemon-reload

4 重启docker
systemctl restart docker
5)查看是否成功
docker info

三、Docker基本命令
1.帮助启动命令
| 命令 | 信息 |
|---|---|
| docker version | 查看版本 |
| docker info | 查看docker具体信息 |
| docker --help | 总体帮助文档 |
| docker 具体命令 --help | 命令帮助文档 |
| systemctl start docker | 启动docker |
| systemctl stop docker | 停止docker |
| systemctl restart docker | 重启docker |
| systemctl status docker | 查看docker状态 |
| systemctl enable docker | 开机启动 |
2.镜像命令
1)查看本地镜像
docker images
    查询结果表格字段:镜像仓库源(REPOSITORY)、标签版本号(TAG)、镜像ID(IMAGE ID)、镜像创建时间(CREATED)、镜像大小(SIZE)
    -a: 列出本地所有的镜像(含中间映像层)
    -q: 只显示镜像Id
    --digests :显示镜像的摘要信息
    --no-trunc :显示完整的镜像信息

2)搜索镜像
docker search 镜像名
    查询结果表格字段:镜像名称(NAME)、镜像说明(DESCRIPTION)、点赞数量(STARS)、是否官网(OFFICIAL)、是否自动构建(AUTOMATED)
	--no-trunc : 显示完整的镜像描述
    --limit 只列出N个镜像,默认25个
	-s : 列出收藏数不小于指定值的镜像。
	--automated : 只列出 automated build类型的镜像;

3)镜像下载
docker pull 镜像名[:TAG]
    没有TAG就是最新版,等价于docker pull 镜像名称:latest

4)镜像删除
docker rmi
    删除一个: docker rmi -f 镜像ID
    删除多个: docker rmi -f 镜像名1:TAG 镜像名2:TAG
    删除全部: docker rmi -f $(docker images -qa)

5)查看镜像/容器/数据卷所占的空间
docker system df
3.容器命令
1)新建并启动容器
docker run [OPTIONS] IMAGE [COMMAND] [ARG...]
	OPTIONS说明(常用):有些是一个减号,有些是两个减号
        --name="容器新名字": 为容器指定一个名称;
        -d: 后台运行容器,并返回容器ID,也即启动守护式容器;
        -i:以交互(interavtive)模式运行容器,通常与 -t 同时使用;
        -t:为容器重新分配一个伪输入终端,通常与 -i 同时使用;
        -P: 随机端口映射;
        -p: 指定端口映射,有以下四种格式
              ip:hostPort:containerPort
              ip::containerPort
    【前台交互式启动】docker run -it 容器
    【后台守护式启动】docker run -d 容器

2)查看正在运行的容器
docker ps [OPTIONS]
	OPTIONS说明(常用):
        -a :列出当前所有正在运行的容器+历史上运行过的
        -l :显示最近创建的容器。
        -n:显示最近n个创建的容器。
        -q :静默模式,只显示容器编号。

3)退出容器
	exit 容器停止并退出
	ctrl+P+Q 容器不停止退出

4)进入正在运行的容器并以命令行交互
	 docker exec -it 容器ID /bin/bash 【推荐】  (exec 是在容器中打开新的终端,并且可以启动新的进程,用exit退出,不会导致容器的停止)
	 docker attach 容器ID	                     (attach 直接进入容器启动命令的终端,不会启动新的进程,用exit退出,会导致容器的停止)

5)启动已停止运行的容器
	docker start 容器ID/容器名

6)重启重启
	docker restart 容器ID/容器名

7)停止容器
	docker stop 容器ID/容器名

8)强制停止容器
	docker kill 容器ID/容器名

9)删除已停止的容器
	删除一个: docker rm 容器ID
	删除多个: docker rm -f $(docker ps -a -q)

10)查看容器日志
    docker logs [OPTIONS] 容器ID
		-t 是加入时间戳
		-f 跟随最新的日志打印
		--tail 数字 显示最后多少条
     [常用]docker logs -f -t --tail 容器ID

11)查看容器内运行的进程
 	docker top 容器ID

12)查看容器内部细节
	docker inspect 容器ID

13)从容器内拷贝文件到主机上
	docker cp  容器ID:容器内路径 目的主机路径

14)导入和导出容器
     导出: docker export 容器ID > 文件名.tar
     导入: cat 文件名.tar | docker import - 镜像用户/镜像名:镜像版本号
4.容器命令 help命令查看
attach    Attach to a running container                 # 当前 shell 下 attach 连接指定运行镜像
build     Build an image from a Dockerfile              # 通过 Dockerfile 定制镜像
commit    Create a new image from a container changes   # 提交当前容器为新的镜像
cp        Copy files/folders from the containers filesystem to the host path   #从容器中拷贝指定文件或者目录到宿主机中
create    Create a new container                        # 创建一个新的容器,同 run,但不启动容器
diff      Inspect changes on a container's filesystem   # 查看 docker 容器变化
events    Get real time events from the server          # 从 docker 服务获取容器实时事件
exec      Run a command in an existing container        # 在已存在的容器上运行命令
export    Stream the contents of a container as a tar archive   # 导出容器的内容流作为一个 tar 归档文件[对应 import ]
history   Show the history of an image                  # 展示一个镜像形成历史
images    List images                                   # 列出系统当前镜像
import    Create a new filesystem image from the contents of a tarball # 从tar包中的内容创建一个新的文件系统映像[对应export]
info      Display system-wide information               # 显示系统相关信息
inspect   Return low-level information on a container   # 查看容器详细信息
kill      Kill a running container                      # kill 指定 docker 容器
load      Load an image from a tar archive              # 从一个 tar 包中加载一个镜像[对应 save]
login     Register or Login to the docker registry server    # 注册或者登陆一个 docker 源服务器
logout    Log out from a Docker registry server          # 从当前 Docker registry 退出
logs      Fetch the logs of a container                 # 输出当前容器日志信息
port      Lookup the public-facing port which is NAT-ed to PRIVATE_PORT    # 查看映射端口对应的容器内部源端口
pause     Pause all processes within a container        # 暂停容器
ps        List containers                               # 列出容器列表
pull      Pull an image or a repository from the docker registry server   # 从docker镜像源服务器拉取指定镜像或者库镜像
push      Push an image or a repository to the docker registry server    # 推送指定镜像或者库镜像至docker源服务器
restart   Restart a running container                   # 重启运行的容器
rm        Remove one or more containers                 # 移除一个或者多个容器
rmi       Remove one or more images             # 移除一个或多个镜像[无容器使用该镜像才可删除,否则需删除相关容器才可继续或 -f 强制删除]
run       Run a command in a new container              # 创建一个新的容器并运行一个命令
save      Save an image to a tar archive                # 保存一个镜像为一个 tar 包[对应 load]
search    Search for an image on the Docker Hub         # 在 docker hub 中搜索镜像
start     Start a stopped containers                    # 启动容器
stop      Stop a running containers                     # 停止容器
tag       Tag an image into a repository                # 给源中镜像打标签
top       Lookup the running processes of a container   # 查看容器中运行的进程信息
unpause   Unpause a paused container                    # 取消暂停容器
version   Show the docker version information           # 查看 docker 版本号
wait      Block until a container stops, then print its exit code   # 截取容器停止时的退出状态值
四、Docker镜像
镜像是一种轻量级、可执行的独立软件包,它包含运行某个软件所需的所有内容,我们把应用程序和配置依赖打包好形成一个可交付的运行环境(包括代码、运行时需要的库、环境变量和配置文件等),这个打包好的运行环境就是image镜像文件。
1.Docker镜像分层
当我们通过pull拉取镜像,在下载的过程中我们可以看到docker的镜像好像是在一层一层的下载,这就是镜像分层,它在底层使用了联合文件系统(UnionFS)
Docker中的镜像分层,支持通过扩展现有镜像,创建新的镜像。类似Java继承于一个Base基础类,自己再按需扩展。新镜像是从 base 镜像一层一层叠加生成的。每安装一个软件,就在现有镜像的基础上增加一层

2.UnionFS联合文件系统
UnionFS(联合文件系统):Union文件系统(UnionFS)是一种分层、轻量级并且高性能的文件系统,它支持对文件系统的修改作为一次提交来一层层的叠加,同时可以将不同目录挂载到同一个虚拟文件系统下(unite several directories into a single virtual filesystem)。Union 文件系统是 Docker 镜像的基础。镜像可以通过分层来进行继承,基于基础镜像(没有父镜像),可以制作各种具体的应用镜像。
特性:一次同时加载多个文件系统,但从外面看起来,只能看到一个文件系统,联合加载会把各层文件系统叠加起来,这样最终的文件系统会包含所有底层的文件和目录,好处肯定就是复用
3.Docker镜像加载原理
docker的镜像实际上由一层一层的文件系统组成,这种层级的文件系统UnionFS。
bootfs(boot file system)主要包含bootloader和kernel, bootloader主要是引导加载kernel, Linux刚启动时会加载bootfs文件系统,在Docker镜像的最底层是引导文件系统bootfs。这一层与我们典型的Linux/Unix系统是一样的,包含boot加载器和内核。当boot加载完成之后整个内核就都在内存中了,此时内存的使用权已由bootfs转交给内核,此时系统也会卸载bootfs。
rootfs (root file system) ,在bootfs之上。包含的就是典型 Linux 系统中的 /dev, /proc, /bin, /etc 等标准目录和文件。rootfs就是各种不同的操作系统发行版,比如Ubuntu,Centos等等。

Docker镜像层都是只读的,容器层是可写的,当容器启动时,一个新的可写层被加载到镜像的顶部。这一层通常被称作“容器层”,“容器层”之下的都叫“镜像层”
所有对容器的改动 - 无论添加、删除、还是修改文件都只会发生在容器层中。只有容器层是可写的,容器层下面的所有镜像层都是只读的。

五、本地镜像发布到阿里云
1.流程

2.镜像的生成方法
(1)通过commit创建一个新的镜像
docker commit 提交容器副本使之成为一个新的镜像
docker commit  -m="提交的描述信息"  -a="作者"  容器ID 要创建的目标镜像名:[标签名]
(2)通过DockerFile
3.push到阿里云
1)登陆阿里云官网
选择控制台,进入容器镜像服务
2)选择个人实例

3)新建命名空间

4)新建镜像仓库


5)操作指南
阿里云会提供对应的操作指南

(6)示例
// 登陆阿里云Docker仓库
[root@localhost docker]# docker login --username=王佳林酱 registry.cn-hangzhou.aliyuncs.com
Password:
WARNING! Your password will be stored unencrypted in /root/.docker/config.json.
Configure a credential helper to remove this warning. See
https://docs.docker.com/engine/reference/commandline/login/#credentials-store

Login Succeeded
// 查看镜像
[root@localhost docker]# docker images
REPOSITORY   TAG       IMAGE ID       CREATED        SIZE
redis        latest    7614ae9453d1   3 months ago   113MB
// docker tag重命名镜像
[root@localhost docker]# docker tag 7614ae9453d1 registry.cn-hangzhou.aliyuncs.com/wangjialin/jianan:1.1
// 推送
[root@localhost docker]# docker push registry.cn-hangzhou.aliyuncs.com/wangjialin/jianan:1.1
The push refers to repository [registry.cn-hangzhou.aliyuncs.com/wangjialin/jianan]
8e5669d83291: Pushed
9975392591f2: Pushed
529cdb636f61: Pushed
4b8e2801e0f9: Pushed
9b24afeb7c2f: Pushed
2edcec3590a4: Pushed
1.1: digest: sha256:563888f63149e3959860264a1202ef9a644f44ed6c24d5c7392f9e2262bd3553 size: 1573
4.pull阿里云镜像
上面我们将镜像发布到了阿里云上面,这里面尝试拉取,那么拉取的命令在操作指南里面已经提供了
// 从阿里云提供的操作指南上复制即可
$ docker pull registry.cn-hangzhou.aliyuncs.com/wangjialin/jianan:[镜像版本号]
六、本地私有镜像库
1.官方Docker Hub地址:https://hub.docker.com/,中国大陆访问太慢了且准备被阿里云取代的趋势,不太主流。
2.Dockerhub、阿里云这样的公共镜像仓库可能不太方便,涉及机密的公司不可能提供镜像给公网,所以需要创建一个本地私人仓库供给团队使用,基于公司内部项目构建镜像。
Docker Registry是官方提供的工具,可以用于构建私有镜像仓库
1.搭建步骤
1.下载镜像Docker Registry
[root@localhost docker]# docker pull registry
Using default tag: latest
latest: Pulling from library/registry
79e9f2f55bf5: Pull complete
0d96da54f60b: Pull complete
5b27040df4a2: Pull complete
e2ead8259a04: Pull complete
3790aef225b9: Pull complete
Digest: sha256:169211e20e2f2d5d115674681eb79d21a217b296b43374b8e39f97fcf866b375
Status: Downloaded newer image for registry:latest
docker.io/library/registry:latest
2.运行私有库
[root@localhost docker]# docker run -d -p 5000:5000 --privileged=true registry
d19d2ef935fa74c06e0118c2690f75c124f482ed6000ae709dc4e950be7a1883
[root@localhost docker]# docker ps
CONTAINER ID   IMAGE      COMMAND                  CREATED          STATUS          PORTS                                       NAMES
d19d2ef935fa   registry   "/entrypoint.sh /etc…"   48 seconds ago   Up 47 seconds   0.0.0.0:5000->5000/tcp, :::5000->5000/tcp   vigilant_ptolemy
3.案例演示
1)创建一个新镜像,拉取ubuntu镜像,安装ifconfig命令
[root@localhost docker]# docker pull ubuntu
Using default tag: latest
latest: Pulling from library/ubuntu
7b1a6ab2e44d: Pull complete
Digest: sha256:626ffe58f6e7566e00254b638eb7e0f3b11d4da9675088f4781a50ae288f3322
Status: Downloaded newer image for ubuntu:latest
docker.io/library/ubuntu:latest
[root@localhost docker]# docker run -it ubuntu /bin/bash
root@c55e49d5fb93:/# ifconfig
bash: ifconfig: command not found
root@c55e49d5fb93:/# apt-get update
.....
root@c55e49d5fb93:/# apt-get install net-tools
....
root@c55e49d5fb93:/# ifconfig
2)commit镜像
// 查看正常运行的容器
[root@localhost docker]# docker ps
CONTAINER ID   IMAGE      COMMAND                  CREATED          STATUS          PORTS                                       NAMES
c55e49d5fb93   ubuntu     "/bin/bash"              7 minutes ago    Up 7 minutes                                                relaxed_black
d19d2ef935fa   registry   "/entrypoint.sh /etc…"   12 minutes ago   Up 12 minutes   0.0.0.0:5000->5000/tcp, :::5000->5000/tcp   vigilant_ptolemy
// 将上面创建的案例镜像commit
[root@localhost docker]# docker commit -m="ifconfig cmd add" -a="jialin" c55e49d5fb93 myubuntu:1.1
sha256:3a71a171f302f318565d7a93504dffed1bd12afceb6ce3c6ee2ee27e3553db52
// 查看结果
[root@localhost docker]# docker images
REPOSITORY   TAG       IMAGE ID       CREATED         SIZE
myubuntu     1.1       3a71a171f302   4 seconds ago   109MB
registry     latest    b8604a3fe854   4 months ago    26.2MB
ubuntu       latest    ba6acccedd29   5 months ago    72.8MB
4.私服镜像数量验证
通过HTTP请求验证私服仓库没有任何镜像
[root@localhost docker]# curl -XGET http://192.168.146.144:5000/v2/_catalog
{"repositories":[]}
5.新镜像修改
使用命令 docker tag 将镜像修改为私服库的镜像,然后推送进去
公式: docker tag 镜像:Tag Host:Port/Repository:Tag
[root@localhost docker]# docker tag myubuntu:1.1 192.168.146.144:5000/myubuntu:1.1
[root@localhost docker]# docker images
REPOSITORY                      TAG       IMAGE ID       CREATED          SIZE
192.168.146.144:5000/myubuntu   1.1       3a71a171f302   11 minutes ago   109MB
myubuntu                        1.1       3a71a171f302   11 minutes ago   109MB
registry                        latest    b8604a3fe854   4 months ago     26.2MB
ubuntu                          latest    ba6acccedd29   5 months ago     72.8MB
6.修改私服库使之支持HTTP
修改 /etc/docker/daemon.json,添加新内容"insecure-registries": ["192.168.146.144:5000"],注意IP为自己的
// 先查看一下
[root@localhost docker]# cat /etc/docker/daemon.json
{
  "registry-mirrors": ["https://bc0ogk7n.mirror.aliyuncs.com"]
}
// 修改内容
[root@localhost docker]# vi /etc/docker/daemon.json
// 重启docker
[root@localhost docker]# systemctl restart docker
// 重启Docker以后记得启动registry仓库
[root@localhost docker]# docker start d19d2ef935fa
// 再次查看
[root@localhost docker]# cat /etc/docker/daemon.json
{
  "registry-mirrors": ["https://bc0ogk7n.mirror.aliyuncs.com"],
  "insecure-registries": ["192.168.146.144:5000"]
}
7.push推送到私服库
[root@localhost docker]# docker push 192.168.146.144:5000/myubuntu:1.1
The push refers to repository [192.168.146.144:5000/myubuntu]
e4167fdc22fe: Pushed
9f54eef41275: Pushed
1.1: digest: sha256:4b4f60661571772a940dae8b54689f7cf597fbaa65c357d41f15c6187e0e572f size: 741
8.私服镜像数量验证
[root@localhost docker]# curl -XGET http://192.168.146.144:5000/v2/_catalog
{"repositories":["myubuntu"]}
9.拉取使用
[root@localhost docker]# docker pull 192.168.146.144:5000/myubuntu:1.1
1.1: Pulling from myubuntu
7b1a6ab2e44d: Already exists
1c3c8666f09e: Pull complete
Digest: sha256:4b4f60661571772a940dae8b54689f7cf597fbaa65c357d41f15c6187e0e572f
Status: Downloaded newer image for 192.168.146.144:5000/myubuntu:1.1
192.168.146.144:5000/myubuntu:1.1
[root@localhost docker]# docker images
REPOSITORY                      TAG       IMAGE ID       CREATED             SIZE
192.168.146.144:5000/myubuntu   1.1       3a71a171f302   About an hour ago   109MB
registry                        latest    b8604a3fe854   4 months ago        26.2MB
ubuntu                          latest    ba6acccedd29   5 months ago        72.8MB
[root@localhost docker]# docker run -it 3a71a171f302
root@3cf959355ee1:/# ifconfig
eth0: flags=4163<UP,BROADCAST,RUNNING,MULTICAST>  mtu 1500
...
七、Docker容器数据卷
1.简介
容器数据卷就是将docker容器内的数据保存进宿主机的磁盘内
卷就是目录或文件,存在于一个或多个容器中,由docker挂载到容器,但不属于联合文件系统,因此能够绕过Union File System提供一些用于持续存储或共享数据的特性,卷的设计目的就是数据的持久化,完全独立于容器的生存周期,因此Docker不会在容器删除时删除其挂载的数据卷
简单点说就是在容器外绑定了一个移动硬盘,当容器出问题时,硬盘内的数据是不会丢失的
2.命令
docker run -it --privileged=true -v /宿主机绝对路径目录:/容器内目录 [-v 可以挂载多个目录] 镜像名

--privileged=true用于扩大容器的权限,解决挂载目录没有权限的问题,也即使用该参数,container内的root拥有真正的root权限,否则,container内的root只是外部的一个普通用户权限
3.特点
- 数据卷可在容器之间共享或重用数据
- 卷中的更改可以直接实时生效,爽
- 数据卷中的更改不会包含在镜像的更新中
- 数据卷的生命周期一直持续到没有容器使用它为止
4.数据卷可以为读写/只读
默认宿主机目录和容器内目录是同步的,而且都可以读写,但是这个可以修改
【默认:读写】
docker run -it --privileged=true -v /宿主机绝对路径目录:/容器内目录:rw 镜像名

【只读】
docker run -it --privileged=true -v /宿主机绝对路径目录:/容器内目录:ro 镜像名
5.卷的继承和共享
当容器1和宿主机绑定了容器卷,那么容器2可以继承容器1的卷规则
关键命令:--volumes-from 父类
[root@localhost docker]# docker run -it --name myu3 --privileged=true --volumes-from 父类 镜像名 /bin/bash
6.案例
1)启动容器,添加数据卷
[root@localhost docker]# docker run -it --name myu3 --privileged=true -v /usr/local/docker/test1:/tmp/myDockerData ubuntu /bin/bash
root@432a25c18f9b:
2)查看挂载结果
[root@localhost docker]# docker inspect 432a25c18f9b

"Mounts": [
            {
                "Type": "bind",
                "Source": "/usr/local/docker/test1",
                "Destination": "/tmp/myDockerData",
                "Mode": "",
                "RW": true,
                "Propagation": "rprivate"
            }
        ],
3)数据共享测试
| 当docker修改,主机同步获得 |
|---|
| 当主机修改,docker同步获取 |
| docker容器stop,此时修改主机的内容,容器重启以后,数据依然同步 |
// 宿主机内映射目录添加文件
[root@localhost test1]# pwd
/usr/local/docker/test1
[root@localhost test1]# touch a.txt
[root@localhost test1]# vi a.txt
[root@localhost test1]# cat a.txt
我在宿主机内添加的
[root@localhost test1]# docker ps
CONTAINER ID   IMAGE          COMMAND                  CREATED         STATUS         PORTS                                       NAMES
432a25c18f9b   ubuntu         "/bin/bash"              5 minutes ago   Up 5 minutes                                               myu3
3cf959355ee1   3a71a171f302   "/bin/bash"              2 hours ago     Up 2 hours                                                 mystifying_gauss
d19d2ef935fa   registry       "/entrypoint.sh /etc…"   3 hours ago     Up 2 hours     0.0.0.0:5000->5000/tcp, :::5000->5000/tcp   vigilant_ptolemy

// 进入到容器内,查看是否同步
[root@localhost test1]# docker exec -it 432a25c18f9b /bin/bash
root@432a25c18f9b:/# cd /tmp/myDockerData/
root@432a25c18f9b:/tmp/myDockerData# ll
total 4
drwxr-xr-x. 2 root root 19 Apr  5 13:51 ./
drwxrwxrwt. 1 root root 26 Apr  5 13:45 ../
-rw-r--r--. 1 root root 28 Apr  5 13:51 a.txt
root@432a25c18f9b:/tmp/myDockerData# cat a.txt
我在宿主机内添加的
root@432a25c18f9b:/tmp/myDockerData#
八、Docker安装
1.Docker安装Tomcat
拉取Tomcat镜像,然后启动
[root@localhost test1]# docker search tomcat
[root@localhost test1]# docker pull tomcat
[root@localhost test1]# docker run -it -d -p 8080:8080 tomcat
e7eb0e42f63dc3cb34a71bf49ef941feacd348d64e9e38f327d4f94748717019
启动之后,通过http://192.168.146.144:8080/访问会404,需要进入容器内,按照下面进行修改
[root@localhost test1]# docker exec -it e7eb0e42f63d /bin/bash
root@e7eb0e42f63d:/usr/local/tomcat# ls -l
total 132
-rw-r--r--. 1 root root 18994 Dec  2 22:01 BUILDING.txt
-rw-r--r--. 1 root root  6210 Dec  2 22:01 CONTRIBUTING.md
-rw-r--r--. 1 root root 60269 Dec  2 22:01 LICENSE
-rw-r--r--. 1 root root  2333 Dec  2 22:01 NOTICE
-rw-r--r--. 1 root root  3378 Dec  2 22:01 README.md
-rw-r--r--. 1 root root  6905 Dec  2 22:01 RELEASE-NOTES
-rw-r--r--. 1 root root 16517 Dec  2 22:01 RUNNING.txt
drwxr-xr-x. 2 root root  4096 Dec 22 17:07 bin
drwxr-xr-x. 1 root root    22 Apr  5 14:30 conf
drwxr-xr-x. 2 root root  4096 Dec 22 17:06 lib
drwxrwxrwx. 1 root root    80 Apr  5 14:30 logs
drwxr-xr-x. 2 root root   159 Dec 22 17:07 native-jni-lib
drwxrwxrwx. 2 root root    30 Dec 22 17:06 temp
drwxr-xr-x. 2 root root     6 Dec 22 17:06 webapps
drwxr-xr-x. 7 root root    81 Dec  2 22:01 webapps.dist
drwxrwxrwx. 2 root root     6 Dec  2 22:01 work
root@e7eb0e42f63d:/usr/local/tomcat# rm -r webapps
root@e7eb0e42f63d:/usr/local/tomcat# mv webapps.dist webapps
上面拉取的是Tomcat最新版,还需要进行配置才能访问到Tomcat页面,那么我们使用的时候,没必要用那么高版本,可以使用其它的镜像,这样pull下来以后直接启动即可
[root@localhost test1]# docker search billygoo/tomcat8-jdk8
NAME                    DESCRIPTION                               STARS     OFFICIAL   AUTOMATED
billygoo/tomcat8-jdk8   Install openjdk8 using tomcat:8.0-jre8.   0                    [OK]
[root@localhost test1]# docker pull billygoo/tomcat8-jdk8
[root@localhost test1]# docker run -d -p 8081:8080 --name tomcat2 billygoo/tomcat8-jdk8
6637b6f99dc05671f984e2cd4a2c686706225ed32dda9f086501c98781b615a6
2.Docker安装Mysql
1) 获取mysql5.7版本镜像
[root@localhost test1]# docker pull mysql:5.7
5.7: Pulling from library/mysql
72a69066d2fe: Pull complete
93619dbc5b36: Pull complete
99da31dd6142: Pull complete
626033c43d70: Pull complete
37d5d7efb64e: Pull complete
ac563158d721: Pull complete
d2ba16033dad: Pull complete
0ceb82207cd7: Pull complete
37f2405cae96: Pull complete
e2482e017e53: Pull complete
70deed891d42: Pull complete
Digest: sha256:f2ad209efe9c67104167fc609cca6973c8422939491c9345270175a300419f94
Status: Downloaded newer image for mysql:5.7
docker.io/library/mysql:5.7
[root@localhost test1]# docker images
REPOSITORY                      TAG       IMAGE ID       CREATED        SIZE
mysql                           5.7       c20987f18b13   3 months ago   448MB
2) 创建容器卷数据库配置文件
解决数据库字符编码问题,这样让数据库支持中文
1)创建文件
[root@localhost test1]# vi /usr/local/mysql/my.cnf

2)将以下内容粘贴到刚才创建的文件中
[mysqld]
user=mysql
character-set-server=utf8
default_authentication_plugin=mysql_native_password
[client]
default-character-set=utf8
[mysql]
default-character-set=utf8
3) 启动mysql镜像
[root@localhost test1]# docker run -d -p 3306:3306 --privileged=true --name mysql \
-v /usr/local/mysql/conf:/etc/mysql/conf.d \
-v /usr/local/mysql/logs:/logs \
-v /usr/local/mysql/data:/var/lib/mysql  \
-v /usr/local/mysql/my.cnf:/etc/mysql/my.cnf  \
-e MYSQL_ROOT_PASSWORD=123456  mysql:5.7
9906d07a8d76c0bea52427a8371f372bacb2131a0e6cea4f07eac46f16e11978

命令分析:
1)-p 3306:3306 端口映射
2)--name mysql 启动的镜像名
3)-v /usr/local/mysql/conf:/etc/mysql/conf.d 配置文件挂载
4)-v /usr/local/mysql/logs:/logs  日志文件挂载
5)-v /usr/local/mysql/data:/var/lib/mysql 数据库数据挂载
6)-v /usr/local/mysql/my.cnf:/etc/mysql/my.cnf 数据库配置文件挂载
7)-e MYSQL_ROOT_PASSWORD=123456 设置数据库密码
8)-d 后台运行
9)mysql:5.7  拉取的mysql镜像
4) 查看数据库字符编码
[root@localhost mysql]# docker exec -it 9906d07a8d76 /bin/bash
root@9906d07a8d76:/# mysql -u root -p
Enter password:
Welcome to the MySQL monitor.  Commands end with ; or \g.
Your MySQL connection id is 2
Server version: 5.7.36 MySQL Community Server (GPL)

Copyright (c) 2000, 2021, Oracle and/or its affiliates.

Oracle is a registered trademark of Oracle Corporation and/or its
affiliates. Other names may be trademarks of their respective
owners.

Type 'help;' or '\h' for help. Type '\c' to clear the current input statement.

mysql> SHOW VARIABLES LIKE 'character%';
+--------------------------+----------------------------+
| Variable_name            | Value                      |
+--------------------------+----------------------------+
| character_set_client     | utf8                       |
| character_set_connection | utf8                       |
| character_set_database   | utf8                       |
| character_set_filesystem | binary                     |
| character_set_results    | utf8                       |
| character_set_server     | utf8                       |
| character_set_system     | utf8                       |
| character_sets_dir       | /usr/share/mysql/charsets/ |
+--------------------------+----------------------------+
8 rows in set (0.01 sec)
5) 当容器实例被删除,数据依旧存在
首先,进入到mysql,查看里面的表中确实存在数据
[root@localhost mysql]# docker exec -it mysql /bin/bash
root@9906d07a8d76:/# mysql -u root -p
Enter password:

mysql> use db01;
Database changed
mysql> select * from test01;
+------+--------+
| id   | name   |
+------+--------+
|    1 | hha    |
|    2 | 哈哈   |
+------+--------+
2 rows in set (0.00 sec)
关闭容器并且删除
[root@localhost mysql]# docker stop mysql
mysql
[root@localhost mysql]# docker rm -f mysql
mysql
再次启动一个Mysql实例,发现数据依旧存在
[root@localhost mysql]# docker run -d -p 3306:3306 --privileged=true --name mysql \
> -v /usr/local/mysql/conf:/etc/mysql/conf.d \
> -v /usr/local/mysql/logs:/logs \
> -v /usr/local/mysql/data:/var/lib/mysql  \
> -v /usr/local/mysql/my.cnf:/etc/mysql/my.cnf  \
> -e MYSQL_ROOT_PASSWORD=123456  mysql:5.7
28be583bbdeccb90c4de102169c320560eb5022825c816c8a33497cc69578189
[root@localhost mysql]# docker exec -it mysql /bin/bash
root@28be583bbdec:/# mysql -u root -p
Your MySQL connection id is 2
Server version: 5.7.36 MySQL Community Server (GPL)

Copyright (c) 2000, 2021, Oracle and/or its affiliates.

Oracle is a registered trademark of Oracle Corporation and/or its
affiliates. Other names may be trademarks of their respective
owners.

Type 'help;' or '\h' for help. Type '\c' to clear the current input statement.

mysql> use db01;
Database changed
mysql> select * from test01;
+------+--------+
| id   | name   |
+------+--------+
|    1 | hha    |
|    2 | 哈哈   |
+------+--------+
2 rows in set (0.00 sec)

mysql>
6) Navicat连接Mysql
3.Docker安装Redis
1) 获取Redis6.0.8镜像
[root@localhost mysql]# docker pull redis:6.0.8
6.0.8: Pulling from library/redis
bb79b6b2107f: Pull complete
1ed3521a5dcb: Pull complete
5999b99cee8f: Pull complete
3f806f5245c9: Pull complete
f8a4497572b2: Pull complete
eafe3b6b8d06: Pull complete
Digest: sha256:21db12e5ab3cc343e9376d655e8eabbdbe5516801373e95a8a9e66010c5b8819
Status: Downloaded newer image for redis:6.0.8
docker.io/library/redis:6.0.8
[root@localhost mysql]# docker images
REPOSITORY                      TAG       IMAGE ID       CREATED         SIZE
redis                           6.0.8     16ecd2772934   17 months ago   104MB
2) 前提设置
将一个redis.conf文件拷贝进宿主机目录下,用于数据卷
[root@localhost redis]# pwd
/usr/local/redis
[root@localhost redis]# ll
总用量 0
-rw-r--r--. 1 root root 0 4月   5 23:23 redis.conf
3) 启动Redis
[root@localhost redis]# docker run -d -p 6379:6379 --privileged=true --name redis \
  -v /usr/local/redis/data:/data \
  -v /usr/local/redis/redis.conf:/etc/redis/redis.conf  \
  redis:6.0.8 redis-server \
  --appendonly yes --requirepass  123456

分析:
1)-d 后台运行
2)-p 6379:6379 端口映射
3)--privileged=true 权限
4)--name redis 容器启动后的名字
5)-v /usr/local/redis/data:/data redis数据目录挂载
6)-v /usr/local/redis/redis.conf:/etc/redis/redis.conf 配置文件挂载
7)redis:6.0.8 后台运行
8)redis-server 启动redis
9)--appendonly yes redis数据持久化采用AOF方式
10)--requirepass  123456 设置redis密码
4) 进入Redis
[root@localhost redis]# docker exec -it redis /bin/bash
root@67b99799be9c:/data# redis-cli
127.0.0.1:6379> AUTH 123456
OK
127.0.0.1:6379> set k1 v1
OK
127.0.0.1:6379> get k1
"v1"
127.0.0.1:6379>
5) 客户端连接Redis
4.Docker安装Nginx
1 拉取nginx镜像
命令:
docker pull nging:1.8
2 查看nginx拉取结果

3 nginx初始配置
创建文件夹
mkdir /usr/local/nginx/conf

将1个最原始的Nginx.conf上传到/usr/local/nginx/conf 这个目录下,用于文件挂载
4 启动nginx
命令:
docker run --name nginx -p 80:80 \
-v /usr/local/nginx/conf/nginx.conf:/etc/nginx/nginx.conf \
-v /usr/local/nginx/log:/var/log/nginx \
-d nginx:1.8

分析:
1)--name nginx 名字
2)-p 80:80 端口映射
3)-v /usr/local/nginx/conf/nginx.conf:/etc/nginx/nginx.conf 配置文件挂载
4)-d nginx:1.8 后台运行
5 查看启动结果

6 修改nginx.conf
修改nginx.conf,直接修改/usr/local/nginx/conf目录下的nginx.conf即可
然后重启ngin
7 nginx操作
重启
docker restart nginx
关闭
docker stop nginx
删除
docker rm nginx
5.Docker安装Mysql主从复制
1)新建主机配置文件my.cnf
[root@localhost mysql-master]# pwd
/usr/local/mysql-master
[root@localhost mysql-master]# cat my.cnf
[mysqld]
## 设置server_id,同一局域网中需要唯一
server_id=101
## 指定不需要同步的数据库名称
binlog-ignore-db=mysql
## 开启二进制日志功能
log-bin=mall-mysql-bin
## 设置二进制日志使用内存大小(事务)
binlog_cache_size=1M
## 设置使用的二进制日志格式(mixed,statement,row)
binlog_format=mixed
## 二进制日志过期清理时间。默认值为0,表示不自动清理。
expire_logs_days=7
## 跳过主从复制中遇到的所有错误或指定类型的错误,避免slave端复制中断。
## 如:1062错误是指一些主键重复,1032错误是因为主从数据库数据不一致
slave_skip_errors=1062
2)新建主服务实例3307
[root@localhost mysql-master]# docker run -d -p 3307:3306 --privileged=true --name mysql-master \
> -v /usr/local/mysql/mysql-master/conf:/etc/mysql/conf.d \
> -v /usr/local/mysql/mysql-master/logs:/logs \
> -v /usr/local/mysql/mysql-master/data:/var/lib/mysql  \
> -v /usr/local/mysql/mysql-master/my.cnf:/etc/mysql/my.cnf  \
> -e MYSQL_ROOT_PASSWORD=123456  mysql:5.7
3038cb0169b2017047ecb628db28536a8d68c771dcf899c96453a94437736fd3
3)创建数据同步用户
[root@localhost mysql-master]# docker exec -it mysql-master /bin/bash
root@95f7bb73d22f:/# mysql -u root -p
Enter password:
Welcome to the MySQL monitor.  Commands end with ; or \g.
Your MySQL connection id is 3
Server version: 5.7.36-log MySQL Community Server (GPL)

Copyright (c) 2000, 2021, Oracle and/or its affiliates.

Oracle is a registered trademark of Oracle Corporation and/or its
affiliates. Other names may be trademarks of their respective
owners.

Type 'help;' or '\h' for help. Type '\c' to clear the current input statement.

mysql> CREATE USER 'slave'@'%' IDENTIFIED BY '123456'; #创建从机的账户,允许访问我主机
Query OK, 0 rows affected (0.00 sec)

mysql> GRANT REPLICATION SLAVE,REPLICATION CLIENT ON *.* TO 'slave'@'%'; #用户授权
Query OK, 0 rows affected (0.01 sec)

mysql>
4)新建从机配置文件my.cnf
[root@localhost mysql-slave]# pwd
/usr/local/mysql-slave
[root@localhost mysql-slave]# cat my.cnf
[mysqld]
## 设置server_id,同一局域网中需要唯一
server_id=102
## 指定不需要同步的数据库名称
binlog-ignore-db=mysql
## 开启二进制日志功能,以备Slave作为其它数据库实例的Master时使用
log-bin=mall-mysql-slave1-bin
## 设置二进制日志使用内存大小(事务)
binlog_cache_size=1M
## 设置使用的二进制日志格式(mixed,statement,row)
binlog_format=mixed
## 二进制日志过期清理时间。默认值为0,表示不自动清理。
expire_logs_days=7
## 跳过主从复制中遇到的所有错误或指定类型的错误,避免slave端复制中断。
## 如:1062错误是指一些主键重复,1032错误是因为主从数据库数据不一致
slave_skip_errors=1062
## relay_log配置中继日志
relay_log=mall-mysql-relay-bin
## log_slave_updates表示slave将复制事件写进自己的二进制日志
log_slave_updates=1
## slave设置为只读(具有super权限的用户除外)
read_only=1
5)新建从服务实例3308
[root@localhost mysql-slave]# docker run -d -p 3308:3306 --privileged=true --name mysql-slave \
> -v /usr/local/mysql-slave/conf:/etc/mysql/conf.d \
> -v /usr/local/mysql-slave/logs:/logs \
> -v /usr/local/mysql-slave/data:/var/lib/mysql  \
> -v /usr/local/mysql-slave/my.cnf:/etc/mysql/my.cnf  \
> -e MYSQL_ROOT_PASSWORD=123456  mysql:5.7
02246019b61fe6963e31d894b358002a08cad0d8f23f5ffb5c59a2ce8211253c
6)在主数据库中查看主从状态
[root@localhost mysql-slave]# docker exec -it mysql-master /bin/bash
root@95f7bb73d22f:/# mysql -u root -p
Enter password:
Welcome to the MySQL monitor.  Commands end with ; or \g.
Your MySQL connection id is 4
Server version: 5.7.36-log MySQL Community Server (GPL)

Copyright (c) 2000, 2021, Oracle and/or its affiliates.

Oracle is a registered trademark of Oracle Corporation and/or its
affiliates. Other names may be trademarks of their respective
owners.

Type 'help;' or '\h' for help. Type '\c' to clear the current input statement.

mysql> show master status; #查看主从状态
+-----------------------+----------+--------------+------------------+-------------------+
| File                  | Position | Binlog_Do_DB | Binlog_Ignore_DB | Executed_Gtid_Set |
+-----------------------+----------+--------------+------------------+-------------------+
| mall-mysql-bin.000003 |      617 |              | mysql            |                   |
+-----------------------+----------+--------------+------------------+-------------------+
1 row in set (0.01 sec)

mysql>
7)在从数据库中配置主从复制
[root@localhost ~]# docker exec -it mysql-slave /bin/bash
root@02246019b61f:/# mysql -u root -p
Enter password:
Welcome to the MySQL monitor.  Commands end with ; or \g.
Your MySQL connection id is 3
Server version: 5.7.36-log MySQL Community Server (GPL)

Copyright (c) 2000, 2021, Oracle and/or its affiliates.

Oracle is a registered trademark of Oracle Corporation and/or its
affiliates. Other names may be trademarks of their respective
owners.

Type 'help;' or '\h' for help. Type '\c' to clear the current input statement.

# 输入配置主从复制的SQL
mysql> change master to \
       master_host='192.168.146.144', \
       master_user='slave', \
       master_password='123456', \
       master_port=3307, \
       master_log_file='mall-mysql-bin.000003', \
       master_log_pos=617, \
       master_connect_retry=30;
Query OK, 0 rows affected, 2 warnings (0.34 sec)

# 开启主从同步配置
mysql> start slave;
Query OK, 0 rows affected (0.00 sec)

# 查看状态
mysql> show slave status \G;
*************************** 1. row ***************************
               Slave_IO_State:
                  Master_Host: 192.168.146.144
                  Master_User: slave
                  Master_Port: 3307
                Connect_Retry: 30
              Master_Log_File: mall-mysql-bin.000001
          Read_Master_Log_Pos: 617
               Relay_Log_File: mall-mysql-relay-bin.000001
                Relay_Log_Pos: 4
        Relay_Master_Log_File: mall-mysql-bin.000001
             Slave_IO_Running: Yes # 已开始
            Slave_SQL_Running: Yes # 已开始


# 配置主从复制命令
master_host:主数据库的IP地址;
master_port:主数据库的运行端口;
master_user:在主数据库创建的用于同步数据的用户账号;
master_password:在主数据库创建的用于同步数据的用户密码;
master_log_file:指定从数据库要复制数据的日志文件,通过查看主数据的状态,获取File参数;
master_log_pos:指定从数据库从哪个位置开始复制数据,通过查看主数据的状态,获取Position参数;
master_connect_retry:连接失败重试的时间间隔,单位为秒。
8)主从复制测试
九、Docker搭建Redis集群搭建
1.面试题
1~2亿条数据需要缓存,请问如何设计这个存储案例?
| 一般业界有3种解决方案:具体解释见Redis文档 |
|---|
| 哈希取余分区 |
| 一致性哈希算法分区 |
| 哈希槽分区 |
2.三主三从集群搭建
1)创建6个redis实例
[root@localhost local]# docker run -d --name redis-node-1 --net host --privileged=true \
> -v /usr/local/redis-node-1:/data redis:6.0.8 \
> --cluster-enabled yes --appendonly yes --port 7001
d56ff3c8d3354d5bea8691b836d22936c11bc9a421a75872f325f329c80ed24e
[root@localhost local]# docker run -d --name redis-node-2 --net host --privileged=true \
> -v /usr/local/redis-node-2:/data redis:6.0.8 \
> --cluster-enabled yes --appendonly yes --port 7002
5b9c2a2645238c7d79e63d5c9ddae4f225cf164f6fb23b57c54d405c8010e930
[root@localhost local]# docker run -d --name redis-node-3 --net host --privileged=true \
> -v /usr/local/redis-node-3:/data redis:6.0.8 \
> --cluster-enabled yes --appendonly yes --port 7003
1b6ad28db46710d33f1702779123037f68dc254ac5f8d0637930d0acb077cfe8
[root@localhost local]# docker run -d --name redis-node-4 --net host --privileged=true \
> -v /usr/local/redis-node-4:/data redis:6.0.8 \
> --cluster-enabled yes --appendonly yes --port 7004
6592702722fc6737dc393969cf6f6d30e98ad2c91c8f05168f78c25e2b0cb008
[root@localhost local]# docker run -d --name redis-node-5 --net host --privileged=true \
> -v /usr/local/redis-node-5:/data redis:6.0.8 \
> --cluster-enabled yes --appendonly yes --port 7005
2e6ae66a8de8f13cb540b7b8b0a3b84cf68458a1f373f086df3547cb05b3c4a8
[root@localhost local]# docker run -d --name redis-node-6 --net host --privileged=true \
> -v /usr/local/redis-node-6:/data redis:6.0.8 \
> --cluster-enabled yes --appendonly yes --port 7006
bec7fd99b0c6f67ae79f1e9a406fe40c2d712d331175c62dd4ae25d6f61b1dad

[root@localhost local]# docker ps -n 6
CONTAINER ID   IMAGE         COMMAND                  CREATED          STATUS          PORTS     NAMES
bec7fd99b0c6   redis:6.0.8   "docker-entrypoint.s…"   18 seconds ago   Up 17 seconds             redis-node-6
2e6ae66a8de8   redis:6.0.8   "docker-entrypoint.s…"   22 seconds ago   Up 22 seconds             redis-node-5
6592702722fc   redis:6.0.8   "docker-entrypoint.s…"   28 seconds ago   Up 28 seconds             redis-node-4
1b6ad28db467   redis:6.0.8   "docker-entrypoint.s…"   34 seconds ago   Up 34 seconds             redis-node-3
5b9c2a264523   redis:6.0.8   "docker-entrypoint.s…"   40 seconds ago   Up 39 seconds             redis-node-2
d56ff3c8d335   redis:6.0.8   "docker-entrypoint.s…"   50 seconds ago   Up 49 seconds             redis-node-1
2)进入容器redis-node-1并为6台机器构建集群关系
在Redis文档中已经详细写了过程 https://blog.csdn.net/weixin_44051038/article/details/114004060
[root@localhost local]# docker exec -it redis-node-1 /bin/bash
root@localhost:/data# redis-cli -p 6379 --cluster create \
> 192.168.146.144:7001 \
> 192.168.146.144:7002 \
> 192.168.146.144:7003 \
> 192.168.146.144:7004 \
> 192.168.146.144:7005 \
> 192.168.146.144:7006 \
> --cluster-replicas 1
>>> Performing hash slots allocation on 6 nodes...
Master[0] -> Slots 0 - 5460
Master[1] -> Slots 5461 - 10922
Master[2] -> Slots 10923 - 16383
Adding replica 192.168.146.144:7005 to 192.168.146.144:7001
Adding replica 192.168.146.144:7006 to 192.168.146.144:7002
Adding replica 192.168.146.144:7004 to 192.168.146.144:7003
>>> Trying to optimize slaves allocation for anti-affinity
[WARNING] Some slaves are in the same host as their master
M: 008df78cbf50c93708cedca918ca376bee2a4c21 192.168.146.144:7001
   slots:[0-5460] (5461 slots) master
M: 3281d6e09493bcfab54d33d0d06c605f1f60caf0 192.168.146.144:7002
   slots:[5461-10922] (5462 slots) master
M: f0380a61462310dc351f32a1071bb4304f851f7c 192.168.146.144:7003
   slots:[10923-16383] (5461 slots) master
S: a382d28bb747d9bf821812cf9853fcd0b2a9deca 192.168.146.144:7004
   replicates 3281d6e09493bcfab54d33d0d06c605f1f60caf0
S: fdbe3d8761fd8f060ac2c8e40de1175ba6bbf526 192.168.146.144:7005
   replicates f0380a61462310dc351f32a1071bb4304f851f7c
S: 0c323c182f4b819fbf0076ab8097b83a0ced5371 192.168.146.144:7006
   replicates 008df78cbf50c93708cedca918ca376bee2a4c21
Can I set the above configuration? (type 'yes' to accept): yes
>>> Nodes configuration updated
>>> Assign a different config epoch to each node
>>> Sending CLUSTER MEET messages to join the cluster
Waiting for the cluster to join
.
>>> Performing Cluster Check (using node 192.168.146.144:7001)
M: 008df78cbf50c93708cedca918ca376bee2a4c21 192.168.146.144:7001
   slots:[0-5460] (5461 slots) master
   1 additional replica(s)
S: fdbe3d8761fd8f060ac2c8e40de1175ba6bbf526 192.168.146.144:7005
   slots: (0 slots) slave
   replicates f0380a61462310dc351f32a1071bb4304f851f7c
S: 0c323c182f4b819fbf0076ab8097b83a0ced5371 192.168.146.144:7006
   slots: (0 slots) slave
   replicates 008df78cbf50c93708cedca918ca376bee2a4c21
S: a382d28bb747d9bf821812cf9853fcd0b2a9deca 192.168.146.144:7004
   slots: (0 slots) slave
   replicates 3281d6e09493bcfab54d33d0d06c605f1f60caf0
M: f0380a61462310dc351f32a1071bb4304f851f7c 192.168.146.144:7003
   slots:[10923-16383] (5461 slots) master
   1 additional replica(s)
M: 3281d6e09493bcfab54d33d0d06c605f1f60caf0 192.168.146.144:7002
   slots:[5461-10922] (5462 slots) master
   1 additional replica(s)
[OK] All nodes agree about slots configuration.
>>> Check for open slots...
>>> Check slots coverage...
[OK] All 16384 slots covered.
3)查看Redis集群状态
从其中可以看到每个节点的身份、槽分配情况以及主从状态
root@localhost:/data# redis-cli -p 7001
127.0.0.1:7001> cluster nodes
fdbe3d8761fd8f060ac2c8e40de1175ba6bbf526 192.168.146.144:7005@17005 slave f0380a61462310dc351f32a1071bb4304f851f7c 0 1649253047000 3 connected
0c323c182f4b819fbf0076ab8097b83a0ced5371 192.168.146.144:7006@17006 slave 008df78cbf50c93708cedca918ca376bee2a4c21 0 1649253048041 1 connected
a382d28bb747d9bf821812cf9853fcd0b2a9deca 192.168.146.144:7004@17004 slave 3281d6e09493bcfab54d33d0d06c605f1f60caf0 0 1649253047028 2 connected
f0380a61462310dc351f32a1071bb4304f851f7c 192.168.146.144:7003@17003 master - 0 1649253047000 3 connected 10923-16383
3281d6e09493bcfab54d33d0d06c605f1f60caf0 192.168.146.144:7002@17002 master - 0 1649253045000 2 connected 5461-10922
008df78cbf50c93708cedca918ca376bee2a4c21 192.168.146.144:7001@17001 myself,master - 0 1649253044000 1 connected 0-5460
3.集群环境下数据读取
集群环境下,读取数据下,需要加一个 -c,自动重定向,具体见Redis文章
# redis-cli -c -p <port>
4.主从容错切换
上面启动了3主3从,此时停止主机7001,从机会自动上位
当我们重新启动7001时,此时7001变成slave状态,如果要恢复7001为主机状态,需要先将从机重启一下,让7001升级为主机
5.主从扩容
在Redis文章中已经表明:
这里只写需要的步骤:
1)新建2个Redis实例
2)新实例加入集群
3)重新分配槽
4)将2个新的实例配置主从关系
6.主从缩容
见Redis文章 :
具体步骤:
1)删除从节点
2)将主节点槽位清空,重新分配
3)将主节点删除


 295
295


 被折叠的 条评论
为什么被折叠?
被折叠的 条评论
为什么被折叠?
 到【灌水乐园】发言


