


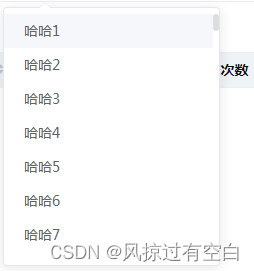
element 下拉数据过多,导致列表卡顿加载慢,使用虚拟列表方式渲染,无需分页
上效果图:
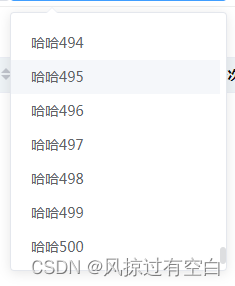
看起来是加载全部,实际上只是数据是全部数据,DOM上面的却一直是可视窗口的10条,当然这条数是自己设置。我们看一下加载的DOM。
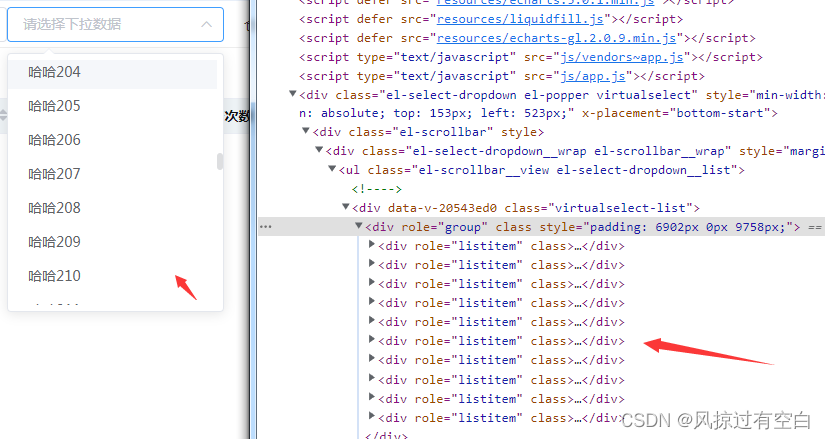
不管怎么往下滚,DOM加载的都是10条。这样就不会导致卡顿影响效率,或者要做分页处理了。
下面上一下步骤代码:
准备工作:安装虚拟列表
npm install vue-virtual-scroll-list --save
- 第一步先创建Select.vue文件,复制一下代码进去即可。注意引入el-option-node.vue
<template>
<div>
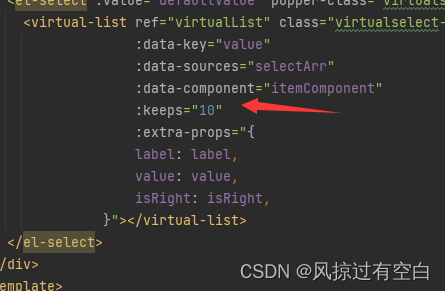
<el-select :value="defaultValue" popper-class="virtualselect" filterable :filter-method="filterMethod" @visible-change="visibleChange" v-bind="$attrs" v-on="$listeners">
<virtual-list ref="virtualList" class="virtualselect-list"
:data-key="value"
:data-sources="selectArr"
:data-component="itemComponent"
:keeps="10"
:extra-props="{
label: label,
value: value,
isRight: isRight,
}"></virtual-list>
</el-select>
</div>
</template>
<script>
import virtualList from 'vue-virtual-scroll-list'
import ElOptionNode from './el-option-node'
export default {
components:{
'virtual-list': virtualList
},
model: {
prop: 'defaultValue',
event: 'change',
},
props: {
selectData: {
type: Object,
default () {
return {}
}
},//父组件传的值
//数组
list:{
type: Object,
default () {
return {}
}
},
//显示名称
label:{
type: String,
default:''
},
//标识
value:{
type: String,
default:''
},
//显示右边
isRight:{
type: Boolean,
default:false
},
defaultValue: {
type: String,
default: ''
},// 绑定的默认值
},
mounted() {
this.init();
},
watch: {
'list'() {
this.init();
}
},
data() {
return {
itemComponent: ElOptionNode,
selectArr:[]
}
},
methods: {
init() {
if(!this.defaultValue) {
this.selectArr = this.list;
}else {
// 回显问题
// 由于只渲染20条数据,当默认数据处于20条之外,在回显的时候会显示异常
// 解决方法:遍历所有数据,将对应回显的那一条数据放在第一条即可
this.selectArr = JSON.parse(JSON.stringify(this.list));
let obj = {};
for (let i = 0; i < this.selectArr.length; i++) {
const element = this.selectArr[i];
if(element[this.value].toLowerCase() === this.defaultValue.toLowerCase()) {
obj = element;
this.selectArr.splice(i,1);
break;
}
}
this.selectArr.unshift(obj);
}
},
// 搜索
filterMethod(query) {
if (query !== '') {
this.$refs.virtualList.scrollToIndex(0);//滚动到顶部
setTimeout(() => {
this.selectArr = this.list.filter(item => {
return this.selectData.isRight?
(item[this.label].toLowerCase().indexOf(query.toLowerCase()) > -1 || item[this.value].toLowerCase().indexOf(query.toLowerCase()) > -1)
:item[this.label].toLowerCase().indexOf(query.toLowerCase()) > -1;
});
},100)
} else {
this.init();
}
},
visibleChange(bool) {
if(!bool) {
this.$refs.virtualList.reset();
this.init();
}
}
}
}
</script>
<style lang="less" scoped>
.virtualselect {
// 设置最大高度
&-list {
max-height:245px;
overflow-y:auto;
}
}
::-webkit-scrollbar {
width: 6px;
height: 6px;
background-color: transparent;
cursor: pointer;
margin-right: 5px;
}
::-webkit-scrollbar-thumb {
background-color: rgba(144,147,153,.3) !important;
border-radius: 3px !important;
}
::-webkit-scrollbar-thumb:hover{
background-color: rgba(144,147,153,.5) !important;
}
::-webkit-scrollbar-track {
background-color: transparent !important;
border-radius: 3px !important;
-webkit-box-shadow: none !important;
}
</style>
- 第二步创建el-option-node.vue文件,复制一下代码进去即可。
<template>
  <el-option :key="label+value" :label="source[label]" :value="source[value]" :disabled="source.disabled">
    <span>{{source[label]}}</span>
    <span v-if="isRight" style="float:right;color:#939393">{{source[value]}}</span>
  </el-option>
</template>
<script>
export default {
  name: 'item-component',
  props: {
    index: {
      type: Number
    },// 每一行的索引
    source: {
      type: Object,
      default () {
        return {}
      }
    },// 每一行的内容
    label: {
      type: String
    },// 需要显示的名称
    value: {
      type: String
    },// 绑定的值
    isRight: {
      type: Boolean,
      default () {
        return false
      }
    },// 右侧是否显示绑定的值
  }
}
</script>
- 第三步在全局引入Select.vue也行,当前页面引入也行,看自己需求;
我这里是全局引入
import cwSelect from '@/components/common/customizeSelect/Select.vue'
const CustomComponents = {
    install: function (Vue) {
        Vue.component('cwSelect', cwSelect);
    }
};
- 第四步使用:
<cw-select :list="selectData" label="name" value="code" v-model="defaultValue" placeholder="请选择下拉数据" clearable ></cw-select>
总结:list的值是自己的数据。label 和value和v-model和原来的el-select属性一样。其他的也一样用就好了,比如这个clearable 要清除的直接写上去,disabled也是一样,原来的el-select属性怎么加这个就怎么加上去。基本能满足一般需求。试试吧。
哦对了,修改加载的条数是在
好了,到这就结束了,能用到就点个赞吧~


 4883
4883


 被折叠的 条评论
为什么被折叠?
被折叠的 条评论
为什么被折叠?
 到【灌水乐园】发言


