


简单手写spring的依赖注入
什么是依赖注入?
IOC(DI)-控制反转(依赖注入)
所谓的IOC称之为控制反转,简单来说就是将对象 的创建的权力及对象的生命周期的管理过程交由Spring框架来处理,从此在开发过程中不在需要关注对象的创建和生命周期的管理,而是在需要的时候由Spring框架提供,这个由Spring框架管理对象创建和生命周期的机制称之为控制反转。而在创建对象的过程中Spring可以依据配置对象的属性进行设置,这个过程称之为依赖注入,也即DI
个人理解
目前的java开发,spring仍是最主流的框架,换句话说如果你不了解spring,那么你将很难拿到offer,所以学习并且理解spring是很重要的一件事,依赖注入是spring的一个特性,在工作中几乎无时无刻不在使用,本题只是简单的一个手写实现
spring中原本的代码健壮性是很强的,让人看起来就会感觉很繁琐复杂,所以本篇只是粗略实现一下DI的功能,本篇仅供初学者参考,如果觉得本篇比较简单或者完全理解本篇内容后,请移步spring源码
手写DI步骤
所需要的环境
1.JDK 1.8
2.IDEA或者ecilpese皆可以,建议使用IDEA
3.maven
4.一颗求知的心
需要提前了解的内容
1.反射(重要,不太理解的话可以先掌握常用方法)
2.xml解析(了解xml解析)
项目结构

pom文件
 <dependencies>
    <dependency>
      <groupId>org.jdom</groupId>
      <artifactId>jdom</artifactId>
      <version>2.0.2</version>
    </dependency>

    <dependency>
      <groupId>jaxen</groupId>
      <artifactId>jaxen</artifactId>
      <version>1.2.0</version>
    </dependency>
  </dependencies>
手写步骤
1.创建实体类
我们先在pojo包下创建一个实体类Student
package com.tao.spring.DItest.pojo;

public class Student {
    private String name;
    private int age;
    private String className;

    public String getName() {
        return name;
    }

    public void setName(String name) {
        this.name = name;
    }

    public int getAge() {
        return age;
    }

    public void setAge(int age) {
        this.age = age;
    }

    public String getClassName() {
        return className;
    }

    public void setClassName(String className) {
        this.className = className;
    }

    @Override
    public String toString() {
        return "Student{" +
                "name='" + name + '\'' +
                ", age=" + age +
                ", className='" + className + '\'' +
                '}';
    }
}
小提示:
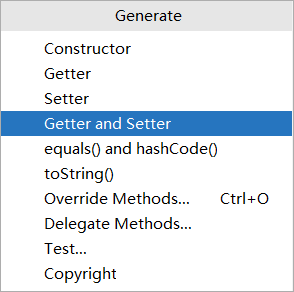
在写完属性后按下alt+insert,选择Getter and Setter可以快速生成get和set方法和tostring方法。如果是按下去没出现下面提示框的话,就按下alt+fn+insert
2.创建xml文件用于记录要注入的属性
<?xml version="1.0" encoding="UTF-8"?>
<beans>
    <bean id="Student" class="com.tao.spring.DItest.pojo.Student">
        <property name="name" value="李四"/>
        <property name="age" value="18"/>
        <property name="classname" value="8班"/>
    </bean>
</beans>
3.解析XML文件,使用反射实现依赖注入
在iocFactory包下创建ApplicationContext接口
public interface ApplicationContext {
    Object getBean(String name);
}
在本包下再创建impl包,然后新建ClassPathApplicationContext去实现ApplicationContext接口
package com.tao.spring.DItest.iocFactory.impl;

import com.tao.spring.DItest.iocFactory.ApplicationContext;
import org.jdom2.Document;
import org.jdom2.Element;
import org.jdom2.JDOMException;
import org.jdom2.input.SAXBuilder;
import org.jdom2.xpath.XPathExpression;
import org.jdom2.xpath.XPathFactory;

import java.io.File;
import java.io.IOException;
import java.lang.reflect.Field;
import java.lang.reflect.InvocationTargetException;
import java.lang.reflect.Method;
import java.net.URISyntaxException;
import java.net.URL;
import java.util.*;

public class ClassPathApplicationContext implements ApplicationContext {

    //要解析的配置文件
    private File file;

    //存放bean 贯穿全局的属性 请在项目中一直留意
    private Map map=new HashMap();

    //解析配置文件  类似于  ApplicationContext=new ClassPathApplicationContext("application.xml")
    public ClassPathApplicationContext(String configfile) throws URISyntaxException, IOException, JDOMException, ClassNotFoundException, InvocationTargetException, InstantiationException, IllegalAccessException {
        //获取xml文件路径
        URL url = this.getClass().getClassLoader().getResource(configfile);
        System.out.println(url.toString());

        File file = new File(url.toURI());

        //解析xml
        xmlParse(file);
    }

    //解析文件
    private void xmlParse(File file) throws IOException, JDOMException, ClassNotFoundException, InstantiationException, IllegalAccessException, InvocationTargetException {
        //创建document对象
        Document document = new SAXBuilder().build(file);

        // 获取所有的Bean节点
        XPathFactory xPathFactory = XPathFactory.instance();
        XPathExpression expression = xPathFactory.compile("//bean");

        //遍历bean集合
        List beans = expression.evaluate(document);
        Iterator iterator = beans.iterator();

        while (iterator.hasNext()){
            Element bean = (Element) iterator.next();

            //获取配置文件的id属性值
            String id = bean.getAttributeValue("id");
            String cls = bean.getAttributeValue("class");

            //通过反射拿到类相应信息
            Class<?> aClass = Class.forName(cls);
            Object object = aClass.newInstance();

            //存储bean中属性的类型
            Map<String, String> filedTypeMap = new HashMap<>();
            filedTypeMap=getFiledType(aClass);

            //拿取该类所有方法,通过set赋值  (DI实现方法之一 set注入)
            Method[] methods = aClass.getDeclaredMethods();

            //遍历bean下面所有属性 和set方法一一对应 再进行赋值
            List<Element> propertys = bean.getChildren("property");

            for (Element property : propertys) {
                for (Method method : methods) {
                    //获取属性名字 去匹配
                    String name = method.getName().toLowerCase();

                    //普通对象属性
                    if (property.getAttribute("name")!=null) {
                        if (name.startsWith("set")) {
                            String tempName = name.substring(3);
                            if (tempName.equals(property.getAttributeValue("name"))) {
                                String s = filedTypeMap.get(tempName);
                                if (s!=null){
                                    if (s.equals("int")){
                                        method.invoke(object, Integer.parseInt(property.getAttributeValue("value")));
                                    }else {
                                        method.invoke(object, property.getAttributeValue("value"));
                                    }
                                }
                            }
                        }
                    }else {
                        method.invoke(object,map.get(property.getAttributeValue("ref")));
                    }

                }
            }
            //将bean添加到map中
            map.put(id,object);
        }
    }

    private Map<String, String> getFiledType(Class<?> aClass) {
        Map<String, String> filedTypeMap = new HashMap<>();
        Field[] declaredFields = aClass.getDeclaredFields();
        for (Field declaredField : declaredFields) {
            filedTypeMap.put(declaredField.getName().toLowerCase(Locale.ROOT),declaredField.getGenericType().getTypeName());
        }
        return filedTypeMap;
    }

    @Override
    public Object getBean(String name) {
        return map.get(name);
    }
}
如果对xml结构不太了解的话,请参考下图

4.测试类
package com.tao.spring.DItest.test;

import com.tao.spring.DItest.iocFactory.ApplicationContext;
import com.tao.spring.DItest.iocFactory.impl.ClassPathApplicationContext;
import com.tao.spring.DItest.pojo.Student;
import org.jdom2.JDOMException;

import java.io.IOException;
import java.lang.reflect.InvocationTargetException;
import java.net.URISyntaxException;

public class ApplicationTest {
    public static void main(String[] args) throws URISyntaxException, IOException, JDOMException, ClassNotFoundException, InvocationTargetException, InstantiationException, IllegalAccessException {
        ApplicationContext applicationContext=new ClassPathApplicationContext("application.xml");
        Student student1 = (Student) applicationContext.getBean("Student");
        Student student2 = (Student) applicationContext.getBean("Student");

        System.out.println(student1);
        System.out.println("**********************");
        System.out.println(student2);

        System.out.println(student1==student2);
    }
}
5.输出结果

根据结果可以看出成功给Student对象注入xml中的属性值,并且是单例模式,并且两个对象为同一个对象
思考与改进
这个项目能成功的注入简单属性,如果是引用类型的属性该如何注入?
比如说现在有个实体类Clothes
package com.tao.spring.DIreftest.pojo;

public class Clothes {
    private String jacket;
    private String shirt;
    private String pants;

    public String getJacket() {
        return jacket;
    }

    public void setJacket(String jacket) {
        this.jacket = jacket;
    }

    public String getShirt() {
        return shirt;
    }

    public void setShirt(String shirt) {
        this.shirt = shirt;
    }

    public String getPants() {
        return pants;
    }

    public void setPants(String pants) {
        this.pants = pants;
    }

    @Override
    public String toString() {
        return "Clothes{" +
                "jacket='" + jacket + '\'' +
                ", shirt='" + shirt + '\'' +
                ", pants='" + pants + '\'' +
                '}';
    }
}
然后Student持有这个属性
package com.tao.spring.DIreftest.pojo;

public class Student {
    private String name;
    private int age;
    private String className;
    private Clothes clothes;

    public String getName() {
        return name;
    }

    public void setName(String name) {
        this.name = name;
    }

    public int getAge() {
        return age;
    }

    public void setAge(int age) {
        this.age = age;
    }

    public String getClassName() {
        return className;
    }

    public void setClassName(String className) {
        this.className = className;
    }

    public Clothes getClothes() {
        return clothes;
    }

    public void setClothes(Clothes clothes) {
        this.clothes = clothes;
    }

    @Override
    public String toString() {
        return "Student{" +
                "name='" + name + '\'' +
                ", age=" + age +
                ", className='" + className + '\'' +
                ", clothes=" + clothes +
                '}';
    }
}
如果理解了前面的项目的话,这个也很好实现注入的,无非是在xml中写明需要注入的实例,然后在set方法注入的时候进行判断,试试看自己实现一下吧
改进后的项目
1.结构图
只是增加了一个实体类Clothes

2.修改xml文件
复制之前的xml文件,然后粘贴后改名为refapplication.xml
写入被引用的bean
<?xml version="1.0" encoding="UTF-8" ?>
<beans>
    <bean id="clothes" class="com.tao.spring.DIreftest.pojo.Clothes">
        <property name="jacket" value="LiNing"/>
        <property name="shirt" value="T-shirt"/>
        <property name="pants" value="zhwnweisi"/>
    </bean>

    <bean id="student" class="com.tao.spring.DIreftest.pojo.Student">
        <property name="name" value="lisan"/>
        <property name="age" value="20"/>
        <property name="classname" value="6班"/>
        <property ref="clothes"/>
    </bean>
</beans>
3.修改注入逻辑
            for (Element property : propertys) {
                for (Method method : methods) {
                    //获取属性名字 去匹配
                    String name = method.getName().toLowerCase();

                    //普通对象属性
                    if (property.getAttribute("name")!=null) {
                        if (name.startsWith("set")) {
                            String tempName = name.substring(3);
                            if (tempName.equals(property.getAttributeValue("name"))) {
                                String s = filedTypeMap.get(tempName);
                                if (s!=null){
                                    if (s.equals("int")){
                                        method.invoke(object, Integer.parseInt(property.getAttributeValue("value")));
                                    }else {
                                        method.invoke(object, property.getAttributeValue("value"));
                                    }
                                }
                            }
                        }
                        //引用对象
                    }else {
                        String tempName = name.substring(3);
                        if (name.startsWith("set")) {
                            if (tempName.equals(property.getAttributeValue("ref"))) {
                                String s = filedTypeMap.get(tempName);
                                method.invoke(object, map.get(property.getAttributeValue("ref")));
                            }
                        }
                    }

                }
            }

            //将bean添加到map中
            map.put(id,object);
4.测试类
xml文件名不要写错哦
    public static void main(String[] args) throws URISyntaxException, IOException, JDOMException, ClassNotFoundException, InvocationTargetException, InstantiationException, IllegalAccessException {
        ApplicationContext applicationContext=new ClassPathApplicationContext("refapplication.xml");
        Student student1 = (Student) applicationContext.getBean("student");
        Student student2 = (Student) applicationContext.getBean("student");

        System.out.println(student1);
        System.out.println("**********************");
        System.out.println(student2);

        System.out.println(student1==student2);
    }
5.输出结果

从结果可以看出注入还是很成功的!
本篇文档仅供参考,如果有疏漏和不足之处欢迎在评论区指出!


 127
127


 被折叠的 条评论
为什么被折叠?
被折叠的 条评论
为什么被折叠?
 到【灌水乐园】发言


