


使用场景
要求页面在滑动到一定范围时,如果出现横向盒子列表,则在靠近这个横向盒子列表时,列表会根据当前页面手指上下滑动的范围去实时控制这个横向盒子左右移动,通过这种方式来提示用户此处可以左右滑动。
实现经历
1、scroll-view:scrollTop不能够满足手指当前的实时移动,且只能在scroll-view标签范围内,才能监听到 bindscroll;
2、swiper:不适用整个页面;
3、touchmove:虽然有做节流,但还是因频繁调用setData,在安卓上,还是有很明显的卡顿,ios上好一些;
4、wxs:最后采用在wxs里面去做touchmove相关的操作
代码片段
index.js
const app = getApp()

Page({
  data: {
    test_info: [
      1,2,3,4,5,6,7,8,9,10
    ],
  }
})
index.wxs
var lastX, lastY, allStatusX, allStatusY, scrollLeft

var scrollMove = function (e, ins) {
    //console.log("pageY = " + JSON.stringify(e.changedTouches[0].pageY));
    var currentX = e.changedTouches[0].pageX;
    var currentY = e.changedTouches[0].pageY;
    allStatusX = currentX - lastX;
    allStatusY = currentY - lastY;
    // var scrollLeft = 0 - e.changedTouches[0].pageY + "px";

    //上下方向实时滑动
    if (Math.abs(allStatusX) < Math.abs(allStatusY)) {
        //console.log(allStatusY);
        if (allStatusY < 0) {
            console.log('实时向上滑动')
            scrollLeft = -160
        } else {
            console.log('实时向下滑动')
            scrollLeft = 0
        }
    }

    // console.log("scrollXMove = " + JSON.stringify(e.detail));
    ins.selectComponent(".head-box").setStyle({
        "transform":"translateX("+scrollLeft+"px);"
    });
}

var scrollStart = function (e, ins) {
    lastX = e.touches[0].pageX
    lastY = e.touches[0].pageY
    console.log('开始坐标轴' + JSON.stringify(lastX), JSON.stringify(lastY));
}

var scrollEnd = function (e, ins) {
    console.log("scrollEnd");
}

module.exports = {
    scrollMove: scrollMove,
    scrollStart: scrollStart,
    scrollEnd: scrollEnd
}
index.wxml
<wxs module="scrollMove" src="./index.wxs"> </wxs>
<view style="margin-top:50rpx;">
	下面可以左右滑动
</view>

<!-- <scroll-view class="scroll-x-table" scroll-y="true" upper-threshold="0" lower-threshold="0" bindscroll="{{scrollMove.scrollXMove}}">
	<view class="subscribe-box justify">
		<block wx:for="{{test_info}}" wx:for-index="index" wx:for-item="item" wx:key="fieldId">
			<view class="field-info">
				<view class="field-title">{{item}}</view>
			</view>
		</block>
	</view>
</scroll-view> -->

<view capture-bind:touchmove="{{scrollMove.scrollMove}}" capture-bind:touchstart="{{scrollMove.scrollStart}}" capture-bind:touchend="{{scrollMove.scrollEnd}}">
	<view class="subscribe-box justify">
		<block wx:for="{{test_info}}" wx:for-index="index" wx:for-item="item" wx:key="fieldId">
			<view class="field-info">
				<view class="field-title">{{item}}</view>
			</view>
		</block>
	</view>
</view>


<view style="margin:30rpx;">
	底部内容随上面滑动左右移动
</view>
<view class="head-scroll-x head-fixed justify">
	<view class="head-box">
		<block wx:for="{{test_info}}" wx:for-index="index" wx:for-item="item" wx:key="fieldId">
			<view class="head-line">
				<view class="title">底部{{item}}</view>
			</view>
		</block>
	</view>
</view>
index.wxss
page {
  width: 100vw;
  height: 100vh;
}

.head-scroll-x {
  margin: 0;
  height: 80rpx;
  white-space: nowrap;
  background-color: white;
}

.head-box {
  background-color: white;
  padding-left: 15rpx;
  transition: transform .5s;
}

.head-line {
  display: inline-block;
  width: 120rpx;
}

.head-line .title {
  width: 100rpx;
  height: 80rpx;
  line-height: 80rpx;
  text-align: center;
  background-color: greenyellow;
  font-size: 25rpx;
}

.scroll-x-table {
  width: 750rpx;
  margin: 30rpx 0 0;
  padding-bottom: 20rpx;
  height: 200rpx;
}

.subscribe-box {
  margin-top: 5rpx;
}

.field-info {
  margin: 0 10rpx;
  width: 100%;
}

.field-title {
  width: 90%;
  height: 80rpx;
  line-height: 80rpx;
  margin: 0 auto;
  margin-bottom: 20rpx;
  text-align: center;
  background-color: orange;
  box-sizing: border-box;
}

.justify {
  display: flex;
  flex-direction: column;
  justify-content: space-between;
}
1️⃣instance对象支持的方法:
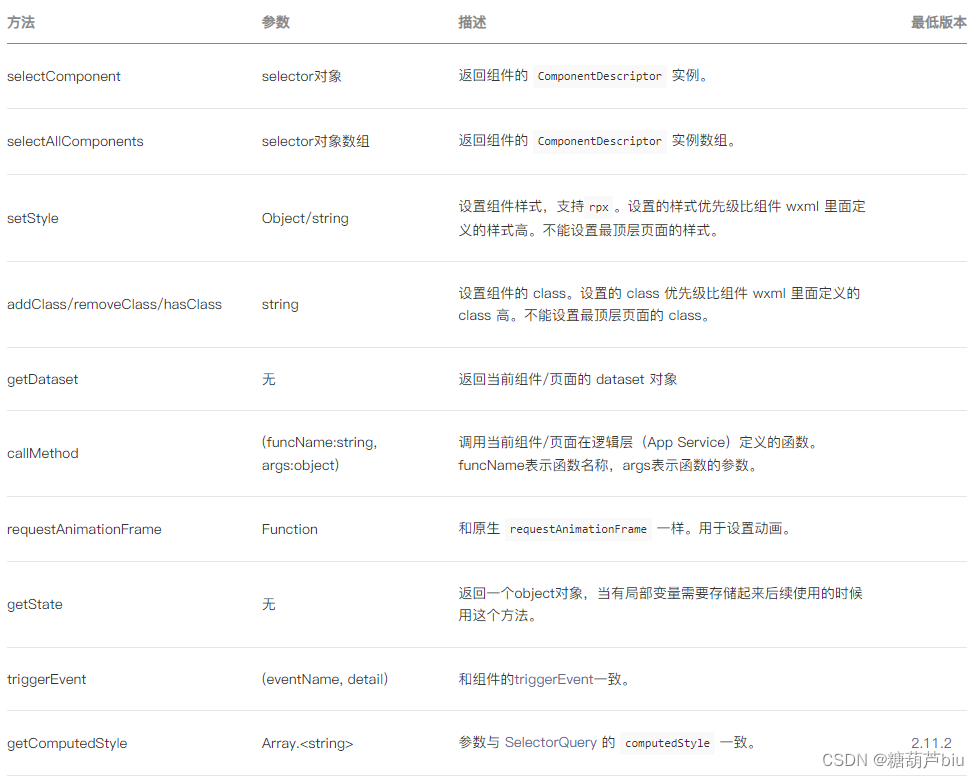
最常用的就是获取组件(类似于获取dom节点)、设置样式和class,以及调用app service方法,并且还有强大的触发器函数的使用,可以监听appservice 层中的data变化,具体demo请查看官方文档链接
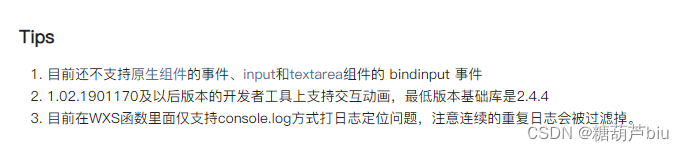
2️⃣官方Tips:
GIF演示

注意事项
1、wxs不能使用ES6+语法,否则会报错(勾选了ES6转ES5也没用)
2、console.log()不能直接打印对象,需要JSON.stringify
3、不能调用app service环境中的方法和wx.xxxx方法
以上就是我在项目中关于使用wxs来实现 “手指上下滑动范围与盒子左右移动关联” 的全部内容啦,如果能够帮助到您,欢迎点赞👍+关注💗+收藏⭐️啦❗️❗️❗️,希望我们彼此能在前端的道路上继续加油努力探索呀😆😆😆


 5583
5583


 被折叠的 条评论
为什么被折叠?
被折叠的 条评论
为什么被折叠?
 到【灌水乐园】发言


