


1.引入依赖关系
        <!-- 引入shiro的相关依赖 就可以不用引入springboot-web启动器了 -->
        <dependency>
            <groupId>org.apache.shiro</groupId>
            <artifactId>shiro-spring-boot-web-starter</artifactId>
            <version>1.7.1</version>
        </dependency>
  <!-- 引入jwt的相关依赖 -->
         <dependency>
            <groupId>com.auth0</groupId>
            <artifactId>java-jwt</artifactId>
            <version>3.10.3</version>
        </dependency>
	<!-- 额外的Mybatis  mysql驱动 lombok devtools热启动器 springboot启动器 -->
   <dependencies>
        <dependency>
            <groupId>org.springframework.boot</groupId>
            <artifactId>spring-boot-starter</artifactId>
        </dependency>

        <dependency>
            <groupId>org.springframework.boot</groupId>
            <artifactId>spring-boot-devtools</artifactId>
            <scope>runtime</scope>
            <optional>true</optional>
        </dependency>
        <dependency>
            <groupId>org.projectlombok</groupId>
            <artifactId>lombok</artifactId>
            <optional>true</optional>
        </dependency>
        <dependency>
            <groupId>org.springframework.boot</groupId>
            <artifactId>spring-boot-starter-test</artifactId>
            <scope>test</scope>
        </dependency>
        <dependency>
            <groupId>org.mybatis.spring.boot</groupId>
            <artifactId>mybatis-spring-boot-starter</artifactId>
            <version>2.1.4</version>
        </dependency>
        <dependency>
            <groupId>mysql</groupId>
            <artifactId>mysql-connector-java</artifactId>
            <version>5.1.49</version>
        </dependency>
        <dependency>
            <groupId>com.github.pagehelper</groupId>
            <artifactId>pagehelper-spring-boot-starter</artifactId>
            <version>1.3.0</version>
        </dependency>
    </dependencies>
2.JWT相关工具类
引入JWT后呢, UsernamePasswordToken就不能拿来直接用了, 不过如果有多个自定义域的模式, 倒是可以写2套, 一套登录使用UsernamePasswordToken, 第二套, 验证使用MyJsonWebToken.
我们不考虑多域模式, 以单一自定义域的方式开发!
1.用MyJsonWebToken替换UsernamePasswordToken 实体类
package com.woniuxy.shiro.utils;

import lombok.AllArgsConstructor;
import lombok.Data;
import lombok.NoArgsConstructor;
import org.apache.shiro.authc.AuthenticationToken;

/**
 * @author: mayuhang  <br/>
 * Date: 2021/4/23:0:01  <br/>
 * Description: 存放token返回token  模仿UsernamePasswordToken 将替换原本的登录方式
 * SimpleAuthenticationInfo对象中的Principal 和 Credentials 是根据你自定义域中的认证方法来的,你怎么放
 */
@AllArgsConstructor
@Data
@NoArgsConstructor
public class MyJsonWebToken implements AuthenticationToken {
    String token;
    @Override
    public Object getPrincipal() {
        return token;
    }

    @Override
    public Object getCredentials() {
        return token;
    }
}
2.JWT工具类(了解即可)
package com.woniuxy.utils;

import com.auth0.jwt.JWT;
import com.auth0.jwt.JWTVerifier;
import com.auth0.jwt.algorithms.Algorithm;
import com.auth0.jwt.interfaces.DecodedJWT;

import java.util.Date;

/**
 * @author: mayuhang  <br/>
 * Date: 2021/4/22:23:41  <br/>
 * Description: 工具类 生成JWT 和
 */
public class JWTUtil {
    //过期时间5分钟
    private static final long EXPIRE_TIME = 5*60*1000;
    /**
     * Description : 校验token是否正确,错了就直接异常了 所以就直接返回true即可  <br/>
     * ChangeLog : 1. 创建 (2021/5/3 21:58 [mayuhang]);
     * @param token 密钥
     *        username 用户名
     *        secret 用户的密码  用于加密 作为解密条件 类似之前jwt教学中的signWith
     *              //签名算法 以及签的名字
     *             .signWith(SignatureAlgorithm.HS256, "woniuxy");
     * @return 是否正确
     **/
    public static boolean verify(String token,String username,String secret){
        //这里需要和生成签名的签名算法保持一致~
        Algorithm algorithm = Algorithm.HMAC256(secret);
        JWTVerifier verifier = JWT.require(algorithm).withClaim("username", username).build();
        verifier.verify(token);
        return true;
    }
    /**
     * Description : 获得token中的信息无需secret解密也能获得  <br/>
     * ChangeLog : 1. 创建 (2021/5/3 22:01 [mayuhang]);
     * @param token
     * @return token中包含的用户名
     **/
    public static String getUserName(String token){
        DecodedJWT jwt = JWT.decode(token);
        return jwt.getClaim("username").asString();
    }
    /**
     * Description : 生成签名,5min后过期  <br/>
     * ChangeLog : 1. 创建 (2021/5/3 22:01 [mayuhang]);
     * @param username 用户名
     * @param secret 用户的密码
     * @return 加密的token
     **/
    public static String sign(String username,String secret){
        Date date = new Date(System.currentTimeMillis() + EXPIRE_TIME);
        Algorithm algorithm = Algorithm.HMAC256(secret);
        return JWT.create()
                .withClaim("username",username)
                .withExpiresAt(date)
                .sign(algorithm);
    }
}
3.JWTFilter过滤器
还记得这个springmvc中的过滤器么? 代码执行流程如下:
preHandle->isAccessAllowed->isLoginAttempt->executeLogin
package com.woniuxy.shiro.utils;

import org.apache.shiro.web.filter.authc.BasicHttpAuthenticationFilter;
import org.springframework.http.HttpStatus;
import org.springframework.stereotype.Component;
import org.springframework.web.bind.annotation.RequestMethod;

import javax.servlet.ServletRequest;
import javax.servlet.ServletResponse;
import javax.servlet.http.HttpServletRequest;
import javax.servlet.http.HttpServletResponse;
import java.io.IOException;

/**
 * @author: mayuhang  <br/>
 * Date: 2021/4/23:0:24  <br/>
 * Description:继承官方的BasicHttpAuthenticationFilter,并且重写鉴权的方法
 * 代码的执行流程preHandle->isAccessAllowed->isLoginAttempt->executeLogin
 */
@Component
public class JWTFilter extends BasicHttpAuthenticationFilter {
    /**
     * 对跨域提供支持
     */
    @Override
    protected boolean preHandle(ServletRequest request, ServletResponse response) throws Exception {
        HttpServletRequest httpServletRequest = (HttpServletRequest) request;
        HttpServletResponse httpServletResponse = (HttpServletResponse) response;
        httpServletResponse.setHeader("Access-control-Allow-Origin", httpServletRequest.getHeader("Origin"));
        httpServletResponse.setHeader("Access-Control-Allow-Methods", "GET,POST,OPTIONS,PUT,DELETE");
        httpServletResponse.setHeader("Access-Control-Allow-Headers", httpServletRequest.getHeader("Access-Control-Request-Headers"));
        // 跨域时会首先发送一个option请求,这里我们给option请求直接返回正常状态
        if (httpServletRequest.getMethod().equals(RequestMethod.OPTIONS.name())) {
            httpServletResponse.setStatus(HttpStatus.OK.value());
            return false;
        }
        return super.preHandle(request, response);
    }
    /**
     * 这里我们详细说明下为什么最终返回的都是true,即允许访问
     * 例如我们提供一个地址 GET /article
     * 登入用户和游客看到的内容是不同的
     * 如果在这里返回了false,请求会被直接拦截,用户看不到任何东西
     * 所以我们在这里返回true,Controller中可以通过 subject.isAuthenticated() 来判断用户是否登入
     * 如果有些资源只有登入用户才能访问,我们只需要在方法上面加上 @RequiresAuthentication 注解即可
     */
    @Override
    protected boolean isAccessAllowed(ServletRequest request, ServletResponse response, Object mappedValue) {
        if (isLoginAttempt(request, response)) {
            try {
                //如果有token
                executeLogin(request, response);
            } catch (Exception e) {
                //如果请求头没有带Authorization属性的token 就到这里咯
                response401(request, response);
            }
        }
        return true;
    }
    /**
     * 判断用户是否想要登入。
     * 检测header里面是否包含Authorization字段即可
     */
    @Override
    protected boolean isLoginAttempt(ServletRequest request, ServletResponse response) {
        HttpServletRequest hsr = (HttpServletRequest) request;
        String authorization = hsr.getHeader("Authorization");
        return authorization!=null;
    }

    @Override
    protected boolean executeLogin(ServletRequest request, ServletResponse response) throws Exception {
        HttpServletRequest httpServletRequest = (HttpServletRequest) request;
        //从请求头中获取token
        String authorization = httpServletRequest.getHeader("Authorization");
        //放入对象中, redis或者数据库查询  等同于之前的UsernamePasswordToken
        MyJsonWebToken token = new MyJsonWebToken(authorization);
        // 提交给realm进行登入,如果错误他会抛出异常并被捕获
        System.out.println("JWTFilter.executeLogintoken交给realm判断:"+token);
        //这个等同于直接的 subject.login(token)
        getSubject(request, response).login(token);
        // 如果没有抛出异常则代表登入成功,返回true
        return true;
    }
        /**
         * 将非法请求跳转到 /401
         */
    private void response401(ServletRequest req, ServletResponse resp) {
        try {
            HttpServletResponse httpServletResponse = (HttpServletResponse) resp;
            httpServletResponse.sendRedirect("/401");
        } catch (IOException e) {
            System.err.println(e.getMessage());
        }
    }
}
3.编写自定义域
package com.woniuxy.shiro.utils;

import com.woniuxy.entity.RbacManager;
import com.woniuxy.entity.RbacPerm;
import com.woniuxy.service.RbacPermService;
import com.woniuxy.service.impl.UserService;
import com.woniuxy.utils.JWTUtil;
import org.apache.shiro.authc.*;
import org.apache.shiro.authz.AuthorizationInfo;
import org.apache.shiro.authz.SimpleAuthorizationInfo;
import org.apache.shiro.crypto.hash.Md5Hash;
import org.apache.shiro.crypto.hash.SimpleHash;
import org.apache.shiro.realm.AuthorizingRealm;
import org.apache.shiro.subject.PrincipalCollection;
import org.springframework.beans.factory.annotation.Autowired;
import org.springframework.context.annotation.Configuration;

import java.util.Arrays;
import java.util.HashSet;
import java.util.List;

/**
 * @author: mayuhang  <br/>
 * Date: 2021/4/23:0:02  <br/>
 * Description:自定义域  自己写登录验证 和授权
 */
@Configuration
public class MyRealm extends AuthorizingRealm {
    @Autowired
    UserService userService;
    @Autowired
    RbacPermService rbacPermService;
    @Override
    public void setName(String name){
        super.setName("myRealm");
    }
    // 这个需要注意下, 多域模式中, 每个域里面 请自己配置自己的token来源
    // 这里的token是来自 自定义的JWTToken
    // 必须重写此方法,不然 传的jwt, shiro却使用的是UsernamePasswordToken进行解析,
    // 会报一个错, 你token格式不对(JWT的值是3部分, UsernamePasswordToken只有1节....)
    @Override
    public boolean supports(AuthenticationToken token) {
        return token instanceof MyJsonWebToken;
    }
    /**
     * 授权信息
     * 在前后端不分离的情况下, 在html页面使用<shiro>|后端使用shiro的@checkRole,@checkPermission相关注解才能触发
     * 前后端分离的模式, 就直接用注解验证权限即可, 根据需求来
     */
    @Override
    protected AuthorizationInfo doGetAuthorizationInfo(PrincipalCollection principals) {
        System.out.println("MyRealm.doGetAuthorizationInfo, 授权方法进入!!!");
        //这里得去获取到这个token  不用token过滤器 直接从redis里面拿数据!!
        String userName = JWTUtil.getUserName(principals.toString());
        //去数据库查出用户信息, 含角色(也可含权限, 看你实体怎么定义咯= =)
        RbacManager user = userService.getUser(userName);
        //授权信息集合
        SimpleAuthorizationInfo simpleAuthorizationInfo = new SimpleAuthorizationInfo();
        //1.如果需求是角色可以配置多个,则如下获取所有角色 并放入授权信息集合(模拟多角色查询,虽然目前是单的)
        String roles = String.valueOf(user.getRoleId());
        if (!"".equals(roles)&&roles!=null){
            String[] roles1 = roles.split(",");
            for (String role: roles1) {
                simpleAuthorizationInfo.addRole(role);
            }
        }
        //2.目前是单个角色则直接这样用吧.....
//       simpleAuthorizationInfo.addRole(user.getRoleId()+"");
        //3.通过角色, 去查询中间表 找到所有的权限  获取tyep字段,a接口权限link细节信息(同第1步)
        List<RbacPerm> forRole = rbacPermService.findForRole(roles);
        //4.转成HashSet去重存放
        HashSet<String> permissions = new HashSet<>();
        for (RbacPerm rbacPerm : forRole) {
            if(rbacPerm.getCode()!=null){
                permissions.add(rbacPerm.getCode());
            }
        }
        //5.放入simpleAuthorizationInfo对象中
        simpleAuthorizationInfo.addStringPermissions(permissions);
        return simpleAuthorizationInfo;
    }
    /**
     * 身份认证方法
     * 需要在用户登录系统时触发
     * 该方法将是我们主要的方法, 流程是登录后, 携带token 与权限信息 发送到 vue中 存储浏览器
     * 在页面渲染时,直接传入菜单和 页面按钮显示权限
     * @return
     * @throws AuthenticationException
     */
    @Override
    protected AuthenticationInfo doGetAuthenticationInfo(AuthenticationToken auth) throws AuthenticationException {
        System.out.println("MyRealm.doGetAuthenticationInfo, 用户认证方法进入!");
        String myJWT = (String) auth.getCredentials();
        String username = JWTUtil.getUserName(myJWT);
        if (username==null){
            throw new AuthenticationException("token无效");
        }
        //通过用户名,查出当前用户密码
        RbacManager user = userService.getUser(username);

        if (user==null){
            throw new AuthenticationException("User 不存在");
        }
        //通过存入的myJWT与传入的账号密码进行验证, 账号密码是否正确(类比之前手动比较密码~~~~)
        if (JWTUtil.verify(myJWT,username,user.getPassword())) {
            return new SimpleAuthenticationInfo(myJWT,myJWT,this.getName());
        }else {
            throw new AuthenticationException("用户名或者密码错误");
        }
    }
}
4.编写配置类ShiroConfig
1、需要配置禁用session,安全管理器,shiro过滤器, 注解支持 ,生命周期,
  package com.woniuxy.shiro.utils;

import org.apache.shiro.mgt.SessionStorageEvaluator;
import org.apache.shiro.spring.LifecycleBeanPostProcessor;
import org.apache.shiro.spring.security.interceptor.AuthorizationAttributeSourceAdvisor;
import org.apache.shiro.spring.web.ShiroFilterFactoryBean;
import org.apache.shiro.web.mgt.DefaultWebSecurityManager;
import org.apache.shiro.web.mgt.DefaultWebSessionStorageEvaluator;
import org.springframework.context.annotation.Bean;
import org.springframework.context.annotation.Configuration;

import javax.servlet.Filter;
import java.util.HashMap;
import java.util.Map;

/**
 * @author: mayuhang  <br/>
 * Date: 2021/4/23:0:35  <br/>
 * Description: shiro核心配置, 中央大脑 SecurityManager 相关配置 等同于之前玩 shiro-realm.ini的时候
 */
@Configuration
public class ShiroConfig {

    /**
     * 禁用session, 不保存用户登录状态。保证每次请求都重新认证。
     * 需要注意的是,如果用户代码里调用Subject.getSession()还是可以用session
     */
    @Bean
    protected SessionStorageEvaluator sessionStorageEvaluator() {
        DefaultWebSessionStorageEvaluator sessionStorageEvaluator = new DefaultWebSessionStorageEvaluator();
        sessionStorageEvaluator.setSessionStorageEnabled(false);
        return sessionStorageEvaluator;
    }
    //配置安全管理器, 传入自己写的自定义域
    @Bean
    public DefaultWebSecurityManager securityManager(MyRealm realm) {
        //使用默认的安全管理器
        DefaultWebSecurityManager securityManager = new
                DefaultWebSecurityManager(realm);
        //将自定义的realm交给安全管理器统一调度管理
        securityManager.setRealm(realm);
        return securityManager;
    }
    //Filter工厂,设置对应的过滤条件和跳转条件
    @Bean("shiroFilterFactoryBean")
    public ShiroFilterFactoryBean shirFilter(DefaultWebSecurityManager securityManager) {
        //1.创建shiro过滤器工厂
        ShiroFilterFactoryBean filterFactory = new ShiroFilterFactoryBean();
        //2.设置安全管理器
        filterFactory.setSecurityManager(securityManager);
        //3.通用配置,如果没有前后端分离配置这个(配置登录页面,登录成功页面,验证未成功页面)
//        filterFactory.setLoginUrl("/autherror?code=1"); //设置登录页面
//        filterFactory.setUnauthorizedUrl("/autherror?code=2"); //授权失败跳转页面
        //4.配置过滤器集合
        /**
         * key :访问连接
         * 支持通配符的形式
         * value:过滤器类型
         * shiro常用过滤器类型
         * anno :匿名访问(表明此链接所有人可以访问)
         * authc :认证后访问(表明此链接需登录认证成功之后可以访问)
         */
//        Map<String,String> filterMap = new LinkedHashMap<String,String>();
        // 配置不会被拦截的链接 顺序判断
//        filterMap.put("/user/home", "anon");
//        filterMap.put("/login", "anon");
//        filterMap.put("/user/**", "authc");
        //5.设置自定义jwt过滤器
        Map<String, Filter> jwt = new HashMap<>();
        jwt.put("jwt",new JWTFilter());
        filterFactory.setFilters(jwt);
        /*
         * 6设置所有的请求都经过我们的JWTfilter
         * 自定义url规则
         * http://shiro.apache.org/web.html#urls-
         */
        Map<String, String> filterRuleMap = new HashMap<>();
        // 所有请求通过我们自己的JWT Filter
        filterRuleMap.put("/**", "jwt");
        // 访问401和404页面不通过我们的Filter
        filterRuleMap.put("/401", "anon");
        filterFactory.setFilterChainDefinitionMap(filterRuleMap);
        return filterFactory;
    }
    //开启shiro注解支持
    @Bean
    public AuthorizationAttributeSourceAdvisor
    authorizationAttributeSourceAdvisor(DefaultWebSecurityManager securityManager) {
        AuthorizationAttributeSourceAdvisor advisor = new
                AuthorizationAttributeSourceAdvisor();
        advisor.setSecurityManager(securityManager);
        return advisor;
    }
    /**
     * Description : 管理Subject主体对象,生命周期的组件,用户只是打印下生产销毁日志什么的,请参考spring中bean的生命周期   <br/>
     * ChangeLog : 1. 创建 (2021/4/27 0:25 [mayuhang]);
     *
     * @return org.apache.shiro.spring.LifecycleBeanPostProcessor
     **/
    @Bean
    public LifecycleBeanPostProcessor lifecycleBeanPostProcessor() {
        return new LifecycleBeanPostProcessor();
    }
}
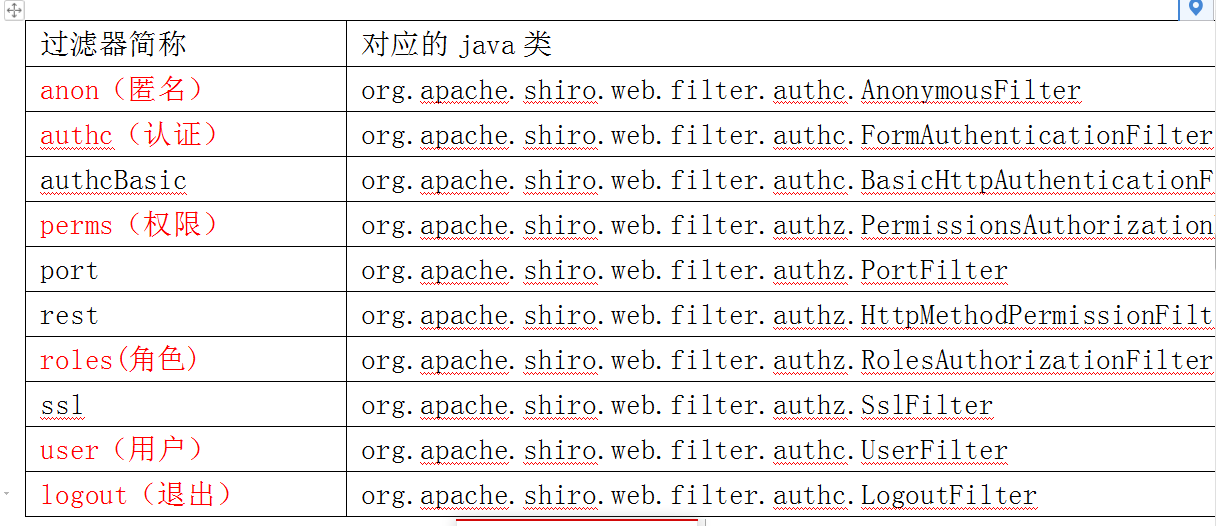
2.Shiro中过滤器的类型,以及ShiroConfig配置
5.Shiro 登录认证操作
Controller 修改登录方法
     @PostMapping("/login")
    public ResponseEntity login(@RequestParam("username") String username,
                                @RequestParam("password") String password) {
            //根据注册的时候 或者修改manager里面的加密方式来, 只要一样即可
            SimpleHash md5 = new SimpleHash("MD5", password, username);
            String newPassword = md5.toHex();
            //从数据库判断密码是否正确
            RbacManager user = userService.getUser(username);
            if (user.getPassword().equals(newPassword)) {
             //1.用了jwt而且不用多域模式  就不要用这个来登录了
//            Subject subject = SecurityUtils.getSubject();
//            UsernamePasswordToken token = new UsernamePasswordToken(username, newPassword);
//            System.out.println("UserController.login:"+token.toString());
//            subject.login(token);
                return new ResponseEntity(200, "登录成功", JWTUtil.sign(username, newPassword));
            } else {
                throw new UnauthorizedException();
            }
    }
完整的登录controller代码
package com.woniuxy.Controller;

import com.woniuxy.entity.RbacManager;
import com.woniuxy.entity.ResponseEntity;
import com.woniuxy.exception.UnauthorizedException;
import com.woniuxy.service.impl.UserService;
import com.woniuxy.utils.JWTUtil;
import org.apache.shiro.SecurityUtils;
import org.apache.shiro.authc.UsernamePasswordToken;
import org.apache.shiro.authz.annotation.Logical;
import org.apache.shiro.authz.annotation.RequiresAuthentication;
import org.apache.shiro.authz.annotation.RequiresPermissions;
import org.apache.shiro.authz.annotation.RequiresRoles;
import org.apache.shiro.crypto.hash.SimpleHash;
import org.apache.shiro.subject.Subject;
import org.springframework.beans.factory.annotation.Autowired;
import org.springframework.http.HttpStatus;
import org.springframework.web.bind.annotation.*;

/**
 * @author: mayuhang  <br/>
 * Date: 2021/4/22:23:52  <br/>
 * Description:
 */
@RestController
public class UserController {
    @Autowired
    UserService userService;

    @PostMapping("/login")
    public RbacEntity<Manager> login(String account, String password){
        //加密
        SimpleHash md5 = new SimpleHash("MD5", password, account);
        String newPassword = md5.toHex();
        System.out.println(newPassword);
        //从数据库中判断密码是否正确
        Manager manager = managerService.getManager(account);
        if(manager.getPassword().equals(newPassword)){
            String sign = JwtUtils.sign(account, newPassword);
            manager.setToken(sign);
            System.out.println("::"+redisTemplate.opsForValue().get(sign));
            return new RbacEntity<Manager>(200,"登录成功",manager);
        }else{
            return new RbacEntity<Manager>(430,"用户名或密码有误!",manager);
        }
    }
    /**
     * Description : 不携带token直接请求的话 就是游客咯  <br/>
     * ChangeLog : 1. 创建 (2021/5/3 22:15 [mayuhang]);
     *
     * @return com.woniuxy.entity.ResponseEntity
     **/
    @GetMapping("/article")
    public ResponseEntity article() {
        Subject subject = SecurityUtils.getSubject();
        if (subject.isAuthenticated()) {
            return new ResponseEntity(200, "您已经登录", null);
        } else {
            return new ResponseEntity(200, "You are guest", null);
        }
    }
    /**
     * Description : 加注解 判断是否认证过的, 等同于之前的subject.isAuthenticated()  <br/>
     * ChangeLog : 1. 创建 (2021/5/3 22:51 [mayuhang]);
     *
     * @return com.woniuxy.entity.ResponseEntity
     **/
    @GetMapping("/require_auth")
    @RequiresAuthentication
    public ResponseEntity requireAuth() {
        return new ResponseEntity(200, "恭喜您登录成功,可以获取菜单数据了!", null);
    }
    /**
     * Description : 是否有某个角色, 等同于subject.hasRole,有多个的话 参考下面权限判断  <br/>
     * ChangeLog : 1. 创建 (2021/5/3 22:53 [mayuhang]);
     *
     * @return com.woniuxy.entity.ResponseEntity
     **/
    @GetMapping("/require_role")
    @RequiresRoles("1")
    public ResponseEntity requireRole() {
        return new ResponseEntity(200, "你有超级管理员角色", null);
    }
    /**
     * Description : 是否有某个权限, 等同于subject.isPermitted  <br/>
     * ChangeLog : 1. 创建 (2021/5/3 22:53 [mayuhang]);
     *
     * @return com.woniuxy.entity.ResponseEntity
     **/
    @GetMapping("/require_permission")
    @RequiresPermissions(logical = Logical.OR, value = {"role:view", "perm_manage"})
    public ResponseEntity requirePermission() {
        return new ResponseEntity(200, "您正在访问权限,需要编辑,perm_manage权限的接口", null);
    }
    /**
     * Description : 所有401等权限认证, 错误的, 都到这里来~  <br/>
     * ChangeLog : 1. 创建 (2021/5/3 22:54 [mayuhang]);
     *
     * @return com.woniuxy.entity.ResponseEntity
     **/
    @RequestMapping(path = "/401")
    @ResponseStatus(HttpStatus.UNAUTHORIZED)
    public ResponseEntity unauthorized() {
        return new ResponseEntity(401, "未经授权", null);
    }
}
6.全局异常处理
package com.woniuxy.exception;

/**
 * @author: mayuhang  <br/>
 * Date: 2021/4/22:23:54  <br/>
 * Description:自定义异常处理
 */
public class UnauthorizedException extends RuntimeException {
    public UnauthorizedException(String message) {
        super(message);
    }

    public UnauthorizedException() {
        super();
    }
}
处理框架异常参考下方(这个可以不需要, 了解即可):
restful需要统一返回异常格式, 所以就处理下springboot的异常了…
@RestControllerAdvice
public class ExceptionController {

// 捕捉shiro的异常
@ResponseStatus(HttpStatus.UNAUTHORIZED)
@ExceptionHandler(ShiroException.class)
public ResponseBean handle401(ShiroException e) {
	return new ResponseBean(401, e.getMessage(), null);
}

// 捕捉UnauthorizedException
@ResponseStatus(HttpStatus.UNAUTHORIZED)
@ExceptionHandler(UnauthorizedException.class)
public ResponseBean handle401() {
	return new ResponseBean(401, "Unauthorized", null);
}

// 捕捉其他所有异常
@ExceptionHandler(Exception.class)
@ResponseStatus(HttpStatus.BAD_REQUEST)
public ResponseBean globalException(HttpServletRequest request, Throwable ex) {
	return new ResponseBean(getStatus(request).value(), ex.getMessage(), null);
}

private HttpStatus getStatus(HttpServletRequest request) {
Integer statusCode = (Integer) request.getAttribute("javax.servlet.error.status_code");
	if (statusCode == null) {
		return HttpStatus.INTERNAL_SERVER_ERROR;
	}
		return HttpStatus.valueOf(statusCode);
	}
}
7.自定义ResponseEntity
package com.woniuxy.entity;

import lombok.AllArgsConstructor;
import lombok.Data;
import lombok.NoArgsConstructor;

/**
 * @author: mayuhang  <br/>
 * Date: 2021/4/22:23:51  <br/>
 * Description: 这个 mvc里面讲过了哦
 */
@Data
@AllArgsConstructor
@NoArgsConstructor
public class ResponseEntity<T> {
    // http 状态码
    private int code;

    // 返回信息
    private String msg;

    // 返回的数据
    private T t;
}


 1万+
1万+


 被折叠的 条评论
为什么被折叠?
被折叠的 条评论
为什么被折叠?
 到【灌水乐园】发言


