


1 节点基础环境准备
这里提供VMware和centos7.9的软件包
https://pan.quark.cn/s/82d707d94cb8#/list/share
https://mirrors.tuna.tsinghua.edu.cn/centos/7.9.2009/isos/x86_64/CentOS-7-x86_64-Minimal-2009.iso
1.1 节点规划
master 192.168.100.10
node1 192.168.100.20
node2 192.168.100.30
| 服务器 | 操作系统 |
| master | CentOS Linux release 7.9.2009 (Core)|
| node1 | CentOS Linux release 7.9.2009 (Core)|
| node2 | CentOS Linux release 7.9.2009 (Core)|
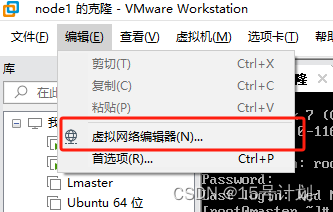
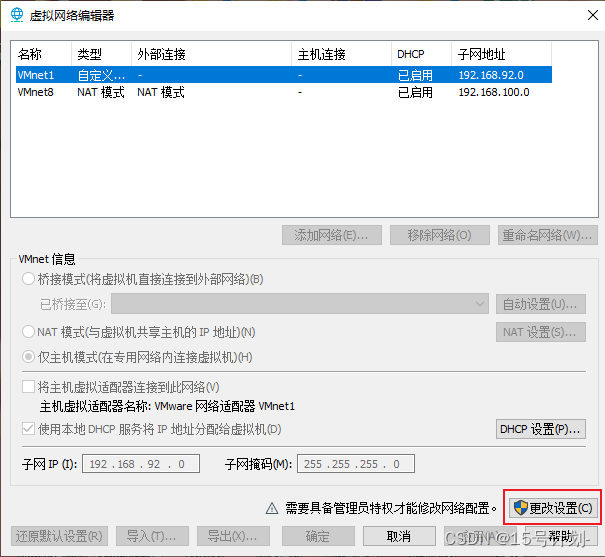
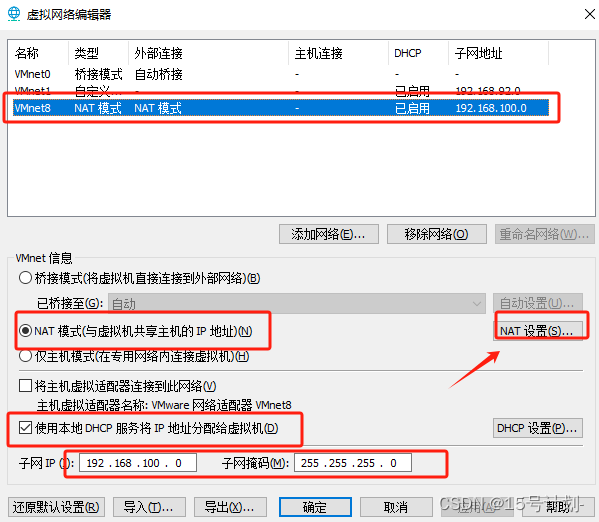
1.2 配置VMware的虚拟网络模式

1.3 更改网卡IP
//更改IP
//只需要修改ONBOOT="yes"
//加上IPADDR=192.168.100.10
//加上NETMASK=255.255.255.0
//加上GATEWAY=192.168.100.2
//加上DNS1=114.114.114.114
//这里演示master节点,node1、node2更改IPADDR即可
[root@master ~]# vi /etc/sysconfig/network-scripts/ifcfg-ens33
TYPE="Ethernet"
PROXY_METHOD="none"
BROWSER_ONLY="no"
BOOTPROTO="static"
DEFROUTE="yes"
IPV4_FAILURE_FATAL="no"
IPV6INIT="yes"
IPV6_AUTOCONF="yes"
IPV6_DEFROUTE="yes"
IPV6_FAILURE_FATAL="no"
IPV6_ADDR_GEN_MODE="stable-privacy"
NAME="ens33"
UUID="9e82244b-a44c-4e63-abf8-28f7f968d40f"
DEVICE="ens33"
IPADDR=192.168.100.10
NETMASK=255.255.255.0
GATEWAY=192.168.100.2
DNS1=114.114.114.114
ONBOOT="yes"
"/etc/sysconfig/network-scripts/ifcfg-ens33" 19L, 399C
//保存 然后重启网络服务
[root@master ~]# systemctl restart network
1.4 更改主机名称
//192.168.100.10
[root@localhost ~]#  hostnamectl set-hostname master && bash
//192.168.100.20
[root@localhost ~]#  hostnamectl set-hostname node1 && bash
//192.168.100.20
[root@localhost ~]#  hostnamectl set-hostname node2 && bash
1.5 一些预备操作
//所有机器都要做,演示master节点
//关闭swap分区  k8s不喜欢swap分区 不关闭swap k8s会初始化失败
//临时
[root@master ~]# swapoff -a
//永久
[root@master ~]# sed -ri 's/.*swap.*/#&/' /etc/fstab

//关闭SElinux
//临时
[root@master ~]# setenforce 0
//查看SElinux状态
[root@master ~]# getenforce
Permissive
//永久
[root@master ~]# sed -i 's/SELINUX=.*/SELINUX=disabled/g' /etc/selinux/config
//查看SElinux状态
[root@master ~]# getenforce
Disabled
//两种均可

//关闭防火墙
[root@master ~]# systemctl stop firewalld
//设置防火墙开机不自启
[root@master ~]# systemctl disable firewalld
1.6 编辑/etc/hosts文件
[root@master ~]# cat >> /etc/hosts << EOF
192.168.100.10 master
192.168.100.20 node1
192.168.100.30 node2
EOF
[root@node1 ~]# cat >> /etc/hosts << EOF
192.168.100.10 master
192.168.100.20 node1
192.168.100.30 node2
EOF
[root@node2 ~]# cat >> /etc/hosts << EOF
192.168.100.10 master
192.168.100.20 node1
192.168.100.30 node2
EOF
1.7 使用Kubernetes的yum源
//安装wget
[root@master ~]# yum install -y wget
//移动原本yum源,增加新的Kubernetes yum源
[root@master ~]# mv /etc/yum.repos.d/* /mnt/;wget ftp://ftp.rhce.cc/k8s/* -P /etc/yum.repos.d/
1.8 安装docker和Kubernetes
//所有机器都要做,演示master节点
//安装docker-ce
[root@master ~]# yum -y install docker-ce
//查看docker版本
[root@master ~]# docker --version
Docker version 26.1.2, build 211e74b
//配置docker镜像加速器
[root@master ~]# cat > /etc/docker/daemon.json <<EOF
> {
> "registry-mirrors": ["https://frz7i079.mirror.aliyuncs.com"]
> }
> EOF
//启动docker,并设置开机自启动
[root@master ~]# systemctl start docker
[root@master ~]# systemctl enable docker
//安装k8s1.20.0
[root@master ~]# yum -y install kubelet-1.20.0-0 kubeadm-1.20.0-0 kubectl-1.20.0-0 --disableexcludes=kubernetes
//设置不开启swap
[root@master ~]# sed -i "s/KUBELET_EXTRA_ARGS.*/KUBELET_EXTRA_ARGS=\"--fail-swap-on=false\"/g" /etc/sysconfig/kubelet
//设置kubelet开机自启动并现在启动kubelet
[root@master ~]# systemctl enable kubelet --now
2 节点基础环境准备
2.1 安装docker和Kubernetes
//查看kubernetes启动需要的镜像
[root@master ~]# kubeadm config images list
I0514 22:25:56.094454    9247 version.go:251] remote version is much newer: v1.30.0; falling back to: stable-1.20
k8s.gcr.io/kube-apiserver:v1.20.15
k8s.gcr.io/kube-controller-manager:v1.20.15
k8s.gcr.io/kube-scheduler:v1.20.15
k8s.gcr.io/kube-proxy:v1.20.15
k8s.gcr.io/pause:3.2
k8s.gcr.io/etcd:3.4.13-0
k8s.gcr.io/coredns:1.7.0
//进行kubeadm初始化
//要是初始化失败,使用下面命令可以重新设置Kubernetes节点
[root@master ~]# kubeadm reset -f
//--image-repository registry.aliyuncs.com/google_containers:使用阿里云镜像仓库,不然有些镜像下载不下来
//--kubernetes-version=v1.20.0:指定k8s的版本
//--pod-network-cidr=10.244.0.0/16:指定pod的网段
//--apiserver-advertise-address=192.168.100.10:API服务器将通告它正在侦听的IP地址。如果没有设置,将使用默认的网络接口。
//--ignore-preflight-errors=NumCPU:检查的列表,其错误将显示为警告。例如:“IsPrivilegedUser,交换”。值'all'忽略所有检查的错误。
//--ignore-preflight-errors=Swap:检查的列表,其错误将显示为警告。例如:“IsPrivilegedUser,交换”。值'all'忽略所有检查的错误。
//--service-cidr=10.96.0.0/12:为业务贵宾使用其他范围的IP地址。(默认“10.96.0.0/12”)
//会自动pull镜像进行Kubernetes搭建,不用自己再docker pull
[root@master ~]# kubeadm init --kubernetes-version=v1.20.0 --pod-network-cidr=10.244.0.0/16 --service-cidr=10.96.0.0/12 --apiserver-advertise-address=192.168.100.10 --ignore-preflight-errors=Swap --ignore-preflight-errors=NumCPU --image-repository registry.aliyuncs.com/google_containers
[init] Using Kubernetes version: v1.20.0
[preflight] Running pre-flight checks
        [WARNING IsDockerSystemdCheck]: detected "cgroupfs" as the Docker cgroup driver. The recommended driver is "systemd". Please follow the guide at https://kubernetes.io/docs/setup/cri/
        [WARNING SystemVerification]: this Docker version is not on the list of validated versions: 26.1.2. Latest validated version: 19.03
[preflight] Pulling images required for setting up a Kubernetes cluster
[preflight] This might take a minute or two, depending on the speed of your internet connection
[preflight] You can also perform this action in beforehand using 'kubeadm config images pull'
[certs] Using certificateDir folder "/etc/kubernetes/pki"
[certs] Generating "ca" certificate and key
[certs] Generating "apiserver" certificate and key
[certs] apiserver serving cert is signed for DNS names [kubernetes kubernetes.default kubernetes.default.svc kubernetes.default.svc.cluster.local master] and IPs [10.96.0.1 192.168.100.10]
[certs] Generating "apiserver-kubelet-client" certificate and key
[certs] Generating "front-proxy-ca" certificate and key
[certs] Generating "front-proxy-client" certificate and key
[certs] Generating "etcd/ca" certificate and key
[certs] Generating "etcd/server" certificate and key
[certs] etcd/server serving cert is signed for DNS names [localhost master] and IPs [192.168.100.10 127.0.0.1 ::1]
[certs] Generating "etcd/peer" certificate and key
[certs] etcd/peer serving cert is signed for DNS names [localhost master] and IPs [192.168.100.10 127.0.0.1 ::1]
[certs] Generating "etcd/healthcheck-client" certificate and key
[certs] Generating "apiserver-etcd-client" certificate and key
[certs] Generating "sa" key and public key
[kubeconfig] Using kubeconfig folder "/etc/kubernetes"
[kubeconfig] Writing "admin.conf" kubeconfig file
[kubeconfig] Writing "kubelet.conf" kubeconfig file
[kubeconfig] Writing "controller-manager.conf" kubeconfig file
[kubeconfig] Writing "scheduler.conf" kubeconfig file
[kubelet-start] Writing kubelet environment file with flags to file "/var/lib/kubelet/kubeadm-flags.env"
[kubelet-start] Writing kubelet configuration to file "/var/lib/kubelet/config.yaml"
[kubelet-start] Starting the kubelet
[control-plane] Using manifest folder "/etc/kubernetes/manifests"
[control-plane] Creating static Pod manifest for "kube-apiserver"
[control-plane] Creating static Pod manifest for "kube-controller-manager"
[control-plane] Creating static Pod manifest for "kube-scheduler"
[etcd] Creating static Pod manifest for local etcd in "/etc/kubernetes/manifests"
[wait-control-plane] Waiting for the kubelet to boot up the control plane as static Pods from directory "/etc/kubernetes/manifests". This can take up to 4m0s
[apiclient] All control plane components are healthy after 11.504263 seconds
[upload-config] Storing the configuration used in ConfigMap "kubeadm-config" in the "kube-system" Namespace
[kubelet] Creating a ConfigMap "kubelet-config-1.20" in namespace kube-system with the configuration for the kubelets in the cluster
[upload-certs] Skipping phase. Please see --upload-certs
[mark-control-plane] Marking the node master as control-plane by adding the labels "node-role.kubernetes.io/master=''" and "node-role.kubernetes.io/control-plane='' (deprecated)"
[mark-control-plane] Marking the node master as control-plane by adding the taints [node-role.kubernetes.io/master:NoSchedule]
[bootstrap-token] Using token: pev1kk.qdp5e2usn5gxm20v
[bootstrap-token] Configuring bootstrap tokens, cluster-info ConfigMap, RBAC Roles
[bootstrap-token] configured RBAC rules to allow Node Bootstrap tokens to get nodes
[bootstrap-token] configured RBAC rules to allow Node Bootstrap tokens to post CSRs in order for nodes to get long term certificate credentials
[bootstrap-token] configured RBAC rules to allow the csrapprover controller automatically approve CSRs from a Node Bootstrap Token
[bootstrap-token] configured RBAC rules to allow certificate rotation for all node client certificates in the cluster
[bootstrap-token] Creating the "cluster-info" ConfigMap in the "kube-public" namespace
[kubelet-finalize] Updating "/etc/kubernetes/kubelet.conf" to point to a rotatable kubelet client certificate and key
[addons] Applied essential addon: CoreDNS
[addons] Applied essential addon: kube-proxy

Your Kubernetes control-plane has initialized successfully!

To start using your cluster, you need to run the following as a regular user:

  mkdir -p $HOME/.kube
  sudo cp -i /etc/kubernetes/admin.conf $HOME/.kube/config
  sudo chown $(id -u):$(id -g) $HOME/.kube/config

Alternatively, if you are the root user, you can run:

  export KUBECONFIG=/etc/kubernetes/admin.conf

You should now deploy a pod network to the cluster.
Run "kubectl apply -f [podnetwork].yaml" with one of the options listed at:
  https://kubernetes.io/docs/concepts/cluster-administration/addons/

Then you can join any number of worker nodes by running the following on each as root:

kubeadm join 192.168.100.10:6443 --token pev1kk.qdp5e2usn5gxm20v \
    --discovery-token-ca-cert-hash sha256:6ee80937073b051e17644f4294fad1ac0c0928d4b3bf38980bb9d29efec81ead
//查看docker images
[root@master ~]# docker images
REPOSITORY                                                        TAG        IMAGE ID       CREATED       SIZE
registry.aliyuncs.com/google_containers/kube-proxy                v1.20.0    10cc881966cf   3 years ago   118MB
registry.aliyuncs.com/google_containers/kube-apiserver            v1.20.0    ca9843d3b545   3 years ago   122MB
registry.aliyuncs.com/google_containers/kube-controller-manager   v1.20.0    b9fa1895dcaa   3 years ago   116MB
registry.aliyuncs.com/google_containers/kube-scheduler            v1.20.0    3138b6e3d471   3 years ago   46.4MB
registry.aliyuncs.com/google_containers/etcd                      3.4.13-0   0369cf4303ff   3 years ago   253MB
registry.aliyuncs.com/google_containers/coredns                   1.7.0      bfe3a36ebd25   3 years ago   45.2MB
registry.aliyuncs.com/google_containers/pause                     3.2        80d28bedfe5d   4 years ago   683kB
//根据提示创建目录和配置文件
[root@master ~]# mkdir -p $HOME/.kube
[root@master ~]# cp -i /etc/kubernetes/admin.conf $HOME/.kube/config
[root@master ~]# chown $(id -u):$(id -g) $HOME/.kube/config
//第二台机器node1
[root@node1 ~]# kubeadm join 192.168.100.10:6443 --token fvqpjn.8po0dy1edzattpsr     --discovery-token-ca-cert-hash sha256:6ee80937073b051e17644f4294fad1ac0c0928d4b3bf38980bb9d29efec81ead
[preflight] Running pre-flight checks
        [WARNING IsDockerSystemdCheck]: detected "cgroupfs" as the Docker cgroup driver. The recommended driver is "systemd". Please follow the guide at https://kubernetes.io/docs/setup/cri/
        [WARNING SystemVerification]: this Docker version is not on the list of validated versions: 26.1.2. Latest validated version: 19.03
[preflight] Reading configuration from the cluster...
[preflight] FYI: You can look at this config file with 'kubectl -n kube-system get cm kubeadm-config -o yaml'
[kubelet-start] Writing kubelet configuration to file "/var/lib/kubelet/config.yaml"
[kubelet-start] Writing kubelet environment file with flags to file "/var/lib/kubelet/kubeadm-flags.env"
[kubelet-start] Starting the kubelet
[kubelet-start] Waiting for the kubelet to perform the TLS Bootstrap...

This node has joined the cluster:
* Certificate signing request was sent to apiserver and a response was received.
* The Kubelet was informed of the new secure connection details.

Run 'kubectl get nodes' on the control-plane to see this node join the cluster.
//第三台机器node2
[root@node2 ~]# kubeadm join 192.168.100.10:6443 --token fvqpjn.8po0dy1edzattpsr     --discovery-token-ca-cert-hash sha256:6ee80937073b051e17644f4294fad1ac0c0928d4b3bf38980bb9d29efec81ead
[preflight] Running pre-flight checks
        [WARNING IsDockerSystemdCheck]: detected "cgroupfs" as the Docker cgroup driver. The recommended driver is "systemd". Please follow the guide at https://kubernetes.io/docs/setup/cri/
        [WARNING SystemVerification]: this Docker version is not on the list of validated versions: 26.1.2. Latest validated version: 19.03
[preflight] Reading configuration from the cluster...
[preflight] FYI: You can look at this config file with 'kubectl -n kube-system get cm kubeadm-config -o yaml'
[kubelet-start] Writing kubelet configuration to file "/var/lib/kubelet/config.yaml"
[kubelet-start] Writing kubelet environment file with flags to file "/var/lib/kubelet/kubeadm-flags.env"
[kubelet-start] Starting the kubelet
[kubelet-start] Waiting for the kubelet to perform the TLS Bootstrap...

This node has joined the cluster:
* Certificate signing request was sent to apiserver and a response was received.
* The Kubelet was informed of the new secure connection details.

Run 'kubectl get nodes' on the control-plane to see this node join the cluster.
//master节点
//查看节点是否都加入进来了
[root@master ~]# kubectl get nodes
NAME     STATUS     ROLES                  AGE   VERSION
master   NotReady   control-plane,master   13m   v1.20.0
node1    NotReady   <none>                 15s   v1.20.0
node2    NotReady   <none>                 3s    v1.20.0
2.2 配置Kubernetes的网络,使用flannel网络模式
//下载flannel插件
[root@master ~]# wget https://raw.githubusercontent.com/coreos/flannel/master/Documentation/kube-flannel.yml
--2024-05-15 00:22:40--  https://raw.githubusercontent.com/coreos/flannel/master/Documentation/kube-flannel.yml
Resolving raw.githubusercontent.com (raw.githubusercontent.com)... 199.232.68.133
Connecting to raw.githubusercontent.com (raw.githubusercontent.com)|199.232.68.133|:443... connected.
HTTP request sent, awaiting response... 200 OK
Length: 4345 (4.2K) [text/plain]
Saving to: 鈥榢ube-flannel.yml.1鈥

100%[===========================================================>] 4,345       --.-K/s   in 0s

2024-05-15 00:22:41 (25.2 MB/s) - 鈥榢ube-flannel.yml.1鈥saved [4345/4345]
//如果下载失败,可使用下述命令
[root@master ~]# cat >> /etc/hosts << EOF
> 199.232.68.133 raw.githubusercontent.com
> EOF
[root@master ~]# wget https://raw.githubcontent.com/coreos/flannel/master/Documentation/kube-flannel.yml
//配置flannel网络
[root@master ~]# kubectl apply -f kube-flannel.yml
namespace/kube-flannel created
clusterrole.rbac.authorization.k8s.io/flannel created
clusterrolebinding.rbac.authorization.k8s.io/flannel created
serviceaccount/flannel created
configmap/kube-flannel-cfg created
daemonset.apps/kube-flannel-ds created
//下载镜像
//三台机器都要做,演示master节点
//查看需要哪些flannel镜像
[root@master ~]# grep image kube-flannel.yml
image: docker.io/flannel/flannel-cni-plugin:v1.4.1-flannel1
image: docker.io/flannel/flannel:v0.25.1
image: docker.io/flannel/flannel:v0.25.1
[root@master ~]# docker pull docker.io/flannel/flannel-cni-plugin:v1.4.1-flannel1
[root@master ~]# docker pull docker.io/flannel/flannel:v0.25.1
//获取节点状态,发现都是ready
[root@master ~]# kubectl get nodes
NAME     STATUS   ROLES                  AGE   VERSION
master   Ready    control-plane,master   96m   v1.20.0
node1    Ready    <none>                 82m   v1.20.0
node2    Ready    <none>                 82m   v1.20.0
3 基本运行与维护
3.1 部署nginx应用
//下载nginx镜像
[root@master ~]# docker pull nginx
//创建namespace
[root@master ~]# kubectl create namespace ns-nginx
namespace/ns-nginx created
//创建deployment
[root@master ~]# kubectl create deployment nginx-deployment --image=nginx -n ns-nginx
deployment.apps/nginx-deployment created
//查看namespace中的应用
[root@master ~]# kubectl get pod -o wide -n ns-nginx
NAME                                READY   STATUS    RESTARTS   AGE   IP           NODE    NOMINATED NODE   READINESS GATES
nginx-deployment-84cd76b964-gn6pp   1/1     Running   0          10m   10.244.1.2   node1   <none>           <none>
//访问nginx
[root@master ~]# curl -L 10.244.1.2
<!DOCTYPE html>
<html>
<head>
<title>Welcome to nginx!</title>
<style>
html { color-scheme: light dark; }
body { width: 35em; margin: 0 auto;
font-family: Tahoma, Verdana, Arial, sans-serif; }
</style>
</head>
<body>
<h1>Welcome to nginx!</h1>
<p>If you see this page, the nginx web server is successfully installed and
working. Further configuration is required.</p>

<p>For online documentation and support please refer to
<a href="http://nginx.org/">nginx.org</a>.<br/>
Commercial support is available at
<a href="http://nginx.com/">nginx.com</a>.</p>

<p><em>Thank you for using nginx.</em></p>
</body>
</html>
3.2 将应用的端口映射为nodeport端口,集群外机器通过nodeport端口能够访问应用主页
//创建nodeport服务
[root@master ~]# kubectl expose deployment nginx-deployment --port=80 --type=NodePort -n ns-nginx
//获取ip
[root@master ~]# kubectl get svc -n ns-nginx
NAME               TYPE       CLUSTER-IP       EXTERNAL-IP   PORT(S)        AGE
nginx-deployment   NodePort   10.111.200.188   <none>        80:30050/TCP   47s
//访问nginx
[root@master ~]# curl -L 192.168.100.10:30050
<!DOCTYPE html>
<html>
<head>
<title>Welcome to nginx!</title>
<style>
html { color-scheme: light dark; }
body { width: 35em; margin: 0 auto;
font-family: Tahoma, Verdana, Arial, sans-serif; }
</style>
</head>
<body>
<h1>Welcome to nginx!</h1>
<p>If you see this page, the nginx web server is successfully installed and
working. Further configuration is required.</p>

<p>For online documentation and support please refer to
<a href="http://nginx.org/">nginx.org</a>.<br/>
Commercial support is available at
<a href="http://nginx.com/">nginx.com</a>.</p>

<p><em>Thank you for using nginx.</em></p>
</body>
</html>
//节点node1和node2访问
[root@node1 ~]# curl -L 192.168.100.10:30050
<!DOCTYPE html>
<html>
<head>
<title>Welcome to nginx!</title>
<style>
html { color-scheme: light dark; }
body { width: 35em; margin: 0 auto;
font-family: Tahoma, Verdana, Arial, sans-serif; }
</style>
</head>
<body>
<h1>Welcome to nginx!</h1>
<p>If you see this page, the nginx web server is successfully installed and
working. Further configuration is required.</p>

<p>For online documentation and support please refer to
<a href="http://nginx.org/">nginx.org</a>.<br/>
Commercial support is available at
<a href="http://nginx.com/">nginx.com</a>.</p>

<p><em>Thank you for using nginx.</em></p>
</body>
</html>
[root@node2 ~]# curl -L 192.168.100.10:30050
<!DOCTYPE html>
<html>
<head>
<title>Welcome to nginx!</title>
<style>
html { color-scheme: light dark; }
body { width: 35em; margin: 0 auto;
font-family: Tahoma, Verdana, Arial, sans-serif; }
</style>
</head>
<body>
<h1>Welcome to nginx!</h1>
<p>If you see this page, the nginx web server is successfully installed and
working. Further configuration is required.</p>

<p>For online documentation and support please refer to
<a href="http://nginx.org/">nginx.org</a>.<br/>
Commercial support is available at
<a href="http://nginx.com/">nginx.com</a>.</p>

<p><em>Thank you for using nginx.</em></p>
</body>
</html>
3.3 应用的动态扩缩容
//扩容nginx 到3个pod
[root@master ~]# kubectl scale deployment/nginx-deployment --replicas=3 -n ns-nginx
deployment.apps/nginx-deployment scaled
//查看
[root@master ~]# kubectl get pod -o wide -n ns-nginx
NAME                                READY   STATUS    RESTARTS   AGE    IP           NODE    NOMINATED NODE   READINESS GATES
nginx-deployment-84cd76b964-c8slp   1/1     Running   0          3m1s   10.244.1.3   node1   <none>           <none>
nginx-deployment-84cd76b964-gn6pp   1/1     Running   0          37m    10.244.1.2   node1   <none>           <none>
nginx-deployment-84cd76b964-zv5zd   1/1     Running   0          3m1s   10.244.2.4   node2   <none>           <none>
//缩容nginx 到3个pod
[root@master ~]# kubectl scale deployment/nginx-deployment --replicas=2 -n ns-nginx
deployment.apps/nginx-deployment scaled
//查看
[root@master ~]# kubectl get pod -o wide -n ns-nginx
NAME                                READY   STATUS    RESTARTS   AGE     IP           NODE    NOMINATED NODE   READINESS GATES
nginx-deployment-84cd76b964-gn6pp   1/1     Running   0          38m     10.244.1.2   node1   <none>           <none>
nginx-deployment-84cd76b964-zv5zd   1/1     Running   0          4m14s   10.244.2.4   node2   <none>           <none>
4 kubernetes的常用命令
//查看namespace中的deploymen
[root@master ~]# kubectl describe deployment -n ns-nginx
Name:                   nginx-deployment
Namespace:              ns-nginx
CreationTimestamp:      Wed, 15 May 2024 01:27:48 -0400
Labels:                 app=nginx-deployment
Annotations:            deployment.kubernetes.io/revision: 1
Selector:               app=nginx-deployment
Replicas:               2 desired | 2 updated | 2 total | 2 available | 0 unavailable
StrategyType:           RollingUpdate
MinReadySeconds:        0
RollingUpdateStrategy:  25% max unavailable, 25% max surge
Pod Template:
  Labels:  app=nginx-deployment
  Containers:
   nginx:
    Image:        nginx
    Port:         <none>
    Host Port:    <none>
    Environment:  <none>
    Mounts:       <none>
  Volumes:        <none>
Conditions:
  Type           Status  Reason
  ----           ------  ------
  Progressing    True    NewReplicaSetAvailable
  Available      True    MinimumReplicasAvailable
OldReplicaSets:  <none>
NewReplicaSet:   nginx-deployment-84cd76b964 (2/2 replicas created)
Events:
  Type    Reason             Age    From                   Message
  ----    ------             ----   ----                   -------
  Normal  ScalingReplicaSet  40m    deployment-controller  Scaled up replica set nginx-deployment-84cd76b964 to 1
  Normal  ScalingReplicaSet  6m2s   deployment-controller  Scaled up replica set nginx-deployment-84cd76b964 to 3
  Normal  ScalingReplicaSet  2m18s  deployment-controller  Scaled down replica set nginx-deployment-84cd76b964 to 2
//更多可以
[root@master ~]# kubectl describe -h


 782
782

 被折叠的 条评论
为什么被折叠?
被折叠的 条评论
为什么被折叠?
 到【灌水乐园】发言


