前言
针对CentOS-7在安装mysql-8.0.19中遇到安装失败,远程连接等一系列问题,提出相关解决方案。
一、准备工作
1、安装之前 查看系统已装的rpm程序,如果有数据,删除,然后重启
[root@localhost ~]# rpm -qa | grep mariadb
 mariadb-libs-5.5.64-1.el7.x86_64
[root@localhost ~]# rpm -e mariadb-libs-5.5.64-1.el7.x86_64 --nodeps
[root@localhost ~]# rpm -qa | grep mariadb
[root@localhost ~]# reboot
2、在Linux系统/目录opt文件下创建两个文件夹(software、server)
[root@localhost ~]# cd /opt
[root@localhost opt]# mkdir software
[root@localhost opt]# mkdir server
3、把安装包放到software下(通过xftp直接拖过去)
mysql-8.0.19安装包:https://pan.baidu.com/s/14mYUtEJVkzKiDWEFyl-Akw
提取码:fwu4
4、解压到server文件夹
[root@localhost opt]# tar -xvf /opt/software/mysql-8.0.19-1.el7.x86_64.rpm-bundle.tar -C /opt/server
二、安装
1、按顺序安装以下文件
rpm -ivh /opt/server/mysql-community-common-8.0.19-1.el7.x86_64.rpm
rpm -ivh /opt/server/mysql-community-libs-8.0.19-1.el7.x86_64.rpm
rpm -ivh /opt/server/mysql-community-client-8.0.19-1.el7.x86_64.rpm
rpm -ivh /opt/server/mysql-community-server-8.0.19-1.el7.x86_64.rpm
*如果安装第四个报错 如:
[root@localhost opt]# rpm -ivh /opt/server/mysql-community-common-8.0.19-		1.el7.x86_64.rpm
警告:/opt/server/mysql-community-common-8.0.19-1.el7.x86_64.rpm: 头V3 DSA/SHA1 Signature, 密钥 ID 5072e1f5: NOKEY
准备中...                          ################################# [100%]
正在升级/安装...
1:mysql-community-common-8.0.19-1.e################################# [100%]
则执行以下代码(依次执行)
yum search perl
yum search libaio
yum search net-tools
yum -y install perl.x86_64
yum install -y libaio.x86_64
yum -y install net-tools.x86_64
安装完之后再次执行报错的第四个安装文件
rpm -ivh /opt/server/mysql-community-server-8.0.19-1.el7.x86_64.rpm
三、安装之后
1、启动mysql服务
[root@localhost opt]# systemctl start mysqld
2、查看一下mysql服务状态
[root@localhost opt]# systemctl status mysqld
● mysqld.service - MySQL Server
   Loaded: loaded (/usr/lib/systemd/system/mysqld.service; enabled; vendor preset: disabled)
   Active: active (running) since 四 2021-05-20 16:46:43 CST; 5s ago
     Docs: man:mysqld(8)
           http://dev.mysql.com/doc/refman/en/using-systemd.html
  Process: 21704 ExecStartPre=/usr/bin/mysqld_pre_systemd (code=exited, status=0/SUCCESS)
 Main PID: 21836 (mysqld)
   Status: "Server is operational"
   CGroup: /system.slice/mysqld.service
           └─21836 /usr/sbin/mysqld
3、登录mysql
[root@localhost opt]# mysql -u root -p
Enter password:
【注意】初始密码在 /var/log/mysqld.log中可以查看到
4、登录成功之后,需要修改初始密码【密码必修包含大小写子母,标点符号,数字,如下:‘Alvin.123456’】
mysql> show databases;
ERROR 1820 (HY000): You must reset your password using ALTER USER statement before executing this statement.
mysql> ALTER USER 'root'@'localhost' IDENTIFIED BY 'Alvin.123456';
Query OK, 0 rows affected (0.01 sec)
4、退出,重登(如果需要通过Navicat执行mysql,还需执行以下操作)
mysql> use mysql;
Reading table information for completion of table and column names
You can turn off this feature to get a quicker startup with -A

Database changed
mysql> select host from user where user='root';
+-----------+
| host      |
+-----------+
| localhost |
+-----------+
1 row in set (0.00 sec)

mysql> update user set host = '%' where user ='root';
Query OK, 1 row affected (0.00 sec)
Rows matched: 1  Changed: 1  Warnings: 0

mysql> select host from user where user='root';
+------+
| host |
+------+
| %    |
+------+
1 row in set (0.00 sec)
5、如果需要远程连接mysql 还需要关闭防火墙
# 关闭
systemctl stop firewalld
# 取消开机启动
systemctl disable firewalld
# 查看是否开机自启
systemctl is-enabled firewalld
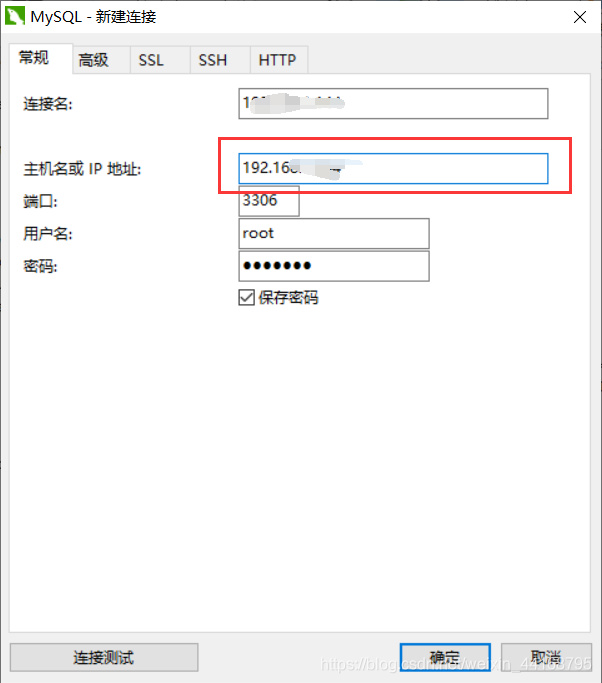
6、此时就可以通过Navicat远程连接mysql(通过ip地址连接)


 632
632

 被折叠的 条评论
为什么被折叠?


