


基于 配置类 方式管理 Bean
1完全注解开发理解
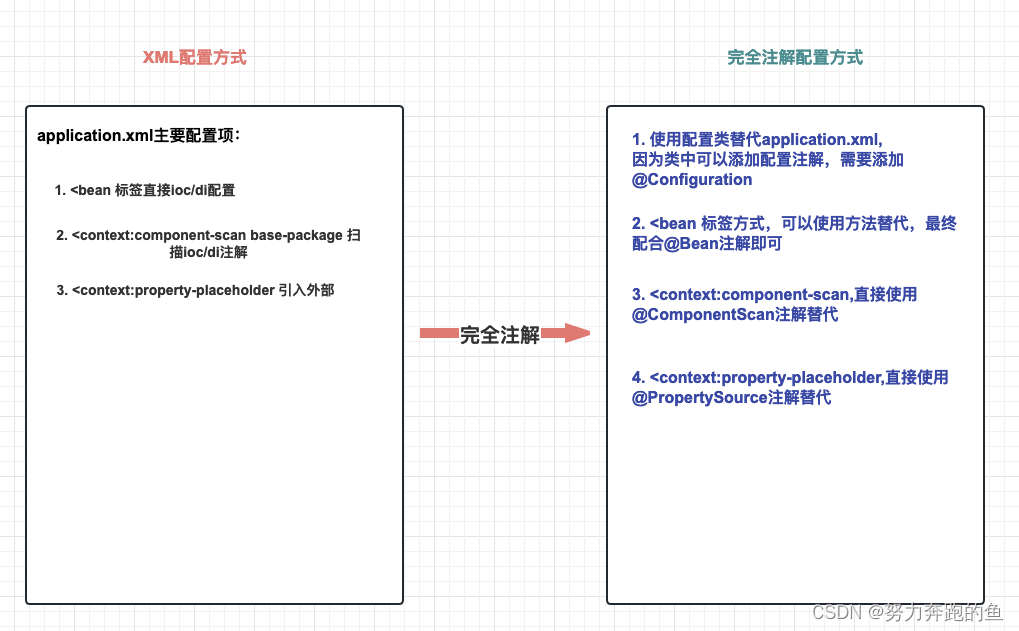
Spring 完全注解配置(Fully Annotation-based Configuration)是指通过 Java配置类 代码来配置 Spring 应用程序,使用注解来替代原本在 XML 配置文件中的配置。相对于 XML 配置,完全注解配置具有更强的类型安全性和更好的可读性。
两种方式思维转化:
2 配置类和扫描注解
@Configuration指定一个类为配置类,可以添加配置注解,替代配置xml文件
@ComponentScan(basePackages = {“包”,“包”}) 替代<context:component-scan标签实现注解扫描
@PropertySource(“classpath:配置文件地址”) 替代 <context:property-placeholder标签
配合IoC/DI注解,可以进行完整注解开发!
3 案例
在com.lx.ico_01文件下创建StudnetSservice、StudentController
@Service
public class StuentService {

    public void show(){
        System.out.println("Student");
    }
}
@Controller
public class StudentController {

    @Autowired
    private StuentService stuentService;

    public void show(){
        stuentService.show();
    }
}
创建配置类Config
//标注当前类是配置类,替代application.xml
@Configuration //配置类
//使用注解读取外部配置,替代 <context:property-placeholder标签
//@PropertySource("classpath:application.properties")

//使用@ComponentScan注解,可以配置扫描包,替代<context:component-scan标签
@ComponentScan("com.lx.ioc_01") //扫描bean
public class Config {
}
测试 打印输出 Studdnet
public class javaTest {
    @Test
    public void test1(){
    // AnnotationConfigApplicationContext 根据配置类创建 IOC 容器对象
        AnnotationConfigApplicationContext annotationConfigApplicationContext
                = new AnnotationConfigApplicationContext(Config.class);
        StudentController bean = annotationConfigApplicationContext.getBean(StudentController.class);
        bean.show();
    }
}
可以使用 no-arg 构造函数实例化AnnotationConfigApplicationContext ,然后使用 register() 方法对其进行配置。此方法在以编程方式生成 AnnotationConfigApplicationContext 时特别有用。以下示例演示如何执行此操作:
// AnnotationConfigApplicationContext-IOC容器对象
ApplicationContext iocContainerAnnotation =
new AnnotationConfigApplicationContext();
//外部设置配置类
iocContainerAnnotation.register(MyConfiguration.class);
//刷新后方可生效!!
iocContainerAnnotation.refresh();
4 @Bean定义组件
4.1 @Bean组件使用
场景需求:将Druid连接池对象存储到IoC容器
需求分析:第三方jar包的类,添加到ioc容器,无法使用@Component等相关注解!因为源码jar包内容为只读模式!
xml方式实现:
<?xml version="1.0" encoding="UTF-8"?>
<beans xmlns="http://www.springframework.org/schema/beans"
       xmlns:xsi="http://www.w3.org/2001/XMLSchema-instance"
       xmlns:context="http://www.springframework.org/schema/context"
       xsi:schemaLocation="http://www.springframework.org/schema/beans http://www.springframework.org/schema/beans/spring-beans.xsd http://www.springframework.org/schema/context https://www.springframework.org/schema/context/spring-context.xsd">


    <!-- 引入外部属性文件 -->
    <context:property-placeholder location="classpath:jdbc.properties"/>

    <!-- 实验六 [重要]给bean的属性赋值:引入外部属性文件 -->
    <bean id="druidDataSource" class="com.alibaba.druid.pool.DruidDataSource">
        <property name="url" value="${jdbc.url}"/>
        <property name="driverClassName" value="${jdbc.driver}"/>
        <property name="username" value="${jdbc.user}"/>
        <property name="password" value="${jdbc.password}"/>
    </bean>

</beans>
配置类方式实现:
@Bean 注释用于指示方法实例化、配置和初始化要由 Spring IoC 容器管理的新对象。对于那些熟悉 Spring 的 <beans/> XML 配置的人来说, @Bean 注释与 <bean/> 元素起着相同的作用。
//标注当前类是配置类,替代application.xml
@Configuration
//引入jdbc.properties文件
@PropertySource({"classpath:application.properties","classpath:jdbc.properties"})
@ComponentScan(basePackages = {"com.atguigu.components"})
public class MyConfiguration {

    //如果第三方类进行IoC管理,无法直接使用@Component相关注解
    //解决方案: xml方式可以使用<bean标签
    //解决方案: 配置类方式,可以使用方法返回值+@Bean注解
    @Bean
    public DataSource createDataSource(@Value("${jdbc.user}") String username,
                                       @Value("${jdbc.password}")String password,
                                       @Value("${jdbc.url}")String url,
                                       @Value("${jdbc.driver}")String driverClassName){
        //使用Java代码实例化
        DruidDataSource dataSource = new DruidDataSource();
        dataSource.setUsername(username);
        dataSource.setPassword(password);
        dataSource.setUrl(url);
        dataSource.setDriverClassName(driverClassName);
        //返回结果即可
        return dataSource;
    }
}
4.2 @Bean注解细节
4.2.1 @Bean生成BeanName问题
@Bean注解源码:
   public @interface Bean {
       //前两个注解可以指定Bean的标识
       @AliasFor("name")
       String[] value() default {};
       @AliasFor("value")
       String[] name() default {};

       //autowireCandidate 属性来指示该 Bean 是否候选用于自动装配。
       //autowireCandidate 属性默认值为 true,表示该 Bean 是一个默认的装配目标,
       //可被候选用于自动装配。如果将 autowireCandidate 属性设置为 false,则说明该 Bean 不是默认的装配目标,不会被候选用于自动装配。
       boolean autowireCandidate() default true;

       //指定初始化方法
       String initMethod() default "";
       //指定销毁方法
       String destroyMethod() default "(inferred)";
   }
指定@Bean的名称:
 @Configuration
   public class AppConfig {

     @Bean("myThing") //指定名称
     public Thing thing() {
       return new Thing();
     }
   }
@Bean 注释注释方法。使用此方法在指定为方法返回值的类型的 ApplicationContext 中注册 Bean 定义。缺省情况下,Bean 名称与方法名称相同。下面的示例演示 @Bean 方法声明:
  @Configuration
   public class AppConfig {

     @Bean
     public TransferServiceImpl transferService() {
       return new TransferServiceImpl();
     }
   }
前面的配置完全等同于下面的Spring XML:
<beans>
  <bean id="transferService" class="com.acme.TransferServiceImpl"/>
</beans>
4.2.2 @Bean 初始化和销毁方法指定
@Bean 注解支持指定任意初始化和销毁回调方法,非常类似于 Spring XML 在 bean 元素上的 init-method 和 destroy-method 属性,如以下示例所示:
   public class BeanOne {

     public void init() {
       // initialization logic
     }
   }

   public class BeanTwo {

     public void cleanup() {
       // destruction logic
     }
   }

   @Configuration
   public class AppConfig {

     @Bean(initMethod = "init")
     public BeanOne beanOne() {
       return new BeanOne();
     }

     @Bean(destroyMethod = "cleanup")
     public BeanTwo beanTwo() {
       return new BeanTwo();
     }
   }
4.2.3 @Bean Scope作用域
可以指定使用 @Bean 注释定义的 bean 应具有特定范围。您可以使用在 Bean 作用域部分中指定的任何标准作用域。
默认作用域为 singleton ,但您可以使用 @Scope 注释覆盖此范围,如以下示例所示:
   @Configuration
   public class MyConfiguration {

     @Bean
     @Scope("prototype")
     public Encryptor encryptor() {
       // ...
     }
   }
4.4.4 @Bean方法之间依赖
准备组件
public class HappyMachine {

    private String machineName;

    public String getMachineName() {
        return machineName;
    }

    public void setMachineName(String machineName) {
        this.machineName = machineName;
    }
}
public class HappyComponent {
    //引用新组件
    private HappyMachine happyMachine;

    public HappyMachine getHappyMachine() {
        return happyMachine;
    }

    public void setHappyMachine(HappyMachine happyMachine) {
        this.happyMachine = happyMachine;
    }

    public void doWork() {
        System.out.println("HappyComponent.doWork");
    }

}
Java配置类实现:
方案1:
直接调用方法返回 Bean 实例:在一个 @Bean 方法中直接调用其他 @Bean 方法来获取 Bean 实例,虽然是方法调用,也是通过IoC容器获取对应的Bean,例如:
  @Configuration
   public class JavaConfig {

       @Bean
       public HappyMachine happyMachine(){
           return new HappyMachine();
       }

       @Bean
       public HappyComponent happyComponent(){
           HappyComponent happyComponent = new HappyComponent();
           //直接调用方法即可!
           happyComponent.setHappyMachine(happyMachine());
           return happyComponent;
       }

   }
方案2:
参数引用法:通过方法参数传递 Bean 实例的引用来解决 Bean 实例之间的依赖关系,例如:
   /**
    * projectName: com.atguigu.config
    * description: 配置HappyComponent和HappyMachine关系
    */

   @Configuration
   public class JavaConfig {

       @Bean
       public HappyMachine happyMachine(){
           return new HappyMachine();
       }

       /**
        * 可以直接在形参列表接收IoC容器中的Bean!
        *    情况1: 直接指定类型即可
        *    情况2: 如果有多个bean,(HappyMachine 名称 ) 形参名称等于要指定的bean名称!
        *           例如:
        *               @Bean
        *               public Foo foo1(){
        *                   return new Foo();
        *               }
        *               @Bean
        *               public Foo foo2(){
        *                   return new Foo()
        *               }
        *               @Bean
        *               public Component component(Foo foo1 / foo2 通过此处指定引入的bean)
        */
       @Bean
       public HappyComponent happyComponent(HappyMachine happyMachine){
           HappyComponent happyComponent = new HappyComponent();
           //赋值
           happyComponent.setHappyMachine(happyMachine);
           return happyComponent;
       }

   }
5 @Import
@Import 注释允许从另一个配置类加载 @Bean 定义,如以下示例所示:
@Configuration
public class ConfigA {

  @Bean
  public A a() {
    return new A();
  }
}

@Configuration
@Import(ConfigA.class)
public class ConfigB {

  @Bean
  public B b() {
    return new B();
  }
}
现在,在实例化上下文时不需要同时指定 ConfigA.class 和 ConfigB.class ,只需显式提供 ConfigB ,如以下示例所示:
public static void main(String[] args) {
  ApplicationContext ctx = new AnnotationConfigApplicationContext(ConfigB.class);

  // now both beans A and B will be available...
  A a = ctx.getBean(A.class);
  B b = ctx.getBean(B.class);
}
此方法简化了容器实例化,因为只需要处理一个类,而不是要求您在构造期间记住可能大量的 @Configuration 类。


 284
284


 被折叠的 条评论
为什么被折叠?
被折叠的 条评论
为什么被折叠?
 到【灌水乐园】发言


