


一、RabbitMQ介绍
1.1 引言
1.模块之间的耦合度过高,导致一个模块宕机后,全部功能都不能用了
2.同步通讯的成本问题
1.2 RabbitMQ的介绍
市面上比较火爆的几款MQ:
ActiveMQ、RocketMQ、Kafka、RabbitMQ
1.语言的支持:ActiveMQ、RocketMQ只支持Java,Kafka支持多门语言,RabbitMQ支持多种语言
2.效率方面:ActiveMQ、RocketMQ、Kafka毫秒级别,RabbitMQ微秒级别。
3.消息丢失、消息重复问题:RabbitMQ针对消息的持久化和重复问题都有比较成熟的解决方案
4.学习成本:非常简单
RabbitMQ严格地遵循AMQP协议,高级消息队列,帮助我们在进程间进行异步消息传递
二、RabbitMQ安装
version: "3.1"
services:
  rabbitmq:
    image: daocloud.io/library/rabbitmq:management
    restart: always
    container_name: rabbitmq
    ports:
      - 5672:5672
      - 15672:15672
    volumes:
      - ./data:/var/lib/rabbitmq
三、RabbitMQ架构
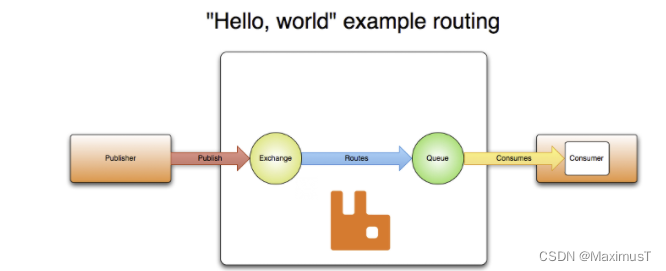
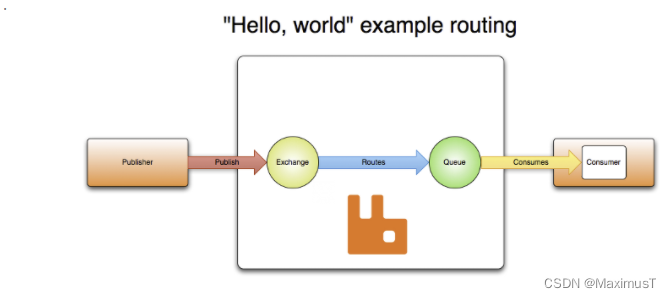
3.1 官方简单架构图
3.2 完整架构图
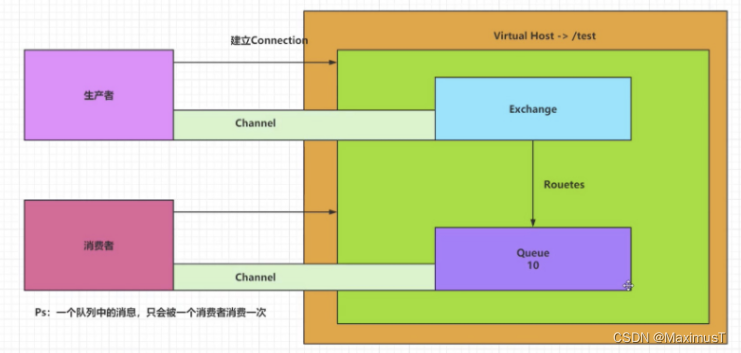
创建一个全新的用户和全新的virtualhost,并将test用户设置可以操作/test的权限
四、RabbitMQ的使用
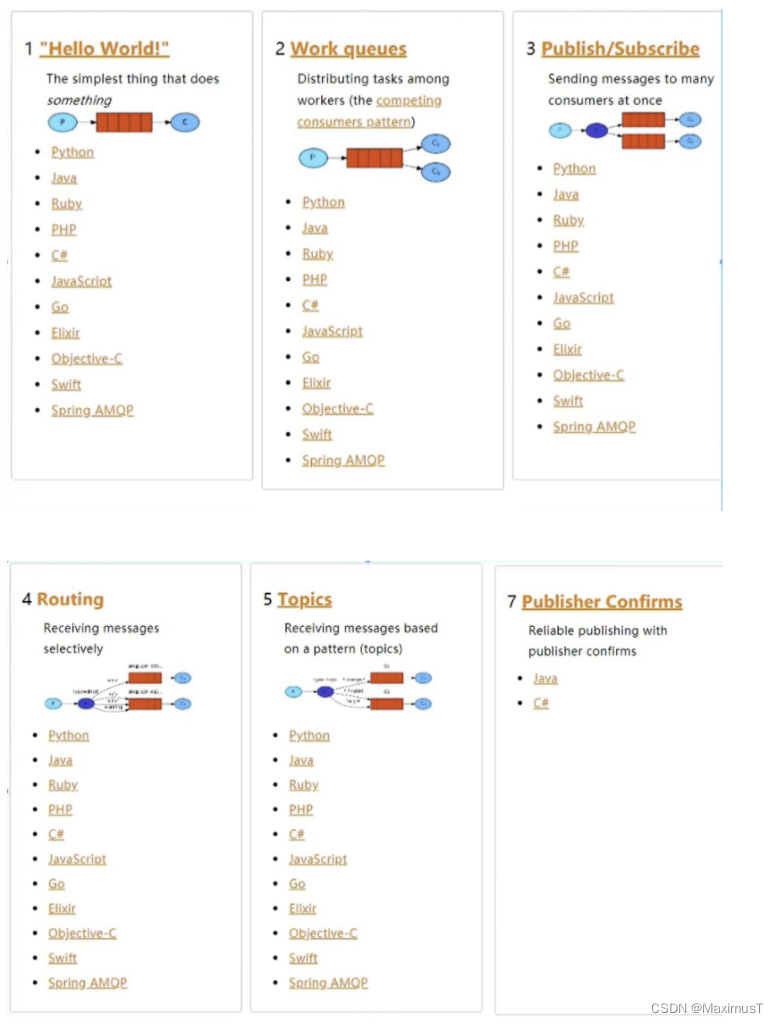
4.1、RabbitMQ常用的六种通讯方式
4.2Java连接RabbitMQ
1、创建maven项目
2.导入依赖
<dependencies>
     <dependency>
         <groupId>junit</groupId>
         <artifactId>junit</artifactId>
         <version>4.12</version>
         <scope>test</scope>
     </dependency>
     <dependency>
         <groupId>com.rabbitmq</groupId>
         <artifactId>amqp-client</artifactId>
         <version>5.10.0</version>
     </dependency>
 </dependencies>
3、创建工具类连接RabbitMQ
import com.rabbitmq.client.Connection;
import com.rabbitmq.client.ConnectionFactory;

import java.io.IOException;
import java.util.concurrent.TimeoutException;

public class RabbitMQClient {
    public static Connection getConnection(){
        //创建connection工厂
        ConnectionFactory factory = new ConnectionFactory();
        factory.setHost("*.*.*.*");
        factory.setPort(5672);
        factory.setUsername("test");
        factory.setPassword("test");
        factory.setVirtualHost("/test");
        //创建connection
        Connection connection = null;
        try {
            connection = factory.newConnection();
        } catch (IOException e) {
            e.printStackTrace();
        } catch (TimeoutException e) {
            e.printStackTrace();
        }
        return connection;
    }
}
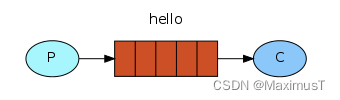
4.3 Hello-World
1.一个生产者、一个默认交换机、一个队列和一个消费者
public class Publish {

 @Test
 public void publish() throws Exception {
     //1. 获取Connection
     Connection connection = RabbitMQClient.getConnection();
     //2. 创建channel
     Channel channel = connection.createChannel();
     //3. 发布消息到exchange
     String msg = "Hello-world!";
     /**
         * 参数1:指定exchange,使用“”
         * 参数2:指定路由的规则,使用具体的队列名称
         * 参数3:指定传递的消息所携带的properties,使用null
         * 参数4:指定发布的具体消息,byte[]类型
         */
        channel.basicPublish("","HelloWorld",null,msg.getBytes());
        //exchange是不会将消息持久化到本地,Queue才会将消息持久化
        System.out.println("生产者发布消息成功!");

        //4. 释放资源
        channel.close();
        connection.close();
    }
2.创建消费者,创建一个channel,创建一个队列并且消费当前队列
public class Consumer {
    @Test
    public void consume() throws IOException, TimeoutException {
        //1. 获取连接对象
        Connection connection= RabbitMQClient.getConnection();
        //2. 创建channel
        Channel channel=connection.createChannel();
        //3. 声明队列,Hello-World
        /**
         * 参数1. queue-指定队列名称
         * 参数2. durable-当前队列是否需要持久化
         * 参数3. exchange-是否排外(执行conn.close()之后-当前队列会被自动删除,当前队列只能被一个消费者消费)
         * 参数4. autoDelete-如果这个队列没有消费者在消费,队列自动删除
         * 参数5. arguments-指定当前队列的其他信息
         */
        channel.queueDeclare("HelloWorld",true,false,false,null);
        //4. 开启监听Queue
        DefaultConsumer consumer=new DefaultConsumer(channel){
            @Override
            public void handleDelivery(String consumerTag, Envelope envelope, AMQP.BasicProperties properties, byte[] body) throws IOException {
                System.out.println("接收到消息"+new String(body,"UTF-8"));
            }
        };
        /**
         * 参数1. queue-指定消费哪一个队列
         * 参数2. deliverCallback-指定是否自动ACK(当值为true时,接收消息后会立即高速RabbitMQ)
         * 参数3. consumer-指定消费回调
         */
        channel.basicConsume("HelloWorld",true,consumer);

        System.out.println("消费者开始监听队列");
        System.in.read();
        //5. 释放资源
        channel.close();
        connection.close();
    }
}
4.4 Work
一个生产者、一个默认交换机、一个队列和两个消费者
![[外链图片转存失败,源站可能有防盗链机制,建议将图片保存下来直接上传(img-a2IABJST-1660491192155)(C:\Users\MaximusT\AppData\Roaming\Typora\typora-user-images\image-20220814233147016.png)]](https://img-blog.csdnimg.cn/cfc77828bd8a47318dac345ee129e931.png)
只需要在消费者端,添加Qos能力以及更改为手动ack即可让消费者,根据自己的能力去消费指定的消息,而不是在默认情况下由RabbitMQ平均分配
1.循环发送消息
2.创建多个消费者(手动设置ACK,每一个消费者消费能力不同)
//1.指定当前消费者,一次消费多少消息
channel.basicQos(1);

DefaultConsumer consumer=new DefaultConsumer(channel){
    @Override
    public void handleDelivery(String consumerTag, Envelope envelope, AMQP.BasicProperties properties, byte[] body) throws IOException {
        try {
            Thread.sleep(100);
        } catch (InterruptedException e) {
            throw new RuntimeException(e);
        }
        System.out.println("消费者1接收到消息"+new String(body,"UTF-8"));
        //2.手动ack
        channel.basicAck(envelope.getDeliveryTag(),false);
    }
};
//3.指定手动ack
channel.basicConsume("Work",false,consumer);
4.5 Publish/Subscribe
一个生产者、一个自己创建的交换机、两个队列和两个消费者
![[外链图片转存失败,源站可能有防盗链机制,建议将图片保存下来直接上传(img-ZPHqtjbP-1660491192155)(C:\Users\MaximusT\AppData\Roaming\Typora\typora-user-images\image-20220814233137733.png)]](https://img-blog.csdnimg.cn/1b56b2a7b2cd415b93857ee8a690e65f.png)
声明一个Fanout类型的exchange,并且将exchange和queue绑定在一起,绑定的方式就是直接绑定
1.让生产者创建一个exchange并且指定类型,和一个或者多个队列绑定到一起
//2.5 创建exchange-绑定某一个队列
/**
                         * 参数1. exchange的名称
                         * 参数2. exchange的类型 FANOUT-publish、DIRECT-Routing、TOPIC-Topics
                         */
channel.exchangeDeclare("pubsub-exchange", BuiltinExchangeType.FANOUT);
channel.queueBind("pubsub-queue1","pubsub-exchange","");
channel.queueBind("pubsub-queue2","pubsub-exchange","");
2.消费者还是正常的监听某一个队列即可
4.6 Routing
一个生产者、一个交换机、两个队列和两个消费者
![[外链图片转存失败,源站可能有防盗链机制,建议将图片保存下来直接上传(img-9GUQKhbM-1660491192156)(C:\Users\MaximusT\AppData\Roaming\Typora\typora-user-images\image-20220814233130560.png)]](https://img-blog.csdnimg.cn/fc2543649c9e4ca89966796a1dd43277.png)
创建一个DIRECT类型的exchange,并且根据RoutingKey去绑定指定的队列
1.生产者在创建DIRECT类型的exchange后绑定响应的队列,并且在发送消息时指定具体的RoutingKey即可
channel.exchangeDeclare("routing-exchange", BuiltinExchangeType.DIRECT);
channel.queueBind("routing-queue-error","routing-exchange","ERROR");
channel.queueBind("routing-queue-info","routing-exchange","INFO");


//3.发布消息到exchange

channel.basicPublish("routing-exchange","ERROR",null,"ERROR".getBytes());
channel.basicPublish("routing-exchange","INFO",null,"INFO1".getBytes());
channel.basicPublish("routing-exchange","INFO",null,"INFO2".getBytes());
channel.basicPublish("routing-exchange","INFO",null,"INFO3".getBytes());
2.消费者基本没有变化
4.7 Topic
一个生产者、一个交换机、两个队列和两个消费者
![[外链图片转存失败,源站可能有防盗链机制,建议将图片保存下来直接上传(img-vkaTT3iC-1660491192156)(C:\Users\MaximusT\AppData\Roaming\Typora\typora-user-images\image-20220814233123032.png)]](https://img-blog.csdnimg.cn/777313287a1a4609b3f4461724a0acda.png)
- 生产者创建Topic的Exchange并且绑定到队列中,此次绑定通过*和#关键字,对指定routingKey的内容,编写时需要注意格式XXX.XXX.XXX去编写
*–>占位符(一个xxx)、#–>通配符(多个xxx),在发送消息时,指定具体的RoutingKey到底是什么
channel.exchangeDeclare("topic-exchange", BuiltinExchangeType.TOPIC);
// *-->占位符
// #-->通配符
channel.queueBind("topic-queue-1","topic-exchange","*.red.*");
channel.queueBind("topic-queue-2","topic-exchange","fast.#");
channel.queueBind("topic-queue-2","topic-exchange","*.*.rabbit");


//3.发布消息到exchange

channel.basicPublish("topic-exchange","fast.red.monkey",null,"快红猴".getBytes());
channel.basicPublish("topic-exchange","slow.black.dog",null,"慢黑狗".getBytes());
channel.basicPublish("topic-exchange","fast.white.cat",null,"快白猫".getBytes());
channel.basicPublish("topic-exchange","slow.white.rabbit",null,"慢白兔".getBytes());
五、RabbitMQ整合SpringBoot
5.1 RabbitMQ整合SpringBoot
1.创建SpringBoot工程
2.导入依赖
<dependency>
 <groupId>org.springframework.boot</groupId>
 <artifactId>spring-boot-starter-amqp</artifactId>
</dependency>
3.编写配置文件
spring:
rabbitmq:
 host: *.*.*.*
 port: 5672
 username: test
 password: test
 virtual-host: /test
4.编写配置类,声明exchange和queue,并且绑定在一起
@Configuration
public class RabbitMQConfig {
 //1.创建exchange-topic
 @Bean
 public TopicExchange getTopicExchange(){
     return new TopicExchange("boot-topic-exchange",true,false);
 }

 //2.创建queue
 @Bean
 public Queue queue(){
     return new Queue("boot-queue",true,false,false,null);
 }
 //3.绑定在一起
 @Bean
 public Binding getBinding(TopicExchange topicExchange,Queue queue){
     return BindingBuilder.bind(queue).to(topicExchange).with("*.red.*");
 }
}
5.发布消息到RabbitMQ
@Autowired
RabbitTemplate rabbitTemplate;
@Test
void contextLoads(){
 rabbitTemplate.convertAndSend("boot-topic-exchange","slow.red.dog","红色狗");
}
6.创建消费者监听消息
@Component
public class Consumer {

 @RabbitListener(queues = "boot-queue")
 public void getMassage(Object message){
     System.out.println("接收到消息:"+message.toString());
 }
}
5.2 手动ACK
1.添加配置文件
spring:
rabbitmq:
 host: *.*.*.*
 port: 5672
 username: test
 password: test
 virtual-host: /test
 listener:
   simple:
     acknowledge-mode: manual
2.在消费消息的位置修改方法,再手动ACK
@Component
public class Consumer {

 @RabbitListener(queues = "boot-queue")
 public void getMassage(String msg, Channel channel, Message message) throws IOException {
     System.out.println("接收到消息:"+msg);
     //手动ack
     channel.basicAck(message.getMessageProperties().getDeliveryTag(),false);
 }
}
六、RabbitMQ的其他操作
6.1 消息的可靠性
6.1.1 Confirm机制(保证生产者发布消息到exchange,无法保证发送到queue)
RabbitMQ的事务:事务可以保证消息的100%传递,可以通过事务回滚去记录日志,后面定时再发送当前消息。但是事务的操作效率太低,加入事务后效率比不加事务慢至少100倍
![[外链图片转存失败,源站可能有防盗链机制,建议将图片保存下来直接上传(img-6f6HIfR1-1660491192156)(C:\Users\MaximusT\AppData\Roaming\Typora\typora-user-images\image-20220814233104837.png)]](https://img-blog.csdnimg.cn/b933b0cb12614562aba69b028ade1f00.png)
RabbitMQ除了事务,还提供了Confirm的确认机制,这种机制的效率比事务高很多
1.普通Confirm方式
//3.发布消息到exchange
//3.1开启confirm
channel.confirmSelect();
//3.2发送消息
String msg="Hello,world";
channel.basicPublish("","HelloWorld",null,msg.getBytes());
System.out.println("生产者发布消息成功!");
//3.3判断是否发送成功
if (channel.waitForConfirms()){
 System.out.println("消息发送成功");
}else {
 System.out.println("消息发送失败");
}
2.批量Confirm方式
//3.发布消息到exchange
//3.1开启confirm
channel.confirmSelect();

//3.2 批量发送消息
for (int i = 0; i < 1000; i++) {
String msg="Hello,world";
channel.basicPublish("","HelloWorld",null,msg.getBytes());
}
//3.3 确定
channel.waitForConfirmsOrDie();
3.异步Confirm方式
//1. 获取Connection、2. 创建channel
...
 //3. 发布消息到exchange
 //开启confirm
 channel.confirmSelect();
//批量发送消息
for (int i = 0; i < 10; i++) {
 String msg = "Hello-world"+i;
 channel.basicPublish("","HelloWorld",null,msg.getBytes());
}

//确认消息是否发送成功
channel.addConfirmListener(new ConfirmListener() {
 public void handleAck(long deliveryTag, boolean multiple) throws IOException {
     System.out.println("消息发送成功,标识:"+deliveryTag+",是否是批量"+multiple);
 }

 public void handleNack(long deliveryTag, boolean multiple) throws IOException {
     System.out.println("消息发送失败,标识:"+deliveryTag+",是否是批量"+multiple);
 }
});

//4. 释放资源
6.1.2 Return机制
![[外链图片转存失败,源站可能有防盗链机制,建议将图片保存下来直接上传(img-G68BseNv-1660491192156)(C:\Users\MaximusT\AppData\Roaming\Typora\typora-user-images\image-20220814161936669.png)]](https://img-blog.csdnimg.cn/daab16f23148456cbbb8a015e9a4c650.png)
Confirm只能保证到exchange,无法保证可以被exchange分发到queue
而且exchange不能持久化消息,queue才可以持久化消息
采用Return机制来监听消息是否从exchange发送到queue中
开启return机制后,要是程序执行回调函数必须使用另一个带mandatory参数(设置为true)的消息构造方法
//1. 获取Connection、2. 创建channel
        ...
        //开启return机制
        channel.addReturnListener(new ReturnListener() {
            public void handleReturn(int replyCode, String replyText, String exchange, String routingKey, AMQP.BasicProperties properties, byte[] body) throws IOException {
                //当消息没有送达queue是才会执行
                System.out.println(new String(body,"UTF-8")+"没有送达Queue中");
            }
        });
        //3. 发布消息到exchange

        //开启confirm
        channel.confirmSelect();
        for (int i = 0; i < 10; i++) {
            String msg = "Hello-world"+i;
            //消息的构造方法不一样,多一个参数
            channel.basicPublish("","bingo",true,null,msg.getBytes());
        }

        channel.addConfirmListener(new ConfirmListener() {
            public void handleAck(long deliveryTag, boolean multiple) throws IOException {
                System.out.println("消息发送成功,标识:"+deliveryTag+",是否是批量"+multiple);
            }

            public void handleNack(long deliveryTag, boolean multiple) throws IOException {
                System.out.println("消息发送失败,标识:"+deliveryTag+",是否是批量"+multiple);
            }
        });

        System.in.read();
        //4. 释放资源
6.1.3 SpringBoot实现Confirm和Return
1.编写配置文件,克莱齐Confirm和Return机制
spring:
 rabbitmq:

   publisher-confirm-type: simple
   publisher-returns: true
2.指定RabbitTemplate对象,开启Confirm和Return,并且编写了回调函数
@Component
public class PublishConfirmAndReturnConfig implements RabbitTemplate.ConfirmCallback,RabbitTemplate.ReturnCallback {

    @Autowired
   private RabbitTemplate rabbitTemplate;

    @PostConstruct //init-method
    public void initMethod(){
        rabbitTemplate.setConfirmCallback(this);
        rabbitTemplate.setReturnCallback(this);
    }
    @Override
    public void confirm(CorrelationData correlationData, boolean ack, String s) {
            if (ack){
                System.out.println("消息已经送达exchange");
            }else {
                System.out.println("消息没有送达exchange");
            }
    }

    @Override
    public void returnedMessage(Message message, int i, String s, String s1, String s2) {
        System.out.println("消息没有送到queue");
    }
}
6.2 消息重复消费
![[外链图片转存失败,源站可能有防盗链机制,建议将图片保存下来直接上传(img-yYFsNa4G-1660491192157)(C:\Users\MaximusT\AppData\Roaming\Typora\typora-user-images\image-20220814174244084.png)]](https://img-blog.csdnimg.cn/3344d69d149042f392a70589b460ea91.png)
重复消费消息,会对非幂等操作造成问题(幂等性操作:执行多次操作不影响最终结果,例如删除操作)
重复消费消息的原因是消费者没有给RabbitMQ一个ack
为了解决消息被重复消费的问题,可以采用Redis,在消费者消费之前,将消息id放到redis中
id-0(正在执行业务)
id-1(执行业务成功)
如果ack失败,在RabbitMQ将消息交给其他消费者时,消费者先执行setnx(redis方法),如果key已经存在则获取key的值,当获取到的值为0时,消费者什么都不做,当获取到的值为1时,消费者直接ack.
极端情况:第一个消费者执行业务时出现了死锁,在setnx基础上,再给key设置一个生存时间。
1.生产者发送消息时指定messageID
AMQP.BasicProperties properties = new AMQP.BasicProperties().builder().deliveryMode(1).messageId(UUID.randomUUID().toString()).build();
        String msg = "Hello-world";
        channel.basicPublish("", "bingo", true, properties, msg.getBytes());
2.消费者在消费消息时根据具体业务逻辑操作redis
        //4. 开启监听Queue
        DefaultConsumer consumer = new DefaultConsumer(channel){
            @Override
            public void handleDelivery(String consumerTag, Envelope envelope, AMQP.BasicProperties properties, byte[] body) throws IOException {
                Jedis jedis = new Jedis("*.*.*.*", 6379);
                String messageId = properties.getMessageId();
                String result = jedis.set(messageId, "0", "NX", "EX", 10);//存活10s
                if (result!=null&&result.equalsIgnoreCase("OK")) {
                    System.out.println("接收到消息" + new String(body, "UTF-8"));
                    jedis.set(messageId,"1");
                    channel.basicAck(envelope.getDeliveryTag(),false);
                }else {
                    String s = jedis.get(messageId);
                    if ("1".equalsIgnoreCase(s)){
                        channel.basicAck(envelope.getDeliveryTag(),false);
                    }
                }
            }
        };
需要先导入redis依赖
6.2.2 SpringBoot实现
1.导入依赖
		<dependency>
			<groupId>org.springframework.boot</groupId>
			<artifactId>spring-boot-starter-data-redis</artifactId>
		</dependency>
2.编写配置文件
编写配置文件
spring:
  rabbitmq:
    ...
  redis:
    host: *.*.*.*
    port: 6379
修改生产者
	@Test
	void contextLoads() {
		CorrelationData messageId = new CorrelationData(UUID.randomUUID().toString());
		rabbitTemplate.convertAndSend("boot-topic-exchange","slow.red.dog","红色的大狼狗".getBytes(),messageId);
	}
4.修改消费者
@Component
public class Consumer {

    @Autowired
    private StringRedisTemplate redisTemplate;

    @RabbitListener(queues = "boot-queue")
    public void getMassage(String msg, Channel channel, Message message) throws IOException {
        //0. 获取MessageId
        String messageId = message.getMessageProperties().getMessageId();
        //1. 设置key到redis
        if (redisTemplate.opsForValue().setIfAbsent(messageId, "0", 10, TimeUnit.SECONDS)) {
            //2. 消费消息
            System.out.println("消费消息");
            //3. 设置key的value为1
            redisTemplate.opsForValue().set(messageId, "1");
            //4. 手动ack
            channel.basicAck(message.getMessageProperties().getDeliveryTag(), false);
        } else {
            //5. 获取redis中的value即可,如果是1,手动ack
            if ("1".equalsIgnoreCase(redisTemplate.opsForValue().get(messageId))) {
                channel.basicAck(message.getMessageProperties().getDeliveryTag(), false);
            }
        }
    }
}


 6077
6077


 被折叠的 条评论
为什么被折叠?
被折叠的 条评论
为什么被折叠?
 到【灌水乐园】发言


