


- 1.springboot helloworld
- 2.Springboot返回json数据
- 3. Springboot使用其他json转换框架
- 4. Springboot全局异常捕捉
- 5. Springboot JPA 连接数据库
- 6. Springboot 配置JPA
- 7. Springboot整合JPA保存数据
- 8. Springboot使用 jdbcTemplate保存数据
- 9. springboot 常用配置
- 10. springboot静态资源处理
- 11.springboot实现任务调度
- 12.springboot 普通类调用bean
- 13. springboot 使用模板引擎
- 14. springboot集成jsp
- 15 springboot集成Servlet
- 16.springboot 集成Filter和Listener
- 17. springboot拦截器HandlerInterceptor
- 18. springboot系统启动任务 CommandLineRunner
- 19. springboot集成junit单元测试
- 20. springboot读取系统环境变量
- 21. springboot使用自定义的properties
- 22. springboot改变默认包扫描
- 23. Springboot 自定义启动 Banner
- 24. springboot导入spring xml配置文件
- 25. springboot热部署
- 26. springboot监控和管理生产环境
- 27. springboot start详解
- 28. springboot依赖的版本
- 29. Springboot 文件上传
- 30. springboot 集成redis缓存
- 31.springboot 之 spring cache
- 32. Spring boot 集成 EHCache
- 33. Springboot 分布式 Session 共享
1.springboot helloworld
1.1 介绍
-
自从structs2出现上次的漏洞以后,对spring的关注度开始越来越浓。
-
以前spring开发需要配置一大堆的xml,后台spring加入了annotaion,使得xml配置简化了很多,当然还是有些配置需要使用xml,比如声明component scan等。
-
Spring开了一个新的model spring boot,主要思想是降低spring的入门,使得新手可以以最快的速度让程序在spring框架下跑起来。
-
那么如何写 Hello world 呢?
Hello 之步骤:
(1)新建一个 Maven Java 工程
(2)在 pom.xml 文件中添加 Spring Boot Maven 依赖
(3)编写启动类
(4)运行程序
1.2 Hello 之 New
- 这个步骤很简单,相信大家都会,小编在此为了文档的完整性,稍作简单说明: 首先使用 IDE(IDEA)工具新建一个 Maven 工程,可以是 Maven Java Project,也可以是 Maven Web Project,随便取一个工程名称。我使用的是 STS,工程名是 spring-boot-hello1。
1.3 Hello 之 Maven
- 第二步,在 pom.xml 中引入 spring-boot-start-parent,spring 官方的解释叫什么 stater poms,它可以提供 dependency management,也就是说依赖管理,引入以后在申明其它 dependency 的时候就不需要 version 了, 后面可以看到
<parent>
    <groupId>org.springframework.boot</groupId>
    <artifactId>spring-boot-starter-parent</artifactId>
    <version>1.3.3.RELEASE</version>
</parent>
1.4 Hello 之 maven web
- 第三步,因为我们开发的是 web 工程,所以需要在 pom.xml 中引入 spring-boot-starter-web,spring 官方解释说 spring-boot-start-web 包含了 spring webmvc 和 tomcat 等 web 开发的特性。
<dependencies>
	<dependency>
		<groupId>org.springframework.boot</groupId>
		<artifactId>spring-boot-starter-web</artifactId>
    </dependency>
</dependencies>
1.5 Hello 之 Maven Run Application
- 如果我们要直接 Main 启动 spring,那么以下 plugin 必须要添加,否则是无法启动的。如果使用 maven 的 spring-boot:run 的话是不需要此配置的。(我在测试的时候,如果不配置下面的 plugin 也是直接在 Main 中运行 的。)
<build>
    <plugins>
        <plugin>
            <groupId>org.springframework.boot</groupId>
            <artifactId>spring-boot-maven-plugin </artifactId>
        </plugin>
    </plugins>
</build>
1.6 Hello 之 coding
- 第四步,真正的程序开始啦,我们需要一个启动类,然后在启动类申明让 spring boot 自动给我们配置 spring 需要的配置,比如:@SpringBootApplication,为了可以尽快让程序跑起来,我们简单写一个通过浏览器访问 hello world 字样的例子:
@RestController
@SpringBootApplication
public class App{
    @RequestMapping("/")
	public String hello(){
		return	"Hello	world!";
	}
public static void main(String[] args) {
	SpringApplication.run(App.class, args);
	}
}
- 其中@SpringBootApplication 申明让 spring boot 自动给程序进行必要的配置,等价于以默认属性使用 @Configuration,@EnableAutoConfiguration 和@ComponentScan
- @RestController 返回 json 字符串的数据,直接可以编写 RESTFul 的接口;
1.7 Hello 之 Run
- 第五步,就是运行我们的 Application 了,我们先介绍第一种运行方式。第一种方式特别简单:右键 Run As -> Java Application。之后打开浏览器输入地址:http://127.0.0.1:8080/ 就可以看到 Hello world!了。第二种方式 右键 project – Run as – Maven build – 在 Goals 里输入 spring-boot:run ,然后 Apply,最后点击 Run。
1.8 Hello 之 Error
-
顺利的情况下当然是皆大欢喜了,但是程序吧往往会给你开个小玩笑。那么我们要注意什么呢?主要是 jdk 的版本之类的,请看官方说明:
[外链图片转存失败,源站可能有防盗链机制,建议将图片保存下来直接上传(img-y5c3cRIB-1629127744604)(https://cdn.jsdelivr.net/gh/coderchen1/picture2/img/20210813112823.png)]
2.Springboot返回json数据
- 在做如下操作之前,我们对之前的 Hello 进行简单的修改,我们新建一个包 com.hpit.test.web 然后新建一个类 HelloController, 然后修改 App.java 类,主要是的这个类就是一个单纯的启动类。
- 主要代码如下: App.java
package com.hpit;
import org.springframework.boot.SpringApplication;
import org.springframework.boot.autoconfigure.SpringBootApplication;
/**
* Hello world!
*/
/*其中@SpringBootApplication 申明让 spring boot 自动给程序进行必要的配置,等价于以默认属性使用@Configuration,@EnableAutoConfiguration 和@ComponentScan*/
@SpringBootApplication
public class App {
	public static void main(String[] args) {
		SpringApplication.run(App.class, args);
	}
}
com.hpit.test.web.HelloController :
package com.hpit.test.web;
import org.springframework.web.bind.annotation.RequestMapping;
import org.springframework.web.bind.annotation.RestController;
@RestController// 标记为:restful
public class HelloController {
	@RequestMapping("/")
	public String hello(){
		return"Hello world!";
	}
}
-
运行代码和之前是一样的效果的。
-
我们在编写接口的时候,时常会有需求返回 json 数据,那么在 spring boot 应该怎么操作呢?主要是在 class 中 加入注解@RestController。
-
返回 JSON 之步骤:
(1)编写一个实体类 Demo
(2)编写 DemoController;
(3)在 DemoController 加上@RestController 和@RequestMapping 注解;
(4)测试
具体代码如下: com.hpit.test.bean.Demo
package com.hpit.test.bean;
/**
* 测试实体类.
* @author Administrator
*/
public class Demo {
    private longid;//主键.
    private String name;//测试名称.

    public long getId(){
    	returnid;
    }
	public void setId(longid){
		this.id = id;
	}
    public String getName() {
    	returnname;
    }
    publicvoid setName(String name){
    	this.name = name;
    }
}
com.hpit.test.web.DemoController:
package com.hpit.test.web;
import org.springframework.web.bind.annotation.RequestMapping;
import org.springframework.web.bind.annotation.RestController;
import com.hpit.test.bean.Demo;
/**
* 测试.
* @author Administrator
*/
@RestController
@RequestMapping("/demo")
public class DemoController {
    /**
    * 返回 demo 数据:
    * 请求地址:http://127.0.0.1:8080/demo/getDemo
    * @return
    */
    @RequestMapping("/getDemo")
    public Demo getDemo(){
        Demo demo = new Demo();
        demo.setId(1);
        demo.setName("Zjs");
        return demo;
	}
}
那么在浏览器访问地址:http://127.0.0.1:8080/demo/getDemo 返回如下数据:
{
id: 1,
name: "Zjs"
}
是不是很神奇呢,其实 Spring Boot 也是引用了 JSON 解析包 Jackson,那么自然我们就可以在 Demo 对象上使 用 Jackson 提供的 json 属性的注解,对时间进行格式化,对一些字段进行忽略等等。
Spring boot 热部署
在编写代码的时候,你会发现我们只是简单把打印信息改变了下,就需要重新部署,如果是这样的编码方式,那 么我们估计一天下来之后就真的是打几个 Hello World 之后就下班了。那么如何解决热部署的问题呢?那就是 springloaded,加入如下配置:
<plugin>
    <groupId>org.springframework.boot</groupId>
    <artifactId>spring-boot-maven-plugin</artifactId>
    <!-- 配置热部署 -->
    <dependencies>
        <dependency>
            <groupId>org.springframework</groupId>
            <artifactId>springloaded</artifactId>
            <version>1.2.4.RELEASE</version>
        </dependency>
    </dependencies>
    <executions>
        <execution>
            <goals>
            	<goal>repackage</goal>
            </goals>
            <configuration>
            	<classifier>exec</classifier>
            </configuration>
        </execution>
    </executions>
</plugin>
如果是使用 spring-boot:run 的话,那么到此配置结束,现在你就可以体验 coding…coding 的爽了。
如果使用的 run as – java application 的话,那么还需要做一些处理哦: 把 spring-loader-1.2.4.RELEASE.jar 下载下来,放到项目的 lib 目录中,然后把 IDEA 的 run 参数里 VM 参数设 置为:-javaagent:.\lib\springloaded-1.2.4.RELEASE.jar -noverify 然后启动就可以了,这样在 run as 的时候,也能进行热部署了。
3. Springboot使用其他json转换框架
- 个人使用比较习惯的 json 框架是 fastjson,所以 spring boot 默认的 json 使用起来就很陌生了,所以很自然我就 想我能不能使用 fastjson 进行 json 解析呢?
<dependencies>
    <dependency>
        <groupId>com.alibaba</groupId>
        <artifactId>fastjson</artifactId>
        <version>1.2.15</version>
    </dependency>
</dependencies>
-
这里要说下很重要的话,官方文档说的 1.2.10 以后,会有两个方法支持 HttpMessageconvert,一个是 FastJsonHttpMessageConverter,支持 4.2 以下的版本,一个是 FastJsonHttpMessageConverter4 支持 4.2 以 上的版本,具体有什么区别暂时没有深入研究。这里也就是说:低版本的就不支持了,所以这里最低要求就是 1.2.10+
-
配置 fastjon 支持两种方法:
第一种方法:
(1)启动类继承 extends WebMvcConfigurerAdapter
(2)覆盖方法 configureMessageConverters
第二种方法:
(1)在 App.java 启动类中,注入 Bean : HttpMessageConverters
具体代码如下:
代码:App.java
import java.util.List;
import org.springframework.boot.SpringApplication;
import org.springframework.boot.autoconfigure.SpringBootApplication;
import org.springframework.http.converter.HttpMessageConverter;
import org.springframework.web.servlet.config.annotation.WebMvcConfigurerAdapter;
import com.alibaba.fastjson.serializer.SerializerFeature;
import com.alibaba.fastjson.support.spring.FastJsonHttpMessageConverter;
//如果想集成其他的json框架需要继承WebMvcConfigurerAdapter,并重写configureMessageConverters
@SpringBootApplication
public class App extends WebMvcConfigurerAdapter {
	// 第一种方式,重写configureMessageConverters,并将FastJsonConverter设置到系统中
	@Override
	public void configureMessageConverters(List<HttpMessageConverter<?>> converters) {
		FastJsonHttpMessageConverter converter = new FastJsonHttpMessageConverter();
		converter.setFeatures(SerializerFeature.PrettyFormat);
		converters.add(converter);
		super.configureMessageConverters(converters);
	}
	// 第二种方法:注入beanHttpMessageConverters
    /*
	* @Bean public HttpMessageConverters faMessageConverters(){
	* return new HttpMessageConverters(new FastJsonHttpMessageConverter()); }
	*/
	public static void main(String[] args) {
		SpringApplication.run(App.class, args);
	}
}
4. Springboot全局异常捕捉
- 在一个项目中的异常我们我们都会统一进行处理的,那么如何进行统一进行处理呢? 新建一个类 GlobalDefaultExceptionHandler, 在 class 注解上@ControllerAdvice
@CONTROLLERADVICE:即把@CONTROLLERADVICE 注解内部使用@EXCEPTIONHANDLER、@INITBINDER、@MODELATTRIBUTE 注解的方法应用到所有的 @REQUESTMAPPING 注解的方法。非常简单,不过只有当使用@EXCEPTIONHANDLER 最有用,另外两个用处不大
- 在方法上注解上
@ExceptionHandler(value = Exception.class),具体代码如下
package com.hpit.base.exception;
import javax.servlet.http.HttpServletRequest;
import org.springframework.web.bind.annotation.ControllerAdvice;
import org.springframework.web.bind.annotation.ExceptionHandler;
@ControllerAdvice
publicclass GlobalDefaultExceptionHandler {
	@ExceptionHandler(value = Exception.class)
	public void defaultErrorHandler(HttpServletRequest req, Exception e) {
    /*If the exception is annotated with @ResponseStatus rethrow it and let
      the framework handle it - like the OrderNotFoundException example
      at the start of this post.
      AnnotationUtils is a Spring Framework utility class.
      if (AnnotationUtils.findAnnotation(e.getClass(), ResponseStatus.class) != null)
      throw e;
      Otherwise setup and send the user to a default error-view.
      ModelAndView mav = new ModelAndView();
      mav.addObject("exception", e);
      mav.addObject("url", req.getRequestURL());
      mav.setViewName(DEFAULT_ERROR_VIEW);
      return mav;*/
	// 打印异常信息:
	e.printStackTrace();
	System.out.println("GlobalDefaultExceptionHandler.defaultErrorHandler()");
    /*
    * 返回 json 数据或者 String 数据:
    * 那么需要在方法上加上注解:@ResponseBody
    * 添加 return 即可。
    */
    /*
    * 返回视图:
    * 定义一个 ModelAndView 即可,
    * 然后 return;
    * 定义视图文件(比如:error.html,error.ftl,error.jsp);
    */
	}
}
com.hpit.test.web.DemoController 加入方法
@RequestMapping("/zeroException")
publicint zeroException(){
	return 100/0;
}
访问:http://127.0.0.1:8080/zeroException 这个方法肯定是抛出异常的,那么在控制台就可以看到我们全局捕捉 的异常信息了
5. Springboot JPA 连接数据库
-
在任何一个平台都逃离不了数据库的操作,那么在 spring boot 中怎么接入数据库呢? 很简单,我们需要在 application.properties 进行配置一下,application.properties 路径是 src/main/resources 下, 对于 application.properties 更多的介绍请自行百度进行查找相关资料进行查看,在此不进行过多的介绍,以下只 是 mysql 的配置文件。
-
大体步骤:
(1)在 application.properties 中加入 datasouce 的配置
(2)在 pom.xml 加入 mysql 的依赖。
(3)获取 DataSouce 的 Connection 进行测试。
src/main/resouces/application.properties:
########################################################
###datasource
########################################################
spring.datasource.url = jdbc:mysql://localhost:3306/test
spring.datasource.username = root
spring.datasource.password = root
spring.datasource.driverClassName = com.mysql.jdbc.Driver
spring.datasource.max-active=20
spring.datasource.max-idle=8
spring.datasource.min-idle=8
spring.datasource.initial-size=10
pom.xml 配置:
<dependency>
    <groupId>mysql</groupId>
    <artifactId>mysql-connector-java</artifactId>
</dependency>
到此相关配置就 ok 了,那么就可以在项目中进行测试了,我们可以新建一个 class Demo 进行测试,实体类创建 完毕之后,我们可能需要手动进行编写建表语句,这时候我们可能就会想起 Hibernate 的好处了。那么怎么在 spring boot 使用 Hibernate 好的特性呢?So easy,具体怎么操作,请看下篇之 JPA – Hibernate。
6. Springboot 配置JPA
-
在说具体如何在 spring boot 使用 Hibernate 前,先抛装引玉些知识点。什么是 JPA 呢? JPA 全称 Java Persistence API.JPA 通过 JDK 5.0 注解或 XML 描述对象-关系表的映射关系,并将运行期的实 体对象持久化到数据库中
-
https://baike.baidu.com/item/JPA?fr=aladdin
-
https://www.jianshu.com/p/589f40ecce95(简单了解一下JPA)
-
接下里就说本文章重点了,那么怎么操作呢?只需要如下配置就可以了?
pom.xml 配置:
<dependency>
    <groupId>mysql</groupId>
    <artifactId>mysql-connector-java</artifactId>
</dependency>
<dependency>
    <groupId>org.springframework.boot</groupId>
    <artifactId>spring-boot-starter-data-jpa</artifactId>
</dependency>
application.properties 配置:
########################################################
###datasource
########################################################
spring.datasource.url = jdbc:mysql://localhost:3306/test
spring.datasource.username = root
spring.datasource.password = root
spring.datasource.driverClassName = com.mysql.jdbc.Driver
spring.datasource.max-active=20
spring.datasource.max-idle=8
spring.datasource.min-idle=8
########################################################
### Java Persistence Api
########################################################
# Specify the DBMS
spring.jpa.database = MYSQL
# Show or not log for each sql query
spring.jpa.show-sql = true
# Hibernate ddl auto (create, create-drop, update)
spring.jpa.hibernate.ddl-auto = update
# Naming strategy
spring.jpa.hibernate.naming-strategy = org.hibernate.cfg.ImprovedNamingStrategy
# stripped before adding them to the entity manager)
spring.jpa.properties.hibernate.dialect = org.hibernate.dialect.MySQL5Dialect
那么就可以使用 Hibernate 带来的好处了,在实体类注解@Entity 就会自动进行表的 DDL 操作了
我们在 com.hpit.test.bean.Demo 中加入注解:@Entity
@Entity//加入这个注解,Demo 就会进行持久化了,在这里没有对@Table 进行配置,请自行配置。
public class Demo {
	@Id @GeneratedValue
	private long id;//主键.
	private String name;//测试名称.
	//其它代码省略.
}
这时候运行就会在数据库看到 demo 表了。
7. Springboot整合JPA保存数据
总体步骤:
(1) 创建实体类 Demo,如果已经存在,可以忽略。
(2) 创建 jpa repository 类操作持久化。
(3) 创建 service 类。
(4) 创建 restful 请求类。
(5) 测试
代码如下: com.hpit.test.bean.Demo :
import javax.persistence.Column;
import javax.persistence.Entity;
import javax.persistence.GeneratedValue;
import javax.persistence.Id;
import javax.persistence.Table;
/**
* TODO DEMO标的实体类映射
* @Entity 加入这个注解,Demo就会进行持久化了
*/
@Entity
@Table(name = "DEMO", schema = "ROOT")
public class Demo {
    @Id @GeneratedValue
    private Integer id;
    @Column(name = "name")
    private String name;

    public Demo(){
    	super();
    }
    public Demo(Integer id,String name){
        super();
        this.id = id;
        this.name = name;
    }
    public Integer getId(){
   		return id;
    }
    public void setId(Integer id){
    	this.id = id;
    }
    public String getName(){
    	return name;
	}
    public void setName(String name){
		this.name = name;
	}
}
com.hpit.test.dao.DemoRepository(这是一个接口,没有具体的实现,这就是 JPA):
import org.springframework.data.repository.CrudRepository;
import com.hpit.springboot01.entity.Demo;
/**
* TODO Demo表的DAO层接口,并没有具体的实现,继承基础CRUD实现
* 泛型1:实体类 泛型2:主键映射类型
*/
public interface IDemoRepository extends CrudRepository<Demo, Integer> {

}
到这里保存数据的方法就写完了。CrudRepository 类把一些常用的方法都已经进行定义和实现了。那么你现在 就可以在别的类引入调用了。
另外就是在 Spring Data 的核心接口里面 Repository 是最基本的接口了, spring 提供了很多实现了该接口的基本 接口,如:CrudRepository,PagingAndSortingRepository,SimpleJpaRepository,QueryDslJpaRepository 等大 量查询接口
com.hpit.test.service.DemoService :
import com.hpit.springboot01.dao.IDemoRepository;
import com.hpit.springboot01.entity.Demo;
/**
* TODO 简单业务逻辑层
*/
@Service("demoService") // 定义业务逻辑层
public class DemoService {
	@Autowired // 自动装配DAO
	private IDemoRepository demoRepository;

	@Transactional // 自动事务托管

	public void save(Demo demo) {
		demoRepository.save(demo);
	}
}
开发数据保存控制器:
import org.springframework.beans.factory.annotation.Autowired;
import org.springframework.stereotype.Controller;
import org.springframework.web.bind.annotation.RequestMapping;
import com.hpit.springboot01.entity.Demo;
import com.hpit.springboot01.services.DemoService;
/**
* TODO 开发测试数据保存控制器
*/
@Controller
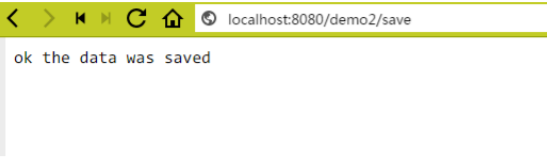
@RequestMapping("/demo2")
public class DemoController {
@Autowired
private DemoService demoService;
@ResponseBody
@RequestMapping("/save")
public String save() {
demoService.save(new Demo("angle"));
return "ok the data was saved";
}
}
8. Springboot使用 jdbcTemplate保存数据
整体步骤:
(1) 在 pom.xml 加入 jdbcTemplate 的依赖;
(2) 编写 DemoDao 类,声明为:@Repository,引入 JdbcTemplate
(3) 编写 DemoService 类,引入 DemoDao 进行使用
(4) 编写 Demo2Controller 进行简单测试。
具体操作流程如下:
使用 JdbcTemplate 类需要加入数据库配置信息(如果在 JPA 已经加入的话,这个步骤就可以忽略了) 那么只需要在需要使用的类中加入:
@Resource
private JdbcTemplate jdbcTemplate;
这样就可以使用 jdbcTemplate 进行数据库的操作了。
比如:
 String sql = "insert into Demo(name,age) values(?,?)";
 jdbcTemplate.update(sql, new Object[]{demo.getName(),demo.getAge()});
具体案例
1.定义 Dao 层代码
import org.springframework.beans.factory.annotation.Autowired;
import org.springframework.jdbc.core.BeanPropertyRowMapper;
import org.springframework.jdbc.core.JdbcTemplate;
import org.springframework.jdbc.core.RowMapper;
import org.springframework.stereotype.Repository;
import com.hpit.springboot01.entity.Demo;
/**
* TODO 使用JPA jdbc模板操作数据
*/
@Repository("demoDao1")
public class DemoDaoUseJdbcTemplate {
	@Autowired //自动装配模板
	private JdbcTemplate jdbcTemplate;
    /**
    * TODO 根据主键获取数据
    * @param id 主键
    * @return 实体对象
    */
	public Demo getById(Integer id){
		String sql = "select * from Demo where id = ?";
        //获取数据映射
        RowMapper<Demo> mapper = new BeanPropertyRowMapper<>(Demo.class);
        return jdbcTemplate.queryForObject(sql, mapper, id);
	}
}
2.开发业务逻辑层
import org.springframework.beans.factory.annotation.Autowired;
import org.springframework.stereotype.Service;
import com.hpit.springboot01.dao.DemoDaoUseJdbcTemplate;
import com.hpit.springboot01.entity.Demo;
/**
* TODO 定义业务逻辑
*/
@Service("demoService2")
public class DemoService2 {
    @Autowired
    private DemoDaoUseJdbcTemplate daoUseJdbcTemplate;
    public Demo getById(Integer id) {
    	return daoUseJdbcTemplate.getById(id);
    }
}
3.开发控制器
import org.springframework.beans.factory.annotation.Autowired;
import org.springframework.stereotype.Controller;
import org.springframework.web.bind.annotation.RequestMapping;
import org.springframework.web.bind.annotation.RequestParam;
import org.springframework.web.bind.annotation.ResponseBody;
import com.hpit.springboot01.entity.Demo;
import com.hpit.springboot01.services.DemoService;
import com.hpit.springboot01.services.DemoService2;
/**
* TODO 开发测试数据保存控制器
*/
@Controller
@RequestMapping("/demo2")
public class DemoController {
    @Autowired
    private DemoService demoService;
    @Autowired
    private DemoService2 demoService2;

    @ResponseBody
    @RequestMapping("/save")
    public String save() {
    	demoService.save(new Demo("angle"));
    	return "ok the data was saved";
    }

    @ResponseBody
    @RequestMapping("/show")
    public Demo showDemo(@RequestParam(name = "no", defaultValue = "1", required = true) Integer id) {
    	return demoService2.getById(id);
	}
}
4.启动应用,查看效果

当前前提是你的数据库中有 id=1 的数据了,不然会报错的: org.springframework.dao.EmptyResultDataAccessException
9. springboot 常用配置
1.程序基本配置
- Spring boot 默认端口是 8080,如果想要进行更改的话,只需要修改 applicatoin.properties 文件,在配置文件中 加入:
server.port=9090
常用配置:
########################################################
###EMBEDDED SERVER CONFIGURATION (ServerProperties)
########################################################
server.port=8080
server.address= # bind to a specific NIC
server.session-timeout= # session timeout in seconds
the context path, defaults to '/'
server.context-path=/spring-boot #修改默认访问路径
server.servlet-path= # the servlet path, defaults to '/'
server.tomcat.access-log-pattern= # log pattern of the access log
server.tomcat.access-log-enabled=false # is access logging enabled
server.tomcat.protocol-header=x-forwarded-proto # ssl forward headers
server.tomcat.remote-ip-header=x-forwarded-for
server.tomcat.basedir=/tmp # base dir (usually not needed, defaults to tmp)
server.tomcat.background-processor-delay=30; # in seconds
server.tomcat.max-threads = 0 # number of threads in protocol handler
server.tomcat.uri-encoding = UTF-8 # character encoding to use for URL decoding
2.修改 java 编译版本
- Spring Boot 在编译的时候,是有默认 JDK 版本的,如果我们期望使用我们要的 JDK 版本的话,那么要怎么配置 呢?
- 这个只需要修改 pom.xml 文件的 – 加入一个 plugin 即可。
<plugin>
    <artifactId>maven-compiler-plugin</artifactId>
    <configuration>
        <source>1.8</source>
        <target>1.8</target>
    </configuration>
</plugin>
10. springboot静态资源处理
默认静态资源处理
- Spring Boot 默认为我们提供了静态资源处理,使用 WebMvcAutoConfiguration 中的配置各种属性。
- 建议大家使用 Spring Boot 的默认配置方式,如果需要特殊处理的再通过配置进行修改。
- 如果想要自 己 完 全 控 制 WebMVC ,就需要在 @Configuration 注解的配置类上 增 加 @EnableWebMvc ( @SpringBootApplication 注解的程序入 口 类 已 经 包 含 @Configuration ), 增 加 该 注 解 以 后 WebMvcAutoConfiguration 中配置就不会生效,你需要自己来配置需要的每一项。这种情况下的配置还是要多看 一下 WebMvcAutoConfiguration 类。
- 我们既然是快速使用 Spring Boot,并不想过多的自己再重新配置。本文还是主要针对 Spring Boot 的默认处理方 式,部分配置在 application 配置文件中(.properties 或 .yml)
默认资源映射
- 我们在启动应用的时候,可以在控制台中看到如下信息:
2016-01-08 09:29:30.362 INFO 24932 ---[ main]o.s.w.s.handler.SimpleUrlHandlerMapping : MappedURLpath[/webjars/**]ontohandleroftype[class org.springframework.web.servlet.resource.ResourceHttpRequestHandler] 2016-01-08 09:29:30.362 INFO 24932 ---[ main]o.s.w.s.handler.SimpleUrlHandlerMapping : MappedURLpath[/**]ontohandleroftype[class org.springframework.web.servlet.resource.ResourceHttpRequestHandler] 2016-01-08 09:29:30.437 INFO 24932 ---[ main]o.s.w.s.handler.SimpleUrlHandlerMapping : MappedURLpath[/**/favicon.ico]ont
-
其中默认配置的 /** 映射到 /static (或/public、/resources、/META-INF/resources)
-
其中默认配置的 /webjars/** 映射到 classpath:/META-INF/resources/webjars/
-
PS:上面的 static、public、resources 等目录都在 classpath: 下面(如 src/main/resources/static)。
-
如果我按如下结构存放相同名称的图片,那么 Spring Boot 读取图片的优先级是怎样的呢?如下图
- 当我们访问地址 http://localhost:8080/test.jpg 的时候,显示哪张图片?这里可以直接告诉大家,优先级顺序为: META/resources > resources > static > public (已进行测试)
- 如果我们想访问 test2.jpg,请求地址 http://localhost:8080/img/test2.jpg
自定义静态资源处理
- 前面我们介绍了 Spring Boot 的默认资源映射,一般够用了,那我们如何自定义目录?
- 这些资源都是打包在 jar 包中的,然后实际应用中,我们还有很多资源是在管理系统中动态维护的,并不可能在 程序包中,对于这种随意指定目录的资源,如何访问?
- 自定义目录 以增加 /myres/* 映射到 classpath:/myres/* 为例的代码处理为:
- 实现类继承 WebMvcConfigurerAdapter 并重写方法 addResourceHandlers (对于访问 myres 文件夹中的 test.jpg 图片的地址为 http://localhost:8080/myres/test.jpg)
package org.springboot.sample.config;
import org.springboot.sample.interceptor.MyInterceptor1;
import org.springboot.sample.interceptor.MyInterceptor2;
import org.springframework.context.annotation.Configuration;
import org.springframework.web.servlet.config.annotation.InterceptorRegistry;
import org.springframework.web.servlet.config.annotation.ResourceHandlerRegistry;
import org.springframework.web.servlet.config.annotation.WebMvcConfigurerAdapter;
@Configuration
public class MyWebAppConfigurer extends WebMvcConfigurerAdapter {
	@Override
	public void addResourceHandlers(ResourceHandlerRegistry registry) {
		registry.addResourceHandler("/myres/**").addResourceLocations("classpath:/myres/");
		super.addResourceHandlers(registry);
	}
}
-
访问 myres 文件夹中的 test.jpg 图片的地址为 http://localhost:8080/myres/test.jpg
-
这样使用代码的方式自定义目录映射,并不影响 Spring Boot 的默认映射,可以同时使用。
-
如果我们将/myres/* 修改为 /* 与默认的相同时,则会覆盖系统的配置,可以多次使用 addResourceLocations 添加目录,优先级先添加的高于后添加的。
-
其中addResourceLocations 的参数是动参 ,可以这样写 addResourceLocations(“classpath:/img1/”, “classpath:/img2/”, “classpath:/img3/”);
使用外部目录
- 如果我们要指定一个绝对路径的文件夹(如 D:/data/api_files ),则只需要使用 addResourceLocations 指定即可。 // 可以直接使用 addResourceLocations 指定磁盘绝对路径,同样可以配置多个位置,注意路径写法需要 加上 file: registry.addResourceHandler("/api_files/**").addResourceLocations(“file:D:/data/api_files”);
11.springboot实现任务调度
- spring boot 实现任务调度非常简单,只需要在调度类头上添加@Configuration,然后再调度方法上添加 @Schuldle 注解,并为@Schuldle 指定 CronExpress 表达式
- 代码如下:
import org.apache.log4j.Logger;
import org.springframework.context.annotation.Configuration;
import org.springframework.scheduling.annotation.EnableScheduling;
import org.springframework.scheduling.annotation.Scheduled;
@Configuration // 声明类为系统配置类
@EnableScheduling // 开启调度任务
public class MyScheduleConfig {
	private Logger logger = Logger.getLogger(getClass());
	@Scheduled(cron = "0 0/1 * * * ?") // 定义调度器
	public void job1() {
		logger.info("this is my first job execute");
	}
}
12.springboot 普通类调用bean
- 我们知道如果我们要在一个类使用 spring 提供的 bean 对象,我们需要把这个类注入到 spring 容器中,交给 spring 容器进行管理,但是在实际当中,我们往往会碰到在一个普通的 Java 类中,想直接使用 spring 提供的其他对象 或者说有一些不需要交给 spring 管理,但是需要用到 spring 里的一些对象。如果这是 spring 框架的独立应用程序,我们通过:
ApplicationContext ac = new FileSystemXmlApplicationContext("applicationContext.xml");
ac.getBean("beanId");
- 这样的方式就可以很轻易的获取我们所需要的对象。
- 但是往往我们所做的都是 Web Application,这时我们启动 spring 容器是通过在 web.xml 文件中配置,这样就不适合使用上面的方式在普通类去获取对象了,因为这样做就相当于加载了两次spring容器,而我们想是否可以通过在启动 web 服务器的时候,就把 Application 放在某一个类中,我们通过这个类在获取,这样就可以在普通类获取spring bean对象了,让我们接着往下看。
普通类调用 Spring bean 对象:
-
可以参考:http://412887952-qq-com.iteye.com/blog/1479445 这里有更多这方面的介绍,比较详细,在这里只是抛装引玉说明在 Spring Boot 是如何进行调用的。
-
在 Spring Boot 可以扫描的包下 假设我们编写的工具类为 SpringUtil。
-
如果我们编写的 SpringUtil 在 Spring Boot 可以扫描的包下或者使用@ComponentScan 引入自定义的包了,那 么原理很简单,只需要使得 SpringUtil 实现接口:ApplicationContextAware,然后加上@Component 注解即可, 具体编码如下:
package com.hpit.springboot01.util;
import org.apache.log4j.Logger;
import org.springframework.beans.BeansException;
import org.springframework.context.ApplicationContext;
import org.springframework.context.ApplicationContextAware;
import org.springframework.stereotype.Component;
/**
* spring工具类,为了更方便的获取spring的applicationContext 直接实现接口ApplicationContextAware
*/
@Component
public class SpringUtil implements ApplicationContextAware {
	private Logger logger = Logger.getLogger(getClass());
	private static ApplicationContext applicationContext;
	@Override
	public void setApplicationContext(ApplicationContext applicationContext) throws BeansException {
		if (SpringUtil.applicationContext == null) {
			SpringUtil.applicationContext = applicationContext;
		}
		logger.info(
					"========ApplicationContext配置成功,在普通类可以通过调用
					SpringUtils.getApplicationContext()获取applicationContext对象,applicationContext="
					+ SpringUtil.applicationContext + "========");
	}
    /**
    * 获取spring上下文
    *
    * @return
    */
	public static ApplicationContext getApplicationContext() {
		return applicationContext;
	}
    public static Object getBean(String beanName) {
		return applicationContext.getBean(beanName);
	}
	public static <T> Object getBean(Class<T> class1) {
		return applicationContext.getBean(class1);
	}
	public static <T> Object getBean(Class<T> class1, String beanName) {
		return applicationContext.getBean(class1, beanName);
	}
}
不在 Spring Boot 的扫描包下方式一
- 这种情况处理起来也很简单,先编写 SpringUtil 类,同样需要实现接口:ApplicationContextAware,具体编码如下:simple.plugin.spring.SpringUtil
package simple.plugin.spring;
import org.springframework.beans.BeansException;
import org.springframework.context.ApplicationContext;
import org.springframework.context.ApplicationContextAware;

public class SpringUtil implements ApplicationContextAware{
	private static ApplicationContext applicationContext = null;
	@Override
	public void setApplicationContext(ApplicationContext applicationContext) throws BeansException{
        if(SpringUtil.applicationContext == null){
            SpringUtil.applicationContext = applicationContext;
        }
        System.out.println("---------------------------------------------------------------------");
        System.out.println("---------------------------------------------------------------------");
        System.out.println("---------------simple.plugin.spring.SpringUtil-----------------------");
        System.out.println("========ApplicationContext 配置成功 , 在普通类可以通过调用
        SpringUtils.getAppContext() 获取applicationContext对象,applicationContext="+SpringUtil.applicationContext+"========");
        System.out.println("-----------------------------------------------------------------");
	}
    //获取 applicationContext
    public static ApplicationContext getApplicationContext() {
    	returnapplicationContext;
    }
    //通过 name 获取 Bean.
    public static Object getBean(String name){
    	return getApplicationContext().getBean(name);
    }
    //通过 class 获取 Bean.
    public static <T> T getBean(Class<T> clazz){
    	return getApplicationContext().getBean(clazz);
    }
    //通过 name,以及 Clazz 返回指定的 Bean
    public static <T> T getBean(String name,Class<T> clazz){
    	return getApplicationContext().getBean(name, clazz);
    }
}
之后这一步才是关键,使用@Bean 注解,在 App.java 类中将 SpringUtil 注解进来,代码如下:
package	com.hpit;
import	org.springframework.boot.SpringApplication;
import	org.springframework.boot.autoconfigure.SpringBootApplication;
import	org.springframework.boot.web.servlet.ServletComponentScan;
import	org.springframework.context.annotation.Bean;
import	org.springframework.context.annotation.Import;
import	simple.plugin.spring.SpringUtil;
/**
*	Hello	world!
* 其中@SpringBootApplication 申明让springboot自动给程序进行必要的配置,等价于以默认属性使用
* @Configuration,@EnableAutoConfiguration 和@ComponentScan
*/

@SpringBootApplication
@ServletComponentScan
public class App{
    /**注册 Spring Util
    * 这里为了和上一个冲突,所以方面名为:springUtil2
    * 实际中使用 springUtil
    */
	@Bean
	public SpringUtil springUtil2(){
        return new SpringUtil();
    }
    /**
    *
    参数里 VM 参数设置为:
    -javaagent:.\lib\springloaded-1.2.4.RELEASE.jar	-noverify
    *	@param	args
    */
    public static void main(String[] args){
    	SpringApplication.run(App.class,args);
    }
}
不在SpringBoot的扫描包下方式二
代码基本和上面都是相同的,主要是在 App.java 中使用@Import 进行导入。 而且在SpringUtil是不需要添加@Component注解
@SpringBootApplication
@ServletComponentScan
@Import(value={SpringUtil.class})
publicclass App {
	//省略其它代码.
}
说明以上3种方式都生效了,这 3 种方式根据实际情况选择一种方式就可以了。 那么这样在普通类既可以使用: SpringUtil.getBean() 获取到 Spring IOC 容器中的 bean。 当然也可以在 Spring 管理的类中使用: @Resouce 或者@Autowired 进行注入使用,当然我们这个类的核心是普通类可以调用 spring 的 bean 进行使用 了,是不是很神奇呢。
13. springboot 使用模板引擎
使用 thymeleaf 模板引擎
整体步骤:
(1) 在 pom.xml 中引入 thymeleaf;
(2) 如何关闭 thymeleaf 缓存
(3) 编写模板文件.html
- SpringBoot 默认就是使用 thymeleaf 模板引擎的,所以只需要在 pom.xml 加入依赖即可:
<dependency>
    <groupId>org.springframework.boot</groupId>
    <artifactId>spring-boot-starter-thymeleaf</artifactId>
</dependency>
- Thymeleaf缓存在开发过程中,肯定是不行的,那么就要在开发的时候把缓存关闭 , 只需要在 application.properties 进行配置即可:
########################################################
###THYMELEAF (ThymeleafAutoConfiguration)
########################################################
#spring.thymeleaf.prefix=classpath:/templates/
#spring.thymeleaf.suffix=.html
#spring.thymeleaf.mode=HTML5
#spring.thymeleaf.encoding=UTF-8
# ;charset=<encoding> is added
#spring.thymeleaf.content-type=text/html
# set to false for hot refresh
spring.thymeleaf.cache=false
- 编写模板文件 src/main/resouces/templates/helloHtml.html
<!DOCTYPE html>
<html xmlns="http://www.w3.org/1999/xhtml" xmlns:th="http://www.thymeleaf.org"
xmlns:sec="http://www.thymeleaf.org/thymeleaf-extras-springsecurity3">
<head>
<title>Hello World!</title>
</head>
<body>
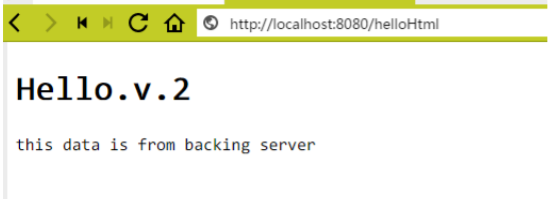
<h1 th:inline="text">Hello.v.2</h1>
<p th:text="${hello}"></p>
</body>
</html>
编写访问路径(com.hpit.test.web.ThymeleafController):
import java.util.Map;
import org.springframework.stereotype.Controller;
import org.springframework.web.bind.annotation.RequestMapping;
/**
* TODO thymeleaf模板引擎控制器
* @author Administrator
*/
@Controller
public class ThymeleafController {
	@RequestMapping("/helloHtml")
    public String hello(Map<String, Object> map) {
    	map.put("hello", "this data is from backing server");
    	return "helloHtml";
    }
}
启动应用,输入地址:http://127.0.0.1:8080/helloHtml 会输出:
使用 freemarker 模板引擎
使用freemarker也很简单,在 pom.xml加入freemarker的依赖
<dependency>
    <groupId>org.springframework.boot</groupId>
    <artifactId>spring-boot-starter-freemarker</artifactId>
</dependency>
剩下的编码部分都是一样的,说下 application.properties 文件:
########################################################
###FREEMARKER (FreeMarkerAutoConfiguration)
########################################################
spring.freemarker.allow-request-override=false
spring.freemarker.cache=true
spring.freemarker.check-template-location=true
spring.freemarker.charset=UTF-8
spring.freemarker.content-type=text/html
spring.freemarker.expose-request-attributes=false
spring.freemarker.expose-session-attributes=false
spring.freemarker.expose-spring-macro-helpers=false
#spring.freemarker.prefix=
#spring.freemarker.request-context-attribute=
#spring.freemarker.settings.*=
#spring.freemarker.suffix=.ftl
#spring.freemarker.template-loader-path=classpath:/templates/#comma-separatedlist
#spring.freemarker.view-names= #whitelistofviewnamesthatcanberesolved
开发 freemarker 模板
helloHtml1.ftl
<!DOCTYPE html>
<html>
    <head>
    	<meta charset="UTF-8">
    <title>freemarker模板的使用</title>
    </head>
    <body>
    	<h1>${message}</h1>
    </body>
</html>
开发控制器:
import org.springframework.stereotype.Controller;
import org.springframework.ui.ModelMap;
import org.springframework.web.bind.annotation.RequestMapping;
/**
* TODO freemarker 控制器
*/
@Controller
@RequestMapping("/freemarker")
public class FreemarkerController {
	@RequestMapping("/hello")
	public String hello(ModelMap map){
		map.put("message", "this data is from backing server , for freemarker");
		return "helloHtml1";
	}
}
访问地址:http://localhost:8080/freemarker/hello

thymeleaf 和 freemarker 是可以共存的
14. springboot集成jsp
这个部分比较复杂,所以单独创建一个工程来进行讲解;
大体步骤:
-
创建 Maven web project;
-
在 pom.xml 文件添加依赖;
-
配置 application.properties 支持 jsp
-
编写测试 Controller
-
编写 JSP 页面
-
编写启动类 App.java
- 1.FreeMarker
- 2.Groovy
- 3,Thymeleaf (Spring 官网使用这个)
- 4,Velocity
- 5,JSP (貌似SpringBoot官方不推荐,STS创建的项目会在src/main/resources下有个templates目录,这里就是让我们放模版文件的,然后并没有生成诸如SpringMVC中的webapp目录)不过本文还是选择大家都熟悉的JSP来举例,因为使用 JSP与默认支持的模版需要特殊处理,所以拿来举例更好。
(1)创建 Maven web project
使用 IDEA 新建一个 Maven Web Project ,项目取名为: springboot02
(2)在 pom.xml 文件添加依赖
<!-- springboot parent节点,引入这个之后,在下面和springboot相关的就不需要引入版本了; -->
<parent>
    <groupId>org.springframework.boot</groupId>
    <artifactId>spring-boot-starter-parent</artifactId>
    <version>1.3.3.RELEASE</version>
</parent>
依赖包:
<!-- web 支持: 1、web mvc; 2、restful; 3、jackjson 支持; 4、aop ........ -->
<dependency>
    <groupId>org.springframework.boot</groupId>
    <artifactId>spring-boot-starter-web</artifactId>
</dependency>
<!-- servlet 依赖. -->
<dependency>
    <groupId>javax.servlet</groupId>
    <artifactId>javax.servlet-api</artifactId>
    <scope>provided</scope>
</dependency>
<!--
JSTL(JSP Standard Tag Library,JSP 标准标签库)是一个不断完善的开放源代码的 JSP 标
签库,是由 apache 的 jakarta 小组来维护的。JSTL 只能运行在支持 JSP1.2 和 Servlet2.3 规范的容器上,
如 tomcat4.x。在 JSP 2.0 中也是作为标准支持的。
不然报异常信息:
javax.servlet.ServletException: Circular view path [/helloJsp]: would
dispatch back to the current handler URL [/helloJsp] again. Check your ViewResolver
setup! (Hint: This may be the result of an unspecified view, due to default view name
generation.)
-->
<dependency>
    <groupId>javax.servlet</groupId>
    <artifactId>jstl</artifactId>
</dependency>
<!-- tomcat 的支持.-->
<dependency>
    <groupId>org.springframework.boot</groupId>
    <artifactId>spring-boot-starter-tomcat</artifactId>
    <scope>provided</scope>
</dependency>
<dependency>
    <groupId>org.apache.tomcat.embed</groupId>
    <artifactId>tomcat-embed-jasper</artifactId>
    <scope>provided</scope>
</dependency>
Jdk 编译版本:
<build>
    <finalName>spring-boot-jsp</finalName>
    <plugins>
        <plugin>
            <artifactId>maven-compiler-plugin</artifactId>
            <configuration>
                <source>1.8</source>
                <target>1.8</target>
            </configuration>
        </plugin>
    </plugins>
</build>
(3)application.properties 配置
上面说了spring-boot不推荐JSP,想使用JSP需要配置 application.properties。 添加 src/main/resources/application.properties 内容:
# 页面默认前缀目录
spring.mvc.view.prefix=/WEB-INF/views/
# 响应页面默认后缀
spring.mvc.view.suffix=.jsp
# 自定义属性,可以在 Controller 中读取
application.hello=Hello Zjs From application
(4)编写测试 Controller
编写类:com.hpit.sb.controller. HelloJSPController:
import org.springframework.stereotype.Controller;
import org.springframework.ui.ModelMap;
import org.springframework.web.bind.annotation.RequestMapping;
/**
* TODO 开发控制器,该控制器将返回到JSP视图
*/
@Controller
public class HelloJSPController {
    @RequestMapping("/index")
    public String hello(ModelMap map) {
        map.put("message", "this data is from the backing server");
        return "index";
    }
}
(5)编写 JSP 页面
在 src/main 下面创建 webapp/WEB-INF/views 目录用来存放我们的 jsp 页面:index.jsp
<%@ page language="java" contentType="text/html; charset=UTF-8"
 pageEncoding="UTF-8"%>
<!DOCTYPE html PUBLIC "-//W3C//DTD HTML 4.01 Transitional//EN" "http://www.w3.org/TR/html4/loose.dtd">
<html>
<head>
    <meta http-equiv="Content-Type" content="text/html; charset=UTF-8">
    <title>hello jsp</title>
</head>
<body>
    ${message }
</body>
</html>
(6)编写启动类
编写 App.java 启动类
import org.springframework.boot.SpringApplication;
import org.springframework.boot.autoconfigure.SpringBootApplication;
@SpringBootApplication
public class App{
    public static void main(String[] args) throws Exception{
            SpringApplication.run(App.class, args);
        }
}
[外链图片转存失败,源站可能有防盗链机制,建议将图片保存下来直接上传(img-Y8QcvVSM-1629127744613)(https://cdn.jsdelivr.net/gh/coderchen1/picture2/img/20210813174811.png)]
附注:关于集成 JSP 几个问题:
1、SpringBoot 使用jsp时,仍旧可以打成 jar 包的形式吗?
2、SpringBoot使用jsp时,比如说 css,image,js等三种静态资源文件,应该放在什么目录下?这些静态资源映射,在springboot中具体应该怎么做?
例如,下面是 spring 中做的静态资源映射,但是在 spring boot 中不知道怎么处理:
<!-- springmvc.xml 资源映射 -->
<mvc:resources location="/WEB-INF/css/" mapping="/css/**"/>
<mvc:resources location="/WEB-INF/js/" mapping="/js/**"/>
<mvc:resources location="/WEB-INF/image/" mapping="/image/**"/>
3、下面这个 tomcat 的包必须导入吗,spring-boot-starter-web 中不是有一个内嵌的 tomcat 吗?
<dependency>
    <groupId>org.springframework.boot</groupId>
    <artifactId>spring-boot-starter-tomcat</artifactId>
    <scope>provided</scope>
</dependency>
<1>、针对第一个问题,答案是不可以的。
- 我们先看一段英文描述,如下: When running a Spring Boot application that uses an embedded servlet container (and is packaged as an executable archive), there are some limitations in the JSP support.
- With Tomcat it should work if you use war packaging, i.e. an executable war will work, and will also be deployable to a standard container (not limited to, but including Tomcat). An executable jar will not work because of a hard coded file pattern in Tomcat
- Jetty does not currently work as an embedded container with JSPs.Undertow does not support JSPs.

- 原文的大体意思就是:Tomcat 支持 war 的打包方式,spring boot 支持 war 打包方式。Jetty 现在不支持,JSP 嵌入容器。Undertow 根本就不支持 JSP。
- 所以答案就是打包成 war,jsp 会自然按照 servlet 的标准部署。但也就意味着你不可以用嵌入式的方式运行,而是 Tomcat Server + war 的部署方式
 * 看到这里有些网友肯定会有疑问那什么是嵌入式的 web 服务器?我们这边就拿 jetty 来说明下:

 * Jetty 可以非常容易的嵌入到应用程序当中而不需要程序为了使用 Jetty 做修改。
 * 从某种程度上,你也可以把 Jetty 理解为一个嵌入式的 Web 服务器。所以我们经常会说嵌入式 jetty。
 * Jetty 有一个口号:不要把你的应用部署到 Jetty 中,把 Jetty 部署到你的应用中。Jetty 可以在 Java 应用 程序中向其他 POJO 一样被实例化,换句话说,以嵌入式的模式运行 Jetty 是指将 Http 模块放入你的应用程序 中,而非部署你的程序到一个 HTTP 服务器。这就是所谓的嵌入式 jetty。
 * 另外在说明一点就是 JSP 解析是需要 JSP 引擎处理的,tomcat 就提供了 JSP 处理引擎。所以很显然 JSP 是依赖容器而存在的,不然就没法访问了。那么既然是依赖于 tomcat 的话。有一网友找到一支持打成 jar 包运行的插件: Using Spring Boot with JSPs in Executable Jars https://github.com/ghillert/spring-boot-jsp-demo 经过 java -jar xxx.jar 运行后,可以正常访问网页。 这也可以说明原本是不支持的,但是如果非要支持的话,那么需要进行使用插件进行支持。
<2>针对第二个问题
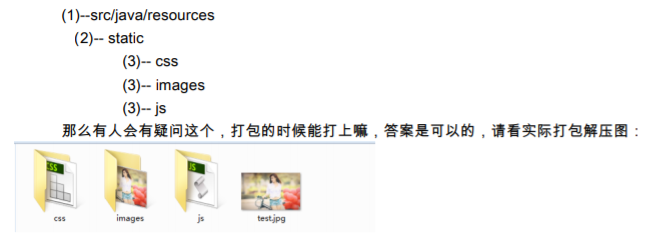
- 对于第二个问题,如果看过之前的章节就很好解决了,只需要在 src/main/resouces 下新建一个 static 目 录,然后在 static 下新建子目录:css,images,js 目录,在 images 放入一张 test.jpg 图片,那么访问路径是: http://127.0.0.1:8080/images/test.jpg
- 当前目录结构应该是这样子的:
15 springboot集成Servlet
- Web开发使用Controller基本上可以完成大部分需求,但是我们还可能会用到 Servlet、Filter、Listener、 Interceptor 等等。
- 当使用 Spring-Boot 时,嵌入式 Servlet 容器通过扫描注解的方式注册 Servlet、Filter 和 Servlet 规范的所有监听器(如 HttpSessionListener 监听器)
- Spring boot 的主Servlet 为DispatcherServlet,其默认的 url-pattern 为“/”。也许我们在应用中还需要定义更多 的 Servlet,该如何使用 SpringBoot 来完成呢?
- 在 spring boot 中添加自己的 Servlet 有两种方法,代码注册 Servlet 和注解自动注册(Filter 和 Listener 也是如 此)。
一、代码注册通过 ServletRegistrationBean、 FilterRegistrationBean 和 ServletListenerRegistrationBean 获得 控制。 也可以通过实现 ServletContextInitializer 接口直接注册。
二、在 SpringBootApplication 上使用@ServletComponentScan 注解后,Servlet、Filter、Listener 可以直接通 过 @WebServlet、@WebFilter、@WebListener 注解自动注册,无需其他代码。
通过代码注册 Servlet 示例代码:
com.hpit.sb.servlet.MyServlet1
import java.io.IOException;
import java.io.PrintWriter;
import javax.servlet.ServletException;
import javax.servlet.annotation.WebServlet;
import javax.servlet.http.HttpServlet;
import javax.servlet.http.HttpServletRequest;
import javax.servlet.http.HttpServletResponse;
/**
* TODO 开发一个普通的servlet
*/
@WebServlet(urlPatterns="/myServlet/*",name="servlet1",description="this is my first servlet in springboot")
public class MyServlet1 extends HttpServlet {
	private static final long serialVersionUID = 6613439809483079873L;
	@Override
	protected void doGet(HttpServletRequest req, HttpServletResponse resp) throws ServletException,
IOException{
        resp.setContentType("text/html;charset=utf-8");
        resp.setCharacterEncoding("utf-8");
        PrintWriter out = resp.getWriter();
        out.println("<html>");
        out.println("<head>");
        out.println("<title>Hello World</title>");
        out.println("</head>");
        out.println("<body>");
        out.println("<h1>这是:MyServlet1</h1>");
        out.println("</body>");
        out.println("</html>");
    }
}
程序入口配置:
com.hpit.sb. App
import org.springframework.boot.SpringApplication;
import org.springframework.boot.autoconfigure.SpringBootApplication;
import org.springframework.context.annotation.Bean;
import com.hpit.sb.servlet.MyServlet1;
/**
*
*
* 大家也许会看到有些demo使用了3个注解: @Configuration;@EnableAutoConfiguration @ComponentScan
*其实:@SpringBootApplication申明让spring boot自动给程序进行必要的配置,等价于以默认属性使用@Configuration,
* @EnableAutoConfiguration和@ComponentScan 所以大家不要被一些文档误导了,让自己很迷茫了,希望本文章对您有所启发;
*/
@SpringBootApplication
public class App {
    /**
    * 注册Servlet.不需要添加注解:@ServletComponentScan
    * 这种方式已经在springboot中废弃
    * @return
    */
    @Bean
    public ServletRegistrationBean regMyServlet1() {
    	return new ServletRegistrationBean(new MyServlet1(), "/myServlet/*");
    }
    public static void main(String[] args) throws Exception {
    	SpringApplication.run(App.class, args);
    }
}
第二种方式:使用注解注册 Servlet
示例代码 com.hpit.sb.servlet. MyServlet2
import javax.servlet.ServletException;
import javax.servlet.annotation.WebServlet;
import javax.servlet.http.HttpServlet;
import javax.servlet.http.HttpServletRequest;
import javax.servlet.http.HttpServletResponse;
/**
* TODO 使用注解开发第二个servlet,该servlet将使用注解注册
*/
@WebServlet(urlPatterns= "/myServlet/*",name ="serlvet2", description="this is the second spring boot
servlet")
public class MyServlet2 extends HttpServlet {
    private static final long serialVersionUID = -7877622076081913248L;
    @Override
    protected void doGet(HttpServletRequest req, HttpServletResponse resp) throws ServletException,
IOException {
        resp.setContentType("text/html;charset=utf-8");
        resp.setCharacterEncoding("utf-8");
        PrintWriter out = resp.getWriter();
        out.println("<html>");
        out.println("<head>");
        out.println("<title>Hello World</title>");
        out.println("</head>");
        out.println("<body>");
        out.println("<h1>这是:MyServlet1</h1>");
        out.println("</body>");
        out.println("</html>");
    }
}
主程序配置:
com.hpit.sb.App
import org.springframework.boot.SpringApplication;
import org.springframework.boot.autoconfigure.SpringBootApplication;
import org.springframework.boot.web.servlet.ServletComponentScan;
import org.springframework.context.annotation.Bean;
import com.hpit.sb.servlet.MyServlet1;

@SpringBootApplication
@ServletComponentScan // 方式二: 添加servlet 注册扫描,将自动注册添加了@WebServlet的类为serlvet
public class App {
    /**
    * 方式一:注册Servlet.不需要添加注解:@ServletComponentScan 这种方式已经在springboot中废弃
    */
    /*
    * @Bean public ServletRegistrationBean regMyServlet1() { return new
    * ServletRegistrationBean(new MyServlet1(), "/myServlet/*"); }
    */
    public static void main(String[] args) throws Exception {
        SpringApplication.run(App.class, args);
    }
}
启动日志:
[外链图片转存失败,源站可能有防盗链机制,建议将图片保存下来直接上传(img-CtRGFtEr-1629127744615)(https://cdn.jsdelivr.net/gh/coderchen1/picture2/img/20210813182349.png)]
16.springboot 集成Filter和Listener
上一章已经对定义 Servlet 的方法进行了说明,过滤器(Filter)和监听器(Listener)的注册方法和 Servlet 一 样,不清楚的可以查看下上一篇文章: 本文将直接使用@WebFilter 和@WebListener 的方式,完成一个 Filter 和一个 Listener;使用注解
@ServletComponentScan//这个就是扫描相应的 Servlet 包;
开发 Filter【:添加@ServletComponentScan 注解之后,使用注解开发的 Filter 和 Linstener 将会被自动注册】 具体实现代码:
com.hpit.sb.filter.MyFilter
import java.io.IOException;
import javax.servlet.Filter;
import javax.servlet.FilterChain;
import javax.servlet.FilterConfig;
import javax.servlet.ServletException;
import javax.servlet.ServletRequest;
import javax.servlet.ServletResponse;
import javax.servlet.annotation.WebFilter;
import org.apache.log4j.Logger;
//使用注解定义一个过滤器
@WebFilter(urlPatterns = "/*", filterName = "myFilter")
public class MyFilter implements Filter {
	private Logger logger = Logger.getLogger(getClass());
	@Override
	public void destroy() {
		logger.info("destroy()");
	}
	@Override
	public void doFilter(ServletRequest request, ServletResponse response, FilterChain chain) throws IOException, ServletException {
        logger.info("doFilter()");
        logger.info("before filter");
        chain.doFilter(request, response);
        logger.info("after filter");
    }
	@Override
    public void init(FilterConfig config) throws ServletException {
		logger.info("init()");
	}
}
开发 Linstener
具体实现代码: com.hpit.sb.listener. Mylistener
import javax.servlet.ServletContextEvent;
import javax.servlet.ServletContextListener;
import javax.servlet.annotation.WebListener;
import org.apache.log4j.Logger;
/**
* TODO 使用注解开发一个监听器
*/
@WebListener
public class Mylistener implements ServletContextListener {
	private Logger logger = Logger.getLogger(getClass());
	@Override
	public void contextDestroyed(ServletContextEvent contextEvent) {
		logger.info("contextDestroyed");
	}
	@Override
	public void contextInitialized(ServletContextEvent contextEvent) {
		logger.info("contextInitialized");
	}
}
启动日志,并请求一个有效连接:
[外链图片转存失败,源站可能有防盗链机制,建议将图片保存下来直接上传(img-keOAEuRr-1629127744616)(https://cdn.jsdelivr.net/gh/coderchen1/picture2/img/20210813182911.png)]
17. springboot拦截器HandlerInterceptor
- 上一章对过滤器的定义做了说明,也比较简单。过滤器属于 Servlet 范畴的 API,与 Spring 没什么关系。 Web 开发中,我们除了使用 Filter 来过滤请 web 求外,还可以使用 Spring 提供的 HandlerInterceptor(拦截器)
- HandlerInterceptor 的功能跟过滤器类似,但是提供更精细的的控制能力:在 request 被响应之前、request 被响 应之后、视图渲染之前以及 request 全部结束之后。我们不能通过拦截器修改 request 内容,但是可以通过抛出 异常(或者返回 false)来暂停 request 的执行。
实现 UserRoleAuthorizationInterceptor 的拦截器有:
ConversionServiceExposingInterceptor
CorsInterceptor
LocaleChangeInterceptor
PathExposingHandlerInterceptor
ResourceUrlProviderExposingInterceptor
ThemeChangeInterceptor
UriTemplateVariablesHandlerInterceptor
UserRoleAuthorizationInterceptor
其中 LocaleChangeInterceptor 和 ThemeChangeInterceptor 比较常用
- 配置拦截器也很简单,Spring 提供了基础类 WebMvcConfigurerAdapter ,我们只需要重写addInterceptors方法添加注册拦截器。
实现自定义拦截器只需要 3 步:
-
创建我们自己的拦截器类并实现 HandlerInterceptor 接口。
-
创建一个 Java 类继承 WebMvcConfigurerAdapter,并重写 addInterceptors 方法
-
实例化我们自定义的拦截器,然后将对像手动添加到拦截器链中(在 addInterceptors 方法中添加)。
PS:本文重点在如何在 Spring-Boot 中使用拦截器,关于拦截器的原理请大家查阅资料了解。
代码: com.hpit.sb.interceptors. MyInterceptor1
import javax.servlet.http.HttpServletRequest;
import javax.servlet.http.HttpServletResponse;
import org.apache.log4j.Logger;
import org.springframework.web.servlet.HandlerInterceptor;
import org.springframework.web.servlet.ModelAndView;
/**
* TODO 使用常规的方式开发springmvc拦截器1
*/
public class MyInterceptor1 implements HandlerInterceptor {
	private Logger logger = Logger.getLogger(getClass());
	@Override
	public void afterCompletion(HttpServletRequest request, HttpServletResponse response, Object object,Exception exception) throws Exception {
    	logger.info("afterCompletion...");
    }
    @Override
    public void postHandle(HttpServletRequest request, HttpServletResponse response, Object object,
    ModelAndView modelAndView) throws Exception {
    	logger.info("postHandle...");
    }
    @Override
    public boolean preHandle(HttpServletRequest request, HttpServletResponse response, Object object)
    throws Exception {
        logger.info("preHandle...");
        return true;
    }
}
com.hpit.sb.interceptors. MyInterceptor2
import javax.servlet.http.HttpServletRequest;
import javax.servlet.http.HttpServletResponse;
import org.apache.log4j.Logger;
import org.springframework.web.servlet.HandlerInterceptor;
import org.springframework.web.servlet.ModelAndView;
/**
* TODO 使用常规的方式开发springmvc拦截器2
*/
public class MyInterceptor2 implements HandlerInterceptor {
	private Logger logger = Logger.getLogger(getClass());
    @Override
    public void afterCompletion(HttpServletRequest request, HttpServletResponse response, Object object,Exception exception) throws Exception {
    	logger.info("afterCompletion...");
    }
    @Override
    public void postHandle(HttpServletRequest request, HttpServletResponse response, Object object,
    ModelAndView modelAndView) throws Exception {
    	logger.info("postHandle...");
    }
    @Override
    public boolean preHandle(HttpServletRequest request, HttpServletResponse response, Object object)
    throws Exception {
    	logger.info("preHandle...");
    	return true;
    }
}
重写 web 配置 addInterceptors()方法,添加自定义拦截器:
com.hpit.sb.config. MyWebAppConfig
import org.springframework.context.annotation.Configuration;
import org.springframework.web.servlet.config.annotation.InterceptorRegistry;
import org.springframework.web.servlet.config.annotation.WebMvcConfigurerAdapter;
import com.hpit.sb.interceptors.MyInterceptor1;
import com.hpit.sb.interceptors.MyInterceptor2;
/**
* TODO 重写webmvc配置
*/
@Configuration
public class MyWebAppConfig extends WebMvcConfigurerAdapter {
    @Override
    public void addInterceptors(InterceptorRegistry registry) {
        // 重写addInterceptors方法并为拦截器配置拦截规则
        registry.addInterceptor(new MyInterceptor1()).addPathPatterns("/**");
        registry.addInterceptor(new MyInterceptor2()).addPathPatterns("/**");
        //排除路径
        //registry.addInterceptor(new MyInterceptor2()).addPathPatterns("/**").excludePathPatterns("/Hello");
        super.addInterceptors(registry);
    }
}
启动日志,请求任意控制器:日志输出:

18. springboot系统启动任务 CommandLineRunner
- 实际应用中,我们会有在项目服务启动的时候就去加载一些数据或做一些事情这样的需求。为了解决这样的问题,SpringBoot 为我们提供了一个方法,通过实现接口 CommandLineRunner 来实现。 很简单,只需要一个类就可以,无需其他配置。
创建任务类 1 实现 CommandLineRunner 接口:
com.hpit.sb.runner. MyCommandRunner1
import org.apache.log4j.Logger;
import org.springframework.boot.CommandLineRunner;
import org.springframework.core.annotation.Order;
import org.springframework.stereotype.Component;
/**
* TODO 为了实现服务器启动即执行某些操作,只需要实现spring boot中的CommandLineRunner接口即可
*/
@Component
@Order(value = 1) // 设置启动执行顺序
public class MyCommandRunner1 implements CommandLineRunner {
	private Logger logger = Logger.getLogger(this.getClass());
    /**
    * TODO 系统启动即会执行Run方法
    */
    @Override
    public void run(String... arg0) throws Exception {
    	logger.info("执行启动任务1...");
    }
}
com.hpit.sb.runner. MyCommandRunner2
import org.apache.log4j.Logger;
import org.springframework.boot.CommandLineRunner;
import org.springframework.core.annotation.Order;
import org.springframework.stereotype.Component;
/**
* TODO 为了实现服务器启动即执行某些操作,只需要实现spring boot中的CommandLineRunner接口即可
*/
@Component
@Order(value = 2) // 设置启动执行顺序
public class MyCommandRunner2 implements CommandLineRunner {
	private Logger logger = Logger.getLogger(this.getClass());
    /**
    * TODO 系统启动即会执行Run方法
    */
    @Override
    public void run(String... arg0) throws Exception {
    	logger.info("执行启动任务2...");
    }
}
Spring Boot 应用程序在启动后,会遍历 CommandLineRunner 接口的实例并运行它们的 run 方法。也可以利用 @Order 注解(或者实现 Order 接口)来规定所有 CommandLineRunner 实例的运行顺序。
如下我们使用@Order 注解来定义执行顺序。
这里的 args 就是程序启动的时候进行设置的:
SpringApplication.run(App.class, new String[]{"hello,","zjs"});
这里为了做演示,配置为固定值了,其实直接接收 main 中的 args 即可,那么在运行的时候,进行配置即可。
启动应用日志输出:

19. springboot集成junit单元测试
Junit 这种老技术,现在又拿出来说,不为别的,某种程度上来说,更是为了要说明它在项目中的重要性。
那么先简单说一下为什么要写测试用例
- 可以避免测试点的遗漏,为了更好的进行测试,可以提高测试效率
- 可以自动测试,可以在项目打包前进行测试校验
- 可以及时发现因为修改代码导致新的问题的出现,并及时解决
那么本文从以下几点来说明怎么使用 Junit,Junit4 比 3 要方便很多,细节大家可以自己了解下,主要就是版本 4 中对方法命名格式不再有要求,不再需要继承 TestCase,一切都基于注解实现。
那么 Spring Boot 如何使用 Junit 呢?
-
加入 Maven 的依赖;
-
编写测试 service;
-
编写测试类
1). 加入 Maven 的依赖:
<dependency>
    <groupId>org.springframework.boot</groupId>
    <artifactId>spring-boot-starter-test</artifactId>
    <scope>test</scope>
</dependency>
2). 编写测试 service:
com.hpit.sb.service. HelloService
import org.springframework.stereotype.Service;
/**
* TODO 编写测试业务逻辑
*/
@Service("helloService")
public class HelloService{
    public String sayHello(){
    	return "hellox";
    }
}
在 src/test/java 下编写测试类:
com.hpit.springboot02.test.TestHelloService
import org.junit.Test;
import org.junit.runner.RunWith;
import org.springframework.beans.factory.annotation.Autowired;
import org.springframework.test.context.ContextConfiguration;
import org.springframework.test.context.junit4.SpringJUnit4ClassRunner;
import com.hpit.sb.App;
import com.hpit.sb.service.HelloService;
/**
* TODO 继承Junit测试
*/
// SpringJUnit支持,由此引入Spring-Test框架支持!
@RunWith(SpringJUnit4ClassRunner.class)
@ContextConfiguration(classes = { App.class }) // 指定我们SpringBoot工程的Application启动类
public class TestHelloService {
// 自动装配业务逻辑层
    @Autowired
    private HelloService helloService;
    @Test
    public void testSayHello() {
    	helloService.sayHello();
    }
}
20. springboot读取系统环境变量
凡是被 Spring 管理的类,实现接口 EnvironmentAware 重写方法 setEnvironment 可以在工程启动时,获取到系统环境变量和application 配置文件中的变量。
com.hpit.sb.environment.MyEnvironment
import org.apache.log4j.Logger;
import org.springframework.beans.factory.annotation.Value;
import org.springframework.boot.bind.RelaxedPropertyResolver;
import org.springframework.context.EnvironmentAware;
import org.springframework.context.annotation.Configuration;
import org.springframework.core.env.Environment;
/**
* TODO 读取spring以及系统环境变量 主要是@Configuration,实现接口:EnvironmentAware就能获取到系统环境信息;
*/
@Configuration
public class MyEnvironment implements EnvironmentAware {
    @Value("${spring.datasource.url}") //使用el表达式读取spring主配置文件
    private String jdbcUrl;
    private Logger logger = Logger.getLogger(getClass());
    @Override
    public void setEnvironment(Environment environment) {
    // springEL表达式获取的值
        logger.info("springel表达式获取的值:" + jdbcUrl);
        // 获取系统属性:
        logger.info("JAVA_HOME" + environment.getProperty("JAVA_HOME"));
        // 获取spring主配置文件中的属性
        logger.info("spring.datasource.url:" + environment.getProperty("spring.datasource.url"));
        // 获取前缀是“spring.datasource”的所有属性值
        RelaxedPropertyResolver propertyResolver = new RelaxedPropertyResolver(environment,
        "spring.datasource.");
        logger.info("通过前缀获取的url:" + propertyResolver.getProperty("url"));
        logger.info("通过前缀获取的driverClassName:" + propertyResolver.getProperty("driverClassName"));
    }
}
其中 application.properties 文件信息是:
spring.mvc.view.prefix=/WEB-INF/views/
spring.mvc.view.suffix=.jsp
spring.datasource.url=jdbc:mysql://localhost:3306/spring
spring.datasource.username = root
spring.datasource.password = root
spring.datasource.driverClassName = com.mysql.jdbc.Driver
启动应用,查看日志输出:
[外链图片转存失败,源站可能有防盗链机制,建议将图片保存下来直接上传(img-j7wOdx3X-1629127744619)(https://cdn.jsdelivr.net/gh/coderchen1/picture2/img/20210813213336.png)]
@Controller @Service 等被 Spring 管理的类都支持,注意重写的方法 setEnvironment 是在系统启动的时候被执行。
或者如下Controller:
com.hpit.sb.controller.SystemEnvironmentController
mport org.apache.log4j.Logger;
import org.springframework.context.EnvironmentAware;
import org.springframework.core.env.Environment;
import org.springframework.web.bind.annotation.RequestMapping;
import org.springframework.web.bind.annotation.RestController;
/**
* TODO 在普通的控制器和Servie业务中也可以直接实现EnvironmentAware来获取系统环境变量,但是在获取系统环境变量的时机为系统加载的时候
*/
@RestController
@RequestMapping("/system")
public class SystemEnvironmentController implements EnvironmentAware{
    private String java_home;
    private Logger logger = Logger.getLogger(getClass());
    @RequestMapping("/javahome")
    public String getJAVAHOME() {
    	return java_home;
    }
    @Override
    public void setEnvironment(Environment environment){
        java_home = environment.getProperty("JAVA_HOME");
        logger.info("控制器中获取的系统环境变量:" + java_home);
    }
}
请求控制器:查看效果

日志输出:

我们还可以通过@ConfigurationProperties 读取 application 属性配置文件中的属性。
具体代码:
com.hpit.sb.config.MyDataConfiguration
import org.springframework.beans.factory.annotation.Autowired;
import org.springframework.boot.context.properties.EnableConfigurationProperties;
import org.springframework.context.annotation.Configuration;
@Configuration
@EnableConfigurationProperties(MySqlConfig.class)
public class MyDataConfiguration {
    @Autowired
    private MySqlConfig config;
}
com.hpit.sb.config.MySqlConfig
import org.springframework.boot.context.properties.ConfigurationProperties;
@ConfigurationProperties(prefix="spring.datasource.")
public class MySqlConfig {
    private String url;
    private String username;
    private String password;
    private String driverClassName;

    public String getUrl() {
    	return url;
    }
    public void setUrl(String url) {
    	this.url = url;
    }
    public String getUsername() {
    	return username;
    }
    public void setUsername(String username) {
    	this.username = username;
    }
    public String getPassword() {
    	return password;
    }
    public void setPassword(String password) {
    	this.password = password;
    }
    public String getDriverClassName() {
    	return driverClassName;
    }
    public void setDriverClassName(String driverClassName) {
    	this.driverClassName = driverClassName;
    }
}
代码解释:
@ConditionOnClass 表明该@Configuration 仅仅在一定条件下才会被加载,这里的条件是 Mongo.class 位于类 路径上 ·
@EnableConfigurationProperties 将 Spring Boot 的配置文件( application.properties )中的 spring.data.mongodb.*属性映射为 MongoProperties 并注入到 MongoAutoConfiguration 中。
@ConditionalOnMissingBean 说明 Spring Boot 仅仅在当前上下文中不存在对象时,才会实例化一个 Bean。这个逻辑也体现了 Spring Boot 的另外一个特性——自定义的 Bean 优先于框架的默认配置,我们如果显 式的在业务代码中定义了一个对象,那么 Spring Boot 就不再创建。
21. springboot使用自定义的properties
- spring boot 使用 application.properties 默认了很多配置。但需要自己添加一些配置的时候,我们应该怎么做呢。 例如在 application.properties 配置文件中加入如下配置:
person.name=zhangsan in application
person.gender=man in application
- 那么如何在应用程序中进行读取呢?
- 首先定义配置读取实体类: com.hpit.sb.properties.MyConfig
import org.springframework.boot.context.properties.ConfigurationProperties;
/**
* TODO 定义读取自定义配置类
*/
@ConfigurationProperties(prefix = "person") // 读取系统配置文件中的preson开头的所有配置,并自动封装到实体类中
public class MyConfig {
    private String name;
    private String gender;
    public MyConfig() {
    }
    public MyConfig(String name, String gender) {
        super();
        this.name = name;
        this.gender = gender;
    }
    public String getName() {
   		return name;
    }
    public void setName(String name) {
    	this.name = name;
    }
    public String getGender() {
    	return gender;
    }
    public void setGender(String gender) {
    	this.gender = gender;
    }
}
添加@ConfigurationProperties 注解用来读取 application.properties 配置文件中以 person 开头的所有配置
2.在 spring boot 入口类加入:
import org.springframework.boot.SpringApplication;
import org.springframework.boot.autoconfigure.SpringBootApplication;
import org.springframework.boot.context.properties.EnableConfigurationProperties;
import org.springframework.boot.web.servlet.ServletComponentScan;
import org.springframework.context.annotation.Bean;
import com.hpit.sb.properties.MyConfig;
import com.hpit.sb.servlet.MyServlet1;
@SpringBootApplication
@ServletComponentScan // 方式二: 添加servlet 注册扫描,将自动注册添加了@WebServlet的类为serlvet
@EnableConfigurationProperties(MyConfig.class) // 配置加载读取自定义配置类
public class App {
    /**
    * 方式一:注册Servlet.不需要添加注解:@ServletComponentScan 这种方式已经在springboot中废弃
    *
    * @return
    */
    /*
    * @Bean public ServletRegistrationBean regMyServlet1() { return new
    * ServletRegistrationBean(new MyServlet1(), "/myServlet/*"); }
    */
    public static void main(String[] args) throws Exception {
    	SpringApplication.run(App.class, args);
    }
}
如何是定义其他配置文件中,需要将实体类改写为:

22. springboot改变默认包扫描
-
在开发中我们知道 Spring Boot 默认会扫描启动类同包以及子包下的注解,那么如何进行改变这种扫描包的方式 呢,原理很简单就是:
-
@ComponentScan 注解进行指定要扫描的包以及要扫描的类
-
接下来我们简单写个例子进行测试下。 第一步:新建两个新包 我们在项目中新建两个包 cn.hpit ; org.hpit ; 第二步:新建两个测试类; 在这里为了方便测试,我们让我们的类在启动的时候就进行执行,所以我们就编写两个类,实现接口 CommandLineRunner,这样在启动的时候我们就可以看到打印信息了。
cn.hpit.sb.MyCommandLineRunner3
import org.apache.log4j.Logger;
import org.springframework.boot.CommandLineRunner;
import org.springframework.context.annotation.Configuration;
/**
* TODO 与App程序入口定义在不同包中的类,测试自定义包扫描路径
*/
@Configuration
public class MyCommandLineRunner3 implements CommandLineRunner{
    private Logger logger = Logger.getLogger(getClass());
    @Override
    public void run(String... arg0) throws Exception {
    	logger.info("项目启动执行任务3");
    }
}
cn.hpit.sb.MyCommandLineRunner4
import org.apache.log4j.Logger;
import org.springframework.boot.CommandLineRunner;
import org.springframework.context.annotation.Configuration;
/**
* TODO 与App程序入口定义在不同包中的类,测试自定义包扫描路径
*/
@Configuration
public class MyCommandLineRunner4 implements CommandLineRunner{
    private Logger logger = Logger.getLogger(getClass());
    @Override
    public void run(String... arg0) throws Exception {
    	logger.info("项目启动执行任务4");
    }
}
在 springboot 中添加自定义包扫描的路径
@ComponentScan(basePackages = { "cn.hpit", "org.hpit","com.hpit" }) // 自定义包扫描路径
public class App {
	//…..省略其他代码
}
启动应用程序:
日志输出:

23. Springboot 自定义启动 Banner
- 对于使用过 Spring Boot的开发者来说,程序启动的时候输出的由字符组成的 Spring 符号并不陌生。这个是 Spring Boot 为自己设计的 Banner:
如果有人不喜欢这个输出,本章说一下怎么修改。
第一种方式:修改的时候,进行设置,在 Application 的 main 方法中
SpringApplication application = new SpringApplication(App.class);
/*
* Banner.Mode.OFF:关闭;
* Banner.Mode.CONSOLE:控制台输出,默认方式;
* Banner.Mode.LOG:日志输出方式;
*/
application.setBannerMode(Banner.Mode.OFF);
application.run(args);
第二种方式:
修改 banner.txt 配置文件 在 src/main/resouces 下新建 banner.txt,在文件中加入:
# 这个是 MANIFEST.MF 文件中的版本号
${application.version}
# 这个是上面的的版本号前面加 v 后上括号
${application.formatted-version}
# 这个是 springboot 的版本号
${spring-boot.version}
# 这个是 springboot 的版本号
${spring-boot.formatted-version}
第三种方式:
重写接口 Banner 实现 SpringBoot 提供了一个接口 org.springframework.boot.Banner,他的实例可以被传给 SpringApplication 的 setBanner(banner)方法。
如果你闲得不行非要着重美化这个命令行输出的话,可以重写 Banner 接口的 printBanner 方法。
第四种方式:
在application.properties 进行配置 在 application.proerpties 进行 banner 的显示和关闭:
### 是否显示 banner,可选值[true|false]
spring.main.show-banner=false
24. springboot导入spring xml配置文件
在 App.java 类编写 HelloService2;
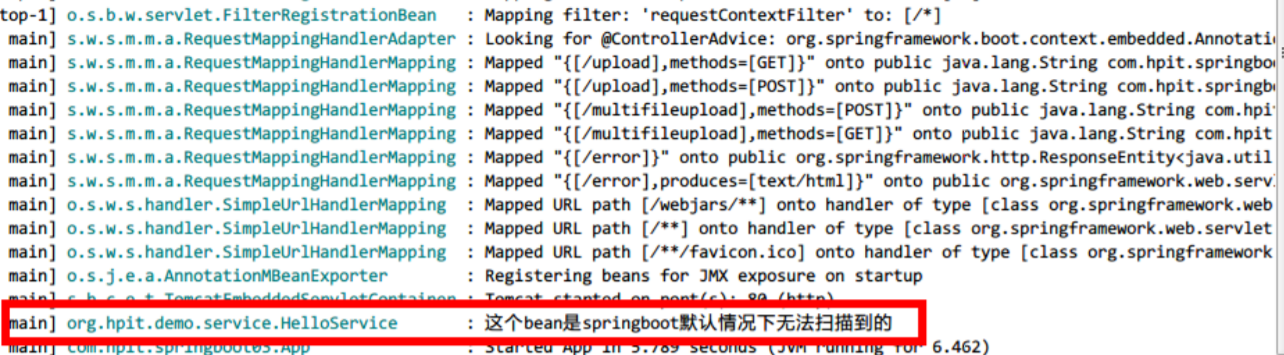
首先我们这里有几个包:com.hpit,org.hpit, 我们这里打算把 App.java 启动类放到 com.hpit 中,根据SpringBoot扫描(根包到子包的原则),我们把 HelloService2 写在 Spring Boot 可以扫描的位置,HelloService 写在 Spring Boot 无法扫描到的位置,那么我们使用配置文件 bean 的方式进行引入,具体代码如下:
- 创建一个 App 默认无法扫描到的
bean org.hpit.demo.service.HelloService
package org.hpit.demo.service;
import org.apache.log4j.Logger;
import org.springframework.stereotype.Service;
/**
* TODO 当前类无法被App扫描到将被配置在applicationContext.xml中
*/
@Service("helloService")
public class HelloService {
    private Logger logger = Logger.getLogger(getClass());
    public void hello() {
    	logger.info("这个bean是springboot默认情况下无法扫描到的");
    }
}
- 在 resource 下创建 spring 传统配置文件 applicationContext.xml(名字任意) src/main/resource/applicationContext.xml
<?xml version="1.0" encoding="UTF-8"?>
<beans xmlns="http://www.springframework.org/schema/beans"
xmlns:xsi="http://www.w3.org/2001/XMLSchema-instance"
xsi:schemaLocation="http://www.springframework.org/schema/beans
http://www.springframework.org/schema/beans/spring-beans.xsd">

        <!-- 在传统spring配置文件中托管springboot默认无法扫描到的bean -->
        <bean id="helloService" class="org.hpit.demo.service.HelloService"></bean>

</beans>
- 创建一个系统启动任务类,用于测试 App 无法扫描到的 Bean 是否能自动装配
com.hpit.springboot03.runner.TestXMLBeanRunner
package com.hpit.springboot03.runner;
import javax.annotation.Resource;
import org.hpit.demo.service.HelloService;
import org.springframework.boot.CommandLineRunner;
import org.springframework.core.annotation.Order;
import org.springframework.stereotype.Component;
/**
* TODO 测试App无法扫到的Bean是否能引入
*/
@Component
@Order(value = 1)
public class TestXMLBeanRunner implements CommandLineRunner {
    @Resource
    private HelloService helloService;
    @Override
    public void run(String... arg0) throws Exception {
    	helloService.hello();
    }
}
- 在 App.java 中配置引入配置文件的注解 @ImportResource
package com.hpit.springboot03;
import javax.servlet.MultipartConfigElement;
import org.springframework.boot.SpringApplication;
import org.springframework.boot.autoconfigure.SpringBootApplication;
import org.springframework.boot.web.servlet.MultipartConfigFactory;
import org.springframework.boot.web.servlet.ServletComponentScan;
import org.springframework.context.annotation.Bean;
import org.springframework.context.annotation.ComponentScan;
import org.springframework.context.annotation.ImportResource;
@SpringBootApplication
@ServletComponentScan // 开始servlet扫描
@ComponentScan(basePackages = { "com.hpit" })
@ImportResource(locations = { "applicationContext.xml" }) // 导入spring配置文件
public class App {
    public static void main(String[] args) throws Exception {
    	SpringApplication.run(App.class, args);
}
// 配置文件上传
@Bean
public MultipartConfigElement multipartConfigFactory() {
    MultipartConfigFactory configFactory = new MultipartConfigFactory();
    configFactory.setMaxFileSize("128MB");// KB MB 设置单个上传文件大小
    configFactory.setMaxRequestSize("1024MB");
    configFactory.setLocation("/");// 设置文件上传路径
    return configFactory.createMultipartConfig();
    }
}
- 启动应用,观察日志输出,发现系统可以引入 App 无法扫描到的 bean
25. springboot热部署
- 进行热部署,但是有部分代码修改了,并不会进行部署。
- 今天我们介绍的这个通过重启的机制就可以解决这个问题了。我们今天要介绍的就是:spring-boot-devtools。 spring-boot-devtools 是一个为开发者服务的一个模块,其中最重要的功能就是自动应用代码更改到最新的 App 上面去。原理是在发现代码有更改之后,重新启动应用,但是速度比手动停止后再启动还要更快,更快指 的不是节省出来的手工操作的时间。
- 其深层原理是使用了两个ClassLoader,一个 Classloader 加载那些不会改变的类(第三方 Jar 包),另一个 ClassLoader 加载会更改的类,称为 restart ClassLoader ,这样在有代码更改的时候,原来的 restart ClassLoader 被丢弃,重新创建一个 restart ClassLoader,由于需 要加载的类相比较少,所以实现了较快的重启时间(5 秒以内)。
- 那如何使用呢,大概两个步骤即可:
第一就是添加相应的依赖:
<!--
    devtools 可以实现页面热部署(即页面修改后会立即生效,这个可以直接在application.properties 文件中配置 spring.thymeleaf.cache=false 来实现),实现类文件热部署(类文件修改后不会立即生效),实现对属性文件的热部署。即 devtools 会监听 classpath 下的文件变动,并且会立即重启应用(发生在保存时机),注意:因为其采用的虚拟机机制,该项重启是很快的
-->
<dependency>
    <groupId>org.springframework.boot</groupId>
    <artifactId>spring-boot-devtools</artifactId>
    <optional>true</optional>
</dependency>
第二点:仅仅加入 devtools 在我们的 idea中还不起作用,这时候还需要添加的 spring-boot-maven-plugin:
<build>
    <plugins>
        <!--
        用于将应用打成可直接运行的 jar(该 jar 就是用于生产环境中的 jar) 值得注意的是,如果没有引用 spring-boot-starter-parent 做 parent,且采用了上述的第二种方式,这里也要做出相应的改动
        -->
        <plugin>
            <groupId>org.springframework.boot</groupId>
            <artifactId>spring-boot-maven-plugin</artifactId>
            <configuration>
            <!--fork : 如果没有该项配置,devtools不会起作用,即应用不会restart-->
            <fork>true</fork>
            </configuration>
        </plugin>
    </plugins>
</build>
运行 App.java ---- Run Application — Java Application 即可进行测试。
测试方法:
- 修改类–>保存:应用会重启
- 修改配置文件–>保存:应用会重启
- 修改页面–>保存:应用会重启,页面会刷新(原理是将 spring.thymeleaf.cache 设为 false)
不能使用分析:
- 对应的 spring-boot 版本是否正确,我这里使用的是 1.3.3 版本;
- 是否加入 plugin 了,以及属性
<fork>true</fork> - IDEA是否开启了 Build Automatically
- 如果设置 SpringApplication.setRegisterShutdownHook(false),则自动重启将不起作用
补充:
-
默认情况下,/META-INF/maven,/META-INF/resources,/resources,/static,/templates,/public 这些文件夹下的文件修改不会使应用重启,但是会重新加载(devtools 内嵌了一个 LiveReload server,当资源发生改变时,浏览器刷新)。
-
如果想改变默认的设置,可以自己设置不重启的目录:
spring.devtools.restart.exclude=static/**,public/**, 这样的话,就只有这两个目录下的文件修改不会导致 restart 操作了。 -
如果要在保留默认设置的基础上还要添加其他的排除目录:spring.devtools.restart.additional-exclude
-
如果想要使得当非 classpath 下的文件发生变化时应用得以重启,使用:spring.devtools.restart.additionalpaths,这样devtools 就会将该目录列入了监听范围。
关闭自动重启
-
设置 spring.devtools.restart.enabled 属性为 false,可以关闭该特性。
-
可以在 application.properties 中设置,也可以通过设置环境变量的方式。
public static void main(String[] args){
   System.setProperty("spring.devtools.restart.enabled","false"); 	 SpringApplication.run(MyApp.class, args);
}
26. springboot监控和管理生产环境
-
spring-boot-actuator 模块提供了一个监控和管理生产环境的模块,可以使用 http、jmx、ssh、telnet 等来管理和监控应用。审计(Auditing)、 健康(health)、数据采集(metrics gathering)会自动加入到应用里面。
-
首先,写一个最基本的spring boot 项目。
-
基于 Maven 的项目添加‘starter’依赖:
<dependency>
    <groupId>org.springframework.boot</groupId>
    <artifactId>spring-boot-starter-actuator</artifactId>
</dependency>
以下是所有监控描述:
| HTTP方法 | 路径 | 描述 | 鉴权 |
|---|---|---|---|
| GET | /autoconfig | 查看自动配置的使用情况,该报告展示所有 auto-configuration 候选者及它们被应用或未被应用的原因 | true |
| GET | /configprops | 显示一个所有@ConfigurationProperties的整理列表 | true |
| GET | /beans | 显示一个应用中所有SpringBeans 的完整列表 | true |
| GET | /dump | 打印线程栈 | true |
| GET | /env | 查看所有环境变量 | true |
| GET | /env/{name} | 查看具体变量值 | true |
| GET | /health | 查看应用健康指标 | false |
| GET | /info | 查看应用信息 | false |
| GET | /mappings | 查看所有 url 映射 | true |
| GET | /metrics | 查看应用基本指标 | true |
| GET | /metrics/{name} | 查看具体指标 | true |
| POST | /shutdown | 允许应用以优雅的方式关闭(默 认情况下不启用) | true |
| GET | /trace | 查看基本追踪信息 | true |
health 比如:http://localhost:8080/health 你可以得到结果
{
    status: "UP",
    diskSpace: {
        status: "UP",
        total: 107374174208,
        free: 14877962240,
        threshold: 10485760
    }
}
可以检查的其他一些情况的健康信息。下面的 HealthIndicators 会被 Spring Boot 自动配置:
DiskSpaceHealthIndicator 低磁盘空间检测
DataSourceHealthIndicator 检查是否能从 DataSource 获取连接
MongoHealthIndicator 检查一个 Mongo 数据库是否可用(up)
RabbitHealthIndicator 检查一个 Rabbit 服务器是否可用(up)
RedisHealthIndicator 检查一个 Redis 服务器是否可用(up)
SolrHealthIndicator 检查一个 Solr 服务器是否可用(up)
自定义当然也可以,你可以注册实现了HealthIndicator接口的 Springbeans,Health 响应需要包含一个 status 和可选的用于展示的详情
import org.springframework.boot.actuate.health.HealthIndicator;
import org.springframework.stereotype.Component;
@Component
public class MyHealth implements HealthIndicator {
    @Override
    public Health health() {
    int errorCode = check(); // perform some specific health check
    if (errorCode != 0) {
    	return Health.down().withDetail("Error Code",errorCode).build();
    }
    return Health.up().build();
    }
}
trace 访问 http://localhost:8080/trace 可以看到结果,默认为最新的一些 HTTP 请求
info
当执行 http://localhost:8080/info 的时候,结果什么没有但是,在 application.properties 加入一些配置
info.app.name=ecs
info.app.version=1.0.0
info.build.artifactId=@project.artifactId@
info.build.version=@project.version@
执行/info 就可以看到有些信息了。
/info 是用来在构建的时候,自动扩展属性的。对于 Maven 项目,可以通过 @…@ 占位符引用 Maven 的’project properties’。 更多的细节和探索,需要自己看看源码和 spring boot 的官方文档
27. springboot start详解
1. spring-boot-starter
这是 Spring Boot 的核心启动器,包含了自动配置、日志和 YAML。
2. spring-boot-starter-actuator
帮助监控和管理应用。
3. spring-boot-starter-amqp
通过 spring-rabbit 来支持 AMQP 协议(Advanced Message Queuing Protocol)。
4. spring-boot-starter-aop
支持面向方面的编程即 AOP,包括 spring-aop 和 AspectJ。
5. spring-boot-starter-artemis
通过 Apache Artemis 支持 JMS 的 API(Java Message Service API)。
6. spring-boot-starter-batch
支持 Spring Batch,包括 HSQLDB 数据库。
7. spring-boot-starter-cache
支持 Spring 的 Cache 抽象。
8. spring-boot-starter-cloud-connectors
支持 Spring Cloud Connectors,简化了在像 Cloud Foundry 或 Heroku 这样的云平台上连接服务。
9. spring-boot-starter-data-elasticsearch
支持 ElasticSearch 搜索和分析引擎,包括 spring-data-elasticsearch。
10. spring-boot-starter-data-gemfire
支持 GemFire 分布式数据存储,包括 spring-data-gemfire。
11. spring-boot-starter-data-jpa
支持 JPA(Java Persistence API),包括 spring-data-jpa、spring-orm、Hibernate。
12. spring-boot-starter-data-mongodb
支持 MongoDB 数据,包括 spring-data-mongodb。
13. spring-boot-starter-data-rest
通过 spring-data-rest-webmvc,支持通过 REST 暴露 Spring Data 数据仓库。
14. spring-boot-starter-data-solr
支持 Apache Solr 搜索平台,包括 spring-data-solr。
15. spring-boot-starter-freemarker
支持 FreeMarker 模板引擎。
16. spring-boot-starter-groovy-templates
支持 Groovy 模板引擎。
17. spring-boot-starter-hateoas
通过spring-hateoas支持基于HATEOAS的RESTful Web服务。
18. spring-boot-starter-hornetq
通过 HornetQ 支持 JMS。
19. spring-boot-starter-integration
支持通用的 spring-integration 模块。
20. spring-boot-starter-jdbc
支持 JDBC 数据库。
21. spring-boot-starter-jersey
支持 Jersey RESTful Web 服务框架。
22. spring-boot-starter-jta-atomikos
通过 Atomikos 支持 JTA 分布式事务处理。
23. spring-boot-starter-jta-bitronix
通过 Bitronix 支持 JTA 分布式事务处理。
24. spring-boot-starter-mail
支持 javax.mail 模块。
25. spring-boot-starter-mobile
支持 spring-mobile。
26. spring-boot-starter-mustache
支持 Mustache 模板引擎。
27. spring-boot-starter-redis
支持 Redis 键值存储数据库,包括 spring-redis。
28. spring-boot-starter-security
支持 spring-security。
29. spring-boot-starter-social-facebook
支持 spring-social-facebook
30. spring-boot-starter-social-linkedin
支持 pring-social-linkedin
31. spring-boot-starter-social-twitter
支持 pring-social-twitter
32. spring-boot-starter-test
支持常规的测试依赖,包括 JUnit、Hamcrest、Mockito 以及 spring-test 模块。
33. spring-boot-starter-thymeleaf
支持 Thymeleaf 模板引擎,包括与 Spring 的集成。
34. spring-boot-starter-velocity
支持 Velocity 模板引擎。
35. spring-boot-starter-web
支持全栈式 Web 开发,包括 Tomcat 和 spring-webmvc。
36. spring-boot-starter-websocket
支持 WebSocket 开发。
37. spring-boot-starter-ws
支持 Spring Web Services。
Spring Boot 应用启动器面向生产环境的还有 2 种,具体如下:
-
spring-boot-starter-actuator 增加了面向产品上线相关的功能,比如测量和监控。
-
spring-boot-starter-remote-shell 增加了远程 ssh shell 的支持。 最后,Spring Boot 应用启动器还有一些替换技术的启动器,具体如下:
1. spring-boot-starter-jetty
引入了 Jetty HTTP 引擎(用于替换 Tomcat)。
2. spring-boot-starter-log4j
支持 Log4J 日志框架。
3. spring-boot-starter-logging
引入了 Spring Boot 默认的日志框架 Logback。
4. spring-boot-starter-tomcat
引入了 Spring Boot 默认的 HTTP 引擎 Tomcat
5. spring-boot-starter-undertow
引入了Undertow HTTP引擎(用于替换Tomcat)
28. springboot依赖的版本
- spring-boot 通过 maven 的依赖管理为我们写好了很多依赖项及其版本,我们可拿来使用。spring-boot 文档介绍 了两种使用方法,一是继承,二是导入。
通过继承
<project>
     <parent>
         <groupId>org.springframework.boot</groupId>
         <artifactId>spring-boot-starter-parent</artifactId>
         <version>1.1.9.RELEASE</version>
     </parent>
</project>
或者在中导入:
<dependencyManagement>
     <dependencies>
         <dependency>
             <groupId>org.springframework.boot</groupId>
             <artifactId>spring-boot-dependencies</artifactId>
             <version>1.1.9.RELEASE</version>
             <type>pom</type>
             <scope>import</scope>
         </dependency>
     </dependencies>
</dependencyManagement>
此外,在其文档里说到,继承时可简单地通过属性定制依赖项版本。比如,改为使用较新的 spring4.1.6.RELEASE 版本:
<properties>
 	<spring.version>4.1.6.RELEASE<spring.version>
</properties>
不过,此法只对继承有效,导入无效。以下摘自其文档说明: This only works if your Maven project inherits (directly or indirectly) from spring-bootdependencies. If you have added spring-boot-dependencies in your own dependencyManagement section with import you have to redefine the artifact yourself instead of overriding the property.
导入时有没有较简单的方法呢?我们可先继承后导入!
1、先建一个过渡性工程,继承后定制依赖项的版本。
 <project>
     <modelVersion>4.0.0</modelVersion>
         <parent>
             <groupId>org.springframework.boot</groupId>
             <artifactId>spring-boot-dependencies</artifactId>
             <version>1.1.9.RELEASE</version>
         </parent>
         <groupId>mycomp</groupId>
         <artifactId>myproject-spring-boot-bom</artifactId>
         <version>1.1.9</version>
         <packaging>pom</packaging>
         <properties>
         	<spring.version>4.1.6.RELEASE</spring.version>
         </properties>
</project>
2、然后导入到自己的工程里。
<project>
     <modelVersion>4.0.0</modelVersion>
     <groupId>mycomp</groupId>
     <artifactId>myproject</artifactId>
     <version>0.0.1-SNAPSHOT</version>
     <dependencyManagement>
         <dependencies>
             <dependency>
                 <groupId>mycomp</groupId>
                 <artifactId>myproject-spring-boot-bom</artifactId>
                 <version>1.1.9</version>
                 <type>pom</type>
                 <scope>import</scope>
             </dependency>
         </dependencies>
     </dependencyManagement>
</project>
这样,虽然多建了一个过渡性工程,但定制依赖项版本同继承时一样简单。
29. Springboot 文件上传
文件上传主要分以下几个步骤:
1. 新建maven java project;
2. 在pom.xml加入相应依赖;
3. 新建一个表单页面(这里使用 thymleaf);
4. 编写 controller;
5. 测试;
6. 对上传的文件做一些限制;
7. 多文件上传实现
(1)新建 maven java project
新建一个名称为 spring-boot-fileupload maven java 项目;
(2)在 pom.xml 加入相应依赖;
加入相应的 maven 依赖,具体看以下解释: POM.XML
<project xmlns="http://maven.apache.org/POM/4.0.0" xmlns:xsi="http://www.w3.org/2001/XMLSchema-instance"
xsi:schemaLocation="http://maven.apache.org/POM/4.0.0 http://maven.apache.org/maven-v4_0_0.xsd">
    <modelVersion>4.0.0</modelVersion>
    <groupId>com.hpit</groupId>
    <artifactId>springboot03</artifactId>
    <packaging>war</packaging>
    <version>0.0.1-SNAPSHOT</version>
    <name>springboot03 Maven Webapp</name>
    <url>http://maven.apache.org</url>
    <properties>
    <project.build.sourceEncoding>UTF-8</project.build.sourceEncoding>
    </properties>
    <!-- spring boot 项目依赖 -->
    <parent>
        <groupId>org.springframework.boot</groupId>
        <artifactId>spring-boot-starter-parent</artifactId>
        <version>1.4.0.RELEASE</version>
    </parent>
    <dependencies>
        <!-- spring boot web支持: 1、web mvc; 2、restful; 3、jackjson支持; 4、aop ........ -->
        <dependency>
            <groupId>org.springframework.boot</groupId>
            <artifactId>spring-boot-starter-web</artifactId>
        </dependency>
        <!--spring boot 集成Junit依赖 -->
        <dependency>
            <groupId>org.springframework.boot</groupId>
            <artifactId>spring-boot-starter-test</artifactId>
            <scope>test</scope>
        </dependency>
        <!-- spring boot thymeleaf模板引擎支持 -->
        <dependency>
            <groupId>org.springframework.boot</groupId>
            <artifactId>spring-boot-starter-thymeleaf</artifactId>
        </dependency>
        <!-- spring boot 配置文件解析处理支持 -->
        <dependency>
            <groupId>org.springframework.boot</groupId>
            <artifactId>spring-boot-configuration-processor</artifactId>
            <optional>true</optional>
        </dependency>
        <!-- servlet 依赖. -->
        <dependency>
            <groupId>javax.servlet</groupId>
                <artifactId>javax.servlet-api</artifactId>
            <scope>provided</scope>
        </dependency>
        <!-- log4j日志输出 -->
        <dependency>
            <groupId>log4j</groupId>
            <artifactId>log4j</artifactId>
            <version>1.2.17</version>
        </dependency>
        <!-- JSTL支持 -->
        <dependency>
            <groupId>javax.servlet</groupId>
            <artifactId>jstl</artifactId>
        </dependency>
        <!-- tomcat 的支持. -->
        <dependency>
            <groupId>org.springframework.boot</groupId>
            <artifactId>spring-boot-starter-tomcat</artifactId>
            <scope>provided</scope>
        </dependency>
        <dependency>
            <groupId>org.apache.tomcat.embed</groupId>
            <artifactId>tomcat-embed-jasper</artifactId>
            <scope>provided</scope>
        </dependency>
    </dependencies>
    <build>
        <finalName>${project.artifactId}</finalName>
        <directory>target</directory>
        <plugins>
            <plugin>
            <artifactId>maven-compiler-plugin</artifactId>
            <configuration>
                <source>1.8</source>
                <target>1.8</target>
            </configuration>
            </plugin>
        </plugins>
    </build>
</project>
(3)新建一个表单页面(这里使用 thymleaf)
在 src/main/resouces 新建 templates(参照前面的章节,应该知道,templates 是 spring boot 存放模板文件的路径),在 templates 下新建一个 file.html
<!DOCTYPE html>
<html>
<head>
    <title>spring boot 文件上传</title>
</head>
<body>
   <form method="POST" enctype="multipart/form-data" action="/upload">
     <p>文件:<input type="file" name="file" /></p>
     <p><input type="submit" value="上传" /></p>
   </form>
</body>
</html>
(4)编写 controller;
编写controller进行测试,这里主要实现两个方法:其一就是提供访问的/file 路径;其二就是提供 post 上 传的/upload 方法,具体看代码实现
com.hpit.springboot03.web.FileUploadController
import java.io.BufferedOutputStream;
import java.io.File;
import java.io.FileOutputStream;
import java.io.IOException;
import org.apache.log4j.Logger;
import org.springframework.stereotype.Controller;
import org.springframework.web.bind.annotation.RequestMapping;
import org.springframework.web.bind.annotation.RequestMethod;
import org.springframework.web.bind.annotation.RequestParam;
import org.springframework.web.bind.annotation.ResponseBody;
import org.springframework.web.multipart.MultipartFile;
/**
* TODO 文件上传控制器
*/
@Controller
public class FileUploadController {
    private Logger logger = Logger.getLogger(getClass());

    @RequestMapping(value = "/upload", method = RequestMethod.GET)
    public String file() {
        logger.info("跳转文件上传控制器");
        return "file";
    }
    /**
    * TODO 文件上传控制器
    *
    * @param file
    * @return
    * @throws IOException
    */
    @ResponseBody
    @RequestMapping(value = "/upload", method = RequestMethod.POST)
    public String upload(@RequestParam("file") MultipartFile file) throws IOException {// 文件上传
        BufferedOutputStream outputStream = new BufferedOutputStream(
        new FileOutputStream(new File(file.getOriginalFilename())));
        logger.info("文件名称:" + file.getOriginalFilename());
        outputStream.write(file.getBytes());
        outputStream.flush();
        outputStream.close();
        return "文件上传成功";
    }
}
(5)编写 App.java 然后测试
App.java 没什么代码,就是 Spring Boot 的启动配置,具体如下:
import javax.servlet.MultipartConfigElement;
import org.springframework.boot.SpringApplication;
import org.springframework.boot.autoconfigure.SpringBootApplication;
import org.springframework.boot.web.servlet.MultipartConfigFactory;
import org.springframework.boot.web.servlet.ServletComponentScan;
import org.springframework.context.annotation.Bean;
import org.springframework.context.annotation.ComponentScan;
@SpringBootApplication
@ServletComponentScan // 开始servlet扫描
@ComponentScan(basePackages = { "com.hpit" })
public class App {
    public static void main(String[] args) throws Exception {
    	SpringApplication.run(App.class, args);
    }
}
然后你就可以访问:http://127.0.0.1 /upload 进行测试了,文件上传的路径是在工程的跟路径下,请刷新查看, 其它的请查看代码中的注释进行自行思考。
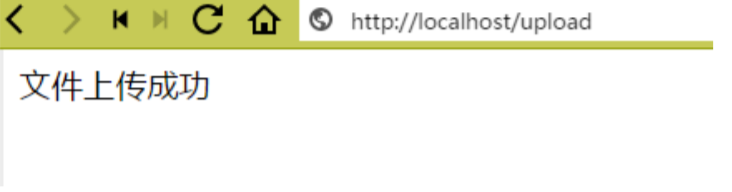
6)对上传的文件做一些限制;
对文件做一些限制是有必要的,在 App.java 进行编码配置:
在 App 主程序入口处添加如下配置:
import javax.servlet.MultipartConfigElement;
import org.springframework.boot.SpringApplication;
import org.springframework.boot.autoconfigure.SpringBootApplication;
import org.springframework.boot.web.servlet.MultipartConfigFactory;
import org.springframework.boot.web.servlet.ServletComponentScan;
import org.springframework.context.annotation.Bean;
import org.springframework.context.annotation.ComponentScan;
@SpringBootApplication
@ServletComponentScan // 开始servlet扫描
@ComponentScan(basePackages = { "com.hpit" })
public class App {
    public static void main(String[] args) throws Exception {
    SpringApplication.run(App.class, args);
}
// 配置文件上传
@Bean
public MultipartConfigElement multipartConfigFactory() {
        MultipartConfigFactory configFactory = new MultipartConfigFactory();
        configFactory.setMaxFileSize("128MB");// KB MB 设置单个上传文件大小
        configFactory.setMaxRequestSize("1024MB");
        configFactory.setLocation("/");// 设置文件上传路径
        return configFactory.createMultipartConfig();
    }
}
(7)多文件上传实现
多文件对于前段页面比较简单,具体代码实现:
在 src/main/resource 下面创建 multifile.html
<!DOCTYPE html>
<html>
    <head>
    	<title>spring boot 多文件上传</title>
    </head>
<body>
    <form method="POST" enctype="multipart/form-data" action="/upload">
        <p>
            文件1:<input type="file" name="file" />
            文件2:<input type="file" name="file" />
            文件3:<input type="file" name="file" />
        </p>
        <p>
            <input type="submit" value="上传" />
        </p>
   </form>
</body>
</html>
添加控制实现:com.hpit.springboot03.web.MultiFileUploadController
package com.hpit.springboot03.web;
import java.io.BufferedOutputStream;
import java.io.File;
import java.io.FileNotFoundException;
import java.io.FileOutputStream;
import java.io.IOException;
import java.util.List;
import javax.servlet.http.HttpServletRequest;
import org.apache.log4j.Logger;
import org.springframework.stereotype.Controller;
import org.springframework.web.bind.annotation.RequestMapping;
import org.springframework.web.bind.annotation.RequestMethod;
import org.springframework.web.bind.annotation.ResponseBody;
import org.springframework.web.multipart.MultipartFile;
import org.springframework.web.multipart.MultipartHttpServletRequest;
@Controller
public class MultiFileUploadController {
    private Logger logger = Logger.getLogger(getClass());
    @RequestMapping(value = "/multifileupload", method = RequestMethod.GET)
    public String multiFile() {
        logger.info("跳转多文件上传");
        return "multifile";
      }
    /**
    * TODO 多文件上传控制器
    *
    * @param servletRequest
    * @return
    */
    @RequestMapping(value = "multifileupload", method = RequestMethod.POST)
    public @ResponseBody String upload(HttpServletRequest servletRequest) {
        List<MultipartFile> files = ((MultipartHttpServletRequest) servletRequest).getFiles("file");
    	for (MultipartFile multipartFile : files) {
    		try {
                    BufferedOutputStream outputStream = new BufferedOutputStream(
                    new FileOutputStream(new File(multipartFile.getOriginalFilename())));
                    outputStream.write(multipartFile.getBytes());
                    outputStream.flush();
                    outputStream.close();
   				} catch (FileNotFoundException e) {
    					e.printStackTrace();
    					return "文件上传失败";
    			} catch (IOException e) {
    					e.printStackTrace();
    					return "文件上传失败";
    			}
    	}
    	return "文件上传成功";
    }
}
启动浏览器输入路径进行测试。
项目结构图:

30. springboot 集成redis缓存
- 本章牵涉到的技术点比较多:Spring Data JPA、Redis、Spring MVC,Spirng Cache,所以在看这篇文章的时候, 需要对以上这些技术点有一定的了解或者也可以先看看这篇文章,针对文章中实际的技术点在进一步了解(注意, 您需要自己下载 Redis Server 到您的本地,所以确保您本地的 Redis 可用,这里还使用了 MySql 数据库,当然 你也可以内存数据库进行测试)。这篇文章会提供对应的 Eclipse 代码示例,具体大体的分如下几个步骤:
1. 新建 Java Maven Project;
2. 在 pom.xml 中添加相应的依赖包;
3. 编写 Spring Boot 启动类;
4. 配置 application.properties;
5. 编写 RedisCacheConfig 配置类;
6. 编写 DemoInfo 测试实体类;
7. 编写 DemoInfoRepository 持久化类;
8. 编写 DemoInfoService 类;
9. 编写 DemoInfoController 类;
10. 测试代码是否正常运行了
11. 自定义缓存 key;
- 新建 Java Maven Project;
这个步骤就不细说,新建一个 spring-boot-redis Java maven project;
- 在 pom.xml 中添加相应的依赖包;
在 Maven 中添加相应的依赖包,主要有:spring boot 父节点依赖;spring boot web 支持;缓存服务 spring-contextsupport;添加 redis 支持;JPA 操作数据库;mysql 数据库驱动,具体 pom.xml 文件如下:
<project xmlns="http://maven.apache.org/POM/4.0.0"xmlns:xsi="http://www.w3.org/2001/XMLS
chema-instance"
xsi:schemaLocation="http://maven.apache.org/POM/4.0.0
http://maven.apache.org/xsd/maven-4.0.0.xsd">
    <modelVersion>4.0.0</modelVersion>
    <groupId>com.hpit</groupId>
    <artifactId>spring-boot-redis</artifactId>
    <version>0.0.1-SNAPSHOT</version>
    <packaging>jar</packaging>
    <name>spring-boot-redis</name>
    <url>http://maven.apache.org</url>
    <properties>
        <project.build.sourceEncoding>UTF-8</project.build.sourceEncoding>
        <!-- 配置 JDK 编译版本. -->
        <java.version>1.8</java.version>
    </properties>
    <!-- spring boot 父节点依赖,
    引入这个之后相关的引入就不需要添加 version 配置,
    spring boot 会自动选择最合适的版本进行添加。
    -->
    <parent>
        <groupId>org.springframework.boot</groupId>
        <artifactId>spring-boot-starter-parent</artifactId>
        <version>1.4.0.RELEASE</version>
    </parent>
    <dependencies>
        <dependency>
            <groupId>junit</groupId>
            <artifactId>junit</artifactId>
            <scope>test</scope>
        </dependency>
        <!-- spring boot web 支持:mvc,aop... -->
        <dependency>
            <groupId>org.springframework.boot</groupId>
            <artifactId>spring-boot-starter-web</artifactId>
        </dependency>
        <!--
        包含支持 UI 模版(Velocity,FreeMarker,JasperReports),
        邮件服务,
        脚本服务(JRuby),
        缓存 Cache(EHCache),
        任务计划 Scheduling(uartz)。
        -->
        <dependency>
            <groupId>org.springframework</groupId>
            <artifactId>spring-context-support</artifactId>
        </dependency>
            <!-- 添加 redis 支持-->
        <dependency>
            <groupId>org.springframework.boot</groupId>
            <artifactId>spring-boot-starter-redis</artifactId>
        </dependency>
        <!-- JPA 操作数据库. -->
        <dependency>
            <groupId>org.springframework.boot</groupId>
            <artifactId>spring-boot-starter-data-jpa</artifactId>
        </dependency>
        <!-- mysql 数据库驱动. -->
        <dependency>
            <groupId>mysql</groupId>
            <artifactId>mysql-connector-java</artifactId>
        </dependency>
        <!-- 单元测试. -->
        <dependency>
            <groupId>org.springframework.boot</groupId>
            <artifactId>spring-boot-starter-test</artifactId>
            <scope>test</scope>
        </dependency>
    </dependencies>
</project>
上面是完整的 pom.xml 文件,每个里面都进行了简单的注释
- 编写 Spring Boot 启动类(com.hpit.App);
package com.hpit;
import org.springframework.boot.SpringApplication;
import org.springframework.boot.autoconfigure.SpringBootApplication;
/**
* Spring Boot 启动类;
*/
@SpringBootApplication
public class App {
    public static void main(String[] args) {
    	SpringApplication.run(App.class, args);
    }
}
- 配置 application.properties;
这里主要是配置两个资源,第一就是数据库基本信息;第二就是 redis 配置;第三就是 JPA 的配置;
Src/main/resouces/application.properties:
########################################################
###datasource 配置 MySQL 数据源;
########################################################
spring.datasource.url = jdbc:mysql://localhost:3306/test
spring.datasource.username = root
spring.datasource.password = root
spring.datasource.driverClassName = com.mysql.jdbc.Driver
spring.datasource.max-active=20
spring.datasource.max-idle=8
spring.datasource.min-idle=8
spring.datasource.initial-size=10
########################################################
###REDIS (RedisProperties) redis 基本配置;
########################################################
# database name
spring.redis.database=0
# server host1
spring.redis.host=127.0.0.1
# server password
#spring.redis.password=
#connection port
spring.redis.port=6379
# pool settings ...
spring.redis.pool.max-idle=8
spring.redis.pool.min-idle=0
spring.redis.pool.max-active=8
spring.redis.pool.max-wait=-1
# name of Redis server
#spring.redis.sentinel.master=
# comma-separated list of host:port pairs
#spring.redis.sentinel.nodes=
########################################################
### Java Persistence Api 自动进行建表
########################################################
# Specify the DBMS
spring.jpa.database = MYSQL
# Show or not log for each sql query
spring.jpa.show-sql = true
# Hibernate ddl auto (create, create-drop, update)
spring.jpa.hibernate.ddl-auto = update
# Naming strategy
spring.jpa.hibernate.naming-strategy = org.hibernate.cfg.ImprovedNamingStrategy
# stripped before adding them to the entity manager)
spring.jpa.properties.hibernate.dialect = org.hibernate.dialect.MySQL5Dialect
- 编写 RedisCacheConfig 配置类;
- 缓存主要有几个要实现的类:其一就是 CacheManager 缓存管理器;其二就是具体操作实现类;其三就是 CacheManager 工厂类(这个可以使用配置文件配置的进行注入,也可以通过编码的方式进行实现);其四就是 缓存 key 生产策略(当然 Spring 自带生成策略,但是在 Redis 客户端进行查看的话是系列化的 key,对于我们肉 眼来说就是感觉是乱码了,这里我们先使用自带的缓存策略)。
com.hpit.config/RedisCacheConfig:
package com.hpit.config;
import org.springframework.cache.CacheManager;
import org.springframework.cache.annotation.CachingConfigurerSupport;
import org.springframework.cache.annotation.EnableCaching;
import org.springframework.context.annotation.Bean;
import org.springframework.context.annotation.Configuration;
import org.springframework.data.redis.cache.RedisCacheManager;
import org.springframework.data.redis.connection.RedisConnectionFactory;
import org.springframework.data.redis.core.RedisTemplate;
/**
* redis 缓存配置;
*
* 注意:RedisCacheConfig 这里也可以不用继承:CachingConfigurerSupport,也就是直接一个普通的
Class 就好了;
*
* 这里主要我们之后要重新实现 key 的生成策略,只要这里修改 KeyGenerator,其它位置不用修改就生效
了。
*
* 普通使用普通类的方式的话,那么在使用@Cacheable 的时候还需要指定 KeyGenerator 的名称;这样编码
的时候比较麻烦。
*/
@Configuration
@EnableCaching//启用缓存,这个注解很重要;
publicclass RedisCacheConfig extends CachingConfigurerSupport {
    /**
    * 缓存管理器.
    * @param redisTemplate
    * @return
    */
    @Bean
    public CacheManager cacheManager(RedisTemplate<?,?> redisTemplate) {
        CacheManager cacheManager = new RedisCacheManager(redisTemplate);
        returncacheManager;
    }
    /**
    * redis 模板操作类,类似于 jdbcTemplate 的一个类;
    * 虽然 CacheManager 也能获取到 Cache 对象,但是操作起来没有那么灵活;
    *
    * 这里在扩展下:RedisTemplate 这个类不见得很好操作,我们可以在进行扩展一个我们
    *
    * 自己的缓存类,比如:RedisStorage 类;
    *
    * @param factory : 通过 Spring 进行注入,参数在 application.properties 进行配置;
    * @return
    */
    @Bean
    public RedisTemplate<String, String> redisTemplate(RedisConnectionFactory factory) {
        RedisTemplate<String, String> redisTemplate = new RedisTemplate<String,
        String>();
        redisTemplate.setConnectionFactory(factory);
        //key 序列化方式;(不然会出现乱码;),但是如果方法上有 Long 等非 String 类型的话,会报类型
        转换错误;
        //所以在没有自己定义 key 生成策略的时候,以下这个代码建议不要这么写,可以不配置或者自己实
        现 ObjectRedisSerializer
        //或者 JdkSerializationRedisSerializer 序列化方式;
        // RedisSerializer<String> redisSerializer = new StringRedisSerializer();//Long 类型
        不可以会出现异常信息;
        // redisTemplate.setKeySerializer(redisSerializer);
        // redisTemplate.setHashKeySerializer(redisSerializer);
        returnredisTemplate;
    }
}
在以上代码有很详细的注释,在这里还是在简单的提下:
RedisCacheConfig 这里也可以不用继承:CachingConfigurerSupport,也就是直接一个普通的 Class 就好了; 这里主要我们之后要重新实现 key 的生成策略,只要这里修改 KeyGenerator,其它位置不用修改就生效了。普通使用普通类的方式的话,那么在使用@Cacheable 的时候还需要指定 KeyGenerator 的名称;这样编码的时候比较麻烦。
- 编写 DemoInfo 测试实体类;
编写一个测试实体类:com.hpit.bean.DemoInfo:
package com.hpit.bean;
import java.io.Serializable;
import javax.persistence.Entity;
import javax.persistence.GeneratedValue;
import javax.persistence.Id;
/**
* 测试实体类,这个随便;
* @author Zjs
* @version v.0.1
*/
@Entity
publicclass DemoInfo implements Serializable{
    privatestaticfinallongserialVersionUID = 1L;
    @Id@GeneratedValue
    privatelongid;
    private String name;
    private String pwd;

    publiclong getId() {
    	return id;
    }
    publicvoid setId(longid) {
    	this.id = id;
    }
    public String getName() {
    	return name;
    }
    publicvoid setName(String name) {
    	this.name = name;
    }
    public String getPwd() {
    	return pwd;
    }
    publicvoid setPwd(String pwd) {
    	this.pwd = pwd;
    }
    @Override
    public String toString() {
        return"DemoInfo [id=" + id + ", name=" + name + ", pwd=" + pwd + "]";
    }
}
- 编写DemoInfoRepository 持久化类;
DemoInfoRepository 使用 Spirng Data JPA 实现: com.hpit.repository.DemoInfoRepository:
package com.hpit.repository;
import org.springframework.data.repository.CrudRepository;
import com.hpit.bean.DemoInfo;

publicinterface DemoInfoRepository extends CrudRepository<DemoInfo,Long> {
    /*内部有继承的方法*/
}
- 编写 DemoInfoService 类;
编写 DemoInfoService,这里有两个技术方面,第一就是使用 Spring @Cacheable 注解方式和 RedisTemplate 对象进行操作,具体代码如下: com.hpit.service.DemoInfoService:
package com.hpit.service;
import com.hpit.bean.DemoInfo;
/**
* demoInfo 服务接口
* @author Zjs
* @version v.0.1
*/
public interface DemoInfoService {
    public DemoInfo findById(longid);
    public void deleteFromCache(longid);
    void test();
}
com.hpit.service.impl.DemoInfoServiceImpl:
package com.hpit.service.impl;
import javax.annotation.Resource;
import org.springframework.cache.annotation.CacheEvict;
import org.springframework.cache.annotation.Cacheable;
import org.springframework.data.redis.core.RedisTemplate;
import org.springframework.data.redis.core.ValueOperations;
import org.springframework.stereotype.Service;
import com.hpit.bean.DemoInfo;
import com.hpit.repository.DemoInfoRepository;
import com.hpit.service.DemoInfoService;
/**
*
*DemoInfo 数据处理类
*/
@Service
publicclass DemoInfoServiceImpl implements DemoInfoService {
    @Resource
    private DemoInfoRepository demoInfoRepository;
    @Resource
    private RedisTemplate<String,String> redisTemplate;
    @Override
    publicvoid test(){
        ValueOperations<String,String> valueOperations = redisTemplate.opsForValue();
        valueOperations.set("mykey4", "random1="+Math.random());
        System.out.println(valueOperations.get("mykey4"));
     }
    //keyGenerator="myKeyGenerator"
    @Cacheable(value="demoInfo") //缓存,这里没有指定 key.
    @Override
    public DemoInfo findById(longid) {
        System.err.println("DemoInfoServiceImpl.findById()=========从数据库中进行获取
        的....id="+id);
        returndemoInfoRepository.findOne(id);
    }

    @CacheEvict(value="demoInfo")
    @Override
    publicvoid deleteFromCache(longid) {
    	System.out.println("DemoInfoServiceImpl.delete().从缓存中删除.");
    }
}
- 编写 DemoInfoController 类;
package com.hpit.controller;
import org.springframework.beans.factory.annotation.Autowired;
import org.springframework.stereotype.Controller;
import org.springframework.web.bind.annotation.RequestMapping;
import org.springframework.web.bind.annotation.ResponseBody;
import com.hpit.bean.DemoInfo;
import com.hpit.service.DemoInfoService;
/**
* 测试类.
*/
@Controller
publicclass DemoInfoController {
    @Autowired
    DemoInfoService demoInfoService;
    @RequestMapping("/test")
    public@ResponseBody String test(){
        DemoInfo loaded = demoInfoService.findById(1);
        System.out.println("loaded="+loaded);
        DemoInfo cached = demoInfoService.findById(1);
        System.out.println("cached="+cached);
        loaded = demoInfoService.findById(2);
        System.out.println("loaded2="+loaded);
        return"ok";
    }
    @RequestMapping("/delete")
    public@ResponseBody String delete(longid){
        demoInfoService.deleteFromCache(id);
        return"ok";
    }
    @RequestMapping("/test1")
    public@ResponseBody String test1(){
        demoInfoService.test();
        System.out.println("DemoInfoController.test1()");
        return"ok";
    }
}
- 测试代码是否正常运行了
启动应用程序,访问地址:http://127.0.0.1:8080/test
查看控制台可以查看:
DemoInfoServiceImpl.findById()=========从数据库中进行获取的....id=1
loaded=DemoInfo [id=1, name=张三, pwd=123456]
cached=DemoInfo [id=1, name=张三, pwd=123456]
DemoInfoServiceImpl.findById()=========从数据库中进行获取的....id=2
loaded2=DemoInfo [id=2, name=张三, pwd=123456]
如果你看到以上的打印信息的话,那么说明缓存成功了。
访问地址:http://127.0.0.1:8080/test1
random1=0.9985031320746356
DemoInfoController.test1()
二次访问:http://127.0.0.1:8080/test
loaded=DemoInfo [id=1, name=张三, pwd=123456]
cached=DemoInfo [id=1, name=张三, pwd=123456]
loaded2=DemoInfo [id=2, name=张三, pwd=123456]
这时候所有的数据都是执行缓存的。
这时候执行删除动作:http://127.0.0.1:8080/delete?id=1
然后在访问:http://127.0.0.1:8080/test
DemoInfoServiceImpl.findById()=========从数据库中进行获取的....id=1
loaded=DemoInfo [id=1, name=张三, pwd=123456]
cached=DemoInfo [id=1, name=张三, pwd=123456]
loaded2=DemoInfo [id=2, name=张三, pwd=123456]
- 自定义缓存 key;
在 com.hpit.config.RedisCacheConfig 类中重写 CachingConfigurerSupport 中的 keyGenerator ,具体实现代码如下
/**
* 自定义 key.
* 此方法将会根据类名+方法名+所有参数的值生成唯一的一个 key,即使@Cacheable 中的 value 属性一
样,key 也会不一样。
*/
@Override
public KeyGenerator keyGenerator() {
    System.out.println("RedisCacheConfig.keyGenerator()");
    return new KeyGenerator() {
    @Override
        public Object generate(Object o, Method method, Object... objects) {
            // This will generate a unique key of the class name, the method name
            //and all method parameters appended.
            StringBuilder sb = new StringBuilder();
            sb.append(o.getClass().getName());
            sb.append(method.getName());
            for (Object obj : objects) {
            	sb.append(obj.toString());
            }
            System.out.println("keyGenerator=" + sb.toString());
            returnsb.toString();
        }
    }
}
这时候在 redis 的客户端查看 key 的话还是序列化的肉眼看到就是乱码了,那么我改变 key 的序列方式,这个很 简单,redis 底层已经有具体的实现类了,我们只需要配置下:
//key 序列化方式;(不然会出现乱码;),但是如果方法上有 Long 等非 String 类型的话,会报类型转换错误;
//所以在没有自己定义 key 生成策略的时候,以下这个代码建议不要这么写,可以不配置或者自己实现ObjectRedisSerializer
//或者 JdkSerializationRedisSerializer 序列化方式;
RedisSerializer<String> redisSerializer = new StringRedisSerializer();//Long 类型不可以会出现异常信息;
redisTemplate.setKeySerializer(redisSerializer);
redisTemplate.setHashKeySerializer(redisSerializer);
综上以上分析:RedisCacheConfig 类的方法调整为:
package com.hpit.config;
import java.lang.reflect.Method;
import org.springframework.cache.CacheManager;
import org.springframework.cache.annotation.CachingConfigurerSupport;
import org.springframework.cache.annotation.EnableCaching;
import org.springframework.cache.interceptor.KeyGenerator;
import org.springframework.context.annotation.Bean;
import org.springframework.context.annotation.Configuration;
import org.springframework.data.redis.cache.RedisCacheManager;
import org.springframework.data.redis.connection.RedisConnectionFactory;
import org.springframework.data.redis.core.RedisTemplate;
import org.springframework.data.redis.serializer.RedisSerializer;
import org.springframework.data.redis.serializer.StringRedisSerializer;
/**
* redis 缓存配置;
*
* 注意:RedisCacheConfig 这里也可以不用继承:CachingConfigurerSupport,也就是直接一个普通的
Class 就好了;
*
* 这里主要我们之后要重新实现 key 的生成策略,只要这里修改 KeyGenerator,其它位置不用修改就生效
了。
* 普通使用普通类的方式的话,那么在使用@Cacheable 的时候还需要指定 KeyGenerator 的名称;这样编码
的时候比较麻烦。
*/
@Configuration
@EnableCaching//启用缓存,这个注解很重要;
publicclass RedisCacheConfig extends CachingConfigurerSupport {
    /**
    * 缓存管理器.
    * @param redisTemplate
    * @return
    */
    @Bean
    public CacheManager cacheManager(RedisTemplate<?,?> redisTemplate) {
    CacheManager cacheManager = new RedisCacheManager(redisTemplate);
    returncacheManager;
    }
    /**
    * RedisTemplate 缓存操作类,类似于 jdbcTemplate 的一个类;
    *
    * 虽然 CacheManager 也能获取到 Cache 对象,但是操作起来没有那么灵活;
    *
    * 这里在扩展下:RedisTemplate 这个类不见得很好操作,我们可以在进行扩展一个我们
    *
    * 自己的缓存类,比如:RedisStorage 类;
    *
    * @param factory : 通过 Spring 进行注入,参数在 application.properties 进行配置;
    * @return
    */
    @Bean
    public RedisTemplate<String, String> redisTemplate(RedisConnectionFactory factory) {
        RedisTemplate<String, String> redisTemplate = new RedisTemplate<String,String>();
        redisTemplate.setConnectionFactory(factory);
        //key 序列化方式;(不然会出现乱码;),但是如果方法上有 Long 等非 String 类型的话,会报类型转换错误;
        //所以在没有自己定义 key 生成策略的时候,以下这个代码建议不要这么写,可以不配置或者自己实现 ObjectRedisSerializer
        //或者 JdkSerializationRedisSerializer 序列化方式;
        RedisSerializer<String> redisSerializer = new StringRedisSerializer();//Long 类型不可以会出现异常信息;
        redisTemplate.setKeySerializer(redisSerializer);
        redisTemplate.setHashKeySerializer(redisSerializer);
        returnredisTemplate;
    }
    /**
    * 自定义 key.
    * 此方法将会根据类名+方法名+所有参数的值生成唯一的一个 key,即使@Cacheable 中的 value 属性一
    样,key 也会不一样。
    */
    @Override
    public KeyGenerator keyGenerator() {
        System.out.println("RedisCacheConfig.keyGenerator()");
        returnnew KeyGenerator() {
            @Override
            public Object generate(Object o, Method method, Object... objects) {
                // This will generate a unique key of the class name, the method name
                //and all method parameters appended.
                StringBuilder sb = new StringBuilder();
                sb.append(o.getClass().getName());
                sb.append(method.getName());
                for (Object obj : objects) {
                    sb.append(obj.toString());
                }
                System.out.println("keyGenerator=" + sb.toString());
                returnsb.toString();
            }
        };
    }
}
这时候在访问地址:http://127.0.0.1:8080/test
这时候看到的 Key 就是:com.hpit.service.impl.DemoInfoServiceImplfindById1 在控制台打印信息是:
(1)keyGenerator=com.hpit.service.impl.DemoInfoServiceImplfindById1
(2)DemoInfoServiceImpl.findById()=========从数据库中进行获取的....id=1
(3)keyGenerator=com.hpit.service.impl.DemoInfoServiceImplfindById1
(4)loaded=DemoInfo [id=1, name=张三, pwd=123456]
(5)keyGenerator=com.hpit.service.impl.DemoInfoServiceImplfindById1
(6)cached=DemoInfo [id=1, name=张三, pwd=123456]
(7)keyGenerator=com.hpit.service.impl.DemoInfoServiceImplfindById2
(8)keyGenerator=com.hpit.service.impl.DemoInfoServiceImplfindById2
(10)DemoInfoServiceImpl.findById()=========从数据库中进行获取的....id=2
(11)loaded2=DemoInfo [id=2, name=张三, pwd=123456]
其中@Cacheable,@CacheEvict 下节进行简单的介绍,剩下的就需要靠你们自己进行扩展了。
31.springboot 之 spring cache
- Spring3.1引入了激动人心的基于注释(annotation)的缓存(cache)技术,它本质上不是一个具体的缓存实现方案(例如 EHCache 或者 OSCache),而是一个对缓存使用的抽象,通过在既有代码中添加少量它定义的各种 annotation,即能够达到缓存方法的返回对象的效果。
- Spring的缓存技术还具备相当的灵活性,不仅能够使用 SpEL(Spring Expression Language)来定义缓存的 key和各种 condition,还提供开箱即用的缓存临时存储方案,也支持和主流的专业缓存例如 EHCache 集成。 其特点总结如下:
1. 通过少量的配置 annotation注释即可使得既有代码支持缓存
2. 支持开箱即用 Out-Of-The-Box,即不用安装和部署额外第三方组件即可使用缓存
3. 支持 Spring Express Language,能使用对象的任何属性或者方法来定义缓存的 key 和 condition
4. 支持 AspectJ,并通过其实现任何方法的缓存支持
5. 支持自定义 key 和自定义缓存管理者,具有相当的灵活性和扩展性
一、基于注解的支持
- Spring 为我们提供了几个注解来支持 Spring Cache。其核心主要是@Cacheable、@CachePut 和@CacheEvict。使 用@Cacheable 标记的方法在执行后 Spring Cache 将缓存其返回结果,@CachePut 主要针对方法配置,能够根据 方法的请求参数对其结果进行缓存,和 @Cacheable 不同的是,它每次都会触发真实方法的调用,而使用 @CacheEvict 标记的方法会在方法执行前或者执行后移除 Spring Cache 中的某些元素。
1. @Cacheable
@Cacheable 可以标记在一个方法上,也可以标记在一个类上。当标记在一个方法上时表示该方法是支持缓存的,当标记在一个类上时则表示该类所有的方法都是支持缓存的。对于一个支持缓存的方法,Spring 会在其被 调用后将其返回值缓存起来,以保证下次利用同样的参数来执行该方法时可以直接从缓存中获取结果,而不需要再次执行该方法。Spring 在缓存方法的返回值时是以键值对进行缓存的,值就是方法的返回结果,至于键的话,Spring 又支持两种策略,默认策略和自定义策略,需要注意的是当一个支持缓存的方法在对象内部被调用 时是不会触发缓存功能的。@Cacheable 可以指定三个属性,value、key 和 condition。
value:缓存的名称,在 spring配置文件中定义,必须指定至少一个。如@Cacheable(value=”mycache”)或者@Cacheable(value={”cache1”,”cache2”}
key:缓存的 key,可以为空,如果指定要按照 SpEL 表达式编写,如果不指定,则缺省按照方法的所有参数进 行组合。如@Cacheable(value=”testcache”,key=”#userName”)
condition:缓存的条件,可以为空,使用 SpEL编写,返回 true 或者 false,只有为 true才进行缓存。如 @Cacheable(value=”testcache”,condition=”#userName.length()>2”)
注:除了上述使用方法参数作为 key 之外,Spring 还为我们提供了一个 root 对象可以用来生成 key。通过该 root 对象我们可以获取到以下信息
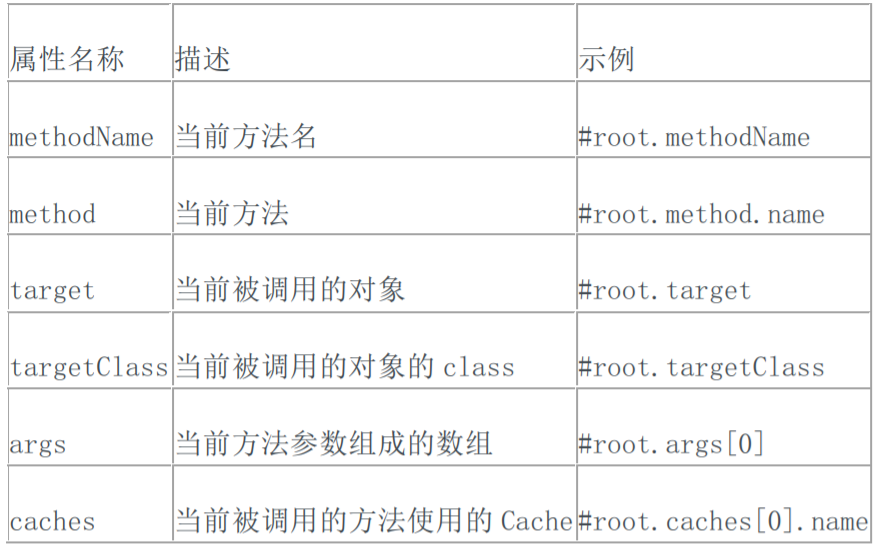
2. @CachePut
- 在支持 Spring Cache 的环境下,对于使用@Cacheable 标注的方法,Spring 在每次执行前都会检查 Cache 中是 否存在相同 key 的缓存元素,如果存在就不再执行该方法,而是直接从缓存中获取结果进行返回,否则才会执 行并将返回结果存入指定的缓存中。@CachePut 也可以声明一个方法支持缓存功能。与@Cacheable 不同的是使 用@CachePut 标注的方法在执行前不会去检查缓存中是否存在之前执行过的结果,而是每次都会执行该方法, 并将执行结果以键值对的形式存入指定的缓存中。
- @CachePut 也可以标注在类上和方法上。使用@CachePut 时我们可以指定的属性跟@Cacheable 是一样的
3.@CacheEvict
- @CacheEvict 是用来标注在需要清除缓存元素的方法或类上的。当标记在一个类上时表示其中所有的方法的执 行都会触发缓存的清除操作。@CacheEvict 可以指定的属性有 value、key、condition、allEntries 和 beforeInvocation。其中 value、key 和 condition 的语义与@Cacheable 对应的属性类似。即 value 表示清除 操作是发生在哪些 Cache 上的(对应 Cache 的名称);key 表示需要清除的是哪个 key,如未指定则会使用默认 策略生成的 key;condition 表示清除操作发生的条件。下面我们来介绍一下新出现的两个属性 allEntries 和 beforeInvocation。
- allEntries:是否清空所有缓存内容,缺省为 false,如果指定为 true,则方法调用后将立即清空所有缓存。如:@CachEvict(value=”testcache”,allEntries=true)
- beforeInvocation:是否在方法执行前就清空,缺省为 false,如果指定为 true,则在方法还没有执行的时候 就清空缓存,缺省情况下,如果方法执行抛出异常,则不会清空缓存。如:@CachEvict(value=” testcache”,beforeInvocation=true)
- 其他参数和@Cacheable 相同
4. @Caching
- @Caching 注解可以让我们在一个方法或者类上同时指定多个 Spring Cache 相关的注解。其拥有三个属性: cacheable、put 和 evict,分别用于指定@Cacheable、@CachePut 和@CacheEvict。如: @Caching(cacheable = @Cacheable(“users”), evict = { @CacheEvict(“cache2”),@CacheEvict(value = “cache3”, allEntries = true) })
二、实例
使用 map 集合实现缓存管理,演示 spring cache 的使用。
- 创建缓存对象实例
package org.springframework.cache.demo;
import java.io.Serializable;

 //缓存对象
 public class User implements Serializable{

     private static final long serialVersionUID = 1L;
     private int id;
     private String name;

     public User(){

     }

     public User(String name){
     	this.name= name;
     }

     public int getId() {
     	return id;
     }
     public void setId(int id) {
     	this.id = id;
     }
     public String getName() {
     	return name;
     }
     public void setName(String name) {
     	this.name = name;
     }
 }
- 对象服务实现类
package org.springframework.cache.demo;

import org.springframework.cache.annotation.CacheEvict;
import org.springframework.cache.annotation.Cacheable;

public class UserService {

    @Cacheable(value = "userCache",key="#userName")
    // 使用了一个缓存名叫 userCache
    public User getUserByName(String userName) {
        // 方法内部实现不考虑缓存逻辑,直接实现业务
        return getFromDB(userName);
    }

    @CacheEvict(value = "userCache", key = "#user.name")
    // 清空 accountCache 缓存
    public void updateUser(User user) {
        updateDB(user);
    }

    @CacheEvict(value = "userCache", allEntries = true,beforeInvocation=true)
    // 清空 accountCache 缓存
    public void reload() {
    }

    private User getFromDB(String userName) {


        System.out.println("查询数据库..." + userName);
        return new User(userName);
    }

    private void updateDB(User user) {

        System.out.println("更新数据库数据..." + user.getName());
    }
}
- 缓存实现
package org.springframework.cache.demo.mycache;
import java.util.Map;
import java.util.concurrent.ConcurrentHashMap;
import org.springframework.cache.Cache;
import org.springframework.cache.support.SimpleValueWrapper;

public class MyCache implements Cache {

    private String name;
    private Map<String, Object> store = new ConcurrentHashMap<String, Object>();;

    public MyCache() {
    }

    public MyCache(String name) {
        this.name = name;
    }

    public void setName(String name) {
        this.name = name;
    }

    public void clear() {
        store.clear();
    }

    public void evict(Object obj) {
    }

    public ValueWrapper get(Object key) {
        ValueWrapper result = null;
        Object thevalue = store.get(key);
        if (thevalue != null) {
            result = new SimpleValueWrapper(thevalue);
        }
        return result;
    }

    public <T> T get(Object key, Class<T> clazz) {
        return clazz.cast(store.get(key));
    }

    public String getName() {
        return name;
    }

    public Object getNativeCache() {
        return store;
    }

    public void put(Object key, Object value) {
        store.put((String) key, value);
    }

    public ValueWrapper putIfAbsent(Object key, Object value) {
        put(key, value);
        return new SimpleValueWrapper(value);
    }
}
- spring 配置
<beans xmlns="http://www.springframework.org/schema/beans"
       xmlns:xsi="http://www.w3.org/2001/XMLSchemainstance" xmlns:cache="http://www.springframework.org/schema/cache"
       xmlns:p="http://www.springframework.org/schema/p"
       xsi:schemaLocation="http://www.springframework.org/schema/beans
                           http://www.springframework.org/schema/beans/spring-beans.xsd
                           http://www.springframework.org/schema/cache
                           http://www.springframework.org/schema/cache/spring-cache.xsd">
    <!-- 启用缓存注解功能,这个是必须的,否则注解不会生效,另外,该注解一定要声明在 spring 主配置文件中
才会生效 -->
    <cache:annotation-driven cache-manager="cacheManager" />

    <bean id="userService" class="org.springframework.cache.demo.UserService" />
    <!-- generic cache manager -->
    <bean id="cacheManager" class="org.springframework.cache.support.SimpleCacheManager">
        <property name="caches">
            <set>
                <bean class="org.springframework.cache.demo.mycache.MyCache"
                      p:name="userCache" />
            </set>
        </property>
    </bean>
</beans>
- 运行类
package org.springframework.cache.demo.mycache;
import org.springframework.cache.demo.User;
import org.springframework.cache.demo.UserService;
import org.springframework.context.ApplicationContext;
import org.springframework.context.support.ClassPathXmlApplicationContext;

public class MyMain {

    @SuppressWarnings("resource")
    public static void main(String[] args) {
        ApplicationContext context = new ClassPathXmlApplicationContext("spring-cachemycache.xml");
        UserService userService = context.getBean(UserService.class);
        // 第一次查询,应该走数据库
        System.out.print("第一次查询...");
        userService.getUserByName("hello");
        // 第二次查询,应该不查数据库,直接返回缓存的值
        System.out.println("第二次查询...");
        userService.getUserByName("hello");
        System.out.println();
        System.out.println("==============");

        // 更新某个记录的缓存,首先构造两个用户记录,然后记录到缓存中
        User user1 = userService.getUserByName("user1");
        // 开始更新其中一个
        user1.setId(1000);
        userService.updateUser(user1);
        // 因为被更新了,所以会查询数据库
        userService.getUserByName("user1");
        // 再次查询,应该走缓存
        userService.getUserByName("user1");
        // 更新所有缓存
        userService.reload();
        System.out.println("清楚所有缓存");
        // 查询数据库
        userService.getUserByName("user1");
        userService.getUserByName("user2");
        // 查询缓存
        userService.getUserByName("user1");
        userService.getUserByName("user2");
    }
}
运行结果:
第一次查询...查询数据库...hello
第二次查询...

==============
查询数据库...user1
更新数据库数据...user1
清楚所有缓存
查询数据库...user1
查询数据库...user2
32. Spring boot 集成 EHCache
- 那么我们先说说这一篇文章我们都会学到 的技术点:Spring Data JPA,Spring Boot 使 用 Mysql,Spring MVC,EHCache,Spring Cache 等(其中@Cacheable 请看上一节的理论知识),具体分如下几个步骤:
(1)新建 Maven Java Project
(2)在 pom.xml 中加入依赖包
(3)编写 Spring Boot 启动类;
(4)配置 application.properties;
(5)编写缓存配置类以及 ehcache.xml 配置文件;
(6)编写 DemoInfo 实体类进行测试;
(7)编写持久类 DemoInfoRepository;
(8)编写处理类 DemoInfoService;
(9)编写 DemoInfoController 测试类;
(10)运行测试;
以上就是具体的步骤了,那么接下来我们一起按照这个步骤来进行实现吧。
(1)新建 Maven Java Project
新建一个工程名为 spring-boot-ehcache 的 maven java project。
(2)在 pom.xml 中加入依赖包
在 pom.xml 文件中加入相应的依赖包,Spring Boot 父节点依赖包;spring boot web 支持;缓存依赖 spring-context-support;集成 ehcache 需要的依赖;JPA 操作数据库;mysql 数据库驱动,具体 pom.xml 文件:
<project xmlns="http://maven.apache.org/POM/4.0.0"
         xmlns:xsi="http://www.w3.org/2001/XMLSchema-instance"
         xsi:schemaLocation="http://maven.apache.org/POM/4.0.0
                             http://maven.apache.org/xsd/maven-4.0.0.xsd">
    <modelVersion>4.0.0</modelVersion>
    <groupId>com.hpit</groupId>
    <artifactId>spring-boot-ehcache</artifactId>
    <version>0.0.1-SNAPSHOT</version>
    <packaging>jar</packaging>
    <name>spring-boot-ehcache</name>
    <url>http://maven.apache.org</url>
    <properties>
        <project.build.sourceEncoding>UTF-8</project.build.sourceEncoding>
        <!-- 配置 JDK 编译版本. -->
        <java.version>1.8</java.version>
    </properties>
        <!-- spring boot 父节点依赖,
            引入这个之后相关的引入就不需要添加 version 配置,
            spring boot 会自动选择最合适的版本进行添加。
        -->
    <parent>
        <groupId>org.springframework.boot</groupId>
        <artifactId>spring-boot-starter-parent</artifactId>
        <version>1.4.0.RELEASE</version>
    </parent>
    <dependencies>
        <!-- 单元测试. -->
        <dependency>
            <groupId>junit</groupId>
            <artifactId>junit</artifactId>
            <scope>test</scope>
        </dependency>
        <!-- spring boot web 支持:mvc,aop... -->
        <dependency>
            <groupId>org.springframework.boot</groupId>
            <artifactId>spring-boot-starter-web</artifactId>
        </dependency>
        <!--
            包含支持 UI 模版(Velocity,FreeMarker,JasperReports),
            邮件服务,
            脚本服务(JRuby),
            缓存 Cache(EHCache),
            任务计划 Scheduling(uartz)。
            -->
        <dependency>
            <groupId>org.springframework</groupId>
            <artifactId>spring-context-support</artifactId>
        </dependency>
        <!-- 集成 ehcache 需要的依赖-->
        <dependency>
            <groupId>net.sf.ehcache</groupId>
            <artifactId>ehcache</artifactId>
        </dependency>
        <!-- JPA 操作数据库. -->
        <dependency>
            <groupId>org.springframework.boot</groupId>
            <artifactId>spring-boot-starter-data-jpa</artifactId>
        </dependency>
        <!-- mysql 数据库驱动. -->
        <dependency>
            <groupId>mysql</groupId>
            <artifactId>mysql-connector-java</artifactId>
        </dependency>
        <!-- Spring boot 单元测试. -->
        <dependency>
            <groupId>org.springframework.boot</groupId>
            <artifactId>spring-boot-starter-test</artifactId>
            <scope>test</scope>
        </dependency>
    </dependencies>
</project>
(3)编写 Spring Boot 启动类(com.hpit.App.java);
package com.hpit;
import org.springframework.boot.SpringApplication;
import org.springframework.boot.autoconfigure.SpringBootApplication;

@SpringBootApplication
public class App {
    public static void main(String[] args) {
        SpringApplication.run(App.class, args);
    }
}
(4)配置 application.properties;
在 application.properties 中主要配置数据库连接和 JPA 的基本配置,具体如下:
Src/main/resouces/application.properties:
########################################################
###datasource ,mysql 数据库连接配置
########################################################
spring.datasource.url = jdbc:mysql://localhost:3306/test
spring.datasource.username = root
spring.datasource.password = root
spring.datasource.driverClassName = com.mysql.jdbc.Driver
########################################################
### Java Persistence Api ,JPA 自动建表操作配置
########################################################
# Specify the DBMS
spring.jpa.database = MYSQL
# Show or not log for each sql query
spring.jpa.show-sql = true
# Hibernate ddl auto (create, create-drop, update)
spring.jpa.hibernate.ddl-auto = update
# Naming strategy
spring.jpa.hibernate.naming-strategy = org.hibernate.cfg.ImprovedNamingStrategy
# stripped before adding them to the entity manager)
spring.jpa.properties.hibernate.dialect = org.hibernate.dialect.MySQL5Dialect
(5)编写缓存配置类以及 ehcache.xml 配置文件:
这个类主要是注册缓存管理对象 EhCacheCacheManager、缓存工厂对象 EhCacheManagerFactoryBean, 具体代码如下:
package com.hpit.config;
import org.springframework.cache.annotation.EnableCaching;
import org.springframework.cache.ehcache.EhCacheCacheManager;
import org.springframework.cache.ehcache.EhCacheManagerFactoryBean;
import org.springframework.context.annotation.Bean;
import org.springframework.context.annotation.Configuration;
import org.springframework.core.io.ClassPathResource;
/**
* 缓存配置.
* @author Zjs
* @version v.0.1
*/
@Configuration
@EnableCaching//标注启动缓存.
public class CacheConfiguration {
    /**
    * ehcache 主要的管理器
    * @param bean
    * @return
    */
    @Bean
    public EhCacheCacheManager ehCacheCacheManager(EhCacheManagerFactoryBean bean){
        System.out.println("CacheConfiguration.ehCacheCacheManager()");
        return new EhCacheCacheManager(bean.getObject());
    }
    /*
    * 据 shared 与否的设置,
    * Spring 分别通过 CacheManager.create()
    * 或 new CacheManager()方式来创建一个 ehcache 基地.
    * 也说是说通过这个来设置 cache 的基地是这里的 Spring 独用,还是跟别的(如 hibernate 的
    Ehcache 共享)
    *
    */
    @Bean
    public EhCacheManagerFactoryBean ehCacheManagerFactoryBean(){
        System.out.println("CacheConfiguration.ehCacheManagerFactoryBean()");
        EhCacheManagerFactoryBean cacheManagerFactoryBean = new EhCacheManagerFactoryBean ();
        cacheManagerFactoryBean.setConfigLocation(newClassPathResource("conf/ehcache.xml"));
        cacheManagerFactoryBean.setShared(true);
        return cacheManagerFactoryBean;
    }
}
在 src/main/resouces/conf 下编写 ehcache.xml 配置文件,当然这个文件你可以放在其它目录下
<?xml version="1.0" encoding="UTF-8"?>
<ehcache xmlns:xsi="http://www.w3.org/2001/XMLSchema-instance"
         xsi:noNamespaceSchemaLocation="http://ehcache.org/ehcache.xsd"
         updateCheck="false">
    <!--
    diskStore:为缓存路径,ehcache 分为内存和磁盘两级,此属性定义磁盘的缓存位置。参数解释如下:
    user.home – 用户主目录
    user.dir – 用户当前工作目录
    java.io.tmpdir – 默认临时文件路径
    -->
    <diskStore path="java.io.tmpdir/Tmp_EhCache" />
    <!--
	defaultCache:默认缓存策略,当 ehcache 找不到定义的缓存时,则使用这个缓存策略。只能定义一个。
	-->
    <!--
    name:缓存名称。
    maxElementsInMemory:缓存最大数目
    maxElementsOnDisk:硬盘最大缓存个数。
    eternal:对象是否永久有效,一但设置了,timeout 将不起作用。
    overflowToDisk:是否保存到磁盘,当系统当机时
    timeToIdleSeconds:设置对象在失效前的允许闲置时间(单位:秒)。仅当 eternal=false 对象不
    是永久有效时使用,可选属性,默认值是 0,也就是可闲置时间无穷大。
    timeToLiveSeconds:设置对象在失效前允许存活时间(单位:秒)。最大时间介于创建时间和失效
    时间之间。仅当 eternal=false 对象不是永久有效时使用,默认是 0.,也就是对象存活时间无穷大。
    diskPersistent:是否缓存虚拟机重启期数据 Whether the disk store persists between
    restarts of the Virtual Machine. The default value is false.
    diskSpoolBufferSizeMB:这个参数设置 DiskStore(磁盘缓存)的缓存区大小。默认是 30MB。每
    个 Cache 都应该有自己的一个缓冲区。
    diskExpiryThreadIntervalSeconds:磁盘失效线程运行时间间隔,默认是 120 秒。
    memoryStoreEvictionPolicy:当达到 maxElementsInMemory 限制时,Ehcache 将会根据指定的
    策略去清理内存。默认策略是 LRU(最近最少使用)。你可以设置为 FIFO(先进先出)或是 LFU(较少使
    用)。
    clearOnFlush:内存数量最大时是否清除。
    memoryStoreEvictionPolicy:可选策略有:LRU(最近最少使用,默认策略)、FIFO(先进先
    出)、LFU(最少访问次数)。
    FIFO,first in first out,这个是大家最熟的,先进先出。
    LFU, Less Frequently Used,就是上面例子中使用的策略,直白一点就是讲一直以来最少
    被使用的。如上面所讲,缓存的元素有一个 hit 属性,hit 值最小的将会被清出缓存。
    LRU,Least Recently Used,最近最少使用的,缓存的元素有一个时间戳,当缓存容量满
    了,而又需要腾出地方来缓存新的元素的时候,那么现有缓存元素中时间戳离当前时间最远的元素将被清出缓
    存。
    -->
    <defaultCache
                  eternal="false"
                  maxElementsInMemory="1000"
                  overflowToDisk="false"
                  diskPersistent="false"
                  timeToIdleSeconds="0"
                  timeToLiveSeconds="600"
                  memoryStoreEvictionPolicy="LRU" />
    <cache
           name="demo"
           eternal="false"
           maxElementsInMemory="100"
           overflowToDisk="false"
           diskPersistent="false"
           timeToIdleSeconds="0"
           timeToLiveSeconds="300"
           memoryStoreEvictionPolicy="LRU" />
</ehcache>
(6)编写 DemoInfo 实体类进行测试
在 com.hpit.bean 下编写 DemoInfo 实体类进行缓存测试:
package com.hpit.bean;
import javax.persistence.Entity;
import javax.persistence.GeneratedValue;
import javax.persistence.Id;
/**
* 测试实体类.
*/
@Entity
public class DemoInfo {
    @Id @GeneratedValue
    private longid;//主键.
    private String name;//名称;
    private String pwd;//密码;
    private intstate;
    public long getId() {
        returnid;
    }
    public void setId(longid) {
        this.id = id;
    }
    public String getName() {
        returnname;
    }
    publicvoid setName(String name) {
        this.name = name;
    }
    public String getPwd() {
        returnpwd;
    }
    public void setPwd(String pwd) {
        this.pwd = pwd;
    }
    public int getState() {
        returnstate;
    }
    public void setState(intstate) {
        this.state = state;
    }
    @Override
    public String toString() {
        return "DemoInfo [id=" + id + ", name=" + name + ", pwd=" + pwd + ",
            state=" +state + "]";
    }
}
(7)编写持久类 DemoInfoRepository;
编写持久类 DemoInfoRepository:
com.hpit.repository.DemoInfoRepository:
package com.hpit.repository;
import org.springframework.data.repository.CrudRepository;
import com.hpit.bean.DemoInfo;
/**
* 操作数据库.
* @author Zjs
* @version v.0.1
*/
public interface DemoInfoRepository extends CrudRepository<DemoInfo,Long>{

}
(8)编写处理类 DemoInfoService;
编写增删改查的方法,在这几个方法中都使用注解缓存,进行缓存的创建以及删除,修改等操作:
com.hpit.service.DemoInfoService:
package com.hpit.service;
import com.hpit.bean.DemoInfo;
import javassist.NotFoundException;
public interface DemoInfoService {
    void delete(Long id);
    DemoInfo update(DemoInfo updated) throws NotFoundException;
    DemoInfo findById(Long id);
    DemoInfo save(DemoInfo demoInfo);
}
com.hpit.service.impl.DemoInfoServiceImpl:
package com.hpit.service.impl;
import javax.annotation.Resource;
import org.springframework.cache.annotation.CacheEvict;
import org.springframework.cache.annotation.CachePut;
import org.springframework.cache.annotation.Cacheable;
import org.springframework.stereotype.Service;
import com.hpit.bean.DemoInfo;
import com.hpit.repository.DemoInfoRepository;
import com.hpit.service.DemoInfoService;
import javassist.NotFoundException;
@Service
public class DemoInfoServiceImpl implements DemoInfoService {
    //这里的单引号不能少,否则会报错,被识别是一个对象;
    public static final String CACHE_KEY = "'demoInfo'";
    @Resource
    private DemoInfoRepository demoInfoRepository;
    /**
    * value 属性表示使用哪个缓存策略,缓存策略在 ehcache.xml
    */
    public static final String DEMO_CACHE_NAME = "demo";
    /**
    * 保存数据.
    * @param demoInfo
    */
    @CacheEvict(value=DEMO_CACHE_NAME,key=CACHE_KEY)
    @Override
    public DemoInfo save(DemoInfo demoInfo){
        return demoInfoRepository.save(demoInfo);
    }
    /**
    * 查询数据.
    * @param id
    * @return
    */
    @Cacheable(value=DEMO_CACHE_NAME,key="'demoInfo_'+#id")
    @Override
    public DemoInfo findById(Long id){
        System.err.println("没有走缓存!"+id);
        return demoInfoRepository.findOne(id);
    }
    /**
    * http://www.mincoder.com/article/2096.shtml:
    *
    * 修改数据.
    *
    * 在支持 Spring Cache 的环境下,对于使用@Cacheable 标注的方法,Spring 在每次执行前都会检查
    Cache 中是否存在相同 key 的缓存元素,如果存在就不再执行该方法,而是直接从缓存中获取结果进行返回,
    否则才会执行并将返回结果存入指定的缓存中。@CachePut 也可以声明一个方法支持缓存功能。与
    @Cacheable 不同的是使用@CachePut 标注的方法在执行前不会去检查缓存中是否存在之前执行过的结果,而
    是每次都会执行该方法,并将执行结果以键值对的形式存入指定的缓存中。
    @CachePut 也可以标注在类上和方法上。使用@CachePut 时我们可以指定的属性跟@Cacheable 是一
    样的。
    *
    * @param updated
    * @return
    *
    * @throws NotFoundException
    */
    @CachePut(value = DEMO_CACHE_NAME,key = "'demoInfo_'+#updated.getId()")
    //@CacheEvict(value = DEMO_CACHE_NAME,key = "'demoInfo_'+#updated.getId()")//这是清除
    缓存.
        @Override
        public DemoInfo update(DemoInfo updated) throws NotFoundException{
        DemoInfo demoInfo = demoInfoRepository.findOne(updated.getId());
        if(demoInfo == null){
            thrownew NotFoundException("No find");
        }
        demoInfo.setName(updated.getName());
        demoInfo.setPwd(updated.getPwd());
        return demoInfo;
    }
    /**
    * 删除数据.
    * @param id
    */
    @CacheEvict(value = DEMO_CACHE_NAME,key = "'demoInfo_'+#id")//这是清除缓存.
    @Override
    public void delete(Long id){
        demoInfoRepository.delete(id);
    }
}
(9)编写 DemoInfoController 测试类;
编写一个 rest 进行测试:
com.hpit.controller.DemoInfoController:
package com.hpit.controller;
import javax.annotation.Resource;
import org.springframework.web.bind.annotation.RequestMapping;
import org.springframework.web.bind.annotation.RestController;
import com.hpit.bean.DemoInfo;
import com.hpit.service.DemoInfoService;
import javassist.NotFoundException;
@RestController
public class DemoInfoController {
    @Resource
    private DemoInfoService demoInfoService;
    @RequestMapping("/test")
    public String test(){
        //存入两条数据.
        DemoInfo demoInfo = new DemoInfo();
        demoInfo.setName("张三");
        demoInfo.setPwd("123456");
        DemoInfo demoInfo2 = demoInfoService.save(demoInfo);
        //不走缓存.
        System.out.println(demoInfoService.findById(demoInfo2.getId()));
        //走缓存.
        System.out.println(demoInfoService.findById(demoInfo2.getId()));
        demoInfo = new DemoInfo();
        demoInfo.setName("李四");
        demoInfo.setPwd("123456");
        DemoInfo demoInfo3 = demoInfoService.save(demoInfo);
        //不走缓存.
        System.out.println(demoInfoService.findById(demoInfo3.getId()));
        //走缓存.
        System.out.println(demoInfoService.findById(demoInfo3.getId()));
        System.out.println("============修改数据=====================");
        //修改数据.
        DemoInfo updated = new DemoInfo();
        updated.setName("李四-updated");
        updated.setPwd("123456");
        updated.setId(demoInfo3.getId());
        try {
            System.out.println(demoInfoService.update(updated));
        } catch (NotFoundException e) {
            e.printStackTrace();
        }
        //不走缓存.
        System.out.println(demoInfoService.findById(updated.getId()));
        return "ok";
    }
}
(10)运行测试;
运行 App.java 进行测试,访问:http://127.0.0.1:8080/test 进行测试,主要是观察控制台的打印信息。
Hibernate: insert into demo_info (name, pwd, state) values (?, ?, ?)
没有走缓存!52
DemoInfo [id=52, name=张三, pwd=123456, state=0]
DemoInfo [id=52, name=张三, pwd=123456, state=0]
Hibernate: insert into demo_info (name, pwd, state) values (?, ?, ?)
没有走缓存!53
DemoInfo [id=53, name=李四, pwd=123456, state=0]
DemoInfo [id=53, name=李四, pwd=123456, state=0]
============修改数据=====================
DemoInfo [id=53, name=李四-updated, pwd=123456, state=0]
DemoInfo [id=53, name=李四-updated, pwd=123456, state=0]
C:\Users\ADMINI~1.ANG\AppData\Local\Temp\
Hibernate: insert into demo_info (name, pwd, state) values (?, ?, ?)
没有走缓存!54
DemoInfo [id=54, name=张三, pwd=123456, state=0]
DemoInfo [id=54, name=张三, pwd=123456, state=0]
Hibernate: insert into demo_info (name, pwd, state) values (?, ?, ?)
没有走缓存!55
DemoInfo [id=55, name=李四, pwd=123456, state=0]
DemoInfo [id=55, name=李四, pwd=123456, state=0]
============修改数据=====================
DemoInfo [id=55, name=李四-updated, pwd=123456, state=0]
DemoInfo [id=55, name=李四-updated, pwd=123456, state=0]
33. Springboot 分布式 Session 共享
在使用 spring boot 做负载均衡的时候,多个 app 之间的 session 要保持一致,这样负载到不同的 app 时候,在 一个 app 登录之后,而访问到另外一台服务器的时候,session 丢失。
常规的解决方案都是使用:如 apache 使用 mod_jk.conf,使用 Memcached 进行共享。
在开发 spring boot app 的时候可以借助 spring session 和 redis 或者 ehcache,用外置的 redis 或者 ehcache 来存储 session 的状态,这里使用 redis 进行介绍,ehcache 实现是一样的
增加相关依赖
<dependency>
    <groupId>org.springframework.boot</groupId>
    <artifactId>spring-boot-starter-redis</artifactId>
</dependency>
<dependency>
    <groupId>org.springframework.session</groupId>
    <artifactId>spring-session-data-redis</artifactId>
</dependency>
RedisSessionConfig.java
package com.wisely.base;
import org.springframework.context.annotation.Configuration;
import org.springframework.session.data.redis.config.annotation.web.http.EnableRedisHttpSession;
@Configuration
@EnableRedisHttpSession
public class RedisSessionConfig {
}
如果需要添加失效时间可以使用以下的写法:
@EnableRedisHttpSession(maxInactiveIntervalInSeconds = 60) //1 分钟失效
相关配置修改
application.properties 修改 redis 配置信息(请自行安装 redis),请根据实际修改。如: spring.redis.host=127.0.0.1
所有实体类实现 Serializable 接口 public class UserInfo implements Serializable
查看效果
这时候登录系统在不同的 app 之间跳转的时候,session 都是一致了,redis 上可以看到:
总结
使用这些代码之后 ,无论你使用 nginx 或者 apache,都无须在关心多个 app 之间的 session 一致的问题了。
注意事项
(1)redis 版本号需要是 2.8 以上否则会抛异常:ERR Unsupported CONFIG parameter: notify-keyspace-events;
(2)RedisSessionConfig 需要放在 App.java 启动类可以扫描的位置;


 5万+
5万+


 被折叠的 条评论
为什么被折叠?
被折叠的 条评论
为什么被折叠?
 到【灌水乐园】发言


