


pytest是python的一种单元测试框架,与python自带的unittest测试框架类似,但是比unittest框架使用起来更简洁,效率更高。pytest还可以做UI自动化和接口自动化。
根据pytest的官方网站介绍,它具有如下特点:
(1)非常容易上手,入门简单,文档丰富,文档中有很多实例可以参考
(2)能够支持简单的单元测试和复杂的功能测试
(3)支持参数化
(4)执行测试过程中可以将某些测试跳过,或者对某些预期失败的case标记成失败
(5)支持重复执行失败的case
(6)支持运行由nose, unittest编写的测试case
(7)pytest具有很多第三方插件,并且可以自定义扩展,比较好用的如pytest-selenium(集成selenium)、pytest-html(完美html测试报告生成)、pytest-rerunfailures(失败case重复执行)、pytest-xdist(多CPU分发)等
(8)方便的和持续集成工具集成
前提:安装pip install pytest或者pip install -U pytest,使用老版本pytest==4.0.2
pytest的用例编写规则:
(1)测试文件以test_开头(以_test结尾也可以),注意:pytest 文件名.py不受此规则限制。
(2)测试类以Test开头,并且不能带有 init 方法
(3)测试函数以test_开头
(4)断言使用基本的assert即可
pytest各种方法执行测试用例(即测试方法):
首先需要在文件目录所在上方输入cmd,有以下几种方法输入命令执行测试用例:
(1)输入pytest,会把当前目录下所有以test_开头的py文件执行
(2)输入pytest -v -s,可以输出文件名称、方法名称、方法里的信息
-v表示输出哪个测试用例被执行了,-s表示输出测试用例中的打印信息,一般都是两个一起使用
(3)输入pytest 文件名 -v -s ,例如:pytest test_a.py -v -s,这样只会执行test_a.py这个文件
(4)输入pytest -k 关键字,执行包含关键字的文件或者方法
(5)输入pytest 文件名::方法名 -v -s,例如:pytest test_a.py::test_case1 -v -s ,这样只会执行test_a.py文件里的方法test_case1
(6)输入pytest 文件名::类名::类里面的方法名 -v -s
----pytest test_c.py::TestCalc::test_mul -v -s #指定test_c.py文件中TestCalc类里面的test_mul方法执行
----pytest test_a.py::TestCalc -v -s #指定test_c.py文件中TestCalc类里面的所有方法执行
下面是pytest的各种举例
- (1)pytest测试报告
- (2)失败重跑
- (3)setup和teardown函数
- (4)控制测试函数的运行顺序
- (5)通过配置文件pytest.ini配置要执行的测试用例
- (6)@pytest.fixture
- (7)@pytest.mark
-
(1)pytest测试报告
先安装包:pip install pytest-html 或pip install -U pytest-html
输入命令:pytest --html=report.html,默认会在当前目录下生成报告report.html
-
(2)失败重跑
先安装包pip install pytest-rerunfailures 或pip install -U pytest-rerunfailures
输入命令:pytest test_a.py -s -v --reruns 3 #3表示次数,表示失败的用例跑3次
(注意注意有失败的用例,才能进行失败重跑)
-
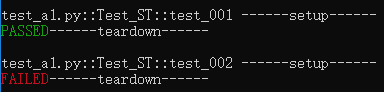
(3)setup和teardown函数
(3-1)etup和teardown函数
表示运行一次测试函数就会运行一次setup和teardown,类似于unittest的setup和teardown
import pytest
class Test_ST():
    def setup(self):
        print("------setup------")
    def teardown(self):
        print("------teardown------")
    def test_001(self):
        assert True
    def test_002(self):
        assert False
执行结果:
(3-2)setup_class和teardown_class
表示一个测试类只运行一次
import pytest
class Test_ST():
    def setup_class(cls):
        print("------setup_class------")
    def teardown_class(cls):
        print("------teardown_class------")
    def test_001(self):
        assert True
    def test_002(self):
        assert True
执行结果:

-
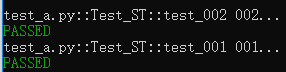
(4)控制测试函数的运行顺序
先安装包:pip install pytest-ordering
使用方法:
(a)使用 @pytest.mark.run(order=x) 标记被测试函数;
(b)运行的顺序由order传入的参数决定(order从小到大的顺序执行,order最小=1)
import pytest
class Test_ST():
    @pytest.mark.run(order=2)
    def test_001(self):
        print("001...")
        assert True
    @pytest.mark.run(order=1)
    def test_002(self):
        print("002...")
        assert True
执行结果:
-
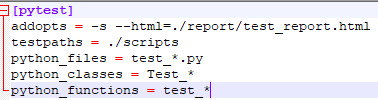
(5)通过配置文件pytest.ini配置要执行的测试用例
pytest的配置文件存放位置及命名:通常放在测试目录下,名称为pytest.ini,命令行运行时会使用配置文件中的配置
(a)配置pytest命令行运行参数
[pytest]
addopts=-s … # 以空格分隔,可添加个命令行参数;所以参数均为插件包的参数
名称固定不要乱改
(b)配置测试搜索的路径
[pytest]
testpaths=./scripts # 表示当前目录下的scripts目录,srcipts目录可自定义
(c)配置测试搜索的文件名
[pytest]
python_files=test_*.py # 表示当前目录下的scripts目录下,以test_开头,.py结尾的所有文件,文件名可自定义
(d)配置测试的测试类名
[pytest]
python_classes=Test_* #当前目录下的scripts目录下,以test_开头,以.py结尾的所有文件中,以Test_开头的类,类可自定义
(e)配置测试的测试函数名
[pytest]
python_functions=test_* #当前目录下的scripts目录下,以test_开头,以.py结尾的所有文件中,以Test_开头的类内,以test_开头的方法,方法可自定义
目录信息如下:

pytest.ini配置文件内容如下:
scripts目录下的python文件如下:

执行:在pytest.ini所在的目录下执行命令pytest -s -v,执行完成后,在report目录下生成test_report.html的测试报告
-
(6)@pytest.fixture
pytest中加入fixture装饰器来标记固定的工厂函数,使测试能够可靠、重复地执行,fixture函数可以在测试执行前和执行后进行必要的准备和清理工作,和unitest测试框架中的setup、teardown类似,但是pytest fixture和传统xUnit风格的setup/teardown函数相比,有了巨大的改进:
(a)fixture具有明确的名称,并通过在测试函数、模块、类或整个项目中声明它们的使用来激活。
(b)fixture是以模块化的方式实现的,因为每个fixture名称都会触发fixture函数,其本身也可以使用其他fixture。
(c)fixture管理从简单的单元扩展到复杂的函数测试,允许根据配置和组件选项参数化fixture和测试,或者在函数、类、模块或整个测试会话范围内重复使用fixture。
(6-1)fixture作为参数引用:直接将pytest.fixture函数的执行结果,作为参数传递给被测试函数
import requests
import pytest
#fixture作为参数引用
@pytest.fixture
def baidu_response():
    print("执行fixture")
    return requests.get("https://www.baidu.com")

#把函数baidu_response()的返回值作为参数传给test_baidu函数
def test_baidu(baidu_response):   #参数baidu_response需要和上面的函数名称保持一致
    response = baidu_response
    assert response.status_code == 200
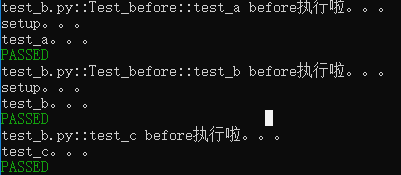
(6-2)fixture作为函数引用
import pytest
#fixture作为函数引用
@pytest.fixture()
def before():
    print("before执行啦。。。")

@pytest.mark.usefixtures("before")  # 每个测试方法执行前都会执行before函数,不包括setup、teardown
class Test_before():
    def setup(self):
        print("setup。。。")

    def test_a(self):
        print("test_a。。。")

    def test_b(self):
        print("test_b。。。")

@pytest.mark.usefixtures("before")  # 函数执行前执行before函数
def test_c():
    print("test_c。。。")
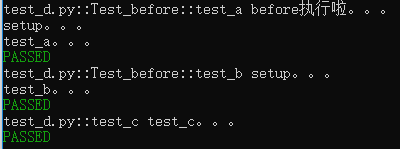
执行结果:
(6-3)设置自动执行@pytest.fixture(autouse=True)
import pytest
#设置每个测试方法执行前自动执行before函数,不包括setup、teardown。不写autouse=True,默认是False,不会自动执行
@pytest.fixture(autouse=True)
def before():
    print("before执行啦。。。")

class Test_before():
    def setup(self):
        print("setup。。。")

    def test_a(self):
        print("test_a。。。")

    def test_b(self):
        print("test_b。。。")

def test_c():
    print("test_c。。。")
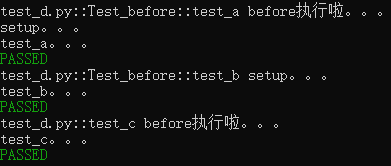
执行结果和(6-2)的执行结果一样
(6-4)设置作用域@pytest.fixture(scope=“module”,autouse=True)
session(慎用):表示多个文件执行的时候,只会执行一个文件里的before函数
module:作用于整个模块,每个module的所有test只运行一次before函数
class:表示当前类只会执行一次before,在类外边的函数也会执行before函数
function:表示每个函数、类中的每个方法都会执行一次before函数
其代码参照(6-3)的代码,只需要将装饰器改成@pytest.fixture(scope=“module”,autouse=True),其他的代码不变。验证作用域时,改变scope的值即可。
module的执行结果:
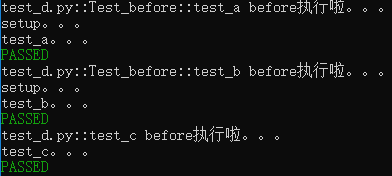
class的执行结果:
function的执行结果:
(6-5)参数化@pytest.fixture(params=[1,2,3])
import pytest

@pytest.fixture(params=[1,2,3])    #参数是列表、元祖、字符串这些序列都可以
def init_xx(request):  # 参数为固定用法
    return request.param   # 取出单个参数,也为固定用法

class Test_xx:
    def setup_class(self):
        print("setup_class------")

    def teardown_class(self):
        print("teardown_class------")
    # 函数中传入参数(init_xx函数的返回值),这个函数每个参数都会执行一次
    def test_xx(self,init_xx):
        print("test_xx------")
        assert init_xx !=4
    # 函数中没有传入参数,这个函数只会执行一次
    def test_yy(self):
        print("test_yy------")
        assert True
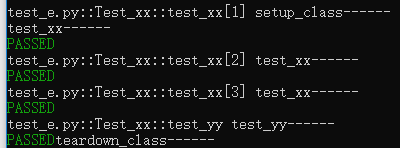
执行结果:
-
(7)@pytest.mark
(7-1)跳过测试函数
使用方法:
@pytest.mark.skipif(condition,reason=None)
参数:
condition:跳过的条件,True(跳过、不执行)/False(不跳过、执行),必传参数
reason:标注原因
import pytest

class Test_skip:
    def test_a(self):
        assert True

    @pytest.mark.skipif(2>1,reason="故意的")  #条件为boolean值,True(跳过)/False(执行)
    def test_b(self):
        assert False
执行结果:

(7-2)预期失败函数
使用方法:
@pytest.mark.xfail(condition,reason=None)
参数:
condition:失败的条件,True(失败),必传参数
reason:标注原因
import pytest

class Test_xfail:
    def test_a(self):
        assert True

    @pytest.mark.xfail(True,reason="故意的")  # 条件为boolean值,True(跳过)/False(不跳过/执行)
    def test_b(self):
        assert True
执行结果:

(7-3)参数化函数
@pytest.mark.parametrize(argnames,argvalues,indirect=False,ids=None,scope=None)
常用参数:
argnames:参数名称
argvalues:参数对应的值,类型必须为list
注意:与fixture的参数化使用方式不同,比fixture更灵活、方便
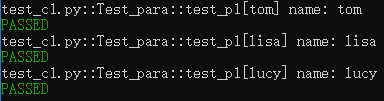
单个参数的参数化例子:
import pytest

class Test_para:
    @pytest.mark.parametrize('name', ["tom", "lisa", "lucy"])     #将列表里的每个参数传给name
    def test_p1(self, name):  # 要传参数的名称,且和参数化中定义的一致
        print("name:",name)
        assert name != "haha"
执行结果:
多个参数的参数化例子:
import pytest

def login_data():
    data=[('wang','wang123'),('li','li23'),('zhao','zhao123')]
    return data

class Test_param:
    @pytest.mark.parametrize("username,password",login_data())
    def test_login(self,username,password):
        print("用户名:%s,密码:%s 登录成功!"%(username,password))
        assert True
执行结果:

多个参数的参数化和selenium结合例子:注意驱动的位置要正确
import pytest
from selenium import webdriver
import time

@pytest.mark.parametrize(
    "num,search_key",
    [("1","光荣之路"),
     ("2","Selenium"),
     ("3","python"),
    ],
ids=["case1","case2","case3"]    #ids中的数据相当于用例名称(对应每一个元祖),如果不写,报告中的用例名称会有中文乱码问题
)
def test_baidu_search(num,search_key):
    driver = webdriver.Chrome(executable_path="E:\\2019TestStudy\\Fullday\\22_自动化测试_自动化测试理论(涉及到三个驱动)和Xpath元素的定位(1)20200308\\三个浏览器的驱动,不需要安装\\chromeDriver")
    driver.get("https://www.baidu.com")
    time.sleep(2)
    driver.find_element_by_id("kw").send_keys(search_key)
    driver.find_element_by_id("su").click()
    time.sleep(2)
    assert driver.title==search_key+"_百度搜索"
    driver.quit()


 2090
2090


 被折叠的 条评论
为什么被折叠?
被折叠的 条评论
为什么被折叠?
 到【灌水乐园】发言


