


1:CMS-内容管理系统
1.新闻发布系统
2.博客blog管理系统
3.员工管理系统
4.图书管理系统
5.qq空间…等等
特点: 发布信息
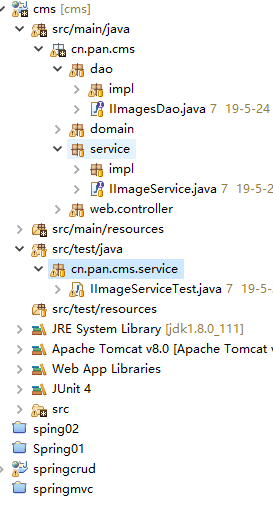
2:Maven:结构
它可以帮我们自动导包,自动编译,规范代码等
老師还没教,今天只学了一个机构
------四大主要结构
		src/main/java -> 			Java代码的存放位置
		src/main/resources -> 		资源文件的存放位置
		src/test/java -> 			测试代码的位置
		src/test/resources -> 		代码资源文件的位置
3:项目搭建的常规操作/xml配置
1.建表:
数据库创建对应的表
2.键domain,dao,service,controller
domain:		域对象 ,对应数据库中的元素
dao:		操作数据库,增删改查
service:	业务层调用dao层,做逻辑判断
controller:	前端控制页面,
3,配置 web.xml,applicationContext.xml,applicationContext-mvc.xml
3.1web.xml配置
	<!--0 监听器  -->
	<listener>
		<listener-class>org.springframework.web.context.ContextLoaderListener </listener-class>
	</listener>


	<context-param>
		 <param-name>contextConfigLocation</param-name>
		 <param-value>classpath:applicationContext.xml</param-value>
	</context-param>

	<!--1,核心控制器  -->
	<servlet>
		<servlet-name>dispatcherServlet</servlet-name>
		<servlet-class>org.springframework.web.servlet.DispatcherServlet</servlet-class>
	<!--2,Spring核心文件路径  -->
		<init-param>
			<param-name>contextConfigLocation</param-name>
			<param-value>classpath:applicationContext-mvc.xml</param-value>
		</init-param>
	<!--3 跟随启动创建  -->
			<load-on-startup>1</load-on-startup>
	</servlet>
	<!--4,过滤器  -->
	<servlet-mapping>
		<servlet-name>dispatcherServlet</servlet-name>
		<url-pattern>/</url-pattern>
	</servlet-mapping>

	<!--5,请求乱码!  -->

		<filter>
			<filter-name>CharacterEncodingFilter</filter-name>
			<filter-class>org.springframework.web.filter.CharacterEncodingFilter</filter-class>
			<init-param>
				<param-name>encoding</param-name>
				<param-value>utf-8</param-value>
			</init-param>
		</filter>

		<filter-mapping>
			<filter-name>CharacterEncodingFilter</filter-name>
			<url-pattern>/*</url-pattern>
		</filter-mapping>
3.2applicationContext.xml配置
<?xml version="1.0" encoding="UTF-8"?>
<beans xmlns="http://www.springframework.org/schema/beans"
 xmlns:xsi="http://www.w3.org/2001/XMLSchema-instance"
 xmlns:context="http://www.springframework.org/schema/context"
 xmlns:mvc="http://www.springframework.org/schema/mvc"
 xsi:schemaLocation="
 http://www.springframework.org/schema/beans
 http://www.springframework.org/schema/beans/spring-beans.xsd
 http://www.springframework.org/schema/context
 http://www.springframework.org/schema/context/spring-context.xsd
 http://www.springframework.org/schema/mvc
 http://www.springframework.org/schema/mvc/spring-mvc.xsd
 " >

 	<!--1 扫描包  -->
	<context:component-scan base-package="cn.pan.cms"></context:component-scan>

 	<!--2 读取配置文件  -->
 	<context:property-placeholder location="classpath:jdbc.properties"/>

	<!--3,加载DataSource对象,配置4金刚  -->
	<bean id="dataSource" class="org.apache.commons.dbcp.BasicDataSource" destroy-method="close">
		<property name="driverClassName" value="${jdbc.driverClassName}" />
		<property name="url" value="${jdbc.url}" />
		<property name="username" value="${jdbc.username}" />
		<property name="password" value="${jdbc.password}" />
	</bean>
	<!--4,配置JdbcTemplate操作数据库  -->
	<bean id="jdbcTemplate" class="org.springframework.jdbc.core.JdbcTemplate">
		<property name="dataSource" ref="dataSource" />
	</bean>
</beans>
3.3applicationContext-mvc.xml配置
<?xml version="1.0" encoding="UTF-8"?>
<beans xmlns="http://www.springframework.org/schema/beans"
 xmlns:xsi="http://www.w3.org/2001/XMLSchema-instance"
 xmlns:context="http://www.springframework.org/schema/context"
 xmlns:mvc="http://www.springframework.org/schema/mvc"
 xsi:schemaLocation="
 http://www.springframework.org/schema/beans
 http://www.springframework.org/schema/beans/spring-beans.xsd
 http://www.springframework.org/schema/context
 http://www.springframework.org/schema/context/spring-context.xsd
 http://www.springframework.org/schema/mvc
 http://www.springframework.org/schema/mvc/spring-mvc.xsd
 " >
 <!--SpringMVC 5大组件  -->

<!--  	引入其他Sprng文件
 	<import resource="classpath:applicationContext.xml"/> -->

 	<!--1,扫描包  -->
	<context:component-scan base-package="cn.pan.cms"></context:component-scan>

 	<!--2,注解生效 ,支持特有SpingMVC注解-->
	<mvc:annotation-driven />
	<!--3,支持静态资源  -->
	<mvc:default-servlet-handler />
	<!--4,视图解析器  -->
	<bean class="org.springframework.web.servlet.view.InternalResourceViewResolver">
		<!-- 	prefix:前缀 -->
		<property name="prefix" value="/WEB-INF/views/" />
		<!-- 	suffix后缀 -->
		<property name="suffix" value=".jsp"></property>
	</bean>
	<!--5,上传解析器  -->
	<bean id="multipartResolver"
		class="org.springframework.web.multipart.commons.CommonsMultipartResolver">
		<property name="maxUploadSize">
			<value>2000000000</value>
		</property>
	</bean>
</beans>
3.4:JDBC配置:
jdbc.driverClassName=com.mysql.jdbc.Driver
jdbc.url=jdbc:mysql:///cms
jdbc.username=root
jdbc.password=XXXXXXXXXXXXX
4:页面设计
SystemController -> 进入后台的主页面
ImagesController -> 进入轮播图(CRUD)管理页面
注意事项:凡是WEB-INF中的页面都要通过Controller访问
5:前端合作
	5.1 前端会把html做好,然后我们把他做的页面搞到我们的项目中来(图片,js,css的引入路径都要进行修改)
	5.2 iframe -> 可以把其它的页面直接放入到页面中来
		<iframe src="..."  />
	5.3 注意点:如果咱们配置有上下文路径:所有跳转的路径前:${pageContext.request.contextPath }
6:图片上传
	6.1 form中需要配置 method="post" enctype="multipart/form-data"
	6.2 后台要根据上传的文件名进行接收
		①./  ②.获取路径  ③.保存图片(fileImg.transferTo(file))
		④.保存Images对象(绝对路径的地址,名称)
7:整体操作流程
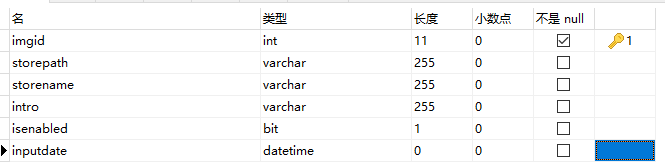
1,.创建数据库表 t_image
2.搭建web项目
創建一個web項目,模拟Maven 创建四大结构
		src/main/java -> 			Java代码的存放位置
		src/main/resources -> 		资源文件的存放位置
		src/test/java -> 			测试代码的位置
		src/test/resources -> 		代码资源文件的位置
3 .创建.dao.domain.service,controller
domain:		域对象 ,对应数据库中的元素
dao:		操作数据库,增删改查
service:	业务层调用dao层,做逻辑判断
controller:	前端控制页面,
4,配置 web.xml,Spring.xml,SpringMVC.xml及JDBC配置文件
1,web-xml配置:
<!--0 监听器  -->
	<listener>
		<listener-class>org.springframework.web.context.ContextLoaderListener </listener-class>
	</listener>


	<context-param>
		 <param-name>contextConfigLocation</param-name>
		 <param-value>classpath:applicationContext.xml</param-value>
	</context-param>

	<!--1,核心控制器  -->
	<servlet>
		<servlet-name>dispatcherServlet</servlet-name>
		<servlet-class>org.springframework.web.servlet.DispatcherServlet</servlet-class>
	<!--2,Spring核心文件路径  -->
		<init-param>
			<param-name>contextConfigLocation</param-name>
			<param-value>classpath:applicationContext-mvc.xml</param-value>
		</init-param>
	<!--3 跟随启动创建  -->
			<load-on-startup>1</load-on-startup>
	</servlet>
	<!--4,过滤器  -->
	<servlet-mapping>
		<servlet-name>dispatcherServlet</servlet-name>
		<url-pattern>/</url-pattern>
	</servlet-mapping>

	<!--5,请求乱码!  -->

		<filter>
			<filter-name>CharacterEncodingFilter</filter-name>
			<filter-class>org.springframework.web.filter.CharacterEncodingFilter</filter-class>
			<init-param>
				<param-name>encoding</param-name>
				<param-value>utf-8</param-value>
			</init-param>
		</filter>

		<filter-mapping>
			<filter-name>CharacterEncodingFilter</filter-name>
			<url-pattern>/*</url-pattern>
		</filter-mapping>
2.Spring.xml --applicationContext.xml配置
<?xml version="1.0" encoding="UTF-8"?>
<beans xmlns="http://www.springframework.org/schema/beans"
 xmlns:xsi="http://www.w3.org/2001/XMLSchema-instance"
 xmlns:context="http://www.springframework.org/schema/context"
 xmlns:mvc="http://www.springframework.org/schema/mvc"
 xsi:schemaLocation="
 http://www.springframework.org/schema/beans
 http://www.springframework.org/schema/beans/spring-beans.xsd
 http://www.springframework.org/schema/context
 http://www.springframework.org/schema/context/spring-context.xsd
 http://www.springframework.org/schema/mvc
 http://www.springframework.org/schema/mvc/spring-mvc.xsd
 " >

 	<!--1 扫描包  -->
	<context:component-scan base-package="cn.pan.cms"></context:component-scan>

 	<!--2 读取配置文件  -->
 	<context:property-placeholder location="classpath:jdbc.properties"/>

	<!--3,加载DataSource对象,配置4金刚  -->
	<bean id="dataSource" class="org.apache.commons.dbcp.BasicDataSource" destroy-method="close">
		<property name="driverClassName" value="${jdbc.driverClassName}" />
		<property name="url" value="${jdbc.url}" />
		<property name="username" value="${jdbc.username}" />
		<property name="password" value="${jdbc.password}" />
	</bean>
	<!--4,配置JdbcTemplate操作数据库  -->
	<bean id="jdbcTemplate" class="org.springframework.jdbc.core.JdbcTemplate">
		<property name="dataSource" ref="dataSource" />
	</bean>
</beans>
3,SpringMVC.xml--applicationContext-mvc.xml配置
<?xml version="1.0" encoding="UTF-8"?>
<beans xmlns="http://www.springframework.org/schema/beans"
 xmlns:xsi="http://www.w3.org/2001/XMLSchema-instance"
 xmlns:context="http://www.springframework.org/schema/context"
 xmlns:mvc="http://www.springframework.org/schema/mvc"
 xsi:schemaLocation="
 http://www.springframework.org/schema/beans
 http://www.springframework.org/schema/beans/spring-beans.xsd
 http://www.springframework.org/schema/context
 http://www.springframework.org/schema/context/spring-context.xsd
 http://www.springframework.org/schema/mvc
 http://www.springframework.org/schema/mvc/spring-mvc.xsd
 " >
 <!--SpringMVC 5大组件  -->

<!--  	引入其他Sprng文件
 	<import resource="classpath:applicationContext.xml"/> -->

 	<!--1,扫描包  -->
	<context:component-scan base-package="cn.pan.cms"></context:component-scan>

 	<!--2,注解生效 ,支持特有SpingMVC注解-->
	<mvc:annotation-driven />
	<!--3,支持静态资源  -->
	<mvc:default-servlet-handler />
	<!--4,视图解析器  -->
	<bean class="org.springframework.web.servlet.view.InternalResourceViewResolver">
		<!-- 	prefix:前缀 -->
		<property name="prefix" value="/WEB-INF/views/" />
		<!-- 	suffix后缀 -->
		<property name="suffix" value=".jsp"></property>
	</bean>
	<!--5,上传解析器  -->
	<bean id="multipartResolver"
		class="org.springframework.web.multipart.commons.CommonsMultipartResolver">
		<property name="maxUploadSize">
			<value>2000000000</value>
		</property>
	</bean>

</beans>
4.JDBC配置文件--jdbc.properties
jdbc.driverClassName=com.mysql.jdbc.Driver
jdbc.url=jdbc:mysql:///cms
jdbc.username=root
jdbc.password=36548021
5.dao层数据库操作
JdbcTemplate 是Sping写好的一个类,专门用来操作数据库的
使用方式很简单, 在配置好JdbcTemplate" <Bean>对象后使用 @Autowired注入 就可以使用了
注入示例:
	@Autowired
	private JdbcTemplate jdbcTemplate;
配置JdbcTemplate示例
	 	<!--2 读取配置文件  -->
 	<context:property-placeholder location="classpath:jdbc.properties"/>

	<!--3,加载DataSource对象,配置4金刚  -->
	<bean id="dataSource" class="org.apache.commons.dbcp.BasicDataSource" destroy-method="close">
		<property name="driverClassName" value="${jdbc.driverClassName}" />
		<property name="url" value="${jdbc.url}" />
		<property name="username" value="${jdbc.username}" />
		<property name="password" value="${jdbc.password}" />
	</bean>
	<!--4,配置JdbcTemplate操作数据库  -->
	<bean id="jdbcTemplate" class="org.springframework.jdbc.core.JdbcTemplate">
		<property name="dataSource" ref="dataSource" />
	</bean>
常用方法:
增删改:update					增删改都是同一个方法,返回的是int值
查询单个:queryForObject 			该方法返回的是一个对象
查询所有:query					该方法会返回一个集合
 增删改:update
 		1,增加;jdbcTemplate.update("insert into t_image (storepath,storename,intro,isenabled,inputdate) values (?,?,?,?,?)",
				images.getStorepath(),images.getStorename(),images.getIntro(),images.getIsenabled(),images.getInputdate()
				);

		2;修改jdbcTemplate.update("update t_image set storepath=?,storename=?,intro=?,isenabled=?,inputdate=? where imgid=?",
				images.getStorepath(),images.getStorename(),images.getIntro(),images.getIsenabled(),images.getInputdate(),images.getImgid()
				);
		3;删除;jdbcTemplate.update("delete from t_image where imgid=?",id);
查询方法<比较特殊>
查询比较特殊一点,使用的方法分别有俩个:
queryForObject():
query():
里面的参数使用BeanPropertyRowMapper对象进行查询操作,
该方法返回了一个查询对象
			return jdbcTemplate.queryForObject("select * from  t_image where imgid=?",
					new BeanPropertyRowMapper<>(Images.class),id);
该方法返回了一个查询集合
			return jdbcTemplate.queryForObject("select * from  t_image where imgid=?",
					new BeanPropertyRowMapper<>(Images.class),id);
6.service调用dao层做逻辑判断
不想写了,真TM类
9,新知识总结:
1 JdbcTemplate 数据库操作对象,
该对象可以很简单的操作数据库,需要在Spring.xml中和 连接池一起配置
该对象的用法:
1,使用对象
	@Autowired
	private JdbcTemplate jdbcTemplate;
2,使用它的方法做增刪改查,
 增刪改是同一个方法 update
jdbcTemplate.update("insert into t_image (storepath,storename,intro,isenabled,inputdate) values (?,?,?,?,?)",
				images.getStorepath(),images.getStorename(),images.getIntro(),images.getIsenabled(),images.getInputdate()
				);

jdbcTemplate.update("delete from t_image where imgid=?",id);


第一个参数:sql语句;
第二个参数:执行参数,该参数可以是一个,也可以是N个,可以做到对很多参数赋值
3, 查询方法比较特殊,
	使用了俩个方法进行查询
		1,查询单个返回的是一个对象
		2.查询所有,返回的是一个集合
	注意:该方法的参数列表, 使用了一个 BeanPropertyRowMapper 对象 来做处理对象,该对象使用方式  如下:
查询单个:
	return jdbcTemplate.queryForObject("select * from  t_image where imgid=?",
		ew BeanPropertyRowMapper<Images>(Images.class),id);
查询所有:
	List<Images> list = jdbcTemplate.query("select * from t_image",
		new BeanPropertyRowMapper<Images>(Images.class));


 161
161


 被折叠的 条评论
为什么被折叠?
被折叠的 条评论
为什么被折叠?
 到【灌水乐园】发言


