


谷粒商城-基础篇
文章目录
- 谷粒商城-基础篇
- 分布式基础篇总结
- 一、分布式基础概念
- 1.1、什么是微服务?
- 1.2、Spring Cloud Alibaba
- 1.3、注册中心 Nacos Discovery
- 1.4、配置中心 Nacos Config
- 1.5、远程调用
- 1.6、Fegin
- 1.7、网关 Spring Cloud Gateway
- 4.Configuring Route Predicate Factories and Gateway Filter Factories
- 5.Route Predicate Factories
- 5.1. The After Route Predicate Factory
- 5.2. The Before Route Predicate Factory
- 5.3. The Between Route Predicate Factory
- 5.4. The Cookie Route Predicate Factory
- 5.5. The Header Route Predicate Factory
- 5.6. The Host Route Predicate Factory
- 5.7. The Method Route Predicate Factory
- 5.8. The Path Route Predicate Factory
- 5.9. The Query Route Predicate Factory
- 5.10. The RemoteAddr Route Predicate Factory
- 5.11. The Weight Route Predicate Factory
- 6. `GatewayFilter` Factories
- [6.2. The `AddRequestParameter` `GatewayFilter` Factory](https://docs.spring.io/spring-cloud-gateway/docs/2.2.9.RELEASE/reference/html/#the-addrequestparameter-gatewayfilter-factory)
- [6.3. The `AddResponseHeader` `GatewayFilter` Factory](https://docs.spring.io/spring-cloud-gateway/docs/2.2.9.RELEASE/reference/html/#the-addresponseheader-gatewayfilter-factory)
- [6.4. The `DedupeResponseHeader` `GatewayFilter` Factory](https://docs.spring.io/spring-cloud-gateway/docs/2.2.9.RELEASE/reference/html/#the-deduperesponseheader-gatewayfilter-factory)
- [6.5. The Hystrix `GatewayFilter` Factory](https://docs.spring.io/spring-cloud-gateway/docs/2.2.9.RELEASE/reference/html/#hystrix)
- [6.6. Spring Cloud CircuitBreaker GatewayFilter Factory](https://docs.spring.io/spring-cloud-gateway/docs/2.2.9.RELEASE/reference/html/#spring-cloud-circuitbreaker-filter-factory)
- [6.6.1. Tripping The Circuit Breaker On Status Codes](https://docs.spring.io/spring-cloud-gateway/docs/2.2.9.RELEASE/reference/html/#circuit-breaker-status-codes)
- [6.7. The `FallbackHeaders` `GatewayFilter` Factory](https://docs.spring.io/spring-cloud-gateway/docs/2.2.9.RELEASE/reference/html/#fallback-headers)
- [6.8. The `MapRequestHeader` `GatewayFilter` Factory](https://docs.spring.io/spring-cloud-gateway/docs/2.2.9.RELEASE/reference/html/#the-maprequestheader-gatewayfilter-factory)
- [6.9. The `PrefixPath` `GatewayFilter` Factory](https://docs.spring.io/spring-cloud-gateway/docs/2.2.9.RELEASE/reference/html/#the-prefixpath-gatewayfilter-factory)
- [6.10. The `PreserveHostHeader` `GatewayFilter` Factory](https://docs.spring.io/spring-cloud-gateway/docs/2.2.9.RELEASE/reference/html/#the-preservehostheader-gatewayfilter-factory)
- [6.11. The `RequestRateLimiter` `GatewayFilter` Factory](https://docs.spring.io/spring-cloud-gateway/docs/2.2.9.RELEASE/reference/html/#the-requestratelimiter-gatewayfilter-factory)
- [6.11.1. The Redis `RateLimiter`](https://docs.spring.io/spring-cloud-gateway/docs/2.2.9.RELEASE/reference/html/#the-redis-ratelimiter)
- [6.12. The `RedirectTo` `GatewayFilter` Factory](https://docs.spring.io/spring-cloud-gateway/docs/2.2.9.RELEASE/reference/html/#the-redirectto-gatewayfilter-factory)
- [6.13. The `RemoveRequestHeader` GatewayFilter Factory](https://docs.spring.io/spring-cloud-gateway/docs/2.2.9.RELEASE/reference/html/#the-removerequestheader-gatewayfilter-factory)
- [6.14. `RemoveResponseHeader` `GatewayFilter` Factory](https://docs.spring.io/spring-cloud-gateway/docs/2.2.9.RELEASE/reference/html/#removeresponseheader-gatewayfilter-factory)
- [6.15. The `RemoveRequestParameter` `GatewayFilter` Factory](https://docs.spring.io/spring-cloud-gateway/docs/2.2.9.RELEASE/reference/html/#the-removerequestparameter-gatewayfilter-factory)
- [6.16. The `RewritePath` `GatewayFilter` Factory](https://docs.spring.io/spring-cloud-gateway/docs/2.2.9.RELEASE/reference/html/#the-rewritepath-gatewayfilter-factory)
- [6.17. `RewriteLocationResponseHeader` `GatewayFilter` Factory](https://docs.spring.io/spring-cloud-gateway/docs/2.2.9.RELEASE/reference/html/#rewritelocationresponseheader-gatewayfilter-factory)
- [6.18. The `RewriteResponseHeader` `GatewayFilter` Factory](https://docs.spring.io/spring-cloud-gateway/docs/2.2.9.RELEASE/reference/html/#the-rewriteresponseheader-gatewayfilter-factory)
- [6.19. The `SaveSession` `GatewayFilter` Factory](https://docs.spring.io/spring-cloud-gateway/docs/2.2.9.RELEASE/reference/html/#the-savesession-gatewayfilter-factory)
- [6.20. The `SecureHeaders` `GatewayFilter` Factory](https://docs.spring.io/spring-cloud-gateway/docs/2.2.9.RELEASE/reference/html/#the-secureheaders-gatewayfilter-factory)
- [6.21. The `SetPath` `GatewayFilter` Factory](https://docs.spring.io/spring-cloud-gateway/docs/2.2.9.RELEASE/reference/html/#the-setpath-gatewayfilter-factory)
- [6.22. The `SetRequestHeader` `GatewayFilter` Factory](https://docs.spring.io/spring-cloud-gateway/docs/2.2.9.RELEASE/reference/html/#the-setrequestheader-gatewayfilter-factory)
- [6.23. The `SetResponseHeader` `GatewayFilter` Factory](https://docs.spring.io/spring-cloud-gateway/docs/2.2.9.RELEASE/reference/html/#the-setresponseheader-gatewayfilter-factory)
- [6.24. The `SetStatus` `GatewayFilter` Factory](https://docs.spring.io/spring-cloud-gateway/docs/2.2.9.RELEASE/reference/html/#the-setstatus-gatewayfilter-factory)
- [6.25. The `StripPrefix` `GatewayFilter` Factory](https://docs.spring.io/spring-cloud-gateway/docs/2.2.9.RELEASE/reference/html/#the-stripprefix-gatewayfilter-factory)
- [6.26. The Retry `GatewayFilter` Factory](https://docs.spring.io/spring-cloud-gateway/docs/2.2.9.RELEASE/reference/html/#the-retry-gatewayfilter-factory)
- [6.27. The `RequestSize` `GatewayFilter` Factory](https://docs.spring.io/spring-cloud-gateway/docs/2.2.9.RELEASE/reference/html/#the-requestsize-gatewayfilter-factory)
- [6.28. The `SetRequestHostHeader` `GatewayFilter` Factory](https://docs.spring.io/spring-cloud-gateway/docs/2.2.9.RELEASE/reference/html/#the-setrequesthostheader-gatewayfilter-factory)
- [6.29. Modify a Request Body `GatewayFilter` Factory](https://docs.spring.io/spring-cloud-gateway/docs/2.2.9.RELEASE/reference/html/#modify-a-request-body-gatewayfilter-factory)
- [6.30. Modify a Response Body `GatewayFilter` Factory](https://docs.spring.io/spring-cloud-gateway/docs/2.2.9.RELEASE/reference/html/#modify-a-response-body-gatewayfilter-factory)
- [6.31. Default Filters](https://docs.spring.io/spring-cloud-gateway/docs/2.2.9.RELEASE/reference/html/#default-filters)
- 二、基础开发
- 写在最后
望君知:专注于后端代码逻辑以及知识点。前端代码可以参考他人笔记。笔记全手敲或者整理文档所得。
基础环境搭建这里就不细说了,跟着视频操作就完事了。
直接先上基础篇的总结,对着总结进行学习
分布式基础篇总结
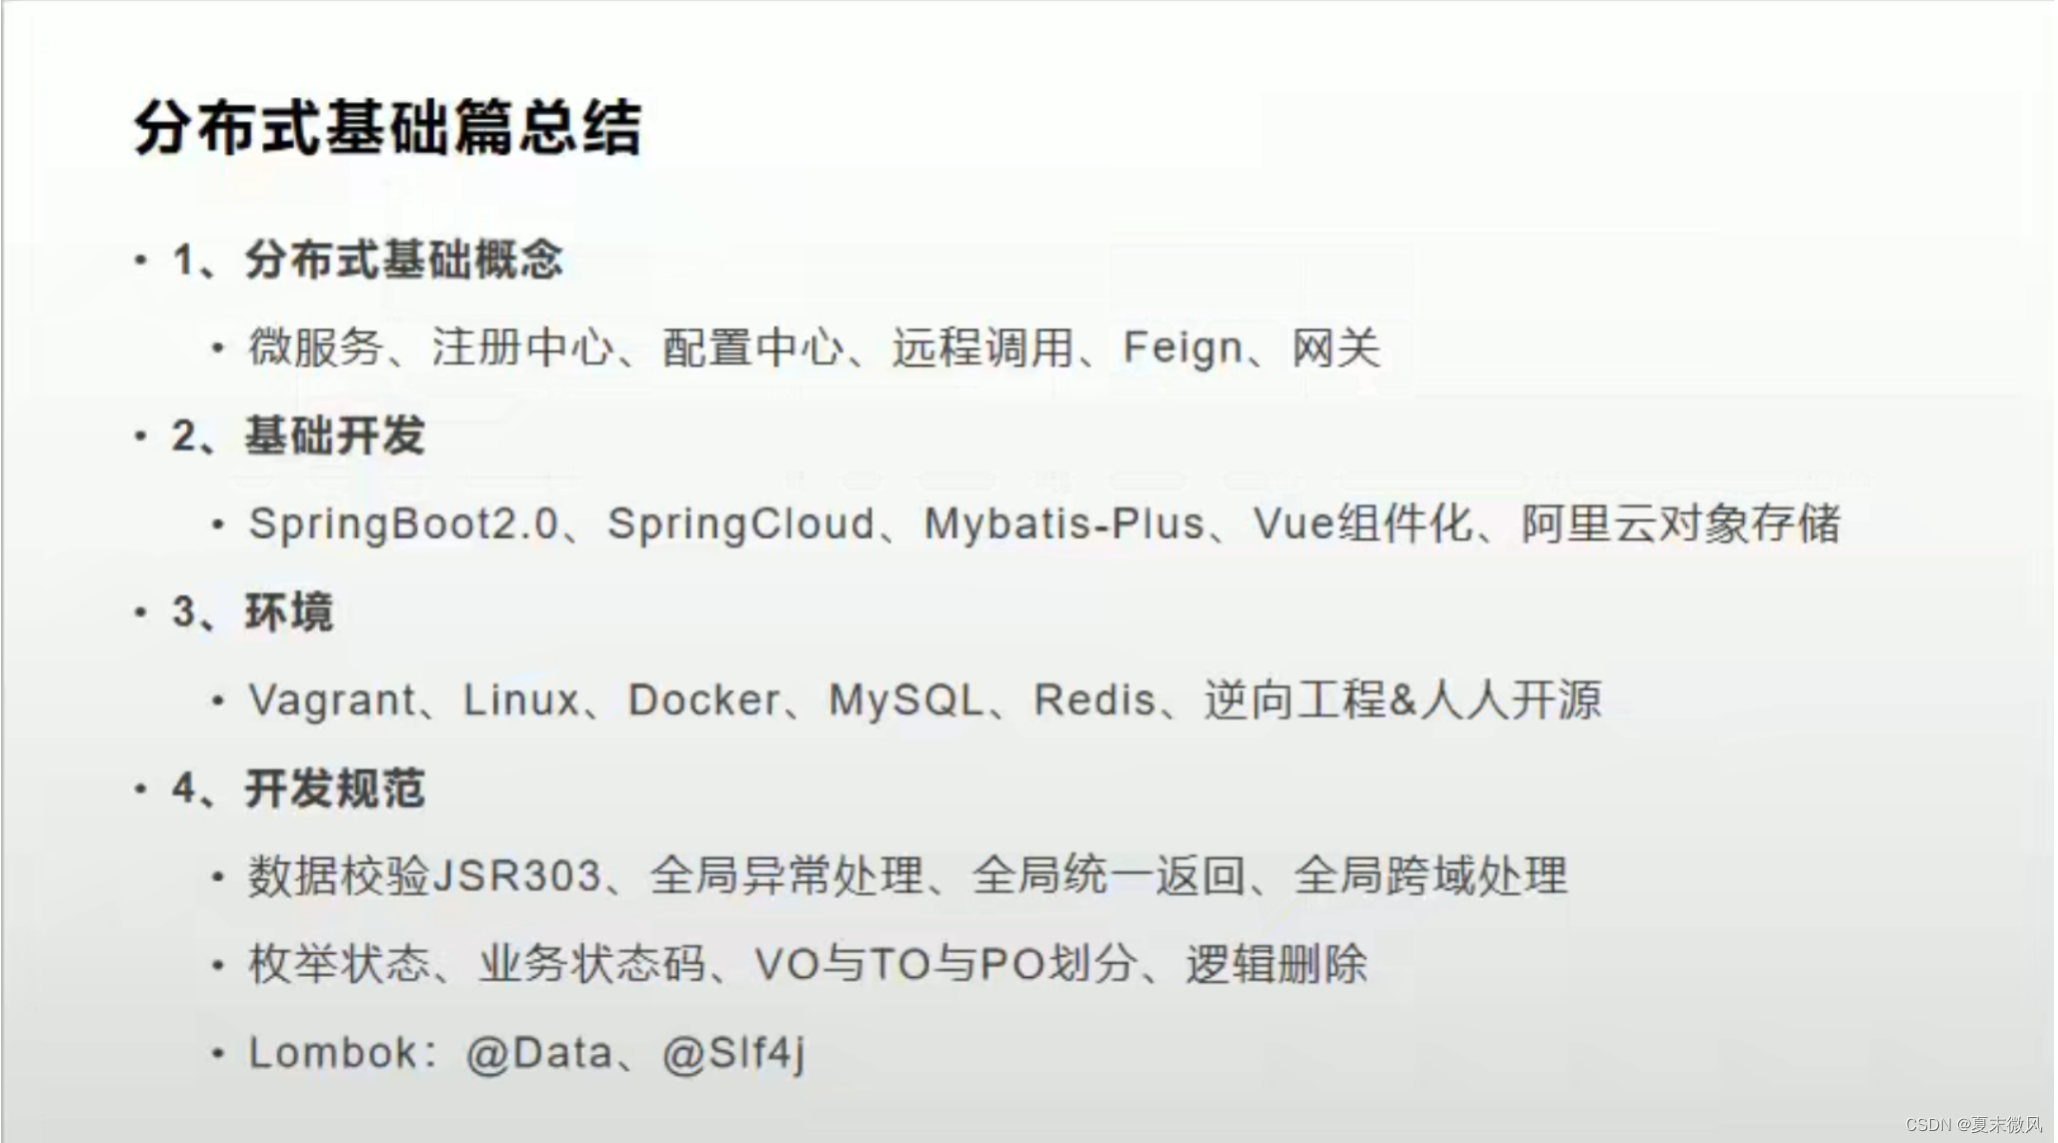
一、分布式基础概念
1.1、什么是微服务?
微服务就是将一个单体架构的应用按业务划分为一个个的独立运行的程序即服务
1.2、Spring Cloud Alibaba
github:Spring Cloud Alibaba 中文文档
https://github.com/alibaba/spring-cloud-alibaba/blob/2.2.x/README-zh.md
PS:以来内容皆来自于官网,作为摘抄。一是方便github网站不稳定访问的情况,二是作为一个专题,也许有人不喜欢看官网呢,那我来带你看。(此处狗头)
Spring Cloud Alibaba 致力于提供微服务开发的一站式解决方案。
- 服务限流降级:默认支持 WebServlet、WebFlux、OpenFeign、RestTemplate、Spring Cloud Gateway、Zuul、Dubbo 和 RocketMQ 限流降级功能的接入,可以在运行时通过控制台实时修改限流降级规则,还支持查看限流降级 Metrics 监控。
- 服务注册与发现:适配 Spring Cloud 服务注册与发现标准,默认集成了 Ribbon 的支持。
- 分布式配置管理:支持分布式系统中的外部化配置,配置更改时自动刷新。
- 消息驱动能力:基于 Spring Cloud Stream 为微服务应用构建消息驱动能力。
- 分布式事务:使用 @GlobalTransactional 注解, 高效并且对业务零侵入地解决分布式事务问题。
- 阿里云对象存储:阿里云提供的海量、安全、低成本、高可靠的云存储服务。支持在任何应用、任何时间、任何地点存储和访问任意类型的数据。
- 分布式任务调度:提供秒级、精准、高可靠、高可用的定时(基于 Cron 表达式)任务调度服务。同时提供分布式的任务执行模型,如网格任务。网格任务支持海量子任务均匀分配到所有 Worker(schedulerx-client)上执行。
- 阿里云短信服务:覆盖全球的短信服务,友好、高效、智能的互联化通讯能力,帮助企业迅速搭建客户触达通道。
组件
Sentinel:把流量作为切入点,从流量控制、熔断降级、系统负载保护等多个维度保护服务的稳定性。
Nacos:一个更易于构建云原生应用的动态服务发现、配置管理和服务管理平台。
RocketMQ:一款开源的分布式消息系统,基于高可用分布式集群技术,提供低延时的、高可靠的消息发布与订阅服务。
Dubbo:Apache Dubbo™ 是一款高性能 Java RPC 框架。
Seata:阿里巴巴开源产品,一个易于使用的高性能微服务分布式事务解决方案。
Alibaba Cloud OSS: 阿里云对象存储服务(Object Storage Service,简称 OSS),是阿里云提供的海量、安全、低成本、高可靠的云存储服务。您可以在任何应用、任何时间、任何地点存储和访问任意类型的数据。
Alibaba Cloud SchedulerX: 阿里中间件团队开发的一款分布式任务调度产品,提供秒级、精准、高可靠、高可用的定时(基于 Cron 表达式)任务调度服务。
Alibaba Cloud SMS: 覆盖全球的短信服务,友好、高效、智能的互联化通讯能力,帮助企业迅速搭建客户触达通道。
更多组件请参考 Roadmap。
如何使用
如何引入依赖
如果需要使用已发布的版本,在 dependencyManagement 中添加如下配置。
<dependencyManagement>
    <dependencies>
        <dependency>
            <groupId>com.alibaba.cloud</groupId>
            <artifactId>spring-cloud-alibaba-dependencies</artifactId>
            <version>2.2.7.RELEASE</version>
            <type>pom</type>
            <scope>import</scope>
        </dependency>
    </dependencies>
</dependencyManagement>
然后在 dependencies 中添加自己所需使用的依赖即可使用。
演示 Demo
为了演示如何使用,Spring Cloud Alibaba 项目包含了一个子模块spring-cloud-alibaba-examples。此模块中提供了演示用的 example ,您可以阅读对应的 example 工程下的 readme 文档,根据里面的步骤来体验。
Example 列表:
Alibaba Cloud SchedulerX Example
版本管理规范
项目的版本号格式为 x.x.x 的形式,其中 x 的数值类型为数字,从 0 开始取值,且不限于 0~9 这个范围。项目处于孵化器阶段时,第一位版本号固定使用 0,即版本号为 0.x.x 的格式。
由于 Spring Boot 1 和 Spring Boot 2 在 Actuator 模块的接口和注解有很大的变更,且 spring-cloud-commons 从 1.x.x 版本升级到 2.0.0 版本也有较大的变更,因此我们采取跟 SpringBoot 版本号一致的版本:
- 1.5.x 版本适用于 Spring Boot 1.5.x
- 2.0.x 版本适用于 Spring Boot 2.0.x
- 2.1.x 版本适用于 Spring Boot 2.1.x
- 2.2.x 版本适用于 Spring Boot 2.2.x
- 2021.x 版本适用于 Spring Boot 2.4.x
1.3、注册中心 Nacos Discovery
本项目演示如何使用 Nacos Discovery Starter 完成 Spring Cloud 应用的服务注册与发现。
大部分的微服务组件的使用情况都是: 1、引入pom.xml依赖,2、编写配置文件。3、开启注解使用。
示例
如何接入
在启动示例进行演示之前,我们先了解一下 Spring Cloud 应用如何接入 Nacos Discovery。 注意 本章节只是为了便于您理解接入方式,本示例代码中已经完成接入工作,您无需再进行修改。
-
首先,修改 pom.xml 文件,引入 Nacos Discovery Starter。
<dependency> <groupId>com.alibaba.cloud</groupId> <artifactId>spring-cloud-starter-alibaba-nacos-discovery</artifactId> </dependency> -
在应用的 /src/main/resources/application.properties 配置文件中配置 Nacos Server 地址
spring.cloud.nacos.discovery.server-addr=127.0.0.1:8848 -
使用 @EnableDiscoveryClient 注解开启服务注册与发现功能
 @SpringBootApplication
 @EnableDiscoveryClient
 public class ProviderApplication {

 	public static void main(String[] args) {
 		SpringApplication.run(ProviderApplication.class, args);
 	}

 	@RestController
 	class EchoController {
 		@GetMapping(value = "/echo/{string}")
 		public String echo(@PathVariable String string) {
 				return string;
 		}
 	}
 }
启动 Nacos Server
- 首先需要获取 Nacos Server,支持直接下载和源码构建两种方式。
- 直接下载:Nacos Server 下载页
考虑到下载速度问题,直接上网盘nacos-server-1.1.3.zip win10-64自取
链接:https://pan.baidu.com/s/1CYLEA0pC_Tb4-2qrYyRQxQ
提取码:yyds
解压即使用,bin目录下打开startup.cmd - 源码构建:进入 Nacos Github 项目页面,将代码 git clone 到本地自行编译打包,参考此文档。推荐使用源码构建方式以获取最新版本
- 直接下载:Nacos Server 下载页
- 启动 Server,进入解压后文件夹或编译打包好的文件夹,找到如下相对文件夹 nacos/bin,并对照操作系统实际情况之下如下命令。
- Linux/Unix/Mac 操作系统,执行命令
sh startup.sh -m standalone - Windows 操作系统,执行命令
cmd startup.cmd
- Linux/Unix/Mac 操作系统,执行命令
应用启动
-
增加配置,在 nacos-discovery-provider-example 项目的 /src/main/resources/application.properties 中添加基本配置信息
spring.application.name=service-provider //给微服务起名。很重要,放在注册中心,其他服务是通过服务名称来访问你的。 server.port=18082 //端口。不冲突即可 -
启动应用,支持 IDE 直接启动和编译打包后启动。
- IDE直接启动:找到 nacos-discovery-provider-example 项目的主类
ProviderApplication,执行 main 方法启动应用。 - 打包编译后启动:在 nacos-discovery-provider-example 项目中执行
mvn clean package将工程编译打包,然后执行java -jar nacos-discovery-provider-example.jar启动应用。
- IDE直接启动:找到 nacos-discovery-provider-example 项目的主类
验证
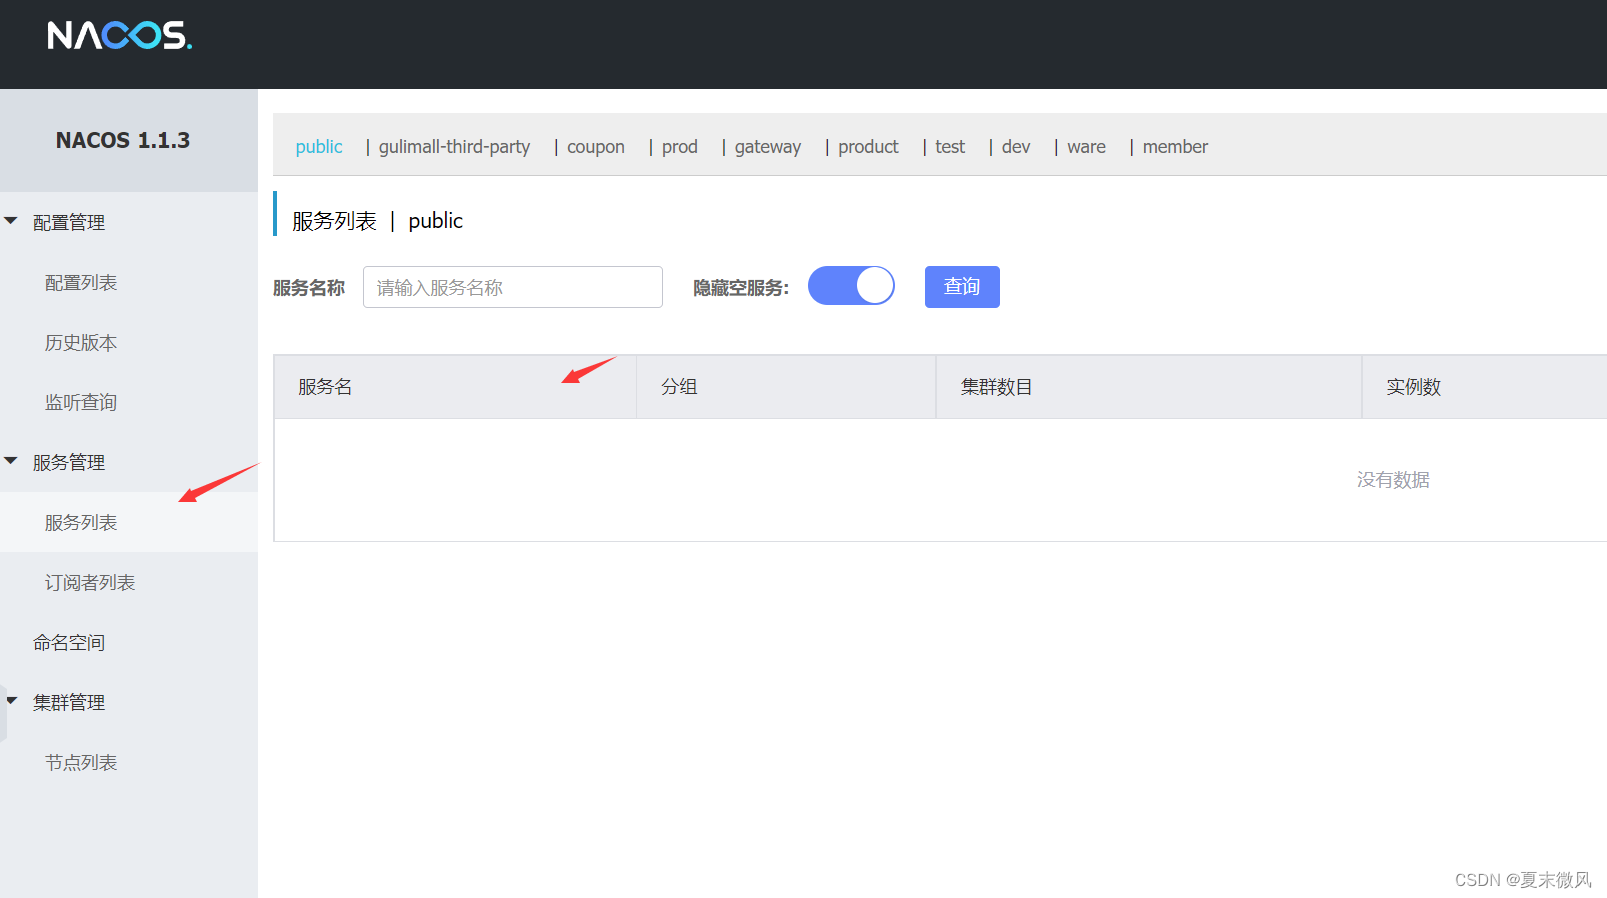
官网验证就不提了,最简单的版本,Nacos启动后,访问http://127.0.0.1:8848/nacos 账号密码都是nacos,nacos

就可以看到注册进来的服务了。当然我这里并不是此演示demo。所以为空。
以上就是基本使用了,如果只是想作为了解和使用,看到这里就可以了。直接跳到下一个目录。
服务发现
集成 Ribbon
为了便于使用,NacosServerList 实现了 com.netflix.loadbalancer.ServerList 接口,并在 @ConditionOnMissingBean 的条件下进行自动注入。如果您有定制化的需求,可以自己实现自己的 ServerList。
Nacos Discovery Starter 默认集成了 Ribbon ,所以对于使用了 Ribbon 做负载均衡的组件,可以直接使用 Nacos 的服务发现。
使用 RestTemplate 和 FeignClient
下面将分析 nacos-discovery-consumer-example 项目的代码,演示如何 RestTemplate 与 FeignClient。
注意 本章节只是为了便于您理解接入方式,本示例代码中已经完成接入工作,您无需再进行修改。此处只涉及Ribbon、RestTemplate、FeignClient相关的内容,如果已经使用了其他服务发现组件,可以通过直接替换依赖来接入 Nacos Discovery。
-
添加 @LoadBlanced 注解,使得 RestTemplate 接入 Ribbon
@Bean @LoadBalanced public RestTemplate restTemplate() { return new RestTemplate(); } -
FeignClient 已经默认集成了 Ribbon ,此处演示如何配置一个 FeignClient。
 @FeignClient(name = "service-provider")
 public interface EchoService {
     @GetMapping(value = "/echo/{str}")
     String echo(@PathVariable("str") String str);
 }
使用 @FeignClient 注解将 EchoService 这个接口包装成一个 FeignClient,属性 name 对应服务名 service-provider。
echo 方法上的 @RequestMapping 注解将 echo 方法与 URL “/echo/{str}” 相对应,@PathVariable 注解将 URL 路径中的
{str}对应成 echo 方法的参数 str。 -
完成以上配置后,将两者自动注入到 TestController 中。
@RestController public class TestController { @Autowired private RestTemplate restTemplate; @Autowired private EchoService echoService; @GetMapping(value = "/echo-rest/{str}") public String rest(@PathVariable String str) { return restTemplate.getForObject("http://service-provider/echo/" + str, String.class); } @GetMapping(value = "/echo-feign/{str}") public String feign(@PathVariable String str) { return echoService.echo(str); } } -
配置必要的配置,在 nacos-discovery-consumer-example 项目的 /src/main/resources/application.properties 中添加基本配置信息
spring.application.name=service-consumer server.port=18083 -
启动应用,支持 IDE 直接启动和编译打包后启动。
- IDE直接启动:找到 nacos-discovery-consumer-example 项目的主类
ConsumerApplication,执行 main 方法启动应用。 - 打包编译后启动:在 nacos-discovery-consumer-example 项目中执行
mvn clean package将工程编译打包,然后执行java -jar nacos-discovery-consumer-example.jar启动应用。
- IDE直接启动:找到 nacos-discovery-consumer-example 项目的主类
验证
- 在浏览器地址栏中输入 http://127.0.0.1:18083/echo-rest/1234,点击跳转,可以看到浏览器显示了 nacos-discovery-provider-example 返回的消息 “hello Nacos Discovery 1234”,证明服务发现生效。
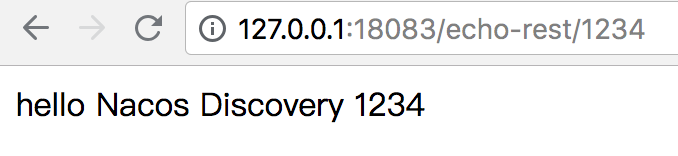
- 在浏览器地址栏中输入 http://127.0.0.1:18083/echo-feign/12345,点击跳转,可以看到浏览器显示 nacos-discovery-provider-example 返回的消息 “hello Nacos Discovery 12345”,证明服务发现生效。

原理
服务注册
Spring Cloud Nacos Discovery 遵循了 spring cloud common 标准,实现了 AutoServiceRegistration、ServiceRegistry、Registration 这三个接口。
在 spring cloud 应用的启动阶段,监听了 WebServerInitializedEvent 事件,当Web容器初始化完成后,即收到 WebServerInitializedEvent 事件后,会触发注册的动作,调用 ServiceRegistry 的 register 方法,将服务注册到 Nacos Server。
服务发现
NacosServerList 实现了 com.netflix.loadbalancer.ServerList 接口,并在 @ConditionOnMissingBean 的条件下进行自动注入,默认集成了Ribbon。
如果需要有更加自定义的可以使用 @Autowired 注入一个 NacosRegistration 实例,通过其持有的 NamingService 字段内容直接调用 Nacos API。
Endpoint 信息查看
Spring Boot 应用支持通过 Endpoint 来暴露相关信息,Nacos Discovery Starter 也支持这一点。
在使用之前需要在 maven 中添加 spring-boot-starter-actuator依赖,并在配置中允许 Endpoints 的访问。
- Spring Boot 1.x 中添加配置 management.security.enabled=false
- Spring Boot 2.x 中添加配置 management.endpoints.web.exposure.include=*
Spring Boot 1.x 可以通过访问 http://127.0.0.1:18083/nacos_discovery 来查看 Nacos Endpoint 的信息。
Spring Boot 2.x 可以通过访问 http://127.0.0.1:18083/actuator/nacos-discovery 来访问。

如上图所示,NacosDiscoveryProperties 则为 Spring Cloud Nacos Discovery 本身的配置,也包括本机注册的内容,subscribe 为本机已订阅的服务信息。
More
更多配置项
| 配置项 | key | 默认值 | 说明 |
|---|---|---|---|
| 服务端地址 | spring.cloud.nacos.discovery.server-addr | ||
| 服务名 | spring.cloud.nacos.discovery.service | spring.application.name | |
| 权重 | spring.cloud.nacos.discovery.weight | 1 | 取值范围 1 到 100,数值越大,权重越大 |
| 网卡名 | spring.cloud.nacos.discovery.network-interface | 当IP未配置时,注册的IP为此网卡所对应的IP地址,如果此项也未配置,则默认取第一块网卡的地址 | |
| 注册的IP地址 | spring.cloud.nacos.discovery.ip | 优先级最高 | |
| 注册的端口 | spring.cloud.nacos.discovery.port | -1 | 默认情况下不用配置,会自动探测 |
| 命名空间 | spring.cloud.nacos.discovery.namespace | 常用场景之一是不同环境的注册的区分隔离,例如开发测试环境和生产环境的资源(如配置、服务)隔离等。 | |
| AccessKey | spring.cloud.nacos.discovery.access-key | ||
| SecretKey | spring.cloud.nacos.discovery.secret-key | ||
| Metadata | spring.cloud.nacos.discovery.metadata | 使用Map格式配置 | |
| 日志文件名 | spring.cloud.nacos.discovery.log-name | ||
| 接入点 | spring.cloud.nacos.discovery.endpoint | UTF-8 | 地域的某个服务的入口域名,通过此域名可以动态地拿到服务端地址 |
| 是否集成Ribbon | ribbon.nacos.enabled | true |
更多介绍
Nacos为用户提供包括动态服务发现,配置管理,服务管理等服务基础设施,帮助用户更灵活,更轻松地构建,交付和管理他们的微服务平台,基于Nacos, 用户可以更快速的构建以“服务”为中心的现代云原生应用。Nacos可以和Spring Cloud、Kubernetes/CNCF、Dubbo 等微服务生态无缝融合,为用户提供更卓越的体验。更多 Nacos 相关的信息,请参考 Nacos 项目。
1.4、配置中心 Nacos Config
本项目演示如何使用 Nacos Config Starter 完成 Spring Cloud 应用的配置管理。
大部分的微服务组件的使用情况都是: 1、引入pom.xml依赖,2、编写配置文件。3、开启注解使用。
示例
如何接入
在启动示例进行演示之前,我们先了解一下 Spring Cloud 应用如何接入 Nacos Config。 注意 本章节只是为了便于您理解接入方式,本示例代码中已经完成接入工作,您无需再进行修改。
-
首先,修改 pom.xml 文件,引入 Nacos Config Starter。
<dependency> <groupId>com.alibaba.cloud</groupId> <artifactId>spring-cloud-starter-alibaba-nacos-config</artifactId> </dependency> -
在应用的 /src/main/resources/bootstrap.properties 配置文件中配置 Nacos Config 元数据
spring.application.name=nacos-config-example spring.cloud.nacos.config.server-addr=127.0.0.1:8848 -
完成上述两步后,应用会从 Nacos Config 中获取相应的配置,并添加在 Spring Environment 的 PropertySources 中。这里我们使用 @Value 注解来将对应的配置注入到 SampleController 的 userName 和 age 字段,并添加 @RefreshScope 打开动态刷新功能
 @RefreshScope
 class SampleController {

 	@Value("${user.name}")
 	String userName;

 	@Value("${user.age}")
 	int age;
 }
上面的注册中心已经下载过nacos了,启动之后,新增一个配置文件
添加的配置的详情如下
 dataId 为 nacos-config-example.properties
 group 为 DEFAULT_GROUP

 内容如下

 user.id=1
 user.name=james
 user.age=17
应用启动
-
增加配置,在应用的 /src/main/resources/application.properties 中添加基本配置信息
server.port=18084 management.endpoints.web.exposure.include=* -
启动应用,支持 IDE 直接启动和编译打包后启动。
- IDE直接启动:找到主类
Application,执行 main 方法启动应用。 - 打包编译后启动:首先执行
mvn clean package将工程编译打包,然后执行java -jar nacos-config-example.jar启动应用。
- IDE直接启动:找到主类
验证
验证自动注入
在浏览器地址栏输入 http://127.0.0.1:18084/user,并点击调转,可以看到成功从 Nacos Config Server 中获取了数据。

验证动态刷新
在刚刚的可视化操作页面修改配置文件
user.age=18
再次访问
- 在浏览器地址栏输入
http://127.0.0.1:18084/user,并点击调转,可以看到应用从 Nacos Server 中获取了最新的数据,age 变成了 18。

以上就是基本使用了,如果只是想作为了解和使用,看到这里就可以了。直接跳到下一个目录。
原理
Nacos Config 数据结构
Nacos Config 主要通过 dataId 和 group 来唯一确定一条配置,我们假定你已经了解此背景。如果不了解,请参考 Nacos 文档。
Nacos Client 从 Nacos Server 端获取数据时,调用的是此接口 ConfigService.getConfig(String dataId, String group, long timeoutMs)。
Spring Cloud 应用获取数据
dataID
在 Nacos Config Starter 中,dataId 的拼接格式如下
${prefix} - ${spring.profiles.active} . ${file-extension}
-
prefix默认为spring.application.name的值,也可以通过配置项spring.cloud.nacos.config.prefix来配置。 -
spring.profiles.active即为当前环境对应的 profile,详情可以参考 Spring Boot文档注意,当 active profile 为空时,对应的连接符
-也将不存在,dataId 的拼接格式变成${prefix}.${file-extension} -
file-extension为配置内容的数据格式,可以通过配置项spring.cloud.nacos.config.file-extension来配置。 目前只支持properties类型。
group
group默认为DEFAULT_GROUP,可以通过spring.cloud.nacos.config.group配置。
自动注入
Nacos Config Starter 实现了 org.springframework.cloud.bootstrap.config.PropertySourceLocator接口,并将优先级设置成了最高。
在 Spring Cloud 应用启动阶段,会主动从 Nacos Server 端获取对应的数据,并将获取到的数据转换成 PropertySource 且注入到 Environment 的 PropertySources 属性中,所以使用 @Value 注解也能直接获取 Nacos Server 端配置的内容。
动态刷新
Nacos Config Starter 默认为所有获取数据成功的 Nacos 的配置项添加了监听功能,在监听到服务端配置发生变化时会实时触发 org.springframework.cloud.context.refresh.ContextRefresher 的 refresh 方法 。
如果需要对 Bean 进行动态刷新,请参照 Spring 和 Spring Cloud 规范。推荐给类添加 @RefreshScope 或 @ConfigurationProperties 注解,
更多详情请参考 ContextRefresher Java Doc。
Endpoint 信息查看
Spring Boot 应用支持通过 Endpoint 来暴露相关信息,Nacos Config Starter 也支持这一点。
在使用之前需要在 maven 中添加 spring-boot-starter-actuator依赖,并在配置中允许 Endpoints 的访问。
- Spring Boot 1.x 中添加配置 management.security.enabled=false
- Spring Boot 2.x 中添加配置 management.endpoints.web.exposure.include=*
Spring Boot 1.x 可以通过访问 http://127.0.0.1:18084/nacos_config 来查看 Nacos Endpoint 的信息。
Spring Boot 2.x 可以通过访问 http://127.0.0.1:18084/actuator/nacosconfig 来访问。

如上图所示,Sources 表示此客户端从哪些 Nacos Config 配置项中获取了信息,RefreshHistory 表示动态刷新的历史记录,最多保存20条,NacosConfigProperties 则为 Nacos Config Starter 本身的配置。
More
更多配置项
| 配置项 | key | 默认值 | 说明 |
|---|---|---|---|
| 服务端地址 | spring.cloud.nacos.config.server-addr | 服务器ip和端口 | |
| DataId前缀 | spring.cloud.nacos.config.prefix | ${spring.application.name} | |
| Group | spring.cloud.nacos.config.group | DEFAULT_GROUP | |
| dataID后缀及内容文件格式 | spring.cloud.nacos.config.file-extension | properties | dataId的后缀,同时也是配置内容的文件格式,目前只支持 properties |
| 配置内容的编码方式 | spring.cloud.nacos.config.encode | UTF-8 | 配置的编码 |
| 获取配置的超时时间 | spring.cloud.nacos.config.timeout | 3000 | 单位为 ms |
| 配置的命名空间 | spring.cloud.nacos.config.namespace | 常用场景之一是不同环境的配置的区分隔离,例如开发测试环境和生产环境的资源隔离等。 | |
| AccessKey | spring.cloud.nacos.config.access-key | ||
| SecretKey | spring.cloud.nacos.config.secret-key | ||
| 相对路径 | spring.cloud.nacos.config.context-path | 服务端 API 的相对路径 | |
| 接入点 | spring.cloud.nacos.config.endpoint | 地域的某个服务的入口域名,通过此域名可以动态地拿到服务端地址 | |
| 是否开启监听和自动刷新 | spring.cloud.nacos.config.refresh-enabled | true | |
| 集群服务名 | spring.cloud.nacos.config.cluster-name |
1.5、远程调用
远程调用,是指进程间的功能调用。进程和进程既可以在于同一台计算机,也可以存在于不同的计算机上。远程并不是指距离上的远程,而是指由于进程和进程之间彼此隔离,跨越进程的边界,才叫远程。
在分布式系统中,各个服务可能处于不同主机,但是服务之间不可避免的需要互相调用,我们称之为远程调用
1.6、Fegin
OpenFeign 是 Spring Cloud 家族的一个成员, 它最核心的作用是为 HTTP 形式的 Rest API 提供了非常简洁高效的 RPC 调用方式
简单使用
使用前提:都注册到了注册中心里去。
简单来说,各个微服务之间调用就是通过OpenFeign组件。
这里只介绍简单使用,想要了解更清楚的可以去看看源码。
第一步、引入依赖 (要和spring cloud 版本对应)
<dependency>
            <groupId>org.springframework.cloud</groupId>
            <artifactId>spring-cloud-starter-openfeign</artifactId>
</dependency>
第二步、使用注解开启feign功能。@EnableFeignClients 开启feign远程调用功能
@EnableFeignClients("com.atguigu.gulimall.product.feign") //参数表示扫描的包路径
@SpringBootApplication
@EnableDiscoveryClient
@MapperScan("com.atguigu.gulimall.product.dao")
public class GulimallProductApplication {

    public static void main(String[] args) {
        SpringApplication.run(GulimallProductApplication.class, args);
    }

}
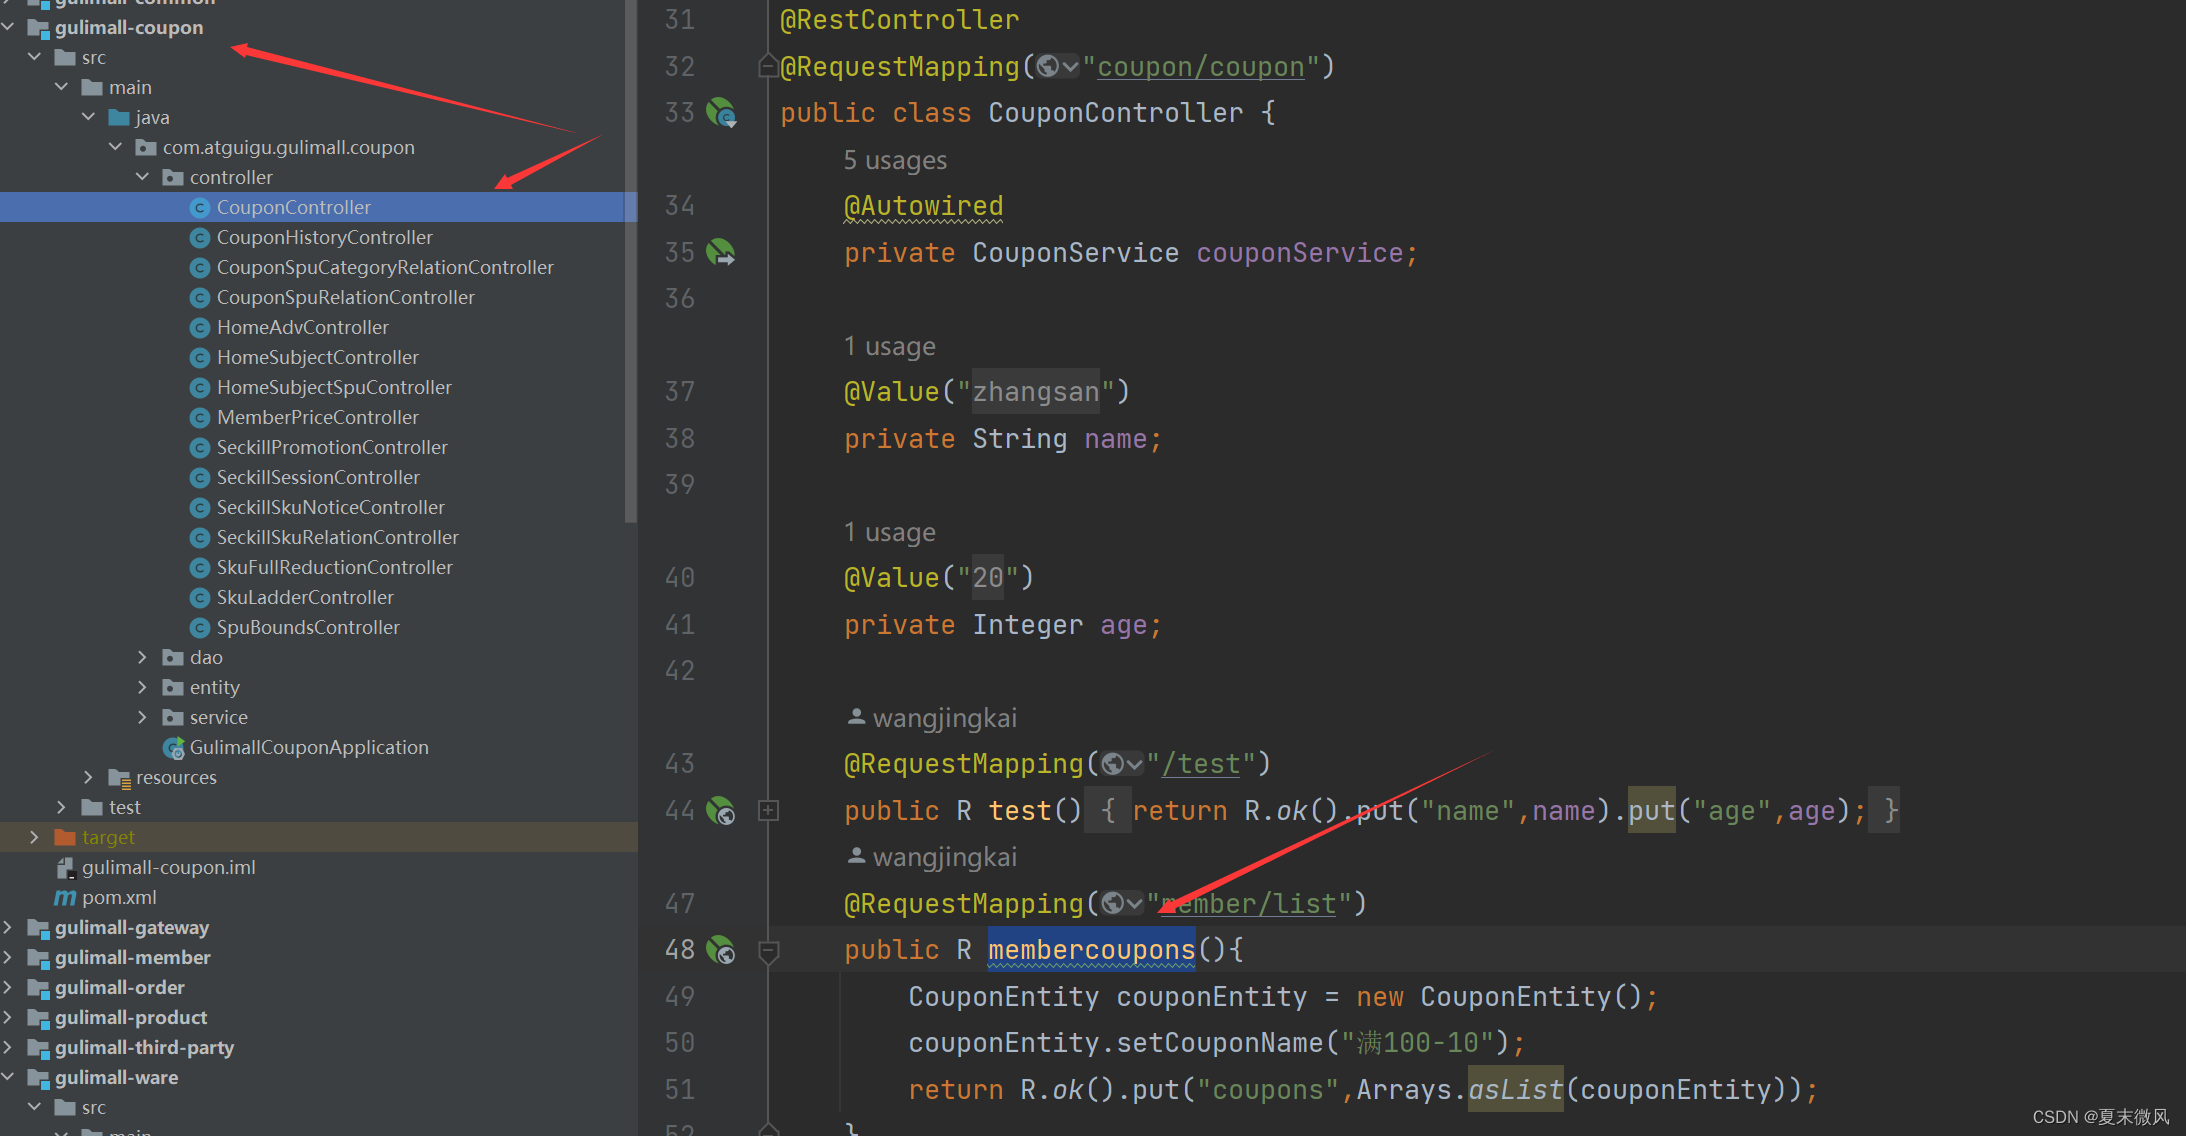
第三步、声明你要远程调用的接口。 @FeignClient 声明这是一个远程调用接口
//即通过名称在注册中心找到该服务,调用该服务的方法saveSkuReduction,发送请求,url路径coupon/coupon/member/list")
//因为这个大部分和所需要调用的接口一致,所以很多时候只需要去对应的微服务复制该接口的方法过来即可。
@FeignClient("gulimall-coupon") //参数表示要调用的微服务在注册中心的名称
public interface CouponFeignService {
//@RequestMapping注解的method属性通过请求的请求方式(get或post)匹配请求映射
//若当前不设置method,则表示不以method为匹配条件,也就是说所有请求方式都能请求成功
    @RequestMapping("coupon/coupon/member/list")
    public R membercoupons();

}
实际就是调用了gulimall-coupon下membercoupons()这个方法。
关于Feign的简单使用到这里即可。
1.7、网关 Spring Cloud Gateway
官网介绍:
This project provides an API Gateway built on top of the Spring Ecosystem, including: Spring 5, Spring Boot 2 and Project Reactor. Spring Cloud Gateway aims to provide a simple, yet effective way to route to APIs and provide cross cutting concerns to them such as: security, monitoring/metrics, and resiliency.
本项目提供了一个构建在 Spring 生态之上的 API Gateway,包括:Spring 5、Spring Boot 2 和 Project Reactor。Spring Cloud Gateway 旨在提供一种简单而有效的方式来路由到 API,并为它们提供横切关注点,例如:安全性、监控/指标和弹性。
简单来说
Spring Cloud GateWay组件的核心是一系列的过滤器,通过这些过滤器可以将客户端发送的请求转发(路由)到对应的微服务。
Spring Cloud GateWay 是加在整个微服务最前沿的防火墙和代理器,隐藏微服务结点IP端口信息,从而加强安全保护。
Spring Cloud GateWay本身也是一个微服务,需要注册到Eureka/Nacos 等服务注册中心。
网关的核心功能是**:过滤和路由**
2.Glossary
-
Route: The basic building block of the gateway. It is defined by an ID, a destination URI, a collection of predicates, and a collection of filters. A route is matched if the aggregate predicate is true.
路由(route):由ID、目标URI、断言集合和过滤器集合组成。如果聚合断言结果为真,则转发到该路由。
-
Predicate: This is a Java 8 Function Predicate. The input type is a Spring Framework
ServerWebExchange. This lets you match on anything from the HTTP request, such as headers or parameters.参照 Java8 的新特性Predicate,允许开发人员匹配 HTTP 请求中的任何内容,比如请求头或请求参数,最后根据匹配结果返回一个布尔值。
-
Filter: These are instances of
GatewayFilterthat have been constructed with a specific factory. Here, you can modify requests and responses before or after sending the downstream request.
这些是使用特定工厂构建的实例。在这里,您可以在发送下游请求之前或之后修改请求和响应。
下图提供了 Spring Cloud Gateway 如何工作的高级概述:
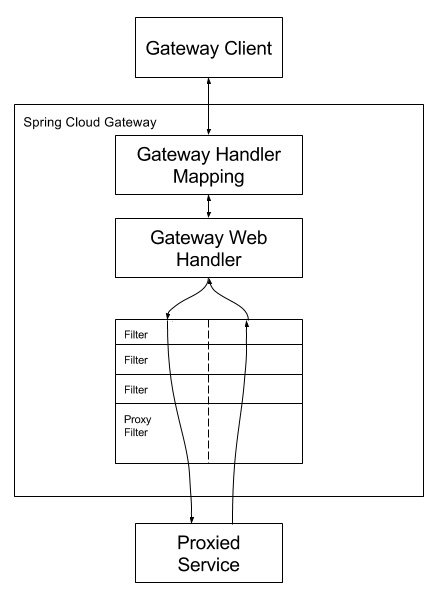
客户端向Spring Cloud Gateway发出请求。如果Gateway Handler Mapping确定请求与路由匹配,则将其发送到Gateway Web
Handler。此handler通过特定于该请求的过滤器链处理请求。图中filters被虚线划分的原因是filters可以在发送代理请求之前或之后执行逻辑。先执行所有“pre filter”逻辑,然后进行请求代理。在请求代理执行完后,执行“post filter”逻辑。
了解到这里就可以了,后面使用的时候再看文档,可不提倡死记硬背哦~ 可以跳往 二、基础开发了;
4.Configuring Route Predicate Factories and Gateway Filter Factories
配置路由谓词工厂和网关过滤工厂
There are two ways to configure predicates and filters: shortcuts and fully expanded arguments. Most examples below use the shortcut way.
有两种配置谓词和过滤器的方法:快捷方式和完全扩展的参数。下面的大多数示例都使用快捷方式。
The name and argument names will be listed as code in the first sentance or two of the each section. The arguments are typically listed in the order that would be needed for the shortcut configuration.
名称和参数名称将code在每个部分的第一句或第二句中列出。参数通常按快捷方式配置所需的顺序列出。
快捷方式配置
Shortcut configuration is recognized by the filter name, followed by an equals sign (=), followed by argument values separated by commas (,).
快捷方式配置由过滤器名称识别,后跟等号 ( =),后跟以逗号 ( ,) 分隔的参数值。
application.yml
spring:
  cloud:
    gateway:
      routes:
      - id: after_route
        uri: https://example.org
        predicates:
        - Cookie=mycookie,mycookievalue
Cookie使用两个参数定义了路由谓词工厂,cookie 名称mycookie和要匹配的值mycookievalue。
完全拓展参数配置
spring:
  cloud:
    gateway:
      routes:
      - id: after_route
        uri: https://example.org
        predicates:
        - name: Cookie
          args:
            name: mycookie
            regexp: mycookievalue
Fully expanded arguments appear more like standard yaml configuration with name/value pairs. Typically, there will be a name key and an args key. The args key is a map of key value pairs to configure the predicate or filter.
完全扩展的参数看起来更像是带有名称/值对的标准 yaml 配置。通常,会有一把name钥匙和一把args钥匙。键是用于配置谓词或过滤器的args键值对映射。
5.Route Predicate Factories
Spring Cloud Gateway matches routes as part of the Spring WebFlux HandlerMapping infrastructure. Spring Cloud Gateway includes many built-in route predicate factories. All of these predicates match on different attributes of the HTTP request. You can combine multiple route predicate factories with logical and statements.
Spring Cloud Gateway 将路由匹配为 Spring WebFluxHandlerMapping基础架构的一部分。Spring Cloud Gateway 包含许多内置的路由谓词工厂。所有这些谓词都匹配 HTTP 请求的不同属性。您可以将多个路由谓词工厂与逻辑and语句结合起来。
5.1. The After Route Predicate Factory
The After route predicate factory takes one parameter, a datetime (which is a java ZonedDateTime). This predicate matches requests that happen after the specified datetime. The following example configures an after route predicate:
After路由谓词工厂采用一个参数 a (datetime它是一个 java ZonedDateTime)。此谓词匹配在指定日期时间之后发生的请求。以下示例配置了一个 after 路由谓词:
Example 1. application.yml
spring:
  cloud:
    gateway:
      routes:
      - id: after_route
        uri: https://example.org
        predicates:
        - After=2017-01-20T17:42:47.789-07:00[America/Denver]
This route matches any request made after Jan 20, 2017 17:42 Mountain Time (Denver).
此路线匹配 2017 年 1 月 20 日 17:42 Mountain Time(丹佛)之后提出的任何请求。
5.2. The Before Route Predicate Factory
The Before route predicate factory takes one parameter, a datetime (which is a java ZonedDateTime). This predicate matches requests that happen before the specified datetime. The following example configures a before route predicate:
Before路由谓词工厂采用一个参数 a (datetime它是一个 java ZonedDateTime)。此谓词匹配在指定的 之前发生的请求datetime。以下示例配置了一个 before 路由谓词:
Example 2. application.yml
spring:
  cloud:
    gateway:
      routes:
      - id: before_route
        uri: https://example.org
        predicates:
        - Before=2017-01-20T17:42:47.789-07:00[America/Denver]
This route matches any request made before Jan 20, 2017 17:42 Mountain Time (Denver).
此路线与 2017 年 1 月 20 日 17:42 Mountain Time (Denver) 之前提出的任何请求相匹配。
5.3. The Between Route Predicate Factory
The Between route predicate factory takes two parameters, datetime1 and datetime2 which are java ZonedDateTime objects. This predicate matches requests that happen after datetime1 and before datetime2. The datetime2 parameter must be after datetime1. The following example configures a between route predicate:
Example 3. application.yml
spring:
  cloud:
    gateway:
      routes:
      - id: between_route
        uri: https://example.org
        predicates:
        - Between=2017-01-20T17:42:47.789-07:00[America/Denver], 2017-01-21T17:42:47.789-07:00[America/Denver]
This route matches any request made after Jan 20, 2017 17:42 Mountain Time (Denver) and before Jan 21, 2017 17:42 Mountain Time (Denver). This could be useful for maintenance windows.
此路线匹配 2017 年 1 月 20 日 17:42 山区时间(丹佛)和 2017 年 1 月 21 日 17:42 山区时间(丹佛)之前提出的任何请求。这对于维护窗口可能很有用。
5.4. The Cookie Route Predicate Factory
The Cookie route predicate factory takes two parameters, the cookie name and a regexp (which is a Java regular expression). This predicate matches cookies that have the given name and whose values match the regular expression. The following example configures a cookie route predicate factory:
Cookie路由谓词工厂有两个参数,cookie和namea regexp(这是一个 Java 正则表达式)。此谓词匹配具有给定名称且其值与正则表达式匹配的 cookie。以下示例配置 cookie 路由谓词工厂:
Example 4. application.yml
spring:
  cloud:
    gateway:
      routes:
      - id: cookie_route
        uri: https://example.org
        predicates:
        - Cookie=chocolate, ch.p
This route matches requests that have a cookie named chocolate whose value matches the ch.p regular expression.
此路由匹配具有名为chocolate其值与ch.p正则表达式匹配的 cookie 的请求。
5.5. The Header Route Predicate Factory
The Header route predicate factory takes two parameters, the header name and a regexp (which is a Java regular expression). This predicate matches with a header that has the given name whose value matches the regular expression. The following example configures a header route predicate:
Header路由谓词工厂有两个参数,header和namea regexp(它是一个 Java 正则表达式)。此谓词与具有给定名称且值与正则表达式匹配的标头匹配。以下示例配置了一个标头路由谓词:
Example 5. application.yml
spring:
  cloud:
    gateway:
      routes:
      - id: header_route
        uri: https://example.org
        predicates:
        - Header=X-Request-Id, \d+
This route matches if the request has a header named X-Request-Id whose value matches the \d+ regular expression (that is, it has a value of one or more digits).
如果请求具有一个名为X-Request-Id其值与\d+正则表达式匹配的标头(即,它具有一个或多个数字的值),则此路由匹配。
5.6. The Host Route Predicate Factory
The Host route predicate factory takes one parameter: a list of host name patterns. The pattern is an Ant-style pattern with . as the separator. This predicates matches the Host header that matches the pattern. The following example configures a host route predicate:
路由谓词工厂采用Host一个参数:主机名列表patterns。该模式是一种 Ant 风格的模式,.以分隔符为分隔符。此谓词匹配Host与模式匹配的标头。以下示例配置主机路由谓词:
Example 6. application.yml
spring:
  cloud:
    gateway:
      routes:
      - id: host_route
        uri: https://example.org
        predicates:
        - Host=**.somehost.org,**.anotherhost.org
URI template variables (such as {sub}.myhost.org) are supported as well.
This route matches if the request has a Host header with a value of www.somehost.org or beta.somehost.org or www.anotherhost.org.
This predicate extracts the URI template variables (such as sub, defined in the preceding example) as a map of names and values and places it in the ServerWebExchange.getAttributes() with a key defined in ServerWebExchangeUtils.URI_TEMPLATE_VARIABLES_ATTRIBUTE. Those values are then available for use by GatewayFilter factories
还支持URI 模板变量(例如{sub}.myhost.org)。
如果请求具有Host值为www.somehost.org或beta.somehost.org或www.anotherhost.org的标头,则此路由匹配。
此谓词将 URI 模板变量(例如sub,在前面的示例中定义)提取为名称和值的映射,并将其放置在 中,ServerWebExchange.getAttributes()其中的键定义为ServerWebExchangeUtils.URI_TEMPLATE_VARIABLES_ATTRIBUTE。然后这些值可供GatewayFilter工厂使用
5.7. The Method Route Predicate Factory
The Method Route Predicate Factory takes a methods argument which is one or more parameters: the HTTP methods to match. The following example configures a method route predicate:
MethodRoute Predicate Factory 接受一个参数,该methods参数是一个或多个参数:要匹配的 HTTP 方法。以下示例配置方法路由谓词:
Example 7. application.yml
spring:
  cloud:
    gateway:
      routes:
      - id: method_route
        uri: https://example.org
        predicates:
        - Method=GET,POST
This route matches if the request method was a GET or a POST.
5.8. The Path Route Predicate Factory
The Path Route Predicate Factory takes two parameters: a list of Spring PathMatcher patterns and an optional flag called matchOptionalTrailingSeparator. The following example configures a path route predicate:
PathRoute Predicate Factory 有两个参数:一个 Spring 列表和一个名为的PathMatcher patterns和可选标志matchOptionalTrailingSeparator。以下示例配置路径路由谓词:
Example 8. application.yml
spring:
  cloud:
    gateway:
      routes:
      - id: path_route
        uri: https://example.org
        predicates:
        - Path=/red/{segment},/blue/{segment}
This route matches if the request path was, for example: /red/1 or /red/blue or /blue/green.
如果请求路径是、例如:/red/1或/red/blue或/blue/green。则此路由匹配
This predicate extracts the URI template variables (such as segment, defined in the preceding example) as a map of names and values and places it in the ServerWebExchange.getAttributes() with a key defined in ServerWebExchangeUtils.URI_TEMPLATE_VARIABLES_ATTRIBUTE. Those values are then available for use by GatewayFilter factories
A utility method (called get) is available to make access to these variables easier. The following example shows how to use the get method:
此谓词将 URI 模板变量(例如segment,在前面的示例中定义)提取为名称和值的映射,并将其放置在 中,ServerWebExchange.getAttributes()其中的键定义为ServerWebExchangeUtils.URI_TEMPLATE_VARIABLES_ATTRIBUTE。然后这些值可供GatewayFilter工厂使用
可以使用一种实用方法(称为get)来更轻松地访问这些变量。以下示例显示了如何使用该get方法:
Map<String, String> uriVariables = ServerWebExchangeUtils.getPathPredicateVariables(exchange);

String segment = uriVariables.get("segment");
5.9. The Query Route Predicate Factory
The Query route predicate factory takes two parameters: a required param and an optional regexp (which is a Java regular expression). The following example configures a query route predicate:
Query路由谓词工厂有两个参数:一个必需的param和一个可选的regexp(它是一个 Java 正则表达式)。以下示例配置查询路由谓词:
Example 9. application.yml
spring:
  cloud:
    gateway:
      routes:
      - id: query_route
        uri: https://example.org
        predicates:
        - Query=green
The preceding route matches if the request contained a green query parameter.
如果请求包含green查询参数,则前面的路由匹配。
application.yml
spring:
  cloud:
    gateway:
      routes:
      - id: query_route
        uri: https://example.org
        predicates:
        - Query=red, gree.
The preceding route matches if the request contained a red query parameter whose value matched the gree. regexp, so green and greet would match.
如果请求包含red其值与正则gree.表达式匹配的查询参数,则前面的路由匹配,因此green并且greet会匹配。
5.10. The RemoteAddr Route Predicate Factory
The RemoteAddr route predicate factory takes a list (min size 1) of sources, which are CIDR-notation (IPv4 or IPv6) strings, such as 192.168.0.1/16 (where 192.168.0.1 is an IP address and 16 is a subnet mask). The following example configures a RemoteAddr route predicate:
路由谓词工厂采用的RemoteAddr列表(最小大小为 1)sources,它们是 CIDR 表示法(IPv4 或 IPv6)字符串,例如192.168.0.1/16(其中192.168.0.1是 IP 地址和16子网掩码)。以下示例配置 RemoteAddr 路由谓词:
Example 10. application.yml
spring:
  cloud:
    gateway:
      routes:
      - id: remoteaddr_route
        uri: https://example.org
        predicates:
        - RemoteAddr=192.168.1.1/24
This route matches if the remote address of the request was, for example, 192.168.1.10.
例如,如果请求的远程地址是 ,则此路由匹配192.168.1.10。
5.11. The Weight Route Predicate Factory
The Weight route predicate factory takes two arguments: group and weight (an int). The weights are calculated per group. The following example configures a weight route predicate:
Weight路由谓词工厂有两个参数:和group(weight一个 int)。权重是按组计算的。以下示例配置权重路由谓词:
Example 11. application.yml
spring:
  cloud:
    gateway:
      routes:
      - id: weight_high
        uri: https://weighthigh.org
        predicates:
        - Weight=group1, 8
      - id: weight_low
        uri: https://weightlow.org
        predicates:
        - Weight=group1, 2
This route would forward ~80% of traffic to weighthigh.org and ~20% of traffic to weighlow.org
该路由会将约 80% 的流量转发到weighthigh.org,将约 20% 的流量转发到weightlow.org
5.11.1. Modifying the Way Remote Addresses Are Resolved
By default, the RemoteAddr route predicate factory uses the remote address from the incoming request. This may not match the actual client IP address if Spring Cloud Gateway sits behind a proxy layer.
You can customize the way that the remote address is resolved by setting a custom RemoteAddressResolver. Spring Cloud Gateway comes with one non-default remote address resolver that is based off of the X-Forwarded-For header, XForwardedRemoteAddressResolver.
XForwardedRemoteAddressResolver has two static constructor methods, which take different approaches to security:
XForwardedRemoteAddressResolver::trustAllreturns aRemoteAddressResolverthat always takes the first IP address found in theX-Forwarded-Forheader. This approach is vulnerable to spoofing, as a malicious client could set an initial value for theX-Forwarded-For, which would be accepted by the resolver.XForwardedRemoteAddressResolver::maxTrustedIndextakes an index that correlates to the number of trusted infrastructure running in front of Spring Cloud Gateway. If Spring Cloud Gateway is, for example only accessible through HAProxy, then a value of 1 should be used. If two hops of trusted infrastructure are required before Spring Cloud Gateway is accessible, then a value of 2 should be used.
默认情况下,RemoteAddr 路由谓词工厂使用来自传入请求的远程地址。如果 Spring Cloud Gateway 位于代理层后面,这可能与实际客户端 IP 地址不匹配。
您可以通过设置自定义来自定义解析远程地址的方式RemoteAddressResolver。Spring Cloud Gateway 带有一个基于X-Forwarded-For 标头的非默认远程地址解析器,XForwardedRemoteAddressResolver.
XForwardedRemoteAddressResolver有两个静态构造方法,它们采用不同的安全方法:
XForwardedRemoteAddressResolver::trustAll返回RemoteAddressResolver始终采用在X-Forwarded-For标头中找到的第一个 IP 地址的 a。这种方法容易受到欺骗,因为恶意客户端可以为 设置初始值,X-Forwarded-For解析器会接受该值。XForwardedRemoteAddressResolver::maxTrustedIndex采用与 Spring Cloud Gateway 前运行的受信任基础架构数量相关的索引。例如,如果 Spring Cloud Gateway 只能通过 HAProxy 访问,则应使用值 1。如果在访问 Spring Cloud Gateway 之前需要两跳可信基础架构,则应使用值 2。
Consider the following header value:
X-Forwarded-For: 0.0.0.1, 0.0.0.2, 0.0.0.3
The following maxTrustedIndex values yield the following remote addresses:
maxTrustedIndex | result |
|---|---|
[Integer.MIN_VALUE,0] | (invalid, IllegalArgumentException during initialization) |
| 1 | 0.0.0.3 |
| 2 | 0.0.0.2 |
| 3 | 0.0.0.1 |
[4, Integer.MAX_VALUE] | 0.0.0.1 |
The following example shows how to achieve the same configuration with Java:
Example 12. GatewayConfig.java
RemoteAddressResolver resolver = XForwardedRemoteAddressResolver
    .maxTrustedIndex(1);

...

.route("direct-route",
    r -> r.remoteAddr("10.1.1.1", "10.10.1.1/24")
        .uri("https://downstream1")
.route("proxied-route",
    r -> r.remoteAddr(resolver, "10.10.1.1", "10.10.1.1/24")
        .uri("https://downstream2")
)
6. GatewayFilter Factories
Route filters allow the modification of the incoming HTTP request or outgoing HTTP response in some manner. Route filters are scoped to a particular route. Spring Cloud Gateway includes many built-in GatewayFilter Factories.
路由过滤器允许以某种方式修改传入的 HTTP 请求或传出的 HTTP 响应。路由过滤器的范围是特定的路由。Spring Cloud Gateway 包含许多内置的 GatewayFilter 工厂。
6.1. The AddRequestHeader GatewayFilter Factory
The AddRequestHeader GatewayFilter factory takes a name and value parameter. The following example configures an AddRequestHeader GatewayFilter:
Example 13. application.yml
spring:
  cloud:
    gateway:
      routes:
      - id: add_request_header_route
        uri: https://example.org
        filters:
        - AddRequestHeader=X-Request-red, blue
This listing adds X-Request-red:blue header to the downstream request’s headers for all matching requests.
AddRequestHeader is aware of the URI variables used to match a path or host. URI variables may be used in the value and are expanded at runtime. The following example configures an AddRequestHeader GatewayFilter that uses a variable:
Example 14. application.yml
spring:
  cloud:
    gateway:
      routes:
      - id: add_request_header_route
        uri: https://example.org
        predicates:
        - Path=/red/{segment}
        filters:
        - AddRequestHeader=X-Request-Red, Blue-{segment}
6.2. The AddRequestParameter GatewayFilter Factory
The AddRequestParameter GatewayFilter Factory takes a name and value parameter. The following example configures an AddRequestParameter GatewayFilter:
Example 15. application.yml
spring:
  cloud:
    gateway:
      routes:
      - id: add_request_parameter_route
        uri: https://example.org
        filters:
        - AddRequestParameter=red, blue
This will add red=blue to the downstream request’s query string for all matching requests.
AddRequestParameter is aware of the URI variables used to match a path or host. URI variables may be used in the value and are expanded at runtime. The following example configures an AddRequestParameter GatewayFilter that uses a variable:
Example 16. application.yml
spring:
  cloud:
    gateway:
      routes:
      - id: add_request_parameter_route
        uri: https://example.org
        predicates:
        - Host: {segment}.myhost.org
        filters:
        - AddRequestParameter=foo, bar-{segment}
6.3. The AddResponseHeader GatewayFilter Factory
The AddResponseHeader GatewayFilter Factory takes a name and value parameter. The following example configures an AddResponseHeader GatewayFilter:
Example 17. application.yml
spring:
  cloud:
    gateway:
      routes:
      - id: add_response_header_route
        uri: https://example.org
        filters:
        - AddResponseHeader=X-Response-Red, Blue
This adds X-Response-Foo:Bar header to the downstream response’s headers for all matching requests.
AddResponseHeader is aware of URI variables used to match a path or host. URI variables may be used in the value and are expanded at runtime. The following example configures an AddResponseHeader GatewayFilter that uses a variable:
Example 18. application.yml
spring:
  cloud:
    gateway:
      routes:
      - id: add_response_header_route
        uri: https://example.org
        predicates:
        - Host: {segment}.myhost.org
        filters:
        - AddResponseHeader=foo, bar-{segment}
6.4. The DedupeResponseHeader GatewayFilter Factory
The DedupeResponseHeader GatewayFilter factory takes a name parameter and an optional strategy parameter. name can contain a space-separated list of header names. The following example configures a DedupeResponseHeader GatewayFilter:
Example 19. application.yml
spring:
  cloud:
    gateway:
      routes:
      - id: dedupe_response_header_route
        uri: https://example.org
        filters:
        - DedupeResponseHeader=Access-Control-Allow-Credentials Access-Control-Allow-Origin
This removes duplicate values of Access-Control-Allow-Credentials and Access-Control-Allow-Origin response headers in cases when both the gateway CORS logic and the downstream logic add them.
The DedupeResponseHeader filter also accepts an optional strategy parameter. The accepted values are RETAIN_FIRST (default), RETAIN_LAST, and RETAIN_UNIQUE.
6.5. The Hystrix GatewayFilter Factory
| Netflix has put Hystrix in maintenance mode. We suggest you use the Spring Cloud CircuitBreaker Gateway Filter with Resilience4J, as support for Hystrix will be removed in a future release. | |
|---|---|
Hystrix is a library from Netflix that implements the circuit breaker pattern. The Hystrix GatewayFilter lets you introduce circuit breakers to your gateway routes, protecting your services from cascading failures and letting you provide fallback responses in the event of downstream failures.
To enable Hystrix GatewayFilter instances in your project, add a dependency on spring-cloud-starter-netflix-hystrix from Spring Cloud Netflix.
The Hystrix GatewayFilter factory requires a single name parameter, which is the name of the HystrixCommand. The following example configures a Hystrix GatewayFilter:
Example 20. application.yml
spring:
  cloud:
    gateway:
      routes:
      - id: hystrix_route
        uri: https://example.org
        filters:
        - Hystrix=myCommandName
This wraps the remaining filters in a HystrixCommand with a command name of myCommandName.
The Hystrix filter can also accept an optional fallbackUri parameter. Currently, only forward: schemed URIs are supported. If the fallback is called, the request is forwarded to the controller matched by the URI. The following example configures such a fallback:
Example 21. application.yml
spring:
  cloud:
    gateway:
      routes:
      - id: hystrix_route
        uri: lb://backing-service:8088
        predicates:
        - Path=/consumingserviceendpoint
        filters:
        - name: Hystrix
          args:
            name: fallbackcmd
            fallbackUri: forward:/incaseoffailureusethis
        - RewritePath=/consumingserviceendpoint, /backingserviceendpoint
This will forward to the /incaseoffailureusethis URI when the Hystrix fallback is called. Note that this example also demonstrates (optional) Spring Cloud Netflix Ribbon load-balancing (defined the lb prefix on the destination URI).
The primary scenario is to use the fallbackUri to an internal controller or handler within the gateway app. However, you can also reroute the request to a controller or handler in an external application, as follows:
Example 22. application.yml
spring:
  cloud:
    gateway:
      routes:
      - id: ingredients
        uri: lb://ingredients
        predicates:
        - Path=//ingredients/**
        filters:
        - name: Hystrix
          args:
            name: fetchIngredients
            fallbackUri: forward:/fallback
      - id: ingredients-fallback
        uri: http://localhost:9994
        predicates:
        - Path=/fallback
In this example, there is no fallback endpoint or handler in the gateway application. However, there is one in another application, registered under localhost:9994.
In case of the request being forwarded to the fallback, the Hystrix Gateway filter also provides the Throwable that has caused it. It is added to the ServerWebExchange as the ServerWebExchangeUtils.HYSTRIX_EXECUTION_EXCEPTION_ATTR attribute, which you can use when handling the fallback within the gateway application.
For the external controller/handler scenario, you can add headers with exception details. You can find more information on doing so in the FallbackHeaders GatewayFilter Factory section.
You can configured Hystrix settings (such as timeouts) with global defaults or on a route-by-route basis by using application properties, as explained on the Hystrix wiki.
To set a five-second timeout for the example route shown earlier, you could use the following configuration:
Example 23. application.yml
hystrix.command.fallbackcmd.execution.isolation.thread.timeoutInMilliseconds: 5000
6.6. Spring Cloud CircuitBreaker GatewayFilter Factory
The Spring Cloud CircuitBreaker GatewayFilter factory uses the Spring Cloud CircuitBreaker APIs to wrap Gateway routes in a circuit breaker. Spring Cloud CircuitBreaker supports two libraries that can be used with Spring Cloud Gateway, Hystrix and Resilience4J. Since Netflix has placed Hystrix in maintenance-only mode, we suggest that you use Resilience4J.
To enable the Spring Cloud CircuitBreaker filter, you need to place either spring-cloud-starter-circuitbreaker-reactor-resilience4j or spring-cloud-starter-netflix-hystrix on the classpath. The following example configures a Spring Cloud CircuitBreaker GatewayFilter:
Example 24. application.yml
spring:
  cloud:
    gateway:
      routes:
      - id: circuitbreaker_route
        uri: https://example.org
        filters:
        - CircuitBreaker=myCircuitBreaker
To configure the circuit breaker, see the configuration for the underlying circuit breaker implementation you are using.
The Spring Cloud CircuitBreaker filter can also accept an optional fallbackUri parameter. Currently, only forward: schemed URIs are supported. If the fallback is called, the request is forwarded to the controller matched by the URI. The following example configures such a fallback:
Example 25. application.yml
spring:
  cloud:
    gateway:
      routes:
      - id: circuitbreaker_route
        uri: lb://backing-service:8088
        predicates:
        - Path=/consumingServiceEndpoint
        filters:
        - name: CircuitBreaker
          args:
            name: myCircuitBreaker
            fallbackUri: forward:/inCaseOfFailureUseThis
        - RewritePath=/consumingServiceEndpoint, /backingServiceEndpoint
The following listing does the same thing in Java:
Example 26. Application.java
@Bean
public RouteLocator routes(RouteLocatorBuilder builder) {
    return builder.routes()
        .route("circuitbreaker_route", r -> r.path("/consumingServiceEndpoint")
            .filters(f -> f.circuitBreaker(c -> c.name("myCircuitBreaker").fallbackUri("forward:/inCaseOfFailureUseThis"))
                .rewritePath("/consumingServiceEndpoint", "/backingServiceEndpoint")).uri("lb://backing-service:8088")
        .build();
}
This example forwards to the /inCaseofFailureUseThis URI when the circuit breaker fallback is called. Note that this example also demonstrates the (optional) Spring Cloud Netflix Ribbon load-balancing (defined by the lb prefix on the destination URI).
The primary scenario is to use the fallbackUri to define an internal controller or handler within the gateway application. However, you can also reroute the request to a controller or handler in an external application, as follows:
Example 27. application.yml
spring:
  cloud:
    gateway:
      routes:
      - id: ingredients
        uri: lb://ingredients
        predicates:
        - Path=//ingredients/**
        filters:
        - name: CircuitBreaker
          args:
            name: fetchIngredients
            fallbackUri: forward:/fallback
      - id: ingredients-fallback
        uri: http://localhost:9994
        predicates:
        - Path=/fallback
In this example, there is no fallback endpoint or handler in the gateway application. However, there is one in another application, registered under localhost:9994.
In case of the request being forwarded to fallback, the Spring Cloud CircuitBreaker Gateway filter also provides the Throwable that has caused it. It is added to the ServerWebExchange as the ServerWebExchangeUtils.CIRCUITBREAKER_EXECUTION_EXCEPTION_ATTR attribute that can be used when handling the fallback within the gateway application.
For the external controller/handler scenario, headers can be added with exception details. You can find more information on doing so in the FallbackHeaders GatewayFilter Factory section.
6.6.1. Tripping The Circuit Breaker On Status Codes
In some cases you might want to trip a circuit breaker based on the status code returned from the route it wraps. The circuit breaker config object takes a list of status codes that if returned will cause the the circuit breaker to be tripped. When setting the status codes you want to trip the circuit breaker you can either use a integer with the status code value or the String representation of the HttpStatus enumeration.
Example 28. application.yml
spring:
  cloud:
    gateway:
      routes:
      - id: circuitbreaker_route
        uri: lb://backing-service:8088
        predicates:
        - Path=/consumingServiceEndpoint
        filters:
        - name: CircuitBreaker
          args:
            name: myCircuitBreaker
            fallbackUri: forward:/inCaseOfFailureUseThis
            statusCodes:
              - 500
              - "NOT_FOUND"
Example 29. Application.java
@Bean
public RouteLocator routes(RouteLocatorBuilder builder) {
    return builder.routes()
        .route("circuitbreaker_route", r -> r.path("/consumingServiceEndpoint")
            .filters(f -> f.circuitBreaker(c -> c.name("myCircuitBreaker").fallbackUri("forward:/inCaseOfFailureUseThis").addStatusCode("INTERNAL_SERVER_ERROR"))
                .rewritePath("/consumingServiceEndpoint", "/backingServiceEndpoint")).uri("lb://backing-service:8088")
        .build();
}
6.7. The FallbackHeaders GatewayFilter Factory
The FallbackHeaders factory lets you add Hystrix or Spring Cloud CircuitBreaker execution exception details in the headers of a request forwarded to a fallbackUri in an external application, as in the following scenario:
Example 30. application.yml
spring:
  cloud:
    gateway:
      routes:
      - id: ingredients
        uri: lb://ingredients
        predicates:
        - Path=//ingredients/**
        filters:
        - name: CircuitBreaker
          args:
            name: fetchIngredients
            fallbackUri: forward:/fallback
      - id: ingredients-fallback
        uri: http://localhost:9994
        predicates:
        - Path=/fallback
        filters:
        - name: FallbackHeaders
          args:
            executionExceptionTypeHeaderName: Test-Header
In this example, after an execution exception occurs while running the circuit breaker, the request is forwarded to the fallback endpoint or handler in an application running on localhost:9994. The headers with the exception type, message and (if available) root cause exception type and message are added to that request by the FallbackHeaders filter.
You can overwrite the names of the headers in the configuration by setting the values of the following arguments (shown with their default values):
executionExceptionTypeHeaderName("Execution-Exception-Type")executionExceptionMessageHeaderName("Execution-Exception-Message")rootCauseExceptionTypeHeaderName("Root-Cause-Exception-Type")rootCauseExceptionMessageHeaderName("Root-Cause-Exception-Message")
For more information on circuit breakers and the gateway see the Hystrix GatewayFilter Factory section or Spring Cloud CircuitBreaker Factory section.
6.8. The MapRequestHeader GatewayFilter Factory
The MapRequestHeader GatewayFilter factory takes fromHeader and toHeader parameters. It creates a new named header (toHeader), and the value is extracted out of an existing named header (fromHeader) from the incoming http request. If the input header does not exist, the filter has no impact. If the new named header already exists, its values are augmented with the new values. The following example configures a MapRequestHeader:
Example 31. application.yml
spring:
  cloud:
    gateway:
      routes:
      - id: map_request_header_route
        uri: https://example.org
        filters:
        - MapRequestHeader=Blue, X-Request-Red
This adds X-Request-Red:<values> header to the downstream request with updated values from the incoming HTTP request’s Blue header.
6.9. The PrefixPath GatewayFilter Factory
The PrefixPath GatewayFilter factory takes a single prefix parameter. The following example configures a PrefixPath GatewayFilter:
Example 32. application.yml
spring:
  cloud:
    gateway:
      routes:
      - id: prefixpath_route
        uri: https://example.org
        filters:
        - PrefixPath=/mypath
This will prefix /mypath to the path of all matching requests. So a request to /hello would be sent to /mypath/hello.
6.10. The PreserveHostHeader GatewayFilter Factory
The PreserveHostHeader GatewayFilter factory has no parameters. This filter sets a request attribute that the routing filter inspects to determine if the original host header should be sent, rather than the host header determined by the HTTP client. The following example configures a PreserveHostHeader GatewayFilter:
Example 33. application.yml
spring:
  cloud:
    gateway:
      routes:
      - id: preserve_host_route
        uri: https://example.org
        filters:
        - PreserveHostHeader
6.11. The RequestRateLimiter GatewayFilter Factory
The RequestRateLimiter GatewayFilter factory uses a RateLimiter implementation to determine if the current request is allowed to proceed. If it is not, a status of HTTP 429 - Too Many Requests (by default) is returned.
This filter takes an optional keyResolver parameter and parameters specific to the rate limiter (described later in this section).
keyResolver is a bean that implements the KeyResolver interface. In configuration, reference the bean by name using SpEL. #{@myKeyResolver} is a SpEL expression that references a bean named myKeyResolver. The following listing shows the KeyResolver interface:
Example 34. KeyResolver.java
public interface KeyResolver {
    Mono<String> resolve(ServerWebExchange exchange);
}
The KeyResolver interface lets pluggable strategies derive the key for limiting requests. In future milestone releases, there will be some KeyResolver implementations.
The default implementation of KeyResolver is the PrincipalNameKeyResolver, which retrieves the Principal from the ServerWebExchange and calls Principal.getName().
By default, if the KeyResolver does not find a key, requests are denied. You can adjust this behavior by setting the spring.cloud.gateway.filter.request-rate-limiter.deny-empty-key (true or false) and spring.cloud.gateway.filter.request-rate-limiter.empty-key-status-code properties.
The RequestRateLimiter is not configurable with the “shortcut” notation. The following example below is invalid:Example 35. application.properties# INVALID SHORTCUT CONFIGURATION spring.cloud.gateway.routes[0].filters[0]=RequestRateLimiter=2, 2, #{@userkeyresolver} | |
|---|---|
6.11.1. The Redis RateLimiter
The Redis implementation is based off of work done at Stripe. It requires the use of the spring-boot-starter-data-redis-reactive Spring Boot starter.
The algorithm used is the Token Bucket Algorithm.
The redis-rate-limiter.replenishRate property is how many requests per second you want a user to be allowed to do, without any dropped requests. This is the rate at which the token bucket is filled.
The redis-rate-limiter.burstCapacity property is the maximum number of requests a user is allowed to do in a single second. This is the number of tokens the token bucket can hold. Setting this value to zero blocks all requests.
The redis-rate-limiter.requestedTokens property is how many tokens a request costs. This is the number of tokens taken from the bucket for each request and defaults to 1.
A steady rate is accomplished by setting the same value in replenishRate and burstCapacity. Temporary bursts can be allowed by setting burstCapacity higher than replenishRate. In this case, the rate limiter needs to be allowed some time between bursts (according to replenishRate), as two consecutive bursts will result in dropped requests (HTTP 429 - Too Many Requests). The following listing configures a redis-rate-limiter:
Rate limits bellow 1 request/s are accomplished by setting replenishRate to the wanted number of requests, requestedTokens to the timespan in seconds and burstCapacity to the product of replenishRate and requestedTokens, e.g. setting replenishRate=1, requestedTokens=60 and burstCapacity=60 will result in a limit of 1 request/min.
Example 36. application.yml
spring:
  cloud:
    gateway:
      routes:
      - id: requestratelimiter_route
        uri: https://example.org
        filters:
        - name: RequestRateLimiter
          args:
            redis-rate-limiter.replenishRate: 10
            redis-rate-limiter.burstCapacity: 20
            redis-rate-limiter.requestedTokens: 1
The following example configures a KeyResolver in Java:
Example 37. Config.java
@Bean
KeyResolver userKeyResolver() {
    return exchange -> Mono.just(exchange.getRequest().getQueryParams().getFirst("user"));
}
This defines a request rate limit of 10 per user. A burst of 20 is allowed, but, in the next second, only 10 requests are available. The KeyResolver is a simple one that gets the user request parameter (note that this is not recommended for production).
You can also define a rate limiter as a bean that implements the RateLimiter interface. In configuration, you can reference the bean by name using SpEL. #{@myRateLimiter} is a SpEL expression that references a bean with named myRateLimiter. The following listing defines a rate limiter that uses the KeyResolver defined in the previous listing:
Example 38. application.yml
spring:
  cloud:
    gateway:
      routes:
      - id: requestratelimiter_route
        uri: https://example.org
        filters:
        - name: RequestRateLimiter
          args:
            rate-limiter: "#{@myRateLimiter}"
            key-resolver: "#{@userKeyResolver}"
6.12. The RedirectTo GatewayFilter Factory
The RedirectTo GatewayFilter factory takes two parameters, status and url. The status parameter should be a 300 series redirect HTTP code, such as 301. The url parameter should be a valid URL. This is the value of the Location header. For relative redirects, you should use uri: no://op as the uri of your route definition. The following listing configures a RedirectTo GatewayFilter:
Example 39. application.yml
spring:
  cloud:
    gateway:
      routes:
      - id: prefixpath_route
        uri: https://example.org
        filters:
        - RedirectTo=302, https://acme.org
This will send a status 302 with a Location:https://acme.org header to perform a redirect.
6.13. The RemoveRequestHeader GatewayFilter Factory
The RemoveRequestHeader GatewayFilter factory takes a name parameter. It is the name of the header to be removed. The following listing configures a RemoveRequestHeader GatewayFilter:
Example 40. application.yml
spring:
  cloud:
    gateway:
      routes:
      - id: removerequestheader_route
        uri: https://example.org
        filters:
        - RemoveRequestHeader=X-Request-Foo
This removes the X-Request-Foo header before it is sent downstream.
6.14. RemoveResponseHeader GatewayFilter Factory
The RemoveResponseHeader GatewayFilter factory takes a name parameter. It is the name of the header to be removed. The following listing configures a RemoveResponseHeader GatewayFilter:
Example 41. application.yml
spring:
  cloud:
    gateway:
      routes:
      - id: removeresponseheader_route
        uri: https://example.org
        filters:
        - RemoveResponseHeader=X-Response-Foo
This will remove the X-Response-Foo header from the response before it is returned to the gateway client.
To remove any kind of sensitive header, you should configure this filter for any routes for which you may want to do so. In addition, you can configure this filter once by using spring.cloud.gateway.default-filters and have it applied to all routes.
6.15. The RemoveRequestParameter GatewayFilter Factory
The RemoveRequestParameter GatewayFilter factory takes a name parameter. It is the name of the query parameter to be removed. The following example configures a RemoveRequestParameter GatewayFilter:
Example 42. application.yml
spring:
  cloud:
    gateway:
      routes:
      - id: removerequestparameter_route
        uri: https://example.org
        filters:
        - RemoveRequestParameter=red
This will remove the red parameter before it is sent downstream.
6.16. The RewritePath GatewayFilter Factory
The RewritePath GatewayFilter factory takes a path regexp parameter and a replacement parameter. This uses Java regular expressions for a flexible way to rewrite the request path. The following listing configures a RewritePath GatewayFilter:
工厂接受一个RewritePath GatewayFilter路径regexp参数和一个replacement参数。这使用 Java 正则表达式以灵活的方式重写请求路径。以下清单配置了一个RewritePath GatewayFilter:
Example 43. application.yml
spring:
  cloud:
    gateway:
      routes:
      - id: rewritepath_route
        uri: https://example.org
        predicates:
        - Path=/red/**
        filters:
        - RewritePath=/red(?<segment>/?.*), $\{segment}
For a request path of /red/blue, this sets the path to /blue before making the downstream request. Note that the $ should be replaced with $\ because of the YAML specification.
对于 的请求路径/red/blue,这会将路径设置为/blue在发出 请求之前。
请注意,由于 YAML 规范,$应将其替换为$\。
6.17. RewriteLocationResponseHeader GatewayFilter Factory
The RewriteLocationResponseHeader GatewayFilter factory modifies the value of the Location response header, usually to get rid of backend-specific details. It takes stripVersionMode, locationHeaderName, hostValue, and protocolsRegex parameters. The following listing configures a RewriteLocationResponseHeader GatewayFilter:
Example 44. application.yml
spring:
  cloud:
    gateway:
      routes:
      - id: rewritelocationresponseheader_route
        uri: http://example.org
        filters:
        - RewriteLocationResponseHeader=AS_IN_REQUEST, Location, ,
For example, for a request of POST api.example.com/some/object/name, the Location response header value of object-service.prod.example.net/v2/some/object/id is rewritten as api.example.com/some/object/id.
The stripVersionMode parameter has the following possible values: NEVER_STRIP, AS_IN_REQUEST (default), and ALWAYS_STRIP.
NEVER_STRIP: The version is not stripped, even if the original request path contains no version.AS_IN_REQUESTThe version is stripped only if the original request path contains no version.ALWAYS_STRIPThe version is always stripped, even if the original request path contains version.
The hostValue parameter, if provided, is used to replace the host:port portion of the response Location header. If it is not provided, the value of the Host request header is used.
The protocolsRegex parameter must be a valid regex String, against which the protocol name is matched. If it is not matched, the filter does nothing. The default is http|https|ftp|ftps.
6.18. The RewriteResponseHeader GatewayFilter Factory
The RewriteResponseHeader GatewayFilter factory takes name, regexp, and replacement parameters. It uses Java regular expressions for a flexible way to rewrite the response header value. The following example configures a RewriteResponseHeader GatewayFilter:
Example 45. application.yml
spring:
  cloud:
    gateway:
      routes:
      - id: rewriteresponseheader_route
        uri: https://example.org
        filters:
        - RewriteResponseHeader=X-Response-Red, , password=[^&]+, password=***
For a header value of /42?user=ford&password=omg!what&flag=true, it is set to /42?user=ford&password=***&flag=true after making the downstream request. You must use $\ to mean $ because of the YAML specification.
6.19. The SaveSession GatewayFilter Factory
The SaveSession GatewayFilter factory forces a WebSession::save operation before forwarding the call downstream. This is of particular use when using something like Spring Session with a lazy data store and you need to ensure the session state has been saved before making the forwarded call. The following example configures a SaveSession GatewayFilter:
Example 46. application.yml
spring:
  cloud:
    gateway:
      routes:
      - id: save_session
        uri: https://example.org
        predicates:
        - Path=/foo/**
        filters:
        - SaveSession
If you integrate Spring Security with Spring Session and want to ensure security details have been forwarded to the remote process, this is critical.
6.20. The SecureHeaders GatewayFilter Factory
The SecureHeaders GatewayFilter factory adds a number of headers to the response, per the recommendation made in this blog post.
The following headers (shown with their default values) are added:
X-Xss-Protection:1 (mode=block)Strict-Transport-Security (max-age=631138519)X-Frame-Options (DENY)X-Content-Type-Options (nosniff)Referrer-Policy (no-referrer)Content-Security-Policy (default-src 'self' https:; font-src 'self' https: data:; img-src 'self' https: data:; object-src 'none'; script-src https:; style-src 'self' https: 'unsafe-inline)'X-Download-Options (noopen)X-Permitted-Cross-Domain-Policies (none)
To change the default values, set the appropriate property in the spring.cloud.gateway.filter.secure-headers namespace. The following properties are available:
xss-protection-headerstrict-transport-securityx-frame-optionsx-content-type-optionsreferrer-policycontent-security-policyx-download-optionsx-permitted-cross-domain-policies
To disable the default values set the spring.cloud.gateway.filter.secure-headers.disable property with comma-separated values. The following example shows how to do so:
spring.cloud.gateway.filter.secure-headers.disable=x-frame-options,strict-transport-security
| The lowercase full name of the secure header needs to be used to disable it… | |
|---|---|
6.21. The SetPath GatewayFilter Factory
The SetPath GatewayFilter factory takes a path template parameter. It offers a simple way to manipulate the request path by allowing templated segments of the path. This uses the URI templates from Spring Framework. Multiple matching segments are allowed. The following example configures a SetPath GatewayFilter:
Example 47. application.yml
spring:
  cloud:
    gateway:
      routes:
      - id: setpath_route
        uri: https://example.org
        predicates:
        - Path=/red/{segment}
        filters:
        - SetPath=/{segment}
For a request path of /red/blue, this sets the path to /blue before making the downstream request.
6.22. The SetRequestHeader GatewayFilter Factory
The SetRequestHeader GatewayFilter factory takes name and value parameters. The following listing configures a SetRequestHeader GatewayFilter:
Example 48. application.yml
spring:
  cloud:
    gateway:
      routes:
      - id: setrequestheader_route
        uri: https://example.org
        filters:
        - SetRequestHeader=X-Request-Red, Blue
This GatewayFilter replaces (rather than adding) all headers with the given name. So, if the downstream server responded with a X-Request-Red:1234, this would be replaced with X-Request-Red:Blue, which is what the downstream service would receive.
SetRequestHeader is aware of URI variables used to match a path or host. URI variables may be used in the value and are expanded at runtime. The following example configures an SetRequestHeader GatewayFilter that uses a variable:
Example 49. application.yml
spring:
  cloud:
    gateway:
      routes:
      - id: setrequestheader_route
        uri: https://example.org
        predicates:
        - Host: {segment}.myhost.org
        filters:
        - SetRequestHeader=foo, bar-{segment}
6.23. The SetResponseHeader GatewayFilter Factory
The SetResponseHeader GatewayFilter factory takes name and value parameters. The following listing configures a SetResponseHeader GatewayFilter:
Example 50. application.yml
spring:
  cloud:
    gateway:
      routes:
      - id: setresponseheader_route
        uri: https://example.org
        filters:
        - SetResponseHeader=X-Response-Red, Blue
This GatewayFilter replaces (rather than adding) all headers with the given name. So, if the downstream server responded with a X-Response-Red:1234, this is replaced with X-Response-Red:Blue, which is what the gateway client would receive.
SetResponseHeader is aware of URI variables used to match a path or host. URI variables may be used in the value and will be expanded at runtime. The following example configures an SetResponseHeader GatewayFilter that uses a variable:
Example 51. application.yml
spring:
  cloud:
    gateway:
      routes:
      - id: setresponseheader_route
        uri: https://example.org
        predicates:
        - Host: {segment}.myhost.org
        filters:
        - SetResponseHeader=foo, bar-{segment}
6.24. The SetStatus GatewayFilter Factory
The SetStatus GatewayFilter factory takes a single parameter, status. It must be a valid Spring HttpStatus. It may be the integer value 404 or the string representation of the enumeration: NOT_FOUND. The following listing configures a SetStatus GatewayFilter:
Example 52. application.yml
spring:
  cloud:
    gateway:
      routes:
      - id: setstatusstring_route
        uri: https://example.org
        filters:
        - SetStatus=BAD_REQUEST
      - id: setstatusint_route
        uri: https://example.org
        filters:
        - SetStatus=401
In either case, the HTTP status of the response is set to 401.
You can configure the SetStatus GatewayFilter to return the original HTTP status code from the proxied request in a header in the response. The header is added to the response if configured with the following property:
Example 53. application.yml
spring:
  cloud:
    gateway:
      set-status:
        original-status-header-name: original-http-status
6.25. The StripPrefix GatewayFilter Factory
The StripPrefix GatewayFilter factory takes one parameter, parts. The parts parameter indicates the number of parts in the path to strip from the request before sending it downstream. The following listing configures a StripPrefix GatewayFilter:
Example 54. application.yml
spring:
  cloud:
    gateway:
      routes:
      - id: nameRoot
        uri: https://nameservice
        predicates:
        - Path=/name/**
        filters:
        - StripPrefix=2
When a request is made through the gateway to /name/blue/red, the request made to nameservice looks like nameservice/red.
6.26. The Retry GatewayFilter Factory
The Retry GatewayFilter factory supports the following parameters:
retries: The number of retries that should be attempted.statuses: The HTTP status codes that should be retried, represented by usingorg.springframework.http.HttpStatus.methods: The HTTP methods that should be retried, represented by usingorg.springframework.http.HttpMethod.series: The series of status codes to be retried, represented by usingorg.springframework.http.HttpStatus.Series.exceptions: A list of thrown exceptions that should be retried.backoff: The configured exponential backoff for the retries. Retries are performed after a backoff interval offirstBackoff * (factor ^ n), wherenis the iteration. IfmaxBackoffis configured, the maximum backoff applied is limited tomaxBackoff. IfbasedOnPreviousValueis true, the backoff is calculated byusingprevBackoff * factor.
The following defaults are configured for Retry filter, if enabled:
retries: Three timesseries: 5XX seriesmethods: GET methodexceptions:IOExceptionandTimeoutExceptionbackoff: disabled
The following listing configures a Retry GatewayFilter:
Example 55. application.yml
spring:
  cloud:
    gateway:
      routes:
      - id: retry_test
        uri: http://localhost:8080/flakey
        predicates:
        - Host=*.retry.com
        filters:
        - name: Retry
          args:
            retries: 3
            statuses: BAD_GATEWAY
            methods: GET,POST
            backoff:
              firstBackoff: 10ms
              maxBackoff: 50ms
              factor: 2
              basedOnPreviousValue: false
When using the retry filter with a forward: prefixed URL, the target endpoint should be written carefully so that, in case of an error, it does not do anything that could result in a response being sent to the client and committed. For example, if the target endpoint is an annotated controller, the target controller method should not return ResponseEntity with an error status code. Instead, it should throw an Exception or signal an error (for example, through a Mono.error(ex) return value), which the retry filter can be configured to handle by retrying. | |
|---|---|
When using the retry filter with any HTTP method with a body, the body will be cached and the gateway will become memory constrained. The body is cached in a request attribute defined by ServerWebExchangeUtils.CACHED_REQUEST_BODY_ATTR. The type of the object is a org.springframework.core.io.buffer.DataBuffer. | |
|---|---|
6.27. The RequestSize GatewayFilter Factory
When the request size is greater than the permissible limit, the RequestSize GatewayFilter factory can restrict a request from reaching the downstream service. The filter takes a maxSize parameter. The maxSize is a DataSizetype, so values can be defined as a number followed by an optionalDataUnitsuffix such as 'KB' or 'MB'. The default is 'B' for bytes. It is the permissible size limit of the request defined in bytes. The following listing configures aRequestSize GatewayFilter`:
Example 56. application.yml
spring:
  cloud:
    gateway:
      routes:
      - id: request_size_route
        uri: http://localhost:8080/upload
        predicates:
        - Path=/upload
        filters:
        - name: RequestSize
          args:
            maxSize: 5000000
The RequestSize GatewayFilter factory sets the response status as 413 Payload Too Large with an additional header errorMessage when the request is rejected due to size. The following example shows such an errorMessage:
errorMessage` : `Request size is larger than permissible limit. Request size is 6.0 MB where permissible limit is 5.0 MB
| The default request size is set to five MB if not provided as a filter argument in the route definition. | |
|---|---|
6.28. The SetRequestHostHeader GatewayFilter Factory
There are certain situation when the host header may need to be overridden. In this situation, the SetRequestHostHeader GatewayFilter factory can replace the existing host header with a specified vaue. The filter takes a host parameter. The following listing configures a SetRequestHostHeader GatewayFilter:
Example 57. application.yml
spring:
  cloud:
    gateway:
      routes:
      - id: set_request_host_header_route
        uri: http://localhost:8080/headers
        predicates:
        - Path=/headers
        filters:
        - name: SetRequestHostHeader
          args:
            host: example.org
The SetRequestHostHeader GatewayFilter factory replaces the value of the host header with example.org.
6.29. Modify a Request Body GatewayFilter Factory
You can use the ModifyRequestBody filter filter to modify the request body before it is sent downstream by the gateway.
| This filter can be configured only by using the Java DSL. | |
|---|---|
The following listing shows how to modify a request body GatewayFilter:
@Bean
public RouteLocator routes(RouteLocatorBuilder builder) {
    return builder.routes()
        .route("rewrite_request_obj", r -> r.host("*.rewriterequestobj.org")
            .filters(f -> f.prefixPath("/httpbin")
                .modifyRequestBody(String.class, Hello.class, MediaType.APPLICATION_JSON_VALUE,
                    (exchange, s) -> return Mono.just(new Hello(s.toUpperCase())))).uri(uri))
        .build();
}

static class Hello {
    String message;

    public Hello() { }

    public Hello(String message) {
        this.message = message;
    }

    public String getMessage() {
        return message;
    }

    public void setMessage(String message) {
        this.message = message;
    }
}
if the request has no body, the RewriteFilter will be passed null. Mono.empty() should be returned to assign a missing body in the request. | |
|---|---|
6.30. Modify a Response Body GatewayFilter Factory
You can use the ModifyResponseBody filter to modify the response body before it is sent back to the client.
| This filter can be configured only by using the Java DSL. | |
|---|---|
The following listing shows how to modify a response body GatewayFilter:
@Bean
public RouteLocator routes(RouteLocatorBuilder builder) {
    return builder.routes()
        .route("rewrite_response_upper", r -> r.host("*.rewriteresponseupper.org")
            .filters(f -> f.prefixPath("/httpbin")
                .modifyResponseBody(String.class, String.class,
                    (exchange, s) -> Mono.just(s.toUpperCase()))).uri(uri))
        .build();
}
if the response has no body, the RewriteFilter will be passed null. Mono.empty() should be returned to assign a missing body in the response. | |
|---|---|
6.31. Default Filters
To add a filter and apply it to all routes, you can use spring.cloud.gateway.default-filters. This property takes a list of filters. The following listing defines a set of default filters:
Example 58. application.yml
spring:
  cloud:
    gateway:
      default-filters:
      - AddResponseHeader=X-Response-Default-Red, Default-Blue
      - PrefixPath=/httpbin
二、基础开发
基础概念
跨域问题
跨域:指的是浏览器不能执行其他网站的脚本。它是由浏览器的同源策略造成的,是浏览器对javascript施加的安全限制。
同源策略:是指协议,域名,端口都要相同,其中有一个不同都会产生跨域;
解决方式
- nginx
- 配置当次请求允许跨域
请求先发送到网关,网关在转发给其他服务
这里可以去参考分布式基础概念的6.16 的RewritePath GatewayFilter 以及5.8 的Path Route
    - id: product_route
      uri: lb://gulimall-product  # lb负载均衡
      predicates:
        - Path=/api/product/**   # path指定对应路径
      filters:
        - RewritePath=/api/(?<segment>/?.*),/$\{segment}

    - id: admin_route
      uri: lb://renren-fast  # lb负载均衡
      predicates:
        - Path=/api/**  # path指定对应路径
      filters: # 重写路径
        - RewritePath=/api/(?<segment>/?.*), /renren-fast/$\{segment}
由网关来配置跨域问题
@Configuration
public class GulimallCorsConfiguration {
    @Bean
    public CorsWebFilter corsWebFilter() {
        UrlBasedCorsConfigurationSource source = new UrlBasedCorsConfigurationSource();
        CorsConfiguration corsConfiguration = new CorsConfiguration();
        // 配置跨越
        corsConfiguration.addAllowedHeader("*"); // 允许那些头
        corsConfiguration.addAllowedMethod("*"); // 允许那些请求方式
        corsConfiguration.addAllowedOrigin("*"); //  允许请求来源
        corsConfiguration.setAllowCredentials(true); // 是否允许携带cookie跨越
        // 注册跨越配置
        source.registerCorsConfiguration("/**",corsConfiguration);
        return new CorsWebFilter(source);
    }
}
这里记得去注释renren-fast项目里的CorsConfig。因为这里也处理了跨域。
阿里云对象存储

官网使用文档
https://help.aliyun.com/document_detail/32009.html?spm=a2c4g.11186623.6.768.549d59aaWuZMGJ
使用代码上传
方式一:在Maven项目中加入依赖项(推荐方式)
在Maven工程中使用OSS Java SDK,只需在pom.xml中加入相应依赖即可。以3.10.2版本为例,在中加入如下内容:
<dependency>
    <groupId>com.aliyun.oss</groupId>
    <artifactId>aliyun-sdk-oss</artifactId>
    <version>3.10.2</version>
</dependency>
如果使用的是Java 9及以上的版本,则需要添加jaxb相关依赖。添加jaxb相关依赖示例代码如下:
<dependency>
    <groupId>javax.xml.bind</groupId>
    <artifactId>jaxb-api</artifactId>
    <version>2.3.1</version>
</dependency>
<dependency>
    <groupId>javax.activation</groupId>
    <artifactId>activation</artifactId>
    <version>1.1.1</version>
</dependency>
<!-- no more than 2.3.3-->
<dependency>
    <groupId>org.glassfish.jaxb</groupId>
    <artifactId>jaxb-runtime</artifactId>
    <version>2.3.3</version>
</dependency>
上传文件流
以下代码用于将文件流上传到目标存储空间examplebucket中exampledir目录下的exampleobject.txt文件。
import com.aliyun.oss.ClientException;
import com.aliyun.oss.OSS;
import com.aliyun.oss.OSSClientBuilder;
import com.aliyun.oss.OSSException;
import java.io.FileInputStream;
import java.io.InputStream;

public class Demo {

    public static void main(String[] args) throws Exception {
        // Endpoint以华东1(杭州)为例,其它Region请按实际情况填写。
        String endpoint = "https://oss-cn-hangzhou.aliyuncs.com";
        // 阿里云账号AccessKey拥有所有API的访问权限,风险很高。强烈建议您创建并使用RAM用户进行API访问或日常运维,请登录RAM控制台创建RAM用户。
        String accessKeyId = "yourAccessKeyId";
        String accessKeySecret = "yourAccessKeySecret";
        // 填写Bucket名称,例如examplebucket。
        String bucketName = "examplebucket";
        // 填写Object完整路径,完整路径中不能包含Bucket名称,例如exampledir/exampleobject.txt。
        String objectName = "exampledir/exampleobject.txt";
        // 填写本地文件的完整路径,例如D:\\localpath\\examplefile.txt。
        // 如果未指定本地路径,则默认从示例程序所属项目对应本地路径中上传文件流。
        String filePath= "D:\\localpath\\examplefile.txt";

        // 创建OSSClient实例。
        OSS ossClient = new OSSClientBuilder().build(endpoint, accessKeyId, accessKeySecret);

        try {
            InputStream inputStream = new FileInputStream(filePath);
            // 创建PutObject请求。
            ossClient.putObject(bucketName, objectName, inputStream);
        } catch (OSSException oe) {
            System.out.println("Caught an OSSException, which means your request made it to OSS, "
                    + "but was rejected with an error response for some reason.");
            System.out.println("Error Message:" + oe.getErrorMessage());
            System.out.println("Error Code:" + oe.getErrorCode());
            System.out.println("Request ID:" + oe.getRequestId());
            System.out.println("Host ID:" + oe.getHostId());
        } catch (ClientException ce) {
            System.out.println("Caught an ClientException, which means the client encountered "
                    + "a serious internal problem while trying to communicate with OSS, "
                    + "such as not being able to access the network.");
            System.out.println("Error Message:" + ce.getMessage());
        } finally {
            if (ossClient != null) {
                ossClient.shutdown();
            }
        }
    }
}
实际上:SpringCloud Alibaba oss 已经为我们封装好了。
Alibaba Cloud OSS: 阿里云对象存储服务(Object Storage Service,简称 OSS),是阿里云提供的海量、安全、低成本、高可靠的云存储服务。您可以在任何应用、任何时间、任何地点存储和访问任意类型的数据。
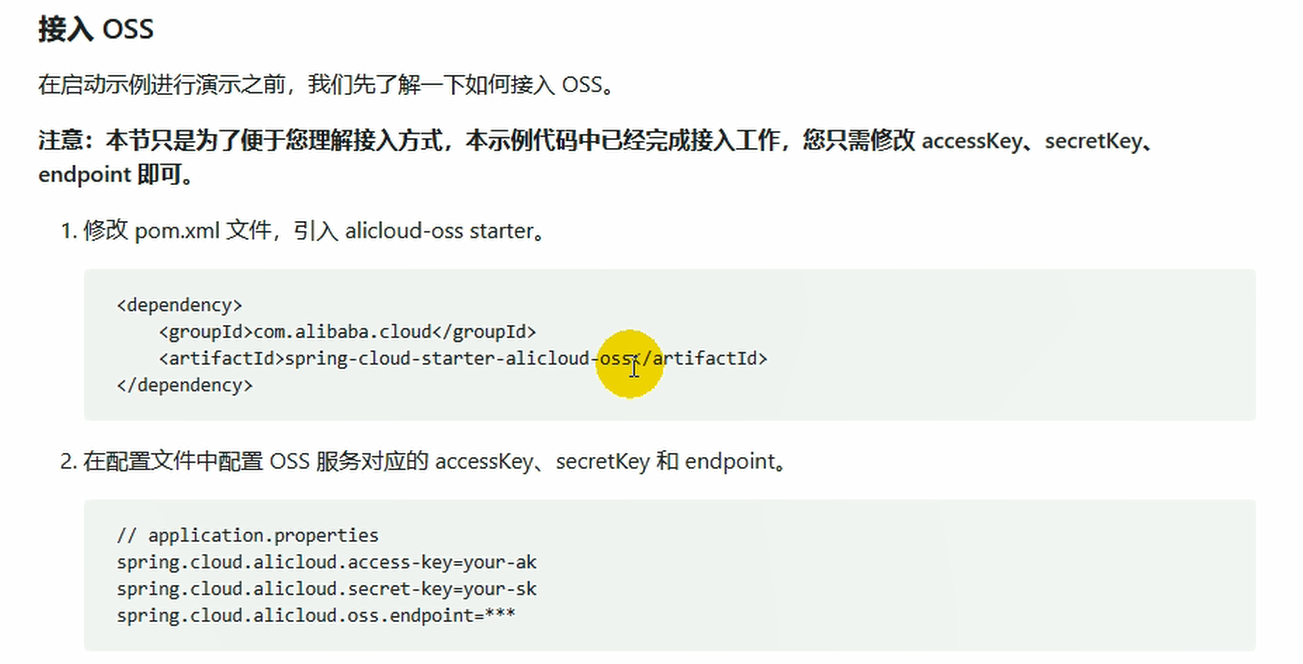
服务端签名后直传
上面的方法还是从前端上传到我们服务器,我们服务器上传到阿里云。有没有一种方法可以直接通过前端上传到阿里云去呢。
实际上我们去服务端只是要到那些我们的签名信息,拿到这些签名信息直接在前端上传到阿里云去。
本文主要介绍如何基于Post Policy的使用规则在服务端通过各种语言代码完成签名,然后通过表单直传数据到OSS。由于服务端签名直传无需将AccessKey暴露在前端页面,相比JavaScript客户端签名直传具有更高的安全性。

该类用于获取签名。
package com.atguigu.gulimall.thirdparty.controller;

import com.aliyun.oss.OSS;
import com.aliyun.oss.common.utils.BinaryUtil;
import com.aliyun.oss.model.MatchMode;
import com.aliyun.oss.model.PolicyConditions;
import com.atguigu.common.utils.R;
import org.springframework.beans.factory.annotation.Autowired;
import org.springframework.beans.factory.annotation.Value;
import org.springframework.web.bind.annotation.RequestMapping;
import org.springframework.web.bind.annotation.RestController;

import java.text.SimpleDateFormat;
import java.util.Date;
import java.util.LinkedHashMap;
import java.util.Map;

@RestController
public class OssController {
    @Autowired
    OSS ossClient;
    @Value("${spring.cloud.alicloud.oss.endpoint}")
    private String endpoint;
    @Value("${spring.cloud.alicloud.oss.bucket}")
    private String bucket;
    @Value("${spring.cloud.alicloud.access-key}")
    private String accessId;

    @RequestMapping("/oss/policy")
    public R policy() {
        String host = "https://" + bucket + "." + endpoint; // host的格式为 bucketname.endpoint
        // callbackUrl为 上传回调服务器的URL,请将下面的IP和Port配置为您自己的真实信息。
//        String callbackUrl = "http://88.88.88.88:8888";
        String format = new SimpleDateFormat("yyyy-MM-dd").format(new Date());
        String dir = format + "/"; // 用户上传文件时指定的前缀。

        Map<String, String> respMap = null;
        try {
            long expireTime = 30;
            long expireEndTime = System.currentTimeMillis() + expireTime * 1000;
            Date expiration = new Date(expireEndTime);
            PolicyConditions policyConds = new PolicyConditions();
            policyConds.addConditionItem(PolicyConditions.COND_CONTENT_LENGTH_RANGE, 0, 1048576000);
            policyConds.addConditionItem(MatchMode.StartWith, PolicyConditions.COND_KEY, dir);

            String postPolicy = ossClient.generatePostPolicy(expiration, policyConds);
            byte[] binaryData = postPolicy.getBytes("utf-8");
            String encodedPolicy = BinaryUtil.toBase64String(binaryData);
            String postSignature = ossClient.calculatePostSignature(postPolicy);

            respMap = new LinkedHashMap<String, String>();
            respMap.put("accessid", accessId);
            respMap.put("policy", encodedPolicy);
            respMap.put("signature", postSignature);
            respMap.put("dir", dir);
            respMap.put("host", host);
            respMap.put("expire", String.valueOf(expireEndTime / 1000));
            // respMap.put("expire", formatISO8601Date(expiration));


        } catch (Exception e) {
            // Assert.fail(e.getMessage());
            System.out.println(e.getMessage());
        }

        return R.ok().put("data",respMap);
    }
}
前端想要直接上传到阿里云上去,当然也需要组件。在项目里提供了文件上传组件,需要修改阿里云Bucket域名地址
注意:阿里云的跨域问题和权限问题。可视化页面设置即可。
内存调优
设置每个项目最大占用内存为100M
VM options: -Xmx100m
开发规范
逻辑删除
使用MyBatis-Plus完成逻辑删除
https://baomidou.com/ 官网文档,当然如果你懒得看,还是我来带你看看关于逻辑删除的部分。已经更新很多版本了,之前还需要配置类,现在直接写在yml,和加上注解。之后会如何再看文档更新了。
说明:
只对自动注入的 sql 起效:
- 插入: 不作限制
- 查找: 追加 where 条件过滤掉已删除数据,且使用 wrapper.entity 生成的 where 条件会忽略该字段
- 更新: 追加 where 条件防止更新到已删除数据,且使用 wrapper.entity 生成的 where 条件会忽略该字段
- 删除: 转变为 更新
例如:
- 删除:
update user set deleted=1 where id = 1 and deleted=0 - 查找:
select id,name,deleted from user where deleted=0
字段类型支持说明:
- 支持所有数据类型(推荐使用
Integer,Boolean,LocalDateTime) - 如果数据库字段使用
datetime,逻辑未删除值和已删除值支持配置为字符串null,另一个值支持配置为函数来获取值如now()
附录:
- 逻辑删除是为了方便数据恢复和保护数据本身价值等等的一种方案,但实际就是删除。
- 如果你需要频繁查出来看就不应使用逻辑删除,而是以一个状态去表示。
使用方法
-
配置 application.yml
mybatis-plus: global-config: db-config: logic-delete-field: flag # 全局逻辑删除的实体字段名(since 3.3.0,配置后可以忽略不配置步骤2) logic-delete-value: 1 # 逻辑已删除值(默认为 1) logic-not-delete-value: 0 # 逻辑未删除值(默认为 0) -
实体类字段上加上
@TableLogic注解@TableLogic private Integer deleted;
自动填充时间字段
前提有引入mybatis-plus.
编写配置类
@Component
public class MyMetaObjectHandler implements MetaObjectHandler {
    @Override
    public void insertFill(MetaObject metaObject) {
        this.setFieldValByName("createTime",new Date(),metaObject);
        this.setFieldValByName("updateTime",new Date(),metaObject);
    }

    @Override
    public void updateFill(MetaObject metaObject) {
        this.setFieldValByName("updateTime",new Date(),metaObject);
    }
}
在实体类字段上加上注解
/**
 * 创建时间
 */
@TableField(fill = FieldFill.INSERT)
private Date createTime;
/**
 * 修改时间
 */
@TableField(fill = FieldFill.UPDATE)
private Date updateTime;
JSR303校验
JSR303是一个规范,它的核心接口是:javax.validation.Validator,该接口根据目标对象类中标注的校验注解进行数据校验,并得到校验结果。
| 空检查 | |
|---|---|
| @Null | 验证对象是否为null |
| @NotNull | 验证对象是否不为null, 无法查检长度为0的字符串 |
| @NotBlank | 检查约束字符串是不是Null还有被Trim的长度是否大于0,只对字符串,且会去掉前后空格. |
| @NotEmpty | 检查约束元素是否为NULL或者是EMPTY. |
| Booelan检查 | |
|---|---|
| @AssertTrue | 验证 Boolean 对象是否为 true |
| @AssertFalse | 验证 Boolean 对象是否为 false |
| 长度检查 | |
|---|---|
| @Size(min=, max=) | 验证对象(Array,Collection,Map,String)长度是否在给定的范围之内 |
| @Length(min=, max=) | Validates that the annotated string is between min and max included. |
| 日期检查 | |
|---|---|
| @Past | 验证 Date 和 Calendar 对象是否在当前时间之前 |
| @Future | 验证 Date 和 Calendar 对象是否在当前时间之后 |
| @Pattern | 验证 String 对象是否符合正则表达式的规则 |
| 数值检查 | 建议使用在Stirng,Integer类型,不建议使用在int类型上,因为表单值为“”时无法转换为int,但可以转换为Stirng为"",Integer为null |
|---|---|
| @Min | 验证 Number 和 String 对象是否大等于指定的值 |
| @Max | 验证 Number 和 String 对象是否小等于指定的值 |
| @DecimalMax | 被标注的值必须不大于约束中指定的最大值. 这个约束的参数是一个通过BigDecimal定义的最大值的字符串表示.小数存在精度 |
| @DecimalMin | 被标注的值必须不小于约束中指定的最小值. 这个约束的参数是一个通过BigDecimal定义的最小值的字符串表示.小数存在精度 |
| @Digits | 验证 Number 和 String 的构成是否合法 |
| @Digits(integer=,fraction=) | 验证字符串是否是符合指定格式的数字,interger指定整数精度,fraction指定小数精度。 |
| @Range(min=, max=) | 检查数字是否介于min和max之间. |
|---|---|
| @Range(min=10000,max=50000,message=“range.bean.wage”) | private BigDecimal wage; |
| @Valid | 递归的对关联对象进行校验, 如果关联对象是个集合或者数组,那么对其中的元素进行递归校验,如果是一个map,则对其中的值部分进行校验.(是否进行递归验证) |
|---|---|
| @CreditCardNumber | 信用卡验证 |
| 验证是否是邮件地址,如果为null,不进行验证,算通过验证。 | |
| @ScriptAssert(lang= ,script=, alias=) | |
| @URL(protocol=,host=, port=,regexp=, flags=) |
    1)、给Bean添加校验注解:javax.validation.constraints,并定义自己的message提示
*   2)、开启校验功能@Valid
*      效果:校验错误以后会有默认的响应;
*   3)、给校验的bean后紧跟一个BindingResult,就可以获取到校验的结果
*   4)、分组校验(多场景的复杂校验)
*         1)、  @NotBlank(message = "品牌名必须提交",groups = {AddGroup.class,UpdateGroup.class})
*          给校验注解标注什么情况需要进行校验
*         2)、@Validated({AddGroup.class})
*         3)、默认没有指定分组的校验注解@NotBlank,在分组校验情况@Validated({AddGroup.class})下不生效,只会在@Validated生效;
*
*   5)、自定义校验
*      1)、编写一个自定义的校验注解
*      2)、编写一个自定义的校验器 ConstraintValidator
*      3)、关联自定义的校验器和自定义的校验注解
*      @Documented
* @Constraint(validatedBy = { ListValueConstraintValidator.class【可以指定多个不同的校验器,适配不同类型的校验】 })
* @Target({ METHOD, FIELD, ANNOTATION_TYPE, CONSTRUCTOR, PARAMETER, TYPE_USE })
* @Retention(RUNTIME)
* public @interface ListValue {
举例
package com.atguigu.gulimall.product.entity;

import com.atguigu.common.valid.AddGroup;
import com.atguigu.common.valid.UpdateGroup;
import com.baomidou.mybatisplus.annotation.TableId;
import com.baomidou.mybatisplus.annotation.TableName;

import java.io.Serializable;
import lombok.Data;
import org.hibernate.validator.constraints.URL;

import javax.validation.constraints.*;

/**
 * 品牌
 *
 * @author wjk
 * @email 302658980@qq.com
 * @date 2022-05-08 12:55:50
 */
@Data
@TableName("pms_brand")
public class BrandEntity implements Serializable {
   private static final long serialVersionUID = 1L;

   /**
    * 品牌id
    */
   @NotNull(message = "修改必须指定品牌id",groups = {UpdateGroup.class})
   @Null(message = "新增不能指定id",groups = {AddGroup.class})
   @TableId
   private Long brandId;
   /**
    * 品牌名
    */
   @NotBlank(message = "品牌名必须提交",groups = {AddGroup.class,UpdateGroup.class})
   private String name;
   /**
    * 品牌logo地址
    */
   @NotBlank(groups = {AddGroup.class})
   @URL(message = "logo必须是一个合法的url地址",groups={AddGroup.class,UpdateGroup.class})
   private String logo;
   /**
    * 介绍
    */
   private String descript;
   /**
    * 显示状态[0-不显示;1-显示]
    */
// @Pattern()
   @NotNull(groups = {AddGroup.class, UpdateGroup.class})
   //@ListValue(vals={0,1},groups = {AddGroup.class, UpdateStatusGroup.class})
   private Integer showStatus;
   /**
    * 检索首字母
    */
   @NotEmpty(groups={AddGroup.class})
   @Pattern(regexp="^[a-zA-Z]$",message = "检索首字母必须是一个字母",groups={AddGroup.class,UpdateGroup.class})
   private String firstLetter;
   /**
    * 排序
    */
   @NotNull(groups={AddGroup.class})
   @Min(value = 0,message = "排序必须大于等于0",groups={AddGroup.class,UpdateGroup.class})
   private Integer sort;


}
统一的异常处理
@ControllerAdvice
*  1)、编写异常处理类,使用@ControllerAdvice。
*  2)、使用@ExceptionHandler标注方法可以处理的异常。
/**
 * 集中处理所有异常
 */
@Slf4j
@RestControllerAdvice(basePackages = "com.atguigu.gulimall.product.controller")
public class GulimallExceptionControllerAdvice {
    @ExceptionHandler(value= MethodArgumentNotValidException.class)
    public R handleVaildException(MethodArgumentNotValidException e){
        log.error("数据校验出现问题{},异常类型:{}",e.getMessage(),e.getClass());
        BindingResult bindingResult = e.getBindingResult();

        Map<String,String> errorMap = new HashMap<>();
        bindingResult.getFieldErrors().forEach((fieldError)->{
            errorMap.put(fieldError.getField(),fieldError.getDefaultMessage());
        });
        return R.error(BizCodeEnume.VAILD_EXCEPTION.getCode(),BizCodeEnume.VAILD_EXCEPTION.getMsg()).put("data",errorMap);
    }

    @ExceptionHandler(value = Throwable.class)
    public R handleException(Throwable throwable){

        log.error("错误:",throwable);
        return R.error(BizCodeEnume.UNKNOW_EXCEPTION.getCode(),BizCodeEnume.UNKNOW_EXCEPTION.getMsg());
    }

}
业务状态码
正规开发过程中,状态码有着严格的定义规则。为了定义这些状态码,我们可以单独定义一个常量类。
例如这个项目:
package com.atguigu.common.exception;

/***
 * 错误码和错误信息定义类
 * 1. 错误码定义规则为5为数字
 * 2. 前两位表示业务场景,最后三位表示错误码。例如:100001。10:通用 001:系统未知异常
 * 3. 维护错误码后需要维护错误描述,将他们定义为枚举形式
 * 错误码列表:
 *  10: 通用
 *      001:参数格式校验
 *  11: 商品
 *  12: 订单
 *  13: 购物车
 *  14: 物流
 *
 *
 */
public enum BizCodeEnume {
    UNKNOW_EXCEPTION(10000,"系统未知异常"),
    VAILD_EXCEPTION(10001,"参数格式校验失败");

    private int code;
    private String msg;
    BizCodeEnume(int code,String msg){
        this.code = code;
        this.msg = msg;
    }

    public int getCode() {
        return code;
    }

    public String getMsg() {
        return msg;
    }
}
Object 划分 VO PO
1、PO (persistant object) 持久化对象
po 就是对应数据库中某一个表的一条记录,多个记录可以用 PO 的集合,PO 中应该不包含任何对数据库到操作
2、DO ( Domain Object) 领域对象
就是从现实世界抽象出来的有形或无形的业务实体
3、TO (Transfer Object) 数据传输对象
不同的应用程序之间传输的对象
4、DTO (Data Transfer Object) 数据传输对象
这个概念来源于 J2EE 的设计模式,原来的目的是为了 EJB的分布式应用提供粗粒度的数据实体,以减少分布式调用的次数,从而提高分数调用的性能和降低网络负载,但在这里,泛指用于展示层与服务层之间的数据传输对象
5、VO(value object) 值对象
通常用于业务层之间的数据传递,和 PO 一样也是仅仅包含数据而已,但应是抽象出的业务对象,可以和表对应,也可以不,这根据业务的需要,用 new 关键字创建,由 GC 回收
view Object 试图对象
接受页面传递来的数据,封装对象,封装页面需要用的数据
6、BO(business object) 业务对象
从业务模型的角度看,见 UML 原件领域模型中的领域对象,封装业务逻辑的, java 对象,通过调用 DAO 方法,结合 PO VO,进行业务操作,business object 业务对象,主要作用是把业务逻辑封装成一个对象,这个对象包括一个或多个对象,比如一个简历,有教育经历,工作经历,社会关系等等,我们可以把教育经历对应一个 PO 、工作经验对应一个 PO、 社会关系对应一个 PO, 建立一个对应简历的的 BO 对象处理简历,每 个 BO 包含这些 PO ,这样处理业务逻辑时,我们就可以针对 BO 去处理
7、POJO ( plain ordinary java object) 简单无规则 java 对象
传统意义的 java 对象,就是说一些 Object/Relation Mapping 工具中,能够做到维护数据库表记录的 persisent object 完全是一个符合 Java Bean 规范的 纯 java 对象,没有增加别的属性和方法,我们的理解就是最基本的 Java bean 只有属性字段 setter 和 getter 方法
POJO 时是 DO/DTO/BO/VO 的统称
8、DAO(data access object) 数据访问对象
是一个 sun 的一个标准 j2ee 设计模式,这个模式有个接口就是 DAO ,他负持久层的操作,为业务层提供接口,此对象用于访问数据库,通常和 PO 结合使用,DAO 中包含了各种数据库的操作方法,通过它的方法,结合 PO 对数据库进行相关操作,夹在业务逻辑与数据库资源中间,配合VO 提供数据库的 CRUD 功能
接口编写
文档地址:https://easydoc.net/s/78237135/ZUqEdvA4/HqQGp9TI
商品系统
01、获取所有分类及子分类
GET 方式
请求路径:/product/category/list/tree
![[(img-jXOUqVAr-1653141587179)(https://cdn.jsdelivr.net/gh/302658980/typora-images/img/image-20220517221401213.png)]](https://img-blog.csdnimg.cn/f2aef2de111b4c83b9fbf6e68ab6675e.png)
分析: 涉及到数据库表:pms_category
主要涉及字段
parent_cid   父分类id
思路:
- 查出所有分类到一个集合里。List categoryEntityList;
- 找出所有的一级分类 特点:parent_cid=0
- 为所有的一级分类设置二级分类,为所有的二级分类设置三级分类
代码
CategoryController
/**
 * 查出所有分类以及子类,以树型结构组装起来
 */
@RequestMapping("/list/tree")
public R list(){
    List<CategoryEntity> entities = categoryService.listWithTree();
    return R.ok().put("data", entities);
}
CategoryServiceImpl
@Override
public List<CategoryEntity> listWithTree() {
    //1、查出所有分类
/*    List<CategoryEntity> entities = baseMapper.selectList(null);
    //2、组装成父子的树形结构       stream的使用默认会,不会去看看文档。
   	    //2.1)、找到所有的一级分类 特点:parent_cid=0 过滤得到一级菜单集合
        List<CategoryEntity> OnelevelMenus = entities
                .stream()
                .filter(categoryEntity -> categoryEntity.getParentCid() == 0)
                .collect(Collectors.toList());
        //2.2)、找到每一个一级分类的子分类。
        //在CategoryEntity实体类上加上一个属性 List<CategoryEntity> children 代表子分类
        //加上注解@TableField(exist = false) 表示在表里不存在

        //对每个一级菜单设置子菜单,调用getChildrens方法
       List<CategoryEntity> collect = OnelevelMenus.stream().map(categoryEntity -> {
            categoryEntity.setChildren(getChildrens(categoryEntity, entities));
            return categoryEntity;
        }).collect(Collectors.toList());
        return collect;
  */
  //  最终写法:
     List<CategoryEntity> levelMenus = entities
                .stream()
                .filter(categoryEntity -> //过滤得到一级菜单
                        categoryEntity.getParentCid() == 0)
                .map((categoryEntity)->{//对每个一级菜单设置子菜单,调用getChildrens方法
                    categoryEntity.setChildren(getChildrens(categoryEntity,entities));
                    return categoryEntity;
                }).sorted((categoryEntity1,categoryEntity2)->{ //排序
                    return (categoryEntity1.getSort()==null?0:categoryEntity1.getSort()) - (categoryEntity2.getSort()==null?0:categoryEntity2.getSort());
                }).collect(Collectors.toList());
        return levelMenus;

}

/**
     * 递归查找所有菜单的子菜单
     * @param root 当前菜单
     * @param all 所有菜单
     * @return 所有的子菜单
     */
    private List<CategoryEntity> getChildrens(CategoryEntity root,List<CategoryEntity> all){
        List<CategoryEntity> children = all.stream().filter(categoryEntity -> {
            //这里对所有菜单进行遍历,如果这次遍历的父分类id等于当前菜单(root)的id。
            //那么即为当前菜单(root)找到了它的子菜单。
            return categoryEntity.getParentCid().equals(root.getCatId());
        }).map((categoryEntity)->{
            //找到了一级分类的子菜单二级分类后,还有可能存在子菜单三级分类,于是继续为这次遍历的实体设置子菜单。
            categoryEntity.setChildren(getChildrens(categoryEntity,all));
            return categoryEntity;
        }).sorted((categoryEntity1,categoryEntity2)->{
            return (categoryEntity1.getSort()==null?0:categoryEntity1.getSort()) - (categoryEntity2.getSort()==null?0:categoryEntity2.getSort());
        }).collect(Collectors.toList());
        return children;
    }
03、获取分类属性分组
GET 方式
请求路径:/product/attrgroup/list/{catelogId}
![[(img-uqtfl4fr-1653141587180)(https://cdn.jsdelivr.net/gh/302658980/typora-images/image-20220519212742418.png)]](https://img-blog.csdnimg.cn/75137d1dcddc4b5b88741d7b6cb8f9c3.png)
分析: 涉及到数据库表:pms_attr_group
主要涉及字段
catelog_id   所属分类id
主要sql
SELECT
	*
FROM
	`pms_attr_group`
WHERE
	catelog_id = #{catelogId}
SELECT
	*
FROM
	pms_attr_group
WHERE
	catelog_id = ?
	AND (
	attr_group_id = KEY
	OR attr_group_name LIKE % KEY %)
思路:
- 根据catelog_id查询整个表,没难度。
- 配上模糊查询,同样没难度。
代码:
AttrGroupController
 @RequestMapping("/list/{catelogId}")
 public R list(@RequestParam Map<String, Object> params,
               @PathVariable("catelogId") Long catelogId){
     PageUtils page = attrGroupService.queryPage(params,catelogId);
     return R.ok().put("page", page);
 }
AttrGroupServiceImpl
@Override
public PageUtils queryPage(Map<String, Object> params, Long catelogId) {
    String key = (String) params.get("key");
    //   select * from pms_attr_group where catelog_id = ? and (attr_group_id = key or attr_group_name like %key%)
    QueryWrapper<AttrGroupEntity> wrapper = new QueryWrapper<AttrGroupEntity>();
    if (!StringUtils.isEmpty(key)){
        wrapper.and((obj)->{
            obj.eq("attr_group_id",key).or().like("attr_group_name",key);
        });
    }
    //这里需要说明一下,前端catelogId默认是0,所以等于0实际上就是没传值过来,查询所有。
    //当然前端如果设置为null,这里就进行null判断
    if (catelogId == 0) {
        IPage<AttrGroupEntity> page = this.page(
                new Query<AttrGroupEntity>().getPage(params),
                wrapper
        );
        return new PageUtils(page);
    } else {
        wrapper.eq("catelog_id", catelogId);
        IPage<AttrGroupEntity> page = this.page(new Query<AttrGroupEntity>().getPage(params), wrapper);
        return new PageUtils(page);
    }
}
04、获取属性分组详情
GET方式
请求地址:/product/attrgroup/info/{attrGroupId}
分析: 涉及到数据库表:pms_attr_group
主要涉及字段
attr_group_id   分组id
主要sql
SELECT
	*
FROM
	`pms_attr_group`
WHERE
	attr_group_id = #{attrGroupId}
思路:
-
根据attr_group_id查询整个表,没难度。
-
再此基础上给前端返回一个参数分类完整路径catelogPath,于是在实体类上加上一个字段用来返回给前端。实际上,我们应该创建一个VO类返回给前端。
@TableField(exist = false)
private Long[] catelogPath;
代码:
AttrGroupController
//首先根据id查到实体类,再给实体类加上catelogPath
@RequestMapping("/info/{attrGroupId}")
  public R info(@PathVariable("attrGroupId") Long attrGroupId){
AttrGroupEntity attrGroup = attrGroupService.getById(attrGroupId);
      Long catelogId = attrGroup.getCatelogId();
      Long[] path =categoryService.findCatelogPath(catelogId);
      attrGroup.setCatelogPath(path);
      return R.ok().put("attrGroup", attrGroup);
  }
CategoryServiceImpl
/**
 * 找到catelogId的完整路径
 * [父,子,孙]--》[0,25,225]
 * @param catelogId 当前分类id
 * @return
 */
@Override
public Long[] findCatelogPath(Long catelogId) {
    //定义一个数组存放最后结果 假设传入的分类id catelogId为255
    List<Long> prams = new ArrayList<>();
    //定义一个findParentPath方法,找到完整路径。
    List<Long> parentPath = findParentPath(catelogId, prams);
    //此时得到的是返过来的[255,34,2]
    //数组反转
    Collections.reverse(parentPath); //[2,34,255]
    return  parentPath.toArray(new Long[0]);
}

/**
     * 找到catelogId的完整路径
     * @param catelogId 当前分类id
     * @param prams 存放结果数组
     * @return
     */
    private List<Long> findParentPath(Long catelogId,List<Long> prams){
        //假设catelogId=255
        prams.add(catelogId); //prams = [225] 第二次[255,34] 第三次[255,34,2]
        //通过catelogId查询pms_category表得到实体类。
        //SELECT * FROM pms_category WHERE cat_id = 225
        //第二次sql SELECT * FROM pms_category WHERE cat_id = 34
        //第三次sql SELECT * FROM pms_category WHERE cat_id = 2
        CategoryEntity byId = this.getById(catelogId);
        //得到其parent_cid = 34
        //第二次得到其parent_cid = 2
        //第三次得到其parent_cid = 0 找到递归结束条件。结束返回完整路径prams=[255,34,2]
        if (byId.getParentCid()!=0){
            //判断,如果parent_cid不为0,那么代表不是一级分类,继续调用该方法找到一级分类为止。
            findParentPath(byId.getParentCid(),prams);
        }
        return prams;
    }
05、获取分类规格参数/09、获取分类销售属性
/product/attr/base/list/{catelogId}
/product/attr/sale/list/{catelogId}
分析: 涉及到数据库表:pms_attr、pms_attr_group、pms_attr_attrgroup_relation、pms_category
主要涉及字段
attr_type 属性类型[0-销售属性,1-基本属性]
attr_group_id   分组id
attr_id  属性id
主要sql
SELECT * FROM pms_attr_attrgroup_relation WHERE attr_id = 1

SELECT * FROM `pms_attr_group` WHERE  attr_group_id = 2

SELECT * FROM pms_category WHERE cat_id = 225
思路:
-
根据条件查询pms_attr表的基本信息
-
再此基础上再加上一个AttrRespVo,里面包含了 分类名字 分组名字 分类完整路径。
代码:
AttrController
///sale/list/0?t=1652358471413&page=1&limit=10&key=
///base/list/225?t=1652271010514&page=1&limit=10&key=1
@GetMapping("{attrType}/list/{catelogId}")
public R baseAttrList(@RequestParam Map<String, Object> params,
                      @PathVariable("catelogId") Long catelogId,
                      @PathVariable("attrType") String type){
    PageUtils page = attrService.queryBaseAttrPage(params,catelogId,type);
    return R.ok().put("page", page);
}
AttrServiceImpl
/**
 *获取分类规格参数/销售属性
 * @param params 分页、模糊查询参数
 * @param catelogId 分类id
 * @param type 类型/base 规格参数   sele销售属性
 * @return
 */
@Override
public PageUtils queryBaseAttrPage(Map<String, Object> params, Long catelogId, String type) {
    //ATTR_TYPE_BASE(1,"基本属性"),ATTR_TYPE_SALE(0,"销售属性");
    //根据type设置查询条件,如果是base 即 基本属性  attr_type = 1;
    QueryWrapper<AttrEntity> queryWrapper = new QueryWrapper<AttrEntity>().eq("attr_type","base".equalsIgnoreCase(type)?ProductConstant.AttrEnum.ATTR_TYPE_BASE.getCode(): ProductConstant.AttrEnum.ATTR_TYPE_SALE.getCode());
    //存在catelogId 则加上
    if (catelogId!=0){
        queryWrapper.eq("catelog_id",catelogId);
    }
    //模糊查询
    String key = (String) params.get("key");
    //p86销售属性不显示的BUG在这里解决
    if (!StringUtils.isEmpty(key)){
        queryWrapper.and((wrapper)->{
            wrapper.eq("attr_id",key).or().like("attr_name",key);
        });
    }
    //SELECT * FROM `pms_attr` WHERE attr_type = 1 AND  catelog_id = 225
    IPage<AttrEntity> page = this.page(
            new Query<AttrEntity>().getPage(params),
            queryWrapper
    );
    //获得AttrEntity集合
    List<AttrEntity> records = page.getRecords();
    List<Object> respVos = records.stream().map(attrEntity -> {
        //创建一个AttrRespVo作为返回 组装了
        //catelogName,groupName,catelogPath
        AttrRespVo attrRespVo = new AttrRespVo();
        BeanUtils.copyProperties(attrEntity, attrRespVo);
        //设置分类名、分组名
        if ("base".equalsIgnoreCase(type)){
            //如果是规格参数  则可以查询 属性&属性分组关联表pms_attr_attrgroup_relation
            //通过attr_id,属性id,查询pms_attr_attrgroup_relation
            //SELECT * FROM pms_attr_attrgroup_relation WHERE attr_id = 1
            AttrAttrgroupRelationEntity relationEntity = relationDao.selectOne(new QueryWrapper<AttrAttrgroupRelationEntity>().eq("attr_id", attrEntity.getAttrId()));
            //如果查询实体存在,且attr_group_id不为空
            if (relationEntity != null && relationEntity.getAttrGroupId()!=null) {
                Long attrGroupId = relationEntity.getAttrGroupId();
                //通过分组attrGroupId查询pms_attr_group
                //SELECT * FROM `pms_attr_group` WHERE  attr_group_id = 2
                AttrGroupEntity attrGroupEntity = attrGroupDao.selectById(attrGroupId);
                if (attrGroupEntity!=null){
                    //通过查询的attrGroupEntity得到分组名称,设置分组名称
                    attrRespVo.setGroupName(attrGroupEntity.getAttrGroupName());
                }
            }
        }
        //通过分类id,获得分类实体,设置分类名称
        CategoryEntity categoryEntity = categoryDao.selectById(attrEntity.getCatelogId());
        if (categoryEntity != null) {
            attrRespVo.setCatelogName(categoryEntity.getName());
        }
        return attrRespVo;

    }).collect(Collectors.toList());

    PageUtils pageUtils = new PageUtils(page);

    pageUtils.setList(respVos);

    return pageUtils;
}
06、保存属性【规格参数,销售属性】
POST方式
请求路径 :/product/attr/save
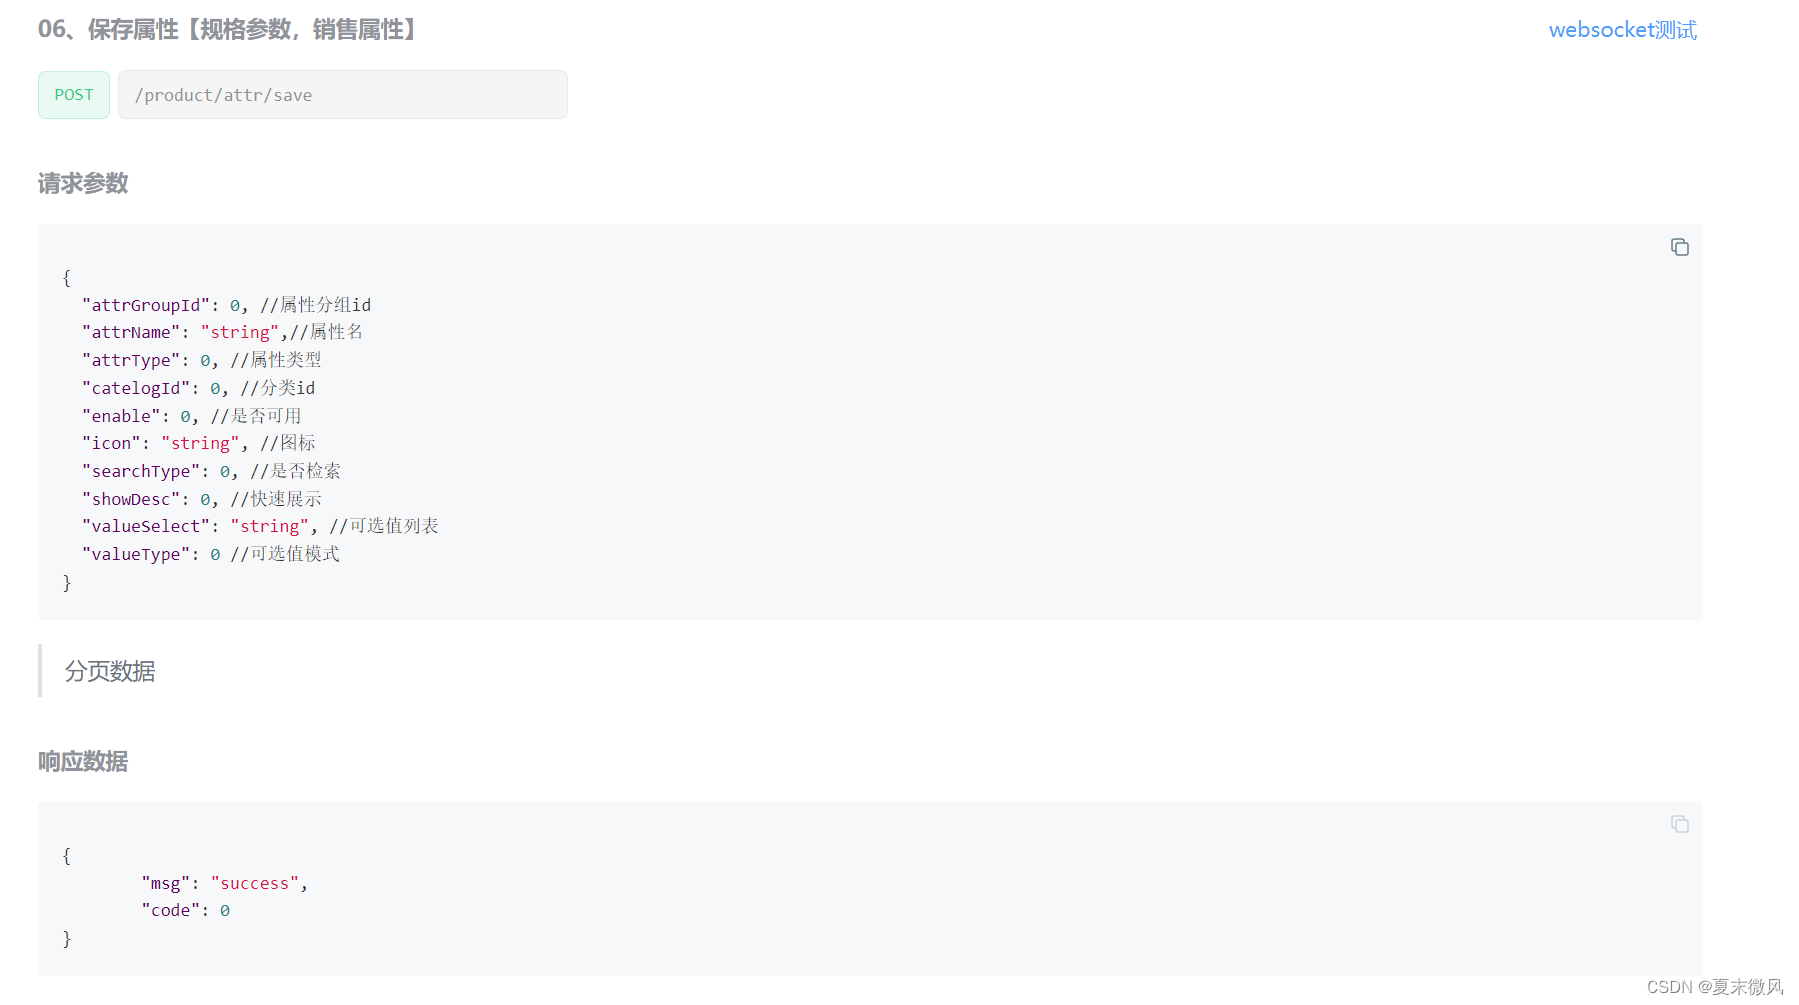
分析: 涉及到数据库表:pms_attr、pms_attr_attrgroup_relation
主要涉及字段
attr_type 属性类型[0-销售属性,1-基本属性]
attr_group_id   分组id
attr_id  属性id
主要sql
最简单不过的两条插入sql
思路:
-
根据保存pms_attr表的基本信息
-
再去pms_attr_attrgroup_relation 关联表里保存一条信息,分别设置属性分组id,和属性id
需要注意的是:由于传入参数多了一个attr_group_id 分组id,attr实体类本身是没有这个属性的,这个时候使用AttrVo来接收进行保存。
代码:
AttrController
 /**
   * 保存
   */
  @RequestMapping("/save")
  public R save(@RequestBody AttrVo attr){
	  attrService.saveAttr(attr);
      return R.ok();
  }
AttrServiceImpl
@Override
public void saveAttr(AttrVo attr) {
    //1、先保持自己的信息
    AttrEntity attrEntity = new AttrEntity();
    BeanUtils.copyProperties(attr,attrEntity);
    this.save(attrEntity);
    //2、保存关联表的信息
    if (attr.getAttrType()==ProductConstant.AttrEnum.ATTR_TYPE_BASE.getCode() && attr.getAttrGroupId()!=null){
        AttrAttrgroupRelationEntity relationEntity = new AttrAttrgroupRelationEntity();
        relationEntity.setAttrGroupId(attr.getAttrGroupId());
        relationEntity.setAttrId(attrEntity.getAttrId());
        relationDao.insert(relationEntity);
    }
}
07、查询属性详情
GET 方式
请求地址:/product/attr/info/{attrId}
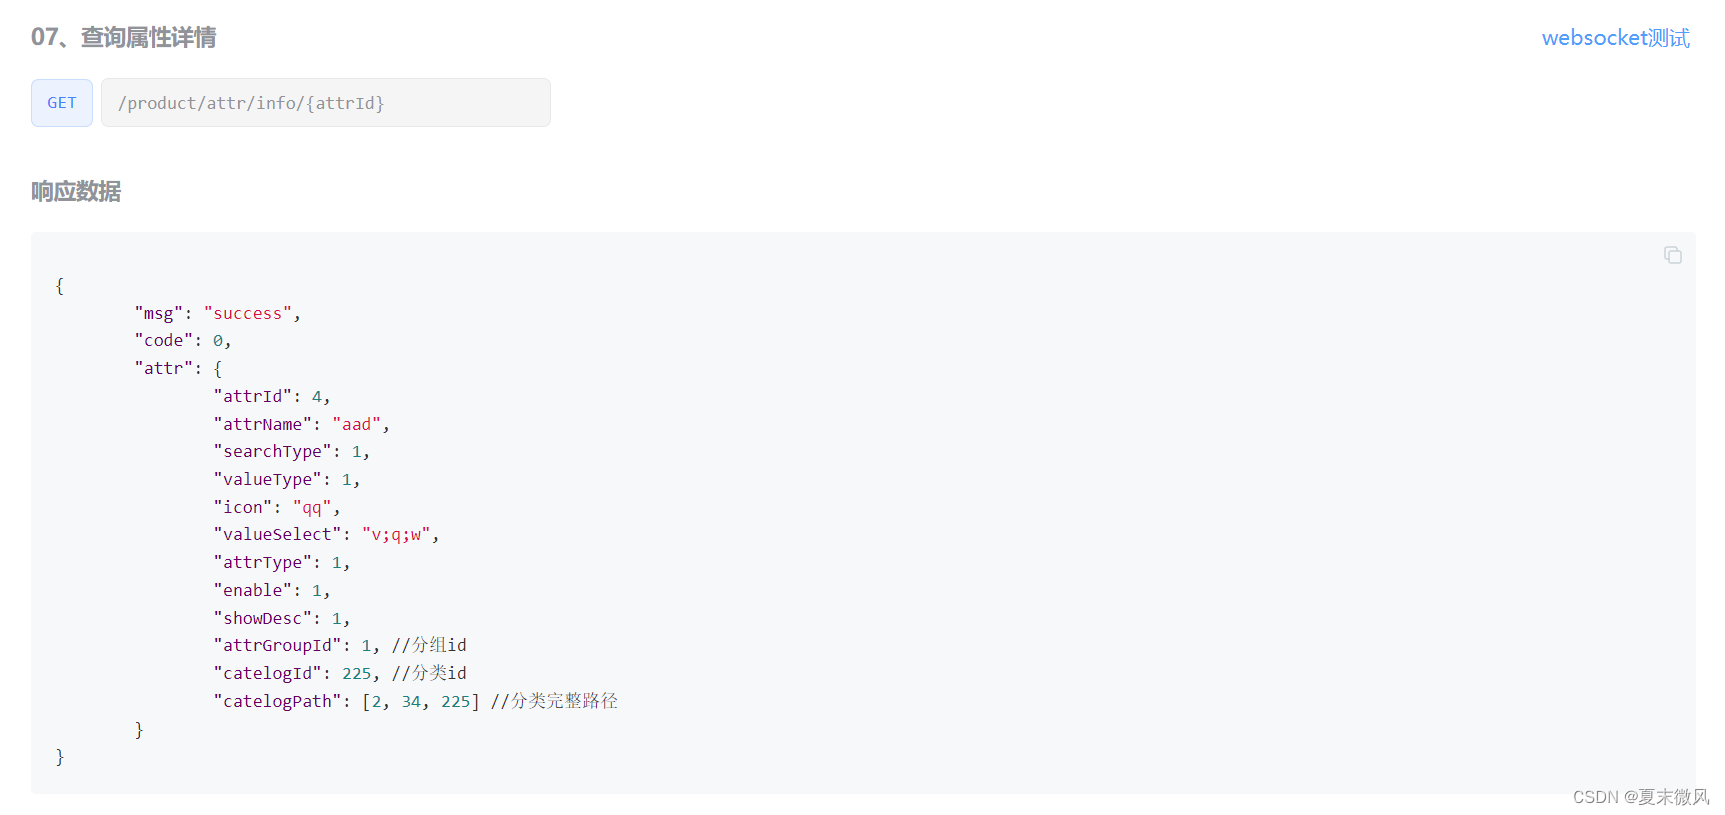
业务需求:
传入属性id,返回属性详情,要求要返回详情。对应的是前端属性修改页面的业务,要返回分组id和需要多返回一个所属分类字段,即在AttrRespVo中加上,private Long[] catelogPath;并且返回AttrRespVo。
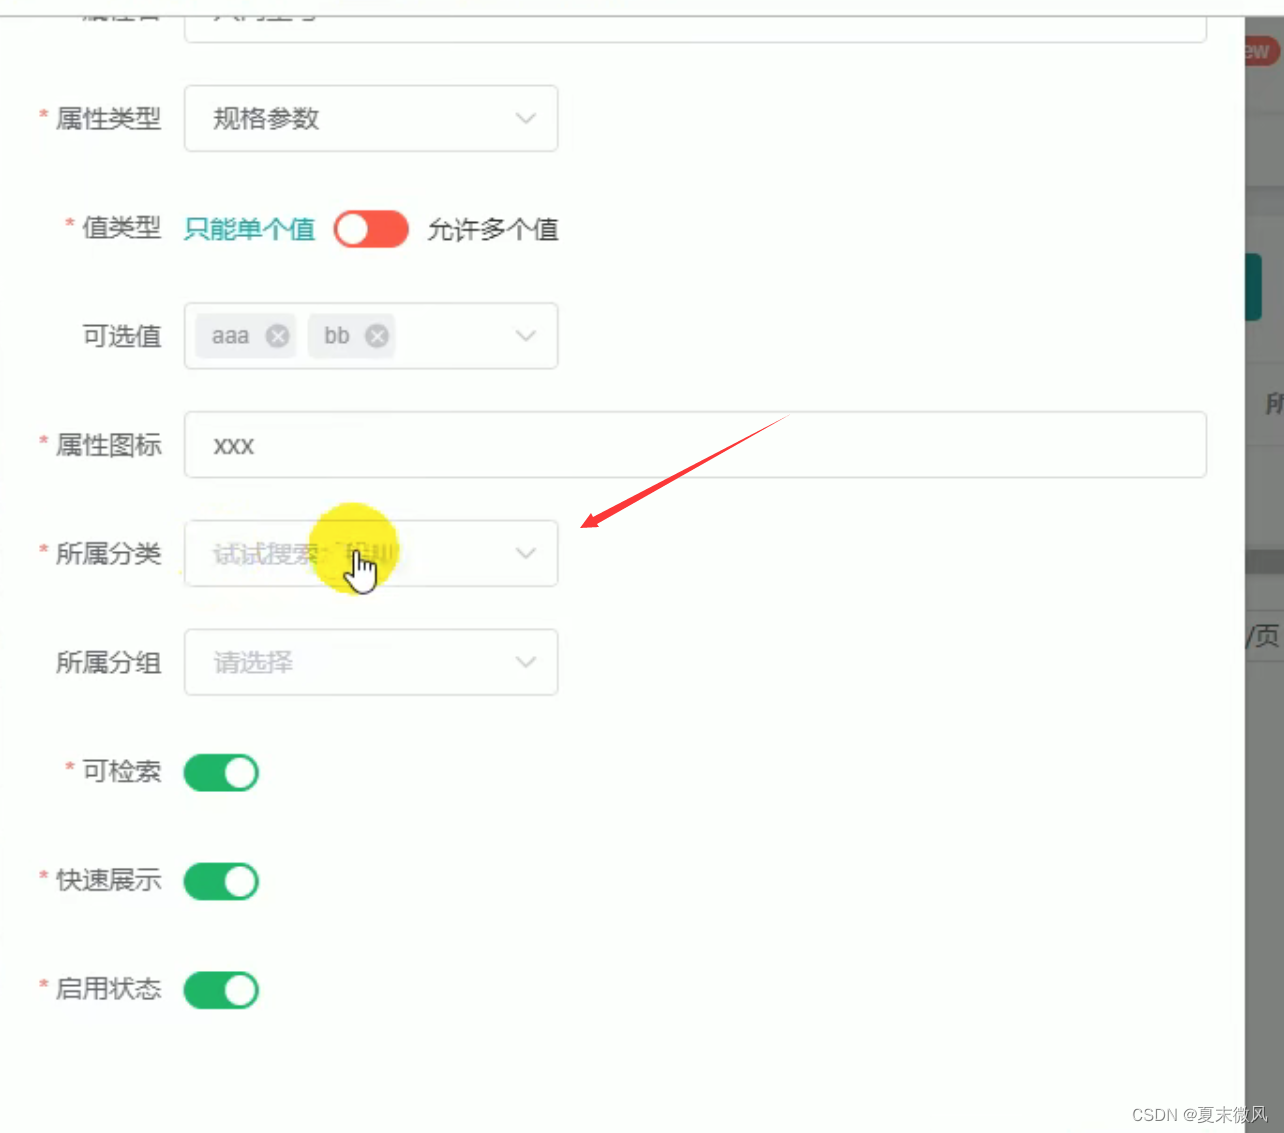
思路:
- 通过属性id,查询属性表的基本信息,封装到AttrRespVo中去。
- 在AttrRespVo中设置上分组id,以及分类完全路径。
查属性&属性分组&关联表,通过attrid,得到attrGroupId.
分类完整路径直接调用之前的方法findCatelogPath(分类id)
分析:
涉及到数据库表:pms_attr属性表、attr_group_id属性分组表、pms_attr_attrgroup_relation属性&属性分组&关联表
主要涉及字段
attr_id 属性id            # SELECT * FROM `pms_attr` WHERE attr_id =1  获得pms_attr基本属性
attr_group_id 属性分组id   # SELECT * FROM pms_attr_attrgroup_relation WHERE attr_id = 1 获得attr_group_id
代码:
AttrController
/**
 * 信息
 */
@RequestMapping("/info/{attrId}")
public R info(@PathVariable("attrId") Long attrId) {
    AttrRespVo respVo = attrService.getAttrInfo(attrId);
    return R.ok().put("attr", respVo);
}
AttrServiceImpl
@Override
public AttrRespVo getAttrInfo(Long attrId) {
    AttrRespVo respVo = new AttrRespVo();
    AttrEntity attrEntity = this.getById(attrId);
    //通过属性id,得到基本信息封装到respVo中去。
    BeanUtils.copyProperties(attrEntity,respVo);
    //1、设置分组信息
    if (attrEntity.getAttrType() == ProductConstant.AttrEnum.ATTR_TYPE_BASE.getCode()){
        //通过属性id,查询属性&属性分组关联表,得到属性分组id
        AttrAttrgroupRelationEntity relationEntity = relationDao.selectOne(new QueryWrapper<AttrAttrgroupRelationEntity>().eq("attr_id", attrEntity.getAttrId()));
        if (relationEntity != null) {
            Long attrGroupId = relationEntity.getAttrGroupId();
            AttrGroupEntity attrGroupEntity = attrGroupDao.selectById(attrGroupId);
            if (attrGroupEntity!=null){
                //设置属性分组id,顺便查询数组的名称。方便前端展示
                respVo.setAttrGroupId(attrGroupEntity.getAttrGroupId());
                respVo.setGroupName(attrGroupEntity.getAttrGroupName());
            }
        }
    }

    //2、设置分类信息
    //调用找到catelogId的完整路径方法
    Long[] catelogPath = categoryService.findCatelogPath(attrEntity.getCatelogId());
    //设置完整路径
    respVo.setCatelogPath(catelogPath);
    //顺便查询分类的名称。方便前端展示
    CategoryEntity categoryEntity = categoryDao.selectById(attrEntity.getCatelogId());
    if (categoryEntity!=null){
        respVo.setCatelogName(categoryEntity.getName());
    }

    return respVo;
}
08、修改属性
POST 方式
请求路径 /product/attr/update
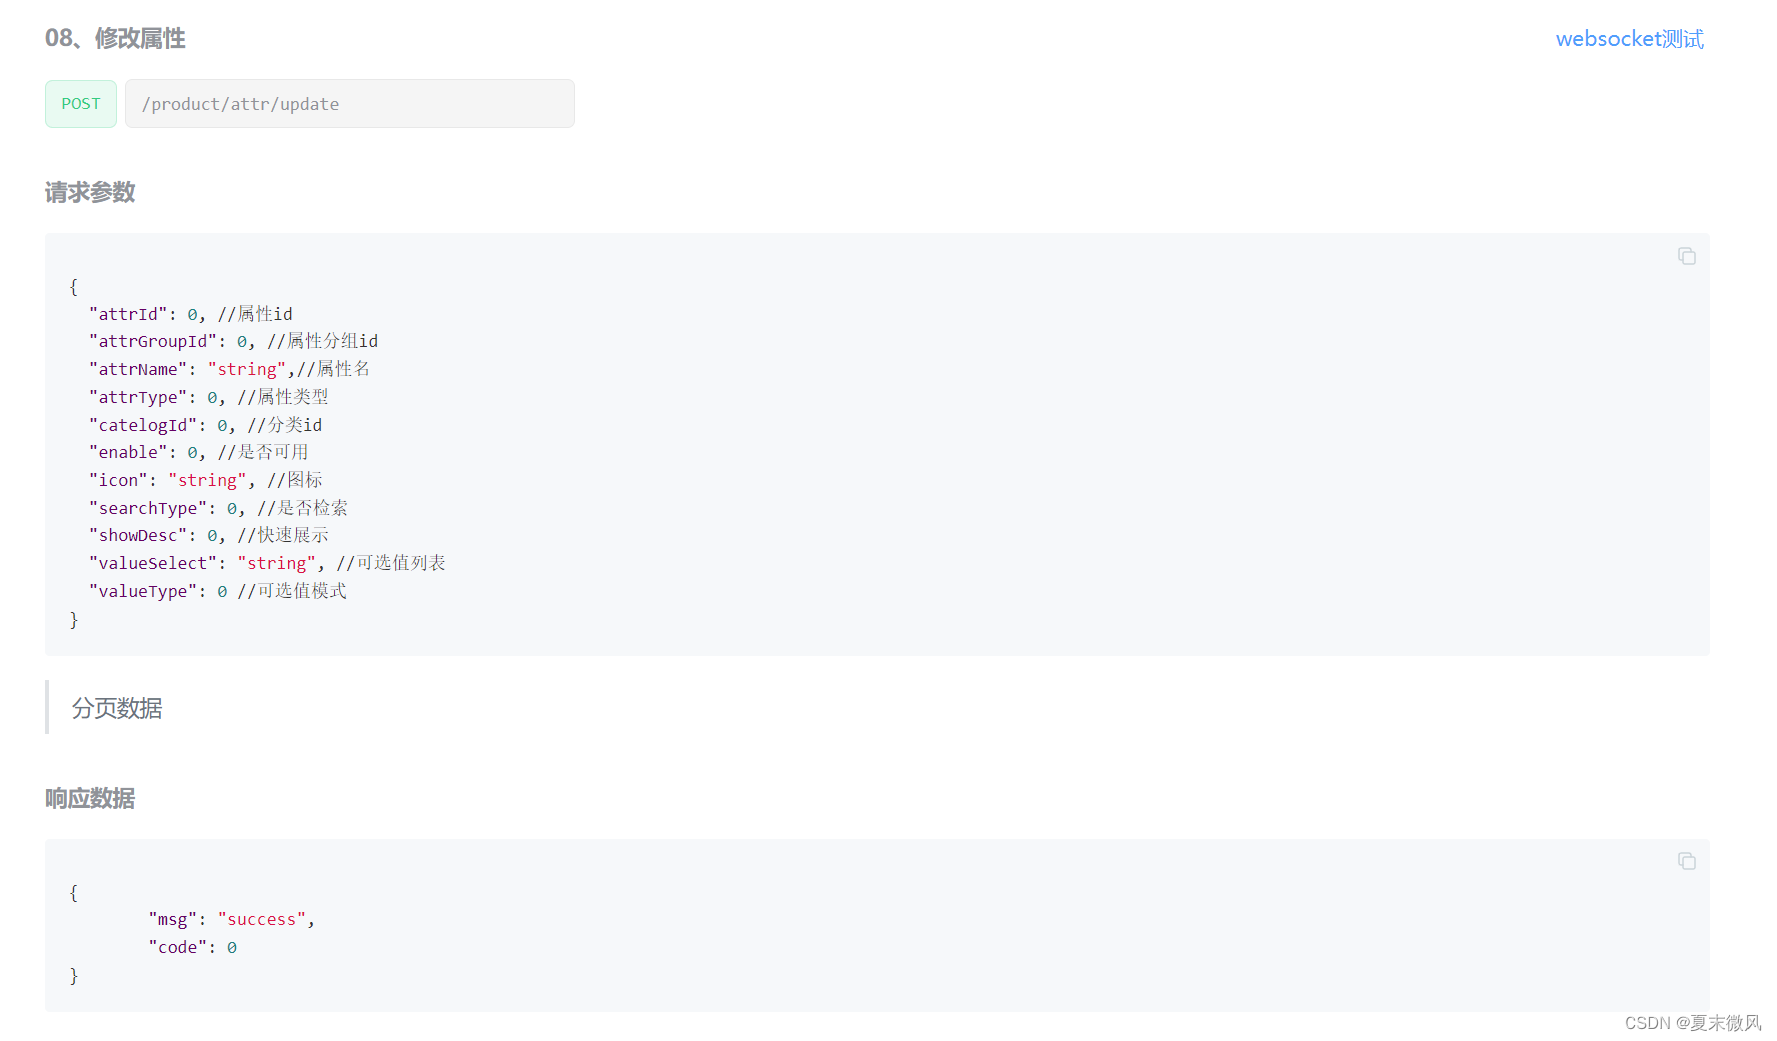
业务需求:
修改pms_attr表。 传入传入用一个Vo接收。AttrVo。Post请求 即 @RequestBody AttrVo attr)
对pms_attr表进行修改后,如果属性类型是基本属性,还应该对pms_attr_attrgroup_relation进行修改。
思路:
-
先将传入的Vo类,对应属性封装到attrEntity实体,通过实体修改pms_attr 表
-
判断:如果是基本属性,新建一个AttrAttrgroupRelationEntity 属性&属性分组&关联实体,设置属性id,属性分组id.
-
再判断:查询数据库里是否存在传入进来的属性id,对应的一条数据。
如果有:就调用修改方法。
如果没有:就调用新增方法。
分析:
涉及数据库表:pms_attr 属性表、pms_attr_attrgroup_relation 属性&属性分组&关联表
主要涉及字段
attr_id 属性id            # SELECT * FROM `pms_attr` WHERE attr_id =1  获得pms_attr基本属性
attr_group_id 属性分组id   # SELECT * FROM pms_attr_attrgroup_relation WHERE attr_id = 1 获得attr_group_id
代码:
AttrController
/**
 * 修改
 */
@RequestMapping("/update")
// @RequiresPermissions("product:attr:update")
public R update(@RequestBody AttrVo attr) {
    attrService.updateAttr(attr);

    return R.ok();
}
AttrServiceImpl
@Override
@Transactional
public void updateAttr(AttrVo attr) {
    //基本修改
    AttrEntity attrEntity = new AttrEntity();
    BeanUtils.copyProperties(attr,attrEntity);
    this.updateById(attrEntity);

    //修改分组关联
    if (attrEntity.getAttrType() == ProductConstant.AttrEnum.ATTR_TYPE_BASE.getCode()){
        AttrAttrgroupRelationEntity relationEntity = new AttrAttrgroupRelationEntity();
        relationEntity.setAttrId(attr.getAttrId());
        relationEntity.setAttrGroupId(attr.getAttrGroupId());

        Integer count = relationDao.selectCount(new QueryWrapper<AttrAttrgroupRelationEntity>().eq("attr_id", attr.getAttrId()));
        if (count>0){
            //修改
            relationDao.update(relationEntity,new UpdateWrapper<AttrAttrgroupRelationEntity>().eq("attr_id",attr.getAttrId()));
        }else{
            relationDao.insert(relationEntity);
        }
    }

}
10、获取属性分组的关联的所有属性
GET 方式
请求路径:/product/attrgroup/{attrgroupId}/attr/relation
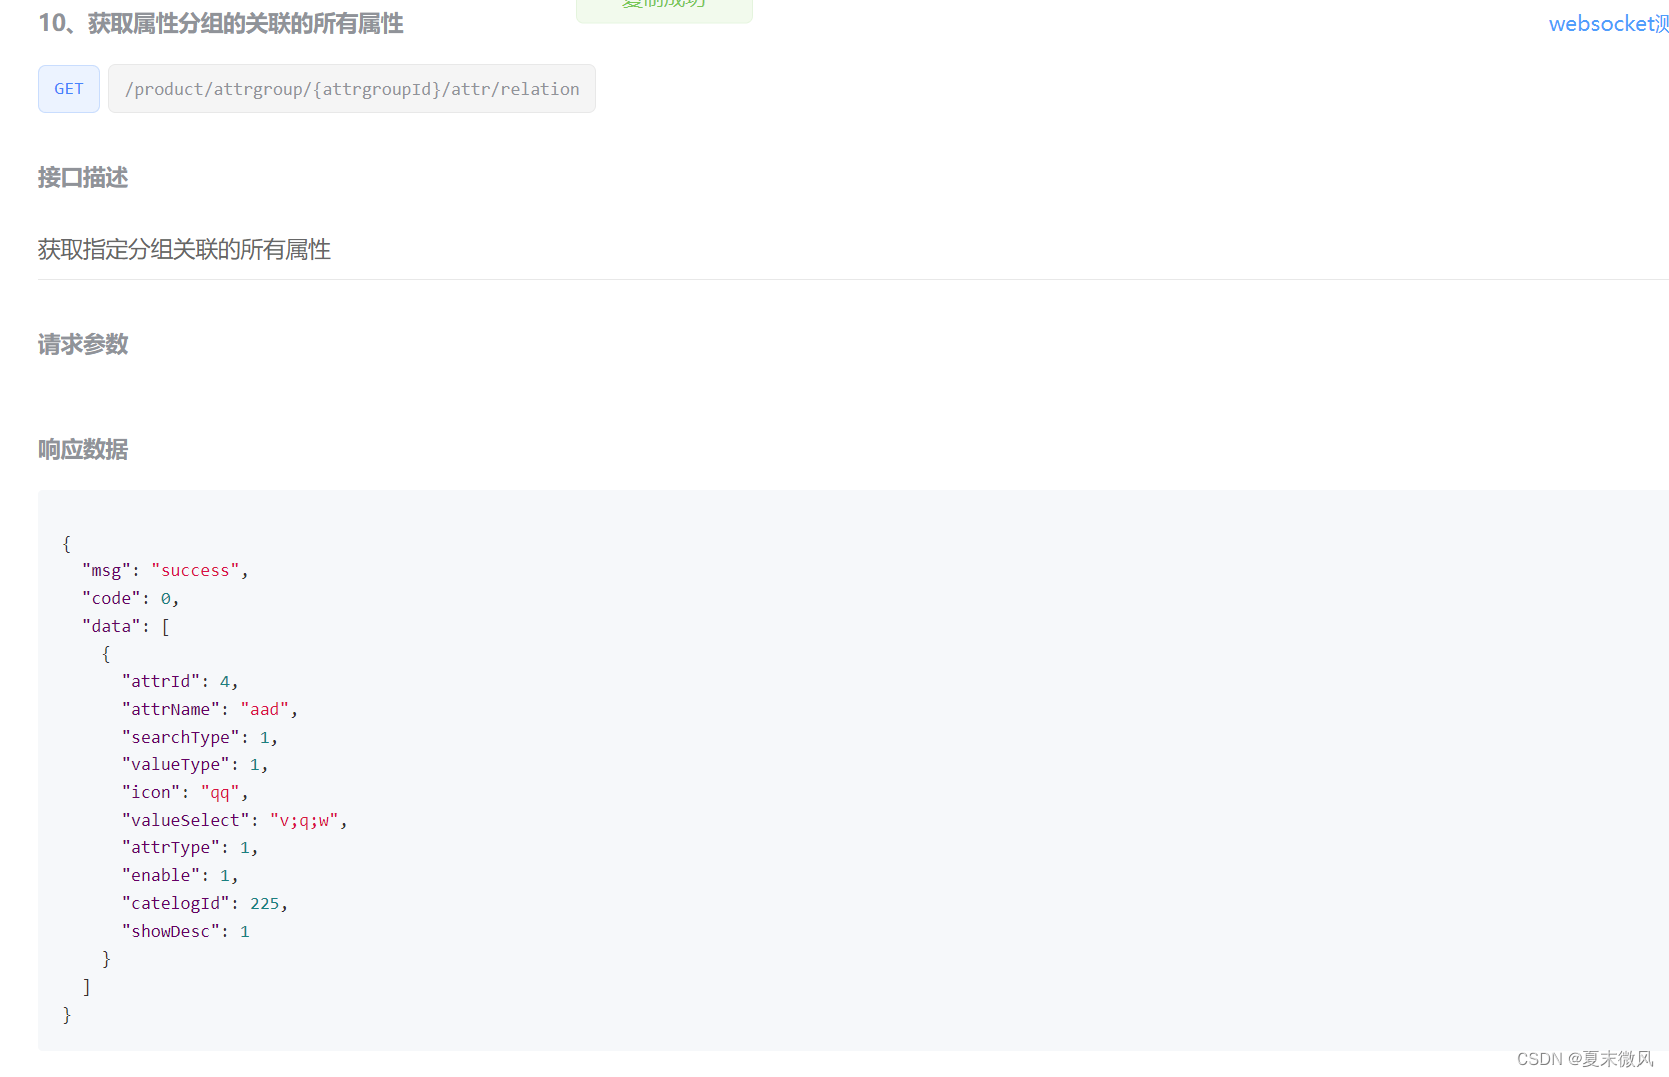
业务需求:
传入attrgroupId,查询所有在该属性分组下的属性。
思路:
- 传入attrgroupId,通过属性分组id,查询属性&属性分组&关联表,得到关联实体的集合。
- 对集合进行处理,收集得到对应是attrgroupId的 attrId的集合。
- 通过批量查询,得到属性实体类集合
分析:
涉及数据库表:pms_attr 属性表、pms_attr_attrgroup_relation 属性&属性分组&关联表
主要涉及字段
attr_id 属性id            # listByIds 根据attrIds,得到属性实体集合
attr_group_id 属性分组id   # selectList 查询pms_attr_attrgroup_relation表,得到关联实体的集合。
代码:
AttrGroupController
@GetMapping("{attrgroupId}/attr/relation")
public R attrRelation(@PathVariable("attrgroupId") Long attrgroupId){
    List<AttrEntity> entities = attrService.getRelationAttr(attrgroupId);

    return R.ok().put("data",entities);
}
AttrServiceImpl
/**
 * 根据分组Id,查找关联的所有基本属性
 * @param attrgroupId
 * @return
 */
@Override
public List<AttrEntity> getRelationAttr(Long attrgroupId) {
    List<AttrAttrgroupRelationEntity> relationEntityList =
            relationDao.selectList(new QueryWrapper<AttrAttrgroupRelationEntity>().eq("attr_group_id", attrgroupId));
    //收集attr_id的集合
    List<Long> attrIds = relationEntityList.stream().map(relationEntity -> {
        return relationEntity.getAttrId();
    }).collect(Collectors.toList());

    if (CollectionUtils.isEmpty(attrIds)){
        return null;
    }
    Collection<AttrEntity> attrEntities = this.listByIds(attrIds);
    return (List<AttrEntity>) attrEntities;
}
11、添加属性与分组关联关系
POST 方式
请求路径 /product/attrgroup/attr/relation
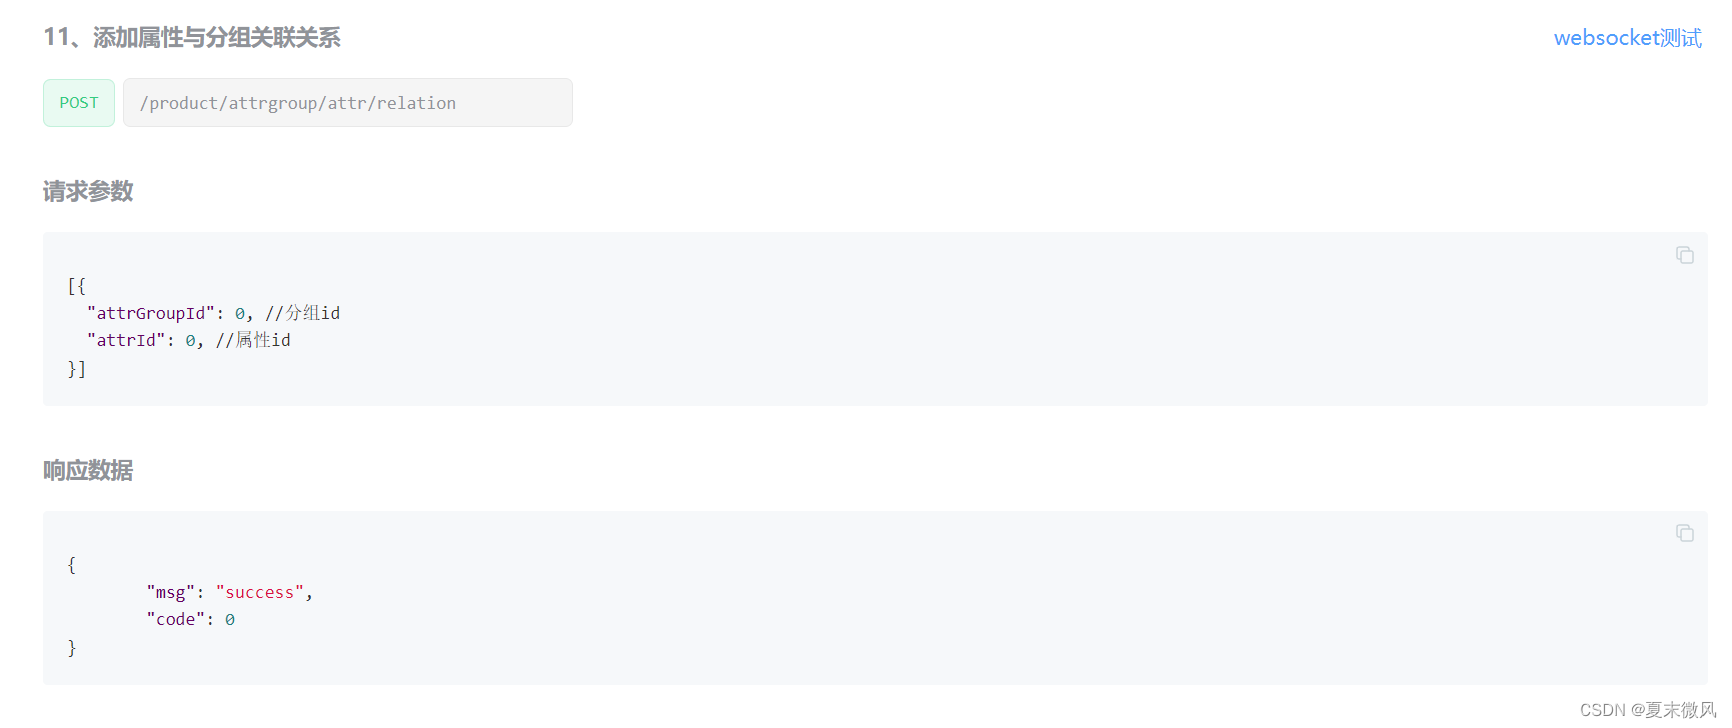
业务需求:
传入(属性id,属性分组id)的集合,进行添加关联关系。
思路:
- 创建一个AttrGroupRelationVo 来接收参数。@RequestBody List vos
- 对集合vos进行处理,为每一个关联类实体设置属性id,属性分组id。
- 进行批量添加
分析:
涉及数据库表:pms_attr_attrgroup_relation 属性&属性分组&关联表
主要涉及字段
attr_id 属性id
attr_group_id 属性分组id
代码:
AttrGroupController
@PostMapping("/attr/relation")
public R attrRelation(@RequestBody List<AttrGroupRelationVo> vos) {

    attrAttrgroupRelationService.saveBatch(vos);

   return R.ok();
}
AttrAttrgroupRelationServiceImpl
@Override
public void saveBatch(List<AttrGroupRelationVo> vos) {
    List<AttrAttrgroupRelationEntity> attrAttrgroupRelationEntities = vos.stream().map((item) -> {
        AttrAttrgroupRelationEntity relationEntity = new AttrAttrgroupRelationEntity();
        BeanUtils.copyProperties(item, relationEntity);
        return relationEntity;
    }).collect(Collectors.toList());
    this.saveBatch(attrAttrgroupRelationEntities);
}
12、删除属性与分组的关联关系
POST 方式
请求路径 /product/attrgroup/attr/relation/delete

业务需求:
传入(属性id,属性分组id)的集合,删除属性与分组的关联关系
思路:
-
AttrGroupRelationVo来接收参数,@RequestBody List vos
-
对集合vos进行处理,为每一个关联类实体设置对应参数。得到关联类实体集合
-
调用批量删除方法deleteBatchRelation 自己写sql
void deleteBatchRelation(@Param("entities") List<AttrAttrgroupRelationEntity> entities);<delete id="deleteBatchRelation"> DELETE FROM `pms_attr_attrgroup_relation` WHERE <foreach collection="entities" item="item" separator=" OR "> (attr_id=#{item.attrId} AND attr_group_id = #{item.attrGroupId}) </foreach> </delete>
分析:
涉及数据库表:pms_attr_attrgroup_relation 属性&属性分组&关联表
主要涉及字段
attr_id 属性id
attr_group_id 属性分组id
代码:
AttrGroupController
//attr/relation/delete
@PostMapping("attr/relation/delete")
public R deleteRelation(@RequestBody AttrGroupRelationVo[] vos){
    attrService.deleteRelation(vos);
    return R.ok();
}
AttrAttrgroupRelationServiceImpl
  /**
     * 删除属性attr关联表
     * @param vos
     */
    @Override
    public void deleteRelation(AttrGroupRelationVo[] vos) {
//        relationDao.delete(new QueryWrapper<>().eq("attr_id",1L).eq("attr_group_id",1L));
        List<AttrAttrgroupRelationEntity> entities = Arrays.asList(vos).stream().map((item) -> {
            AttrAttrgroupRelationEntity relationEntity = new AttrAttrgroupRelationEntity();
            BeanUtils.copyProperties(item, relationEntity);
            return relationEntity;
        }).collect(Collectors.toList());
        relationDao.deleteBatchRelation(entities);
    }
13、获取属性分组没有关联的其他属性
GET 方式
请求地址 /product/attrgroup/{attrgroupId}/noattr/relation
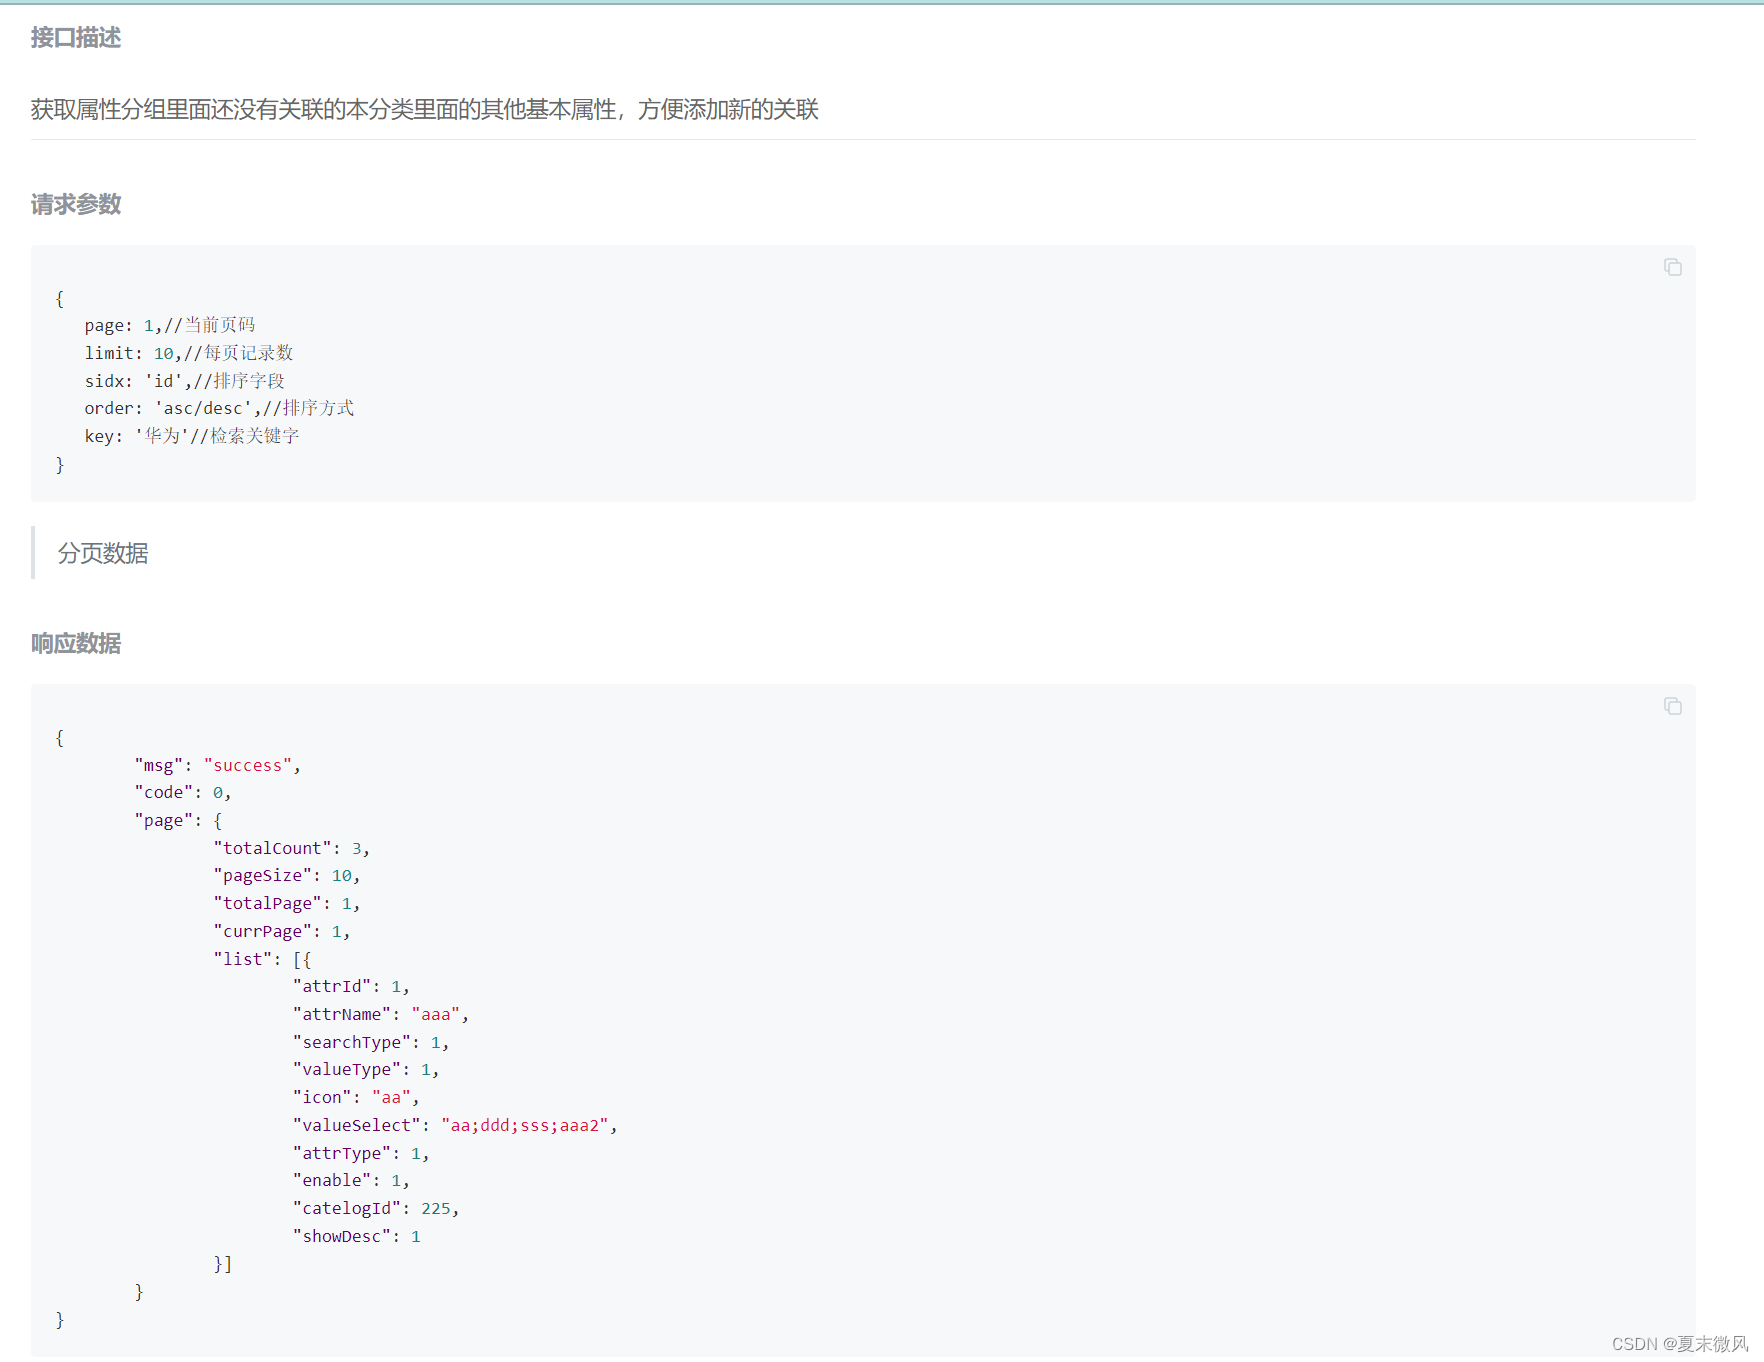
业务需求:
传入attrgroupId,查询所有在该属性分组下的没有关联的属性。
注意:
当前分组只能关联自己所属分类里面的所有属性
当前分组只能关联别的分组没有引用的属性
思路:
- 通过属性分组id,查询属性分组表,得到其分类id(catalogId)
- 通过分类id,查询属性分组表,得到在该分类下的属性分组id集合。
- 查询属性&属性分组关联表,通过属性分组id集合,得到关联实体集合。
- 对关联实体集合进行处理,得到属性id集合
- 从当前分类的所有属性中移除这些属性
- 最后带上模糊条件查询
分析:
涉及数据库表:pms_attr属性表、pms_attr_group属性分组表、pms_attr_attrgroup_relation 属性&属性分组&关联表
主要涉及字段
attr_id 属性id
attr_group_id 属性分组id
代码:
AttrGroupController
@GetMapping("{attrgroupId}/noattr/relation")
public R attrNoRelation(@PathVariable("attrgroupId") Long attrgroupId,
                        @RequestParam Map<String, Object> params){
    PageUtils page = attrService.getNoRelationAttr(params,attrgroupId);

    return R.ok().put("page",page);
}
/**
     * 获取当前分组没有关联的所有属性
     * @param params
     * @param attrgroupId
     * @return
     */
    @Override
    public PageUtils getNoRelationAttr(Map<String, Object> params, Long attrgroupId) {
        //1、当前分组只能关联自己所属分类里面的所有属性
        AttrGroupEntity attrGroupEntity = attrGroupDao.selectById(attrgroupId);
        Long catelogId = attrGroupEntity.getCatelogId();
        //2、当前分组只能关联别的分组没有引用的属性
        //2.1、找到分类下的其他分组
        List<AttrGroupEntity> groupEntities = attrGroupDao.selectList(new QueryWrapper<AttrGroupEntity>().eq("catelog_id", catelogId));
        List<Long> attrGroupIds = groupEntities.stream().map((groupEntity) -> {
            return groupEntity.getAttrGroupId();
        }).collect(Collectors.toList());
        //2.2、这些分组关联的其他属性
        List<AttrAttrgroupRelationEntity> relationEntities = relationDao.selectList(new QueryWrapper<AttrAttrgroupRelationEntity>().in("attr_group_id", attrGroupIds));
        List<Long> attrIds = relationEntities.stream().map((relationEntity) -> {
            return relationEntity.getAttrId();
        }).collect(Collectors.toList());

        //2.3、从当前分类的所有属性中移除这些属性
//        List<AttrEntity> attrEntities =this.baseMapper.selectList(new QueryWrapper<AttrEntity>().eq("catelog_id", catelogId).notIn("attr_id",attrIds));
        QueryWrapper<AttrEntity> wrapper = new QueryWrapper<AttrEntity>().eq("catelog_id", catelogId).eq("attr_type",ProductConstant.AttrEnum.ATTR_TYPE_BASE.getCode());
        if (!CollectionUtils.isEmpty(attrIds)){
            wrapper.notIn("attr_id", attrIds);
        }
        //分页查询带条件,模糊查询
        String key = (String) params.get("key");
        if (StringUtils.isEmpty(key)){
            wrapper.and((queryWrapper)->{
                queryWrapper.eq("attr_id",key).or().like("attr_name",key);
            });
        }

        IPage<AttrEntity> page = this.page(new Query<AttrEntity>().getPage(params), wrapper);

        PageUtils pageUtils = new PageUtils(page);

        return pageUtils;
    }
14、获取分类关联的品牌
GET 方式
请求地址 /product/categorybrandrelation/brands/list
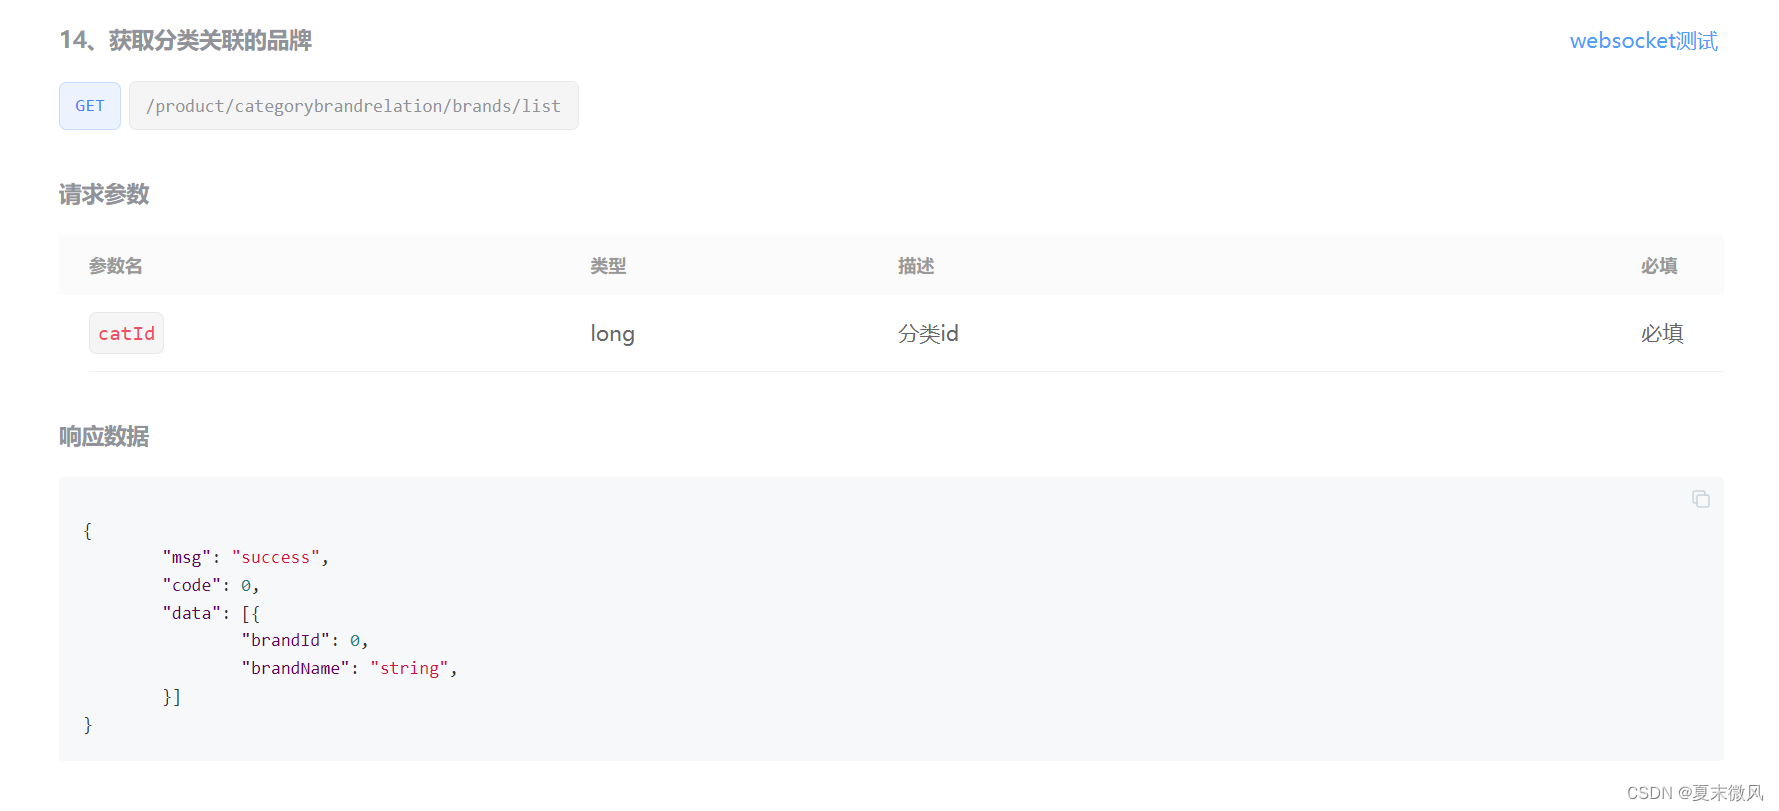
业务需求:
传入分类id,得到其分类所关联的所有品牌集合。
入参:@RequestParam(value = “catId”,required = true) Long catId
出参:List collect
封装一个Vo BrandVo
public class BrandVo {
    /**
     * 品牌id
     */
    private Long brandId;
    /**
     *品牌名称
     */
    private String brandName;
}
注意:分类品牌关联表 有两个冗余字段,分别为品牌名称和分类名称。这冗余是为了方便,否则想得到名称还得去查表。
思路:
- 通过分类id,查询pms_category_brand_relation分类品牌关联表,得到该分类下所有品牌id的集合。
- 对集合进行处理,封装数据到BrandVo
分析:
涉及数据库表:pms_category_brand_relation分类品牌关联表
主要涉及字段
catelog_id 分类id
brand_id 品牌id
代码:
CategoryBrandRelationController
/**
 * 获取分类关联的品牌
 * /product/categorybrandrelation/brands/list
 */
@GetMapping("/brands/list")
public R relationBrandsList(@RequestParam(value = "catId",required = true) Long catId){
    List<BrandEntity> vos =categoryBrandRelationService.getBrandsByCatId(catId);

    List<BrandVo> collect = vos.stream().map(item -> {
        BrandVo brandVo = new BrandVo();
        brandVo.setBrandId(item.getBrandId());
        brandVo.setBrandName(item.getName());
        return brandVo;
    }).collect(Collectors.toList());

    return R.ok().put("data",collect);
}
CategoryBrandRelationServiceImpl
@Override
public List<BrandEntity> getBrandsByCatId(Long catId) {
    List<CategoryBrandRelationEntity> relationEntityList = baseMapper.selectList(new QueryWrapper<CategoryBrandRelationEntity>().eq("catelog_id", catId));

    List<BrandEntity> collect = relationEntityList.stream().map(item -> {
        Long brandId = item.getBrandId();
        BrandEntity byId = brandService.getById(brandId);
        return byId;
    }).collect(Collectors.toList());
    return collect;
}
15、获取品牌关联的分类
GET 方式
请求地址 /product/categorybrandrelation/catelog/list

业务需求:
入参:品牌id @RequestParam(“brandId”) Long brandId
出参:List data
思路:
- 通过品牌id,查询关联的分类集合。
分析:
太简单了不分析了
代码:
CategoryBrandRelationController
/**
 * 获取当前品牌关联的所有分类
 */
@GetMapping("/catelog/list")
// @RequiresPermissions("product:categorybrandrelation:list")
public R catelogList(@RequestParam("brandId") Long brandId){
    List<CategoryBrandRelationEntity> data = categoryBrandRelationService.list(
            new QueryWrapper<CategoryBrandRelationEntity>().eq("brand_id",brandId)
    );

    return R.ok().put("data", data);
}
16、新增品牌与分类关联关系
POST 方式
请求路径:product/categorybrandrelation/save
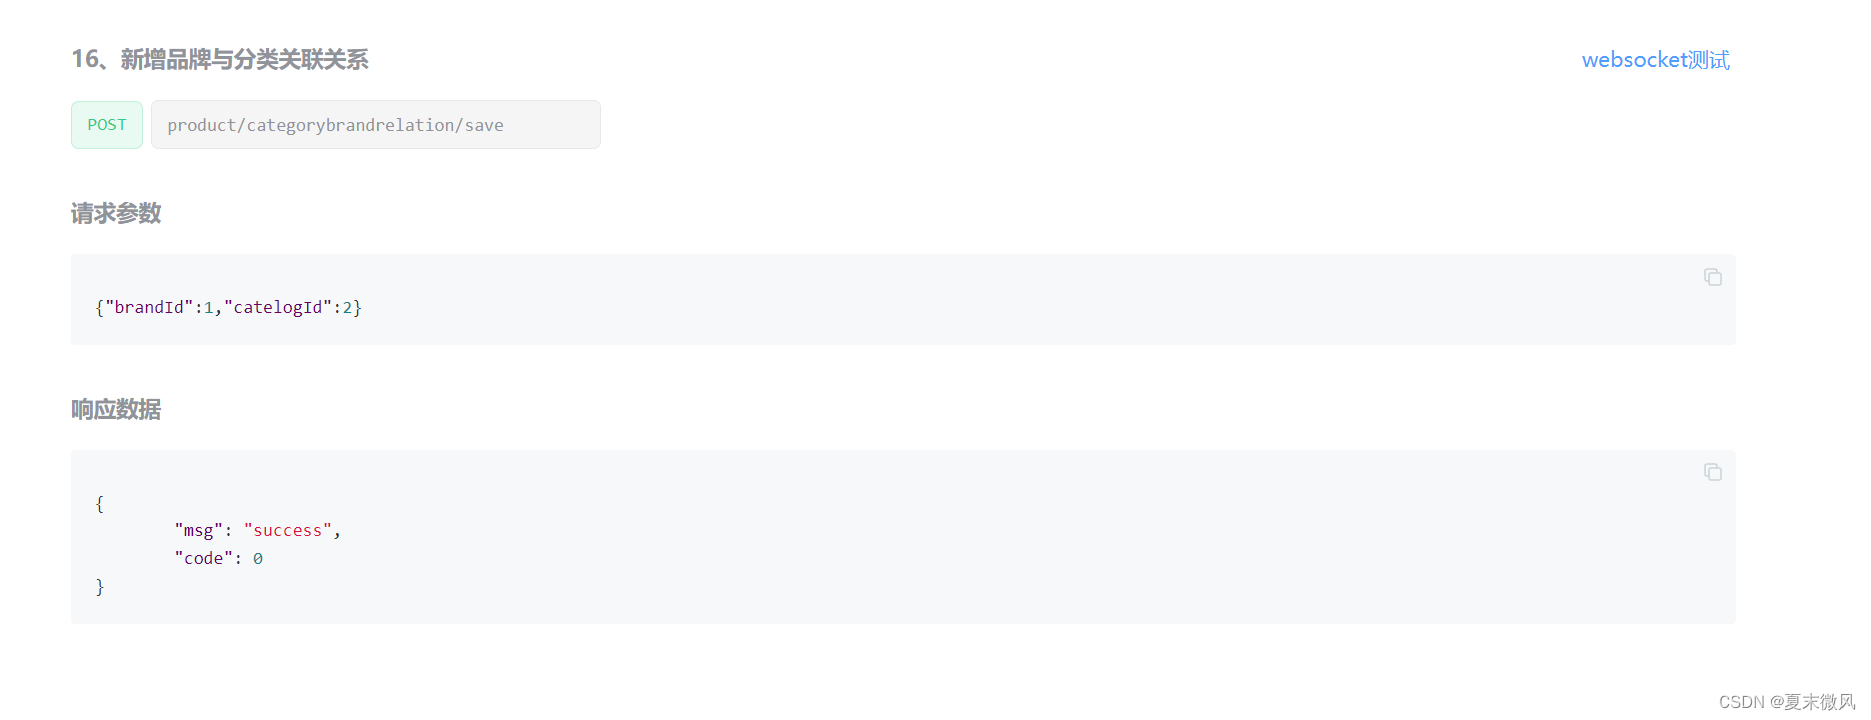
业务需求:
入参:@RequestBody CategoryBrandRelationEntity categoryBrandRelation 已经包含了 品牌id,分类id
思路:
- 通过入参得到品牌id,分类id
- 通过id查询详细名称,设置冗余字段名称
- 插入方法save
分析:
简单的查询,就不分析了。
代码:
CategoryBrandRelationController
 /**
   * 保存
   */
  @RequestMapping("/save")
 // @RequiresPermissions("product:categorybrandrelation:save")
  public R save(@RequestBody CategoryBrandRelationEntity categoryBrandRelation){
categoryBrandRelationService.saveDetail(categoryBrandRelation);

      return R.ok();
  }
CategoryBrandRelationServiceImpl
@Override
public void saveDetail(CategoryBrandRelationEntity categoryBrandRelation) {
    Long brandId = categoryBrandRelation.getBrandId();
    Long catelogId = categoryBrandRelation.getCatelogId();
    //1、查询详细名称
    BrandEntity brandEntity = brandDao.selectById(brandId);
    CategoryEntity categoryEntity = categoryDao.selectById(catelogId);
    categoryBrandRelation.setBrandName(brandEntity.getName());
    categoryBrandRelation.setCatelogName(categoryEntity.getName());
    this.save(categoryBrandRelation);
}
17、获取分类下所有分组&关联属性
GET 方式
请求方式 /product/attrgroup/{catelogId}/withattr
响应数据
{
	"msg": "success",
	"code": 0,
	"data": [{
		"attrGroupId": 1,
		"attrGroupName": "主体",
		"sort": 0,
		"descript": "主体",
		"icon": "dd",
		"catelogId": 225,
		"attrs": [{
			"attrId": 7,
			"attrName": "入网型号",
			"searchType": 1,
			"valueType": 0,
			"icon": "xxx",
			"valueSelect": "aaa;bb",
			"attrType": 1,
			"enable": 1,
			"catelogId": 225,
			"showDesc": 1,
			"attrGroupId": null
			}, {
			"attrId": 8,
			"attrName": "上市年份",
			"searchType": 0,
			"valueType": 0,
			"icon": "xxx",
			"valueSelect": "2018;2019",
			"attrType": 1,
			"enable": 1,
			"catelogId": 225,
			"showDesc": 0,
			"attrGroupId": null
			}]
		},
		{
		"attrGroupId": 2,
		"attrGroupName": "基本信息",
		"sort": 0,
		"descript": "基本信息",
		"icon": "xx",
		"catelogId": 225,
		"attrs": [{
			"attrId": 11,
			"attrName": "机身颜色",
			"searchType": 0,
			"valueType": 0,
			"icon": "xxx",
			"valueSelect": "黑色;白色",
			"attrType": 1,
			"enable": 1,
			"catelogId": 225,
			"showDesc": 1,
			"attrGroupId": null
		}]
	}]
}
业务需求:
获取分类下所有分组和分组下的属性。
例如:分类id 225下有 属性分组id (1、2、4、5)。其中 属性分组1下有 关联了两个属性 attr(2、3)
入参:@PathVariable(“catelogId”) Long catelogId
出参:List vos;
创建一个vo AttrGroupWithAttrsVo 封装要返回的数据。
@Data
public class AttrGroupWithAttrsVo {

    /**
     * 分组id
     */
    private Long attrGroupId;
    /**
     * 组名
     */
    private String attrGroupName;
    /**
     * 排序
     */
    private Integer sort;
    /**
     * 描述
     */
    private String descript;
    /**
     * 组图标
     */
    private String icon;
    /**
     * 所属分类id
     */
    private Long catelogId;
	//对应属性集合
    private List<AttrEntity> attrs;
}
思路:
- 根据分类Id查出所有属性分组集合
- 对集合进行处理,查询属性分组下的所有属性,添加到vo里去。
分析:
代码:
AttrGroupController
/**
 * 获取分类下所有分组&关联属性
 * /product/attrgroup/{catelogId}/withattr
 */
@GetMapping("{catelogId}/withattr")
public R getAttrGroupWithAttrs(@PathVariable("catelogId") Long catelogId){
    List<AttrGroupWithAttrsVo> vos =attrGroupService.getAttrGroupWithAttrsByCatelogId(catelogId);
    return R.ok().put("data",vos);
}
AttrGroupServiceImpl
/**
 * 根据分类Id查出所有的分组以及这些组里的属性
 * @return
 */
@Override
public List<AttrGroupWithAttrsVo> getAttrGroupWithAttrsByCatelogId(Long catelogId) {
    //1、根据分类Id查出所有分组
    List<AttrGroupEntity> attrGroupEntities = baseMapper.selectList(new QueryWrapper<AttrGroupEntity>().eq("catelog_id", catelogId));
    //2、查询分组下的所有属性
    List<AttrGroupWithAttrsVo> collect = attrGroupEntities.stream().map(item -> {
        AttrGroupWithAttrsVo attrGroupWithAttrsVo = new AttrGroupWithAttrsVo();
        BeanUtils.copyProperties(item, attrGroupWithAttrsVo);
        List<AttrEntity> relationAttr = attrService.getRelationAttr(item.getAttrGroupId());
        //这里存在BUG,如果分组没有关联属性则返回为null,前端页面不显示
        //.filter(s -> s.getAttrs()!=null) 过滤即可解决。
        attrGroupWithAttrsVo.setAttrs(relationAttr);
        return attrGroupWithAttrsVo;
    }).filter(s -> s.getAttrs()!=null).collect(Collectors.toList());

    return collect;
}
18、spu检索
GET 方式
请求路径:/product/spuinfo/list

业务需求:
查询spu详细信息,带分页模糊查询。
思路:
带条件查询
分析:
没啥好分析的
代码:
public PageUtils queryPageByCondition(Map<String, Object> params) {
    QueryWrapper<SpuInfoEntity> wrapper = new QueryWrapper<>();

    String key = (String) params.get("key");

    /**
     *  key: '华为',//检索关键字
     *  brandId: 1,//品牌id
     *  status: 0,//商品状态
     *   catelogId: 6,//三级分类id
     */

    if (!StringUtils.isEmpty(key)){
        wrapper.and((w->{
            w.eq("id",key).or().like("spu_name",key);
        }));
    }

    String status = (String) params.get("status");
    if (!StringUtils.isEmpty(status)){
        wrapper.eq("publish_status",status);
    }

    String brandId = (String) params.get("brandId");
    if (!StringUtils.isEmpty(brandId) && !"0".equals(brandId)){
        wrapper.eq("brand_id",brandId);
    }

    String catelogId = (String) params.get("catelogId");
    if (!StringUtils.isEmpty(catelogId) && !"0".equals(catelogId) ){
        wrapper.eq("catelog_id",catelogId);
    }


    IPage<SpuInfoEntity> page = this.page(
            new Query<SpuInfoEntity>().getPage(params),
            wrapper
    );

    return new PageUtils(page);
}
19、新增商品
POST 方式
请求路径:/product/spuinfo/save
请求参数
{
	"spuName": "Apple XR",
	"spuDescription": "Apple XR",
	"catalogId": 225,
	"brandId": 12,
	"weight": 0.048,
	"publishStatus": 0,
	"decript": ["https://gulimall-hello.oss-cn-beijing.aliyuncs.com/2019-11-22//66d30b3f-e02f-48b1-8574-e18fdf454a32_f205d9c99a2b4b01.jpg"],
	"images": ["https://gulimall-hello.oss-cn-beijing.aliyuncs.com/2019-11-22//dcfcaec3-06d8-459b-8759-dbefc247845e_5b5e74d0978360a1.jpg", "https://gulimall-hello.oss-cn-beijing.aliyuncs.com/2019-11-22//5b15e90a-a161-44ff-8e1c-9e2e09929803_749d8efdff062fb0.jpg"],
	"bounds": {
		"buyBounds": 500,
		"growBounds": 6000
	},
	"baseAttrs": [{
		"attrId": 7,
		"attrValues": "aaa;bb",
		"showDesc": 1
	}, {
		"attrId": 8,
		"attrValues": "2019",
		"showDesc": 0
	}],
	"skus": [{
		"attr": [{
			"attrId": 9,
			"attrName": "颜色",
			"attrValue": "黑色"
		}, {
			"attrId": 10,
			"attrName": "内存",
			"attrValue": "6GB"
		}],
		"skuName": "Apple XR 黑色 6GB",
		"price": "1999",
		"skuTitle": "Apple XR 黑色 6GB",
		"skuSubtitle": "Apple XR 黑色 6GB",
		"images": [{
			"imgUrl": "https://gulimall-hello.oss-cn-beijing.aliyuncs.com/2019-11-22//dcfcaec3-06d8-459b-8759-dbefc247845e_5b5e74d0978360a1.jpg",
			"defaultImg": 1
			}, {
			"imgUrl": "https://gulimall-hello.oss-cn-beijing.aliyuncs.com/2019-11-22//5b15e90a-a161-44ff-8e1c-9e2e09929803_749d8efdff062fb0.jpg",
			"defaultImg": 0
		}],
		"descar": ["黑色", "6GB"],
		"fullCount": 5,
		"discount": 0.98,
		"countStatus": 1,
		"fullPrice": 1000,
		"reducePrice": 10,
		"priceStatus": 0,
		"memberPrice": [{
			"id": 1,
			"name": "aaa",
			"price": 1998.99
		}]
		}, {
		"attr": [{
			"attrId": 9,
			"attrName": "颜色",
			"attrValue": "黑色"
		}, {
			"attrId": 10,
			"attrName": "内存",
			"attrValue": "12GB"
		}],
		"skuName": "Apple XR 黑色 12GB",
		"price": "2999",
		"skuTitle": "Apple XR 黑色 12GB",
		"skuSubtitle": "Apple XR 黑色 6GB",
		"images": [{
			"imgUrl": "",
			"defaultImg": 0
		}, {
			"imgUrl": "",
			"defaultImg": 0
		}],
		"descar": ["黑色", "12GB"],
		"fullCount": 0,
		"discount": 0,
		"countStatus": 0,
		"fullPrice": 0,
		"reducePrice": 0,
		"priceStatus": 0,
		"memberPrice": [{
			"id": 1,
			"name": "aaa",
			"price": 1998.99
		}]
	}, {
		"attr": [{
			"attrId": 9,
			"attrName": "颜色",
			"attrValue": "白色"
		}, {
			"attrId": 10,
			"attrName": "内存",
			"attrValue": "6GB"
		}],
		"skuName": "Apple XR 白色 6GB",
		"price": "1998",
		"skuTitle": "Apple XR 白色 6GB",
		"skuSubtitle": "Apple XR 黑色 6GB",
		"images": [{
			"imgUrl": "",
			"defaultImg": 0
		}, {
			"imgUrl": "",
			"defaultImg": 0
		}],
		"descar": ["白色", "6GB"],
		"fullCount": 0,
		"discount": 0,
		"countStatus": 0,
		"fullPrice": 0,
		"reducePrice": 0,
		"priceStatus": 0,
		"memberPrice": [{
			"id": 1,
			"name": "aaa",
			"price": 1998.99
		}]
	}, {
		"attr": [{
			"attrId": 9,
			"attrName": "颜色",
			"attrValue": "白色"
		}, {
			"attrId": 10,
			"attrName": "内存",
			"attrValue": "12GB"
		}],
		"skuName": "Apple XR 白色 12GB",
		"price": "2998",
		"skuTitle": "Apple XR 白色 12GB",
		"skuSubtitle": "Apple XR 黑色 6GB",
		"images": [{
			"imgUrl": "",
			"defaultImg": 0
		}, {
			"imgUrl": "",
			"defaultImg": 0
		}],
		"descar": ["白色", "12GB"],
		"fullCount": 0,
		"discount": 0,
		"countStatus": 0,
		"fullPrice": 0,
		"reducePrice": 0,
		"priceStatus": 0,
		"memberPrice": [{
			"id": 1,
			"name": "aaa",
			"price": 1998.99
		}]
	}]
}
业务需求:
添加商品。
根据请求参数,封装Vo.
@Data
public class SpuSaveVo {

    private String spuName;
    private String spuDescription;
    private Long catelogId;
    private Long brandId;
    private BigDecimal weight;
    private int publishStatus;
    private List<String> decript;
    private List<String> images;
    private Bounds bounds;
    private List<BaseAttrs> baseAttrs;
    private List<Skus> skus;

}
@Data
public class Bounds {
    private BigDecimal buyBounds;
    private BigDecimal growBounds;
}
@Data
public class BaseAttrs {
    private Long attrId;
    private String attrValues;
    private int showDesc;
}
@Data
public class Skus {

    private List<Attr> attr;
    private String skuName;
    private BigDecimal price;
    private String skuTitle;
    private String skuSubtitle;
    private List<Images> images;
    private List<String> descar;
    private int fullCount;
    private BigDecimal discount;
    private int countStatus;
    private BigDecimal fullPrice;
    private BigDecimal reducePrice;
    private int priceStatus;
    private List<MemberPrice> memberPrice;
}
@Data
public class Attr {

    private Long attrId;
    private String attrName;
    private String attrValue;

}
@Data
public class Images {

    private String imgUrl;
    private int defaultImg;


}
@Data
public class MemberPrice {

    private Long id;
    private String name;
    private BigDecimal price;

}
思路:
- 保存spu基本信息 pms_spu_info
- 保存Spu的描述图片 pms_spu_info_desc
- 保存spu的图片集 pms_spu_images
- 保存spu的规格参数;pms_product_attr_value
- 保存spu的积分信息;gulimall_sms->sms_spu_bounds
- 保存当前spu对应的所有sku信息;
分析:
代码:
SpuInfoController
  /**
   * 保存商品
   */
  @RequestMapping("/save")
 // @RequiresPermissions("product:spuinfo:save")
  public R save(@RequestBody SpuSaveVo spuSaveVo){
	  spuInfoService.saveSpuInfo(spuSaveVo);

      return R.ok();
  }
SpuInfoServiceImpl
@Transactional
@Override
public void saveSpuInfo(SpuSaveVo spuSaveVo) {
    //1、保存spu基本信息 pms_spu_info
    SpuInfoEntity spuInfoEntity = new SpuInfoEntity();
    BeanUtils.copyProperties(spuSaveVo,spuInfoEntity);
    spuInfoEntity.setCreateTime(new Date());
    spuInfoEntity.setUpdateTime(new Date());
    this.saveBaseSpuInfo(spuInfoEntity);

    //2、保存Spu的描述图片 pms_spu_info_desc
    List<String> decript = spuSaveVo.getDecript();
    SpuInfoDescEntity descEntity = new SpuInfoDescEntity();
    descEntity.setSpuId(spuInfoEntity.getId());
    descEntity.setDecript(String.join(",",decript));
    spuInfoDescService.saveSpuInfoDese(descEntity);

    //3、保存spu的图片集 pms_spu_images
    SpuImagesEntity spuImagesEntity = new SpuImagesEntity();
    List<String> images = spuSaveVo.getImages();
    spuImagesService.saveImages(spuInfoEntity.getId(),images);

    //4、保存spu的规格参数;pms_product_attr_value
    List<BaseAttrs> baseAttrs = spuSaveVo.getBaseAttrs();
    List<ProductAttrValueEntity> collect = baseAttrs.stream().map(item -> {
        ProductAttrValueEntity valueEntity = new ProductAttrValueEntity();
        valueEntity.setAttrId(item.getAttrId());
        AttrEntity attrEntity = attrService.getById(item.getAttrId());
        valueEntity.setAttrValue(attrEntity.getAttrName());
        valueEntity.setQuickShow(item.getShowDesc());
        valueEntity.setSpuId(spuInfoEntity.getId());
        return valueEntity;
    }).collect(Collectors.toList());
    productAttrValueService.saveProductAttr(collect);

    //5、保存spu的积分信息;gulimall_sms->sms_spu_bounds
    Bounds bounds = spuSaveVo.getBounds();
    SpuBoundTo spuBoundTo = new SpuBoundTo();
    BeanUtils.copyProperties(bounds,spuBoundTo);
    spuBoundTo.setSpuId(spuInfoEntity.getId());
    R r = couponFeignService.saveSpuBounds(spuBoundTo);
    if (r.getCode() != 0){
        log.error("远程保存spu积分信息失败");
    }

    //5、保存当前spu对应的所有sku信息;
    //5.1)、sku的基本信息;pms_sku_info
    List<Skus> skus = spuSaveVo.getSkus();
    if(skus!=null && skus.size()>0){
        skus.forEach(item->{
            String defaultImg = "";
            for (Images image : item.getImages()) {
                if(image.getDefaultImg() == 1){
                    defaultImg = image.getImgUrl();
                }
            }
            //    private String skuName;
            //    private BigDecimal price;
            //    private String skuTitle;
            //    private String skuSubtitle;
            SkuInfoEntity skuInfoEntity = new SkuInfoEntity();
            BeanUtils.copyProperties(item,skuInfoEntity);
            skuInfoEntity.setBrandId(spuInfoEntity.getBrandId());
            skuInfoEntity.setCatelogId(spuInfoEntity.getCatelogId());
            skuInfoEntity.setSaleCount(0L);
            skuInfoEntity.setSpuId(spuInfoEntity.getId());
            skuInfoEntity.setSkuDefaultImg(defaultImg);
            //5.1)、sku的基本信息;pms_sku_info
            skuInfoService.saveSkuInfo(skuInfoEntity);

            Long skuId = skuInfoEntity.getSkuId();

            List<SkuImagesEntity> imagesEntities = item.getImages().stream().map(img -> {
                SkuImagesEntity skuImagesEntity = new SkuImagesEntity();
                skuImagesEntity.setSkuId(skuId);
                skuImagesEntity.setImgUrl(img.getImgUrl());
                skuImagesEntity.setDefaultImg(img.getDefaultImg());
                return skuImagesEntity;
            }).filter(entity->{
                //返回true就是需要,false就是剔除
                return !StringUtils.isEmpty(entity.getImgUrl());
            }).collect(Collectors.toList());
            //5.2)、sku的图片信息;pms_sku_image
            skuImagesService.saveBatch(imagesEntities);
            //TODO 没有图片路径的无需保存

            List<Attr> attr = item.getAttr();
            List<SkuSaleAttrValueEntity> skuSaleAttrValueEntities = attr.stream().map(a -> {
                SkuSaleAttrValueEntity attrValueEntity = new SkuSaleAttrValueEntity();
                BeanUtils.copyProperties(a, attrValueEntity);
                attrValueEntity.setSkuId(skuId);

                return attrValueEntity;
            }).collect(Collectors.toList());
            //5.3)、sku的销售属性信息:pms_sku_sale_attr_value
            skuSaleAttrValueService.saveBatch(skuSaleAttrValueEntities);

            // //5.4)、sku的优惠、满减等信息;gulimall_sms->sms_sku_ladder\sms_sku_full_reduction\sms_member_price
            SkuReductionTo skuReductionTo = new SkuReductionTo();
            BeanUtils.copyProperties(item,skuReductionTo);
            skuReductionTo.setSkuId(skuId);
            if(skuReductionTo.getFullCount() >0 || skuReductionTo.getFullPrice().compareTo(new BigDecimal("0")) == 1){
                R r1 = couponFeignService.saveSkuReduction(skuReductionTo);
                if(r1.getCode() != 0) {
                    log.error("远程保存sku优惠信息失败");
                }
            }

    });
 }
}
用户系统
01、获取所有会员等级
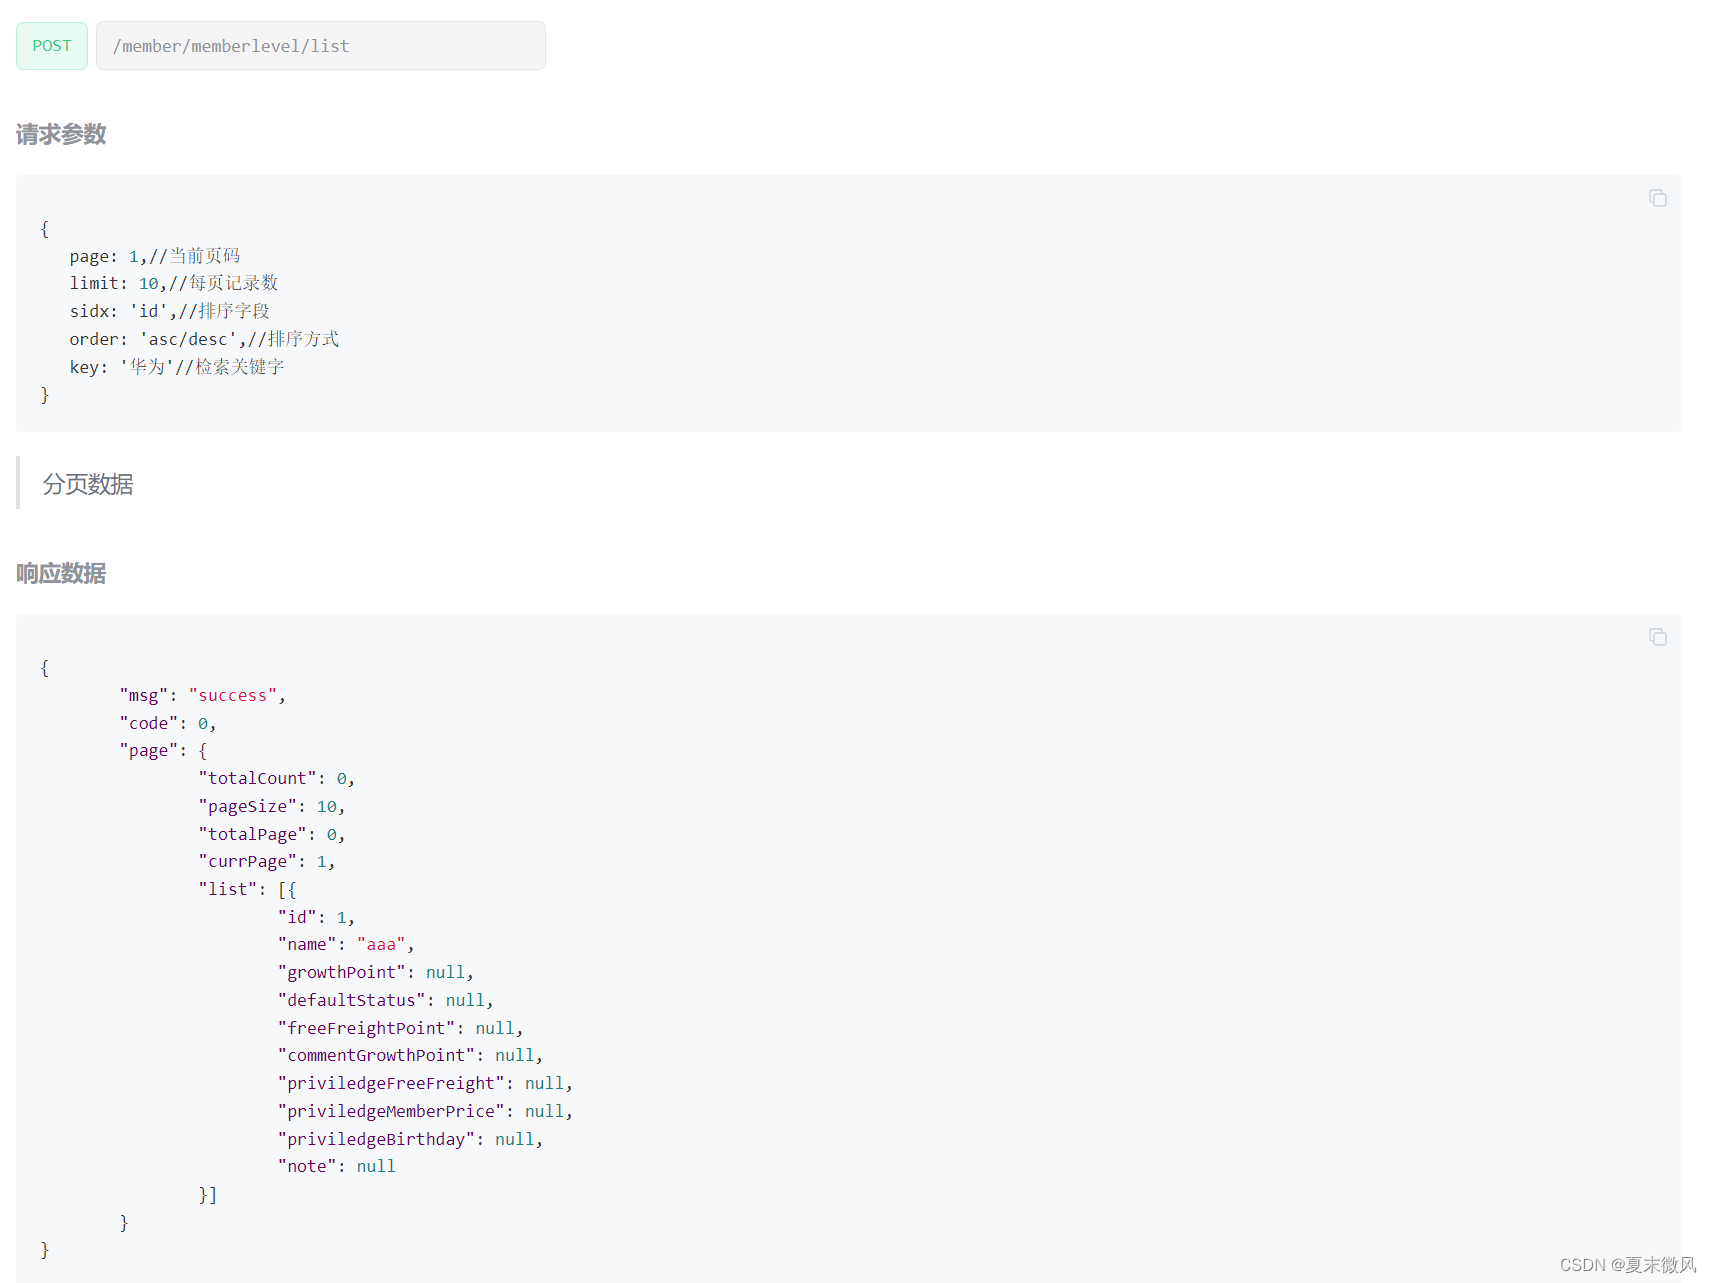
优惠券系统
01、获取优惠券
GET
/coupon/coupon/list
第三方服务
1、获取对象存储服务端签名
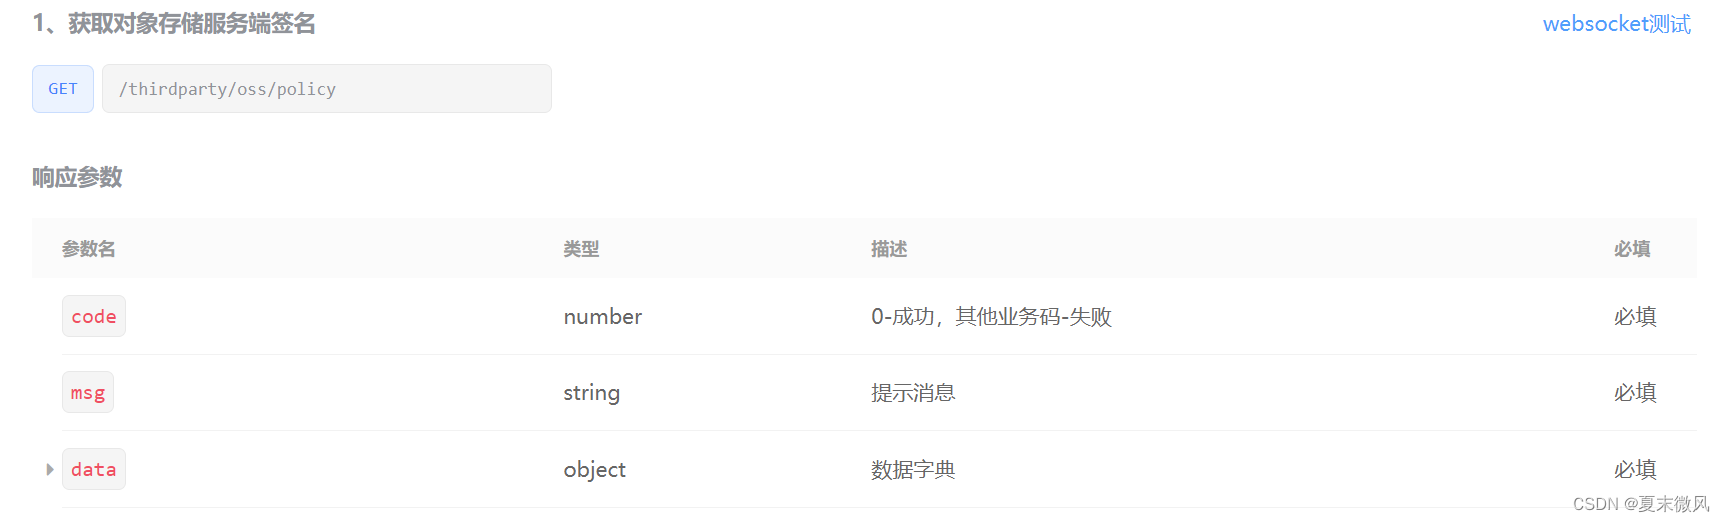
库存系统
01、仓库列表
带个条件查询 简单。
02、查询商品库存
带个条件查询 简单。
03、查询采购需求
带个条件查询 简单。
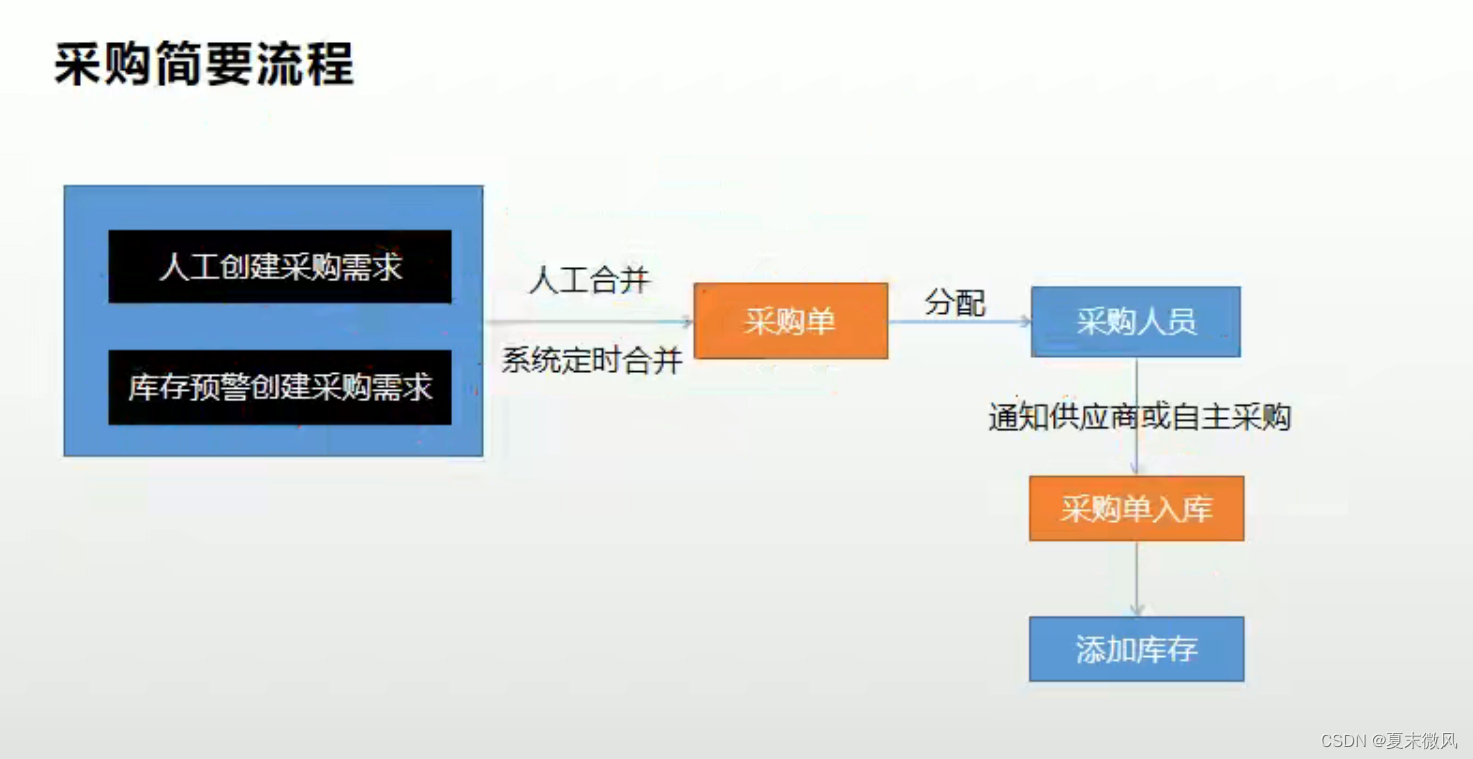
04、合并采购需求
POST 方式
请求路径:/ware/purchase/merge
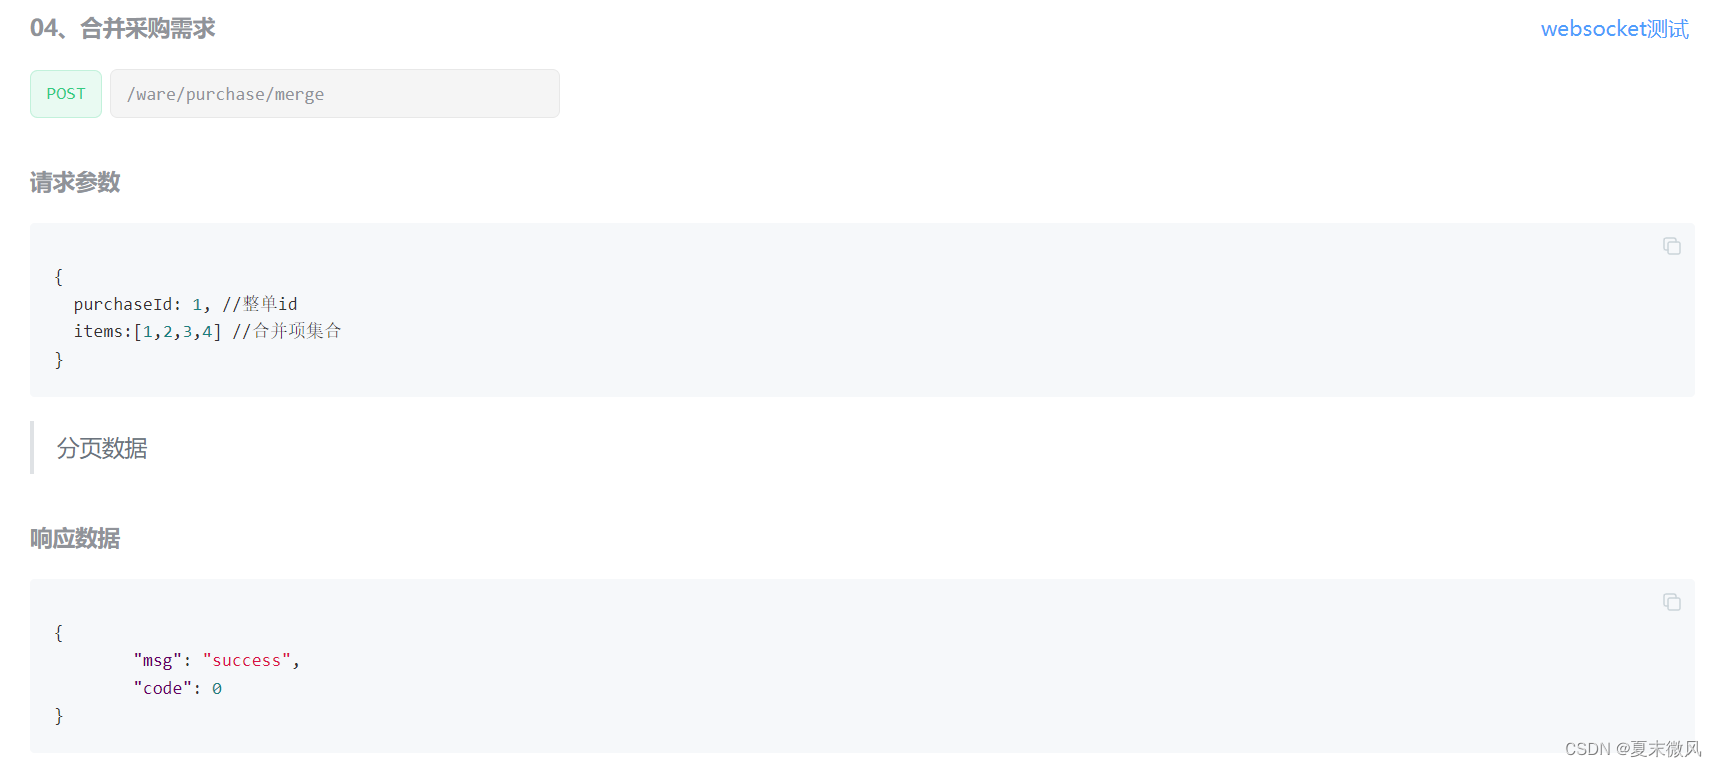
业务需求:
将采购需求合并到采购单上。
查询新建和已分配的采购单。
合并,实际上只是更新了采购需求里采购单id purchase_id
入参:@RequestBody MergeVo mergeVo
创建一个vo 接收参数
@Data
public class MergeVo {

    /**
     * 采购单id
     */
    private Long purchaseId;

    /**
     * 合并集合Id
     */
    private List<Long> items;
}
思路:
- 获得采购单id,如果没有就新建。
- 获取合并集合id ,实际上就是采购需求的id集合。
- 对采购需求id集合进行处理,得到它们的状态 status集合。
- 对状态集合进行遍历,如果是0新建,1已分配。那么就可以合并
- 得到PurchaseDetailEntity集合,进行批量修改。
分析:
涉及到数据库表:wms_purchase 采购单表 、wms_purchase_detail采购需求表
代码:
PurchaseController
@PostMapping("/merge")
// @RequiresPermissions("ware:purchase:list")
public R merge(@RequestBody MergeVo mergeVo){
    purchaseService.mergePurchase(mergeVo);

    return R.ok();
}
PurchaseServiceImpl
@Override
@Transactional
public void mergePurchase(MergeVo mergeVo) {
    Long purchaseId = mergeVo.getPurchaseId();
    if (purchaseId==null){
        //新建一个
        PurchaseEntity purchaseEntity = new PurchaseEntity();
        purchaseEntity.setStatus(WareConstant.PurchaseStatusEnum.CREATED.getCode());
        this.save(purchaseEntity);
        purchaseId = purchaseEntity.getId();
    }
    // 确认采购单状态是0或者1才可以合并
    List<Long> items = mergeVo.getItems();

    //对采购需求id集合进行处理,得到它们的状态 status集合。
    List<Integer> integerList = items.stream().map(item -> {
        PurchaseDetailEntity purchaseDetailEntity = purchaseDetailService.getById(item);
        return purchaseDetailEntity.getStatus();
    }).collect(Collectors.toList());

    Long finalPurchaseId = purchaseId;
    //对状态集合进行遍历,如果是0新建,1已分配。那么就可以合并
    integerList.forEach(integer -> {
        if (integer==0|integer==1){
            List<PurchaseDetailEntity> collect = items.stream().map(item -> {
                PurchaseDetailEntity detailEntity = new PurchaseDetailEntity();
                detailEntity.setId(item);
                detailEntity.setPurchaseId(finalPurchaseId);
                detailEntity.setStatus(WareConstant.PurchaseDetailStatusEnum.ASSIGNED.getCode());
                return detailEntity;
            }).collect(Collectors.toList());
            purchaseDetailService.updateBatchById(collect);
        }
    });

}
05、查询未领取的采购单
GET 方式
请求路径:/ware/purchase/unreceive/list
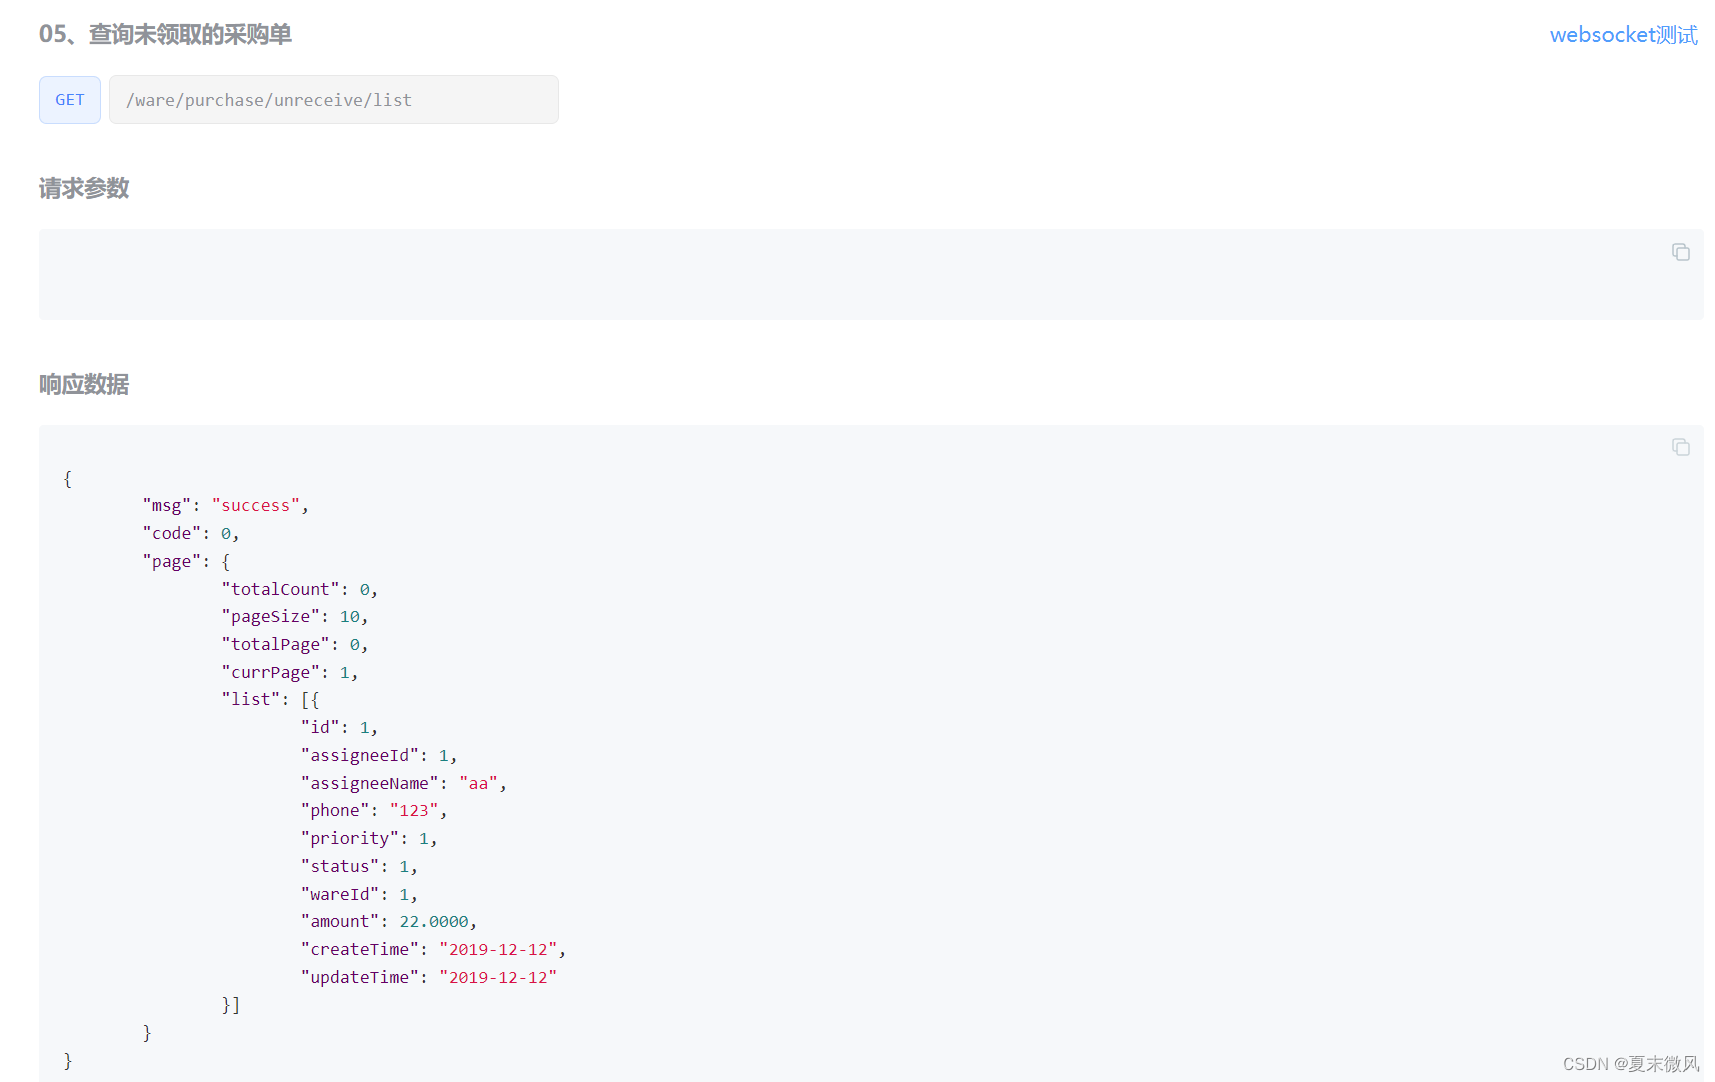
代码
@Override
public PageUtils queryPageUnreceivePurchase(Map<String, Object> params) {

    IPage<PurchaseEntity> page = this.page(
            new Query<PurchaseEntity>().getPage(params),
            new QueryWrapper<PurchaseEntity>().eq("status","0").or().eq("status","1")
    );

    return new PageUtils(page);

}
06、领取采购单
POST
/ware/purchase/received
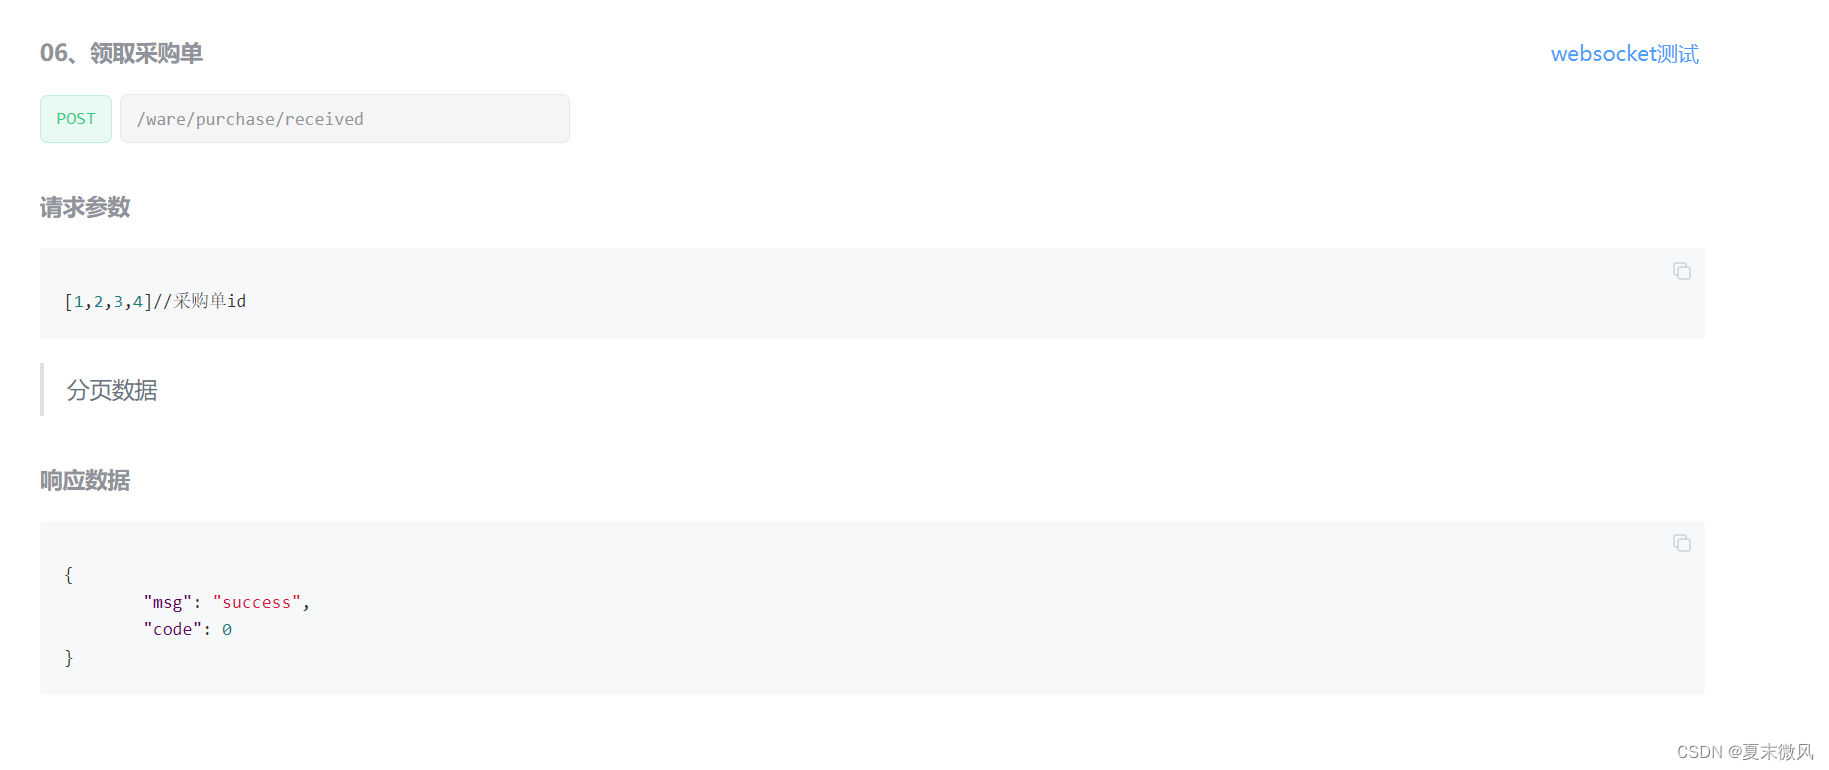
业务需求:
入参:[1,2,3,4]//采购单id @RequestBody List ids
领取采购单,即改变采购单状态为已领取。然后改变采购需求状态为正在采购。
思路:
- 确认当前采购单是新建或者已分配状态
- 改变采购单的状态
- 改变采购需求的状态
分析:
涉及到数据库表:wms_purchase 采购单表 、wms_purchase_detail采购需求表
代码:
PurchaseController
/**\
 * 领取采购单
 */
@PostMapping("/received")
public R received(@RequestBody List<Long> ids){
    //TODO 小细节 员工自能领取属于他的采购单,领取之前还要查取他没有领取的采购单
    purchaseService.received(ids);
    return R.ok();
}
PurchaseServiceImpl
/**
 *
 * @param ids 采购单Id
 */
@Override
@Transactional
public void received(List<Long> ids) {
    //1、确认当前采购单是新建或者已分配状态
    //通过采购单id,得到采购类集合,对采购类集合进行过滤掉只剩下状态是新建或者已分配。
    List<PurchaseEntity> collect = ids.stream().map(id -> {
        PurchaseEntity byId = this.getById(id);
        return byId;
    }).filter(item -> {
        return item.getStatus() == WareConstant.PurchaseStatusEnum.CREATED.getCode() ||
                item.getStatus() == WareConstant.PurchaseStatusEnum.ASSIGNED.getCode();
    }).map(item->{
        //采购单设置状态为已领取
        item.setStatus(WareConstant.PurchaseStatusEnum.RECEIVE.getCode());
        return item;
    }).collect(Collectors.toList());
    //2、改变采购单的状态
    this.updateBatchById(collect);

    //3、改变采购项的状态
    collect.forEach(item->{
        //通过采购单id,查询采购需求实体集合
        List<PurchaseDetailEntity> entities =purchaseDetailService.listDetailByPurchase(item.getId());
        //对采购需求集合进行处理,设置状态为正在采购。
        List<PurchaseDetailEntity> collect1 = entities.stream().map(entity -> {
            PurchaseDetailEntity detailEntity = new PurchaseDetailEntity();
            detailEntity.setId(entity.getId());
            //设置采购需求状态为正在采购
            detailEntity.setStatus(WareConstant.PurchaseDetailStatusEnum.BUYING.getCode());
            return detailEntity;
        }).collect(Collectors.toList());
        purchaseDetailService.updateBatchById(collect1);
    });

}
07、完成采购
POST 方式
请求路径:/ware/purchase/done

业务需求:
完成采购,即改变采购单表和采购需求表状态为已完成。
入参 @RequestBody PurchaseDoneVo items
@Data
public class PurchaseDoneVo {

    /**
     * 采购单Id
     */
    @NotNull
    private Long purchaseId;

    /**
     * 完成/失败的需求详情
     */
    private List<PurchaseItemDoneVo> items;

}
PurchaseItemDoneVo
@Data
public class PurchaseItemDoneVo {

    //{itemId:1,status:3,reason:""}

    /**
     * 采购项id
     */
    private  Long itemId;

    /**
     * 采购状态
     */
    private Integer status;

    /**
     * 异常原因
     */
    private String reason;


}
思路:
- 改变采购需求的状态为已完成。
- 将成功采购的进行入库
- 改变采购单状态为已完成
分析:
涉及到数据库表:wms_purchase 采购单表 、wms_purchase_detail采购需求表
代码:
PurchaseController
@PostMapping("/done")
public R finish(@RequestBody PurchaseDoneVo items){
    purchaseService.done(items);
    return R.ok();
}
PurchaseServiceImpl
@Transactional
@Override
public void done(PurchaseDoneVo doneVo) {


    //1、改变采购需求的状态
    //设置一个flag标记 作为后面采购单是否完成的标识
    Boolean flag = true;
    //得到完成/失败的需求详情集合
    List<PurchaseItemDoneVo> items = doneVo.getItems();
    //创建采购需求实体集合
    List<PurchaseDetailEntity> updates = new ArrayList<>();
    for (PurchaseItemDoneVo item : items) {
        PurchaseDetailEntity detailEntity = new PurchaseDetailEntity();
        //如果采购需求状态为采购失败
        if (item.getStatus()==WareConstant.PurchaseDetailStatusEnum.HASERROR.getCode()){
            //标记为false
            flag = false;
            detailEntity.setStatus(item.getStatus());
        }else {
            detailEntity.setStatus(WareConstant.PurchaseDetailStatusEnum.FINISH.getCode());
            //2、将成功采购的进行入库
            //通过采购项id查出商品skuId,商品数量,skuName,仓库wareId
            PurchaseDetailEntity purchaseDetail = purchaseDetailService.getById(item.getItemId());
            Long skuId = purchaseDetail.getSkuId();
            Integer skuNum = purchaseDetail.getSkuNum();
            Long wareId = purchaseDetail.getWareId();
            wareSkuService.addStock(skuId,skuNum,wareId);
        }
        detailEntity.setId(item.getItemId());
        updates.add(detailEntity);
    }

    purchaseDetailService.updateBatchById(updates);

    //3、改变采购单状态
    Long purchaseId = doneVo.getPurchaseId();
    PurchaseEntity purchaseEntity = new PurchaseEntity();
    purchaseEntity.setId(purchaseId);
    purchaseEntity.setStatus(flag?WareConstant.PurchaseStatusEnum.FINISH.getCode() : WareConstant.PurchaseStatusEnum.HASERROR.getCode());

    this.updateById(purchaseEntity);


}
写在最后
-
笔记纯自己花时间整理,只希望能帮助到更多的人。
-
可以白嫖,但请勿转载发布,笔记手打不易
-
若再许我少年时,一两黄金一两梦
关于打赏:
- 图片上传转存问题真是写笔记的噩梦,之前使用gitee作为图床,挂了。用github作为图床,上传到csdn又因为墙的问题转存失败。
- 最后只好一张一张的保存到本地再上传到csdn,纯属不易。 以后还是使用阿里云oss付费使用吧。

打赏后如需要笔记,请主动发支付信息到邮箱 302658980@qq.com,备注需要的笔记名称。笔记持续更新。
ps:
另外本人创建了一个java交流群,可以在群里交流各自问题,看到了有能力的情况下,会尽力帮忙解决。
即为交流,希望是愿意交流的人才进来,一起努力、进步。
需要进群的 发送邮件 302658980@qq.com 备注 进群即可。(无需打赏)
如果本文有帮到了你,可以帮忙点个赞,谢谢支持。


 1565
1565


 被折叠的 条评论
为什么被折叠?
被折叠的 条评论
为什么被折叠?
 到【灌水乐园】发言


