


本文来聊一下在spring中,当spring 容器启动后,我们有几种初始化操作的方式。
文章目录
在spring 容器中有一个 Persion对象名字叫张三,需要在spring容器启动后调用它的run方法。代码如下
import org.springframework.context.annotation.Bean;
import org.springframework.context.annotation.Configuration;

@Configuration
public class PersonConfig {

    @Bean
    public Person person(){
        Person person = new Person();
        person.setName("张三");
        person.setAge(18);
        return person;
    }
}
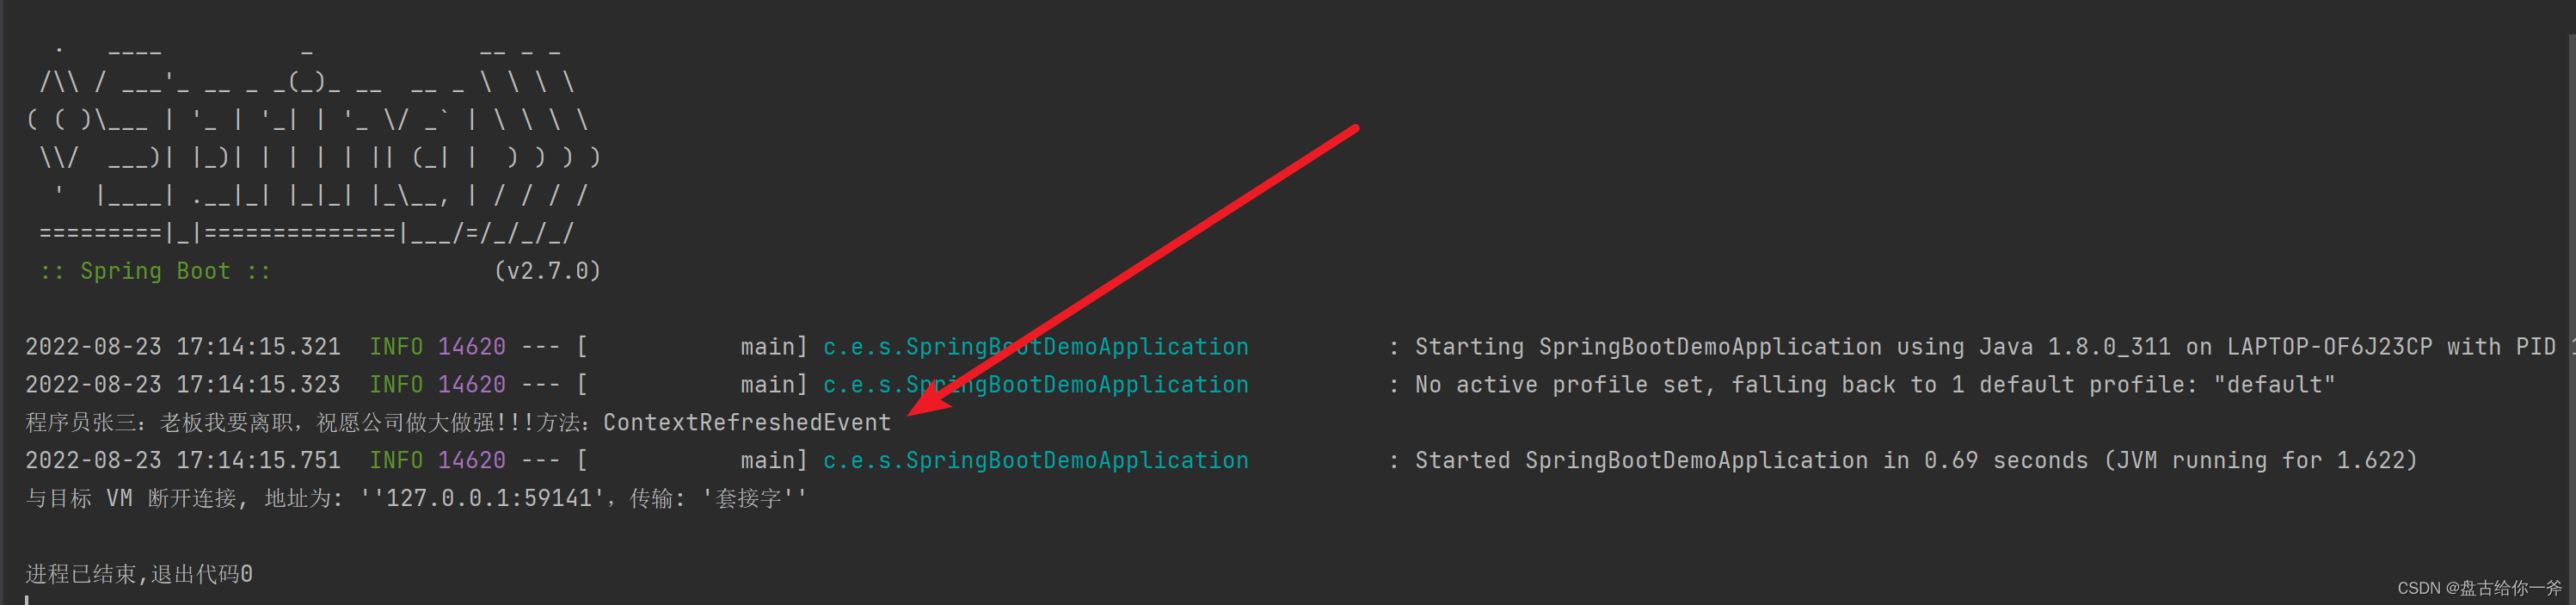
一、ContextRefreshedEvent事件
ContextRefreshedEvent:是Spring容器初始化完成后调用的事件。
ContextRefreshedEvent的父类是ApplicationContextEvent,是一个事件。所以我们通过ApplicationListener来实现。
代码如下:
import com.example.springbootdemo.bean.Person;
import org.springframework.beans.factory.annotation.Autowired;
import org.springframework.context.ApplicationListener;
import org.springframework.context.event.ContextRefreshedEvent;
import org.springframework.stereotype.Component;

@Component
public class PersonAfterListener implements ApplicationListener<ContextRefreshedEvent> {
    @Autowired
    private Person person;

    @Override
    public void onApplicationEvent(ContextRefreshedEvent event) {
        person.run("ContextRefreshedEvent");
    }
}
输出结果:
二、PostConstruct 注解
PostConstruct注解修饰的方式,是在spring容器启动时运行的。优先级大于ContextRefreshedEvent事件。
代码如下:
import com.example.springbootdemo.bean.Person;
import org.springframework.beans.factory.annotation.Autowired;
import org.springframework.stereotype.Component;

import javax.annotation.PostConstruct;

@Component
public class PersonAfterPostConstruct {
    @Autowired
    private Person person;

    @PostConstruct
    public void postConstruct(){
        person.run("PostConstruct");
    }
}
输出结果:
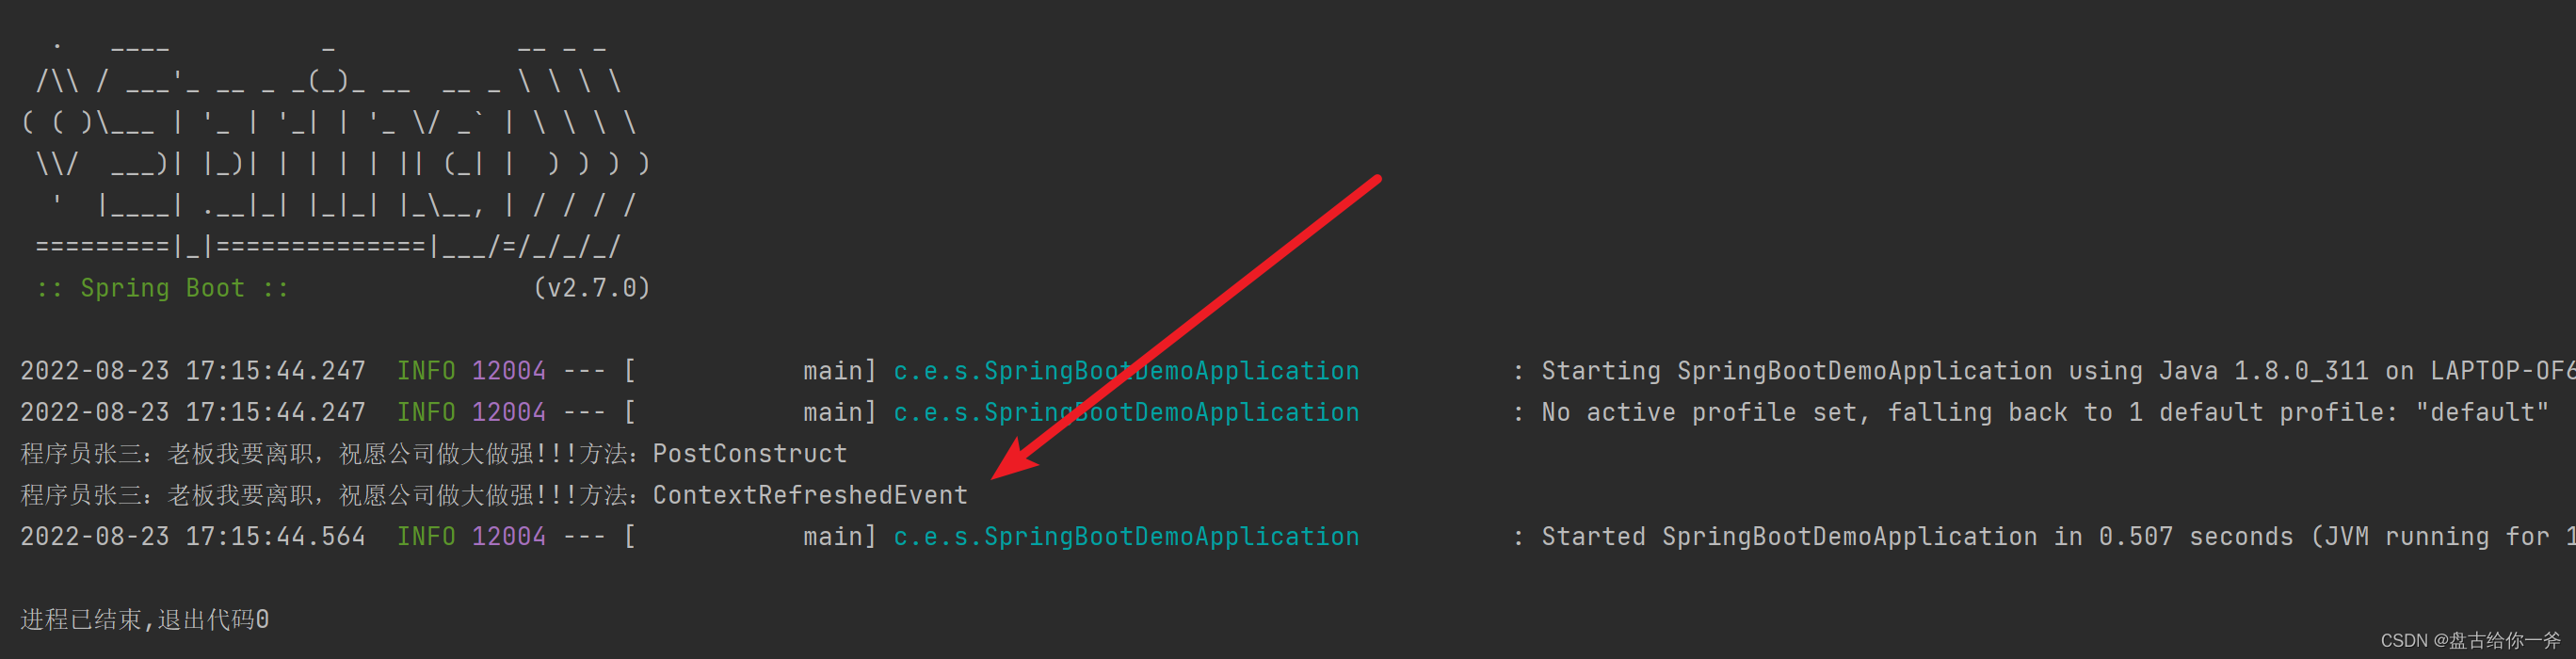
由此可见,PostConstruct优先级大于ContextRefreshedEvent事件。
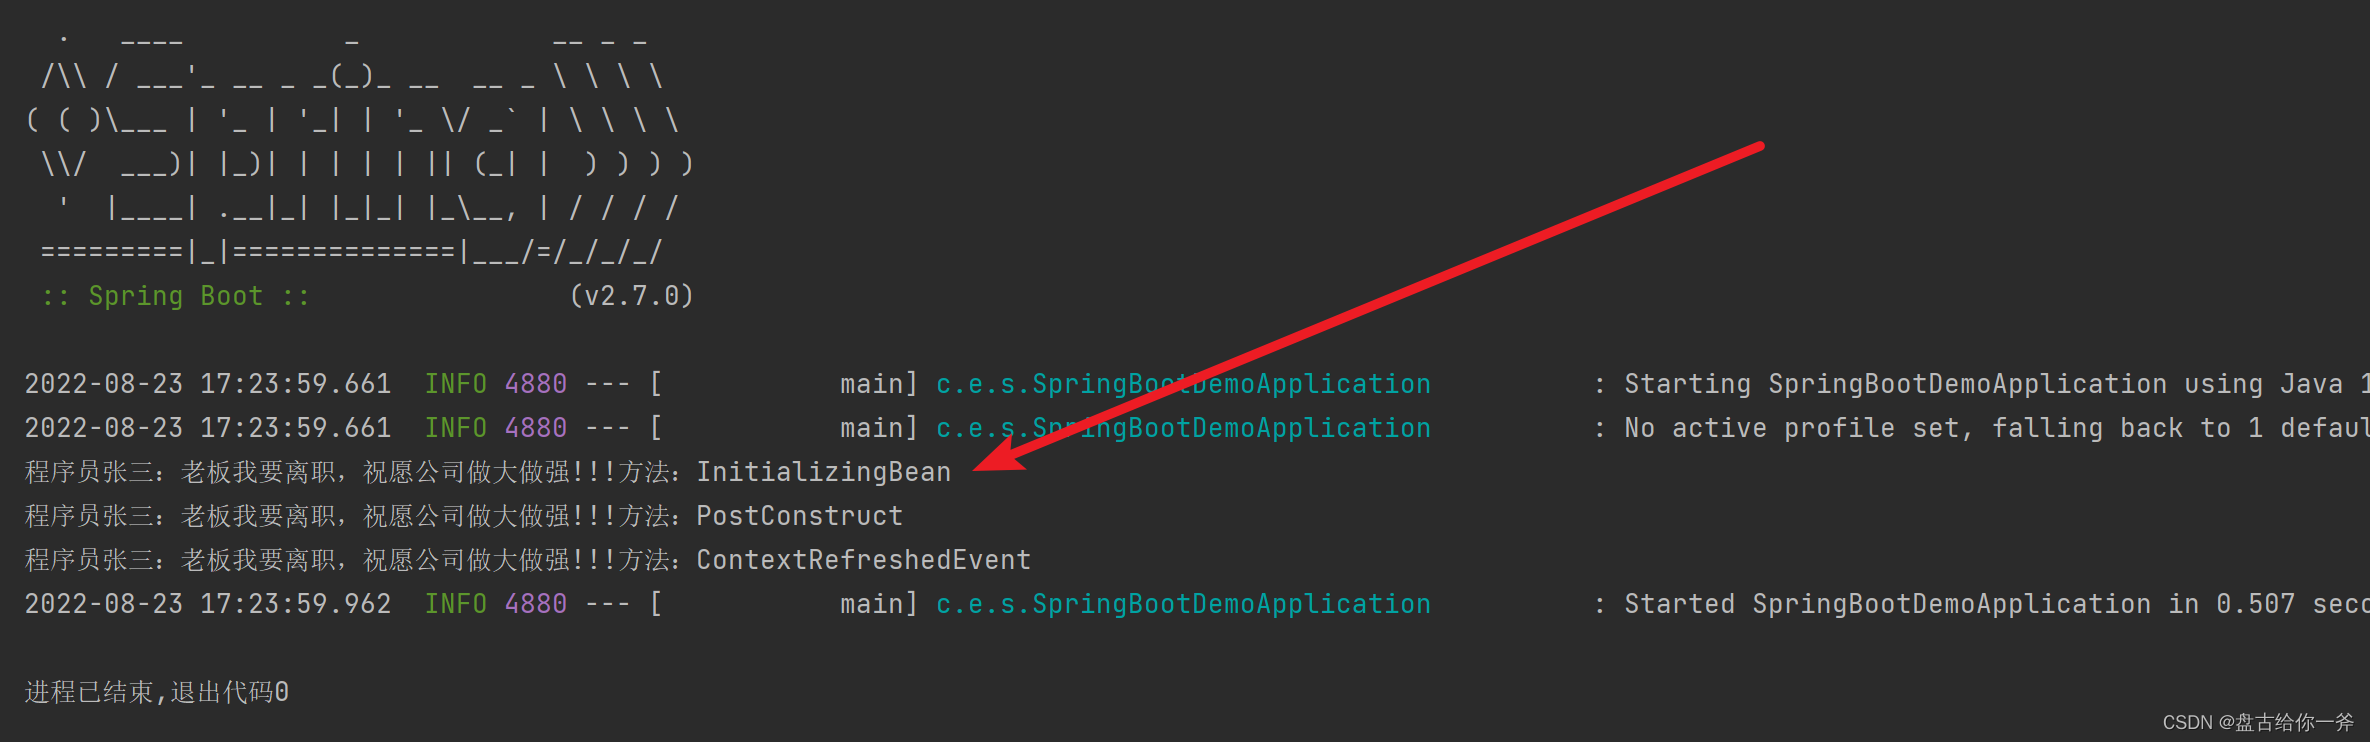
三、InitializingBean
InitializingBean是spring容器在启动并初始化好内部示例后调用的,用来最终为总体bean添加最后属性和操作。
官方原话:This method allows the bean instance to perform validation of its overall configuration and final initialization when all bean properties have been set.
代码如下:
import com.example.springbootdemo.bean.Person;
import org.springframework.beans.factory.InitializingBean;
import org.springframework.beans.factory.annotation.Autowired;
import org.springframework.stereotype.Component;

@Component
public class PersonAfterInitializingBean implements InitializingBean {
    @Autowired
    private Person person;

    @Override
    public void afterPropertiesSet() throws Exception {
        person.run("InitializingBean");
    }
}
输出结果:
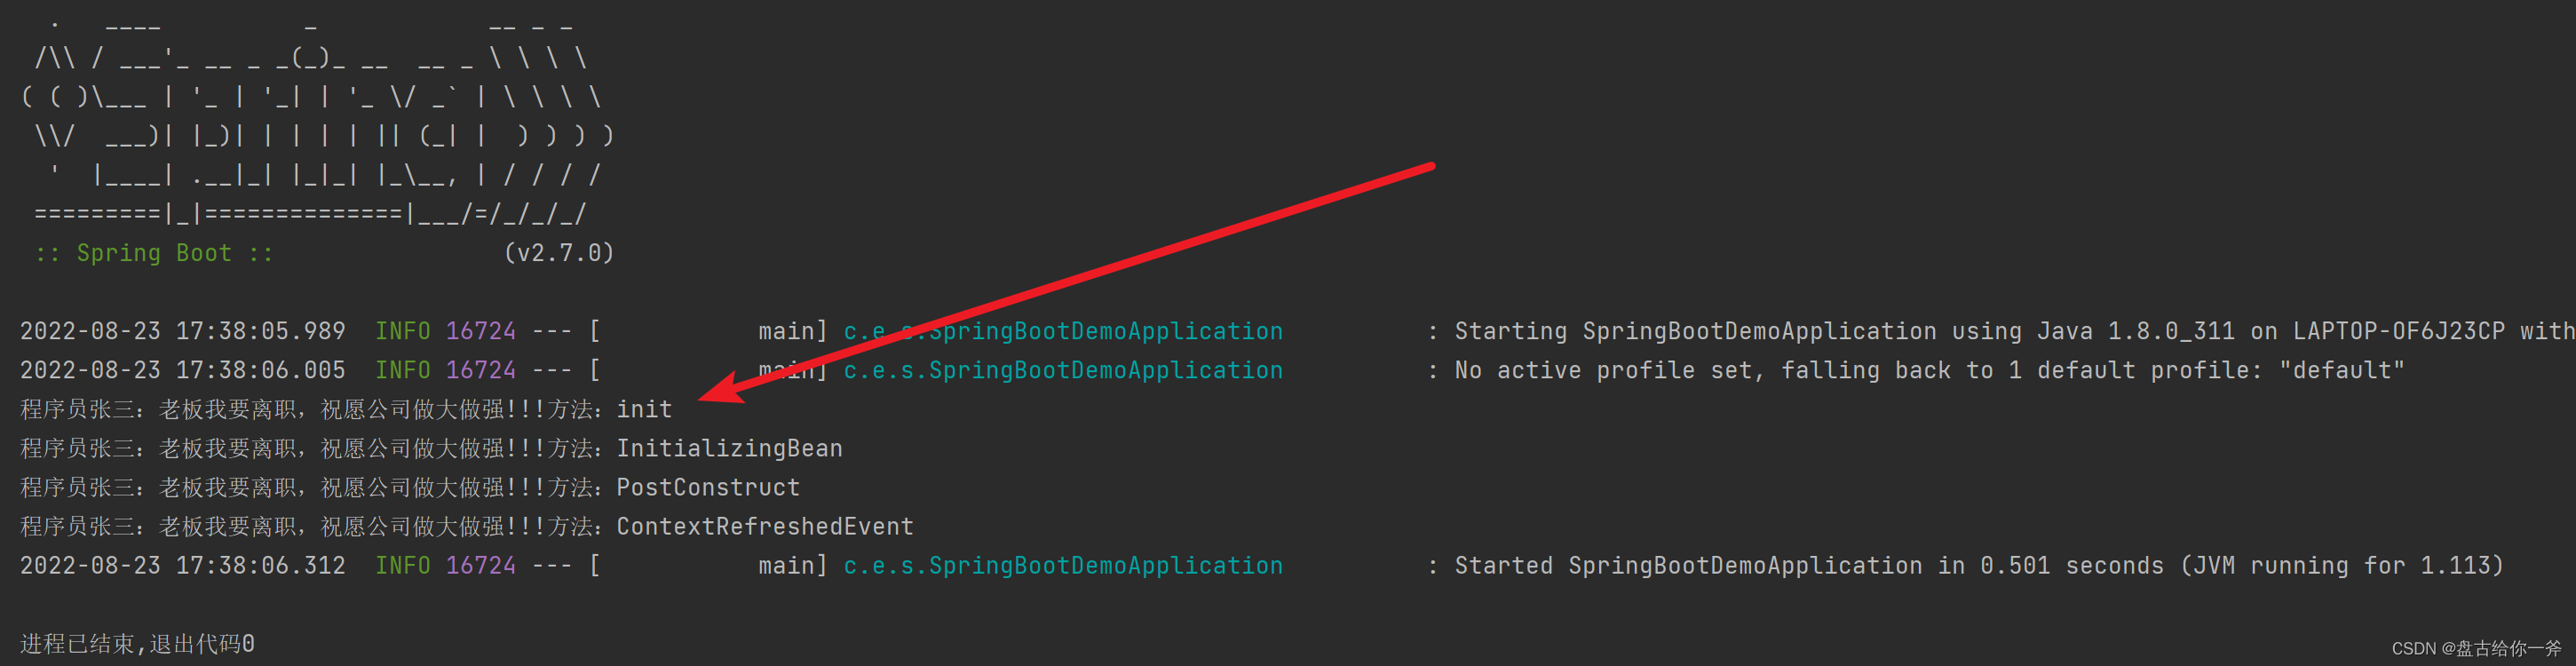
四、init-method方法
这种方法有一定的局限性,并且可能会覆盖曾经的init操作,需要慎用。
Bean在加载到Spring容器中时需要先将Bean的定义信息抽象为BeanDefinition,其中有一个属性init-method代表将来Bean初始化时要调用的方法。
我们通过BeanFactoryPostProcessor来注入init-method方法,并且该方法必须是没有参数的。
代码如下:
import org.springframework.beans.BeansException;
import org.springframework.beans.factory.config.BeanDefinition;
import org.springframework.beans.factory.config.BeanFactoryPostProcessor;
import org.springframework.beans.factory.config.ConfigurableListableBeanFactory;
import org.springframework.stereotype.Component;

@Component
public class PersonAfterInit implements BeanFactoryPostProcessor {

    @Override
    public void postProcessBeanFactory(ConfigurableListableBeanFactory beanFactory) throws BeansException {
        BeanDefinition person = beanFactory.getBeanDefinition("person");
        person.setInitMethodName("run");
    }
}
输出结果:
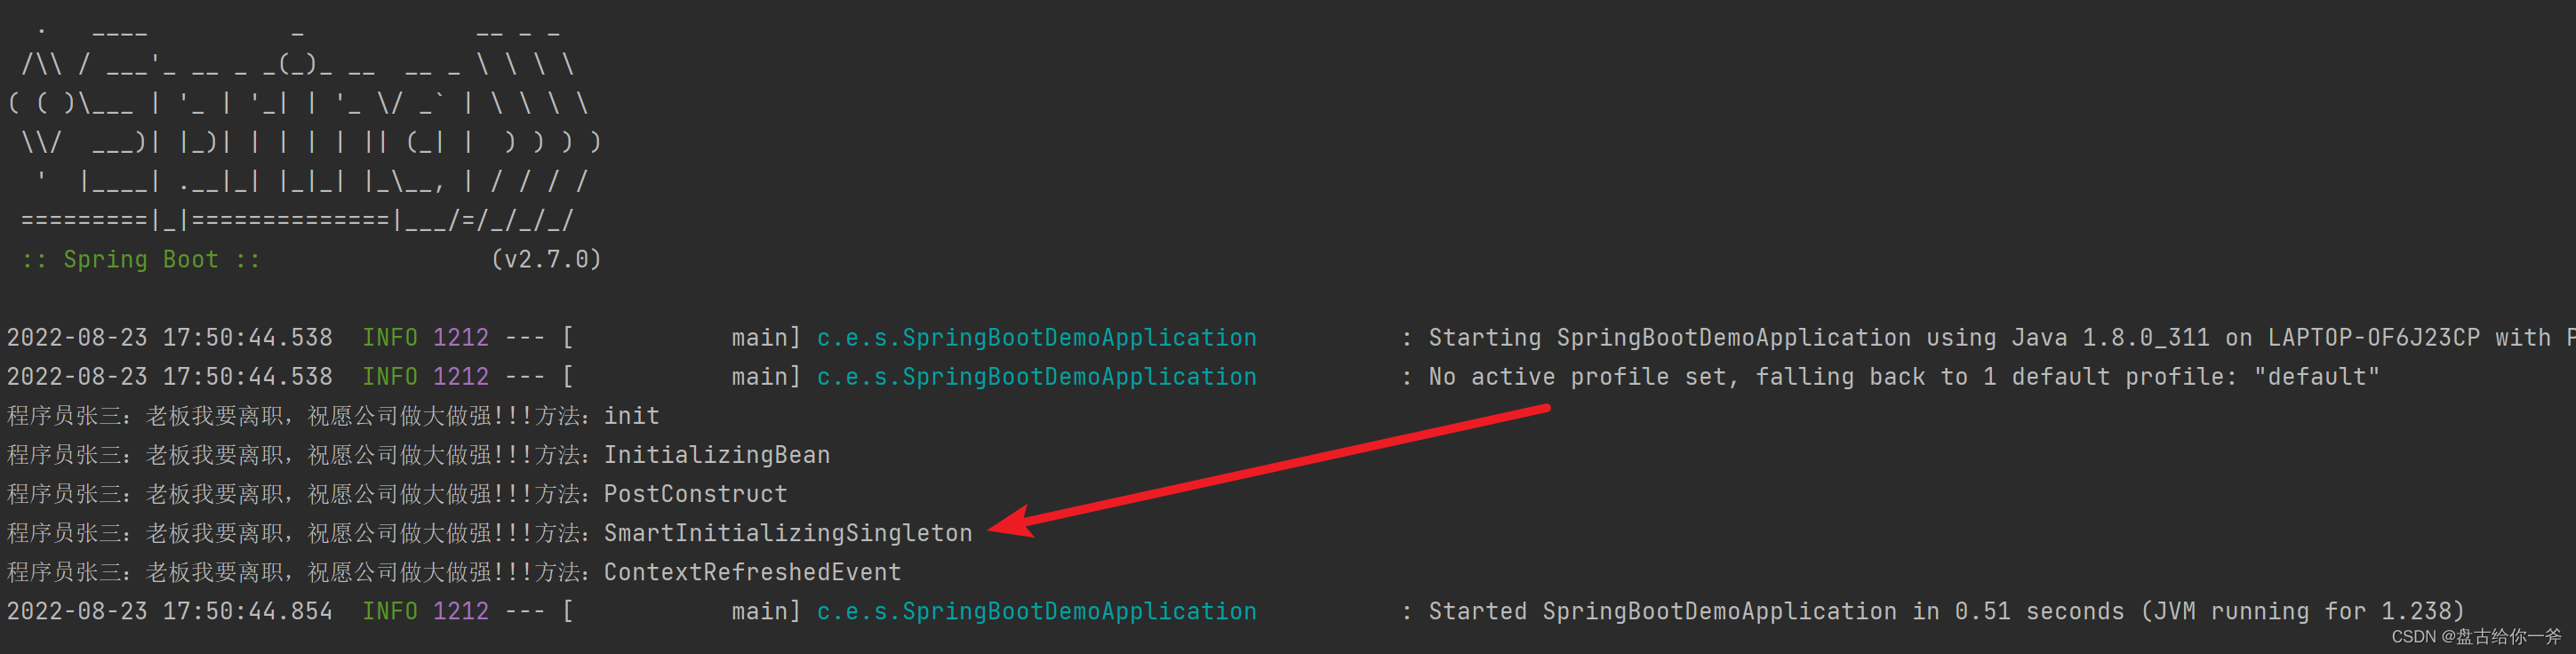
五 、实现 SmartInitializingSingleton 接口
SmartInitializingSingleton是Bean容器在初始化所有非懒加载的单例Bean后调用的方法。
代码如下:
import com.example.springbootdemo.bean.Person;
import org.springframework.beans.factory.SmartInitializingSingleton;
import org.springframework.beans.factory.annotation.Autowired;
import org.springframework.stereotype.Component;

@Component
public class PersonAfterSmartInitializingSingleton implements SmartInitializingSingleton {
    @Autowired
    private Person person;

    @Override
    public void afterSingletonsInstantiated() {
        person.run("SmartInitializingSingleton");
    }
}
输出结果:
六、重写 onRefresh()方法
这个我实在是不会,但我不藏着掖着,告诉你也能实现。
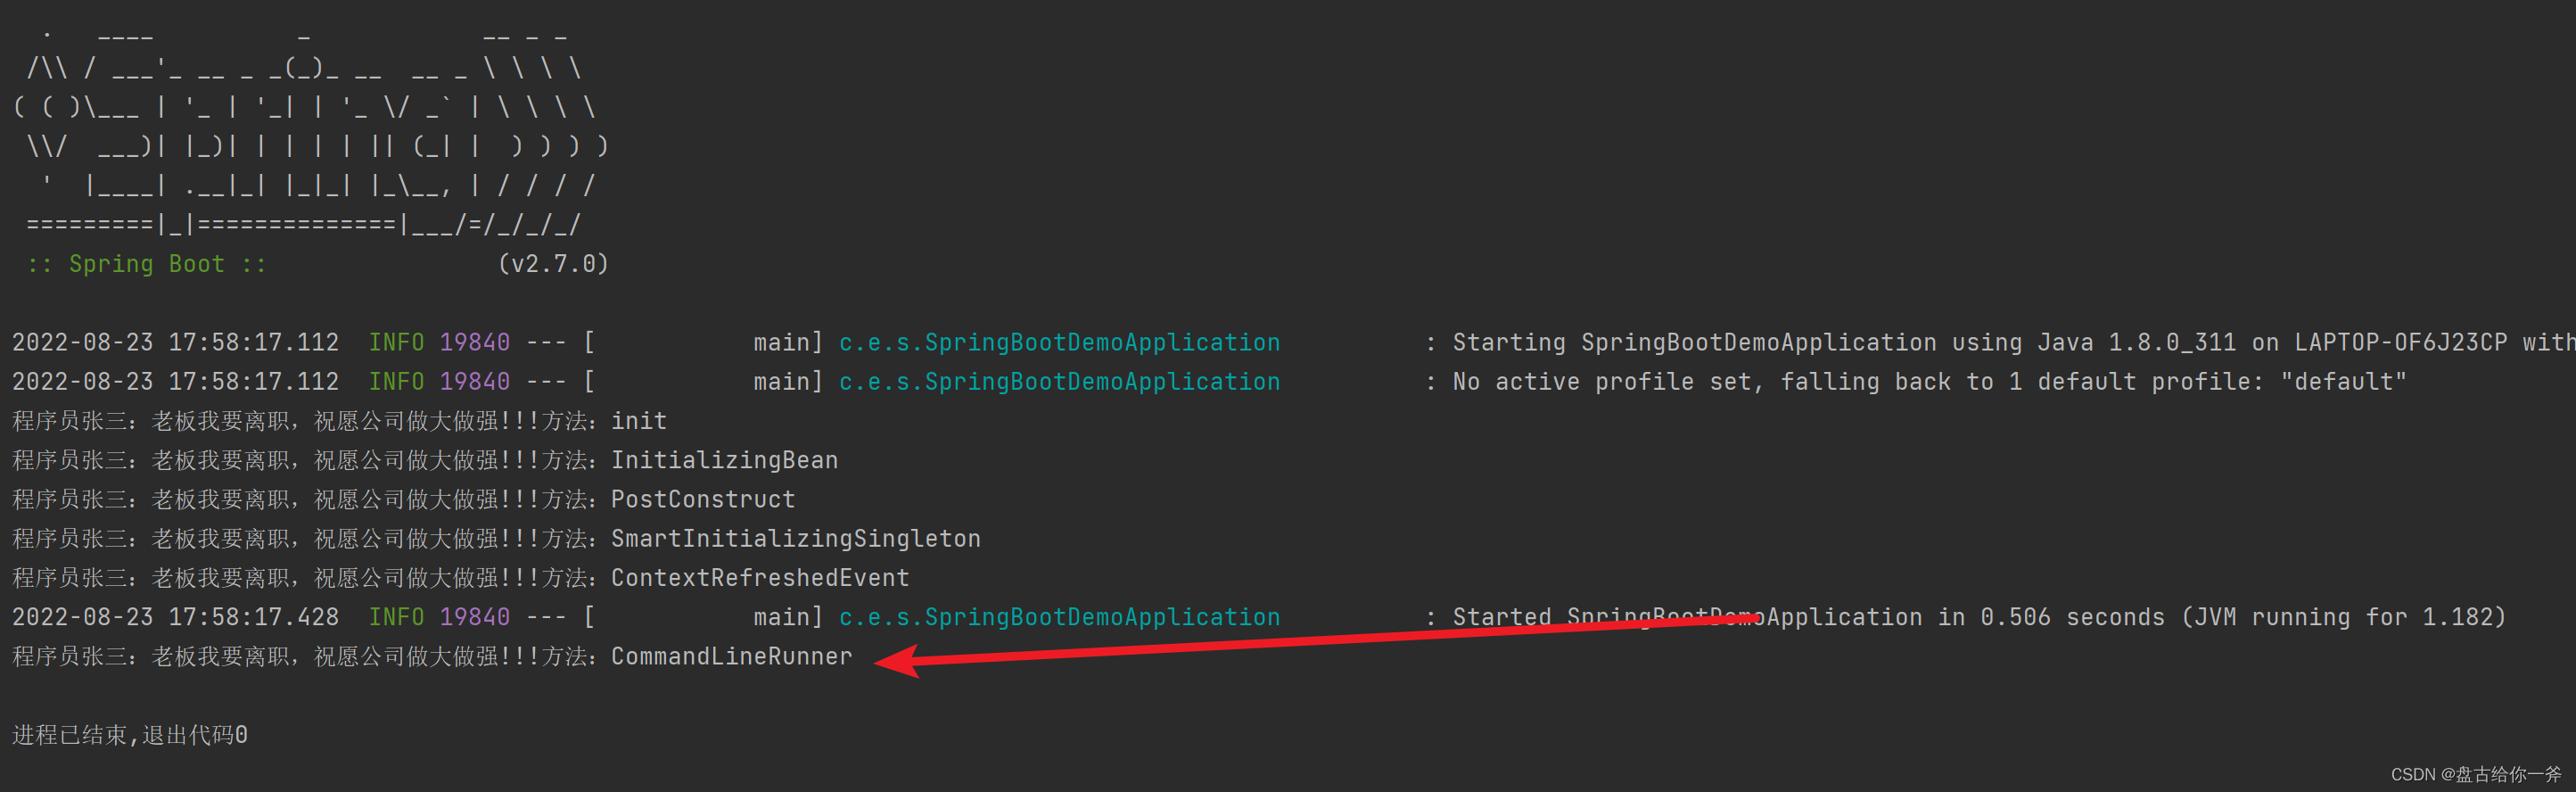
七、CommandLineRunner(仅限Spring Boot)
CommandLineRunner 是一个Spring boot 接口,在应用初始化后执行,且仅会执行一次。可以用来打印项目中配置文件的参数,方便排查问题。
代码如下:
import com.example.springbootdemo.bean.Person;
import org.springframework.beans.factory.annotation.Autowired;
import org.springframework.boot.CommandLineRunner;
import org.springframework.stereotype.Component;

@Component
public class PersonAfterCommandLineRunner implements CommandLineRunner {
    @Autowired
    private Person person;

    @Override
    public void run(String... args) throws Exception {
        person.run("CommandLineRunner");
    }
}
输出结果:
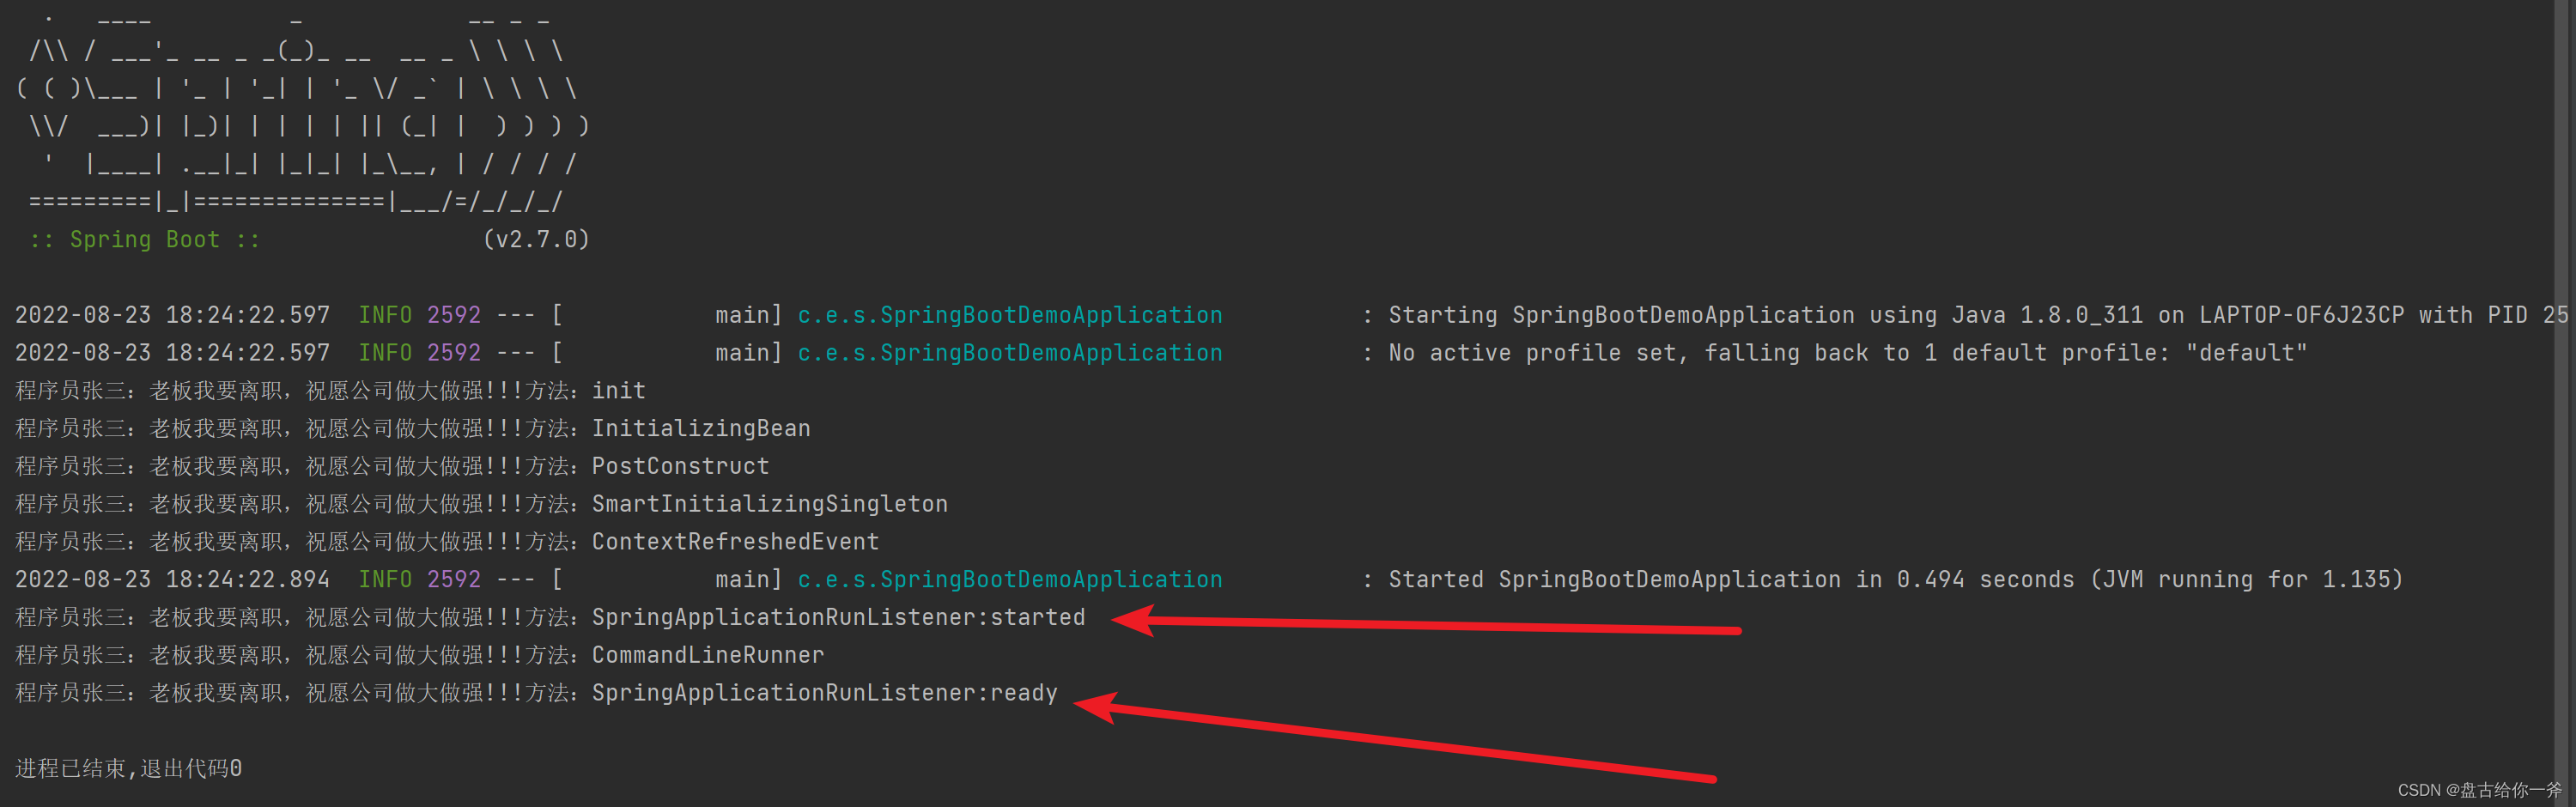
八、SpringApplicationRunListener(仅限Spring boot)
SpringBoot的生命周期事件监听方法,需要搭配resource/META-INF/spring.factories 文件使用。
代码如下:
JAVA代码:
import com.example.springbootdemo.bean.Person;
import org.springframework.boot.ConfigurableBootstrapContext;
import org.springframework.boot.SpringApplication;
import org.springframework.boot.SpringApplicationRunListener;
import org.springframework.context.ConfigurableApplicationContext;
import org.springframework.core.env.ConfigurableEnvironment;

import java.time.Duration;


public class PersonAfterSpringApplicationRunListener implements SpringApplicationRunListener {
    private final SpringApplication application;
    private final String[] args;

    public PersonAfterSpringApplicationRunListener(SpringApplication application, String[] args) {
        this.application = application;
        this.args = args;
    }

    @Override
    public void starting(ConfigurableBootstrapContext bootstrapContext) {
        /*
         * Person has not been registered
         */
//        Person person = bootstrapContext.get(Person.class);
//        person.run("SpringApplicationRunListener:starting");
    }

    @Override
    public void environmentPrepared(ConfigurableBootstrapContext bootstrapContext, ConfigurableEnvironment environment) {
        /*
         * Person has not been registered
         */
//        Person person = bootstrapContext.get(Person.class);
//        person.run("SpringApplicationRunListener:environmentPrepared");
    }

    @Override
    public void contextPrepared(ConfigurableApplicationContext context) {
        /*
         * Person has not been registered
         */
//        Person person = context.getBean(Person.class);
//        person.run("SpringApplicationRunListener:contextPrepared");
    }

    @Override
    public void contextLoaded(ConfigurableApplicationContext context) {
        /*
         * Person has not been registered
         */
//        Person person = context.getBean(Person.class);
//        person.run("SpringApplicationRunListener:contextLoaded");
    }

    @Override
    public void started(ConfigurableApplicationContext context, Duration timeTaken) {
        Person person = context.getBean(Person.class);
        person.run("SpringApplicationRunListener:started");
    }

    @Override
    public void ready(ConfigurableApplicationContext context, Duration timeTaken) {
        Person person = context.getBean(Person.class);
        person.run("SpringApplicationRunListener:ready");
    }

    @Override
    public void failed(ConfigurableApplicationContext context, Throwable exception) {
        Person person = context.getBean(Person.class);
        person.run("SpringApplicationRunListener:failed");
    }
}
spring.factories
org.springframework.boot.SpringApplicationRunListener=com.example.springbootdemo.impl.PersonAfterSpringApplicationRunListener
输出结果:
总结:
执行优先级:init-Method >> InitializingBean >> PostConstruct >> SmartInitializingSingleton >> ContextRefreshedEvent >> SpringApplicationRunListener:started >> CommandLineRunner >> SpringApplicationRunListener:ready


 972
972


 被折叠的 条评论
为什么被折叠?
被折叠的 条评论
为什么被折叠?
 到【灌水乐园】发言


