


1、Java新IO简介


2、缓冲区与Buffer

2.1、Buffer的基本操作


//缓冲区的操作流程
	@Test
	public void nioMethod() {
		//开启10个大小的缓冲区
		IntBuffer buf=IntBuffer.allocate(10);
		//postion:操作位置、limit:缓冲区的限制、capacity:缓冲区的容量
		System.out.println("1、写入数据前的postion、limit、capacity:");
		System.out.println(buf.position()+"、"+buf.limit()+"、"+buf.capacity());
		//定义整形数组
		int temp[]= {1,2,3,5};
		//向缓冲区写入一个数据
		buf.put(3);
		//向缓冲区写入一组数据
		buf.put(temp);
		System.out.println("2、写入数据后的postion、limit、capacity:");
		System.out.println(buf.position()+"、"+buf.limit()+"、"+buf.capacity());
		//重设缓冲区  将操作位置设置为0
		buf.flip();
		System.out.println("3、准备输出数据时的postion、limit、capacity:");
		System.out.println(buf.position()+"、"+buf.limit()+"、"+buf.capacity());

		System.out.println("缓冲区内的内容:");
		while(buf.hasRemaining()) {
			int x=buf.get();
			System.out.print(x+"、");
		}
		System.out.println();
		System.out.println("4、输出数据后的postion、limit、capacity:");
		System.out.println(buf.position()+"、"+buf.limit()+"、"+buf.capacity());
	}
结果:

2.2、深入缓冲区操作


2.3、 创建子缓冲区

测试:
//创建子缓冲区
	@Test
	public void sliceTest() {
		//1、开辟十个大小的缓冲区
		CharBuffer buf=CharBuffer.allocate(10);
		//定义缓冲区对象
		CharBuffer read=null;
		//向缓冲区中加入数据
		buf.put('g');
		buf.put('u');
		buf.put('a');
		buf.put('i');
		//创建只读缓冲区
		read=buf.asReadOnlyBuffer();
		//重设缓冲区
		read.flip();
		System.out.println("缓冲区的内容:");
		//读取缓冲区数据
		while(read.hasRemaining()) {
			char x=read.get();
			System.out.print(x);
		}
		System.out.println();
		try {
			read.put("f");
		}catch (Exception e) {
			// TODO: handle exception
			e.printStackTrace();
		}
	}
结果:

2.4、创建直接缓冲区

测试:
//创建直接缓冲区
	@Test
	public void ByteBufTest() {
		//声明对象
		ByteBuffer buf=null;
		//开辟直接缓冲区
		buf=ByteBuffer.allocateDirect(10);
		//定义byte数组
		byte temp[]= {'g','u','a','i'};
		//向缓冲区写入一组数据
		buf.put(temp);
		//重设缓冲区
		buf.flip();
		System.out.println("缓冲区的内容:");
		// hasRemaining(): 判断当前位置到限制位置之间是否内容
		while(buf.hasRemaining()) {
			byte x=buf.get();
			System.out.print((char)x);
		}
	}
结果:
3、通道

3.1、FileChannel

// 4、使用通道输入输出内容
@Test
public void channelTest() throws IOException {
	// 带输出的数据
	String info[] = { "hello", " guai" };
	// 创建文件对象
	File file = new File("e:/test.txt");
	// 实例化输出流
	FileOutputStream output = new FileOutputStream(file);
	//实例化输入流
	FileInputStream input=new FileInputStream(file);

	//1)输出数据到文件
	// 声明输出的通道对象
	FileChannel fileChannel = null;
	// 的到输出的文件通道
	fileChannel  = output.getChannel();
	// 开辟缓冲
	ByteBuffer buf = ByteBuffer.allocate(1024);
	// 将输出内容写入缓冲
	for (int i = 0; i < info.length; i++) {
		buf.put(info[i].getBytes());
	}
	// 重设缓冲区
	buf.flip();
	// 使用管道输出内容到文件
	fileChannel .write(buf);

	//2)从文件中读取内容
	//清空缓冲区
	buf.clear();
	fileChannel =null;
	//实例化输入管道
	fileChannel =input.getChannel();
	//声明变量接收内容
	int temp=0;
	//将文件中的内容读取到缓冲区
	while((temp=fileChannel.read(buf))!=-1) {

	}
	//重设缓冲区
	buf.flip();
	//输出缓冲区中的内容
	System.out.println("从文件中读取的内容");
	while(buf.hasRemaining()) {
		byte x=buf.get();
		System.out.print((char)x);
	}
	//关闭
	fileChannel .close();
	output.close();
	input.close();
}
结果:
3.2、内存映射

测试;
//5、内存映射,提高文件读写速度
@Test
public void mapTest() throws IOException {
//创建文件对象
File file=new File("e:/test.txt");
//初始化文件输入流对象
FileInputStream input=new FileInputStream(file);
//实例化文件管道
FileChannel fileChannel=input.getChannel();
//声明文件的映射
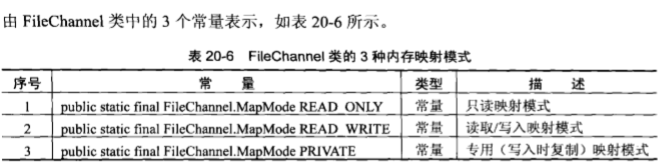
MappedByteBuffer mbb=fileChannel.map(FileChannel.MapMode.READ_ONLY,0,file.length());
//定义数组接收数据
byte data[]=new byte[(int)file.length()];
//定义下标
int foot=0;
//判断是否有数据
while(mbb.hasRemaining()) {
data[foot++]=mbb.get();
}
System.out.println(new String(data));
//关闭
fileChannel.close();
input.close();
}
结果:

3.3、文件锁


测试练习:
//6、文件锁
@Test
public void fileLockTest() throws IOException, InterruptedException {
	//实例化一个文件对象
	File file =new File("e:/test.txt");
	//创建文件输入流
	FileOutputStream output=new FileOutputStream(file);
	//创建文件通道
	FileChannel fChannel=output.getChannel();
	//试图获得此通道的文件锁
	FileLock lock=fChannel.lock();
	if(lock!=null) {
		System.out.println(file.getName()+"文件锁定1秒");
		//线程休眠,模拟该线程对文件的操作过程
		Thread.sleep(1000000);
		//解除锁定
		lock.release();
		System.out.println(file.getName()+"文件解除锁定");
	}
	fChannel.close();
	output.close();
}
5、Selector

测试练习
/**
 *
 * @description: 使用selector建议一个非阻塞的服务器端
 * @author: guai
 * @data: 2020年3月16日 下午6:45:38
 */
public class ServiceUI {

	//服务器端
	@Test
	public void serviceTest() throws IOException {
		//打开一个选择器
		Selector selector=Selector.open();
		//实例化ServerSocketChannel
		ServerSocketChannel socketChannel=ServerSocketChannel.open();
		//配置服务器为非阻塞
		socketChannel.configureBlocking(false);
		// 通过检索与此通道关联的服务端套接字
		ServerSocket initSocket=socketChannel.socket();
		//实例化监听地址与端口
		InetSocketAddress address=new InetSocketAddress(9999);
		//绑定地址
		initSocket.bind(address);
		//注册选择器
		socketChannel.register(selector, SelectionKey.OP_ACCEPT);

		System.out.println("服务器在运行,在9999端口监听。");

		int keysAdd;
		//选择一组建,相应的通道已为IO准备就绪
		while((keysAdd=selector.select())>0) {
			//取出全部生成的key
			Set<SelectionKey> selectedKeys=selector.selectedKeys();
			//实例化Iteration 迭代器
			Iterator<SelectionKey> iterator=selectedKeys.iterator();
			//迭代全部的key
			while(iterator.hasNext()) {
				//取出SelectionKey
				SelectionKey key=(SelectionKey) iterator.next();
				//判断客户端是否已连接上
				if(key.isAcceptable()) {
					System.out.println("与客户端成功连接");
					//取得Channel
					ServerSocketChannel server=(ServerSocketChannel) key.channel();
					//接收连接
					SocketChannel client=server.accept();
				   //设置为非阻塞状态
					client.configureBlocking(false);
					//开启缓冲区
					ByteBuffer outBuf=ByteBuffer.allocate(1024);
					//写入数据
					outBuf.put(("当前时间:"+new Date()).getBytes());
					//重置缓冲区
					outBuf.flip();
					//输出信息
					client.write(outBuf);
					client.close();
				}
			}
			selectedKeys.clear();
		}
	}

	//客户端
	@Test
	public void clientTest() throws Exception {
		//创建socket
		Socket cSocket=new Socket("localhost",9999);
		//通过socket创建输入流
		InputStream input=cSocket.getInputStream();
		//创建缓冲流提高数据读写效率
		BufferedReader br=new BufferedReader(new InputStreamReader(input));
		//读取客户端的请求数据
		String str=null;
		while((str=br.readLine())!=null) {
			System.out.println("服务端信息为:"+str);
		}

		//关闭资源
		br.close();
		cSocket.close();
	}
}
结果:


 508
508


 被折叠的 条评论
为什么被折叠?
被折叠的 条评论
为什么被折叠?
 到【灌水乐园】发言


