


👉 这是一个或许对你有用的社群
🐱 一对一交流/面试小册/简历优化/求职解惑,欢迎加入「芋道快速开发平台」知识星球。下面是星球提供的部分资料:
《项目实战(视频)》:从书中学,往事中“练”
《互联网高频面试题》:面朝简历学习,春暖花开
《架构 x 系统设计》:摧枯拉朽,掌控面试高频场景题
《精进 Java 学习指南》:系统学习,互联网主流技术栈
《必读 Java 源码专栏》:知其然,知其所以然

👉这是一个或许对你有用的开源项目
国产 Star 破 10w+ 的开源项目,前端包括管理后台 + 微信小程序,后端支持单体和微服务架构。
功能涵盖 RBAC 权限、SaaS 多租户、数据权限、商城、支付、工作流、大屏报表、微信公众号等等功能:
Boot 仓库:https://gitee.com/zhijiantianya/ruoyi-vue-pro
Cloud 仓库:https://gitee.com/zhijiantianya/yudao-cloud
视频教程:https://doc.iocoder.cn
【国内首批】支持 JDK 21 + SpringBoot 3.2.2、JDK 8 + Spring Boot 2.7.18 双版本
来源:juejin.cn/post/
7307522662287851558

可以参考官方文章进行体验:spring.io/blog/2023/0… [1]
通过官方快速得到一个基于jdk21的项目:start.spring.io/ [2]
快速体验(二进制部署)
@RestController
 @SpringBootApplication
 public class DemoApplication {

     public static void main(String[] args) {
         SpringApplication.run(DemoApplication.class, args);
     }

     @GetMapping("/customers")
     Collection<Customer> customers() {
         return Set.of(new Customer(1, "A"), new Customer(2, "B"), new Customer(3, "C"));
     }

     record Customer(Integer id, String name) {
     }
 }
启动非常快,秒启动

压测环境内存占用大概70MB左右,空闲时在20MB左右(由于直接打成二进制文件了,不能再使用jconsole、arthas之类的进行监控了),性能上由于不需要JVM预热,性能启动即巅峰。
$ ab -c 50 -n 10000 http://localhost:8080/customers
 Server Software:
 Server Hostname:        localhost
 Server Port:            8080

 Document Path:          /customers
 Document Length:        61 bytes

 Concurrency Level:      50
 Time taken for tests:   1.413 seconds
 Complete requests:      10000
 Failed requests:        0
 Total transferred:      1660000 bytes
 HTML transferred:       610000 bytes
 Requests per second:    7076.39 [#/sec] (mean)
 Time per request:       7.066 [ms] (mean)
 Time per request:       0.141 [ms] (mean, across all concurrent requests)
 Transfer rate:          1147.15 [Kbytes/sec] received

 Connection Times (ms)
               min  mean[+/-sd] median   max
 Connect:        0    2   8.0      2     144
 Processing:     1    5   6.7      4     147
 Waiting:        0    4   5.6      3     145
 Total:          1    7  10.4      6     149
基于 Spring Boot + MyBatis Plus + Vue & Element 实现的后台管理系统 + 用户小程序,支持 RBAC 动态权限、多租户、数据权限、工作流、三方登录、支付、短信、商城等功能
项目地址:https://github.com/YunaiV/ruoyi-vue-pro
视频教程:https://doc.iocoder.cn/video/
快速体验(jar部署)
jar包占用只有19MB,已经不能算是小胖jar了😊
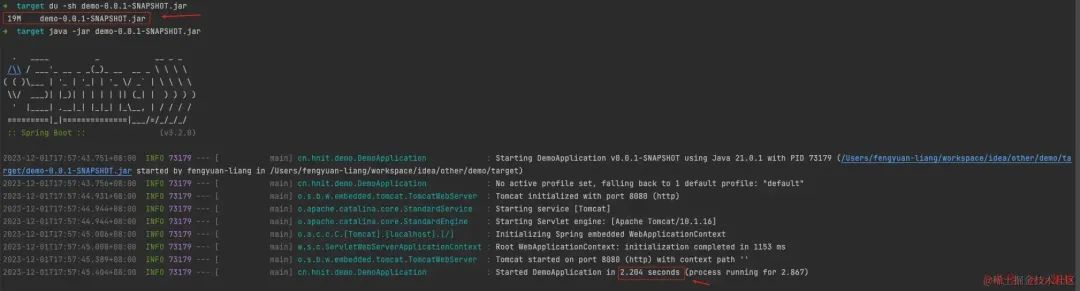
内存占用在压测时大概在200MB左右,空闲时在160MB左右。性能显然也不是启动即巅峰,可以看出其实还是需要进行JVM预热才能达到性能巅峰的
$ ab -c 50 -n 10000 http://localhost:8080/customers
 Server Software:
 Server Hostname:        localhost
 Server Port:            8080

 Document Path:          /customers
 Document Length:        61 bytes

 Concurrency Level:      50
 Time taken for tests:   17.930 seconds
 Complete requests:      10000
 Failed requests:        0
 Total transferred:      1660000 bytes
 HTML transferred:       610000 bytes
 Requests per second:    557.72 [#/sec] (mean)
 Time per request:       89.651 [ms] (mean)
 Time per request:       1.793 [ms] (mean, across all concurrent requests)
 Transfer rate:          90.41 [Kbytes/sec] received

 Connection Times (ms)
               min  mean[+/-sd] median   max
 Connect:        0   38 430.2      2    7004
 Processing:     0   14  90.4      8    1773
 Waiting:        0   12  88.7      6    1771
 Total:          1   53 439.0     10    7011
基于 Spring Cloud Alibaba + Gateway + Nacos + RocketMQ + Vue & Element 实现的后台管理系统 + 用户小程序,支持 RBAC 动态权限、多租户、数据权限、工作流、三方登录、支付、短信、商城等功能
项目地址:https://github.com/YunaiV/yudao-cloud
视频教程:https://doc.iocoder.cn/video/
对比golang
package main

 import (
     "encoding/json"
     "flag"
     "fmt"
     "net/http"
 )

 var port = flag.String("p", "8080", "please input port")

 func main() {
     http.HandleFunc("/customers", func(writer http.ResponseWriter, request *http.Request) {
         data, _ := json.Marshal(request.URL)
         writer.Write(data)
     })
     e := make(chan error)
     go func() {
         e <- fmt.Errorf("error[%v]", http.ListenAndServe(":"+*port, nil))
     }()
     fmt.Println("http 服务器启动...")
     fmt.Println(<-e)
 }
这里golang没有使用框架,仅使用标准库,所以内存占用较低,仅10MB左右,不过即使使用Gin之类的web框架,内存也不会超过20MB
$ ab -c 50 -n 10000 http://localhost:8080/customers
 Server Software:
 Server Hostname:        localhost
 Server Port:            8080

 Document Path:          /customers
 Document Length:        161 bytes

 Concurrency Level:      50
 Time taken for tests:   1.380 seconds
 Complete requests:      10000
 Failed requests:        0
 Total transferred:      2790000 bytes
 HTML transferred:       1610000 bytes
 Requests per second:    7247.68 [#/sec] (mean)
 Time per request:       6.899 [ms] (mean)
 Time per request:       0.138 [ms] (mean, across all concurrent requests)
 Transfer rate:          1974.71 [Kbytes/sec] received

 Connection Times (ms)
               min  mean[+/-sd] median   max
 Connect:        0    2  16.5      2     459
 Processing:     0    4  27.9      2     460
 Waiting:        0    2  10.5      2     459
 Total:          1    7  32.3      4     462
对比Rust
[dependencies]
actix-web = "4"
use actix_web::{get, App, HttpRequest, HttpResponse, HttpServer, Responder};

#[get("/customers")]
async fn echo(req: HttpRequest) -> impl Responder {
    let url = req.uri().to_string();
    HttpResponse::Ok().body(url)
}


#[actix_web::main]
async fn main() -> std::io::Result<()> {
    HttpServer::new(|| {
        App::new()
            .service(echo)
    })
    .bind(("127.0.0.1", 8080))?
    .run()
    .await
}
Actix-web空闲时内存占用大概3MB左右,压测时占用大概6MB左右
$ ab -c 50 -n 10000 http://localhost:8080/customers
Server Software:
Server Hostname:        127.0.0.1
Server Port:            8080

Document Path:          /customers
Document Length:        10 bytes

Concurrency Level:      50
Time taken for tests:   1.091 seconds
Complete requests:      10000
Failed requests:        0
Total transferred:      860000 bytes
HTML transferred:       100000 bytes
Requests per second:    9163.48 [#/sec] (mean)
Time per request:       5.456 [ms] (mean)
Time per request:       0.109 [ms] (mean, across all concurrent requests)
Transfer rate:          769.59 [Kbytes/sec] received

Connection Times (ms)
              min  mean[+/-sd] median   max
Connect:        0    2  11.0      2     189
Processing:     0    3   7.0      3     190
Waiting:        0    2   7.0      2     189
Total:          2    5  13.1      4     193
rust虽然有非常厉害的零成本抽象,但作为代价其编译时间会比较长(在实际项目中真的特别长😢)
$ time cargo build
cargo build  213.00s user 23.08s system 258% cpu 1:31.39 total
结论
AOT-processed已经相对成熟,效果可以说非常惊艳,解决了JVM启动慢、需要预热、内存占用大等问题。
美中不足的是编译速度非常慢,笔者电脑是2017款mac book pro编译花费大概15分钟左右
Finished generating 'demo' in 14m 33s.
 [INFO] ------------------------------------------------------------------------
 [INFO] BUILD SUCCESS
 [INFO] ------------------------------------------------------------------------
 [INFO] Total time:  15:45 min
 [INFO] Finished at: 2023-12-01T17:00:21+08:00
 [INFO] ------------------------------------------------------------------------
[INFO] Total time: 15:45 min [INFO] Finished at: 2023-12-01T17:00:21+08:00
[INFO] ------------------------------------------------------------------------
可以看出java在云原生大环境下已经取得了不错的进步的
参考资料
[1]spring.io/blog/2023/0…: https://spring.io/blog/2023/09/09/all-together-now-spring-boot-3-2-graalvm-native-images-java-21-and-virtual
[2]start.spring.io/: https://start.spring.io/
欢迎加入我的知识星球,全面提升技术能力。
👉 加入方式,“长按”或“扫描”下方二维码噢:

星球的内容包括:项目实战、面试招聘、源码解析、学习路线。


文章有帮助的话,在看,转发吧。
谢谢支持哟 (*^__^*)


 1142
1142

 被折叠的 条评论
为什么被折叠?
被折叠的 条评论
为什么被折叠?
 到【灌水乐园】发言


