


VUE
一.快速入门
<!DOCTYPE html>
<html>
	<head>
		<meta charset="utf-8">
		<title></title>

	</head>
	<body>
		<div id="ann">
			<!-- 引入Vue 的数据 -->
			{{name}}
		</div>
	</body>
	<!-- 引入Vue文件 -->
	<script src="https://cdn.jsdelivr.net/npm/vue/dist/vue.js"></script>
	<script>
		// 绑定vue元素
		new Vue({
			el: "#ann",
			data: {
				name: 'zhangsai'
				}
			}
		})
	</script>
</html>
二.语法
插值表达式
- 获取Vue对象中的属性以及方法
- 获取数组中的内容
- 获取对象中的属性
- 三目运算
- 四则运算
<!DOCTYPE html>
<html>
	<head>
		<meta charset="utf-8">
		<title></title>

	</head>
	<body>

		<div id="a">
			1. 获取Vue对象中的属性以及方法<br />
			{{name}}<br />
			{{hello()}}<br />
			2. 获取数组中的内容<br />
			{{shuzu[4]}}<br />
			3. 获取对象中的属性<br />
			{{student.name}}<br />
			4. 三目运算<br />
			{{1<0?'yes':'no'}}<br />
			5. 四则运算<br />
			{{1+2-1*4/1}}<br />

		</div>

	</body>
	<!-- 引入Vue文件 -->
	<script src="https://cdn.jsdelivr.net/npm/vue/dist/vue.js"></script>
	<script>
		// 绑定vue元素
		new Vue({
			el: "#a",
			data: {
				student: {
					name: 'zhanghaha',
					age: 33
				},//测试3
				shuzu: [1, 2, 3, 4, 5], //测试数组
				hello() {
					return "hello"
				}
			}
		})
	</script>
</html>
条件判断
- v-if
- v-else
- v-else-if
几乎等同于Java的If-else
<!DOCTYPE html>
<html>
	<head>
		<meta charset="utf-8">
		<title></title>
	</head>
	<body>
		<div id="a">
			<!-- 当Flag为True时,代表没钱,为False时代表有钱 -->
			<p v-if="flag">我好穷!!!</p>
			<!-- <p v-else="flag">我有钱了!</p> -->
			<!--else-if 当前一个为false时,判断后一个,如果为true执行,如果不为true 不执行 -->
			<p v-else-if="rich">有钱了,出去浪!</p>
			<!-- 双向绑定,点击按钮,实现Flag取反 -->
			<button @click="flag=!flag">彩票中奖!</button>

		</div>
	</body>
	<script src="https://cdn.jsdelivr.net/npm/vue/dist/vue.js"></script>
	<script type="text/javascript">
		new Vue({
			el: "#a",
			data: {
				flag: true,
				rich: true
			}
		})
	</script>
</html>
-
v-show
V-show跟V-if的区别,
- 在切换true跟false的状态的时候,v-if是添加或者删除标签实现的
- v-show是通过Style的显示设置实现的,所以从效率上讲 V-show的效率更高
循环
- v-for
普通的For循环
<!DOCTYPE html>
<html>
	<head>
		<meta charset="utf-8">
		<title></title>
	</head>
	<body>
		<div id="a">
			<ul>
				<!-- 用法1 : 等同于for(int a :args){a} -->
				<li v-for="a in args">{{a}}</li>
				<hr />
				<!-- 用法2: a为取出的元素,i循环的次数-->
				<li v-for="(a,i) in args" :key="i">
					{{i}} == {{a}}
				</li>
			</ul>
		</div>
	</body>
	<script src="https://cdn.jsdelivr.net/npm/vue/dist/vue.js"></script>
	<script>
		new Vue({
			el: "#a",
			data: {
				args: [1, 2, 3, 4, 5]
			}
		})
	</script>
</html>
- 用for循环取出对象属性
<!DOCTYPE html>
<html>
	<head>
		<meta charset="utf-8">
		<title></title>
	</head>
	<body>
		<div id="a">
			<ul>
				<!-- v:值,k:键,i:序号 -->
				<li v-for="(v,k,i) in stu">
					序号:{{i}},键:{{k}}=值:{{v}}
				</li>
			</ul>
		</div>
	</body>
	<script src="https://cdn.jsdelivr.net/npm/vue/dist/vue.js"></script>
	<script>
		new Vue({
			el: "#a",
			data: {
				stu:{
					name:'zhang',
					age:12,
					sex:'男'
				}
			}
		})
	</script>
</html>
- 遍历对象数组
<!DOCTYPE html>
<html>
	<head>
		<meta charset="utf-8">
		<title></title>
		<link href="https://cdn.jsdelivr.net/npm/bootstrap@3.3.7/dist/css/bootstrap.min.css" rel="stylesheet">

	</head>
	<!-- 获取对象数组 -->
	<body>
		<div id="a">
			<table class="table table-hover" align="center" border="1px" >
				<tr>
					<th>序号</th>
					<th>姓名</th>
					<th>年龄</th>
					<th>性别</th>
				</tr>
				<tr v-for="(stu,i) in students">
					<td>{{i}}</td>
					<td>{{stu.name}}</td>
					<td>{{stu.age}}</td>
					<td>{{stu.sex}}</td>
				</tr>
			</table>
			<!-- 测试嵌套循环 -->
			<ul v-for="stu in students">
				<li v-for="(v,k,i) in stu">
					{{i}}:{{k}}:{{v}}
				</li>
			</ul>
		</div>
	</body>
	<script src="https://cdn.jsdelivr.net/npm/vue/dist/vue.js"></script>
	<!-- jQuery (Bootstrap 的所有 JavaScript 插件都依赖 jQuery,所以必须放在前边) -->
	<script src="https://cdn.jsdelivr.net/npm/jquery@1.12.4/dist/jquery.min.js"></script>
	<!-- 加载 Bootstrap 的所有 JavaScript 插件。你也可以根据需要只加载单个插件。 -->
	<script src="https://cdn.jsdelivr.net/npm/bootstrap@3.3.7/dist/js/bootstrap.min.js"></script>
	<script>
		new Vue({
			el: "#a",
			data: {
				students: [{
						name: '张三',
						age: 11,
						sex: '男'
					},
					{
						name: '李四',
						age: 11,
						sex: '女'
					},
					{
						name: '王五',
						age: 11,
						sex: '男'
					}
				]
			}
		})
	</script>
</html>
三.属性绑定
- 简单的属性绑定
<!DOCTYPE html>
<html>
	<head>
		<meta charset="utf-8">
		<title></title>
	</head>
	<body>
		<!-- 简单的属性绑定 -->
		<div id="a">
			<input type="text" v-model="title"/>{{title}}
		</div>

	</body>
	<script src="https://cdn.jsdelivr.net/npm/vue/dist/vue.js"></script>
	<script>
		new Vue({
			el:"#a",
			data:{
				title:'测试'
			}
		})
	</script>
</html>
- 为标签的属性绑定Vue的值
<!DOCTYPE html>
<html>
	<head>
		<meta charset="utf-8">
		<title></title>
	</head>
	<body>
		<!-- 简单的属性绑定 -->
		<div id="a">
			<input type="text" v-model="title"/>{{title}}
			<!-- 在标签的属性内部不能使用插值表达式来填充进去数据,但是可以使用v-bind把数据绑定到该属性上 -->
			<a v-bind:href="link">百度</a>
			<!-- 也可以直接写个冒号,不写V-bind -->
			<a :href="link">省略V-bind,百度</a>
		</div>

	</body>
	<script src="https://cdn.jsdelivr.net/npm/vue/dist/vue.js"></script>
	<script>
		new Vue({
			el:"#a",
			data:{
				title:'测试',
				link:"http://www.baidu.com"
			}
		})
	</script>
</html>
四.事件绑定
关于事件,需要把握好三个步骤: 设参,传参,和接参
<!DOCTYPE html>
<html>
	<head>
		<meta charset="utf-8">
		<title></title>
	</head>
	<body>
		<div id="a">
			当前年龄:{{age}}
			<hr />
			<!-- @click  =>  v-on:click -->
			<!--                           设参 -->
			<button type="button" @click="guonian(2)">过年</button>
		</div>

	</body>
	<script src="https://cdn.jsdelivr.net/npm/vue/dist/vue.js"></script>
	<script>
		new Vue({
			el:"#a",
			data:{
				age:1,
				yeal:1
			},
			methods:{
				//    传参
				guonian:function(y){
					// 接参
					this.age+=y
				}
			}
		})
	</script>
</html>
扩展
<!DOCTYPE html>
<html>
	<head>
		<meta charset="utf-8">
		<title></title>
	</head>
	<body>
		<div id="a">
			当前年龄:{{age}}
			<hr />
			<!-- @click  =>  v-on:click -->
			<button type="button" @click="guonian()">过年</button>
			<hr />
			<!-- 让用户自定义yeal的值 -->
			过几年:<input type="text" v-model="yeal" />
		</div>

	</body>
	<script src="https://cdn.jsdelivr.net/npm/vue/dist/vue.js"></script>
	<script>
		new Vue({
			el:"#a",
			data:{
				age:1,
				yeal:1
			},
			methods:{
				guonian:function(){
					// 从视图层接受到的数据是字符串格式,需要转化为数字格式
					this.age+=(this.yeal-0);
				}
			}
		})
	</script>
</html>
事件修饰符:
.stop:等同于JavaScript中的event.stopPropagation(),防止事件冒泡.prevent:等同于JavaScript中的event.preventDefault(),防止执行预设的行为(如果事件可取消,则取消该事件,而不停止事件的进一步传播).capture:与事件冒泡的方向相反,事件捕获由外到内.self:只会触发自己范围内的事件,不包含子元素.once:只会触发一次
计算属性:Computed
- 简单理解,计算属性本质上是一个属性,他是把一个方法的计算结果缓存起来,作为一个Vue对象的属性来使用,这样做的好处是,减少了每次计算的运算成本,如果一个属性不经常会发生变化,就可以用这个计算属性
<!DOCTYPE html>
<html>
	<head>
		<meta charset="utf-8">
		<title></title>
	</head>
	<body>
		<div id="a">
			{{getData()}}
			{{getData2}}
		</div>
	</body>
	<script src="https://cdn.jsdelivr.net/npm/vue/dist/vue.js"></script>
	<script>
		var v1 = new Vue({
			el: "#a",
			data: {

			},
			methods: {
				//普通方法,每次执行都将重新执行计算
				getData: function() {
					return Date.now();
				}
			},
			//计算属性,把方法的返回值存为一个属性,只计算一次
			computed: {
				getData2: function() {
					return Date.now();
				}
			}
		})
	</script>
</html>
五.Vue的组件化
1.组件的全局注册
<!DOCTYPE html>
<html>
	<head>
		<meta charset="utf-8">
		<title></title>
	</head>
	<body>
		<div id="a">
			<!-- 使用组件 -->
			<model1></model1>
		</div>
	</body>
	<script src="https://cdn.jsdelivr.net/npm/vue/dist/vue.js"></script>
	<script>
		/*
		参数1:组件名称
		参数2:具体组件的内容
		*/
		Vue.component("model1", {
			// 模板:就是当前组件实际的内容,并且一个组件只能包含一个根标签
			template: "<div><p>{{text}}</p><input type='text' v-model='text'></input><a href='http://www.baidu.com' @click='afn()'>百度链接</a></div>",
			//data必须要使用以方法的返回值的方式返回数据
			data: function() {
				return {
					text: '测试'
				}
			},
			// 当前组件的方法
			methods: {
				afn: function() {
					alert("即将跳转到百度...");
				}
			},
			//当前组件的计算属性
			components:{
			}
		})
		//使用该组件必须要先绑定一个Vue对象
		new Vue({
			el: "#a"
		})
	</script>
</html>
2.组件的本地注册
<!DOCTYPE html>
<html>
	<head>
		<meta charset="utf-8">
		<title></title>
	</head>
	<body>
		<div id="a">
			<model1></model1>
		</div>
		<hr />
		<div id="a1">
			<model1></model1>
		</div>
	</body>
	<script src="https://cdn.jsdelivr.net/npm/vue/dist/vue.js"></script>
	<script>
		new Vue({
			el: "#a",
			//定义本地化组件,只在当前Vue绑定的对象中有效,其他Vue绑定的元素使用无效
			components: {
				'model1': {
					template: "<div><p>{{text}}</p><input type='text' v-model='text'></input><a href='http://www.baidu.com' @click='afn()'>百度链接</a></div>",
					data: function() {
						return {
							text: '测试'
						}
					},
					// 当前组件的方法
					methods: {
						afn: function() {
							alert("即将跳转到百度...");
						}
					},
					//当前组件的计算属性
					components: {},
				}
			}
		})
	</script>
</html>
3.组件的生命周期
现在先做下一了解即可
创建一个组件之后,会在不同阶段调取钩子函数
六.使用Vue-Cli搭建Vue项目
1.什么是Vue-cli
Cli 是Vue的命令行工具,使用Vue提供的各种命令,可以拉取创建运行我们需要是用到的框架,
使用Vue-Cli需要先安装node.js
2.安装Node.js
node.js提供了前端程序的运行环境,可以把node.js理解成运行前端程序的服务器
直接在官网下载安装即可
https://nodejs.org/zh-cn/download/
测试是否安装成功
node -v
3.使用Node.js安装Vue-cli
npm install -g cnpm --registry=https://registry.npm.taobao.org  # 替换成淘宝的镜像
cnpm install vue-cli -g  # 安装Vue-cli
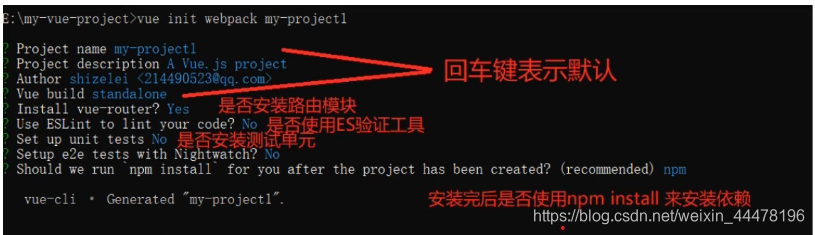
4.使用Vue-Cli下载项目骨架搭建项目
vue list # 列出支持的框架
先创建项目目录
mkdir myVue  #创建?myVue目录
cd myVue  #进入目录
vue init webpack myVueDemo1  #使用Webpack创建一个项目名为MyVueDemo1的项目

#执行完成之后
cd myVue  #进入项目目录
npm run dev #以开发模式执行
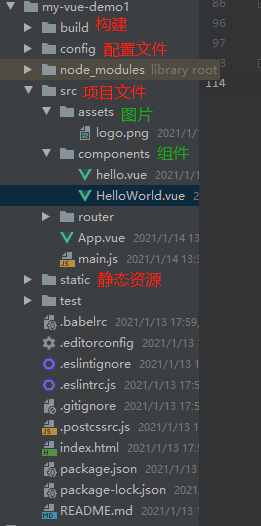
5.目录结构
七.Vue组件之间的传递
参数传递:
1,如何在App.vue中使用子组件
创建子组件
<template>
    <div>我是一个子组件,Hello,Vue !!!</div>
</template>

<script>
    export default {
        name: 'hello'
    }
</script>

<style scoped>

</style>
把组件注册到Main.js
import Vue from 'vue'
import App from './App'
import router from './router'
//导入组件
import hello from './components/hello'

Vue.config.productionTip = false
//定义全局组件
Vue.component(hello)

/* eslint-disable no-new */
new Vue({
  el: '#app',
  router,
  components: { App },
  template: '<App/>'
})
在App.vue中使用组件
<template>
  <div id="app">
<!--    使用组件-->
    <hello></hello>
  </div>
</template>

<script>
export default {
  name: 'App'
}
</script>

<style>
#app {
  font-family: 'Avenir', Helvetica, Arial, sans-serif;
  -webkit-font-smoothing: antialiased;
  -moz-osx-font-smoothing: grayscale;
  text-align: center;
  color: #2c3e50;
  margin-top: 60px;
}
</style>
2.子组件如何接受父组件的传参
1.在子组件中添加一个属性:props然后再其中写上需要接受的参数类型,如数组,对象等
<template>
  <div>我是一个子组件,Hello,Vue !!!
    <hr/>
    <a href="www.baidu.com">百度</a>
    {{MyTitle}}
  </div>
</template>

<script>
export default {
  name: 'Hello',
  //  数组类型传参
  // props: ['MyTitle']
  props: {
    //  对象类型传参
    MyTitle: {
      // 类型为String
      type: String,
      // 是否必须传参
      required: true,
      // 默认值
      default: '没有接受到传参'
    }
  }
}
</script>

<style scoped>

</style>
2.在App.vue中传入参数
<template>
  <div id="app">
<!--    使用组件-->
<!--    传入子组件的my-title的值-->
    <Hello :my-title="msg"></Hello>
  </div>
</template>

<script>
export default {
  name: 'App',
  data () {
    return {
      //  设置值
      msg: 'you good!'
    }
  }
}
</script>

<style>
#app {
  font-family: 'Avenir', Helvetica, Arial, sans-serif;
  -webkit-font-smoothing: antialiased;
  -moz-osx-font-smoothing: grayscale;
  text-align: center;
  color: #2c3e50;
  margin-top: 60px;
}
</style>
3.子组件如何传递参数给到父组件
- 子组件中设置一个返回对象为方法属性传参
<script>
export default {
  name: 'Hello',
  props: {
    'btnfun': {
      'type': Function
    }
  }
- 在模板中添加一个按钮,设置点击事件为此方法,并传递参数
<button @click="btnfun('这是传到父组件的数据')"> 点我体验子传父</button>
- 在父组件中,设置方法
methods:{
    fun: function (m) {
        this.msg = m;
    }
}
- 并且父组件中使用子组件时,指定子组件调用的方法为fun()
<Hello :MyTitle="msg" :btnfun="fun"></Hello>以上,当点击子组件的按钮时,子组件中的方法参数会被传入父组件中对应的方法中,并改变父组件中,msg的值,以改变页面的显示内容
事件传递:
举例:点击事件,子组件中的按钮的点击事件需要更改来自父组件传递过来的参数
- 在父组件中引用子组件时,需要自定义一个@属性,然后引向父组件中一个方法
<template>
  <div id="app">
    <!--    使用子组件,自定义增加和删除的方法-->
    <zizujian :num="shuzi" @incr="addnum" @decr="del"></zizujian>
  </div>
</template>

<script>
    import Zizujian from "./components/Zizujian";

    export default {
        name: 'App',
        components: {Zizujian},
        data() {
            return {
                shuzi: 1
            }
        },
        //定义增加和删除的方法
        methods: {
            addnum() {
                this.shuzi++;
            },
            del() {
                this.shuzi--
            }
        }

    }
</script>

<style>
  #app {
    font-family: 'Avenir', Helvetica, Arial, sans-serif;
    -webkit-font-smoothing: antialiased;
    -moz-osx-font-smoothing: grayscale;
    text-align: center;
    color: #2c3e50;
    margin-top: 60px;
  }
</style>
在子组件中,需要编写按钮,并指定点击事件触发的方法
八.路由
路由(Vue Router)是Vue的官方的路由管理器,使页面构建更加简单
路由:是一种映射关系,是 “path =>组件”的映射
路由器:管理路由的,在路由器里配置路由
1.基础使用
.1.先创建两个组件
<!--Home组件  -->
<template>
<div>首页</div>
</template>

<script>
  export default {
      name: "Home"
  }
</script>

<style scoped>

</style>
<!--Product组件 --> <template> <div>商品列表:商品ID:{{id}}</div> </template> <script> export default { name: "Product", data(){ return{ id:this.$route.params.id } } } </script> <style scoped> </style>2.绑定路由规则
import Vue from 'vue'
import Router from 'vue-router'
import Home from "../components/Home";

Vue.use(Router)

export default new Router({
  routes: [
    {
      path: '/Home',
      component: Home //启动时加载
    },
    {
      path: '/Product/:id',
      component: () => import("../components/Product") //应用时加载
    }
  ]
})
3.在App.vue中使用路由
<template>
  <div id="app">
    <ul class="nav nav-tabs">
<!--      <router-link>标签的作用可以理解为把这个变成一个a标签,然后经过路由在view标签内展示对应的组件-->
      <oi role="presentation" class="active"><router-link to="/Home">首页</router-link></oi>
      <oi role="presentation"><router-link to="/Product/3"> 商品列表</router-link></oi>
    </ul>
<!--    此标签的作用是展示被路由的组件-->
    <router-view/>
  </div>
</template>
2.路由的参数传递
设参
设定路由规则时,指定后面携带的参数
  {
  //:id就是后面应该携带的参数名字
      path: '/Product/:id',
      component: () => import("../components/Product")
    }
传参
在实现路由跳转时,给定参数
<oi role="presentation"><router-link to="/Product/3"> 商品列表</router-link></oi>接参
接受来自路由传递过来的参数的值
<script>
    export default {
        name: "Product",
        data(){
            return{
                // 设置id为当前路由对象传过来的名为ID的参数的值
                id:this.$route.params.id
            }
        }
    }
</script>
3.程序式路由
methods:{
    btnfn:function () { //设定按钮点击方法,实现路由
        this.$router.push("/Product/9999")
    }
}
九.使用Axios发送请求
Axios的作用可以等同于AJAX,可以在浏览器中个实现异步向后端服务器发送请求
1.Axiox的使用
安装Axiox
npm install --save axios vue-axios在main.js 中引用
import axios from "axios";
import VueAxios from "vue-axios";

Vue.use(VueAxios,axios)
发送Axios
//使用get请求向后端发送axios

registfn() {
    this.axios({
        method: 'get',
        url: "http://localhost:8080/sMVC01_war_exploded/regist?name=" + this.name + "&password=" + this.password
    }).then(function (resp) {
        console(resp)
    })
},
//使用Post请求发送axios
registfn() {
this.axios({
method: “post”,
url: “http://localhost:8080/sMVC01_war_exploded/regist”,
data: {
name: this.name,
password: this.password
}
}).then(function (resp) {
console.log(resp)
})
注意:解决MVC的跨域问题:
<mvc:cors>
    <mvc:mapping path="/**"
                 allowed-origins="*"
                 allowed-methods="POST,GET,OPTIONS,DELETE,PUT,PATCH"
                 allowed-headers="Content-Type,Access-Control-Allow-Headers,Authorization,X-Requested-With"
                 allow-credentials="true"/>

</mvc:cors>
解决SpringBoot的跨域问题:
@CrossOrigin(origins = "http://localhost:8080", maxAge = 3600) //接受来自Localhost:8080的请求,加在Controller 或者对应的方法上
十.Axios实现简单的前后端交互
- 前端做一个登录页面
<template>
  <!--  login-box指定样式-->
  <div class="login-box">
    <!--    登录表单-->
    <el-form ref="form" :rules="rules" :model="form" label-width="80px">
      <h3>欢迎登录</h3>
      <!--      用户名-->
      <el-form-item label="用户名:" prop="name">
        <el-input v-model="form.name"></el-input>
      </el-form-item>
      <!--      密码-->
      <el-form-item label="密码:" prop="password">
        <el-input type="password" v-model="form.password"></el-input>
      </el-form-item>
      <!--      表单提交按钮-->
      <el-form-item>
        <el-button type="primary" @click="submitForm('form')">登录</el-button>
      </el-form-item>
    </el-form>
  </div>
</template>

<script>
    export default {
        name: "login",
        //数据
        data() {
            return {
                //表单数据
                form: {
                    name: "",
                    password: ""
                },
                //表单验证
                rules: {
                    name: [
                        {required: true, message: '请输入用户名', trigger: 'blur'},
                        {min: 5, max: 20, message: '长度为5-20个字符', trigger: 'blur'}
                    ],
                    password: [
                        {required: true, message: '请输入密码', trigger: 'blur'},
                        {min: 8, max: 20, message: '长度为8-20个字符', trigger: 'blur'}
                    ]
                }

            }
        },
        //方法
        methods: {
            //提交方法
            submitForm(formName) {
                var vm = this
                //检测当前表单是否有未填的数据项
                this.$refs[formName].validate((valid) => {
                    if (valid) {
                        //都填好了则使用Axios发送到后台进行验证
                        this.axios({
                            method: "post",
                            url: "http://localhost:8081/login",
                            data: {
                                name: vm.form.name,
                                password: vm.form.password
                            }
                            //    验证成功则执行这里的操作
                        }).then(function (resp) {
                            console.log(resp.data)
                            if (resp.data == "ok") {
                                vm.$alert('登录成功,即将跳转到首页', '提示', {
                                    confirmButtonText: '确定',
                                    callback: action => {
                                        //点击确定跳转到Home
                                        vm.$router.push("/Home")
                                    }
                                })
                                //    验证失败,则执行这里的操作
                            } else {
                                vm.$message.error('用户名或密码错误');
                            }
                        })
                        //如果用户名或密码没填完 则执行这里
                    } else {
                        this.$message.error('请检查用户名或密码');
                        return false;
                    }
                });
            }
        }
    }
</script>

<style scoped>
  .login-box {
    width: 500px;
    height: 300px;
    border: #DCDFE6 1px solid;
    border-radius: 20px;
    box-shadow: 0 2px 4px rgba(0, 0, 0, .12), 0 0 6px rgba(0, 0, 0, .04);
    margin: 150px auto;
    padding: 20px 50px 30px 20px;
  }
</style>
- 创建后端Controller
@CrossOrigin(origins = "http://localhost:8080", maxAge = 3600)  //使用此注解以解决跨域问题
@RestController
public class TestController {

    @RequestMapping(value = "/login", method = RequestMethod.POST)
//    封装RequestBody 为一个对象
    public String Login(@RequestBody LoginUser lu) {
        if ("admin".equals(lu.getName()) && "password".equals(lu.getPassword())) {
            return "ok"; //验证成功返回ok
        }
        return "用户名或密码错误"; //验证失败返回"用户名密码错误
    }
}
十一.Vuex
1.安装Vuex
在根目录下使用命令安装Vuex
cnpm install vuex --save
修改
main.js,导入Vuex
import Vuex from 'vuex'

Vue.use(Vuex)
创建store.index.js
import Vue from "vue"
import Vuex from 'vuex'

Vue.use(Vuex);

//创建全局的state对象,用于保存所有组件的公共数据
const state = sessionStorage.getItem('state') ? JSON.parse(sessionStorage.getItem('state')) : {
  //定义一个uesr对象
  //在组件中是通过this.$state.user 来获取
  user: {
    name: ''
  }
};


//实时监听state值得最新状态,注意这里的getters可以理解为计算属性
const getters = {
  //在组件中是通过 this.$store.getters.getUser来获取
  getUser(state) {

    return state.user;
  }
};


//定义改变state初始值的方法,这里是唯一可以改变state的地方,缺点是只能同步执行
const mutations = {
  updateUser(state, user) {
    state.user = user;
  }
};

//定义触发(mutations)函数的方法,可以异步执行mutations里的函数
const actions = {
  //在组件中通过 this.$store.dispatch('asyncUpdateUser',user)来调用函数
  asyncUpdateUser(context, user) {
    context.commit('updateUser', user);
  }
};
export default new Vuex.Store({
  state,
  getters,
  mutations,
  actions
})
2.使用Vuex
组件往state中存值
vm.$store.dispatch('asyncUpdateUser', user); //往state中存值
组件从state中取值
user: this.$store.getters.getUser
3.解决刷新即失效的问题
//为页面添加监听器,监听刷新动作,在刷新之前,把state存入浏览器的sessionStorage
//为app.vue添加
<script>
    export default {
        name: 'App',
        mounted() {
            window.addEventListener('unload', this.saveState)
        },
        methods: {
            saveState() {
                sessionStorage.setItem('state', JSON.stringify(this.$store.state))
            }
        }
    }
</script>
N.parse(sessionStorage.getItem(‘state’)) : {
//定义一个uesr对象
//在组件中是通过this.$state.user 来获取
user: {
name: ‘’
}
};
//实时监听state值得最新状态,注意这里的getters可以理解为计算属性
const getters = {
//在组件中是通过 this.$store.getters.getUser来获取
getUser(state) {
return state.user;
}
};
//定义改变state初始值的方法,这里是唯一可以改变state的地方,缺点是只能同步执行
const mutations = {
updateUser(state, user) {
state.user = user;
}
};
//定义触发(mutations)函数的方法,可以异步执行mutations里的函数
const actions = {
//在组件中通过 this.$store.dispatch(‘asyncUpdateUser’,user)来调用函数
asyncUpdateUser(context, user) {
context.commit(‘updateUser’, user);
}
};
export default new Vuex.Store({
state,
getters,
mutations,
actions
})
### 2.使用Vuex

> 组件往state中存值
>
> ```js
>  vm.$store.dispatch('asyncUpdateUser', user); //往state中存值
> ```

> 组件从state中取值
>
> ```js
> user: this.$store.getters.getUser
> ```

### 3.解决刷新即失效的问题

```js
//为页面添加监听器,监听刷新动作,在刷新之前,把state存入浏览器的sessionStorage
//为app.vue添加
<script>
    export default {
        name: 'App',
        mounted() {
            window.addEventListener('unload', this.saveState)
        },
        methods: {
            saveState() {
                sessionStorage.setItem('state', JSON.stringify(this.$store.state))
            }
        }
    }
</script>


 144
144


 被折叠的 条评论
为什么被折叠?
被折叠的 条评论
为什么被折叠?
 到【灌水乐园】发言


