


SpringCloud oauth2授权认证
使用oauth2之前
授权:授权服务完成授权
鉴权:token验证在网关。权限验证使用AOP根据登录用户信息在具体的服务完成判断
比如访问服务器中的文件服务:
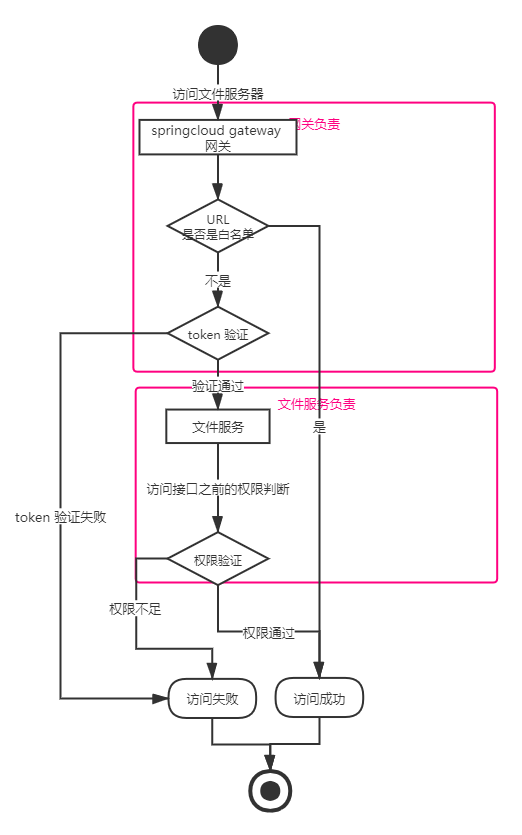
授权是通过授权服务器,获取token。图上没表现出来。
这种模式非常好理解,通过实现SpringCloud gateway的全局过滤器GlobalFilter,实现一个全url拦截,然后对白名单url进行过滤,否则进行token验证。所以本质上,网关也负责了一部分鉴权工作。
@Component
public class AuthorizeFilter implements GlobalFilter, Ordered {
    // 白名单
    private static final String[] whiteList = {
            "/auth/login",
            "/auth/register",
            "/yypt/imageConfig",
            "/dfs/image",
            "/dfs/default",
            "/dfs/defaultImage",
            "/dfs/file/download",
    };
	@Autowired
    private RedisTemplate redisTemplate;

    @Override
    public Mono<Void> filter(ServerWebExchange exchange, GatewayFilterChain chain) {
        String url = exchange.getRequest().getURI().getPath();
        log.info("url:{}", url);
        // 跳过不需要验证的路径
        if (Arrays.stream(whiteList).anyMatch(t -> url.startsWith(t)))
            return chain.filter(exchange);

	    String token = exchange.getRequest().getHeaders().getFirst("token");
		token认证。。。。

        return chain.filter(mutableExchange);
    }
使用springcloud oauth2之后,可以把所有的鉴权工作都交给oauth2认证服务,将相关业务从网关中解耦出来。
使用springcloud oauth2之后:
授权:oauth2服务授权
鉴权:资源服务配置,登录认证和权限认证均通过oauth2服务
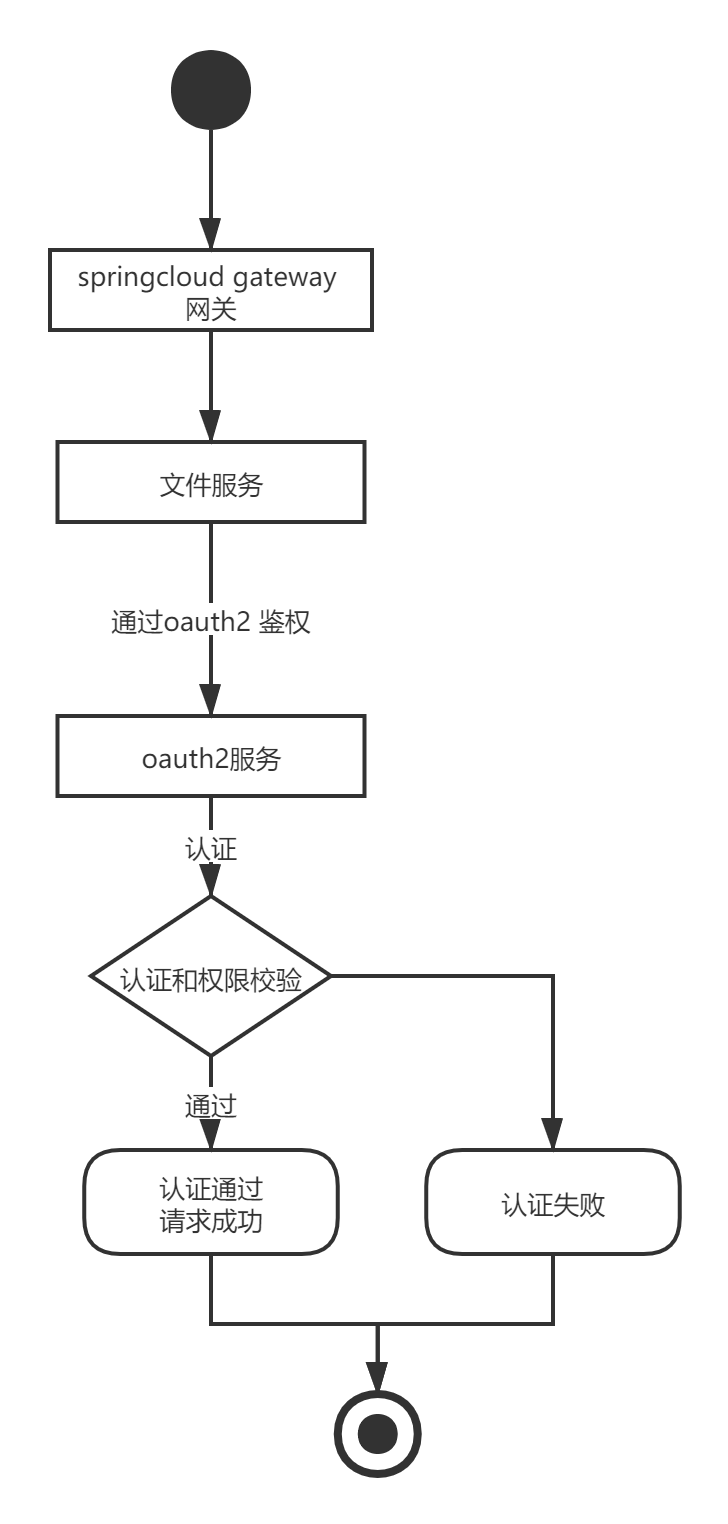
(个人理解)
SpringCloud Oauth2 的 授权方式
授权方式最常用的两种是 授权码模式 和 密码模式
授权码模式
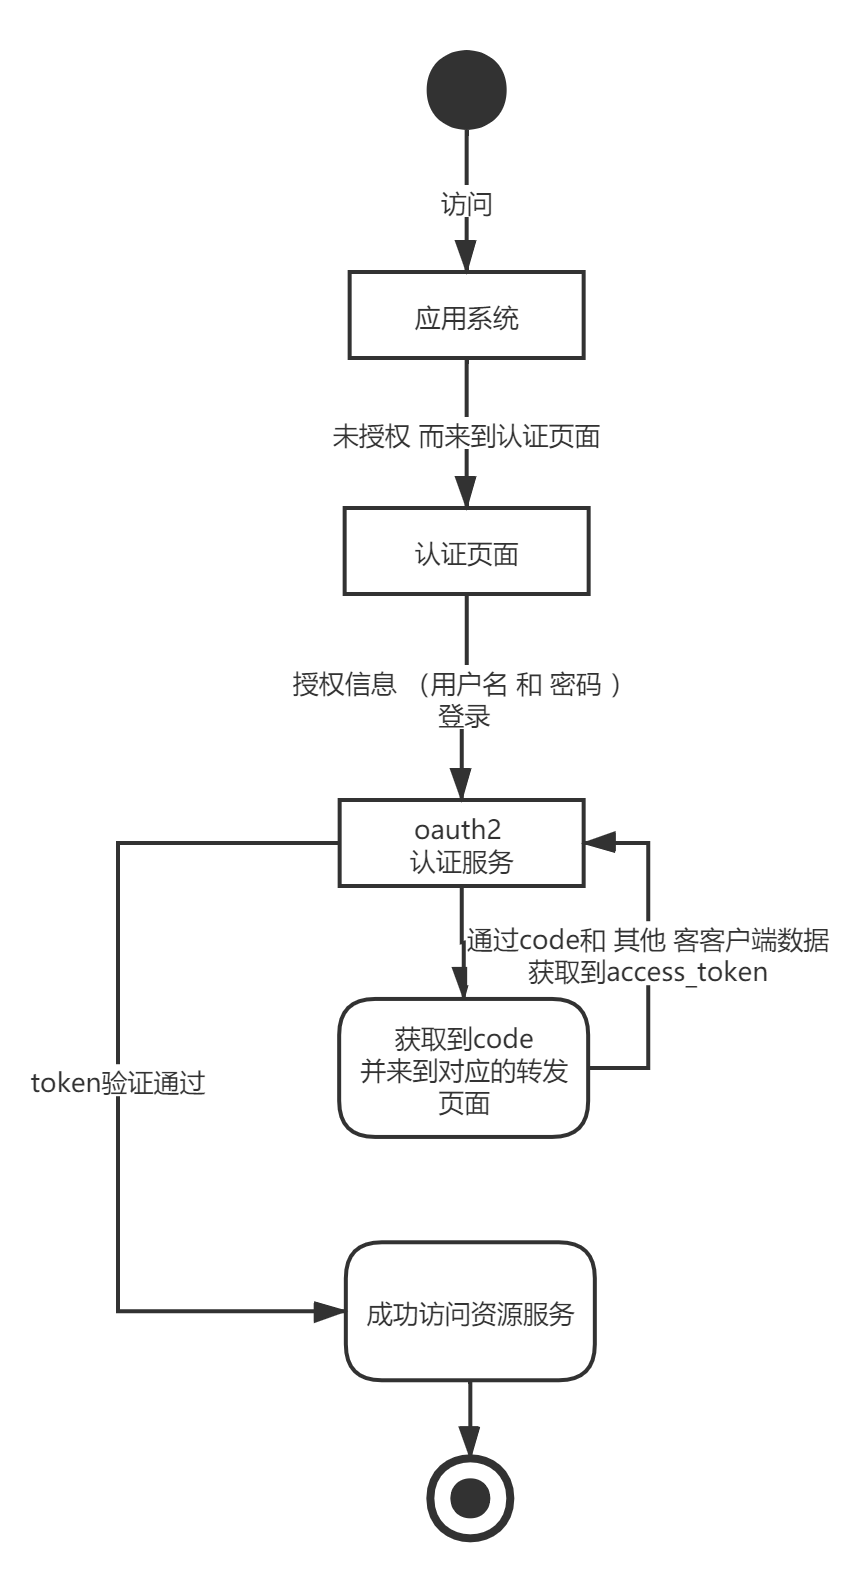
直接理解授权码模式其实挺抽象的。这个过程是我们通过客户端信息(客户端的id,请求数据类型,密钥 ,用户名密码等) 在oauth2认证服务获取token。而拿到了token才能够访问资源服务器。类似于微信的第三方登录。
搭建授权服务器:
        <dependency>
            <groupId>org.projectlombok</groupId>
            <artifactId>lombok</artifactId>
            <optional>true</optional>
        </dependency>
        <dependency>
            <groupId>org.springframework.boot</groupId>
            <artifactId>spring-boot-starter-web</artifactId>
        </dependency>
        <dependency>
            <groupId>org.springframework.cloud</groupId>
            <artifactId>spring-cloud-starter-netflix-eureka-client</artifactId>
        </dependency>
        <dependency>
            <groupId>org.springframework.cloud</groupId>
            <artifactId>spring-cloud-starter-oauth2</artifactId>
        </dependency>
        <dependency>
            <groupId>org.springframework.cloud</groupId>
            <artifactId>spring-cloud-starter-security</artifactId>
        </dependency>
        <dependency>
            <groupId>org.springframework.boot</groupId>
            <artifactId>spring-boot-starter-data-redis</artifactId>
        </dependency>
        <dependency>
            <groupId>org.mybatis.spring.boot</groupId>
            <artifactId>mybatis-spring-boot-starter</artifactId>
        </dependency>
        <dependency>
            <groupId>org.springframework.boot</groupId>
            <artifactId>spring-boot-starter-actuator</artifactId>
        </dependency>
        <dependency>
            <groupId>mysql</groupId>
            <artifactId>mysql-connector-java</artifactId>
        </dependency>
        <dependency>
            <groupId>com.alibaba</groupId>
            <artifactId>druid</artifactId>
        </dependency>
        <dependency>
            <groupId>log4j</groupId>
            <artifactId>log4j</artifactId>
        </dependency>
        <dependency>
            <groupId>com.baomidou</groupId>
            <artifactId>mybatis-plus</artifactId>
            <version>3.0.7.1</version>
        </dependency>
引入的jar包括数据库模块、redis模块、服务注册、oauth2等
1、先声明一个MyUserDetailServicer,声明认证的过程
public class MyUserDetailService implements UserDetailsService {

    @Autowired
    BCryptPasswordEncoder passwordEncoder;

    @Override
    public UserDetails loadUserByUsername(String s) throws UsernameNotFoundException {

        if("tzq".equals(s))
            return new User(
                    "tzq",
                    passwordEncoder.encode("123"),
                    true,
                    true,
                    true,
                    true,
                    Arrays.asList(
                            new SimpleGrantedAuthority("ROLE_m1"),
                            new SimpleGrantedAuthority("ROLE_m2"),
                            new SimpleGrantedAuthority("r1"),
                            new SimpleGrantedAuthority("r2")
                    ));


        return null;
    }
}
//这一块在这我是写死了账号 tzq 密码 123
//应该根据实际逻辑从数据库获取数据
//如果不知道UserDetailsService 这个接口,建议先了解下Spring Security
通过继承AuthorizationServerConfigurerAdapter类实现oauth2的客户端信息配置和认证配置。
package com.oauth2.config;

import org.springframework.beans.factory.annotation.Autowired;
import org.springframework.context.annotation.Bean;
import org.springframework.context.annotation.Configuration;
import org.springframework.data.redis.connection.RedisConnectionFactory;
import org.springframework.data.redis.connection.jedis.JedisConnectionFactory;
import org.springframework.security.crypto.bcrypt.BCryptPasswordEncoder;
import org.springframework.security.oauth2.client.token.JdbcClientTokenServices;
import org.springframework.security.oauth2.config.annotation.configurers.ClientDetailsServiceConfigurer;
import org.springframework.security.oauth2.config.annotation.web.configuration.AuthorizationServerConfigurerAdapter;
import org.springframework.security.oauth2.config.annotation.web.configuration.EnableAuthorizationServer;
import org.springframework.security.oauth2.config.annotation.web.configurers.AuthorizationServerEndpointsConfigurer;
import org.springframework.security.oauth2.config.annotation.web.configurers.AuthorizationServerSecurityConfigurer;
import org.springframework.security.oauth2.provider.ClientDetailsService;
import org.springframework.security.oauth2.provider.client.JdbcClientDetailsService;
import org.springframework.security.oauth2.provider.token.TokenStore;
import org.springframework.security.oauth2.provider.token.store.JdbcTokenStore;
import org.springframework.security.oauth2.provider.token.store.redis.RedisTokenStore;

import javax.sql.DataSource;

/**
 * 通过数据库 获取客户端信息
 */
@Configuration
@EnableAuthorizationServer
public class AuthorizationServerConfig2 extends AuthorizationServerConfigurerAdapter {

    @Autowired
    private BCryptPasswordEncoder passwordEncoder;

    //通过 http://localhost:1203/oauth/authorize?client_id=client&response_type=code 进行登录 权限认证
    @Autowired
    DataSource dataSource;

    //定义 JDBC方式存储数据源
//    @Bean
//    public TokenStore tokenStore(){
//        return new JdbcTokenStore(dataSource);
//    }

    @Autowired
    public RedisConnectionFactory connectionFactory;
    //定义 redis方式存储数据源
    @Bean
    public TokenStore tokenStore(){
        return new RedisTokenStore(connectionFactory);
    }

    //定义JDBC类型的客户端获取方式
    @Bean
    public ClientDetailsService jdbcClientDetailsService(){
        return new JdbcClientDetailsService(dataSource);
    }

    @Override
    public void configure(AuthorizationServerSecurityConfigurer security) throws Exception {
        //这个配置是为了让其他服务能够在这里进行toekn check 不然 "message":"Forbidden","path":"/oauth/check_token"
        //测试了springsecurity 中配置 /oauth/** 开放 依然提示权限不足
        security.checkTokenAccess("permitAll()");
    }

    @Override
    public void configure(ClientDetailsServiceConfigurer clients) throws Exception {
        // 配置客户端
        clients.withClientDetails(jdbcClientDetailsService());
    }

    @Override
    public void configure(AuthorizationServerEndpointsConfigurer endpoints) throws Exception {
        endpoints.tokenStore(tokenStore());
    }
}
配置了TokenStore 为RedisTokenStore ,表示token信息存在redis中
配置JdbcClientDetailService,表示从数据库中校验客户端的信息(数据库这一块的表结构是springcloud auth2定死的,直接创建官方给的表就行);
2、继承WebSecurityConfigurerAdapter
package com.oauth2.config;

import org.springframework.beans.factory.annotation.Autowired;
import org.springframework.context.annotation.Bean;
import org.springframework.context.annotation.Configuration;
import org.springframework.security.authentication.AuthenticationManager;
import org.springframework.security.config.annotation.authentication.builders.AuthenticationManagerBuilder;
import org.springframework.security.config.annotation.method.configuration.EnableGlobalMethodSecurity;
import org.springframework.security.config.annotation.web.builders.HttpSecurity;
import org.springframework.security.config.annotation.web.configuration.EnableWebSecurity;
import org.springframework.security.config.annotation.web.configuration.WebSecurityConfigurerAdapter;
import org.springframework.security.crypto.bcrypt.BCryptPasswordEncoder;

@Configuration
@EnableWebSecurity
@EnableGlobalMethodSecurity(prePostEnabled = true, securedEnabled = true, jsr250Enabled = true)
public class WebSecurityConfiguration extends WebSecurityConfigurerAdapter {

    @Bean
    public BCryptPasswordEncoder passwordEncoder(){
        return new BCryptPasswordEncoder();
    }
    @Bean
    public MyUserDetailService myUserDetailService(){
        return new MyUserDetailService();
    }

    @Override
    protected void configure(HttpSecurity http) throws Exception {
        http.requestMatchers().anyRequest()
                .and()
                .authorizeRequests()
                .antMatchers("/oauth/**").permitAll();
    }

    @Override
    protected void configure(AuthenticationManagerBuilder auth) throws Exception {
        auth.userDetailsService(myUserDetailService());
    }


    /**
     * 不定义没有password grant_type,密码模式需要AuthenticationManager支持
     * 授权码模式不需要
     * @return
     * @throws Exception
     */
    @Override
    @Bean
    public AuthenticationManager authenticationManagerBean() throws Exception {
        return super.authenticationManagerBean();
    }
}
3、application.yml
server:
  port: 1233

spring:
  application:
    name: oauth2-auth
  redis:
    database: 0
    host: localhost
    port: 6379
    password:
    jedis:
      pool:
        max-active: 8
        max-idle: 8
        min-idle: 0
  datasource:
    username: root
    password: root
    url: jdbc:mysql://192.167.1.101:3306/yypt?serverTimezone=UTC
    driver-class-name: com.mysql.jdbc.Driver
    type: com.alibaba.druid.pool.DruidDataSource    # 配置当前要使用的数据源的操作类型

eureka:
  instance:
    prefer-ip-address: true
    instance-id: ${spring.cloud.client.ip-address}:${server.port}
  client:
    service-url:
      defaultZone: http://localhost:1111/eureka/

#mybatis
mybatis-plus:
  mapper-locations: classpath*:mybatis/mapper/*.xml
  #实体扫描,多个package用逗号或者分号分隔
  typeAliasesPackage: com.oauth2.entity
  logging:
    level: debug
  global-config:
    #数据库相关配置
    db-config:
      #主键类型  AUTO:"数据库ID自增", INPUT:"用户输入ID", ID_WORKER:"全局唯一ID (数字类型唯一ID)", UUID:"全局唯一ID UUID";
      id-type: AUTO
      #字段策略 IGNORED:"忽略判断",NOT_NULL:"非 NULL 判断"),NOT_EMPTY:"非空判断"
      field-strategy: NOT_NULL
      #驼峰下划线转换
      column-underline: true
      logic-delete-value: -1.

      logic-not-delete-value: 0
    banner: false
  #原生配置
  configuration:
    map-underscore-to-camel-case: true
    cache-enabled: false
    call-setters-on-nulls: true
    jdbc-type-for-null: 'null'
    log-impl: org.apache.ibatis.logging.stdout.StdOutImpl
配置比较简单。
密码模式
密码模式流程简单很多,完成登录即可获取到token。
/**
 * 通过数据库 获取客户端信息
 */
@Configuration
@EnableAuthorizationServer
public class AuthorizationServerConfig3 extends AuthorizationServerConfigurerAdapter {

    @Autowired
    private BCryptPasswordEncoder passwordEncoder;

    //通过 http://localhost:1203/oauth/authorize?client_id=client&response_type=code 进行登录 权限认证
    @Autowired
    DataSource dataSource;

    //定义 JDBC方式存储数据源
//    @Bean
//    public TokenStore tokenStore(){
//        return new JdbcTokenStore(dataSource);
//    }

    @Autowired
    public RedisConnectionFactory connectionFactory;
    //定义 redis方式存储数据源
    @Bean
    public TokenStore tokenStore(){
        return new RedisTokenStore(connectionFactory);
    }
    @Resource
    private AuthenticationManager authenticationManager;


    //定义JDBC类型的客户端获取方式
    @Bean
    public ClientDetailsService jdbcClientDetailsService(){
        return new JdbcClientDetailsService(dataSource);
    }

    @Override
    public void configure(AuthorizationServerSecurityConfigurer security) throws Exception {
        //这个配置是为了让其他服务能够在这里进行toekn check 不然 "message":"Forbidden","path":"/oauth/check_token"
        //测试了springsecurity 中配置 /oauth/** 开放是不生效的
        security .allowFormAuthenticationForClients()
                .tokenKeyAccess("isAuthenticated()")
                .checkTokenAccess("permitAll()");
    }

    @Override
    public void configure(ClientDetailsServiceConfigurer clients) throws Exception {
        // 配置客户端
        clients.withClientDetails(jdbcClientDetailsService());
    }

    @Autowired
    MyUserDetailService myUserDetailService;

    @Override
    public void configure(AuthorizationServerEndpointsConfigurer endpoints) throws Exception {
        endpoints.tokenStore(tokenStore())
                .authenticationManager(authenticationManager)
                .userDetailsService(myUserDetailService)
                .reuseRefreshTokens(false);
    }
}
跟授权码模式相比,只有这个类不同。其实搭建到这里,密码模式已经搭建好了。
但是我在完成这个配置之后发现拿不到token,我以json格式 传递username,password,grant_type,scope,client_id,client_secret到localhost:1233/oauth/token。
访问失败,记得好像是提示权限不足。当时看了半天,oauth2授权访问应该已经不需要权限。
最后发现,不能以json格式传递那些参数需要传递form-data,就像

实际使用中,一般会由一个其他服务,将我们的授权请求转发到授权服务器上,达成对其他业务的处理。不直接访问oauth2授权服务。
资源服务创建
        <dependency>
            <groupId>org.springframework.cloud</groupId>
            <artifactId>spring-cloud-starter-openfeign</artifactId>
        </dependency>
        <dependency>
            <groupId>org.springframework.boot</groupId>
            <artifactId>spring-boot-starter-web</artifactId>
        </dependency>
        <dependency>
            <groupId>org.springframework.cloud</groupId>
            <artifactId>spring-cloud-starter-netflix-eureka-client</artifactId>
        </dependency>
        <dependency>
            <groupId>org.springframework.cloud</groupId>
            <artifactId>spring-cloud-starter-oauth2</artifactId>
        </dependency>

        <dependency>
            <groupId>org.springframework.boot</groupId>
            <artifactId>spring-boot-starter-data-redis</artifactId>
        </dependency>

        <dependency>
            <groupId>log4j</groupId>
            <artifactId>log4j</artifactId>
        </dependency>
        <dependency>
            <groupId>org.springframework.boot</groupId>
            <artifactId>spring-boot-starter-actuator</artifactId>
        </dependency>
配置简单很多 直接继承ResourceServerConfigurerAdapter类,声明需要权限校验规则。
@Configuration
@EnableResourceServer
@EnableGlobalMethodSecurity(prePostEnabled = true, securedEnabled = true, jsr250Enabled = true)
public class ResourceServerConfiguration extends ResourceServerConfigurerAdapter {

    @Override
    public void configure(HttpSecurity http) throws Exception {
        http
                .requestMatchers()
                .and()
                .exceptionHandling()
                .and()
                .sessionManagement().sessionCreationPolicy(SessionCreationPolicy.STATELESS)
                .and()
                .authorizeRequests()
                // 以下为配置所需保护的资源路径及权限,需要与认证服务器配置的授权部分对应
                .antMatchers("/m1/**").hasRole("m1")
                .antMatchers("/m2/**").hasRole("m2")
                .antMatchers("/r1/**").hasAuthority("r1")
                .antMatchers("/r2/**").hasAuthority("r2");
    }

}
便于测试顺便创建一个controller
@RestController
public class OauthConrtoller {

    @Resource
    RemoteClient client;

    @GetMapping("feign1")
    public String feign1(){
        return client.feign1();
    }

    @GetMapping("ok")
    public String ok(){
        return "不需要权限";
    }

    @GetMapping("m1")
    public String m1(){
        return "需要角色1";
    }

    @GetMapping("m2")
    public String m2(){
        return "需要角色2";
    }

    @GetMapping("r1")
    public String r1(){
        return "需要权限1";
    }

    @GetMapping("r2")
    public String r2(){
        return "需要权限2";
    }
}
访问m1,m2,r1,r2分别需要不同的角色或权限。这块的声明对应前面的MyUserDetailService,那边加了什么权限或角色,这边校验就用什么。
而访问ok没有任何限制的。
feign1通过feign访问了系统中另一个服务。
假如被feign访问的接口同样是需要认证,比如 需要具备权限r1,此时的登录用户虽然已经有r1权限了, feign依然会调用失败,会得到提示提示需要认证。因为这时候feign的请求,完全是另一个请求,没有我们的认证信息。
为feign配置一个拦截器:
/**
 * 注册feign的拦截器  用于添加oauth2的权限认证
 * 声明在feignclient的注解中
 */
public class FeignOauth2RequestInterceptor implements RequestInterceptor {

    private final String AUTHORIZATION_HEADER = "Authorization";
    private final String BEARER_TOKEN_TYPE = "bearer";

    @Override
    public void apply(RequestTemplate requestTemplate) {
        SecurityContext securityContext = SecurityContextHolder.getContext();
        Authentication authorization = securityContext.getAuthentication();

        if(authorization != null && authorization.getDetails() instanceof OAuth2AuthenticationDetails){
            OAuth2AuthenticationDetails details = (OAuth2AuthenticationDetails)authorization.getDetails();
            requestTemplate.header(AUTHORIZATION_HEADER,String.format("%s %s",BEARER_TOKEN_TYPE,details.getTokenValue()));
        }
    }
}
之feignclient声明添加:
@FeignClient(
        value = "source2",
        fallbackFactory = RemoteClient.RemoteClientFallbackFactory.class,
        configuration = FeignOauth2RequestInterceptor.class
)
public interface RemoteClient {
    @GetMapping("feign1")
    public String feign1();

    class RemoteClientFallbackFactory implements FallbackFactory<RemoteClient>{
        @Override
        public RemoteClient create(Throwable throwable) {
            return new RemoteClient() {
                @Override
                public String feign1() {
                    return "feign调用失败了!";
                }
            };
        }
    }
}
application.yml:
security:
  oauth2:
    client:
      client-id: client1
      client-secret: secret
      access-token-uri: http://localhost:1233/oauth/token
      user-authorization-uri: http://localhost:1233/oauth/authorize
    resource:
      token-info-uri: http://localhost:1233/oauth/check_token


 2842
2842

 被折叠的 条评论
为什么被折叠?
被折叠的 条评论
为什么被折叠?
 到【灌水乐园】发言


