


springboot的设计目的是用来简化spring应用的初始搭建以及开发过程。
springboot程序优点:
起步依赖(简化依赖配置)
自动配置(简化常用工程相关配置)
辅助功能(内置服务器,…)
入门案例解析
parent
开发springboot程序要继承spring-boot-starter-parent
spring-boot-starter-parent中定义了若干个依赖管理
继承parent模块可以避免多个依赖使用相同技术时出现版本冲突
继承parent的形式也可以采用引入依赖的形式实现效果
starter
springboot中常见项目名称,定义了当前项目使用的所有依赖坐标,以达到减少依赖配置的目的
引导类
springboot的引导类是boot工程的执行入口,运行main方法就可以启动项目
springboot工程运行后初始化spring容器,扫描引导类 所在包加载bean
内嵌Tomcat
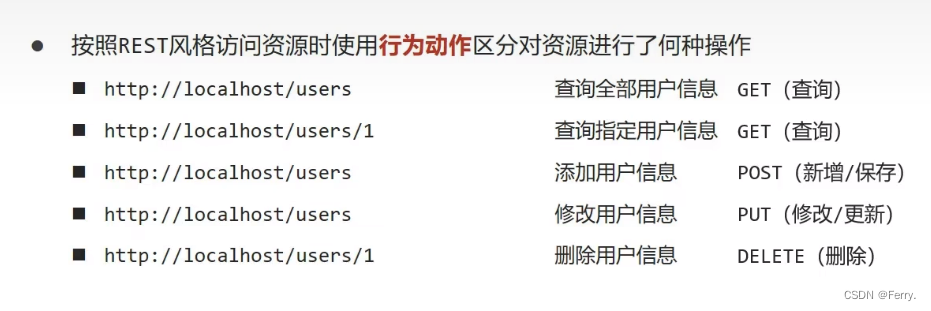
rest风格
表现形式状态转换
优点:隐藏资源的访问行为,无法通过地址得知对资源是何种操作;书写简化。
基础配置
属性配置
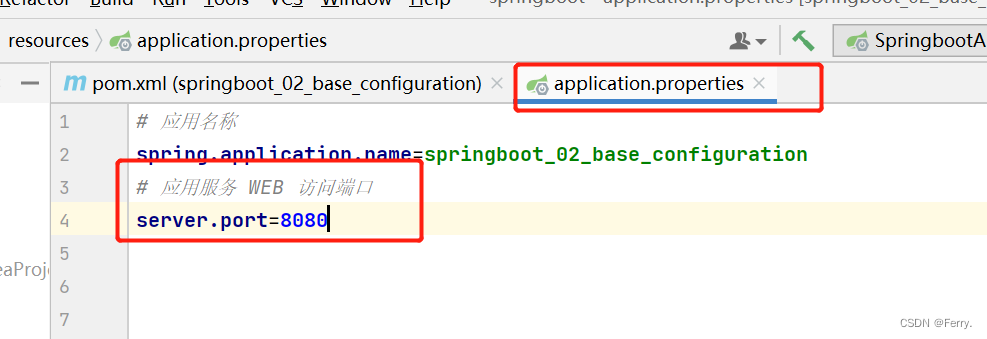
修改服务器端口:localhost:8080/ ========> localhost:80/ 将Tomcat服务器8080端口改成80端口
SpringBoot默认配置文件application.properties,通过键值对配置对应属性
修改配置
#修改banner,关闭运行日志图标(banner)
spring.main.banner-mode=off
#日志,设置日志级别
logging.level.root=info      info/error/debug

SpringBoot内置属性查询
    官方文档中参考文档第一项:Application Properties
SpringBoot提供了多种属性配置方式
SpringBoot配置文件加载顺序
application.properties > application.yml > application.yaml
常用配置文件种类
application.yml
不同配置文件中相同配置按照加载优先级相互覆盖,不同配置文件中不同配置全部保留。
yaml
YAML(YAML Ain’t Markup Language),一种数据序列化格式
优点:
容易阅读
容易与脚本语言交互
以数据为核心,重数据轻格式
YAML文件扩展名
.yml(主流)
.yaml
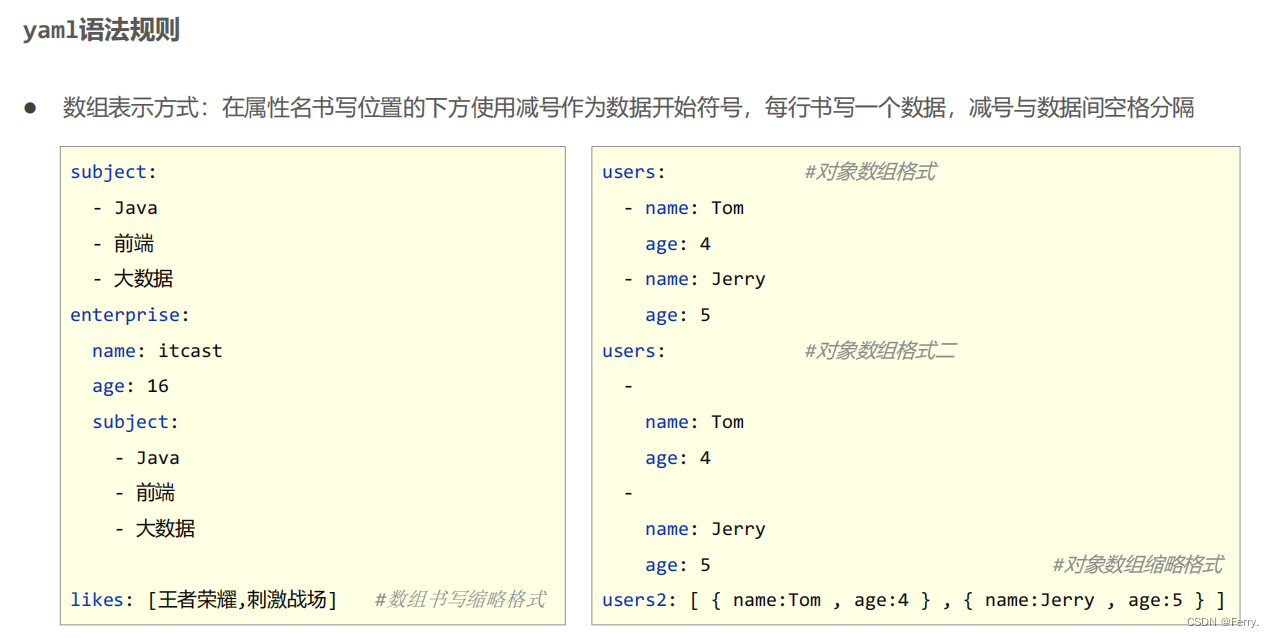
yaml语法规则
大小写敏感
属性层级关系使用多行描述,每行结尾使用冒号结束
使用缩进表示层级关系,同层级左侧对齐,只允许使用空格(不允许使用Tab键)
属性值前面添加空格(属性名与属性值之间使用冒号+空格作为分隔)
# 表示注释
核心规则:数据前面要加空格与冒号隔开
yaml数据读取
application.yml中的配置:
country: wuhan

user:
  name: itcast
  age: 16

users:
  -
    name: lisi
    age: 14
  -
    name: zhangsan
    age: 11

users2: [{name:lisi,age:14},{name:zhansan,age:11}]

likes:
  - music
  - game
  - sleep

likes2: [music,game,sleep]
测试UserController:
//Rest模式
@RestController
@RequestMapping("/books")
public class UserController {

    //读取yaml数据的单一数据
    @Value("${country}")
    private String country1;

    @Value("${user.name}")
    private String name1;

    @Value("${likes[1]}")
    private String like1;

    @Value("${users[1].age}")
    private String age1;

    @GetMapping
    public String getById(){
        System.out.println("springboot is running...");
        System.out.println("country1=======>"+country1);
        System.out.println("name1=======>"+name1);
        System.out.println("likes1=======>"+like1);
        System.out.println("age1=======>"+age1);
        return "springboot is running...";
    }
控制台输出: springboot is running…
country1=======>wuhan
name1=======>Urovo
likes1=======>game
age1=======>11
在配置文件中可以使用属性名引用方式引用属性
#在配置文件中可以使用属性名引用方式引用属性
baseDir: /usr/local/fire

center:
  dataDir: ${baseDir}/data
  tmpDir: ${baseDir}/tmp
  logDir: ${baseDir}/log
  msgDir: ${baseDir}/msgDir
属性值中如果出现转移字符,需要使用双引号包裹
#属性值中如果出现转移字符,需要使用双引号包裹
lesson: "Spring\tboot\nlesson"
application.yml中添加:
#在配置文件中可以使用属性名引用方式引用属性
baseDir: /usr/local/fire

center:
  dataDir: ${baseDir}/data
  tmpDir: ${baseDir}/tmp
  logDir: ${baseDir}/log
  msgDir: ${baseDir}/msgDir

#属性值中如果出现转移字符,需要使用双引号包裹
lesson: "Spring\tboot\nlesson"
UserController中添加:
@Value("${center.tmpDir}")
private String tmpDir1;

@Value("${lesson}")
private String lesson1;

System.out.println("tmpDir1=======>"+tmpDir1);
System.out.println("lesson1=======>"+lesson1);
控制台输出:tmpDir1=======>/usr/local/fire/tmp
lesson1=======>Spring boot
lesson
封装全部数据到Environment对象
- 使用Environment对象封装全部配置信息
- 使用@Autowired自动装配数据到Environment对象中
BookController:
//封装全部数据到Environment对象
@Autowired
private Environment env;

@GetMapping
public String getById(){
    System.out.println(env.getProperty("lesson"));
    System.out.println(env.getProperty("users[1].age"));
    System.out.println(env.getProperty("center.tmpDir"));
    return "hello springboot";
}
控制台输出:Spring boot
lesson
11
/usr/local/fire/tmp
自定义对象封装指定数据
- 使用@ConfigurationProperties注解绑定配置信息到封装类中
- 封装类需要定义为Spring管理的bean,否则无法进行属性注入
application.yml中添加:
#创建类,用于封装下面的数据
#由spring帮我们去加载数据到对象中,一定要告诉spring加载这组信息
#使用时从spring中直接获取信息使用

datasource:
  driver-class-name: com.mysql.cj.jdbc.Driver
  url: jdbc:mysql://localhost:3306/mp?serverTimezone=UTC
  username: root
  password: root
定义一个数据类去封装yaml中对应的数据:
@Data
@NoArgsConstructor//pom引入lombok的依赖
@AllArgsConstructor
//1.定义数据模型封装yaml文件中对应的数据
//2.定义为spring管控的bean
@Component
//3.指定加载的数据
@ConfigurationProperties(prefix = "datasource")
public class MyDataSource {

    private String driver;
    private String url;
    private String username;
    private String password;
}
BookController中添加:
@Autowired
private MyDataSource myDataSource;

System.out.println(myDataSource);
控制台输出:MyDataSource(driver=null,url=jdbc:mysql://localhost:3306/mpserverTimezone=UTC,username=root, password=root)
整合第三方技术
整合Junit
测试save方法:
public interface BookDao {
    void save();
}

@Repository//这个注解的作用是将dao类识别为bean
public class BookDaoImpl implements BookDao {
    @Override
    public void save() {
        System.out.println("test---");
    }
}
名称:@SpringBootTest
类型:测试类注解
位置:测试类定义上方
作用:设置JUnit加载的SpringBoot启动类
@SpringBootTest
class Springboot04JunitApplicationTests {

    //1.注入你要测试的对象
    @Autowired
    private BookDao bookDao;

    @Test
    void contextLoads() {
        //2,执行要测试的方法
        bookDao.save();
    }

}
@SpringBootTest相关属性
classes:设置SpringBoot启动类
如果测试类在SpringBoot启动类的包或子包中,可以省略启动类的设置,也就是省略classes的设定。
比如:此时启动类springboot04JunitApplication在包com.example下,
测试类Springboot04JunitApplicationTests在包com.example或者其子包下就不需要加classes属性,如果在包com下就需要加@SpringBootTest(classes=启动类类名.class)。
整合MyBatis
核心配置:数据库连接相关信息(连什么?连谁?什么权限)
映射配置:SQL映射(XML/注解)
- 勾选MyBatis技术,也就是导入MyBatis对应的starter
- 数据库连接相关信息转换成配置
- 数据库SQL映射需要添加@Mapper被容器识别到
1.新建模块时选择使用的依赖(mybatis,mysql)
2.配置相关信息application.yml
spring:
    datasource:
        driver-class-name: com.mysql.cj.jdbc.Driver
        url: jdbc:mysql://localhost:3306/test
        username: root
        password: root
3.定义数据层接口与映射配置
@Mapper
public interface BookDao {

    @Select("select * from tbl_book where id=#{id}")
    public Book getById(Integer id);
}
@SpringBootTest
class Springboot05MybatisApplicationTests {

    @Autowired
    private BookDao bookDao;

    @Test
    void contextLoads() {
        Book book = bookDao.getById(2);
        System.out.println(book);
    }

}
整合MyBaitis-Plus
MyBatis-Plus与MyBatis区别
导入坐标不同
数据层实现简化
定义数据层接口与映射配置,继承BaseMapper
@Mapper
public interface UserDao extends BaseMapper<User> {
}
其他的和整合mybatis一样,测试:
@SpringBootTest
class Springboot06MybatisPlusApplicationTests {

    @Autowired
    private BookDao bookDao;

    @Test
    void contextLoads() {
        System.out.println(bookDao.selectById(2));
    }

}
整合druid
手动导入Druid对应的starter或者用阿里云去创建springboot
<dependency>
<groupId>com.alibaba</groupId>
<artifactId>druid-spring-boot-starter</artifactId>
<version>1.2.6</version>
</dependency>
两种方法:1.指定数据源类型
spring:
    datasource:
        driver-class-name: com.mysql.cj.jdbc.Driver
        url: jdbc:mysql://localhost:3306/test?serverTimezone=UTC
        username: root
        password: root
        type: com.alibaba.druid.pool.DruidDataSource
2.变更Druid的配置方式
spring:
    datasource:
        druid:
            driver-class-name: com.mysql.cj.jdbc.Driver
            url: jdbc:mysql://localhost:3306/test?serverTimezone=UTC
            username: root
            password: root


 3万+
3万+


 被折叠的 条评论
为什么被折叠?
被折叠的 条评论
为什么被折叠?
 到【灌水乐园】发言


