


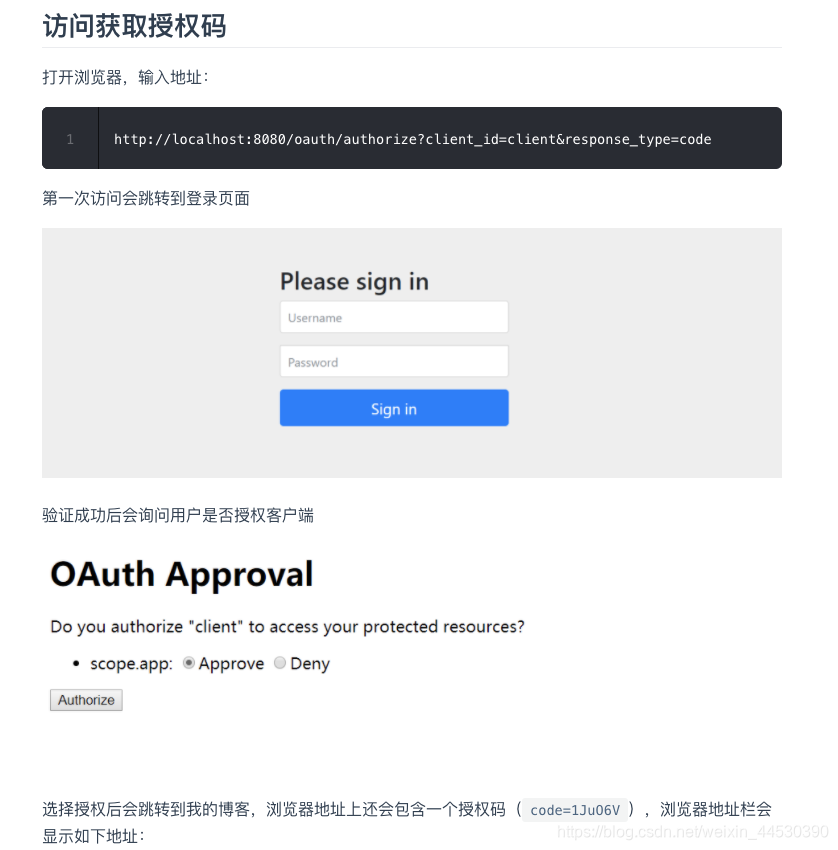
首先我是通过zuul网关(9001)进行访问登录,auth认证服务器(9002)进行原生框架认证
网上给的常规测试都是通过下面的url
http://192.168.2.18:9002/oauth/authorize?client_id=client&response_type=code,
然后会自动跳转到 /login 方法。
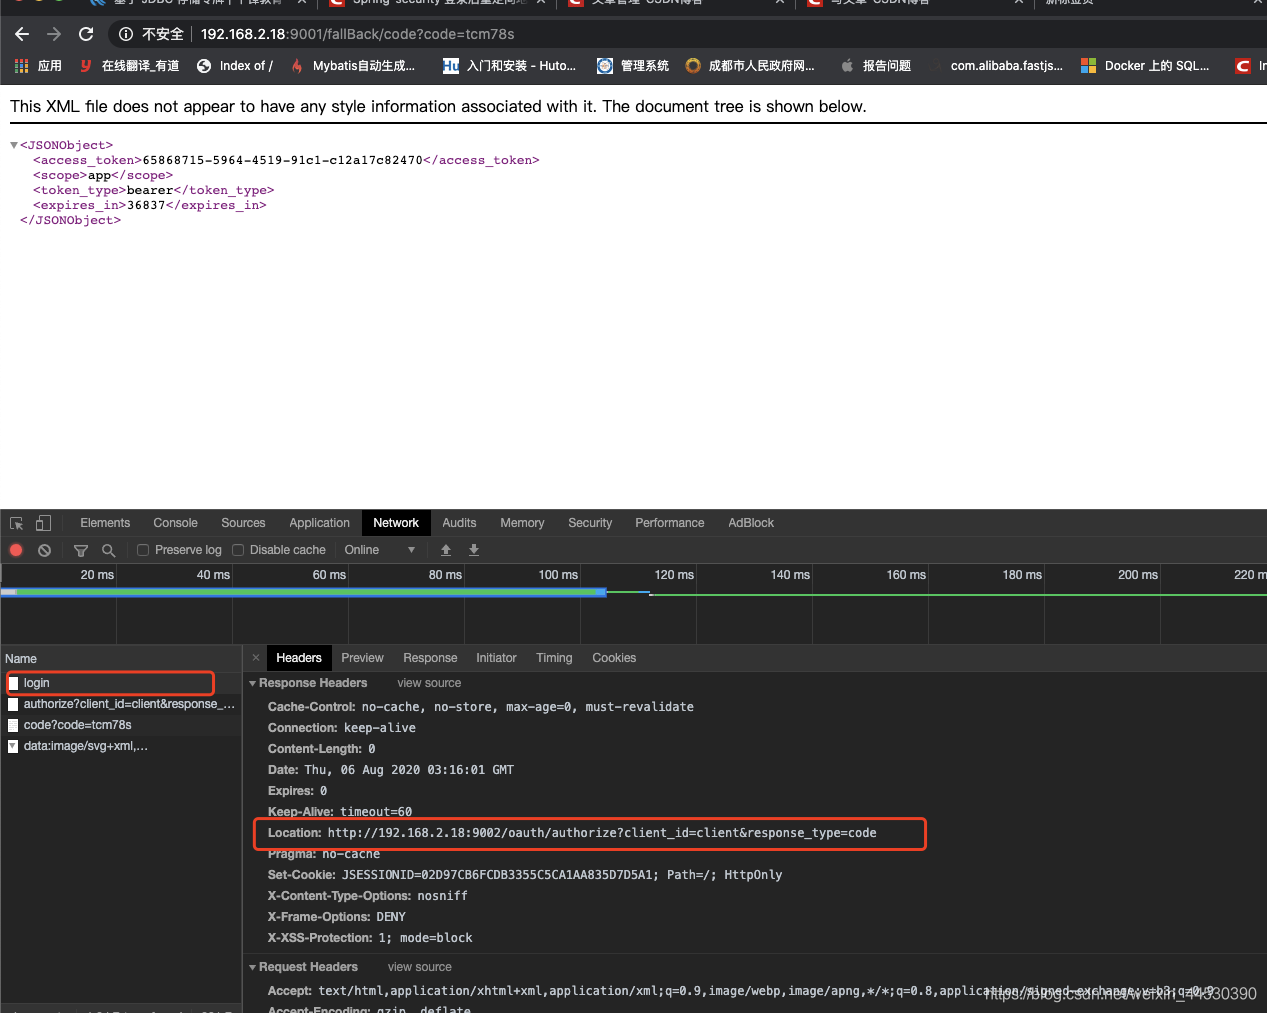
输入用户名和密码然后进行登录,在登录过程中会有一个响应头为:Location。如图:
但是当我们直接输入***http://192.168.2.18:9002/login***时,就会如下图:
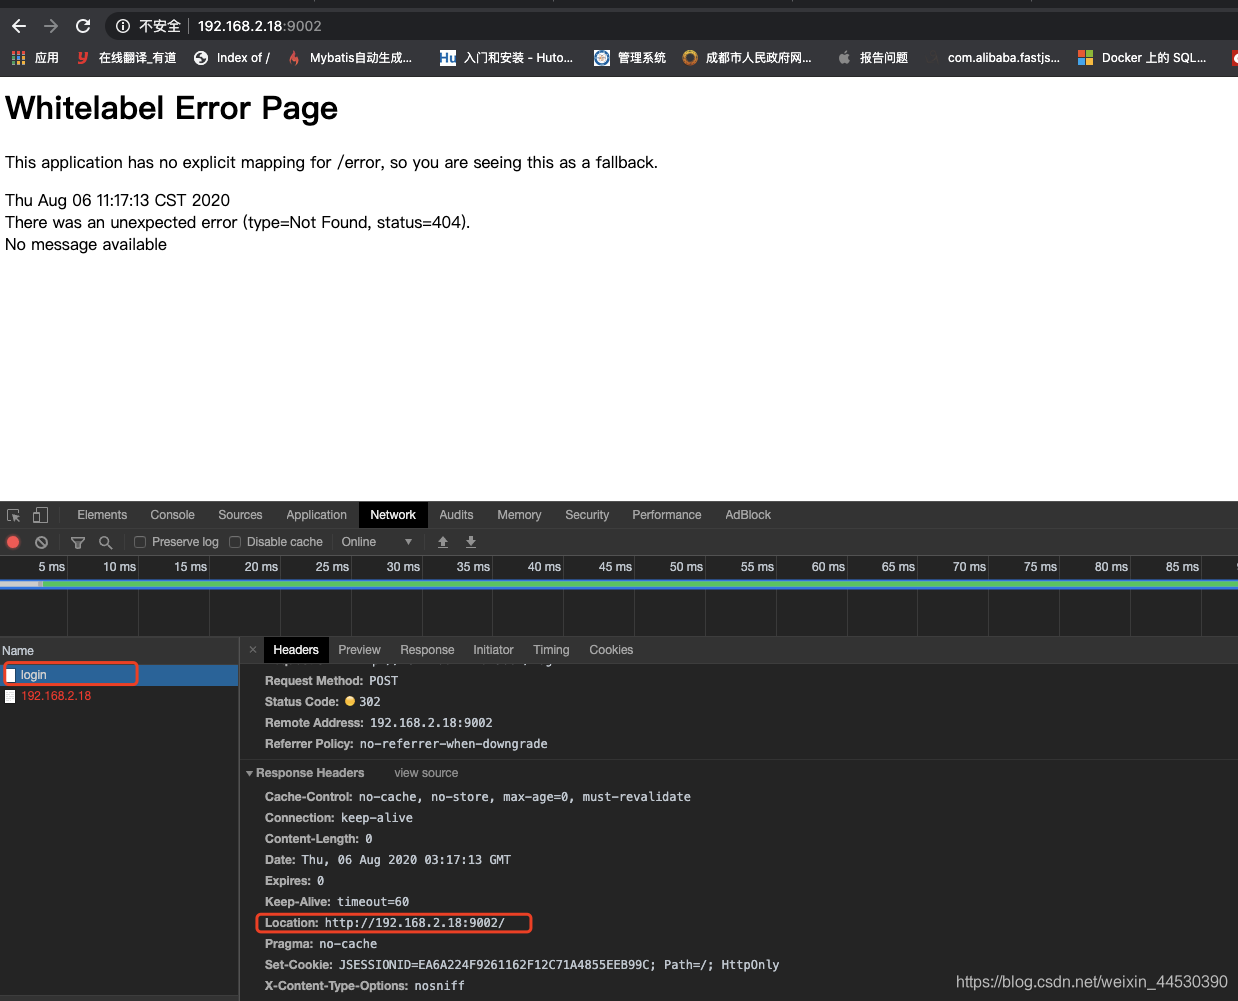
这也就导致我们不能通过框架进行登录了。我们需要做的是将这个Location直接换成:
http://192.168.2.18:9002/oauth/authorize?client_id=client&response_type=code
实际需求是用户 只期望输入用户名和密码,其他的什么认证需要由后台操作完成,用户对于这些转换是无感的。希望输入下面URL的方式就能登录了:
http://192.168.2.18:9001/login/doLogin?username=admin&password=123456
这时候我们就可以像下面进行改造了。根据上面出现的情况,进行手动重定向,完成他请求的接力棒!
zuul的controller层写登录方法:***LoginController.java***代码如下
package com.br.controller;

import com.alibaba.fastjson.JSON;
import com.alibaba.fastjson.JSONObject;
import io.swagger.annotations.Api;
import org.apache.http.Header;
import org.apache.http.HttpEntity;
import org.apache.http.HttpResponse;
import org.apache.http.client.ClientProtocolException;
import org.apache.http.client.methods.CloseableHttpResponse;
import org.apache.http.client.methods.HttpGet;
import org.apache.http.client.methods.HttpPost;
import org.apache.http.entity.ContentType;
import org.apache.http.entity.mime.MultipartEntityBuilder;
import org.apache.http.entity.mime.content.StringBody;
import org.apache.http.impl.client.CloseableHttpClient;
import org.apache.http.impl.client.HttpClientBuilder;
import org.apache.http.util.EntityUtils;
import org.springframework.web.bind.annotation.RequestMapping;
import org.springframework.web.bind.annotation.RequestMethod;
import org.springframework.web.bind.annotation.RestController;

import java.io.IOException;
import java.util.HashMap;
import java.util.Map;

/**
 * @Author huangyongliang
 * @Date 2020/8/5 14:34
 * @Description
 **/
@RestController

@Api(tags = "zuul网关进行登录")
@RequestMapping(value = "login", produces = "application/json;charset=UTF-8")
class LoginController {
    private static final String RESPONSE_TYPE = "code";

    @RequestMapping(value = "doLogin", method = RequestMethod.GET)
    public JSONObject deviceInfo(String username, String password, String client_id, String response_type) {
        if (response_type == null) {
            response_type = RESPONSE_TYPE;
        }
        if (client_id == null) {
            client_id = "client";
        }
        Map<String, String> params = new HashMap<>();

        params.put("username", username);
        params.put("password", password);
        String locationUrl = "http://192.168.2.18:9002/oauth/authorize?client_id=" + client_id + "&response_type=" + response_type;
        String url = "http://192.168.2.18:9002/login";
        String result = "";


        try {
            // 创建HttpClientBuilder
            HttpClientBuilder httpClientBuilder = HttpClientBuilder.create();
            CloseableHttpClient closeableHttpClient = httpClientBuilder.build();
            HttpPost httpPost = new HttpPost(url);
            HttpPost post = new HttpPost(locationUrl);
            //添加http头信息
            MultipartEntityBuilder builder = MultipartEntityBuilder.create();
            params.forEach((k, v) -> {
                builder.addPart(k, new StringBody(v, ContentType.MULTIPART_FORM_DATA));
            });
            HttpEntity postEntity = builder.build();
            httpPost.setEntity(postEntity);
            HttpEntity entity = null;
            try {
                //第一步:执行登录(用户名密码)(注意是POST请求方式),结果是302
                closeableHttpClient.execute(httpPost);
                //第二步:重定向,直接输入auth/login进行登录时,Location是auth的根目录,而我们需要跳转到(注意是POST请求方式)
                // /oauth/authorize?client_id=" + client_id + "&response_type=" + response_type这个路径,才能获取code,,结果是302还需要再次重定向
                HttpResponse execute = closeableHttpClient.execute(post);
                //这里我做了重定向到我自己的方法,这个是oauth2设置的回调地址
                //http://192.168.2.18:9001/fallBack/code(web_server_redirect_uri),
                //直接将code通过后台换取access_token(注意是GET请求方式)
                Header location = execute.getFirstHeader("Location");
                CloseableHttpResponse execute1 = closeableHttpClient.execute(new HttpGet(location.getValue()));
                entity = execute1.getEntity();
                if (entity != null) {
                    result = EntityUtils.toString(entity);
                }
            } catch (ClientProtocolException e) {
                e.printStackTrace();
            } catch (IOException e) {
                e.printStackTrace();
            }
            // 关闭连接
            closeableHttpClient.close();
        } catch (Exception e) {
            e.printStackTrace();
        }
        JSONObject jsonObject = JSON.parseObject(result);


        return jsonObject;


    }

}
然后是auth认证中心内部处理code到access_token的部分 FallBackController.java 如下:
package com.br.controller;

import com.alibaba.fastjson.JSON;
import com.alibaba.fastjson.JSONObject;
import com.br.model.BaseController;
import org.apache.http.HttpEntity;
import org.apache.http.HttpResponse;
import org.apache.http.client.ClientProtocolException;
import org.apache.http.client.methods.HttpGet;
import org.apache.http.client.methods.HttpPost;
import org.apache.http.entity.ContentType;
import org.apache.http.entity.mime.MultipartEntityBuilder;
import org.apache.http.entity.mime.content.StringBody;
import org.apache.http.impl.client.CloseableHttpClient;
import org.apache.http.impl.client.HttpClientBuilder;
import org.apache.http.util.EntityUtils;
import org.springframework.web.bind.annotation.RequestMapping;
import org.springframework.web.bind.annotation.RequestMethod;
import org.springframework.web.bind.annotation.RestController;

import java.io.IOException;
import java.util.Base64;
import java.util.HashMap;

/**
 * @Author huangyongliang
 * @Date 2020/8/3 09:25
 * @Description
 **/
@RestController
@RequestMapping("/fallBack")
public class FallBackController extends BaseController {

    @RequestMapping(value = "code", method = RequestMethod.GET)
    public JSONObject deviceInfo(String code) {
        String APP_ID = "client";
        String APPSECRET = "secret";
        //设置变量 url与返回值其中url使用拼接带入参数APP_ID, APPSECRET
        String url = "http://192.168.2.18:9002/oauth/token";

        String result = "";

        //设置链接
        HttpGet http = new HttpGet(url);
        //设置链接参数与要求
        http.setHeader("Content-Type", "application/x-www-form-urlencoded");
        HashMap<String, String> params = new HashMap<>();

        params.put("grant_type", "authorization_code");
        params.put("code", code);

        try {
            // 创建HttpClientBuilder
            HttpClientBuilder httpClientBuilder = HttpClientBuilder.create();
            CloseableHttpClient closeableHttpClient = httpClientBuilder.build();
            HttpPost httpPost = new HttpPost(url);
            //添加http头信息
            httpPost.addHeader("Authorization", "Basic " + Base64.getUrlEncoder().encodeToString((APP_ID + ":" + APPSECRET).getBytes()));
            MultipartEntityBuilder builder = MultipartEntityBuilder.create();
            params.forEach((k, v) -> {
                builder.addPart(k, new StringBody(v, ContentType.MULTIPART_FORM_DATA));
            });
            HttpEntity postEntity = builder.build();
            httpPost.setEntity(postEntity);
            HttpResponse httpResponse = null;
            HttpEntity entity = null;
            try {
                httpResponse = closeableHttpClient.execute(httpPost);
                entity = httpResponse.getEntity();
                if (entity != null) {
                    result = EntityUtils.toString(entity);
                }
            } catch (ClientProtocolException e) {
                e.printStackTrace();
            } catch (IOException e) {
                e.printStackTrace();
            }
            // 关闭连接
            closeableHttpClient.close();
        } catch (Exception e) {
            e.printStackTrace();
        }
        JSONObject jsonObject = JSON.parseObject(result);


        return jsonObject;
    }
}
pom依赖如下:
        <dependency>
            <groupId>org.apache.httpcomponents</groupId>
            <artifactId>httpmime</artifactId>
            <version>4.5.5</version>
        </dependency>

        <dependency>
            <groupId>commons-httpclient</groupId>
            <artifactId>commons-httpclient</artifactId>
            <version>3.1</version>
        </dependency>
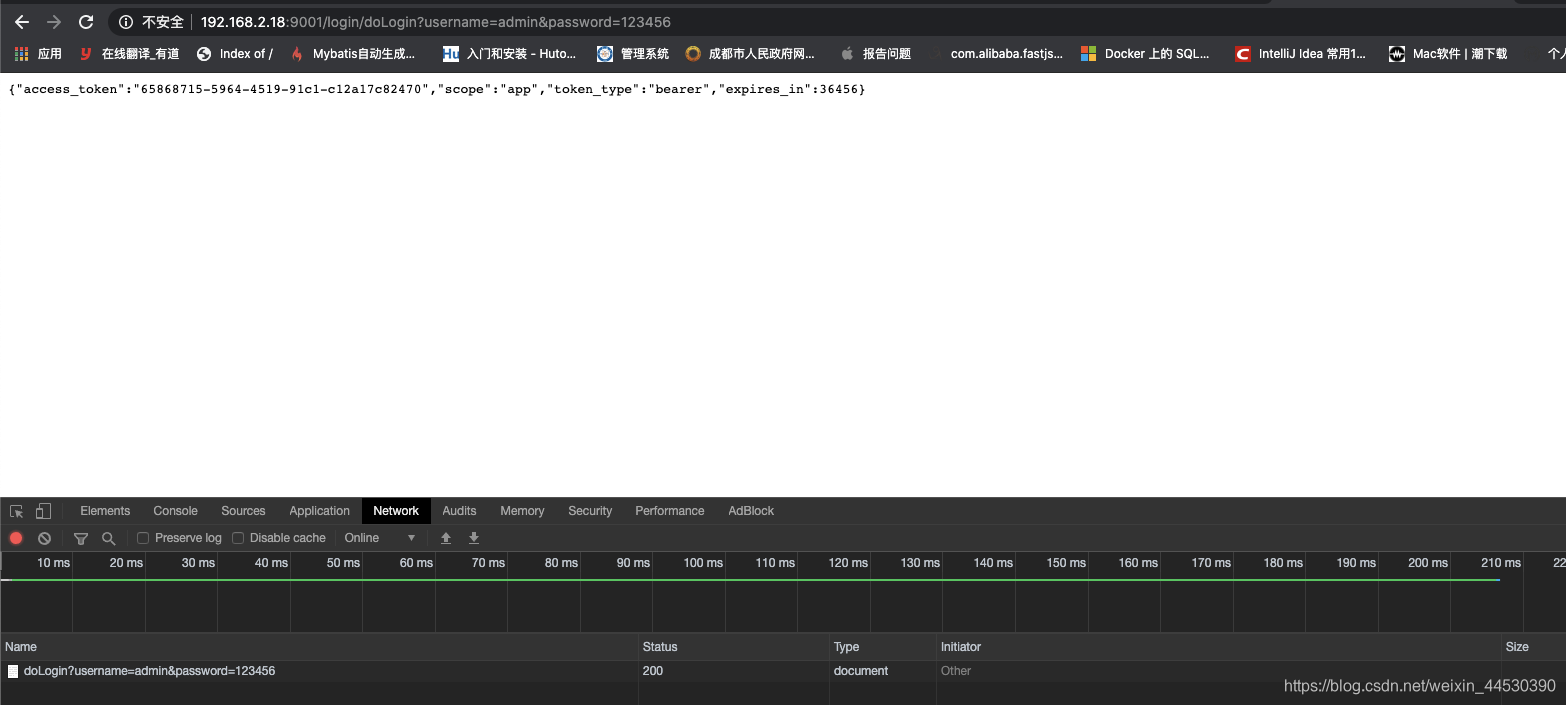
测试效果如下图:直接拿到我们需要的access_token 。
前端的同事们直接带着这个token就可以请求我们的资源服务器了!
好了,结束了! 有不清楚的留言,能回答我尽量回答!有些语言不是很准确,见谅!


 1312
1312


 被折叠的 条评论
为什么被折叠?
被折叠的 条评论
为什么被折叠?
 到【灌水乐园】发言


