


springboot2.1.5结合swagger2生成在线接口API文档
记录下自己对swagger2的使用
自己做后端接口开发的时候, 领导让我提供接口文档,当时自己只有postman的接口地址, 既然领导问到了, 那就做一个接口文档, 当时第一时间想想到了swagger2, 直接在线生成一份, 既简单又美观使用, 各种百度找资源,最后整理出一套比较新的
第一步:在pom文件引入maven依赖
在网上搜寻时发现有2种maven依赖可以引用,一种普通的maven依赖,一种是springboot的启动器,先尝试的第一种, 比springboot启动器配置复杂,而且是英文的,不符合我大中国的阅读习惯,最后生成的接口文档样式没有直接用启动器的直观,所以第一种就不多说了,直接上springboot的启动器依赖
	<!--swagger 启动器-->
    <dependency>
      <groupId>com.battcn</groupId>
      <artifactId>swagger-spring-boot-starter</artifactId>
      <version>2.1.5-RELEASE</version>
    </dependency>
第二步:在controller类里面加入swagger注释
swagger注解的使用说明不懂的可以百度了解,很多,这里就不多说了
话不多说,直接上代码
/**
 * author: 聂鹏
 * email:122352701@qq.com
 * description:测试接口
 * create:2019/8/25
 */
@RestController
@Api(tags="测试接口")
public class TestController {

	@GetMapping("/t")
	@ApiOperation(value = "简单的测试接口", notes = "返回一个简单json",response=NpResult.class)
	public NpResult test() {
		return NpResult.success();
	}
}
/**
 * author: 聂鹏
 * email:122352701@qq.com
 * description:
 * create:2019/8/25
 */

@RestController
@Api(tags="计费接口")
public class CountRuleController {

	//计费
	@PostMapping("/countFee")
	@ApiOperation(value = "计算费用", notes = "根据传入的参数进行计算")
	@ApiImplicitParam(name = "param", value = "请求的CountParam对象", required = true, dataType = "CountParam")
	public NpResult countFee(@RequestBody CountParam param) {

		//中间省略业务代码
		return NpResult.success();
	}

	/**
	 * description:根据名字模糊查询计费方案
	 * @param  name 名字
	 * @return NpResult
	 */
	@GetMapping("/getCountRule")
	@ApiOperation(value = "查询计费方案",notes ="根据名字进行模糊查询")
	@ApiImplicitParam(name = "name",value = "计费方案名字",required = true)
	public NpResult getCountRule(@RequestParam String name) {

		//中间省略业务代码
		return NpResult.success();

	}

	/**
	 * description:启用新的计费方案
	 * @param  id 主键
	 * @return NpResult
	 */
	@PostMapping("/updateStatus")
	@ApiOperation(value = "启用计费方案", notes = "启用另一种计费方案")
	@ApiImplicitParam(name = "id",value = "计费方案id",required = true,dataType="Integer")
	public NpResult updateStatus(@RequestParam Integer id) {

		//中间省略业务代码
		return NpResult.success();
	}
}
第三步:在controller中用到的自定义对象都需要加上swagger注解逐个说明
NpResult 这个实体类是自己封装使用的数据返回对象
/**
 * author: 聂鹏
 * email:122352701@qq.com
 * description: 带 swagger 接口文档的数据返回格式
 * create:2019/8/25
 */
@Data
@ApiModel(description = "响应的json对象")
public class NpResult implements Serializable {

	@ApiModelProperty(value="返回的文本信息",required=true)
	private String msg;

	@ApiModelProperty(value="返回布尔值表示请求成功/失败!",required=true)
	private boolean result;

	@ApiModelProperty(value="分页时返回总条数")
	private Long count;

	@ApiModelProperty(value="返回的数据对象")
	private Object data;

	@ApiModelProperty(value="其他数据")
	private Object obj;

	private NpResult(String msg, boolean result, Long count, Object data, Object obj) {
		this.msg = msg;
		this.result = result;
		this.count = count;
		this.data = data;
		this.obj = obj;
	}

	public static NpResult success() {
		return new NpResult("操作成功",true,null,null,null);
	}
	public static NpResult success(Object data) {
		return new NpResult("操作成功",true,null,data,null);
	}
	/** 返回多个对象 */
	public static NpResult success(Object data,Object obj) {
		return new NpResult("操作成功",true,null,data,obj);
	}
	/** layui分页返回 */
	public static NpResult success(Long count,Object data) {
		return new NpResult("操作成功",true,count,data,null);
	}
	public static NpResult success(Long count,Object data,Object obj) {
		return new NpResult("操作成功",true,count,data,obj);
	}
	public static NpResult error() {
		return new NpResult("操作失败",false,null,null,null);
	}
	public static NpResult error(String msg) {
		return new NpResult(msg,false,null,null,null);
	}
	public static NpResult error(String msg,Object data) {
		return new NpResult(msg,false,null,data,null);
    }
CountParam 上面controller用到的用来接收参数的对象说明
/**
 * author: 聂鹏
 * email:122352701@qq.com
 * description: 参数对象
 * create:2019/8/25
 */
@Data
@ApiModel(description = "请求参数对象")
public class CountParam {

	@ApiModelProperty(value="实际公里数:单位公里",required=true,example="50")
	private double km;

	@ApiModelProperty(value="开始时间,格式yyyy-MM-dd HH:mm:ss",required=true,example="2019-07-17 19:00:00")
	private String beginDate;

	@ApiModelProperty(value="结束时间,格式yyyy-MM-dd HH:mm:ss",required=true,example="2019-07-17 19:10:00")
	private String endDate;

	@ApiModelProperty(value="低速行驶时间:单位分钟",example = "10")
	private int underspeedTime;

	@ApiModelProperty(value="优惠券:单位元",example = "10")
	private double coupon;
}
第四步:在application.properties里面加上API说明
spring.swagger.title=计费系统
spring.swagger.description=计费系统接口文档
spring.swagger.version=1.0
spring.swagger.contact.name=聂鹏
spring.swagger.contact.email=122352701@qq.com
spring.swagger.base-package=com.xxxxx.carfee.controller
第5步:在springboot的启动类上加上注解就可以了
@EnableSwagger2
@SpringBootApplication
public class CarfeeApplication {

	public static void main(String[] args) {
		SpringApplication.run(CarfeeApplication.class, args);
	}
}
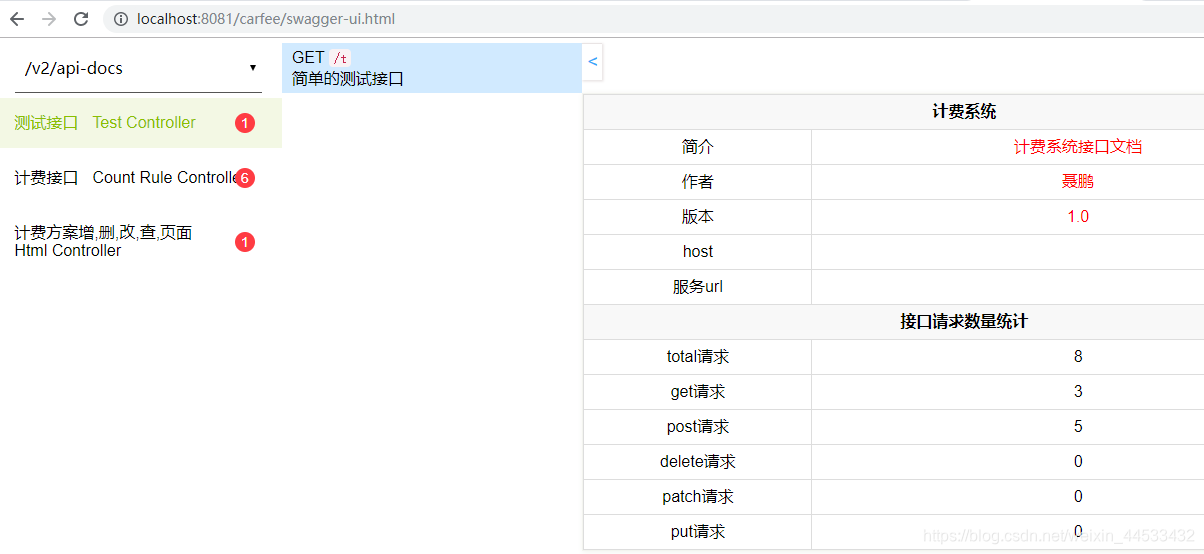
在线接口文档地址: xxxx/swagger-ui.html
我的是 http://localhost:8081/carfee/swagger-ui.html
最后附上使用后的效果
刚进入的总览:
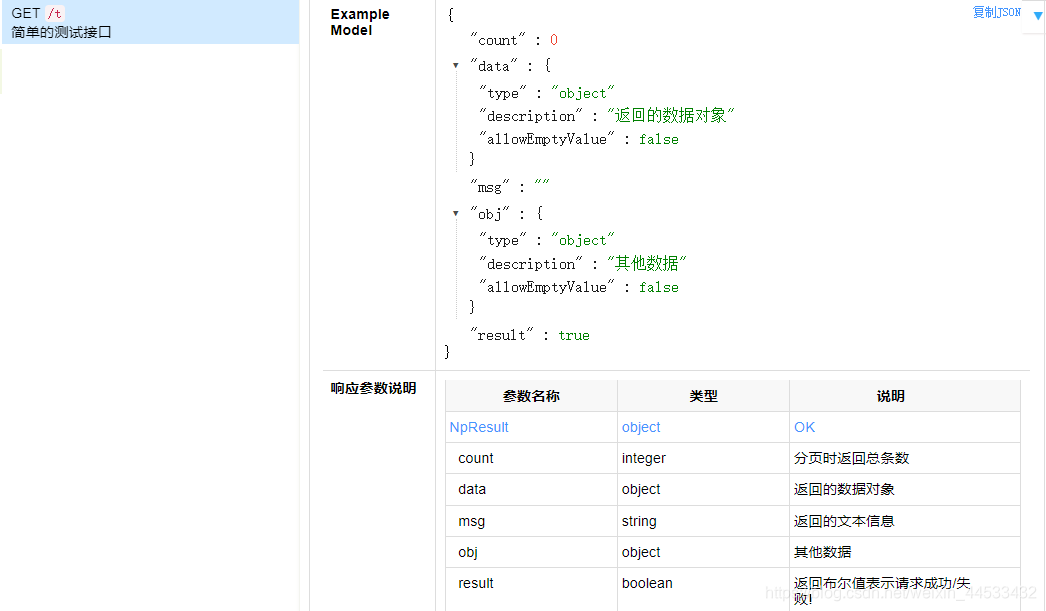
点击测试接口可以看到接口说明, 如果有参数可以看到参数说明

点击NpResult可以看到返回的对象说明
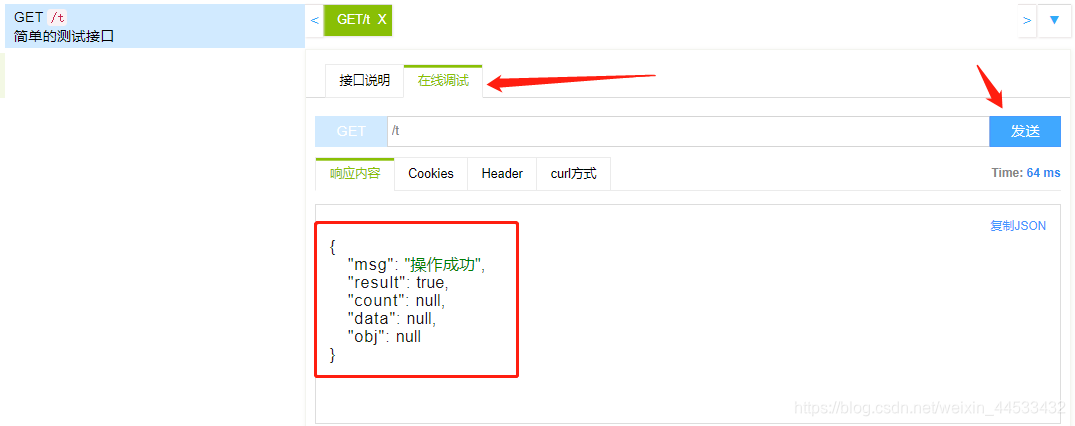
还可以在线调试, postman都可以不用了, 给前端人员做对接调试非常方便


 2561
2561


 被折叠的 条评论
为什么被折叠?
被折叠的 条评论
为什么被折叠?
 到【灌水乐园】发言


