


linux 安装MySQL
一.检查清理服务的配置环境
安装之前先清理干净服务配置环境, 避免带来不必要的影响
1.检查是否已安装 MySQL 软件包
🧅查看系统中已安装的 rpm 软件包列表并过滤出 mysql
rpm -qa | grep mysql

🧅类似 mysql-libs-5.1.52-1.el6_0.1.x86_64 这种代表已经安装了, 我们将其卸载
rpm -e mysql-libs-5.1.52-1.el6_0.1.x86_64           # 正常卸载会有许多依赖软件,无法卸载成功
rpm -e --nodeps mysql-libs-5.1.52-1.el6_0.1.x86_64  # 忽略依赖关系进行卸载
2.检查是否已安装 mariadb
🧅流程与上面步骤一样
rpm -qa | grep mariadb
rpm -e --nodeps mariadb-libs-xxxxxxxx.x86_64  # 将其卸载

二.安装 mysql 服务端
安装方式
-
可以是以二进制包的方式安装, 需要用到
yum安装工具, 比较方便,会在自带的yum源里面检索,版本不一定。 -
也可以源码安装, 安装比
yum安装复杂一点,可以安装特定的版本。
1.二进制包安装方式
二进制安装也需要先检查一下之前是不是已经安装了 mysql
🧅查看是否安装过
yum list installed mysql*    # 列出安装过的 mysq* 之类的包
yum list installed mariadb*

🧅卸载他们
yum remove -y mysql*
yum remove -y mariadb*

🧅开始安装
yum install -y mysql-server  # 安装 mysql 服务端
yum install -y mysql         # 安装 mysq 客户端
yum install -y mysql-server mysql  # 也可以一条命令替代上面两条(mariadb 依赖会自动安装)
2.源码安装(5.6版本)
2.1 源码安装
🧅先选择一个软件包的下载目录,一般放在 /usr/local 下
mkdir /usr/local
cd !$  # 进入该目录
wget https://downloads.mysql.com/archives/get/p/23/file/mysql-5.6.51-linux-glibc2.12-x86_64.tar.gz
ls     # 查看源码包

![[外链图片转存失败,源站可能有防盗链机制,建议将图片保存下来直接上传(img-ueF6iDEN-1613984163679)(https://gitee.com/tao-xiaoxin/img/raw/master/img/20210222164728.png)]](https://img-blog.csdnimg.cn/20210222165752991.png)
🧅在源码包所在的目录将其解压出来
tar -zxvf mysql-5.6.51-linux-glibc2.12-x86_64.tar.gz

🧅将文件夹重命名
mv mysql-5.6.51-linux-glibc2.12-x86_64 mysql-5.6.51

🧅添加系统mysql组和mysql用户. 检查mysql组和用户是否存在
cat /etc/group | grep mysql

🧅若未创建组,使用如下命令创建
groupadd mysql

🧅添加用户,并修改文件的属组属主
useradd -r -g mysql mysql	# useradd -r参数表示mysql用户是系统用户,不可用于登录系统
chown -R mysql:mysql mysql-5.6.51  # -R : 递归设置,将所有者及所属组改为mysql

🧅安装数据库,并创建data目录
cd mysql-5.6.51/scripts
mkdir data

🧅初始化数据库(系统数据,数据库要启动,必须依赖一些表,系统表)
./mysql_install_db --user=mysql --basedir=/usr/local/mysql-5.6.51 --datadir=/usr/local/mysql-5.6.51/data

🧅初始化数据库可能会报错解决方法链接如下:
https://blog.csdn.net/weixin_44621343/article/details/114041278
2.2 配置文件
🧅拷贝配置文件
cd mysql-5.6.51/support-files
cp my-default.cnf /etc/my.cnf
cp mysql.server /etc/init.d/mysql

🧅修改文件路径,全部改成你自己mysql安装的路径
vim /etc/init.d/mysql

🧅找到配置文件中如下字段:
mysqld_pid_file_path=
if test -z "$basedir"
then
  basedir=/usr/local/mysql
  bindir=/usr/local/mysql/bin
  if test -z "$datadir"
  then
    datadir=/usr/local/mysql/data
  fi
  sbindir=/usr/local/mysql/bin
  libexecdir=/usr/local/mysql/bin
else
  bindir="$basedir/bin"


# 修改配置文件里面的配置路径(都改成你自己的文件路径)
basedir=/usr/local/mysql-5.6.51
datadir=/usr/local/mysql-5.6.51/data
bindir=/usr/local/mysql-5.6.51/bin
sbindir=/usr/local/mysql-5.6.51/bin
libexecdir=/usr/local/mysql-5.6.51/bin


🧅配置环境变量
vim /etc/profile

#将以下内容添加到环境变量中
export MYSQL_HOME="/usr/local/mysql-5.6.51"
export PATH="$PATH:$MYSQL_HOME/bin"  # 配完后保存退出 :wq

# 重新加载配置文件
source /etc/profile
2.3 启动MySQL服务
🧅将 mysql 添加到自启动服务
chkconfig --add mysql
chkconfig mysql on

🧅启动 mysql
service mysql start


🧅查看 mysql 状态,是否启动成功。
service mysql status

3.登入测试
[root@shawn support-files]# mysql  #直接输入mysql进入
Welcome to the MySQL monitor.  Commands end with ; or \g.
Your MySQL connection id is 1
Server version: 5.6.51 MySQL Community Server (GPL)

Copyright (c) 2000, 2021, Oracle and/or its affiliates. All rights reserved.

Oracle is a registered trademark of Oracle Corporation and/or its
affiliates. Other names may be trademarks of their respective
owners.

Type 'help;' or '\h' for help. Type '\c' to clear the current input statement.

mysql> show databases;
+--------------------+
| Database           |
+--------------------+
| information_schema |
| mysql              |
| performance_schema |
| test               |
+--------------------+
4 rows in set (0.01 sec)

mysql> \q #\q 退出
Bye

4.修改密码
mysqladmin -uroot password [你的密码]  # 修改密码
# mysqladmin -uroot -p[原密码] password [新密码]  # 如果你之前有密码使用这种方式
mysql -uroot -p[你的密码]  # 指定密码登入 -p 与密码不要空格

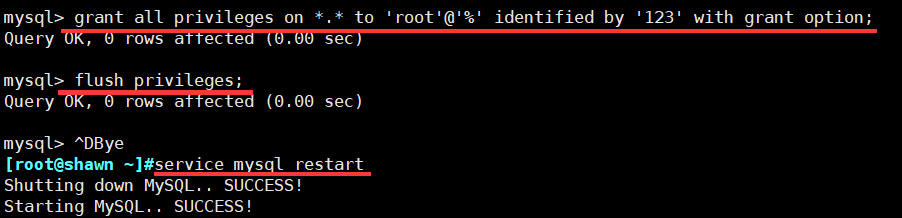
5.设置远程访问
grant all privileges on *.* to 'root'@'%' identified by '[你的密码]' with grant option;  # 允许root用户远程访问
flush privileges;  # 刷新权限
当忘记密码的时候可以使用以下方式进行破解
5.1 修改 my.cnf 配置文件, 跳过授权表
🧅编辑 my.cnf 配置文件
vim /etc/my.cnf

🧅在 [mysqld] 下添加
skip-grant-tables    # 跳过授权表,可以不使用密码登录. 目的是用来破解密码等下有用.

🧅重启 mysql 服务
service mysql restart

🧅无密码进入 mysql, 并修改密码
mysql
update mysql.user set password=password('111') where user="root";
flush privileges;  # 刷新配置之后退出 mysql

🧅将 my.cnf 配置文件里的 skip-grant-table 注释掉(因为密码已经改好了,现在要正常登入)
service mysql restart  # 重启 mysql 服务
mysql -uroot -p111     # 用新的密码登入
5.2 修改my.cnf配置文件,解决字符编码不统一
🎨编辑my.cnf文件


🎨复制以下内容, 使用i模式, 鼠标右键复制进去. 再使用`Esc`键退出修改, 使用`:wq`保存退出. (提示: 以下的;是cnf文件的注释符号, 需要生效去除即可. )
[mysqld]
;skip-grant-tables  ;这里是跳过密码机制表, 可以不使用密码登录. 目的是用来破解密码等下有用.

sql_mode=NO_ENGINE_SUBSTITUTION,STRICT_TRANS_TABLES
character-set-server=utf8


 5万+
5万+


 被折叠的 条评论
为什么被折叠?
被折叠的 条评论
为什么被折叠?
 到【灌水乐园】发言


