


SpringBoot2——数据访问的集成 & 单元测试(JUnit5)
一、数据访问
1.1 数据库场景的自动配置(HikariDataSource)
- SpringBoot 2.06 以后默认使用的是
HikariDataSource数据源。 - SpringBoot 默认配置了
JdbcTemplate,JdbcTemplate是Spring框架自带的对JDBC操作的封装,配了数据源就可以直接使用它操作数据库即可
1、导入JDBC场景和数据库驱动
<dependency>
    <groupId>org.springframework.boot</groupId>
    <artifactId>spring-boot-starter-data-jdbc</artifactId>
</dependency>

<!-- mysql驱动 -->
<dependency>
    <groupId>mysql</groupId>
    <artifactId>mysql-connector-java</artifactId>
	<!--<version>5.1.49</version>-->
</dependency>

想要修改版本:
1、直接依赖引入具体版本(maven的就近依赖原则)
2、重新声明版本(maven的属性的就近优先原则)
<properties>
    <java.version>1.8</java.version>
    <mysql.version>5.1.49</mysql.version>
</properties>
2、修改配置项
spring:
  datasource:
    url: jdbc:mysql://localhost:3306/mybatis_0325
    username: root
    password: root
    type: com.zaxxer.hikari.HikariDataSource # 系统默认的数据源
    driver-class-name: com.mysql.cj.jdbc.Driver # com.mysql.jdbc.Driver
3、测试能否连接上数据库
@SpringBootTest
class Boot05WebAdminApplicationTests {

    @Autowired
    JdbcTemplate jdbcTemplate;

    @Autowired
    DataSource dataSource;

    @Test
    void contextLoads() throws SQLException {

        System.out.println(dataSource.getClass());//class com.zaxxer.hikari.HikariDataSource
        System.out.println(dataSource.getConnection());//HikariProxyConnection@247309715 wrapping com.mysql.cj.jdbc.ConnectionImpl@5792c08c
        Long aLong = jdbcTemplate.queryForObject("select count(*) from t_student", Long.class);
        System.out.println(aLong);//3

    }
}
1.2 整合druid数据源
SprintBoot 默认使用的是 HikariDataSource数据源,这次整合一个第三方的数据源Druid ,它是阿里开发的一款开源的数据源,而且 Druid 能够提供强大的一整套监控和扩展功能。
druid官方github地址:https://github.com/alibaba/druid
1.2.1 自定义druid数据源
1、添加druid依赖
<!--druid数据源-->
<dependency>
    <groupId>com.alibaba</groupId>
    <artifactId>druid</artifactId>
    <version>1.1.17</version>
</dependency>
2、在 application.yml(或aproperties)中添加相应的配置:
spring:
  datasource:
    url: jdbc:mysql://localhost:3306/mybatis_0325
    username: root
    password: root
#    type: com.zaxxer.hikari.HikariDataSource # 系统默认的数据源
    type: com.alibaba.druid.pool.DruidDataSource
    driver-class-name: com.mysql.cj.jdbc.Driver # com.mysql.jdbc.Driver
3、在运行测试方法,查看数据源
@SpringBootTest
class Boot05WebAdminApplicationTests {

    @Autowired
    JdbcTemplate jdbcTemplate;
    @Autowired
    DataSource dataSource;

    @Test
    void contextLoads() throws SQLException {

        System.out.println(dataSource.getClass());
        System.out.println(dataSource.getConnection());
        Long aLong = jdbcTemplate.queryForObject("select count(*) from t_student", Long.class);
        System.out.println(aLong);//3
    }
}

4、配置Druid的监控
创建数据源配置类,进行配置
@Configuration
public class MyDataSourceConfig {

    //默认的自动配置是判断容器中没有才会配@ConditionalOnMissingBean(DataSource.class)
    //使用该方法可以去掉配置文件中的,type: com.alibaba.druid.pool.DruidDataSource
    @ConfigurationProperties("spring.datasource")
    @Bean
    public DataSource dataSource() throws SQLException {
        DruidDataSource druidDataSource = new DruidDataSource();
        //Druid内置提供一个StatFilter,用于统计监控信息,StatFilter的别名是stat
        //配置监控统计拦截的filters,去掉后监控界面sql无法统计,'wall'用于防火墙
        druidDataSource.setFilters("stat,wall");
        return druidDataSource;
    }

    /**
     * 配置 druid的监控页功能
     * @return
     */
    @Bean
    public ServletRegistrationBean statViewServlet() {

        //StatViewServlet的用途包括:
        //1.提供监控信息展示的html页面
        //2.提供监控信息的JSON API
        StatViewServlet statViewServlet = new StatViewServlet();

        ServletRegistrationBean<StatViewServlet> registrationBean = new ServletRegistrationBean<>(statViewServlet, "/druid/*");
        //配置监控页面访问密码
        registrationBean.addInitParameter("loginUsername","admin");
        registrationBean.addInitParameter("loginPassword","123456");

        return registrationBean;
    }

    /**
     * WebStatFilter 用于采集web-jdbc关联监控的数据。
     */
    @Bean
    public FilterRegistrationBean webStatFilter() {
        WebStatFilter webStatFilter = new WebStatFilter();
        FilterRegistrationBean<WebStatFilter> filterRegistrationBean = new FilterRegistrationBean<>(webStatFilter);
        filterRegistrationBean.setUrlPatterns(Arrays.asList("/*"));
        filterRegistrationBean.addInitParameter("exclusions","*.js,*.gif,*.jpg,*.png,*.css,*.ico,/druid/*");
        return filterRegistrationBean;
    }

}
访问http://localhost:8080/druid, 查看下监控

1.2.2 使用官方starter方式
1、在 Spring Boot 项目中加入druid-spring-boot-starter依赖
<dependency>
    <groupId>com.alibaba</groupId>
    <artifactId>druid-spring-boot-starter</artifactId>
    <version>1.1.17</version>
</dependency>
2、分析自动配置(DruidDataSourceAutoConfigure )
@Configuration
@ConditionalOnClass({DruidDataSource.class})
@AutoConfigureBefore({DataSourceAutoConfiguration.class})
@EnableConfigurationProperties({DruidStatProperties.class, DataSourceProperties.class})
@Import({DruidSpringAopConfiguration.class, DruidStatViewServletConfiguration.class, DruidWebStatFilterConfiguration.class, DruidFilterConfiguration.class})
public class DruidDataSourceAutoConfigure {
@AutoConfigureBefore({DataSourceAutoConfiguration.class})表明在SpringBoot默认的配置源之前配置DruidSpringAopConfiguration.class, 监控SpringBean的配置DruidStatViewServletConfiguration.class, 监控页的配置DruidWebStatFilterConfiguration.class, web监控配置DruidFilterConfiguration.class所有Druid自己filter的配置
3、配置文件编写
spring:
  datasource:
    url: jdbc:mysql://localhost:3306/mybatis_0325
    username: root
    password: root
    driver-class-name: com.mysql.cj.jdbc.Driver # com.mysql.jdbc.Driver
4、在运行测试方法,查看数据源
@SpringBootTest
class Boot05WebAdminApplicationTests {

    @Autowired
    JdbcTemplate jdbcTemplate;

    @Autowired
    DataSource dataSource;

    @Test
    void contextLoads() throws SQLException {

        System.out.println(dataSource.getClass());
        System.out.println(dataSource.getConnection());
        Long aLong = jdbcTemplate.queryForObject("select count(*) from t_student", Long.class);
        System.out.println(aLong);//3
    }
}
执行结果:

5、通过全局配置文件yml方式配置Druid的监控
SpringBoot配置示例:https://github.com/alibaba/druid/tree/master/druid-spring-boot-starter
spring:
  datasource:
    url: jdbc:mysql://localhost:3306/mybatis_0325
    username: root
    password: root
    driver-class-name: com.mysql.cj.jdbc.Driver # com.mysql.jdbc.Driver

    druid:
      aop-patterns: com.zb.admin.*  #监控SpringBean
      filters: stat,wall     # 底层开启功能,stat(sql监控),wall(防火墙)

      stat-view-servlet: # 配置监控页功能
        enabled: true
        login-username: admin
        login-password: 123456
        resetEnable: false # 不设置重置按钮

      web-stat-filter: # 监控web
        enabled: true
        urlPattern: /* #默认值
        exclusions: '*.js,*.gif,*.jpg,*.png,*.css,*.ico,/druid/*' # 注意使用单引号,不会转义,默认值


      filter:
        stat: # 对上面filters里面的stat的详细配置
          slow-sql-millis: 1000
          logSlowSql: true
          enabled: true
        wall:
          enabled: true
          config:
            drop-table-allow: false # 配置不允许删除表
后台页面,访问http://localhost:8080/druid
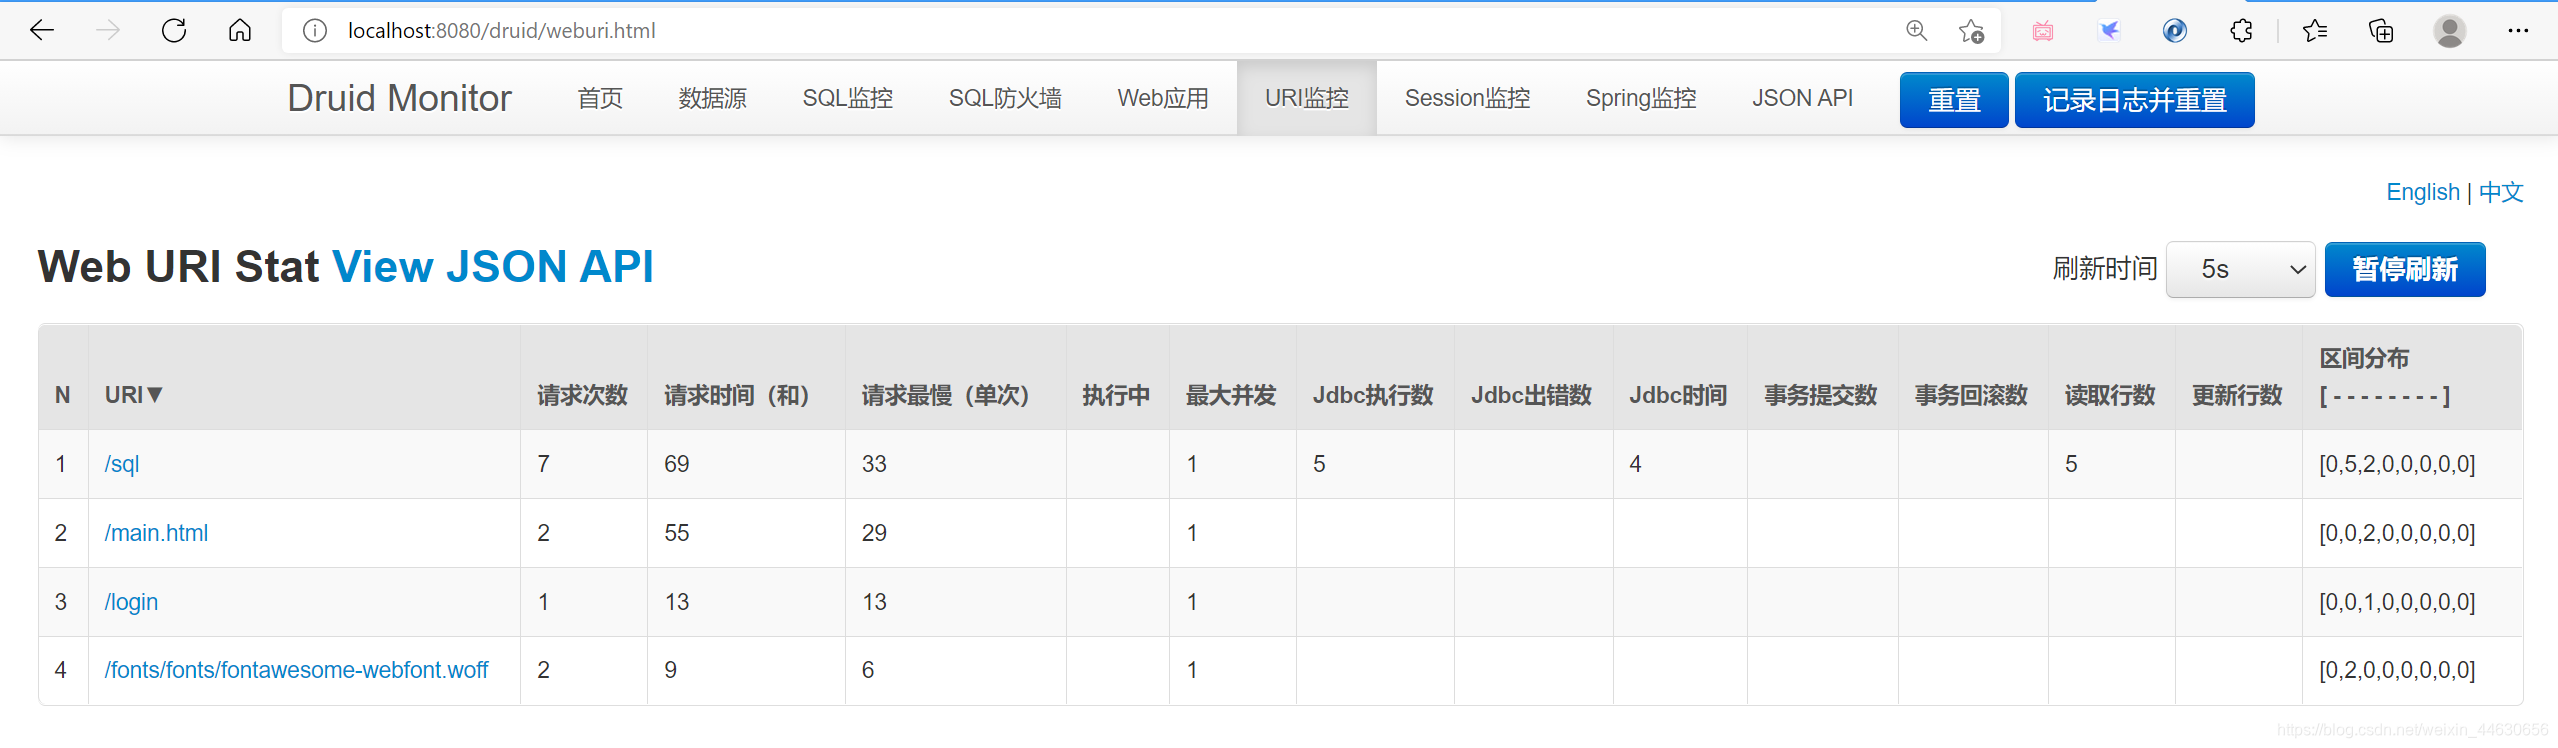
这样就可以监控我们通过Druid连接池来进行的请求了。
1.3 整合MyBatis操作(重点)
mybatis的github链接https://github.com/mybatis
官网:https://mybatis.org/mybatis-3/zh/index.html
1.3.1 整合过程
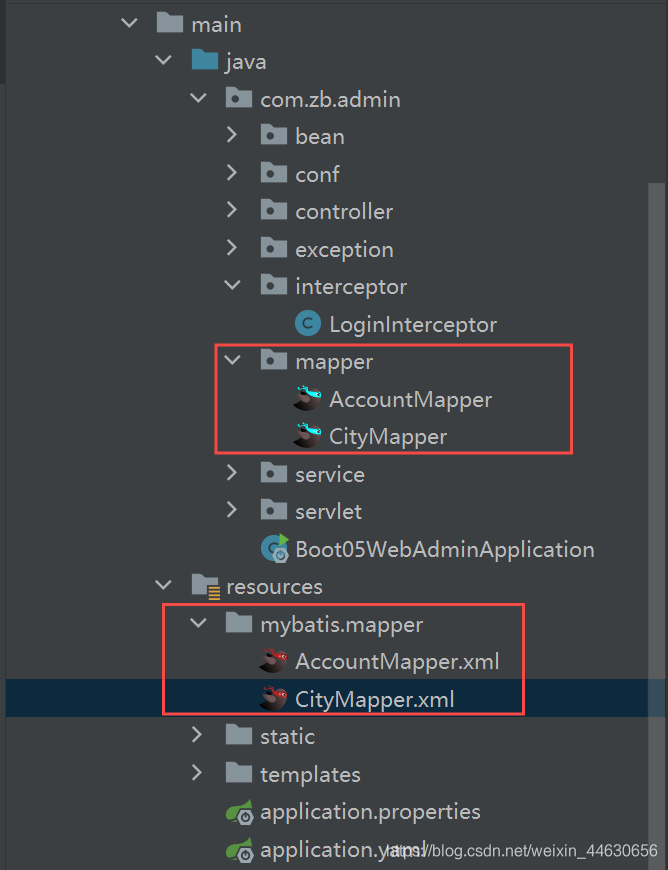
- 项目结构:
1、导入依赖
<!--数据库驱动-->
<dependency>
    <groupId>mysql</groupId>
    <artifactId>mysql-connector-java</artifactId>
</dependency>
<!--mybatis相关依赖-->
<dependency>
    <groupId>org.mybatis.spring.boot</groupId>
    <artifactId>mybatis-spring-boot-starter</artifactId>
    <version>2.2.0</version>
</dependency>
<!--druid相关依赖-->
<dependency>
    <groupId>com.alibaba</groupId>
    <artifactId>druid-spring-boot-starter</artifactId>
    <version>1.1.17</version>
</dependency>
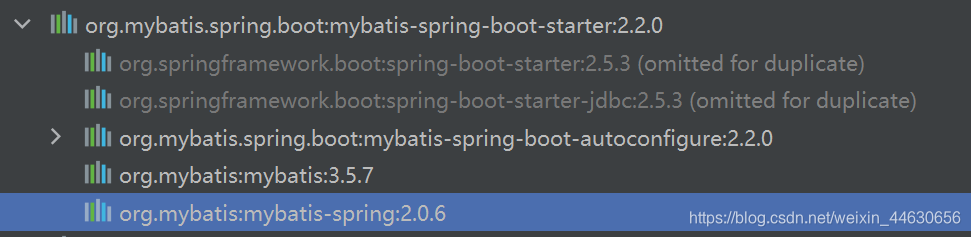
mybatis-spring-boot-starter的依赖关系
2、创建实体类
@Data
public class City {
    private Long id;
    private String name;
    private String state;
    private String country;
}
3、编写配置文件
spring:
  datasource:
    url: jdbc:mysql://localhost:3306/mybatis_0325
    username: root
    password: root
#    type: com.zaxxer.hikari.HikariDataSource # 系统默认的数据源
    type: com.alibaba.druid.pool.DruidDataSource # 指定数据源类型
    driver-class-name: com.mysql.cj.jdbc.Driver # com.mysql.jdbc.Driver

mybatis:
  mapper-locations: classpath:mybatis/mapper/*.xml # mapper文件所在文件夹
  configuration: # 指定mybatis全局配置文件中的相关配置项
    map-underscore-to-camel-case: true # 采用驼峰命名方式转换
4、创建mapper接口,并标记@Mapper注解
可以使用注解或者xml的方式实现,这里展示混合的方式实现
-
定义CityMapper接口文件
@Mapper // 这里必须要添加这个Mapper注解; 也可以在主启动类上统一通过@MapperScan(value="con.zb.admin.mapper")来扫描 public interface CityMapper { @Select("select * from city where id=#{id}") public City getById(Long id); //@Insert("insert into city(`name`,`state`,`country`) values(#{name},#{state},#{country})") //@Options(useGeneratedKeys = true,keyProperty = "id") public void insert(City city); } -
创建CityMapper .xml映射文件
<?xml version="1.0" encoding="UTF-8" ?> <!DOCTYPE mapper PUBLIC "-//mybatis.org//DTD Mapper 3.0//EN" "http://mybatis.org/dtd/mybatis-3-mapper.dtd"> <mapper namespace="com.zb.admin.mapper.CityMapper"> <!--public void insert(City city);--> <insert id="insert" useGeneratedKeys="true" keyProperty="id"> insert into city(`name`,`state`,`country`) values(#{name},#{state},#{country}) </insert> </mapper> -
配置文件(application.yaml)中指定映射文件的位置
mybatis:
  mapper-locations: classpath:mybatis/mapper/*.xml # mapper文件所在文件夹
5、编写Controller层
@Controller
public class IndexController {
    @Autowired
    CityService cityService;

    @ResponseBody
    @GetMapping("/city")
    public City getCityById(Long id){
        return cityService.getById(id);
    }
}
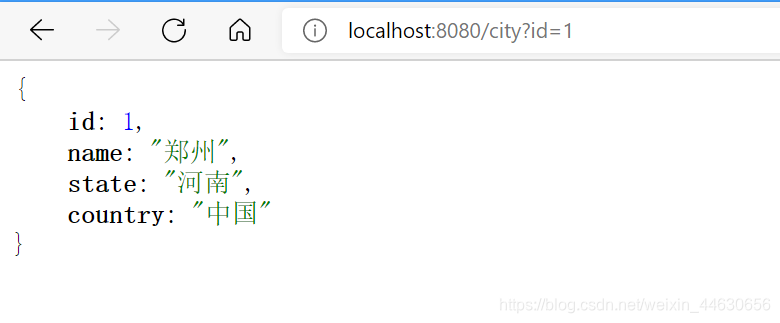
测试结果:
1.3.2 修改Mybatis配置
以开启驼峰命名法为例
方法一:使用配置文件(application.yaml)的方式(推荐)
配置文件mybatis.configuration开头的,就是相当于改mybatis全局配置文件中的值
mybatis:
  mapper-locations: classpath:mybatis/mapper/*.xml # mapper文件所在文件夹
  configuration: # 指定mybatis全局配置文件中的相关配置项
    map-underscore-to-camel-case: true # 采用驼峰命名方式转换
方法二:使用mybatis全局配置文件(不推荐)
-
创建mybatis全局配置文件
<?xml version="1.0" encoding="UTF-8" ?> <!DOCTYPE configuration PUBLIC "-//mybatis.org//DTD Config 3.0//EN" "http://mybatis.org/dtd/mybatis-3-config.dtd"> <configuration> <!-- 开启数据库中列名和pojp的驼峰命名映射 --> <settings> <setting name="mapUnderscoreToCamelCase" value="true"/> </settings> </configuration> -
配置文件(application.yaml)中指定配置文件和映射文件的位置
mybatis:
  config-location: classpath:mybatis/mybatis-config.xml # 配置文件所在位置
  mapper-locations: classpath:mybatis/mapper/*.xml # mapper文件所在文件夹
总结:
- 引入
mybatis-starter - 配置application.yaml中,指定mapper-location位置即可
- 编写Mapper接口并标注
@Mapper注解- 简单方法直接注解方式
- 复杂方法编写mapper.xml进行绑定映射
注意:如果不想使用@Mapper注解标注,可以使用@MapperScan("com.zb.admin.mapper")简化。
1.4 整合MyBatis-Plus完成CRUD(重点)
导入依赖:
<!--mybatis-plus的springboot支持-->
<dependency>
  <groupId>com.baomidou</groupId>
  <artifactId>mybatis-plus-boot-starter</artifactId>
  <version>3.4.3</version>
</dependency>
<!--mysql驱动-->
<dependency>
  <groupId>mysql</groupId>
  <artifactId>mysql-connector-java</artifactId>
  <version>5.1.47</version>
</dependency>
<!--druid相关依赖-->
<dependency>
    <groupId>com.alibaba</groupId>
    <artifactId>druid-spring-boot-starter</artifactId>
    <version>1.1.17</version>
</dependency>
注意: Mybatis 及 Mybatis-Spring 依赖请勿加入项目配置,以免引起版本冲突!!!Mybatis-Plus 会自动帮你维护!
自动配置:
-
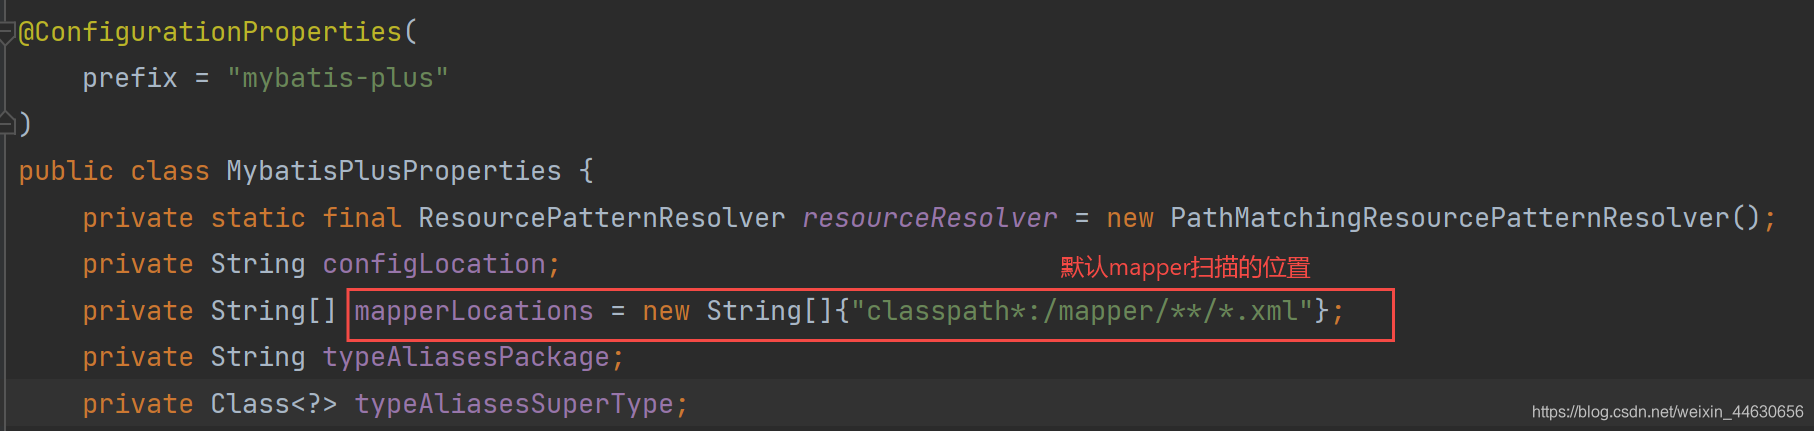
MybatisPlusAutoConfiguration 配置类,MybatisPlusProperties 配置项绑定。
mybatis-plus:xxx就是对mybatis-plus的定制 -
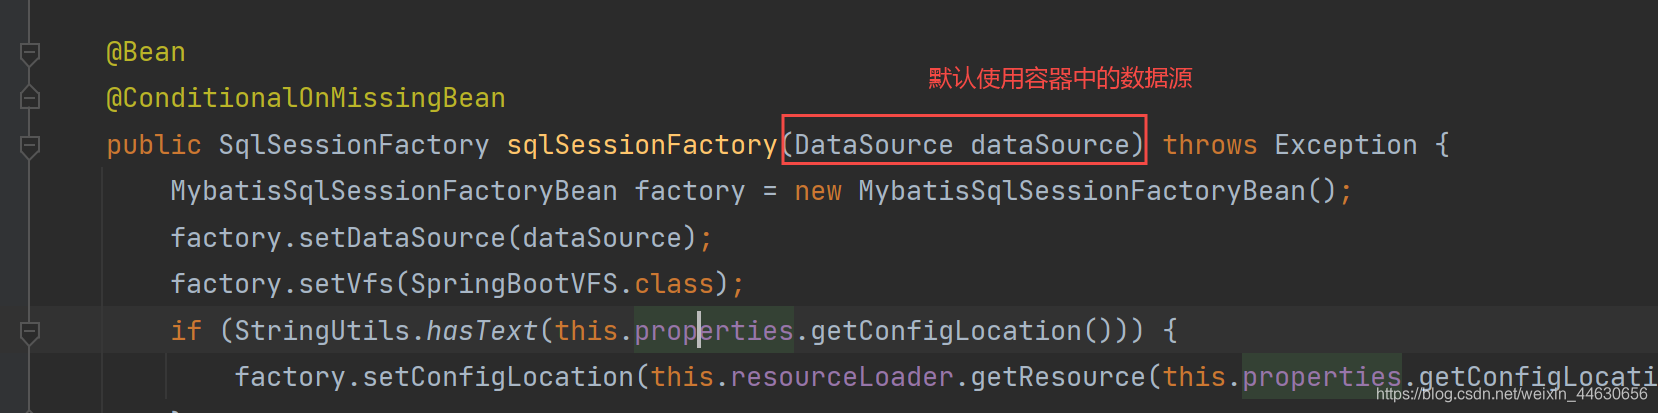
SqlSessionFactory 自动配置好。底层是容器中默认的数据源
-
mapperLocations 自动配置好的。有默认值。
classpath*:/mapper/**/*.xml;任意包的类路径下的所有mapper文件夹下任意路径下的所有xml都是sql映射文件。 建议以后sql映射文件,放在 mapper下
-
容器中也自动配置好了 SqlSessionTemplate

-
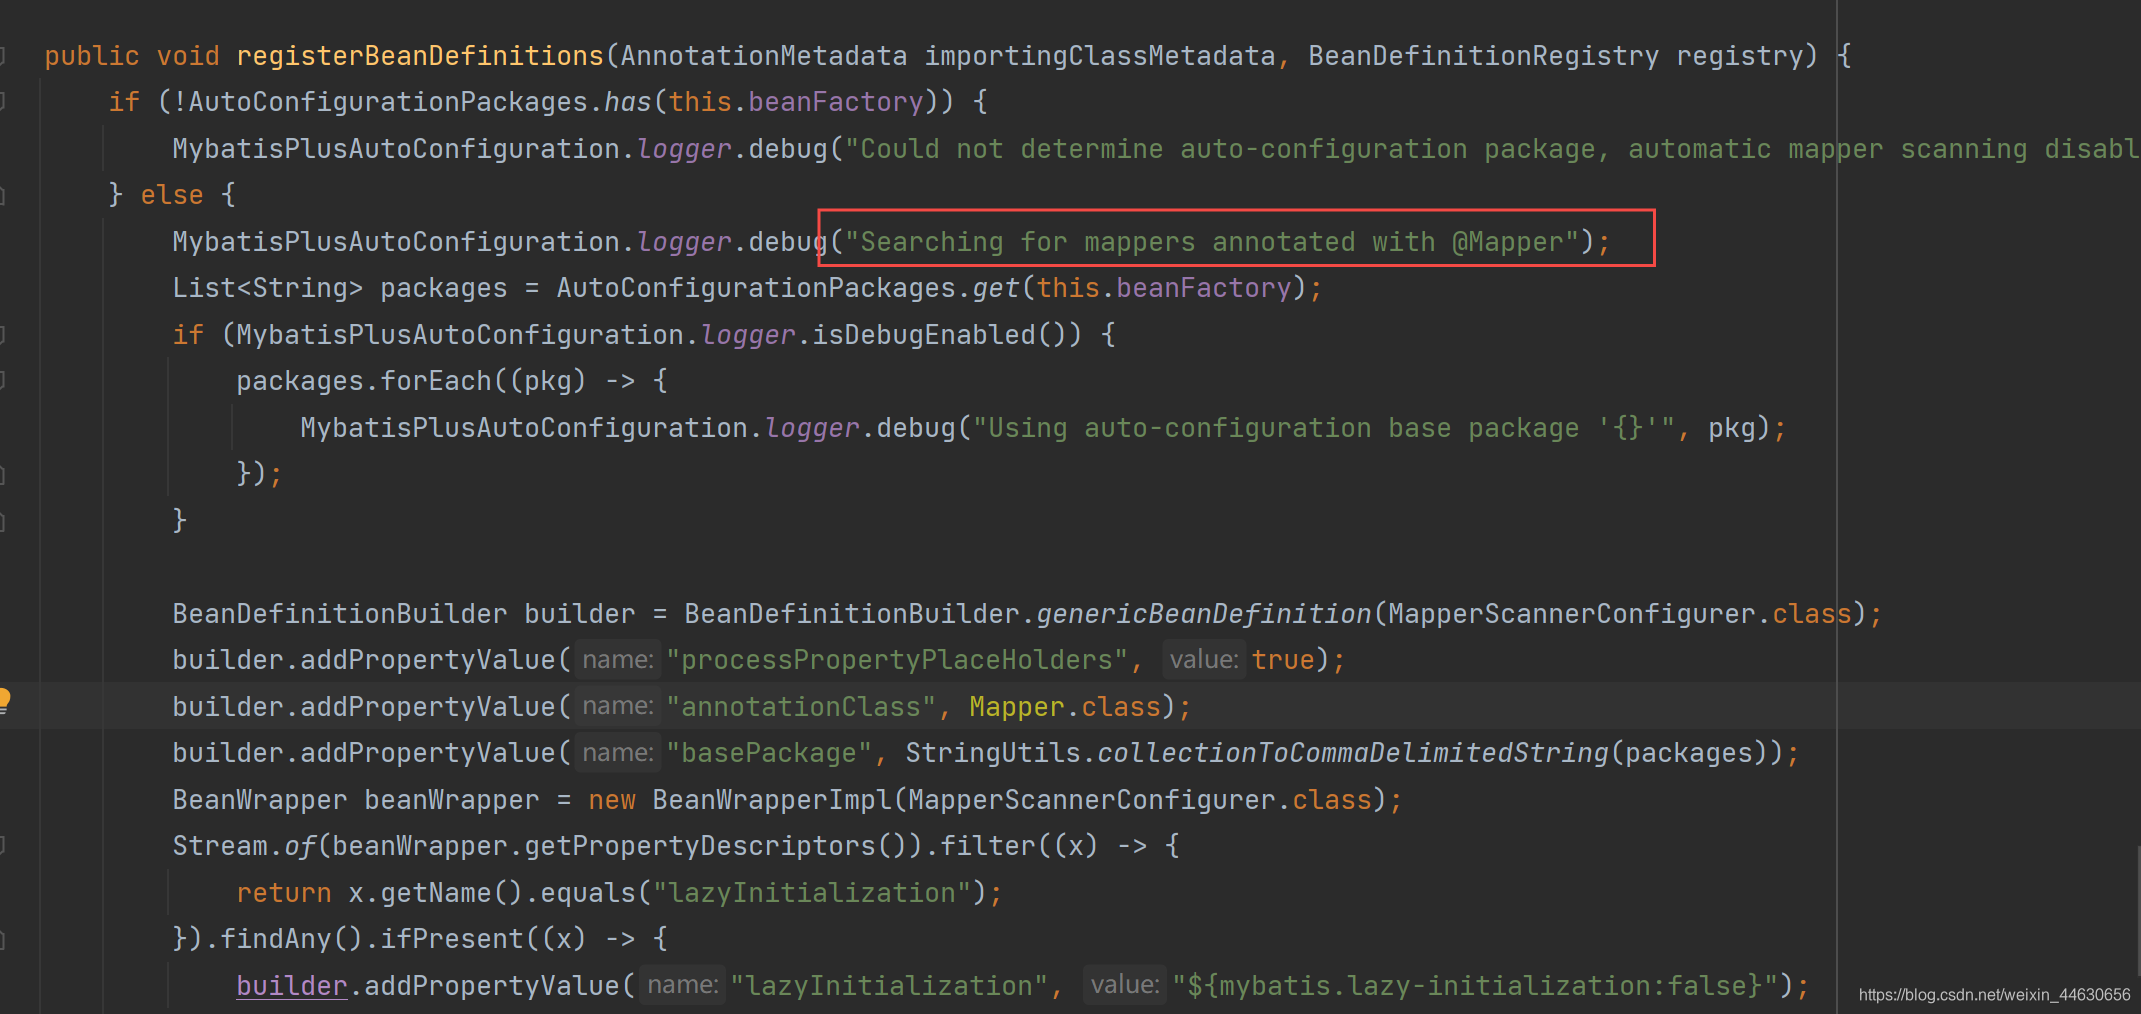
@Mapper标注的接口也会被自动扫描;建议直接@MapperScan("com.zb.mapper")批量扫描就行
之后可以参考:
MybatisPlus学习总结(上)
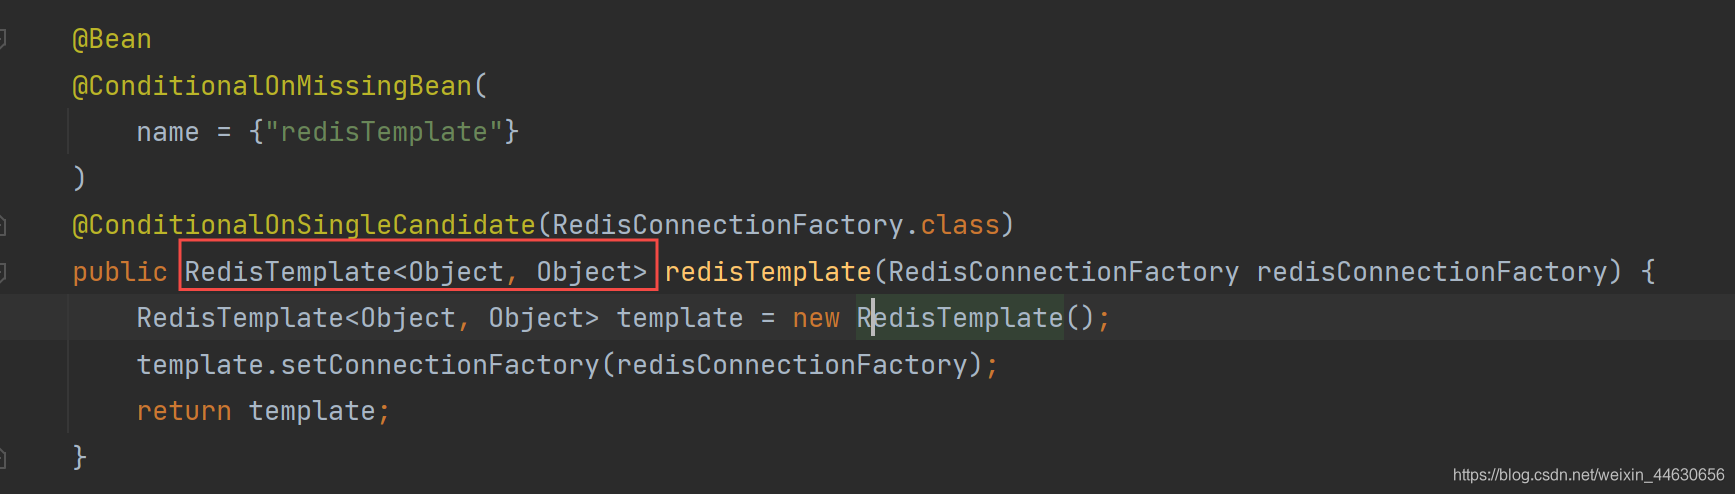
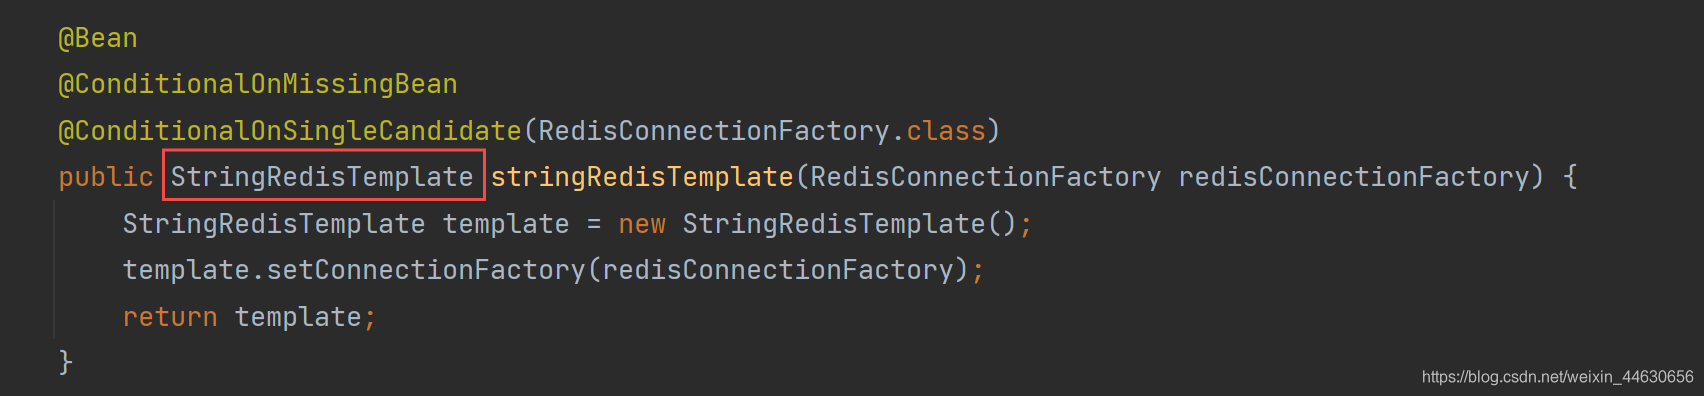
1.5 整合Redis
SpringBoot Data Redis中提供了RedisTemplate和StringRedisTemplate,其中StringRedisTemplate是RedisTemplate的子类,两个方法基本一致,不同之处主要体现在操作的数据类型不同- RedisTemplate中的两个泛型都是Object,意味着存储的key和value都可以是一个对象
- StringRedisTemplate的两个泛型都是String,意味着StringRedisTemplate的key和value都只能是字符串。
注意: 使用RedisTemplate默认是将对象序列化到Redis中,所以放入的对象必须实现对象序列化接口
1、导入依赖:
<!--redis的场景依赖-->
<dependency>
    <groupId>org.springframework.boot</groupId>
    <artifactId>spring-boot-starter-data-redis</artifactId>
</dependency>
spring-boot-starter-data-redis的自动配置:
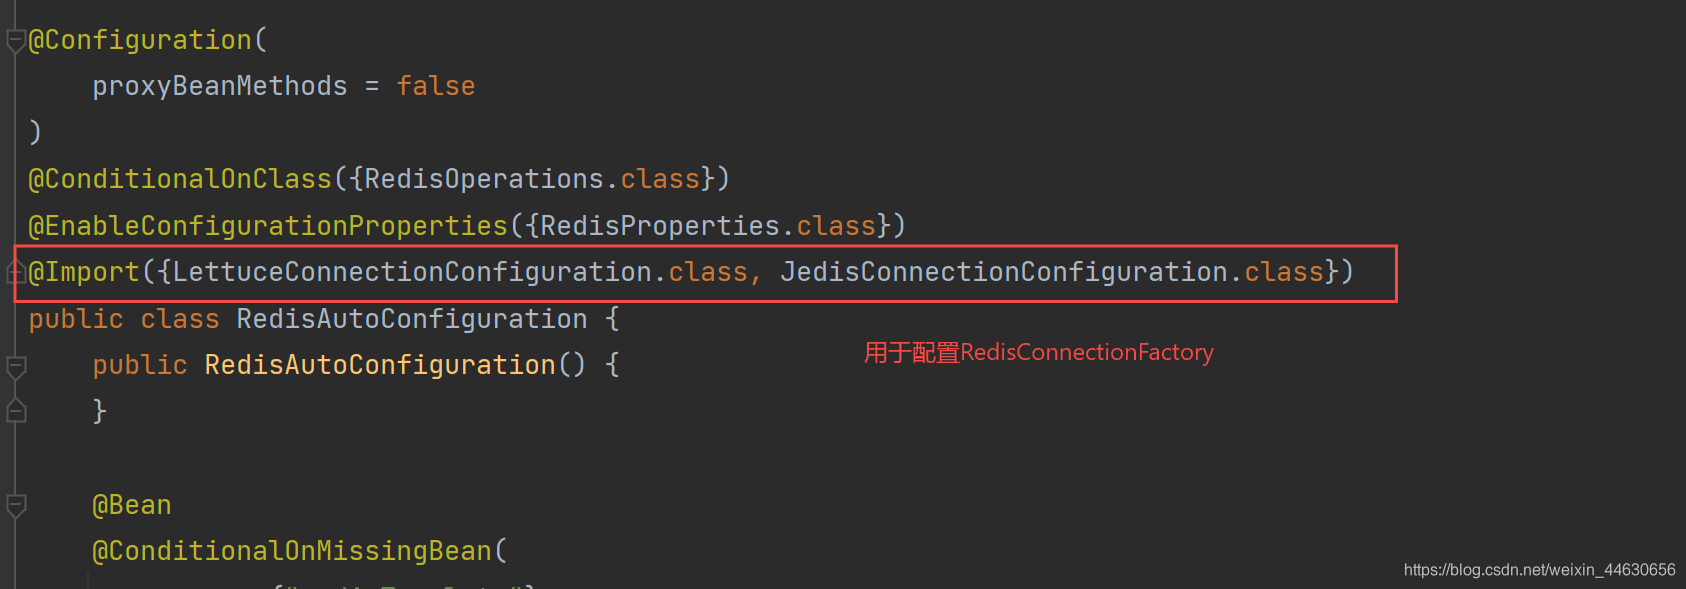
- RedisAutoConfiguration 自动配置类。RedisProperties 属性类 --> spring.redis.xxx是对redis的配置
- 连接工厂是准备好的。
LettuceConnectionConfiguration、JedisConnectionConfiguration
- 自动注入了RedisTemplate<Object, Object>
- 自动注入了StringRedisTemplate;k:v都是String
- 底层只要我们使用
StringRedisTemplate、RedisTemplate就可以操作redis
2、进行配置
spring:
  redis:
    host: 192.168.2.4 # 配置redis的主机地址,默认为localhost
    client-type: jedis # 操作redis的client类型,默认为lettuce
    database: 0 # Redis数据库索引:默认为 0。Redis 一共有 16 个数据库,索引分别为 0-15。从 Redis 客户端也可以看出,从 db0 ~ db15。
    port: 6379 # Redis服务器端口
    password: #设置自己的密码
    timeout: 1000 #连接超时时间
    pool:
      max-active: 50 # 如果赋值为-1,则表示不限制;如果pool已经分配了maxActive个jedis实例,则此时pool 的状态为exhausted(耗尽)
      max-idle: 20 # 连接池中的最大空闲连接,默认值也是8。
      min-idle: 5  # 连接池中的最小空闲连接,默认值也是0。
      max-wait: 5 # 等待可用连接的最大时间,单位毫秒,默认值为-1,表示永不超时。如果超过等待时间,则直接 抛出JedisConnectionException
3、StringRedisTemplate操作
//启动springboot应用
@SpringBootTest(classes = RedisDay2Application.class)
@RunWith(SpringRunner.class)
public class TestStringRedisTemplate {

    //注入StringRedisTemplate
    @Autowired
    private StringRedisTemplate stringRedisTemplate;  //key  value 都是字符串

    //操作redis中key相关
    @Test
    public void testKey(){
        //stringRedisTemplate.delete("name");//删除一个key
        Boolean hasKey = stringRedisTemplate.hasKey("name");//判断某个key是否存在
        System.out.println(hasKey);


        DataType name = stringRedisTemplate.type("name");//判断key所对应值的类型
        System.out.println(name);


        Set<String> keys = stringRedisTemplate.keys("*");//获取redis中所有key
        keys.forEach(key -> System.out.println("key = " + key));

        Long expire = stringRedisTemplate.getExpire("age");//获取key超时时间 -1 永不超时  -2  key不存在 >=0 过期时间
        System.out.println(expire);

        stringRedisTemplate.randomKey();//在redis中随机获取一个key

        //stringRedisTemplate.rename("age","age1");//修改key名字 要求key必须存在 不存在 报错

        //stringRedisTemplate.renameIfAbsent("name","name1");//修改key名字  判断key是否存在

        stringRedisTemplate.move("name1",1);//移动key到指定库
    }

    //操作redis中字符串 opsForValue 实际操作就是redis中String类型
    @Test
    public void testString(){
        stringRedisTemplate.opsForValue().set("name","小陈"); //set 用来设置一个key value

        String value= stringRedisTemplate.opsForValue().get("name"); //用来获取一个key对应value
        System.out.println("value = " + value);

        stringRedisTemplate.opsForValue().set("code","2357",120, TimeUnit.SECONDS);//设置一个key 超时时间

        stringRedisTemplate.opsForValue().append("name","他是是一个好人,单纯少年!");//追加
    }

    //操作redis中list类型   opsForList 实际操作就是redis中list类型
    @Test
    public void testList(){
        //stringRedisTemplate.opsForList().leftPush("names","小陈");//创建一个列表  并放入一个元素
        //stringRedisTemplate.opsForList().leftPushAll("names","小陈","小张","小王");//创建一个列表 放入多个元素
        List<String> names = new ArrayList<>();
        names.add("xiaoming");
        names.add("xiaosan");
        //stringRedisTemplate.opsForList().leftPushAll("names",names);//创建一个列表 放入多个元素

        List<String> stringList = stringRedisTemplate.opsForList().range("names", 0, -1); //遍历list
        stringList.forEach(value-> System.out.println("value = " + value));

        stringRedisTemplate.opsForList().trim("names",1,3); //截取指定区间的list
    }

    //操作redis中set类型   opsForSet 实际操作就是redis中set类型
    @Test
    public void testSet(){
        stringRedisTemplate.opsForSet().add("sets","张三","张三","小陈","xiaoming");//创建set 并放入多个元素


        Set<String> sets = stringRedisTemplate.opsForSet().members("sets");//查看set中成员
        sets.forEach(value-> System.out.println("value = " + value));

        Long size = stringRedisTemplate.opsForSet().size("sets");//获取set集合元素个数
        System.out.println("size = " + size);
    }

    //操作redis中Zset类型   opsForZSet 实际操作就是redis中Zset类型
    @Test
    public void testZset(){
        stringRedisTemplate.opsForZSet().add("zsets","小黑",20);//创建并放入元素

        Set<String> zsets = stringRedisTemplate.opsForZSet().range("zsets", 0, -1);//指定范围查询

        zsets.forEach(value-> System.out.println(value));
        System.out.println("=====================================");
        Set<ZSetOperations.TypedTuple<String>> zsets1 = stringRedisTemplate.opsForZSet().rangeByScoreWithScores("zsets", 0, 1000);//获取指定元素以及分数

        zsets1.forEach(typedTuple ->{
            System.out.println(typedTuple.getValue());
            System.out.println(typedTuple.getScore());
        });
    }

    //操作redis中Hash类型   opsForHash 实际操作就是redis中Hash类型

    @Test
    public void testHash(){

        stringRedisTemplate.opsForHash().put("maps","name","张三");//创建一个hash类型 并放入key value

        Map<String,String> map =  new HashMap<String,String>();
        map.put("age","12");
        map.put("bir","2012-12-12");
        stringRedisTemplate.opsForHash().putAll("maps",map);  //放入多个key value


        List<Object> values = stringRedisTemplate.opsForHash().multiGet("maps", Arrays.asList("name", "age"));//获取多个key的value
        values.forEach(value-> System.out.println(value));

        String value  = (String) stringRedisTemplate.opsForHash().get("maps", "name");//获取hash中某个key的值

        List<Object> vals = stringRedisTemplate.opsForHash().values("maps");//获取所有values

        Set<Object> keys = stringRedisTemplate.opsForHash().keys("maps");//获取所有keys
    }
}
4、RedisTemplate操作
//启动springboot应用
@SpringBootTest(classes = RedisDay2Application.class)
@RunWith(SpringRunner.class)
public class TestRedisTemplate {

    //注入RedisTemplate key Object  Value Object  ===>   对象序列化   name  new User() ====>   name序列化  对象序列化结果
    @Autowired
    private RedisTemplate redisTemplate;

    //opsForxxx  Value String  List  Set  Zset  hash

    @Test
    public void testRedisTemplate(){

        /**
         * redisTemplate对象中 key 和 value 的序列化都是 JdkSerializationRedisSerializer
         *      key: string
         *      value: object
         *      修改默认key序列化方案 :  key  StringRedisSerializer
         */

        //修改key序列化方案   String类型序列
        redisTemplate.setKeySerializer(new StringRedisSerializer());
        //修改hash key 序列化方案
        redisTemplate.setHashKeySerializer(new StringRedisSerializer());

        User user = new User();
        // 这里使用打了Lombok的@Accessors注解, 可以链式使用setter方法
        user.setId(UUID.randomUUID().toString()).setName("小陈").setAge(23).setBir(new Date());
        redisTemplate.opsForValue().set("user", user);//redis进行设置 对象需要经过序列化

        User user1 = (User) redisTemplate.opsForValue().get("user");
        System.out.println(user1);


        redisTemplate.opsForList().leftPush("list",user);

        redisTemplate.opsForSet().add("set",user);

        redisTemplate.opsForZSet().add("zset",user,10);

        redisTemplate.opsForHash().put("map","name",user);
    }
}
切换至jedis:
spring boot 2的spring-boot-starter-data-redis中,默认使用的是lettuce作为redis客户端,如果想使用使用jedis的话:
方法一:排除lettuce的依赖,手动加入jedis依赖
<dependency>
    <groupId>org.springframework.boot</groupId>
    <artifactId>spring-boot-starter-data-redis</artifactId>
    <exclusions>
        <exclusion>
            <groupId>io.lettuce</groupId>
            <artifactId>lettuce-core</artifactId>
        </exclusion>
    </exclusions>
</dependency>
<dependency>
    <groupId>redis.clients</groupId>
    <artifactId>jedis</artifactId>
</dependency>
方法二:加入jedis的依赖并指定client-type使用jedis
<dependency>
    <groupId>redis.clients</groupId>
    <artifactId>jedis</artifactId>
</dependency>
spring.redis.client-type=jedis
二、单元测试
好的博客:JUnit5基本介绍
2.1 JUnit5介绍
导入依赖:
<dependency>
  <groupId>org.springframework.boot</groupId>
  <artifactId>spring-boot-starter-test</artifactId>
  <scope>test</scope>
</dependency>
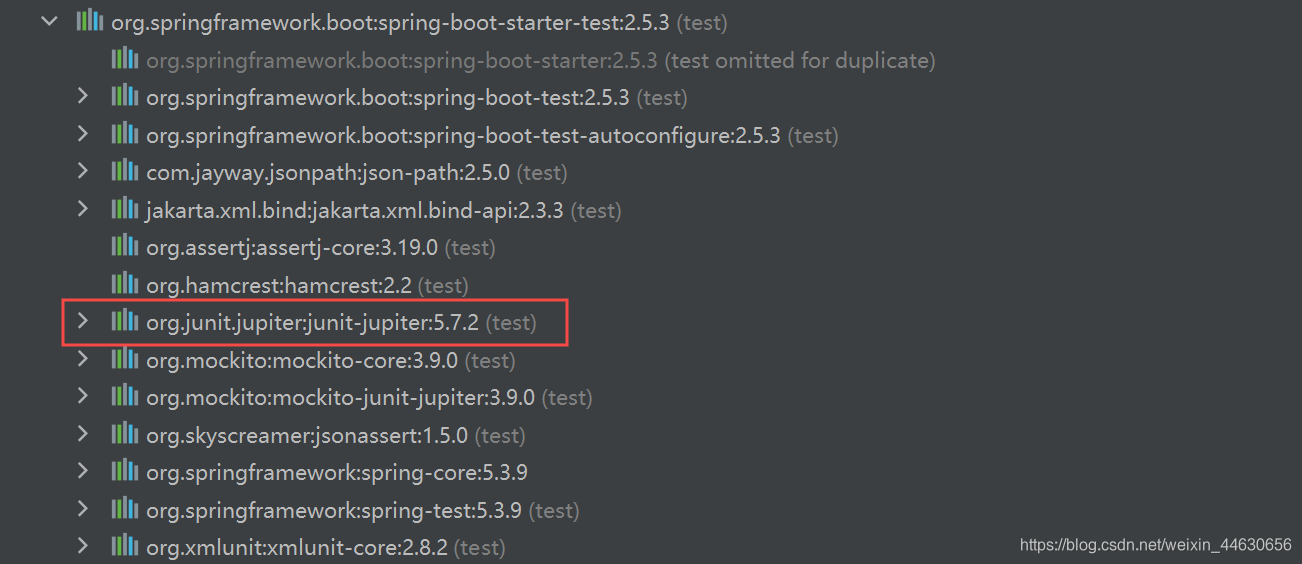
Spring Boot 2.2.0 版本开始引入 JUnit 5 作为单元测试默认库
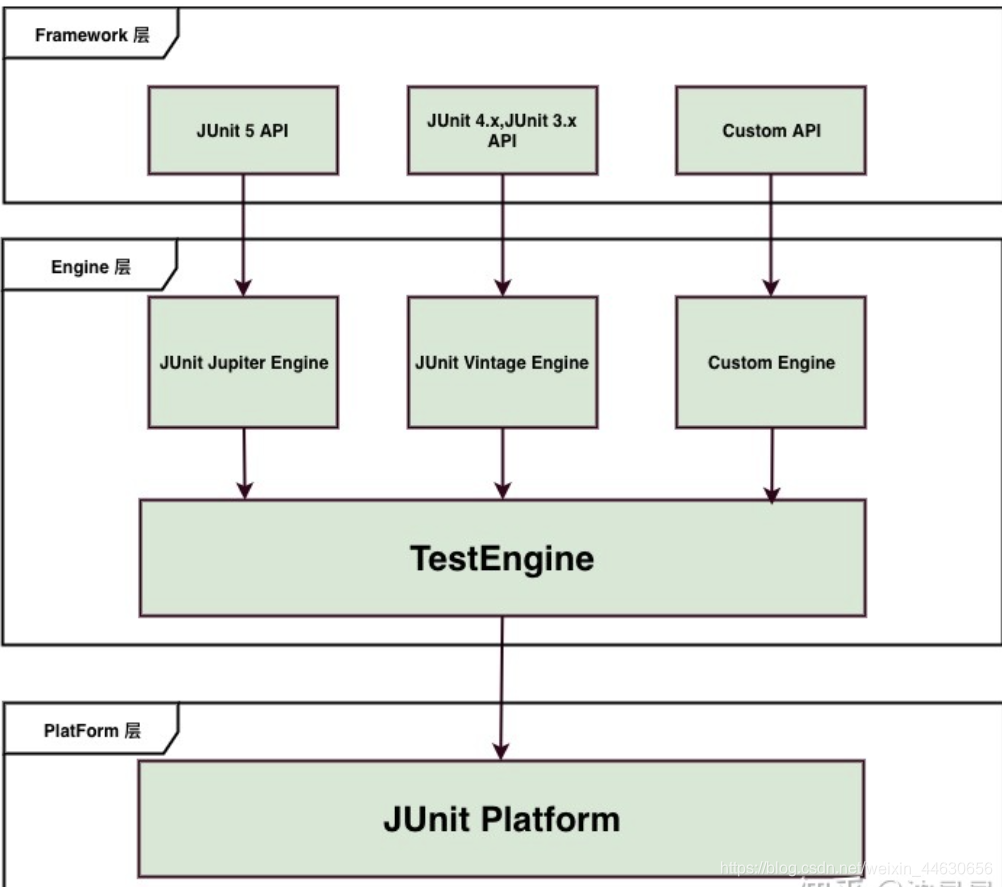
作为最新版本的JUnit框架,JUnit5与之前版本的Junit框架有很大的不同。由三个不同子项目的几个不同模块组成。
JUnit 5 = JUnit Platform + JUnit Jupiter + JUnit Vintage
-
JUnit Platform: Junit Platform是在JVM上启动测试框架的基础,不仅支持Junit自制的测试引擎,其他测试引擎也都可以接入。
-
JUnit Jupiter: JUnit Jupiter提供了JUnit5的新的编程模型,是JUnit5新特性的核心。内部 包含了一个测试引擎,用于在Junit Platform上运行。
-
JUnit Vintage: 由于JUint已经发展多年,为了照顾老的项目,JUnit Vintage提供了兼容JUnit4.x,Junit3.x的测试引擎。
注意:
SpringBoot 2.4 以上版本移除了默认对 Vintage 的依赖。如果需要兼容junit4需要自行引入(不能使用junit4的功能 @Test)
官网说:JUnit 5’s Vintage Engine Removed from spring-boot-starter-test,如果需要继续兼容junit4需要自行引入vintage
<!--兼容junit4-->
<dependency>
    <groupId>org.junit.vintage</groupId>
    <artifactId>junit-vintage-engine</artifactId>
    <scope>test</scope>
    <exclusions>
        <exclusion>
            <groupId>org.hamcrest</groupId>
            <artifactId>hamcrest-core</artifactId>
        </exclusion>
    </exclusions>
</dependency>
整合SpringBoot与Junit4的区别:
-
Junit5只需要
@SpringBootTest注解即可整合SpringBootimport org.junit.jupiter.api.Test; //注意这里使用的是jupiter的Test注解!! @SpringBootTest class Junit5Test { @Test void contextLoads() { } }- 编写测试方法:@Test标注(注意需要使用junit5版本的注解)
- Junit类具有Spring的功能,
@Autowired、比如@Transactional标注测试方法,测试完成后自动回滚
-
Junit4需要
@SpringBootTest+@RunWith(SpringRunner.class))
Junit4向Junit5迁移注意:
-
注解在 org.junit.jupiter.api 包中,断言在 org.junit.jupiter.api.Assertions 类中,前置条件在 org.junit.jupiter.api.Assumptions 类中。
-
把@Before 和@After 替换成@BeforeEach 和@AfterEach。
-
把@BeforeClass 和@AfterClass 替换成@BeforeAll 和@AfterAll。
-
把@Ignore 替换成@Disabled。
-
把@Category 替换成@Tag。
-
把@RunWith、@Rule 和@ClassRule 替换成@ExtendWith。
2.2 JUnit5常用注解
官方文档:https://junit.org/junit5/docs/current/user-guide/#writing-tests-annotations
- @Test : 表示方法是测试方法。但是与JUnit4的@Test不同,他的职责非常单一不能声明任何属性,拓展的测试将会由Jupiter提供额外测试
- @ParameterizedTest : 表示方法是参数化测试,下方会有详细介绍
- @RepeatedTest : 表示方法可重复执行,下方会有详细介绍
- @DisplayName : 为测试类或者测试方法设置展示名称
- @BeforeEach : 表示在每个单元测试之前执行
- @AfterEach : 表示在每个单元测试之后执行
- @BeforeAll : 表示在所有单元测试之前执行
- @AfterAll : 表示在所有单元测试之后执行
- @Tag : 表示单元测试类别,类似于JUnit4中的@Categories
- @Disabled : 表示测试类或测试方法不执行,类似于JUnit4中的@Ignore
- @Timeout : 表示测试方法运行如果超过了指定时间将会返回错误
- @ExtendWith : 为测试类或测试方法提供扩展类引用
使用示例:
@SpringBootTest //包含@ExtendWith({SpringExtension.class})
@DisplayName("junit5功能测试类")
public class Junit5Test {
@Autowired //使用了@SpringBootTest注解就整合了SpringBoot
JdbcTemplate jdbcTemplate;
@DisplayName("测试DisplayName注解")
@Test
void testDisplayName() {
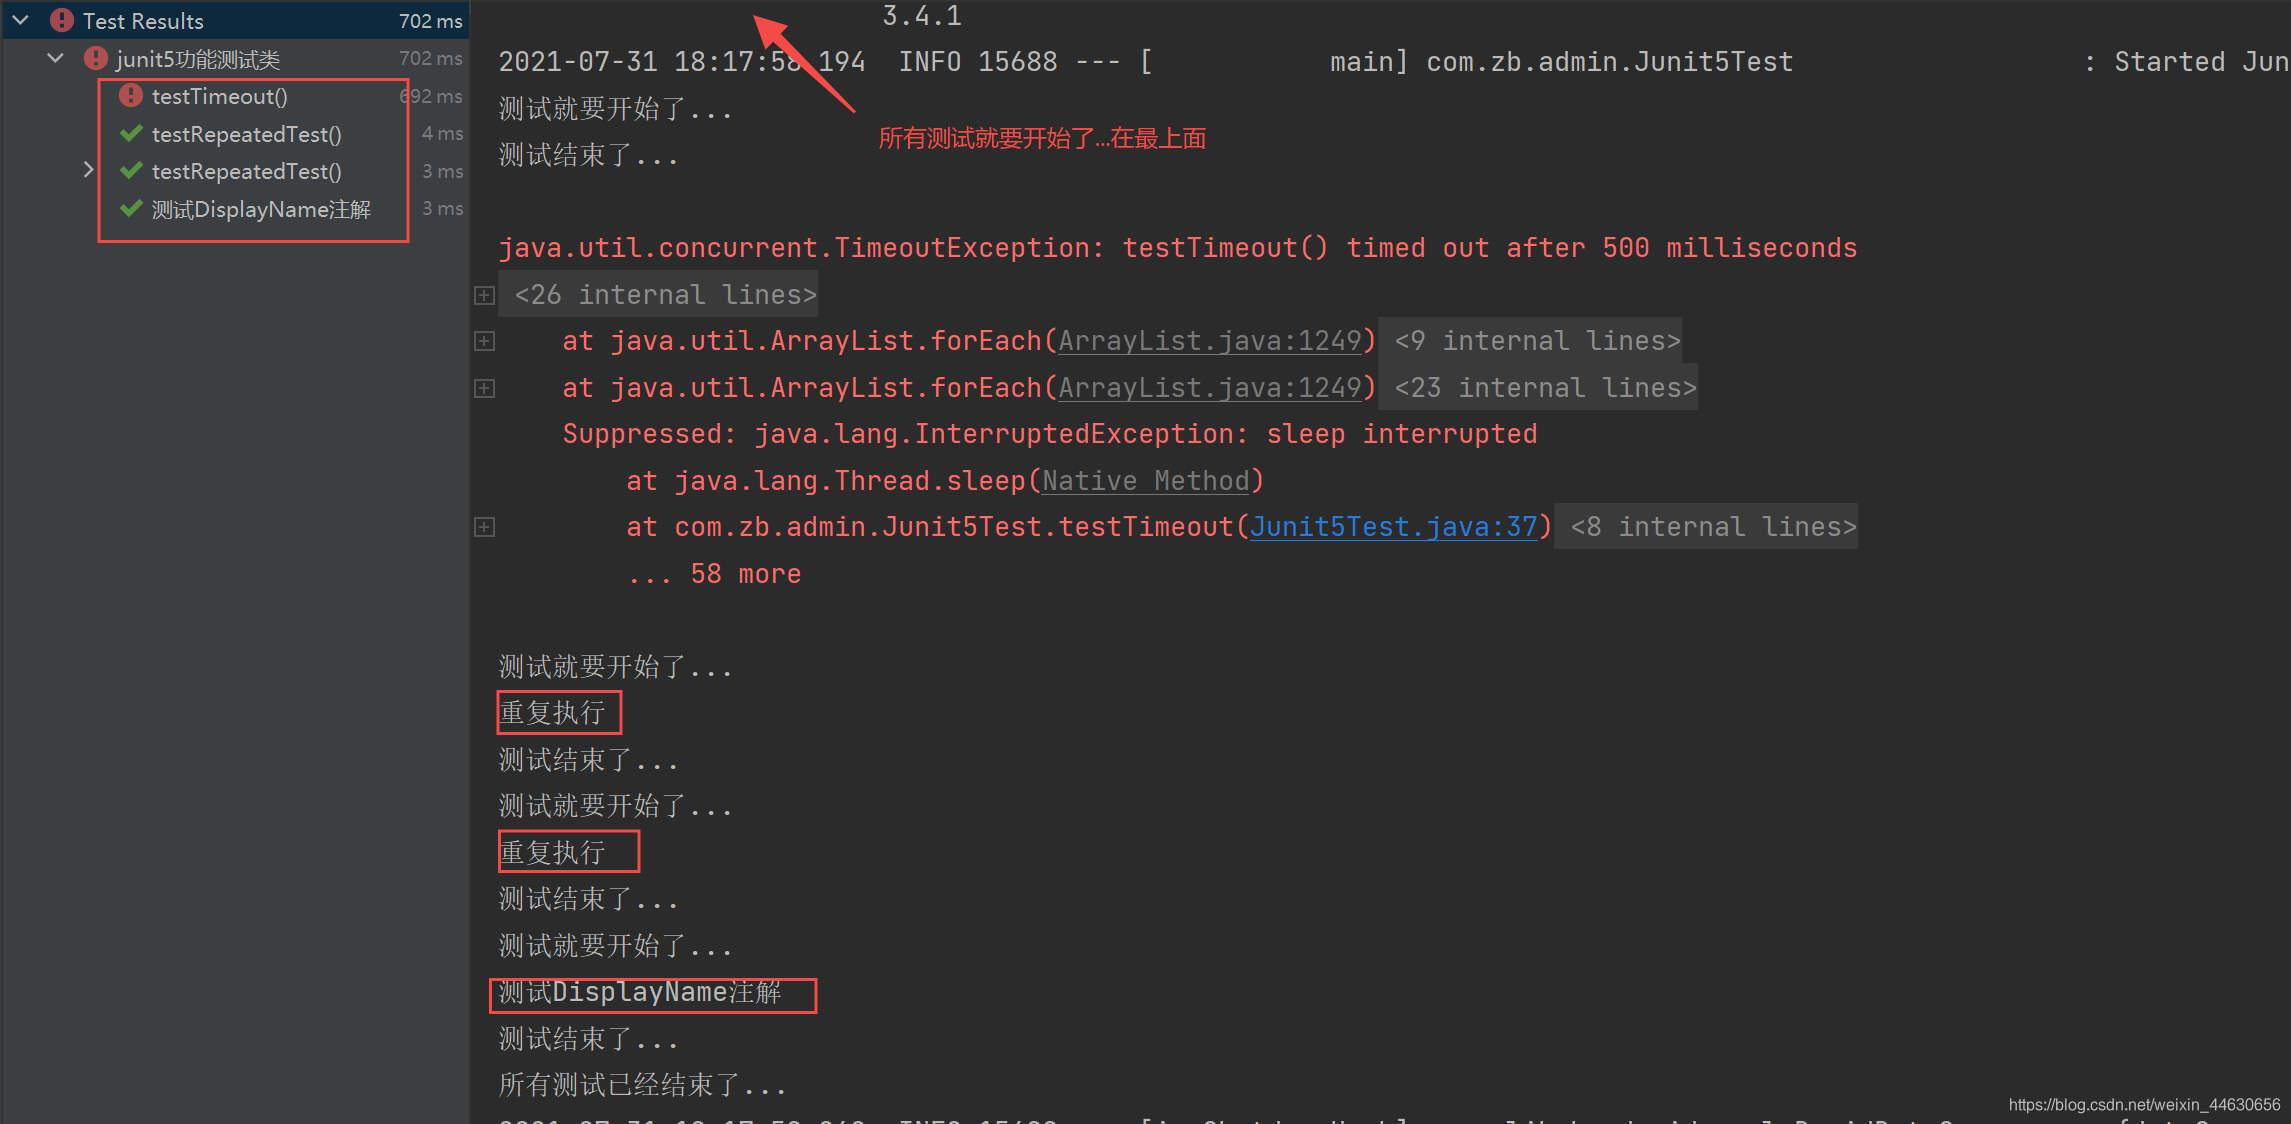
System.out.println("测试DisplayName注解");
}
@RepeatedTest(1)//重复执行
@Test
void testRepeatedTest() {
System.out.println("重复执行");
}
/**
* 规定方法超时时间。超出时间测试出异常
*
* @throws InterruptedException
*/
@Timeout(value = 500, unit = TimeUnit.MILLISECONDS)
@Test
void testTimeout() throws InterruptedException {
Thread.sleep(600);
}
@BeforeEach
void testBeforeEach() {
System.out.println("测试就要开始了...");
}
@AfterEach
void testAfterEach() {
System.out.println("测试结束了...");
}
@BeforeAll
static void testBeforeAll() {
System.out.println("所有测试就要开始了...");
}
@AfterAll
static void testAfterAll() {
System.out.println("所有测试已经结束了...");
}
}
执行结果:
2.3 断言(assertions)
- 断言(assertions)是测试方法中的核心部分,用来对测试需要满足的条件进行验证。这些断言方法都是 org.junit.jupiter.api.Assertions 的静态方法。
- 断言的主要作用:检查业务逻辑返回的数据是否合理。 同时所有的测试运行结束以后,会有一个详细的测试报告;
JUnit 5 内置的断言可以分成如下几个类别:
1、简单断言
用来对单个值进行简单的验证。如:
| 方法 | 说明 |
|---|---|
| assertEquals | 判断两个对象或两个原始类型是否相等 |
| assertNotEquals | 判断两个对象或两个原始类型是否不相等 |
| assertSame | 判断两个对象引用是否指向同一个对象 |
| assertNotSame | 判断两个对象引用是否指向不同的对象 |
| assertTrue | 判断给定的布尔值是否为 true |
| assertFalse | 判断给定的布尔值是否为 false |
| assertNull | 判断给定的对象引用是否为 null |
| assertNotNull | 判断给定的对象引用是否不为 null |
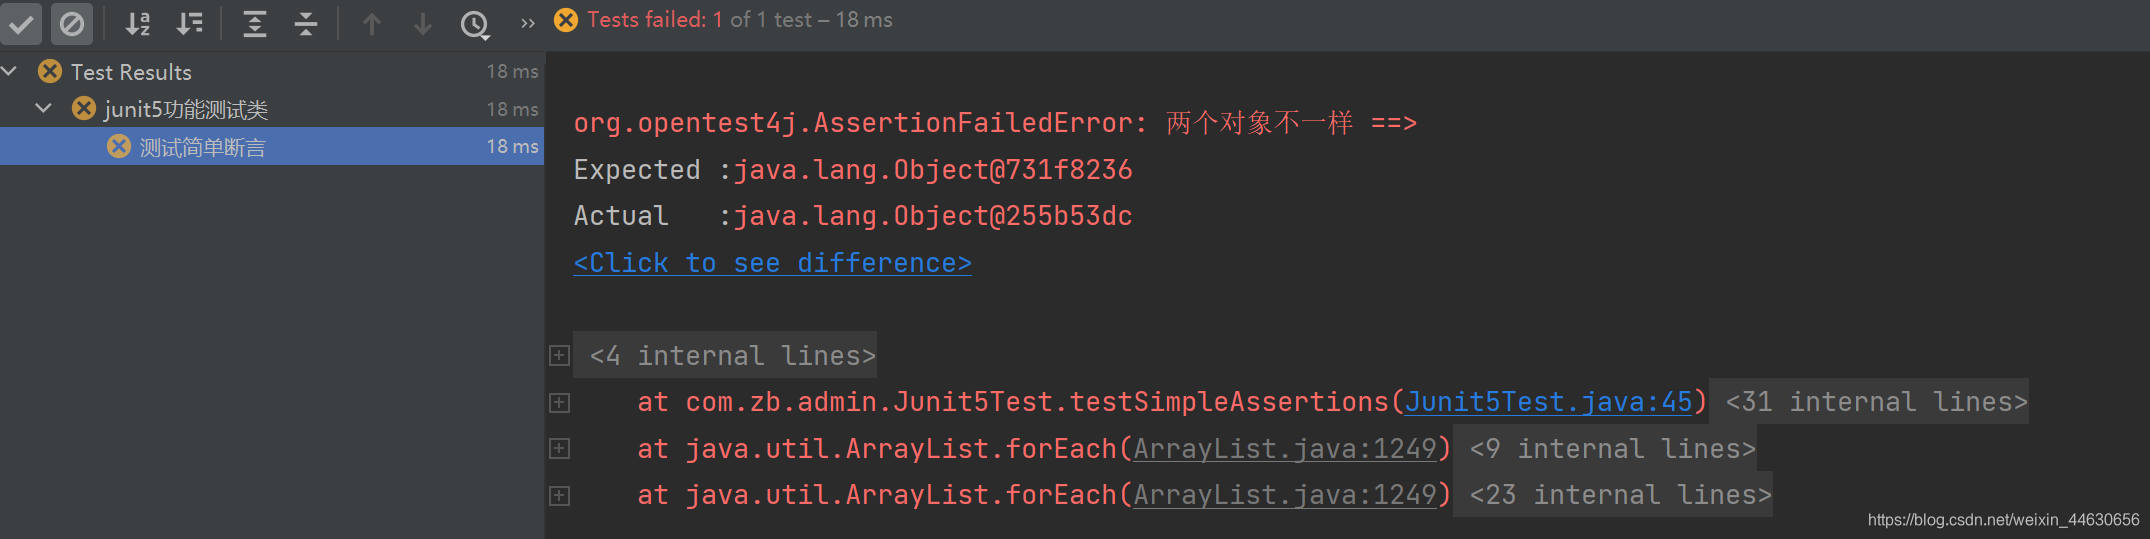
/**
 * 断言:前面断言失败,后面的代码都不会执行
 */
@DisplayName("测试简单断言")
@Test
void testSimpleAssertions() {
    int cal = cal(3, 2);
    //相等
    assertEquals(5, cal, "业务逻辑计算失败");
    Object obj1 = new Object();
    Object obj2 = new Object();
    assertSame(obj1, obj2, "两个对象不一样");
}
int cal(int i, int j) {
    return i + j;
}
结果:
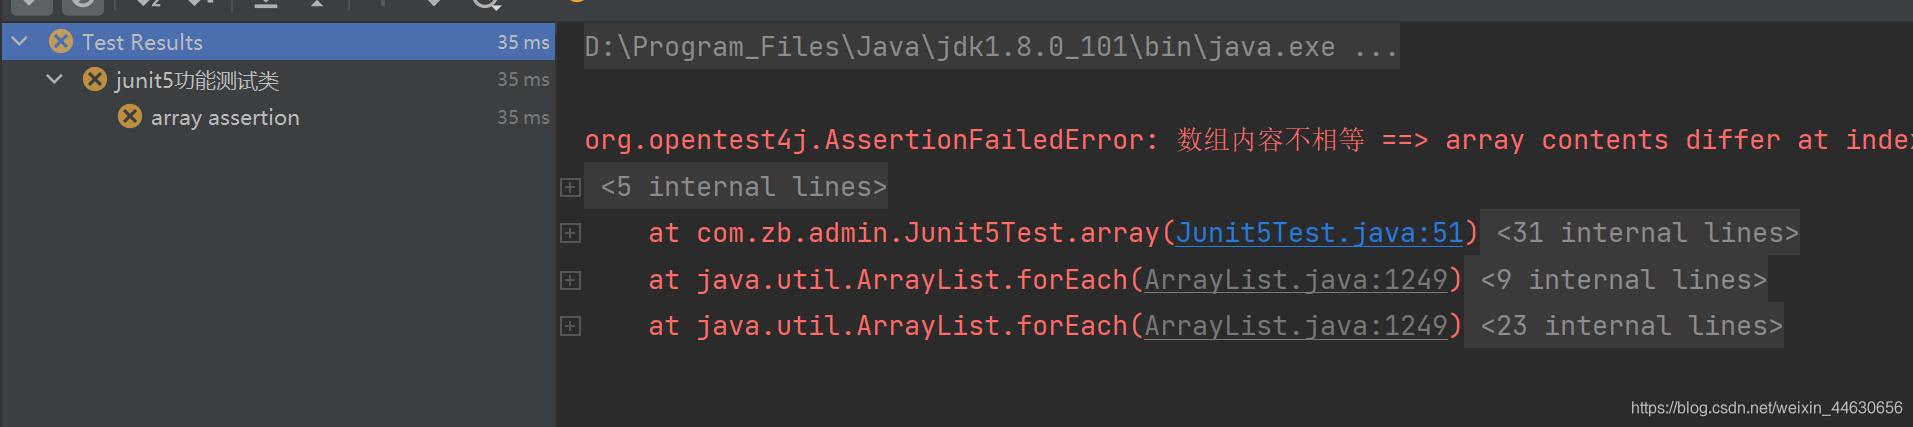
2、数组断言
通过 assertArrayEquals 方法来判断两个对象或原始类型的数组是否相等
@Test
@DisplayName("array assertion")
void array() {
    assertArrayEquals(new int[]{2,1}, new int[]{1, 2}, "数组内容不相等");
}
结果:
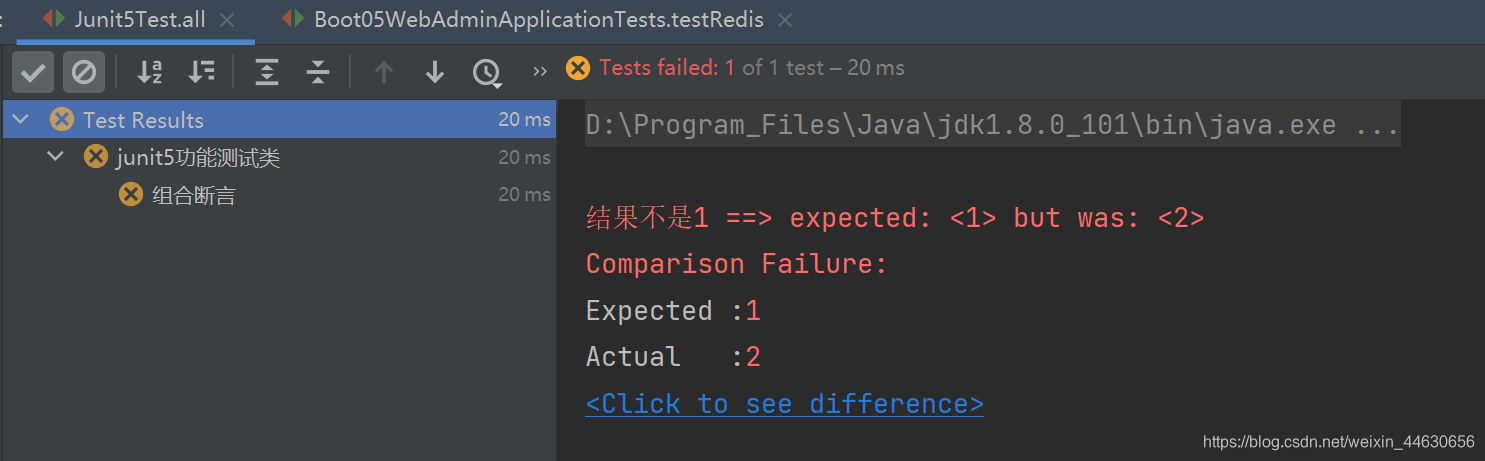
3、组合断言
assertAll 方法接受多个 org.junit.jupiter.api.Executable 函数式接口的实例作为要验证的断言,可以通过 lambda 表达式很容易的提供这些断言
@Test
@DisplayName("组合断言")
void all() {
    /**
     * 所有断言全部需要成功
     */
    assertAll("test",
            () -> assertTrue(true && true, "结果不为true"),
            () -> assertEquals(1, 2, "结果不是1"));

    System.out.println("=====");
}
结果:
4、异常断言
在JUnit4时期,想要测试方法的异常情况时,需要用 @Rule 注解的ExpectedException变量还是比较麻烦的。而JUnit5提供了一种新的断言方式 Assertions.assertThrows() ,配合函数式编程就可以进行使用。
@Test
@DisplayName("异常测试")
public void exceptionTest() {
    ArithmeticException exception = Assertions.assertThrows(
           //扔出断言异常
            ArithmeticException.class, () -> System.out.println(1 % 0));
}
结果:

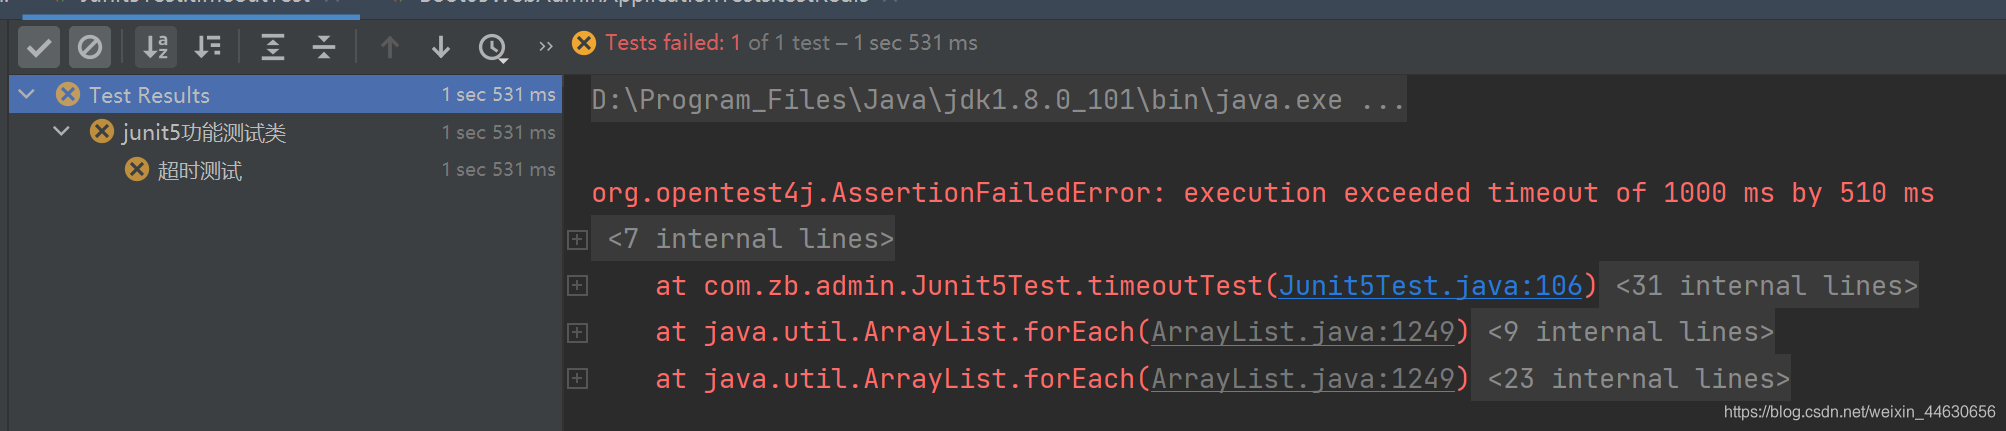
5、超时断言
Junit5还提供了 Assertions.assertTimeout() 为测试方法设置了超时时间
@Test
@DisplayName("超时测试")
public void timeoutTest() {
    //如果测试方法时间超过1s将会异常
    Assertions.assertTimeout(Duration.ofMillis(1000), () -> Thread.sleep(500));
}
结果:
2.4 嵌套测试
JUnit 5 可以通过 Java 中的内部类和 @Nested 注解实现嵌套测试,从而可以更好的把相关的测试方法组织在一起。在内部类中可以使用@BeforeEach 和@AfterEach 注解,而且嵌套的层次没有限制。
@DisplayName("嵌套测试")
public class TestingAStackDemo {

    Stack<Object> stack;

    @Test
    @DisplayName("new Stack()")
    void isInstantiatedWithNew() {
        new Stack<>();
        //嵌套测试情况下,外层的Test不能驱动内层的Before(After)Each/All之类的方法提前/之后运行
        assertNull(stack);//stack为null
    }

    @Nested
    @DisplayName("when new")
    class WhenNew {

        @BeforeEach
        void createNewStack() {
            stack = new Stack<>();
        }

        @Test
        @DisplayName("is empty")
        void isEmpty() {
            assertTrue(stack.isEmpty());
        }

        @Test
        @DisplayName("throws EmptyStackException when popped")
        void throwsExceptionWhenPopped() {
            assertThrows(EmptyStackException.class, stack::pop);
        }

        @Test
        @DisplayName("throws EmptyStackException when peeked")
        void throwsExceptionWhenPeeked() {
            assertThrows(EmptyStackException.class, stack::peek);
        }

        @Nested
        @DisplayName("after pushing an element")
        class AfterPushing {

            String anElement = "an element";

            @BeforeEach
            void pushAnElement() {
                stack.push(anElement);
            }

            /**
             * 内层的Test可以驱动外层的Before(After)Each/All之类的方法提前/之后运行
             */
            @Test
            @DisplayName("it is no longer empty")
            void isNotEmpty() {
                assertFalse(stack.isEmpty());
            }

            @Test
            @DisplayName("returns the element when popped and is empty")
            void returnElementWhenPopped() {
                assertEquals(anElement, stack.pop());
                assertTrue(stack.isEmpty());
            }

            @Test
            @DisplayName("returns the element when peeked but remains not empty")
            void returnElementWhenPeeked() {
                assertEquals(anElement, stack.peek());
                assertFalse(stack.isEmpty());
            }
        }
    }
}
2.5 参数化测试
参数化测试是JUnit5很重要的一个新特性,它使得用不同的参数多次运行测试成为了可能,也为我们的单元测试带来许多便利。
利用 @ValueSource 等注解,指定入参,我们将可以使用不同的参数进行多次单元测试,而不需要每新增一个参数就新增一个单元测试,省去了很多冗余代码。
- @ValueSource: 为参数化测试指定入参来源,支持八大基础类以及String类型,Class类型
- @NullSource: 表示为参数化测试提供一个null的入参
- @EnumSource: 表示为参数化测试提供一个枚举入参
- @CsvFileSource:表示读取指定CSV文件内容作为参数化测试入参
- @MethodSource:表示读取指定方法的返回值作为参数化测试入参(注意方法返回需要是一个流)
@ParameterizedTest
@DisplayName("参数化测试1")
@ValueSource(ints = {1,2,3,4,5})
void testParameterized(int i){
    System.out.println(i);
}

@ParameterizedTest
@DisplayName("参数化测试2")
@MethodSource("stringProvider")
void testParameterized2(String i){
    System.out.println(i);
}

static Stream<String> stringProvider() {
    return Stream.of("apple", "banana","atguigu");
}
结果:

注意:参数化测试可以支持外部的各类入参。如:CSV,YML,JSON 文件甚至方法的返回值也可以作为入参。只需要去实现ArgumentsProvider接口,任何外部文件都可以作为它的入参。


 427
427


 被折叠的 条评论
为什么被折叠?
被折叠的 条评论
为什么被折叠?
 到【灌水乐园】发言


