


Spring Cloud系列(四)之 Config、Bus、Stream、Sleuth
使用SpringCloud版本:
2.1.1.RELEASE
一、Config分布式配置中心
1.1 概述
分布式系统面临的问题:
- 分布式系统中,由于服务数量非常多,配置文件分散在不同微服务项目中,管理极其不方便。为了方便配置文件集中管理,需要分布式配置中心组件。
是什么?
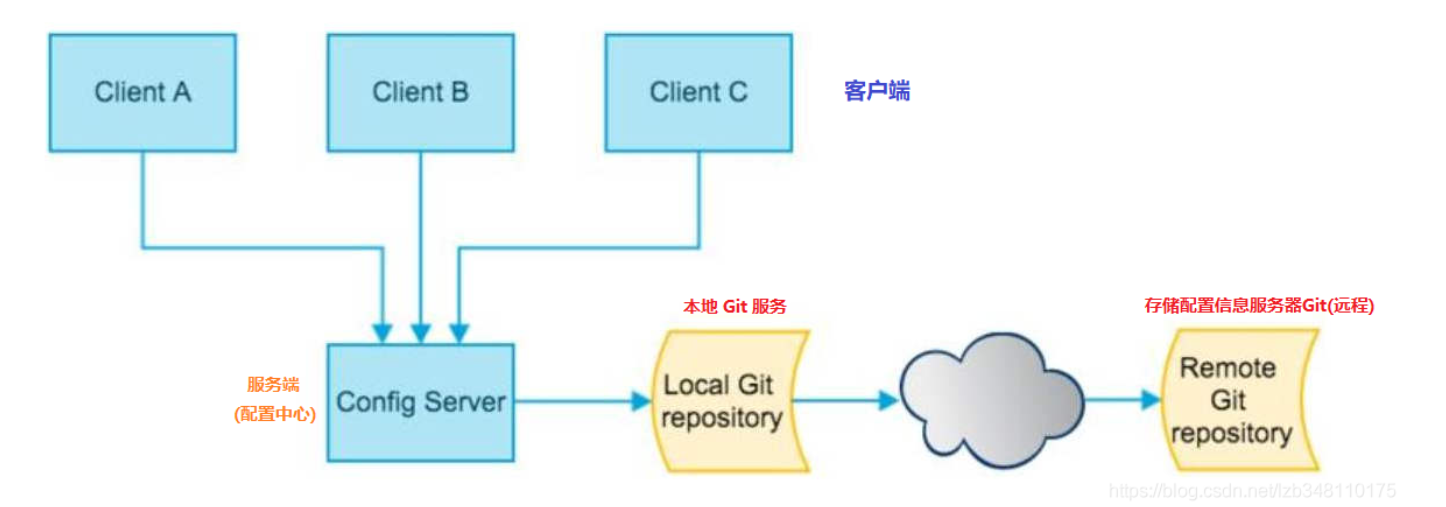
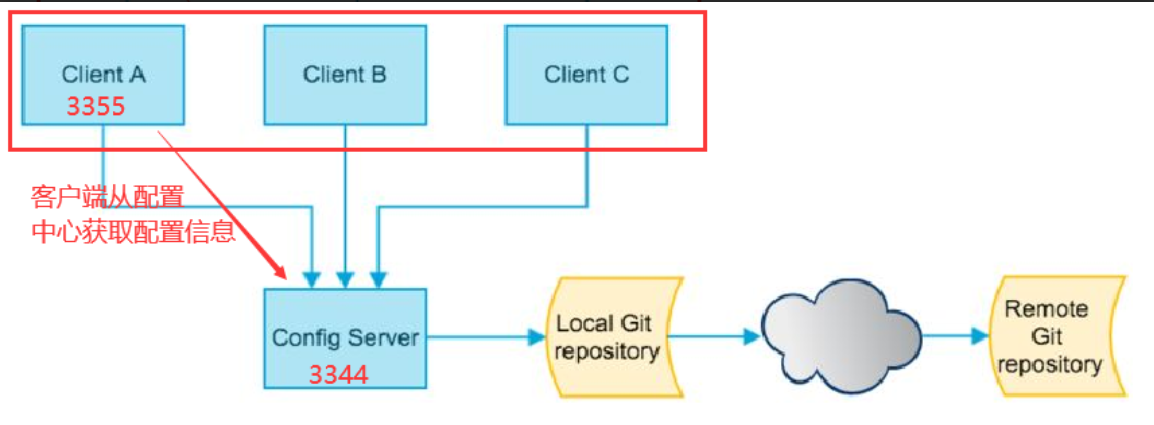
- 在Spring Cloud中,提供了Spring Cloud Config,每个服务单元从config server中获取具体的配置文件,它支持配置文件放在配置服务的本地,也支持配置文件放在远程仓库Git(GitHub、码云)。配置中心本质上是一个微服务,同样需要注册到Eureka服务中心!
Spring Cloud Config 分为服务端和客户端两部分。
- 服务端也成为分布式配置中心,它是一个独立的微服务应用,用来连接配置服务器,并为客户端提供获取配置信息、加密解密信息灯访问接口
- 客户端则是通过指定的配置中心来管理应用资源以及与业务相关的配置内容,并在启动的时候从配置中心获取和加载配置信息,配置服务器默认使用 git 来存储配置信息,这样就有助于对环境配置进行版本管理,并且可以通过 git 客户端工具来方便的管理和访问配置内容
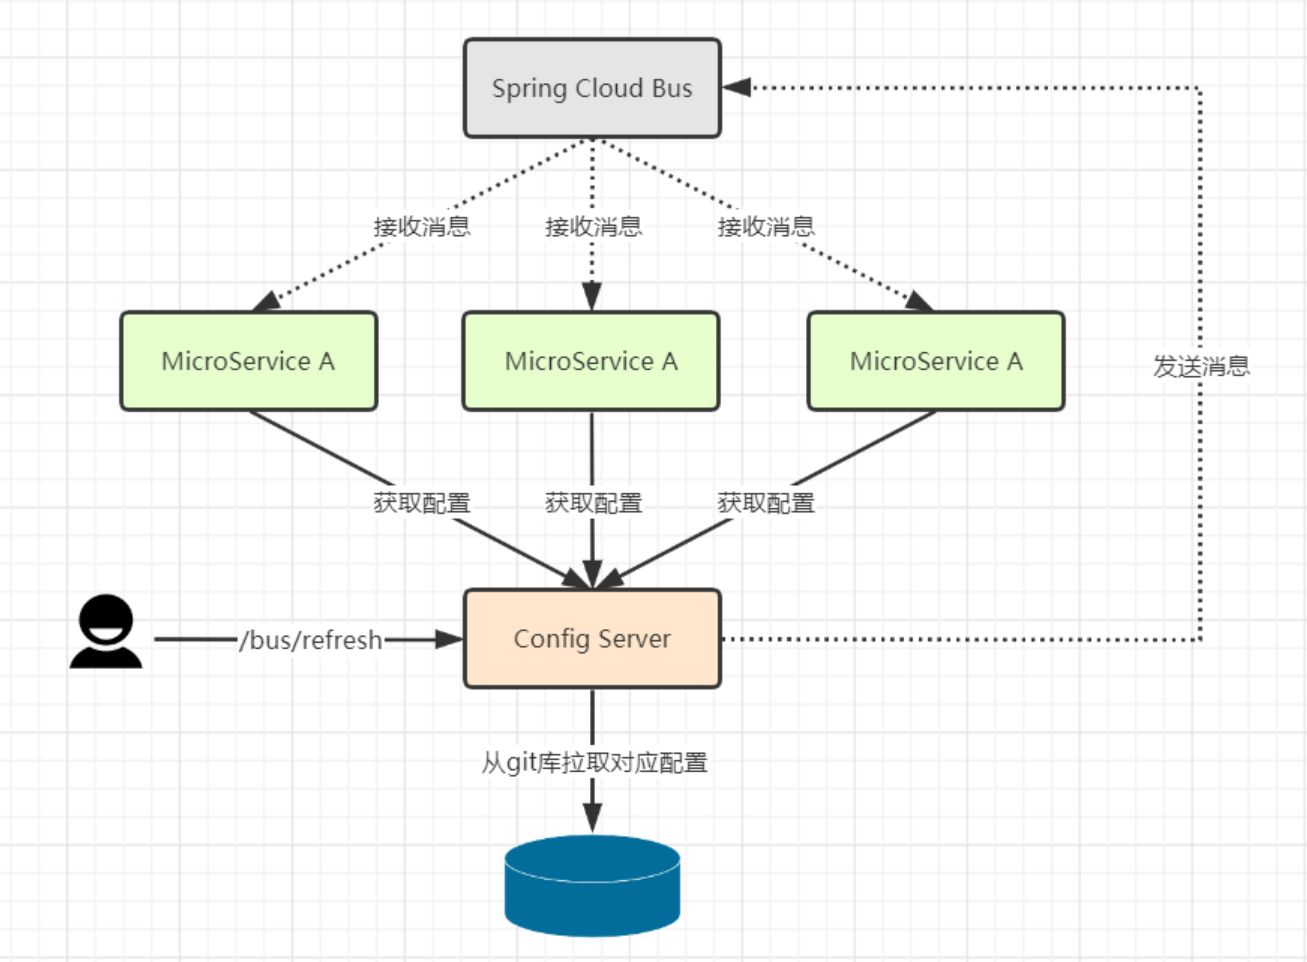
Config 结构图:
配置中心整合步骤:
- 配置文件集中放在码云
- 配置中心获取码云配置文件
- 用户服务获取配置中心文件
1.2 基本使用
1.2.1 Config服务端配置与测试
- 配置文件集中放在码云
- 配置中心获取码云配置文件
- 用户服务获取配置中心文件
1.2.1.1 Git 远程服务器配置
-
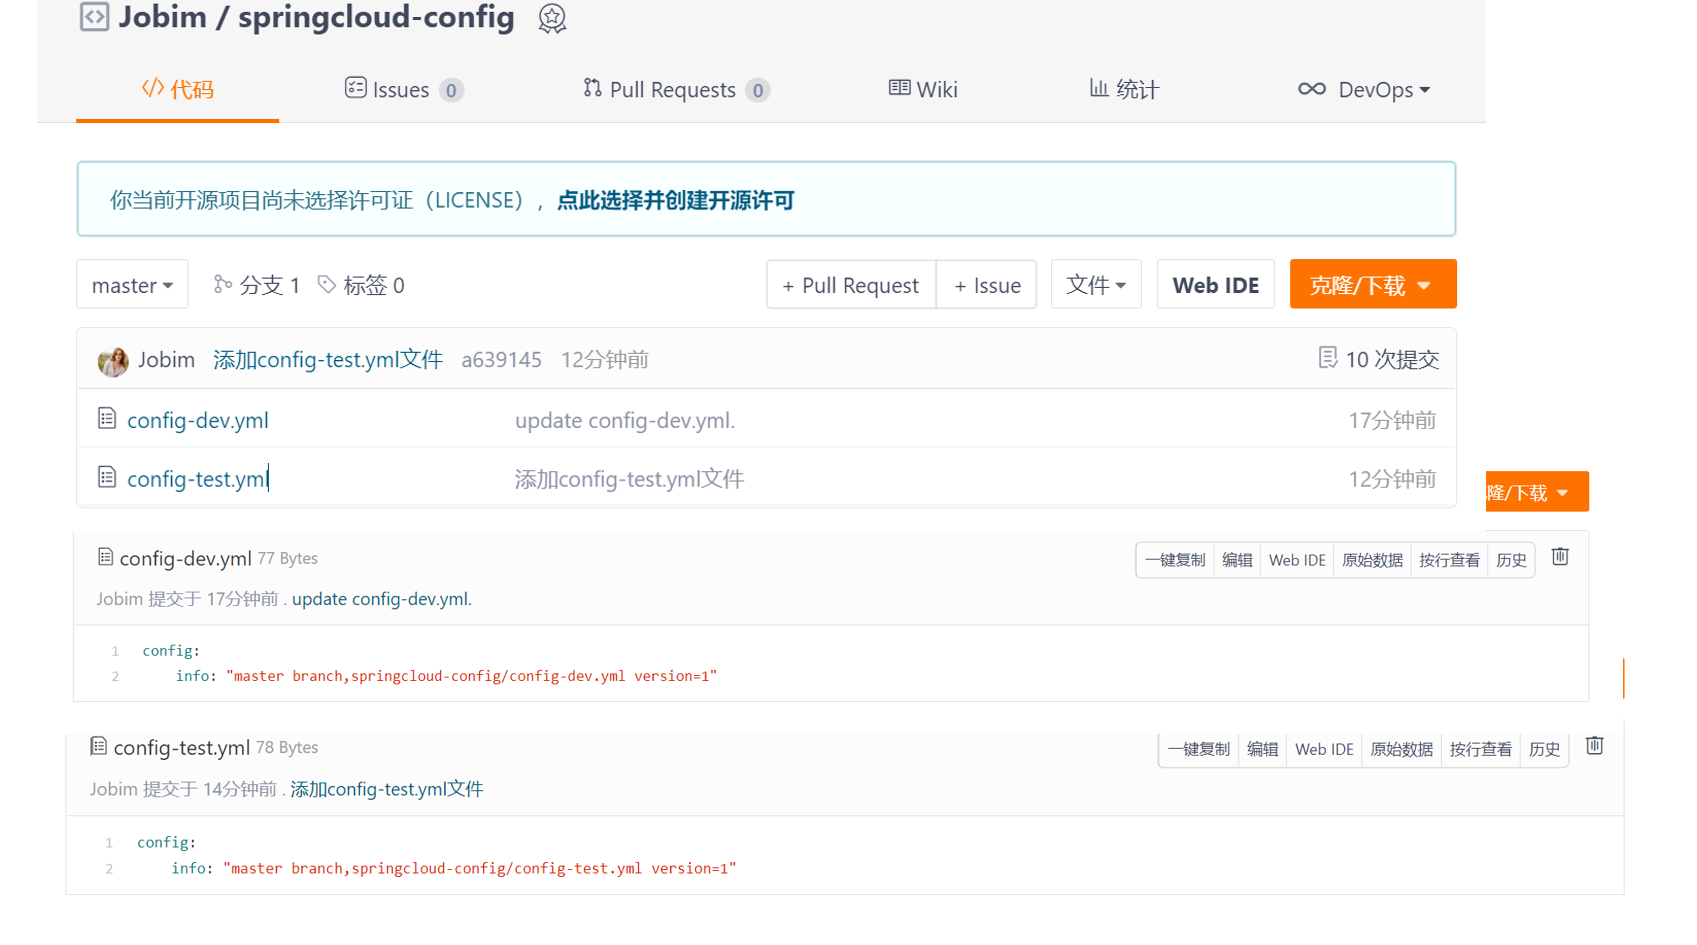
在码云上新建一个名为springcloud-config的新Repository,并创建如下文件:
1.2.1.2 服务端配置测试
服务端:也称为 分布式配置中心,它是一个独立的微服务应用。
-
新建Module模块
cloud-config-center-3344,它就是Cloud的配置中心模块 cloudConfig Center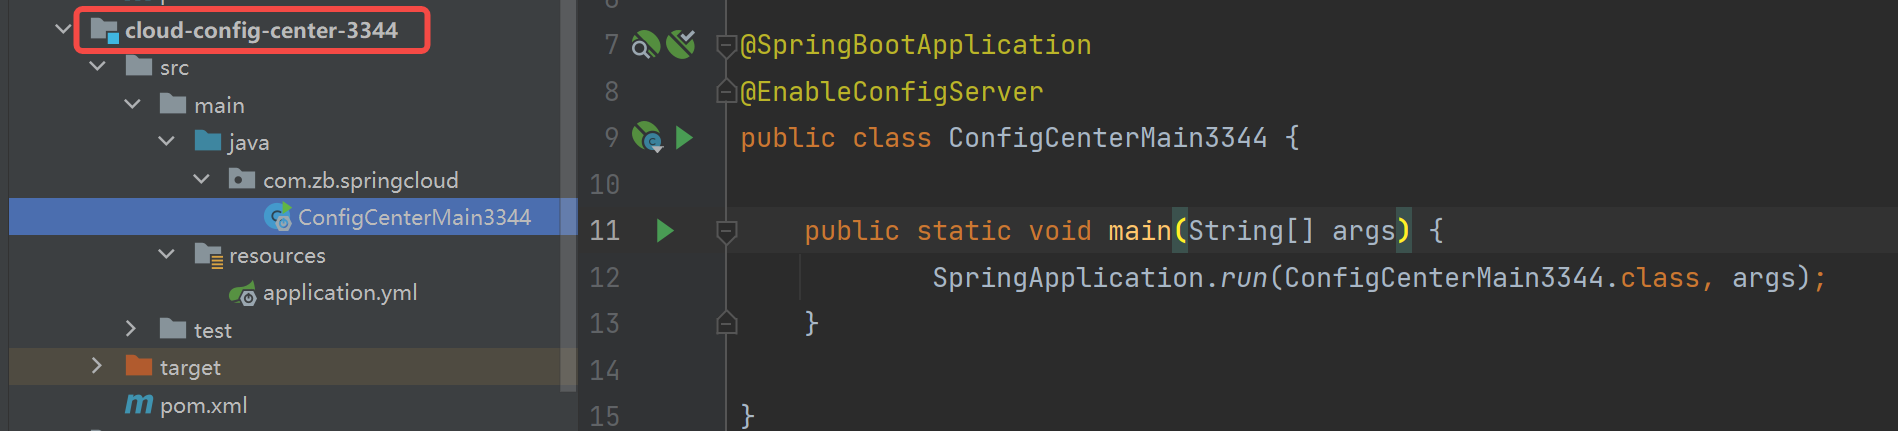
-
引入 pom.xml 依赖
<!--引入spring-cloud-config-server依赖--> <dependency> <groupId>org.springframework.cloud</groupId> <artifactId>spring-cloud-config-server</artifactId> </dependency> -
配置文件 application.yml 修改
server: port: 3344 spring: application: name: cloud-config-center # 注册进Eureka服务器的微服务名 cloud: config: server: git: uri: https://gitee.com/jobim/springcloud-config.git # GitHub上面的git仓库名字 # 搜索目录 search-paths: - springcloud-config # 读取分支 label: master # 服务注册到eureka地址 eureka: client: service-url: defaultZone: http://localhost:7001/eureka -
主启动类,配置@EnableConfigServer注解
@SpringBootApplication @EnableConfigServer public class ConfigCenterMain3344 { public static void main(String[] args) { SpringApplication.run(ConfigCenterMain3344.class, args); } } -
启动服务端模块,测试
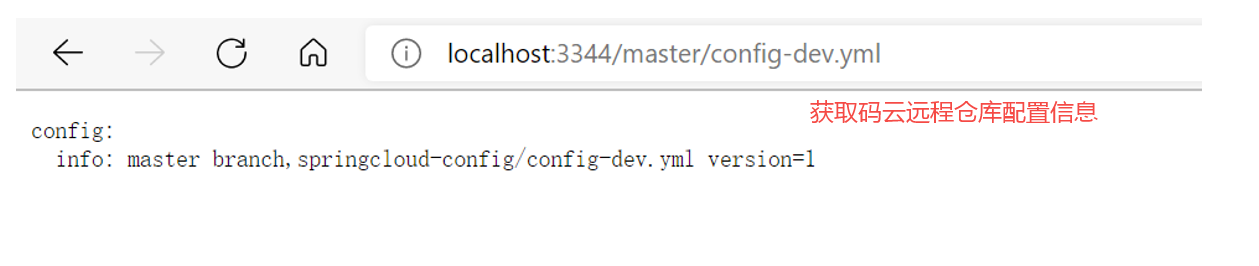
启动 Config 模块后,测试通过 Config 微服务是否可以从上获取配置内容。我们通过地址:
http://localhost:3344/master/config-dev.yml进行配置内容的访问。
1.2.1.3 git远程仓库配置文件读取规则
-
远程 GitHub 仓库,配置文件的命名也是有具体规则的。Spring Cloud Config 官方共支持 5 种方式的配置。5种配置规则见:
/{application}/{profile}/{label}
/{application}-{profile}.yml (这种不带label方式,默认使用 application.yml 配置)
/{label}/{application}-{profile}.yml (推荐使用第三种)
/{application}-{profile}.properties
/{label}/{application}-{profile}.properties

参数说明:
1. `label`:GitHub 分支(branch)名称
2. `application`:服务名
3. `profile`:环境(`dev/test/prod`)
-
/{application}/{profile}/{label}这种方式,返回的是 Json 对象,需要自己解析所要的内容;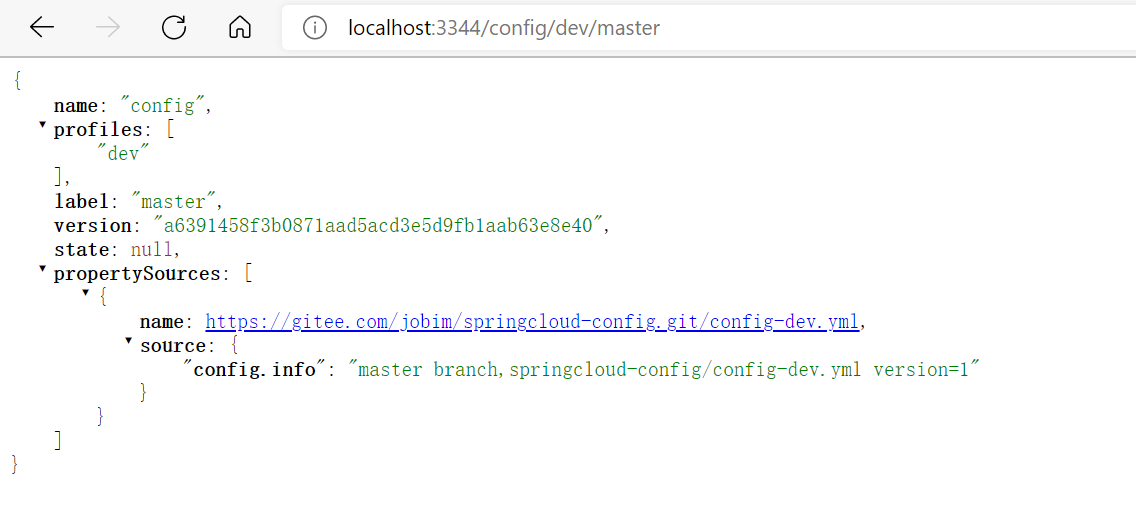
-
/{application}-{profile}.yml这种不带 label 方式,因为 applicaiton.yml 文件已经有配置过 label,不带label 方式,默认走的就是 yml 配置的 label,返回的是配置内容;

-
/{label}/{application}-{profile}.yml推荐使用第3种,这种方式简明扼要,条理清晰,返回的是配置内容;

-
{application}-{profile}.properties同第2种; -
{label}/{application}-{profile}.properties同第3种
1.2.2 Config客户端配置与测试
客服端:在启动的时候从 配置中心(Config Server) 获取和加载配置信息。
-
创建客户端模块,用来读取ConfigServer配置。此处模块名称为:
cloud-config-center-3355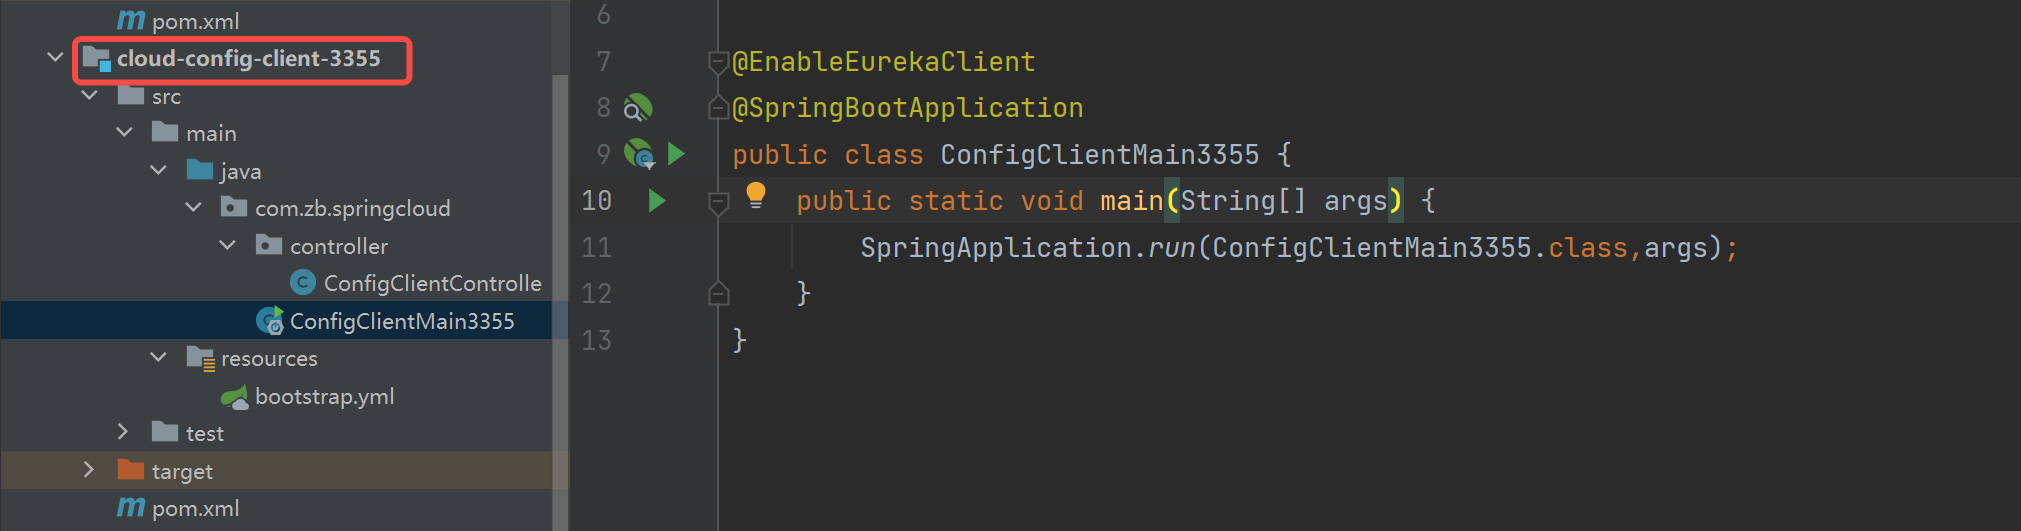
-
引入 pom.xml 依赖
<!--引入spring-cloud-starter-config依赖--> <dependency> <groupId>org.springframework.cloud</groupId> <artifactId>spring-cloud-starter-config</artifactId> </dependency> -
配置文件 bootstrap.yml 修改
注意:此处需要增加的是一个
bootstap.yml文件。application.yml是**(用户级)的资源配置项。bootstrap.yml 是(系统级)**的资源配置项,优先级更高。Spring Cloud 会创建一个 “Bootstrap Context”,作为 Spring 应用的 “Application Context” 的
父上下文。初始化的时候,“Bootstrap Context” 负责从外部源加载配置属性并解析配置。这两个上下文共享一个从外部获取的 “Environment”。"Bootstrap" 属性有高优先级。默认情况下,它们不会被本地配置覆盖。“Bootstrap Context” 和 “Application Context” 有这不同的约定,所以新增了一个 "bootstrap.yml" 文件,保证"Bootstrap Context" 和 "Application Context" 配置的分离。所以,将客户端模块下的 application.yml 文件改为bootstrap.yml,这是很关键的。因为 bootstrap.yml 是比 application.yml 优先加载的。bootstrap.yml 优先级高于 applicaiton.yml。bootstrap.yml 配置内容:
-
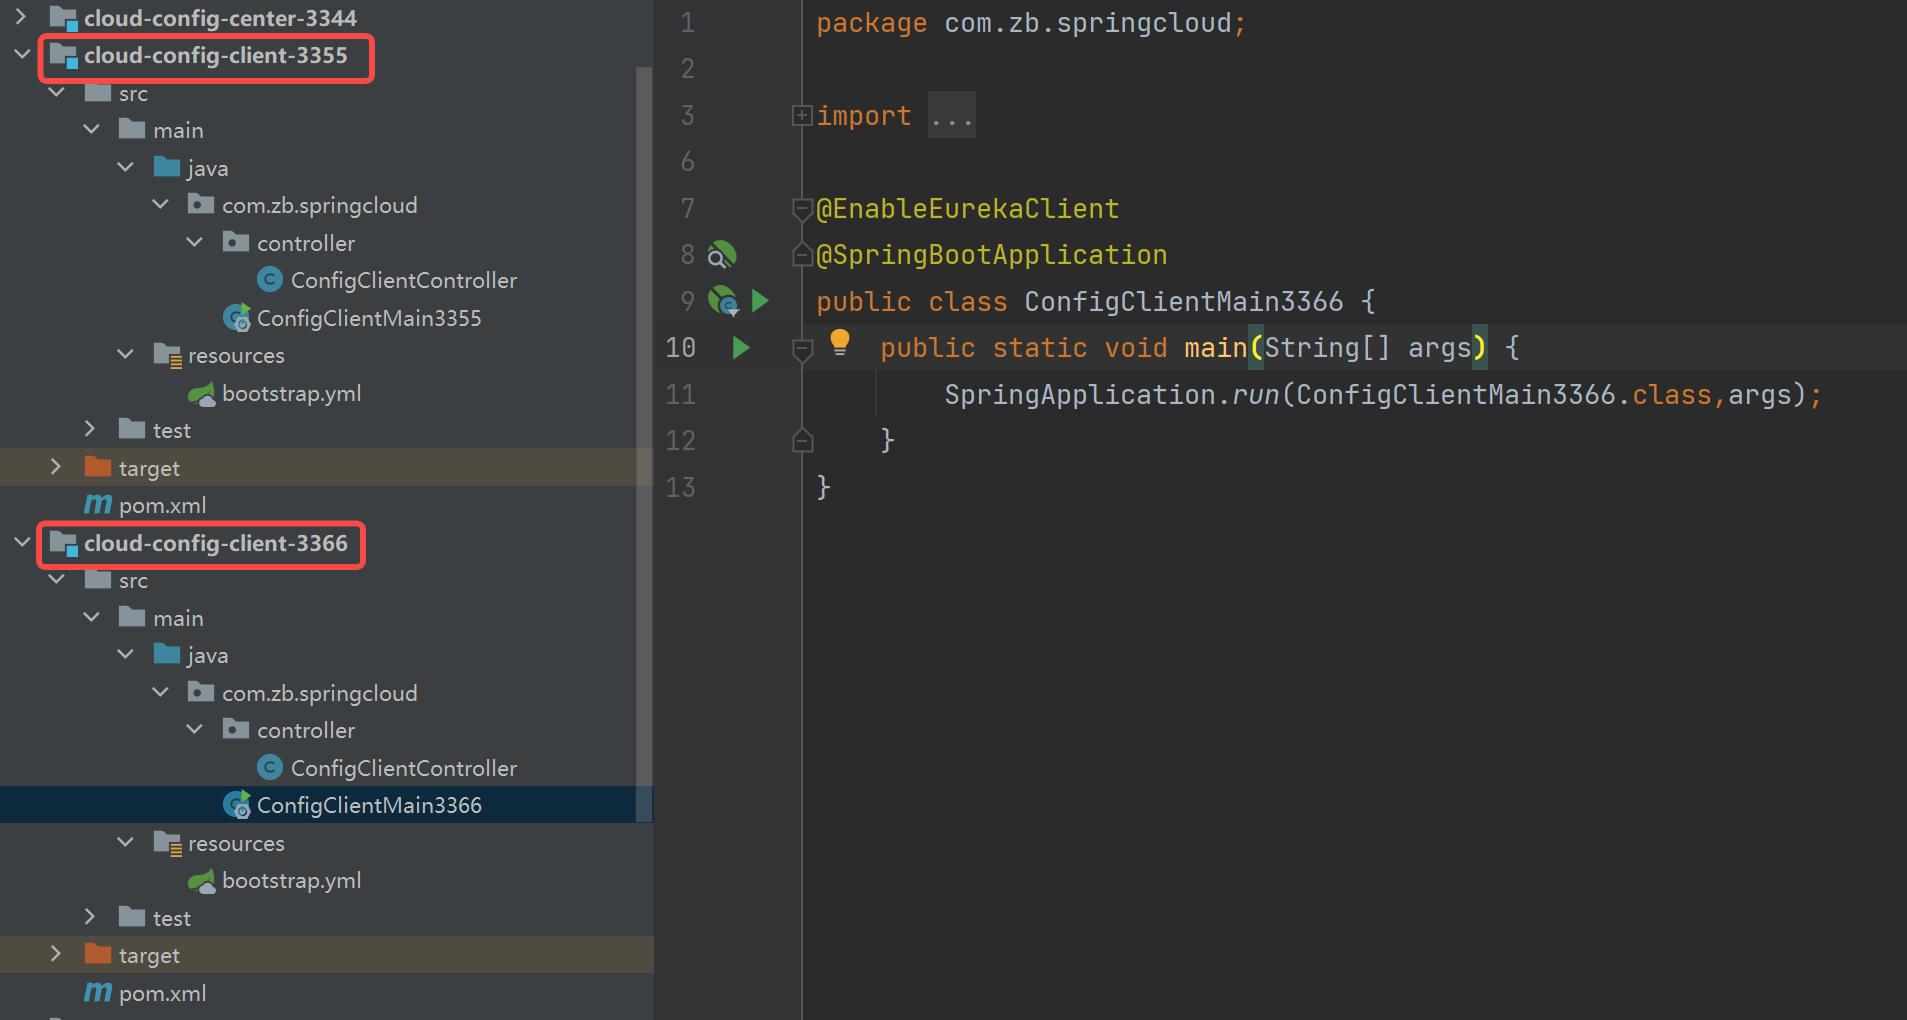
主启动类 配置
@EnableEurekaClient注解@EnableEurekaClient @SpringBootApplication public class ConfigClientMain3355 { public static void main(String[] args) { SpringApplication.run(ConfigClientMain3355.class,args); } } -
controller业务类
@RestController @RefreshScope public class ConfigClientController { @Value("${config.info}") private String configInfo; @GetMapping("/configInfo") public String getConfigInfo() { return configInfo; } } -
启动客户端模块,测试
Config 模块需要注册到 Eureka Server,先启动 Eureka 服务。然后启动 Config Server 3344 模块,最后启动 Client 3355 模块。我们通过地址:
http://localhost:3355/configInfo发现可以成功读取到 ConfigServer 中的config-dev.yml配置。需要获取
test、prod等环境配置信息,只需要修改bootstrap.yml 配置内容中的相关属性,即可获取响应环境的配置信息。
1.3 分布式配置的动态刷新问题
我们实现了客户端3355通过Config3344获取GithHub上的配置信息,那么现在面临另外一个问题:
当 GitHub 上的配置文件内容有调整,Github中配置变更后,ConfigServer 配置中心会立刻响应,然而客户端却没有任何响应,除非客户端重启或者重新加载,才能够获取最新的配置。 难道每次修改配置文件,客户端都需要重启吗?
为了避免每次修改 GitHub 配置文件后,客户端都需要重启的问题,此处就引出了客户端 动态刷新 的问题。
接下来对客户端3355模块进行 动态刷新 配置。
-
pom.xml 引入依赖
<!--引入actuator监控--> <dependency> <groupId>org.springframework.boot</groupId> <artifactId>spring-boot-starter-actuator</artifactId> </dependency> -
修改YML,新增暴露监控端口配置
#暴露监控端点 management: endpoints: web: exposure: include: "*" #此处有很多选项可以配置,为了省事 ,直接配置 * -
Controller层添加
@RefreshScope注解@RestController @RefreshScope public class ConfigClientController { @Value("${config.info}") private String configInfo; @GetMapping("/configInfo") public String getConfigInfo() { return configInfo; } } -
修改远程 GitHub 配置后,手动发送Post请求刷新客户端(3355端口)
-
发现GitHub上修改后,3355还是没有刷新
-
还需要让运维人员发送一下POST请求,刷新一下3355 必须是Post请求,
curl -X POST "http://localhost:3355/actuator/refresh"
-
发送post请求刷新后,客户端3355正常

-
手动版动态刷新,存在的问题:
-
实现了动态刷新,解决了 ConfigClient 重启才能获取最新配置信息问题。假如有 N 多个台,就需要 N 多次的
curl -X POST "http://微服务地址:端口号/actuator/refresh"。这仍然是一个噩梦,还是没有解决根本问题。 -
解决方法——Bus总线
二、SpringCloud Bus 消息总线
2.1 基本介绍
-
Spring Cloud Bus 目前支持两种消息代理:RabbitMQ、Kafka
-
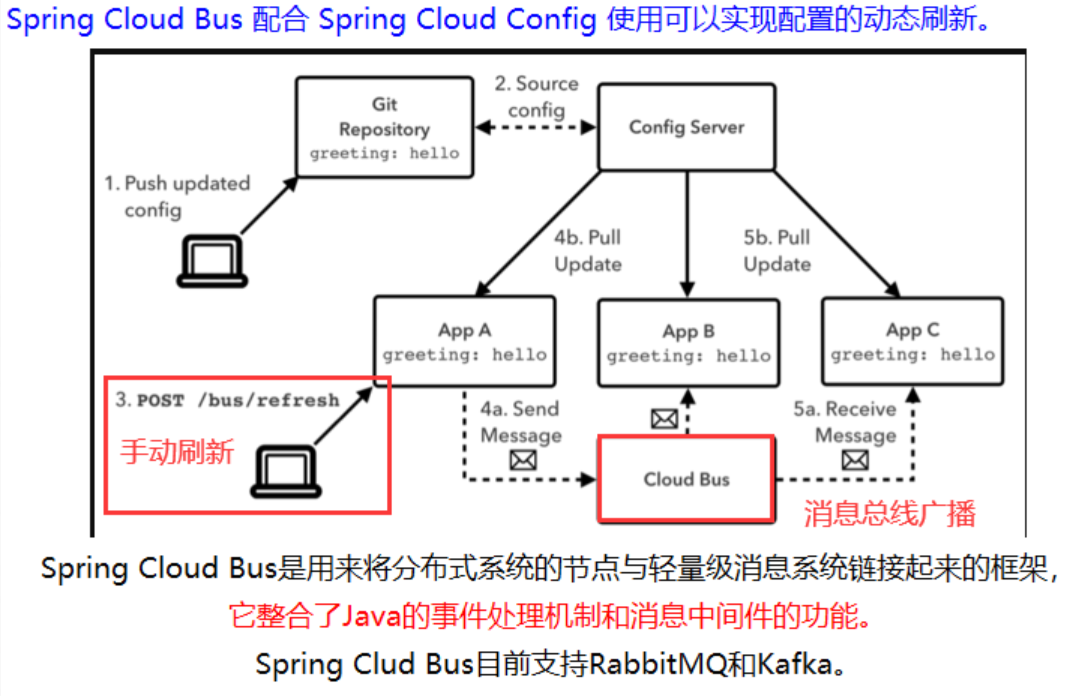
Spring Cloud Config 配合 Spring Cloud Bus 使用可以实现配置的动态刷新
基本原理:
- Config 客户端示例,都去监听 MQ 中的同一个 topic(默认是
springCloudBus)。当一个服务刷新数据的时候,它会把这个消息放入到 Topic 中,这样其他监听同一 Topic 的服务就能够得到通知,然后去更新自身的配置。就是通过 MQ 消息队列的 Topic 机制,达到广播的效果。
bus 动态刷新全局广播有两种设计思想:
- 利用消息总线触发一个客户端的 /bus/refresh,进而刷新所有客户端的配置
- 利用消息总线触发一个服务端 ConfigServer 的 /bus/refresh,进而刷新所有客户端的配置
我们采用第二种,第一种方式不适合的原因有三:
- 打破了微服务的职责单一性。负责业务模块的微服务不应该承担配置刷新的职责
- 破坏了微服务各节点的对等性
- 有一定的局限性。例如微服务迁移时,它的网络地址常常发生变化,如果想要做到自动刷新,还需要增加更多的配置
2.2 Bus 动态刷新全局广播配置
前提:必须先具备良好的RabbitMQ环境、
-
添加一个新的
cloud-config-client-3366,与 3355 组成集群模式。参考 3355,此处不再介绍
-
在
服务端配置中心 Config Server (3344)、客户端集群(3355/3366) 中引入 Bus 总线依赖<!--添加消息总线RabbitMQ支持--> <dependency> <groupId>org.springframework.cloud</groupId> <artifactId>spring-cloud-starter-bus-amqp</artifactId> </dependency> -
服务端配置中心 application.yml 修改 (添加 rabbitmq 相关配置)
server: port: 3344 spring: application: name: cloud-config-center # 注册进Eureka服务器的微服务名 cloud: config: server: git: uri: https://gitee.com/jobim/springcloud-config.git # GitHub上面的git仓库名字 # 搜索目录 search-paths: - springcloud-config # 读取分支 label: master #rabbitmq相关配置 rabbitmq: host: 192.168.2.4 port: 5672 username: admin password: 123 # 服务注册到eureka地址 eureka: client: service-url: defaultZone: http://localhost:7001/eureka ##rabbitmq相关配置,暴露bus刷新配置的端点 management: endpoints: #暴露bus刷新配置的端点 web: exposure: include: 'bus-refresh' -
客户端 application.yml 修改(添加 rabbitmq 相关配置)
#添加rabbitmq相关支持 spring: rabbitmq: host: 192.168.2.4 port: 5672 username: admin password: 123 #暴露监控端点 management: endpoints: web: exposure: include: "*" #此处有很多选项可以配置,为了省事 ,直接配置 * -
启动模块,开始测试
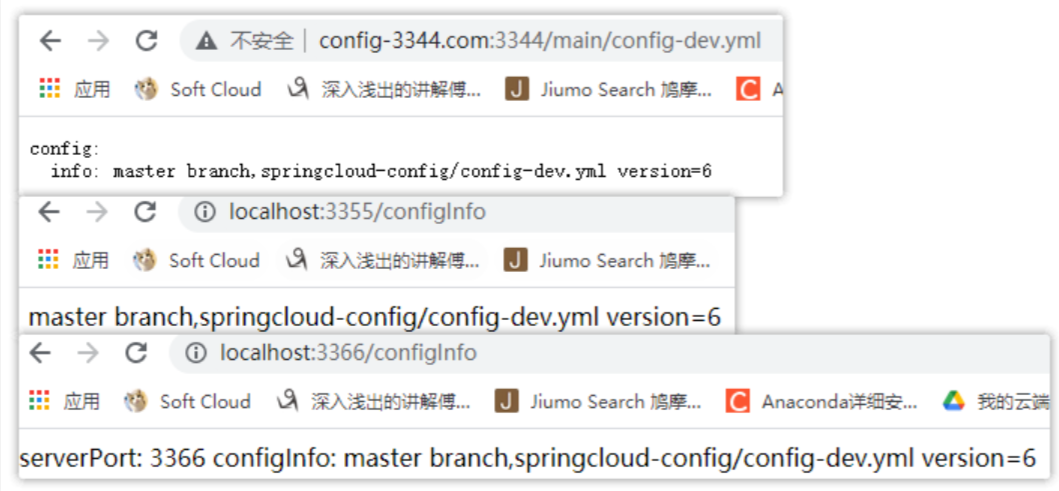
启动:服务端配置中心 Config Server (3344)、客户端集群(3355/3366)、Eureka Server(7001)。修改码云参数配置,然后向
服务端发送 Post 请求,命令:curl -X POST "http://localhost:3344/actuator/bus-refresh"。
当向 Config Server 发送 Post 请求后,总线上的各个实例(客户端 3355/3366)都能够及时
监听和消费配置的变更。使用广播的方式,真正的实现一处通知,处处生效。测试如图所示:
-
基本原理回顾
使用 MQ 广播的方式,实现
一处通知,处处生效的效果。此时我们登陆 Rabbit MQ 客户端,在Exchanges模块,就能够看到一个叫做springCloudBus的 Topic。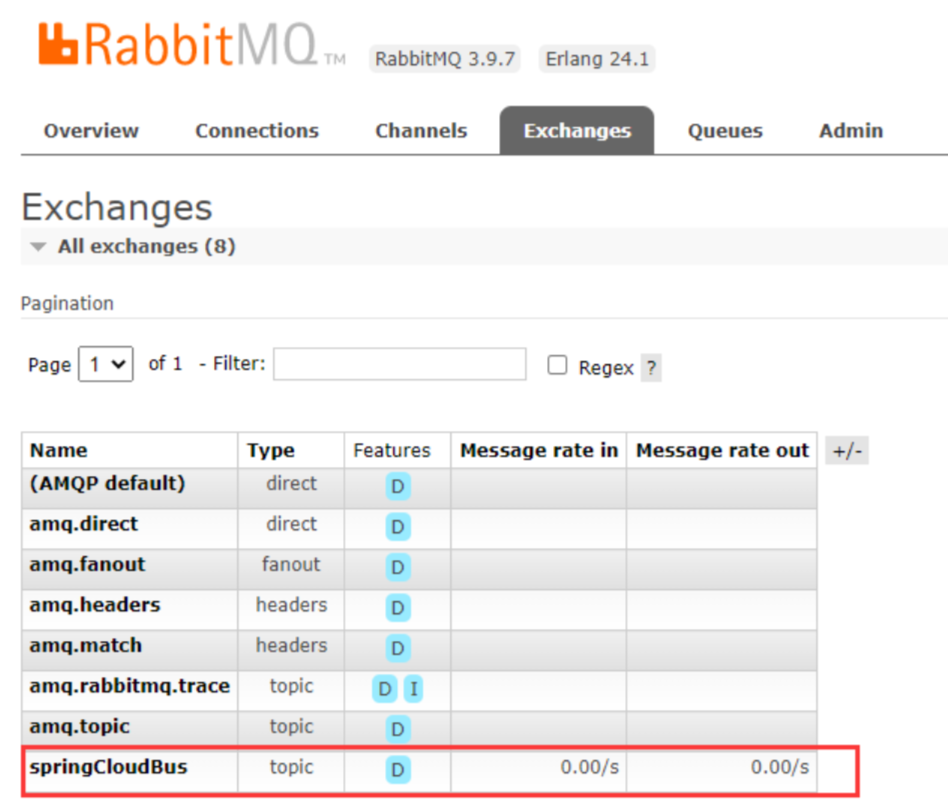
Config 客户端示例,都去监听 MQ 中的同一个 topic(默认是
springCloudBus)。当一个服务刷新数据的时候,它会把这个消息放入到 Topic 中,这样其他监听同一 Topic 的服务就能够得到通知,然后去更新自身的配置。
2.3 Bus 动态刷新定点通知配置
-
如果需要
差异化通知,并不想进行全局广播,此时就用到了 Bus 的定点通知功能。 -
此次我们通过客户端集群(3344/3355)演示。GitHub 远程配置修改后 ,进行差异化定点通知,只通知 3355,不通知 3366。此处命令和全局广播有点不同,命令为:
http://配置中心IP:配置中心的端口号/actuator/bus-refresh/{destination},通过指定/bus/refresh请求不再发送到具体的服务实例上,而是发给 Config Server 并通过{destination} 参数来指定需要更新配置的服务或实例。 -
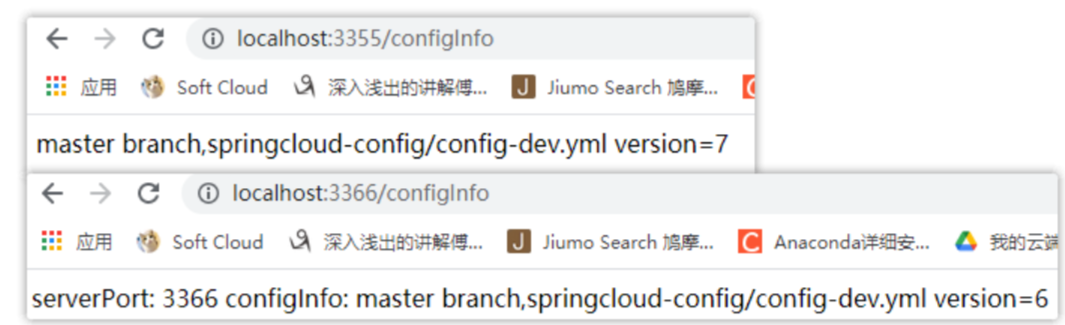
{destination} 参数= 微服务名 :端口号。3355 微服务名为:config-client。此处最终发送的 Post 请求命令为:curl -X POST http://localhost:3344/actuator/bus-refresh/config-client:3355,真正的实现精确通知功能。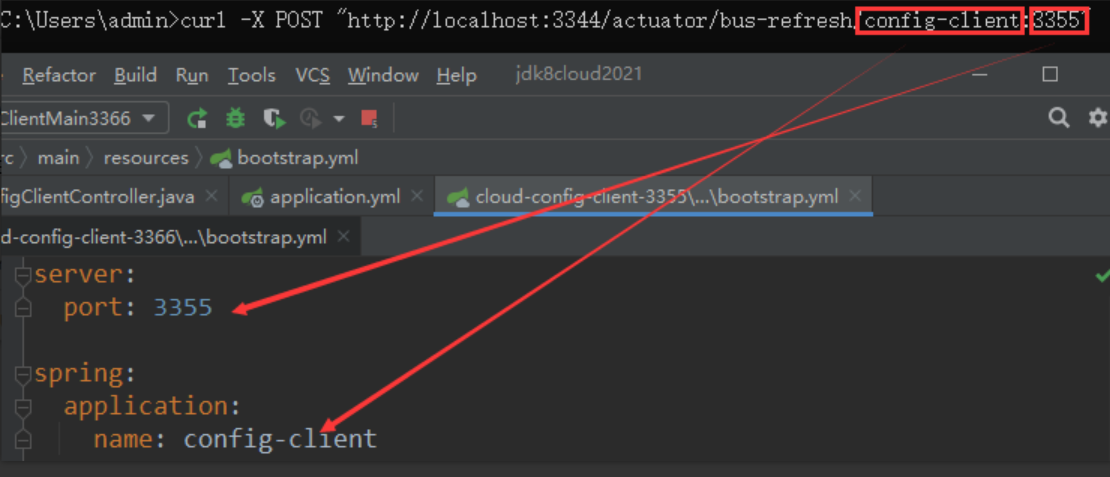
成功:3355刷新,3366未刷新
三、Stream 消息驱动
微服务面临的问题
自己学的是 RabbitMQ,公司用的却是 Kafka 。再学 Kafka?学习成本太高,负担太重
有没有一种技术,可以让我们不再关注 MQ 的细节,只需要用一种适配绑定的方式,就可以帮助我们自动的在各种 MQ 之间切换呢?
Spring Cloud Stream 消息驱动,它来了。
3.1 简介
- Spring Cloud Stream 一个构建消息微服务驱动的框架,它可以屏蔽底层 MQ 之间的细节差异。我们只需要操作Spring Cloud Stream 就可以操作底层多种多样的MQ(目前仅支持 RabbitMQ 和 Kafka)。从而解决我们在 MQ
切换、维护、开发方面的难度问题。
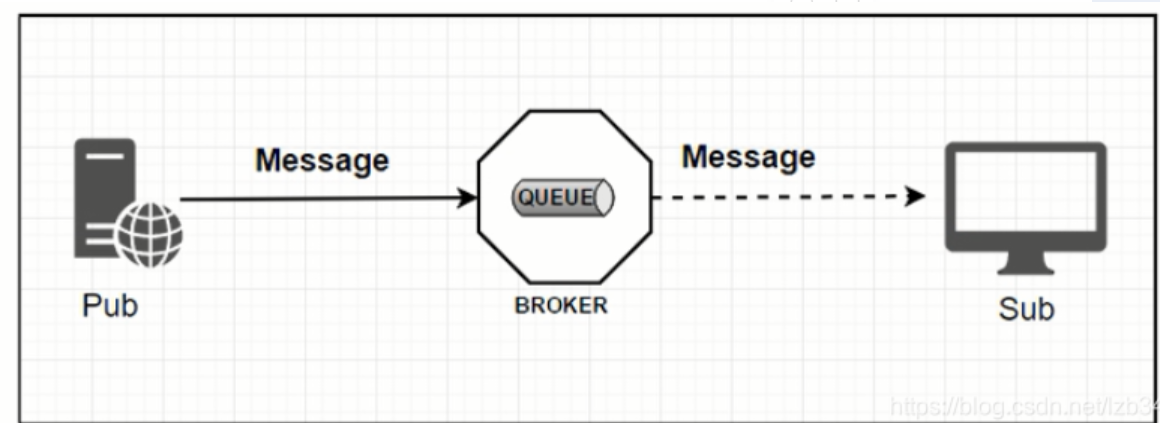
标准MQ:
生产者/消费者之间通过消息媒介传递消息内容
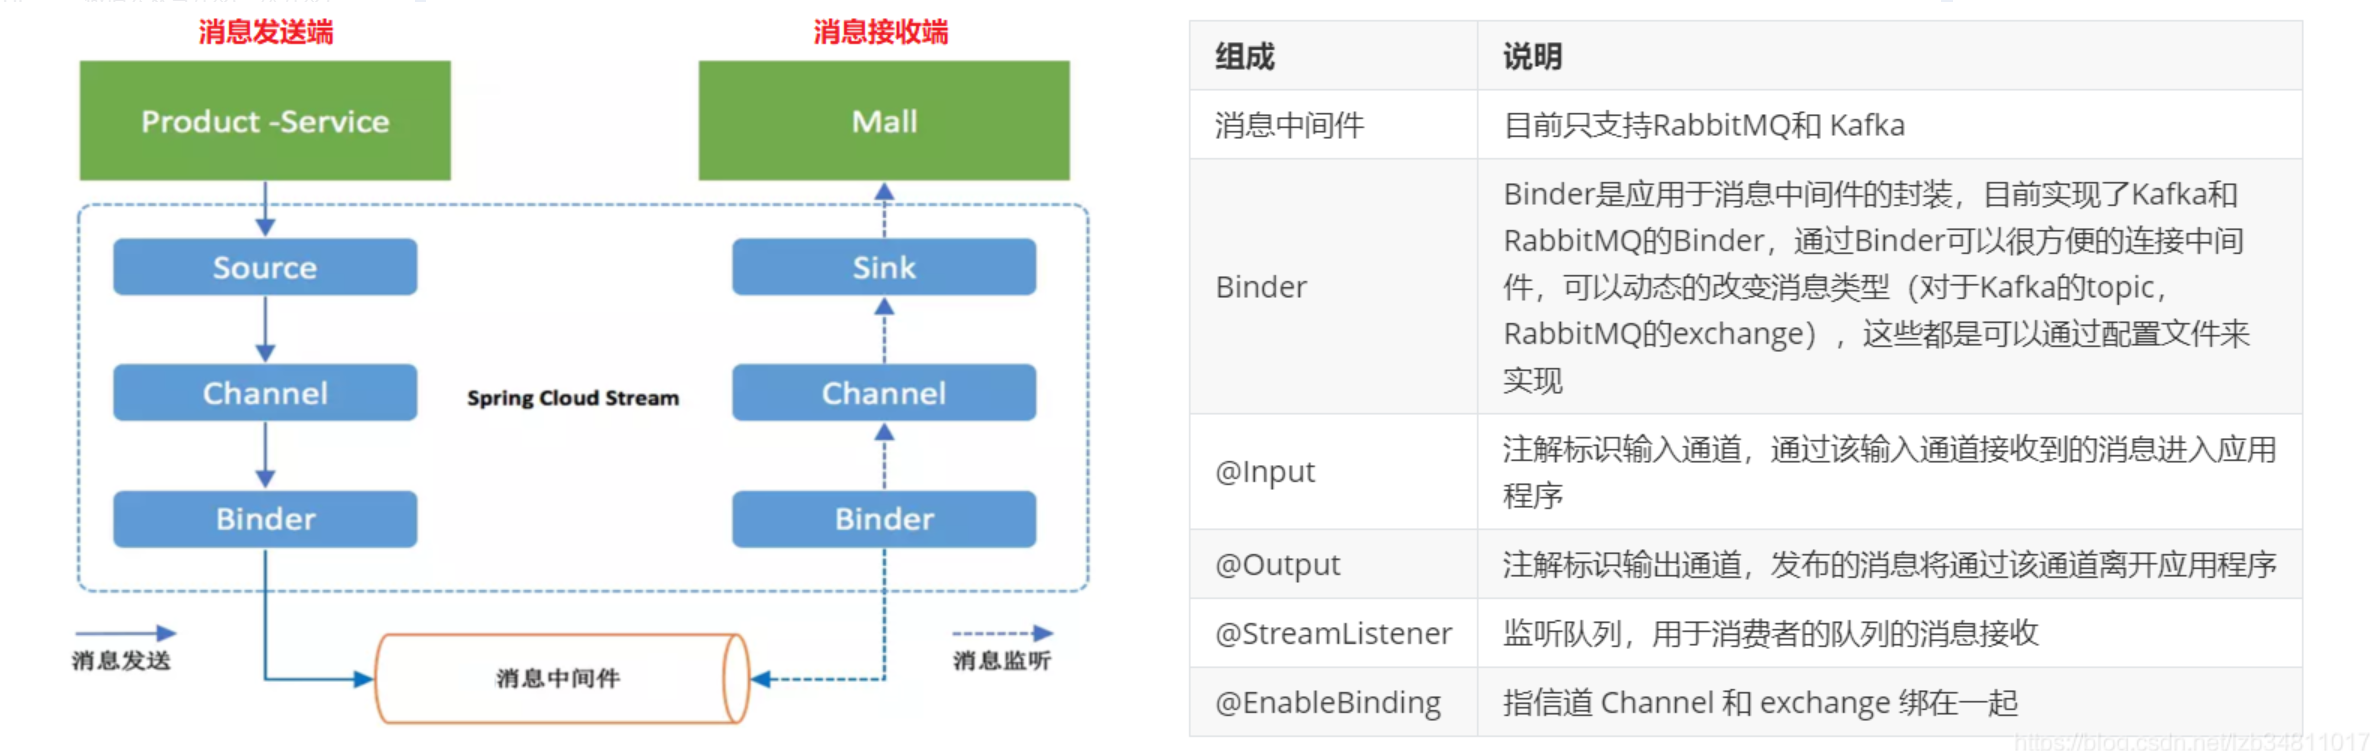
Spring Cloud Stream 的设计思想
- **通过定义绑定器 Binder 作为中间层,实现了应用程序与消息中间件细节之间的隔离。**向应用程序暴露统一的 Channel 通道,使得应用程序不需要再考虑各种消息中间件的实现
- inputs 对应消费者,outputs 对应生产者
- Stream中的消息通信方式遵循了发布-订阅模式,用 Topic 主题进行广播(在RabbitMQ就是Exchange,在Kafka中就是Topic)
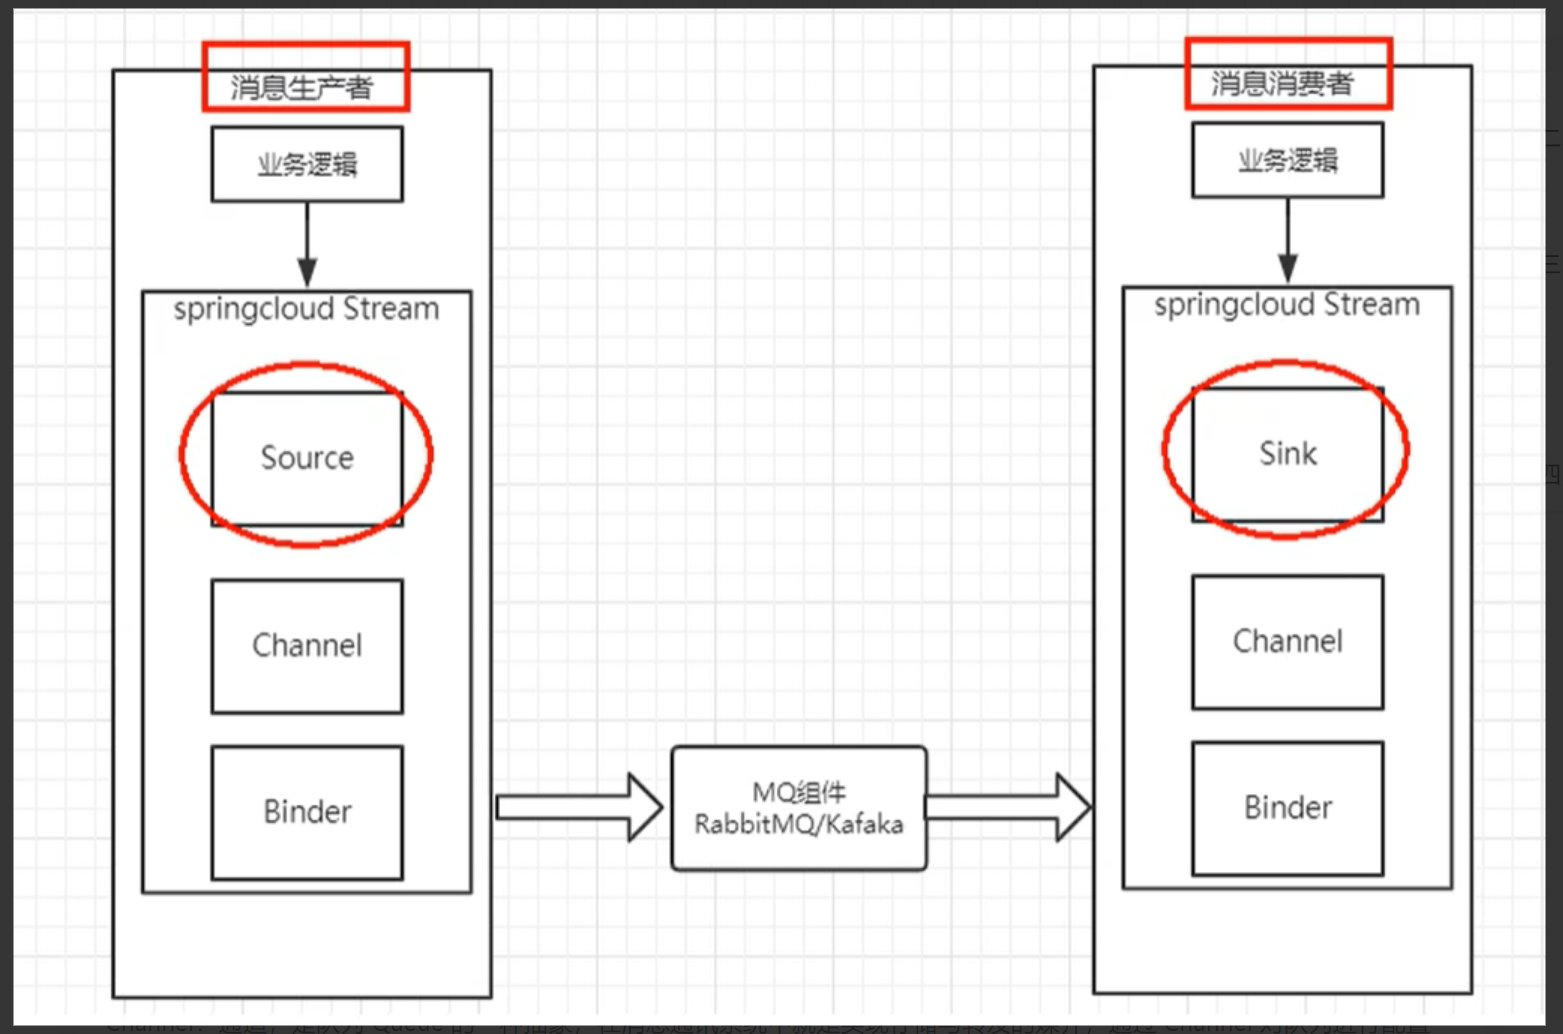
工作流程:
-
Binder:绑定器,很方便的连接中间件,屏蔽差异
-
Channel:通道,是队列 Queue 的一种抽象,在消息通讯系统中就是实现存储与转发的媒介,通过 Channel 对队列进行配置
-
Source 和 Sink:简单理解就是参照物是 Spring Cloud Stream 本身,从 Stream 发布消息就是输出,接收消息就是输入
编码 API 和常用注解:
3.2 基本使用
项目结构:
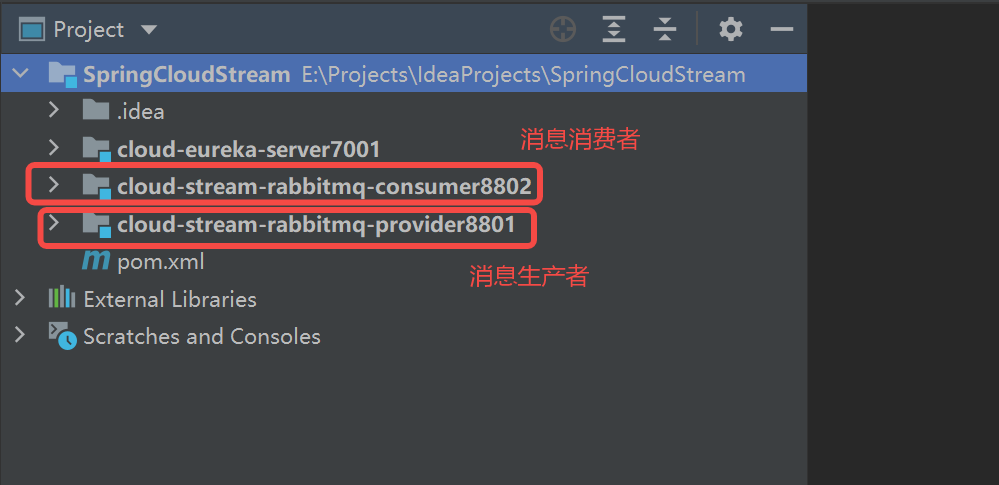
3.2.1 消息生产者
消息生产者模块,命名为:cloud-stream-rabbitmq-provider8801
1、引入pom依赖(引入stream-rabbit依赖)
<dependencies>
    <dependency>
        <groupId>org.springframework.boot</groupId>
        <artifactId>spring-boot-starter-web</artifactId>
    </dependency>
    <dependency>
        <groupId>org.springframework.boot</groupId>
        <artifactId>spring-boot-starter-actuator</artifactId>
    </dependency>
    <dependency>
        <groupId>org.springframework.cloud</groupId>
        <artifactId>spring-cloud-starter-netflix-eureka-client</artifactId>
    </dependency>
    <!--stream-rabbit依赖-->
    <dependency>
        <groupId>org.springframework.cloud</groupId>
        <artifactId>spring-cloud-starter-stream-rabbit</artifactId>
    </dependency>
</dependencies>
2、修改application.yml文件
server:
  port: 8801

spring:
  application:
    name: cloud-stream-provider
  cloud:
    stream:
      binders: # 在此处配置要绑定的rabbitmq的服务信息;
        defaultRabbit: # 表示定义的名称,用于于binding整合
          type: rabbit # 消息组件类型
          environment: # 设置rabbitmq的相关的环境配置
            spring:
              rabbitmq:
                host: 192.168.2.4
                port: 5672
                username: admin
                password: 123
      bindings: # 服务的整合处理
        output: # 这个名字是一个通道的名称
          destination: studyExchange # 表示要使用的Exchange名称定义
          content-type: application/json # 设置消息类型,本次为json,文本则设置“text/plain”
          binder: defaultRabbit # 设置要绑定的消息服务的具体设置


eureka:
  client: # 客户端进行Eureka注册的配置
    service-url:
      defaultZone: http://localhost:7001/eureka
  instance:
    lease-renewal-interval-in-seconds: 2 # 设置心跳的时间间隔(默认是30秒)
    lease-expiration-duration-in-seconds: 5 # 如果现在超过了5秒的间隔(默认是90秒)
    instance-id: send-8801.com  # 在信息列表时显示主机名称
    prefer-ip-address: true     # 访问的路径变为IP地址
3、启动类
@SpringBootApplication
public class StreamMQMain8801 {
    public static void main(String[] args) {
        SpringApplication.run(StreamMQMain8801.class,args);
    }
}
3、业务类编写
-
interface接口
public interface IMessageProvider { String send() ; } -
service
import com.zb.springcloud.service.IMessageProvider; import org.springframework.cloud.stream.annotation.EnableBinding; import org.springframework.cloud.stream.messaging.Source; import org.springframework.integration.support.MessageBuilder; import org.springframework.messaging.MessageChannel; import javax.annotation.Resource; import java.util.UUID; //@EnableBinding 指信道channel和exchange绑定在一起 //@EnableBinding(Source.class) 就是将 Source(源) 放到 Channel 的意思 @EnableBinding(Source.class) // 可以理解为是一个消息的发送管道的定义 public class MessageProviderImpl implements IMessageProvider { @Resource private MessageChannel output; // 消息的发送管道 @Override public String send() { String serial = UUID.randomUUID().toString(); this.output.send(MessageBuilder.withPayload(serial).build()); // 创建并发送消息 System.out.println("***serial: "+serial); return serial; } } -
controller
@RestController
public class SendMessageController {

    @Resource
    private IMessageProvider messageProvider;

    @GetMapping(value = "/sendMessage")
    public String sendMessage() {
        return messageProvider.send();
    }

}
4、客户端测试
启动RabbitMQ、微服务相关模块,通过接口调用 http://localhost:8801/sendMessage 进行消息发送,可以看到后台有显示发送消息,进入 RabbitMQ 可视化界面,可以看到有发送消息波峰出现。
3.2.2 消息消费者
消息消费者模块,命名为:cloud-stream-rabbitmq-provider8802
1、引入pom依赖(引入stream-rabbit依赖)
<dependencies>
    <dependency>
        <groupId>org.springframework.boot</groupId>
        <artifactId>spring-boot-starter-web</artifactId>
    </dependency>
    <dependency>
        <groupId>org.springframework.boot</groupId>
        <artifactId>spring-boot-starter-actuator</artifactId>
    </dependency>
    <dependency>
        <groupId>org.springframework.cloud</groupId>
        <artifactId>spring-cloud-starter-netflix-eureka-client</artifactId>
    </dependency>
    <!--stream-rabbit依赖-->
    <dependency>
        <groupId>org.springframework.cloud</groupId>
        <artifactId>spring-cloud-starter-stream-rabbit</artifactId>
    </dependency>
</dependencies>
2、修改application.yml文件
server:
  port: 8802

spring:
  application:
    name: cloud-stream-consumer
  cloud:
    stream:
      binders: # 在此处配置要绑定的rabbitmq的服务信息;
        defaultRabbit: # 表示定义的名称,用于于binding整合
          type: rabbit # 消息组件类型
          environment: # 设置rabbitmq的相关的环境配置
            spring:
              rabbitmq:
                host: 192.168.2.4
                port: 5672
                username: admin
                password: 123
      bindings: # 服务的整合处理
        input: # 这个名字是一个通道的名称
          destination: studyExchange # 表示要使用的Exchange名称定义
          content-type: application/json # 设置消息类型,本次为对象json,如果是文本则设置“text/plain”
          binder: defaultRabbit # 设置要绑定的消息服务的具体设置

eureka:
  client: # 客户端进行Eureka注册的配置
    service-url:
      defaultZone: http://localhost:7001/eureka
  instance:
    lease-renewal-interval-in-seconds: 2 # 设置心跳的时间间隔(默认是30秒)
    lease-expiration-duration-in-seconds: 5 # 如果现在超过了5秒的间隔(默认是90秒)
    instance-id: receive-8802.com  # 在信息列表时显示主机名称
    prefer-ip-address: true     # 访问的路径变为IP地址
3、创建启动类
@SpringBootApplication
public class StreamMQMain8802 {

    public static void main(String[] args) {
        SpringApplication.run(StreamMQMain8802.class,args);
    }

}
3、业务类编写
import org.springframework.beans.factory.annotation.Value;
import org.springframework.cloud.stream.annotation.EnableBinding;
import org.springframework.cloud.stream.annotation.StreamListener;
import org.springframework.cloud.stream.messaging.Sink;
import org.springframework.messaging.Message;
import org.springframework.stereotype.Component;

@Component
@EnableBinding(Sink.class)
public class ReceiveMessageListener {

    @Value("${server.port}")
    private String serverPort;

    @StreamListener(Sink.INPUT)
    public void input(Message<String> message) {
        System.out.println("消费者1号,------->接收到的消息:" + message.getPayload()+"\t port: "+serverPort);
    }

}
4、消费端测试
启动 RabbitMQ、微服务消息生产模块、消费模块,通过接口调用 http://localhost:880/sendMessage 进行消息发送,可以看到消费者后台在实时接收消息。
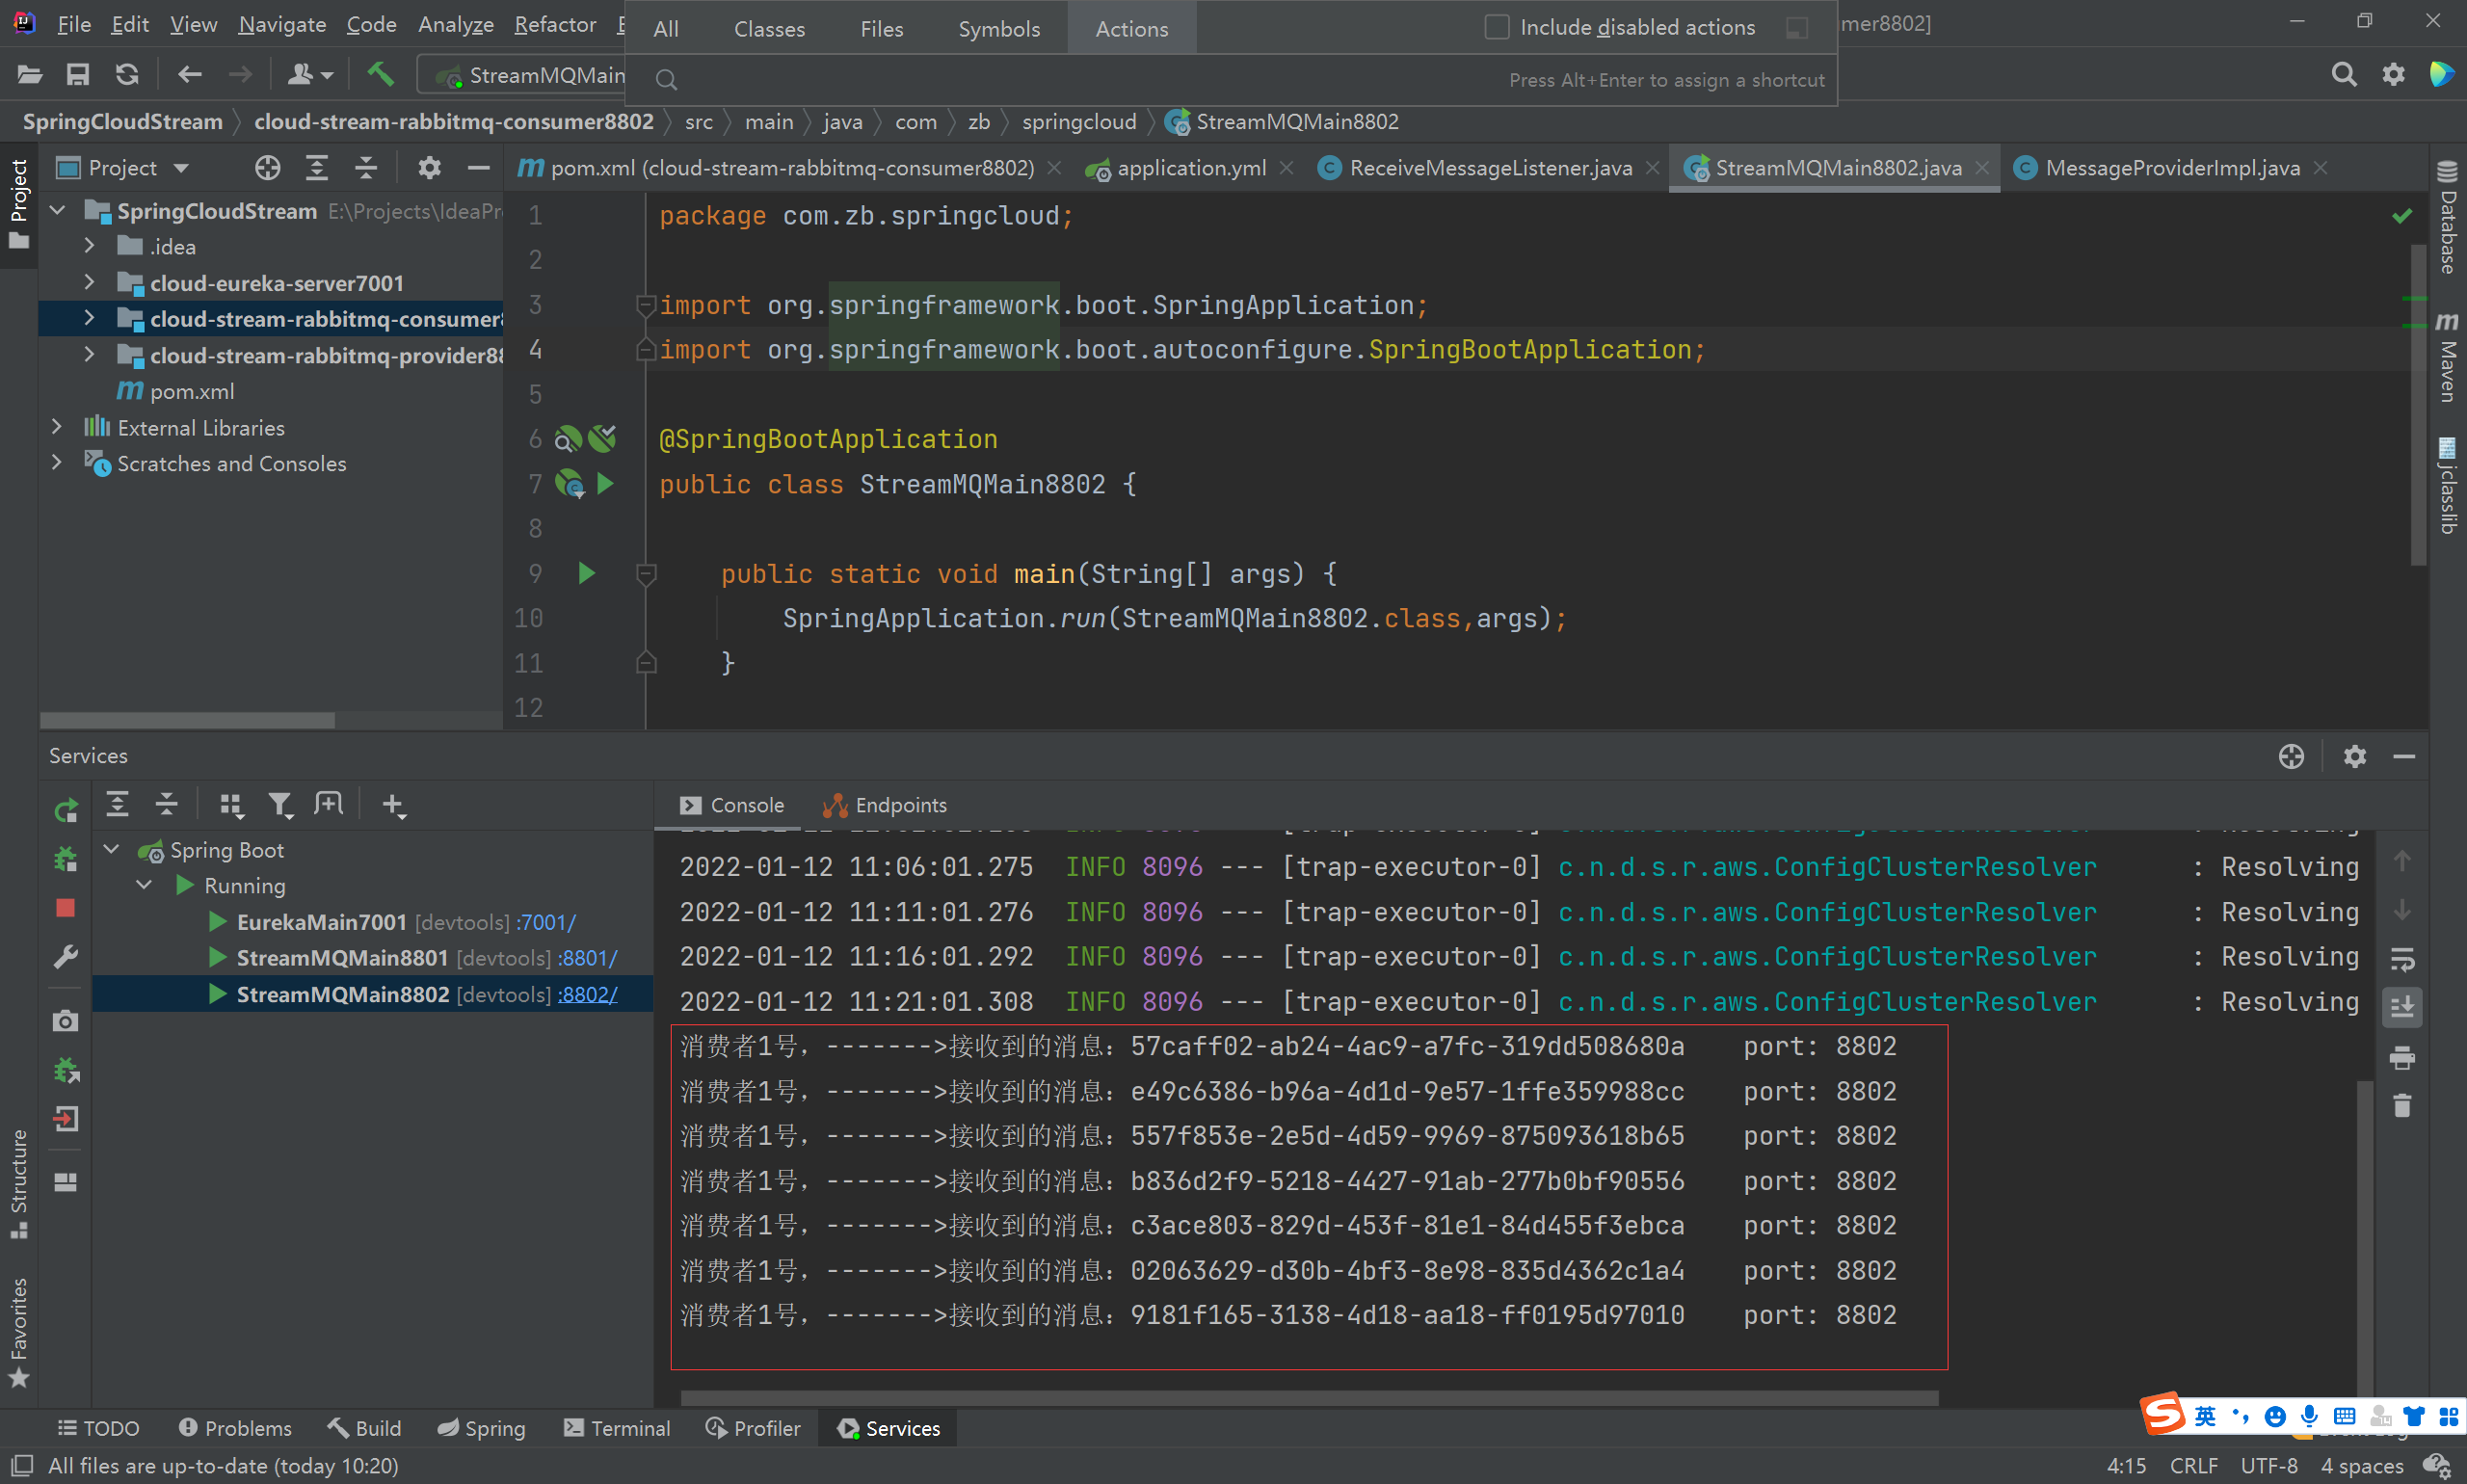
这样,我们并没有引入任何相关 RabbitMQ 包,也并不了解 Rabbit MQ。便能够使用 Rabbit MQ 进行 消息发送 & 接收。这就是Spring Cloud Stream 消息驱动的优越之处。
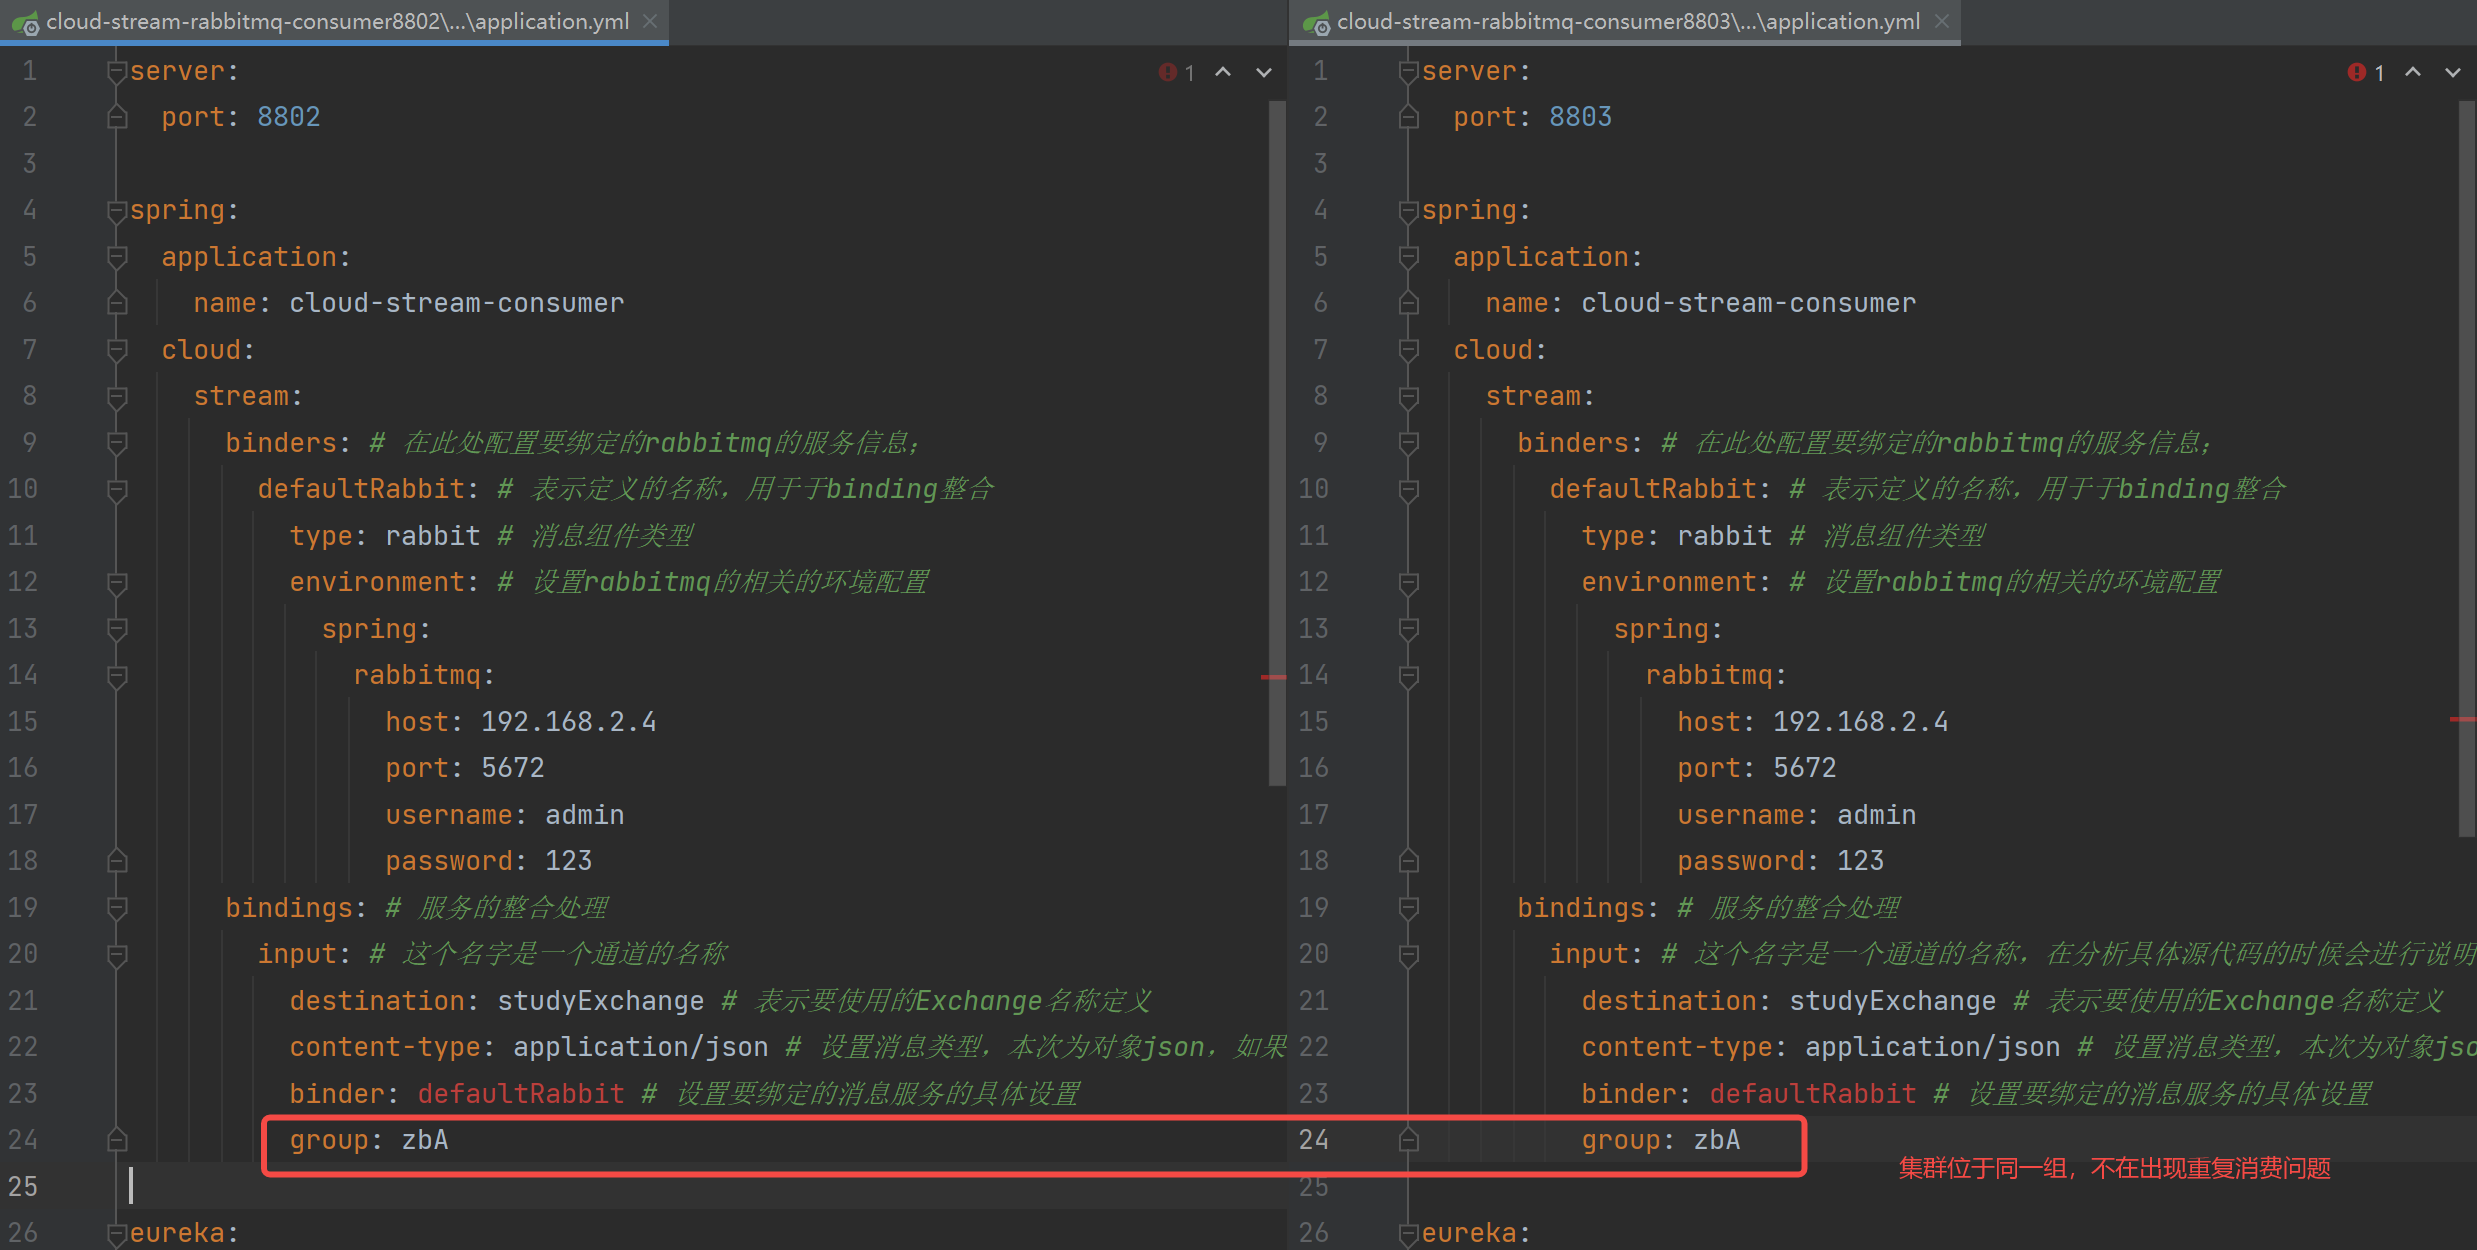
3.3 分组消费
重复消费问题:
-
当集群方式进行消息消费时,就会存在消息的重复消费问题。比如订单信息,如果同一个订单被不同的服务都获取到了,就会造成数据错误,导致库存不准确问题出现。
-
这是因为没有进行分组的原因,不同组就会出现重复消费;同一组内会发生竞争关系,只有一个可以消费。 这个时候,如果发送一条消息到 MQ,不同的组就都会收到消息,就会造成消息的重复消费。
解决方式:
-
在 Stream 中,处于同一个组的多个消费者是竞争关系,就可以保证消息只被一个服务消费一次,而不同组是可以重复消费的。默认分组就是不同的,组流水号不一样。
-
解决方式很简单,只需要用到 Stream 当中 group 属性对消息进行分组即可
四、SpringCloud Sleuth 分布式请求链路跟踪(了解)
4.1 Sleuth介绍
-
在微服务框架中,一个由客户端发起的请求,在后端系统中会经过多个不同的微服务节点调用,协同操作产生最后的请求结果。每一个前端请求都会形成一条复杂的分布式服务调用链路,链路中的任何一环出现
高延时或者错误,都会引起整个请求最后的失败。 -
Spring Cloud Sleuth 提供了分布式系统中一套完整的服务跟踪的解决方案,并且兼容支持了zipkin,完美的解决了多个微服务之间链路调用的问题。
总结: 就是用来处理服务之间调用关系的
4.2 搭建链路监控步骤
4.2.1 安装 Zipkin监控平台
Spring Cloud 从 F 版起就不需要自己构建 Zipkin Server 了,只需要导入 jar 包即可
1、下载:https://search.maven.org/remote_content?g=io.zipkin.java&a=zipkin-server&v=LATEST&c=exec
2、使用 java -jar 命令运行
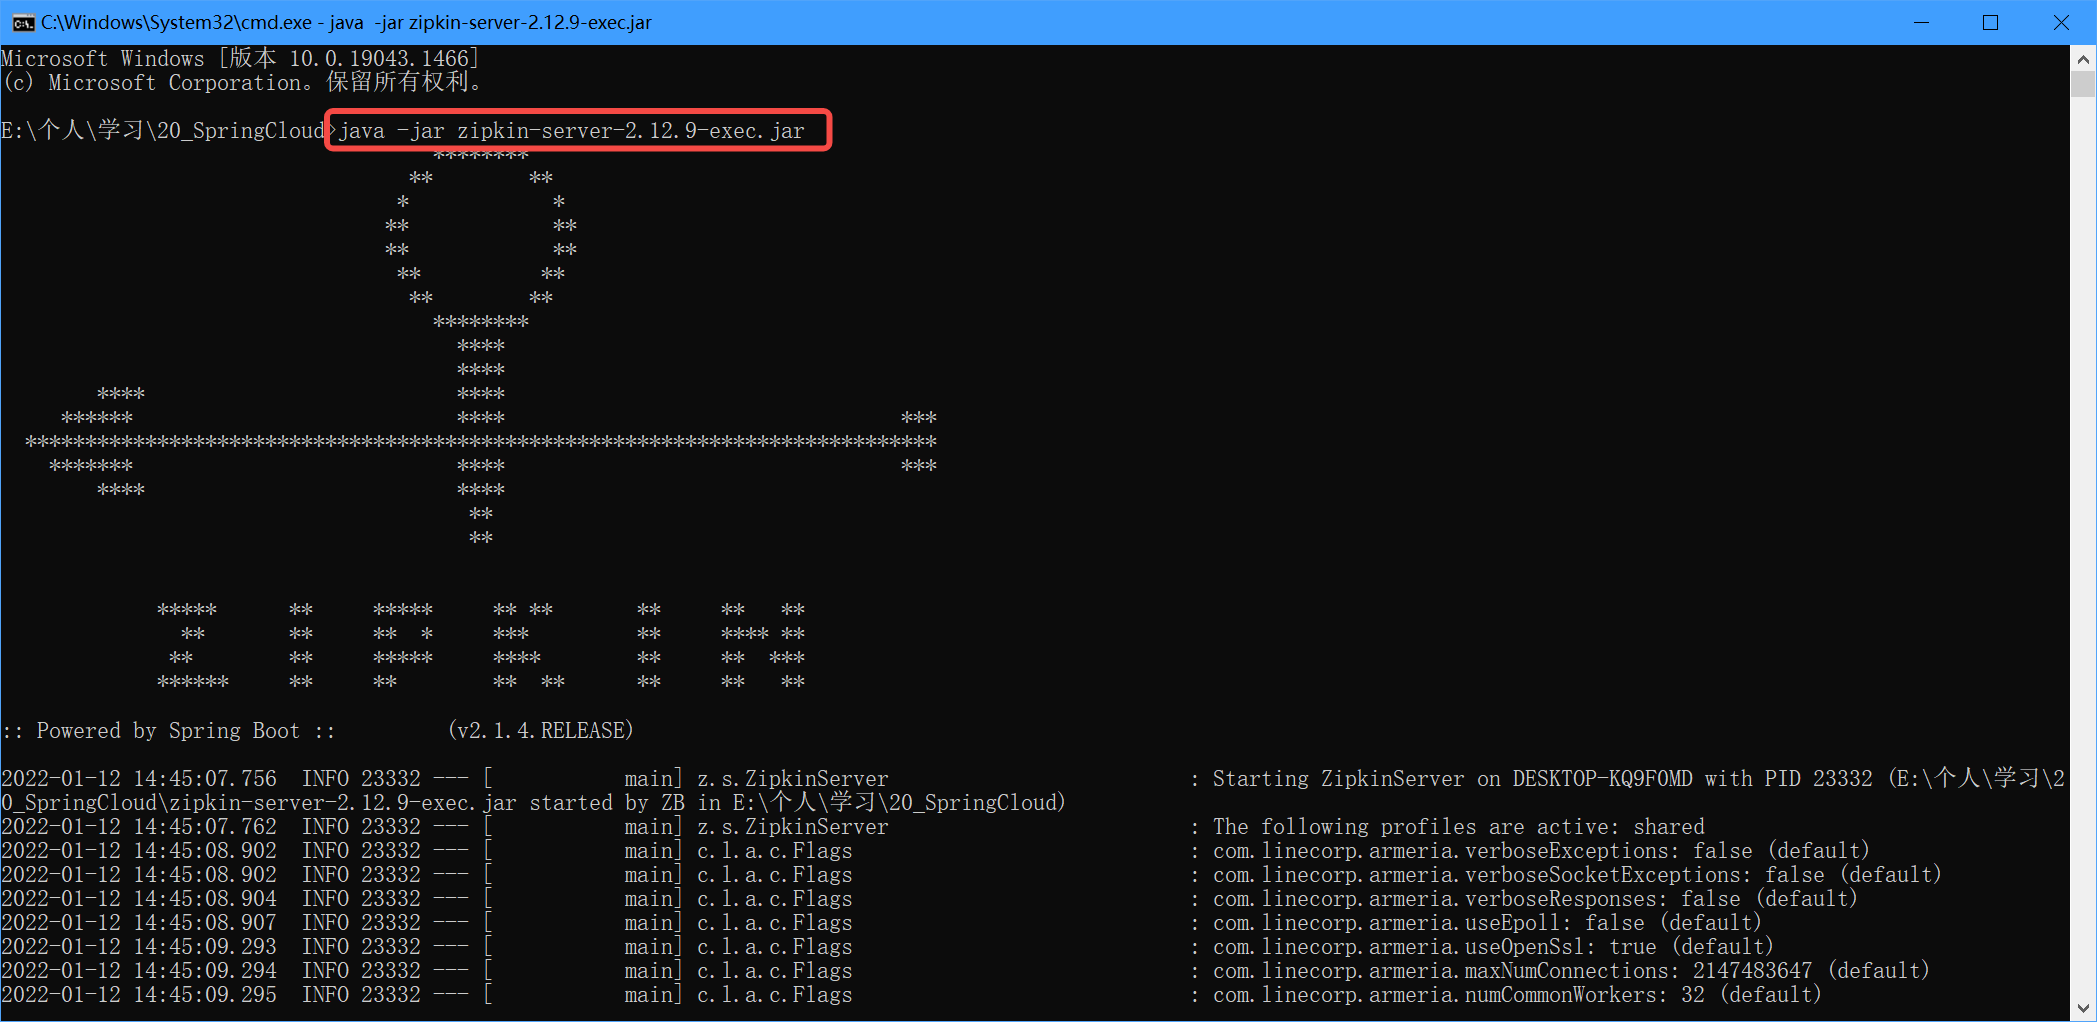
3、浏览器访问 http://localhost:9411/zipkin/,进入如下界面即可

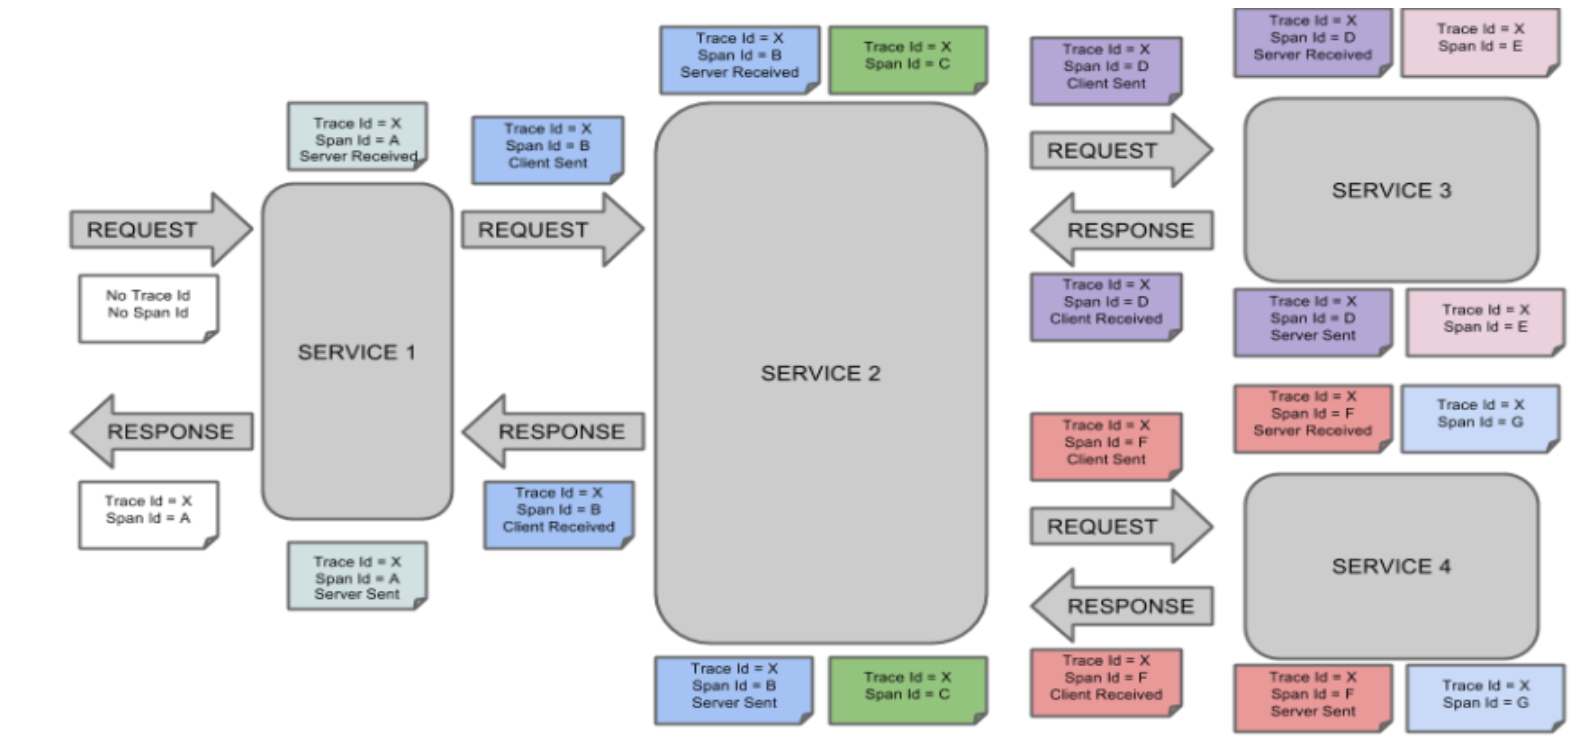
zipkin 基本原理:
-
一条链路通过 trace Id 标识,Span 标识发起的请求信息,各个 Span 通过 Parent Id 关联
-
Trance:类似于树结构的 Span 的集合,表示一条调用链路,存在唯一标识
-
Span:表示调用链路的来源,通俗来说 Span 就是一次请求信息
4.2.2 Sleuth测试环境搭建
1、引入 zipkin + sleuth pom 依赖
<!--引入sleuth+zipkin依赖-->
<dependency>
    <groupId>org.springframework.cloud</groupId>
    <artifactId>spring-cloud-starter-zipkin</artifactId>
</dependency>
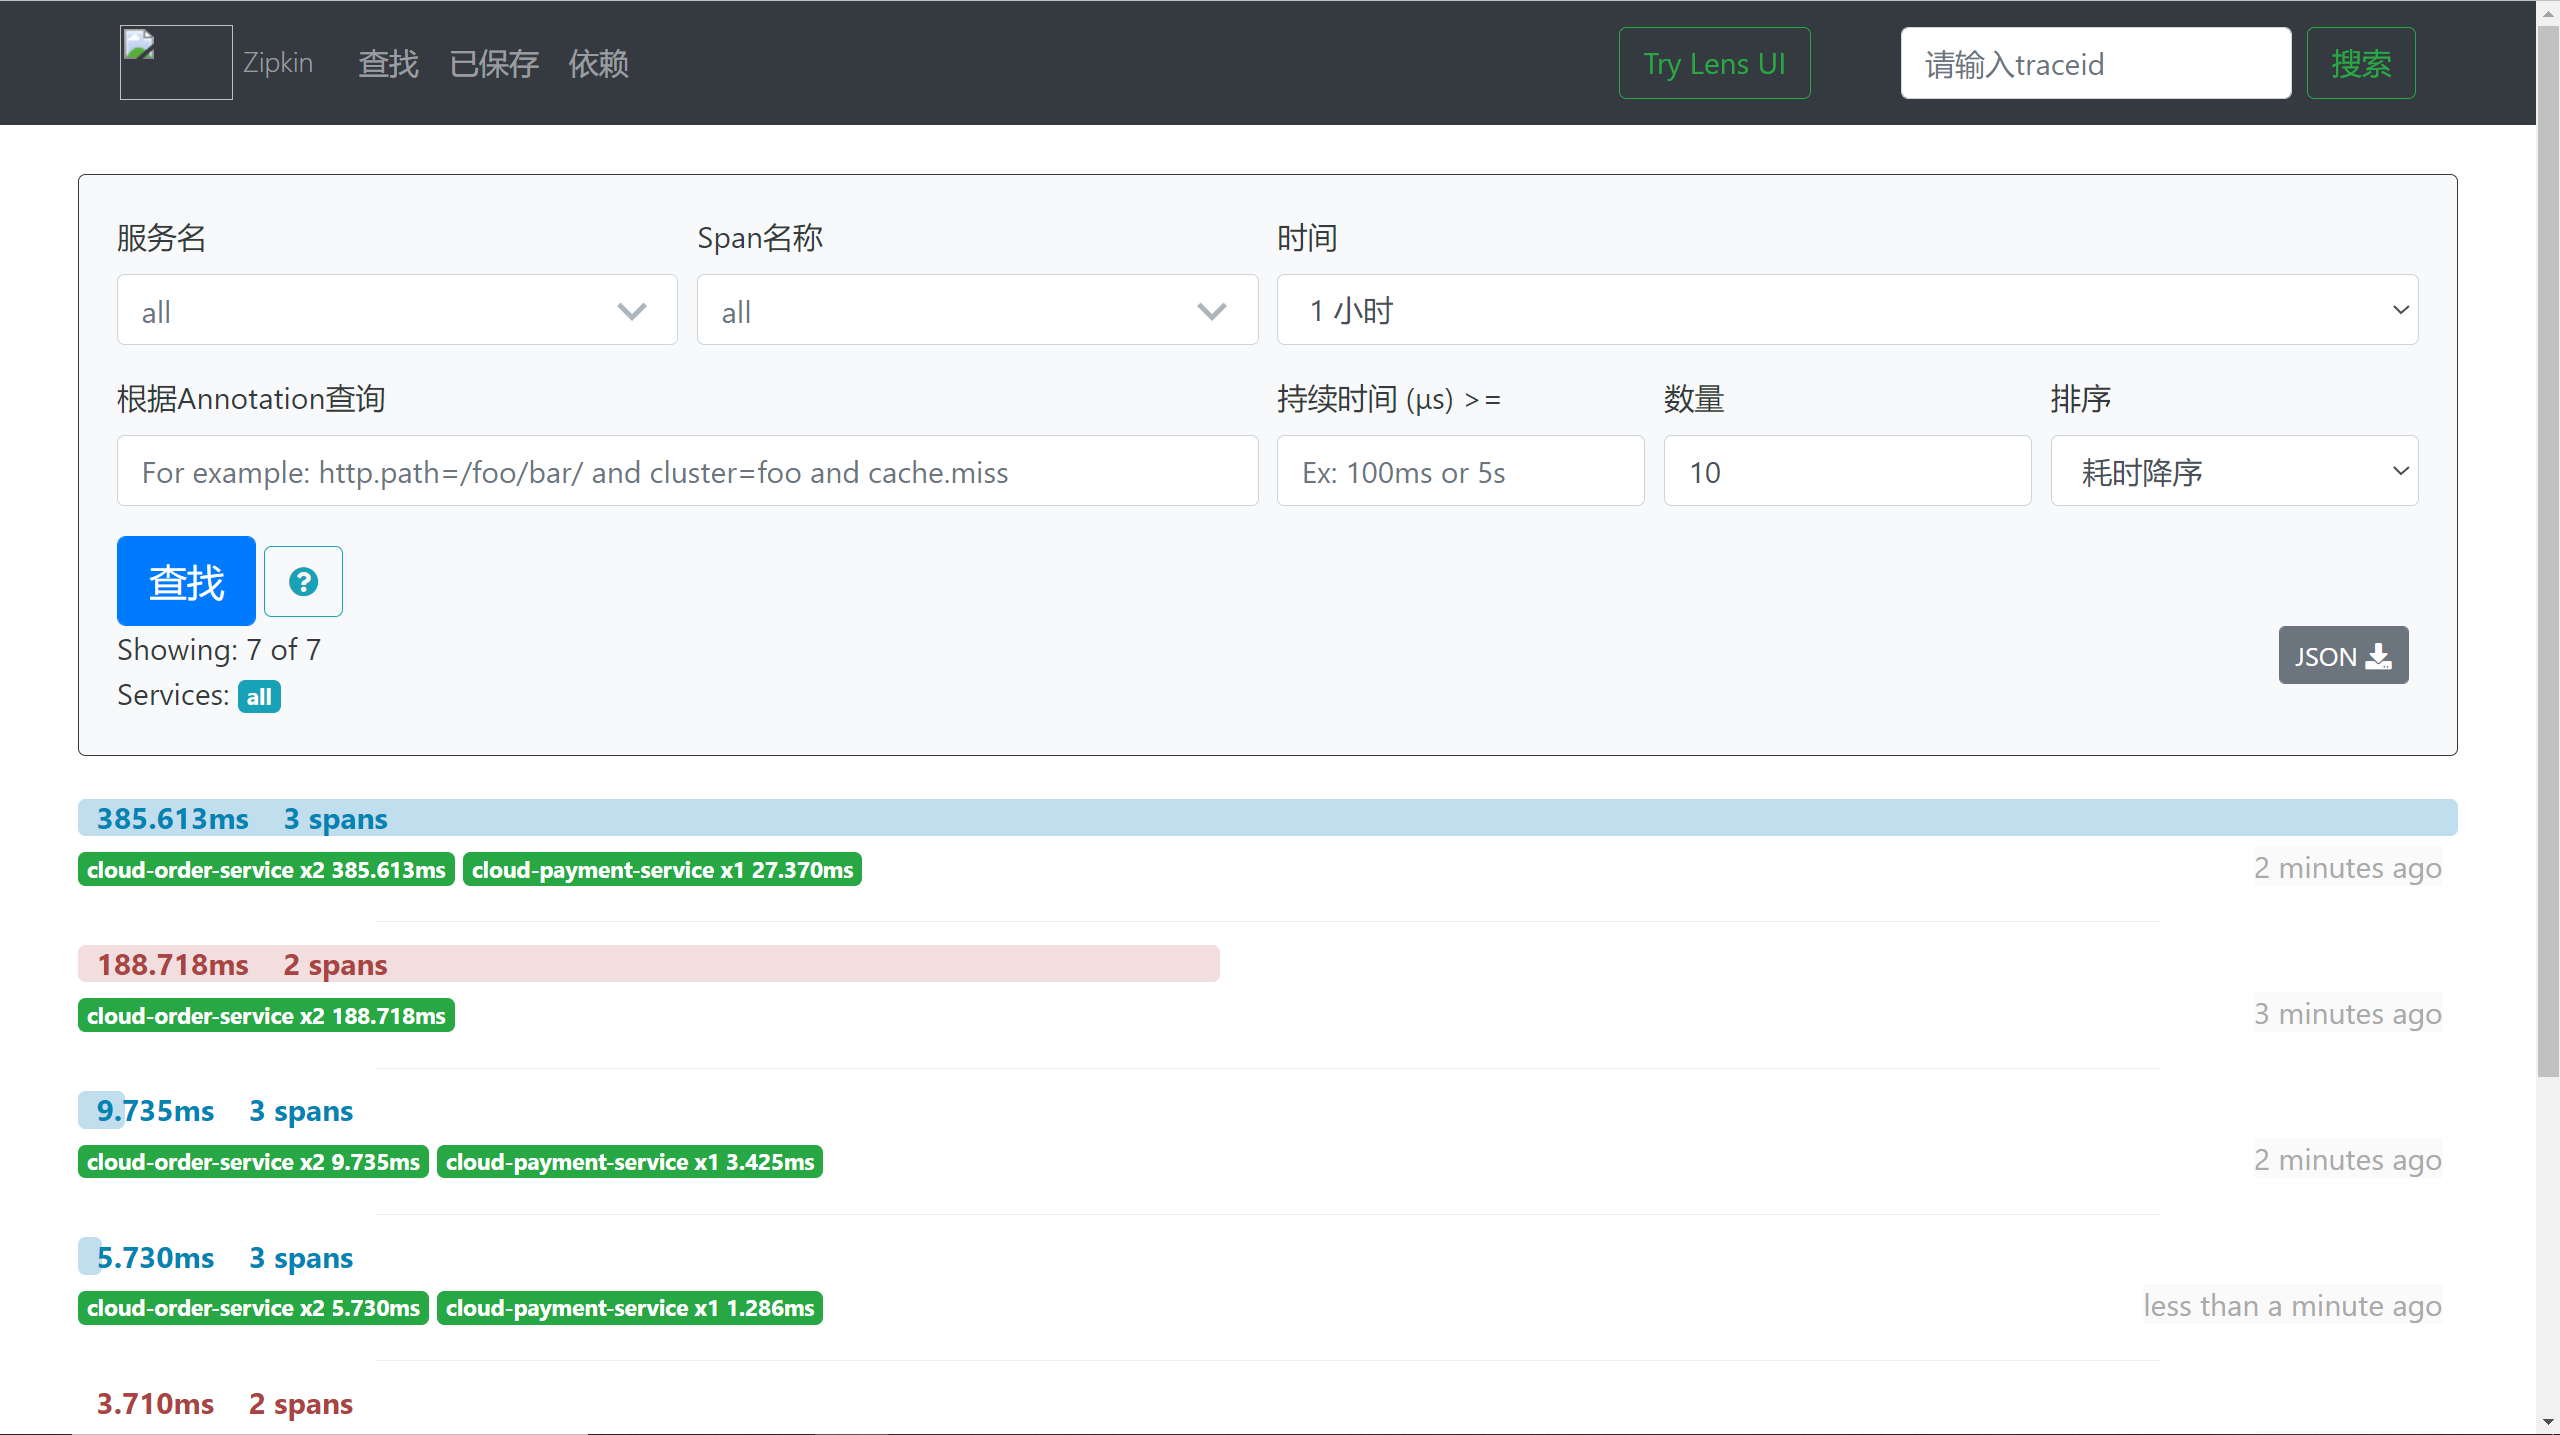
2、修改配置文件
spring:
  zipkin:
  	# 指定 zipkin 地址
    base-url: http://localhost:9411
  sleuth:
    sampler:
      # 采样率介于 0~1 之间,1表示全部采集
      probability: 1
在服务提供者、消费者上都添加上述配置之后,发送的请求就会被监控了。
3、在 zipkin 可视化界面查看详情


 3万+
3万+


 被折叠的 条评论
为什么被折叠?
被折叠的 条评论
为什么被折叠?
 到【灌水乐园】发言


