


IOS Swift 学习入门
配置区
info 配置
Custon IOS Target Properties
- Suppprted interface orientations 设置配置横屏竖屏
开发期间允许使用, http请求设置(上线前必须都是https请求!!!上线前必须都是https请求!!!上线前必须都是https请求!!!,)

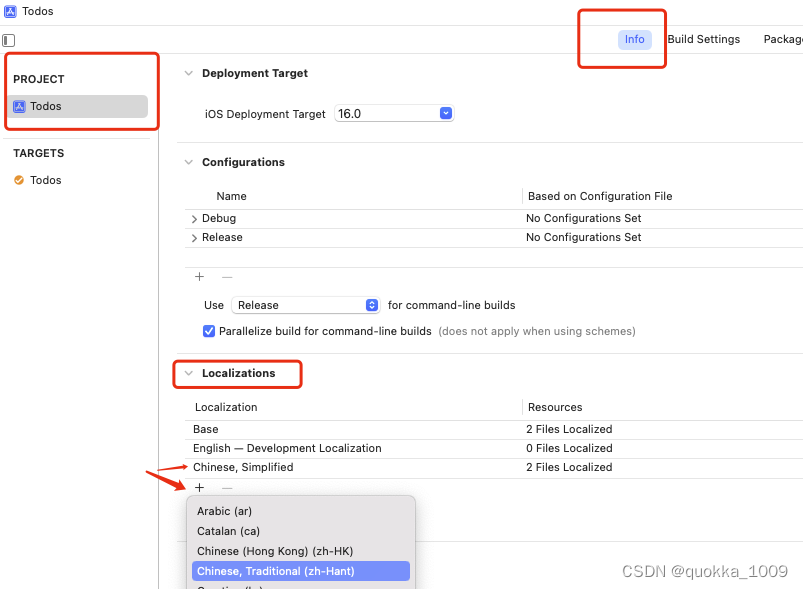
本地化中文
系统自带控件的文字都会变成中文
文件导入Xcode

CocoaPads 依赖管理工具
命令行操作
安装:
sudo gem install cocoapods
命令行操作:
pod init  					初始化项目
pod install					下载依赖
pod install --repo-update 	更新依赖 PS: 删除同级目录下的 “Pods” 目录与Podfile.lock文件
pod repo update 			更新依赖索引 库

pod 'XXXX', '~> 0.0'  		下载指定依赖
M1芯片 在 pod install 报错
解决方案
1.终端输入以下内容以安装"ffi"
sudo arch -x86_64 gem install ffi
2.终端输入以下内容以继续pod操作(也就是在原本的命令前面加上arch -x86_64)
arch -x86_64 pod install
以后pod install时只需做第二步即可。
UI区 + 代码
通用
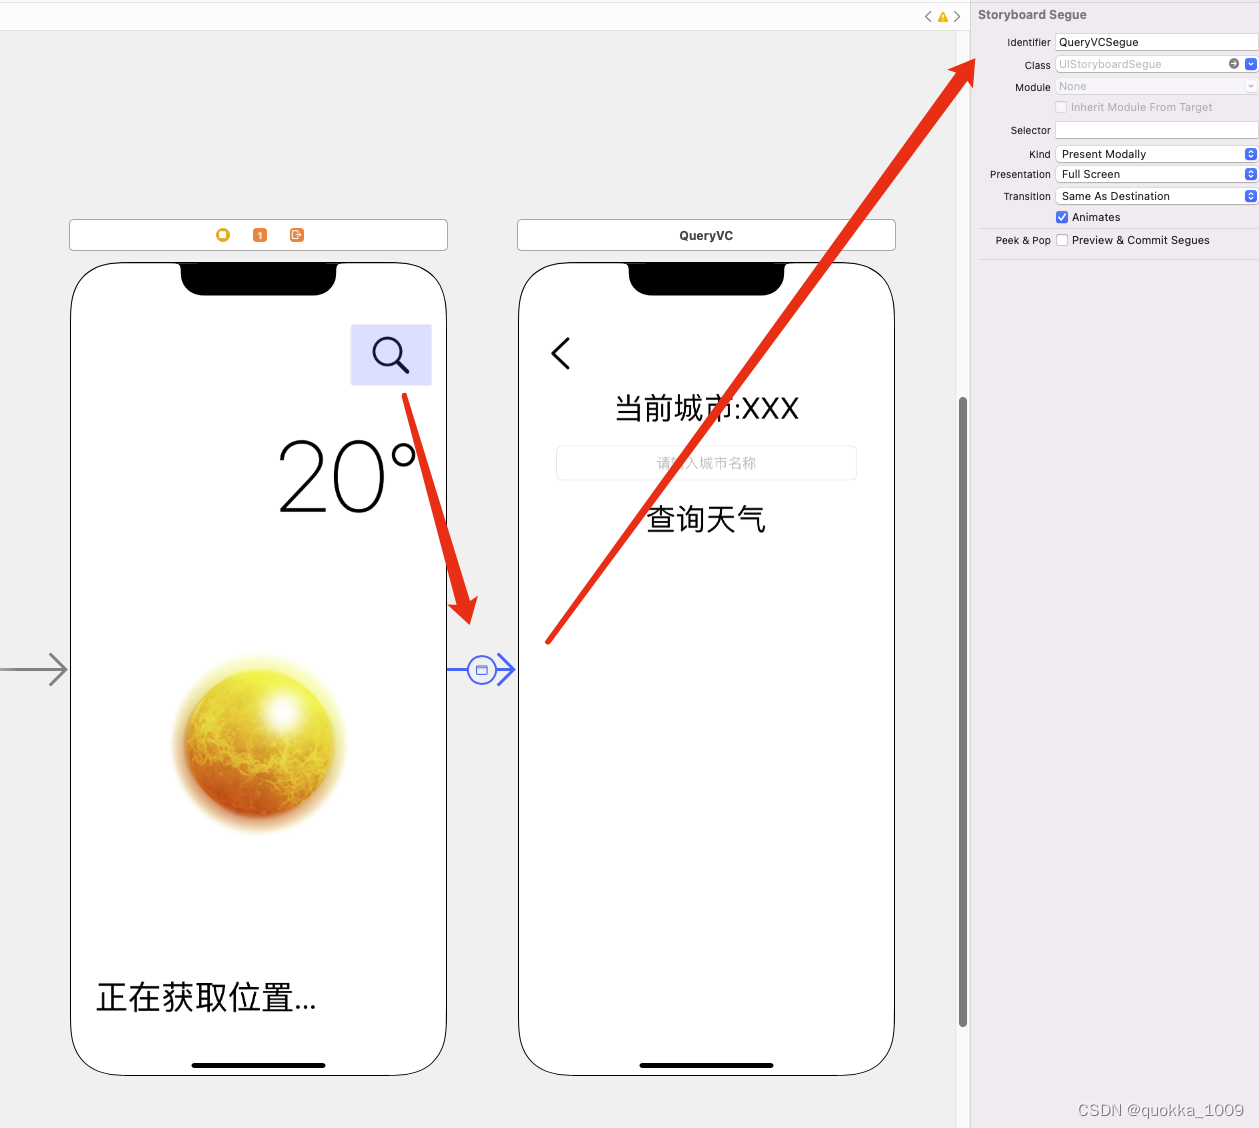
打开新页面方式
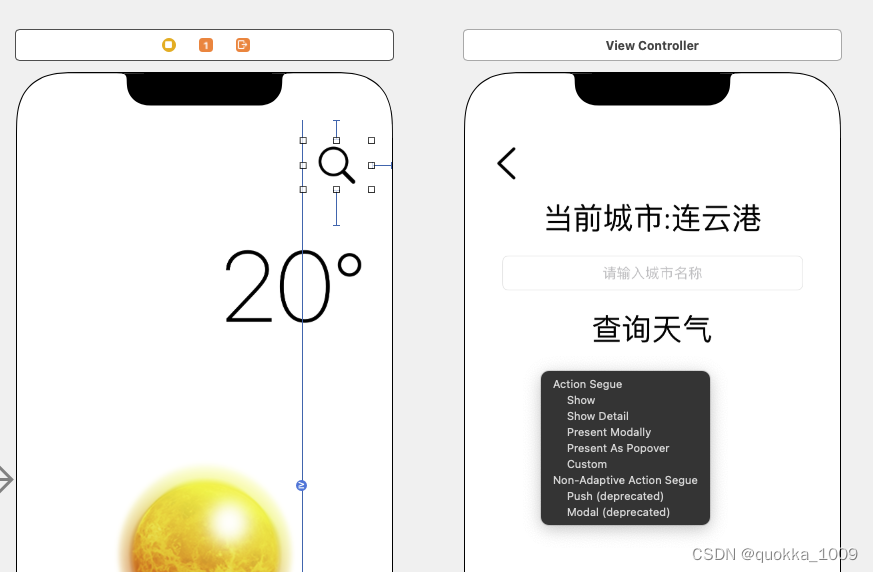
按住 ctrl 拖拽 到目标页面
// show : 从右边向左打开(测试也是 从下向上打开)
Present Modally : 从下向上打开
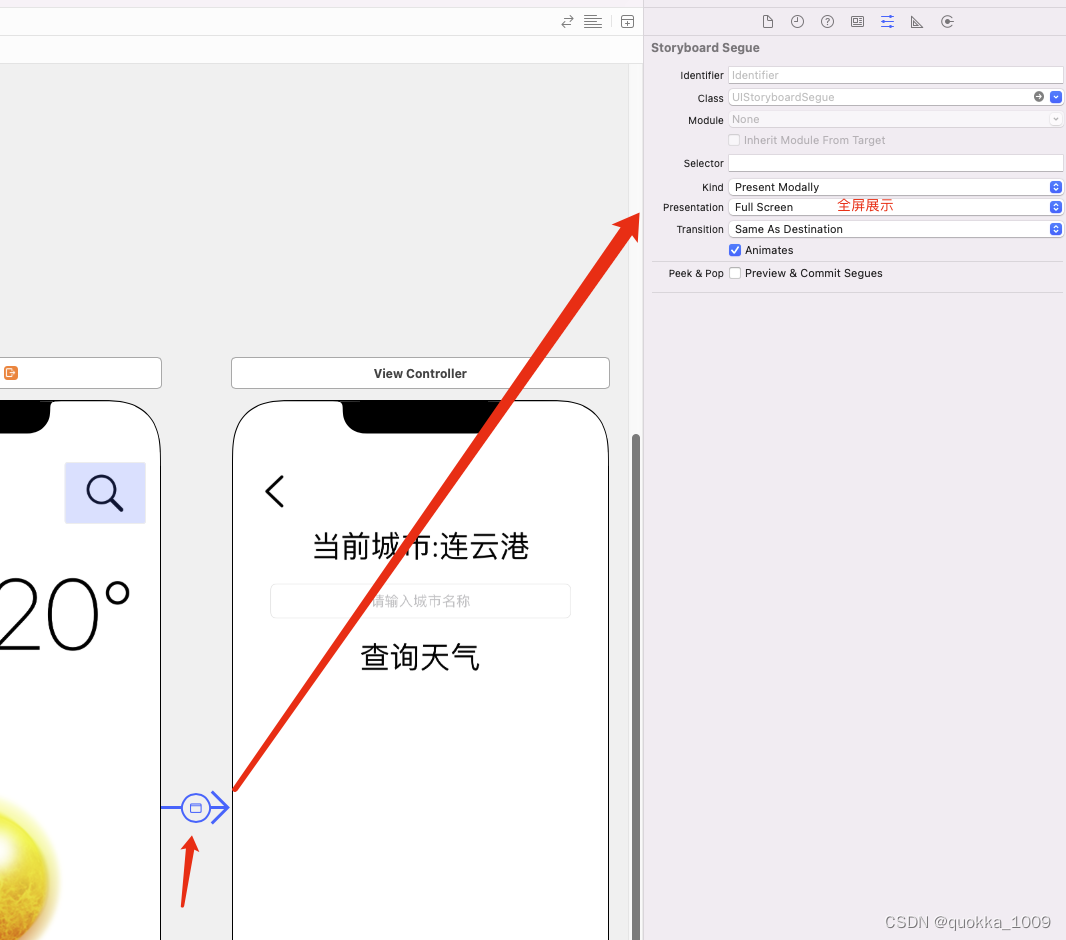
设置新开页面全屏展示
跳转页面 正向传值
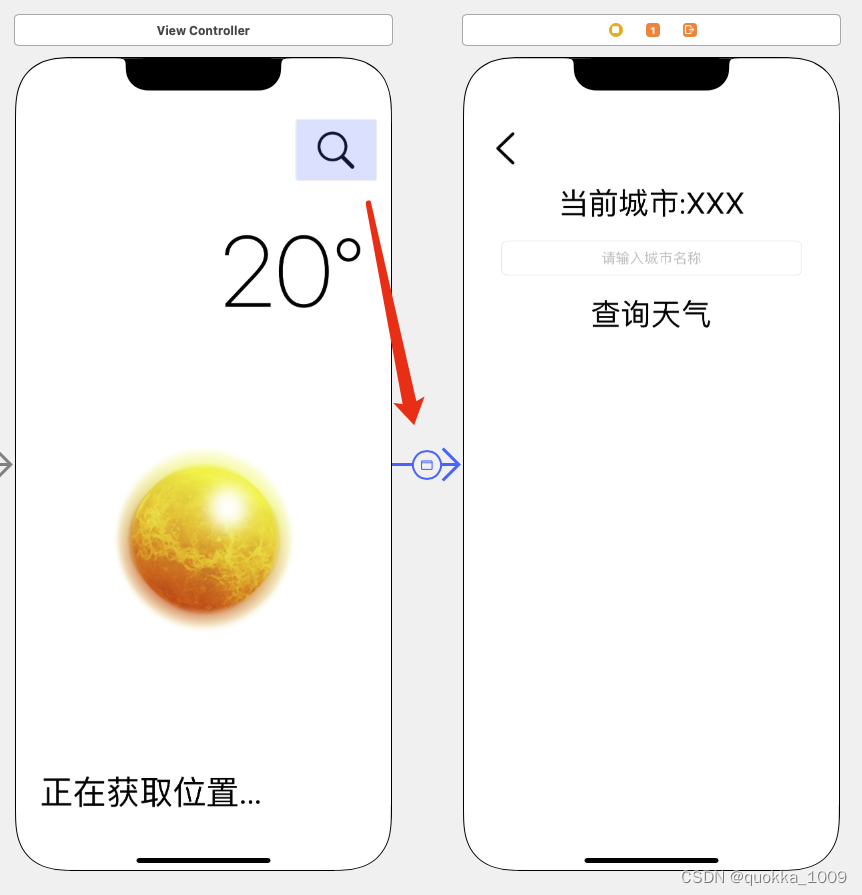
方法1
class AController: UIViewController {

    override func prepare(for segue: UIStoryboardSegue, sender: Any?) {
        if let vc = segue.destination as? BVC {
            vc.address = "赋值信息"
        } else if let vc = segue.destination as? CVC {
            vc.address = "赋值信息"
        }
    }
}

class BVC: UIViewController{

    var address = ""

    @IBOutlet weak var addressLabel: UILabel!

    override func viewDidLoad() {
        super.viewDidLoad()
        self.addressLabel.text = address
    }
}
方法2
设置 identifier 参数
class AController: UIViewController {

    override func prepare(for segue: UIStoryboardSegue, sender: Any?) {
        if segue.identifier == "QueryVCSegue"{
            let vc = segue.destination as! BVC
            vc.address = "赋值信息"
        }
    }
}

class BVC: UIViewController{

    var address = ""

    @IBOutlet weak var addressLabel: UILabel!

    override func viewDidLoad() {
        super.viewDidLoad()
        self.addressLabel.text = address
    }
}
页面跳转 反向传值
发送信息配置
protocol BVCDelegate {
    func didChangCity(city: String)
}

class BVC: UIViewController{

    var delegate: BVCDelegate?

    @IBAction func query(_ sender: Any) {
    	//	关闭页面
        dismiss(animated: true)
        //	给BVCDelegate 方法传数据
        delegate?.didChangCity(city:"传输数据内容..")
    }
接受信息配置
// 添加  Delegate 协议
class AVC: UIViewController, BVCDelegate {

	//	在 prepare 方法中
    override func prepare(for segue: UIStoryboardSegue, sender: Any?) {
        if let vc = segue.destination as? BVC {
           // 当前类信息 挂载给 目标  Delegate
           vc.delegate = self
        }
    }

	//	从添加的   Delegate 协议 方法中,拿去反向传值的内容
    func didChangCity(city: String) {
        print(city)
    }

}
页面关闭 Kind Present Modally
    @IBAction func back(_ sender: Any) {
        dismiss(animated: true)
    }
Stack View 布局
配置说明
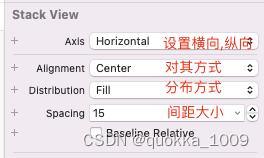
边距推荐尺寸
父视图边距20, 子视图边距8
// 获取页面宽度, 不能赋值
view.frame.width
//	获取页面宽度, 可以赋值
view.frame..size.width
设置屏幕比例宽度
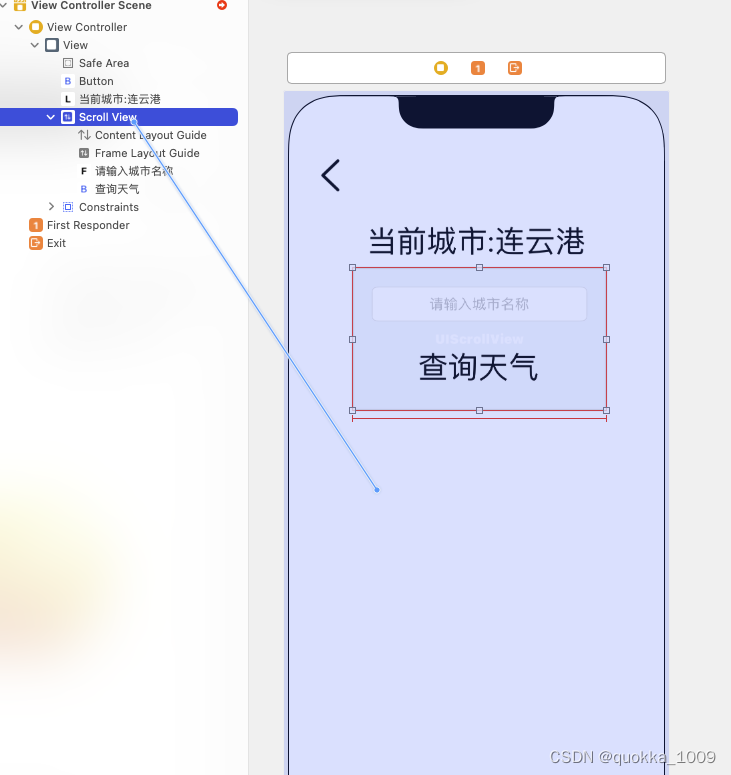
拖拽到需要等比的视图,选择 equal width
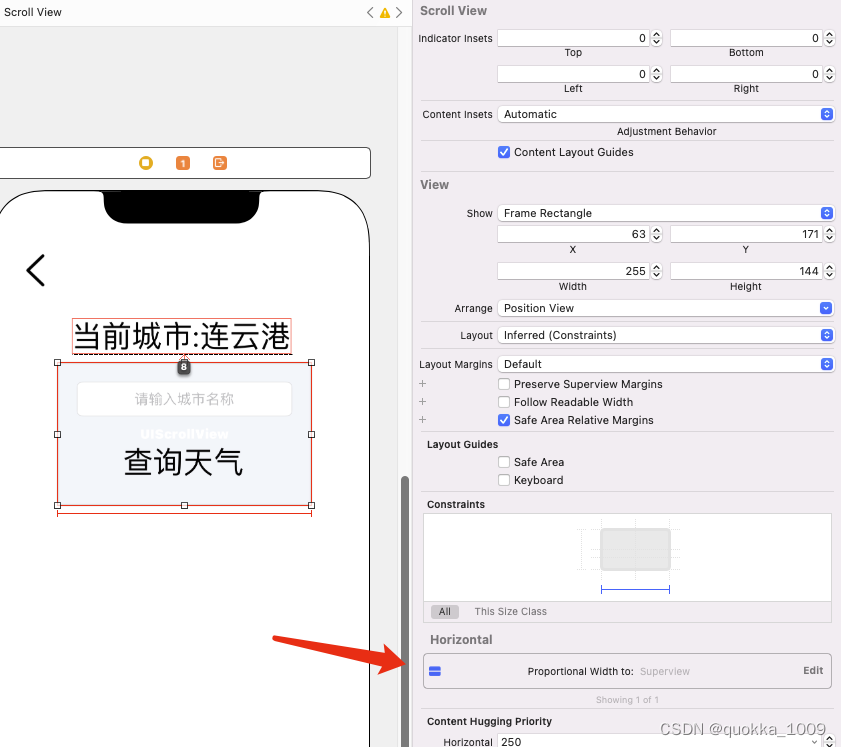
点击进入 设置比例
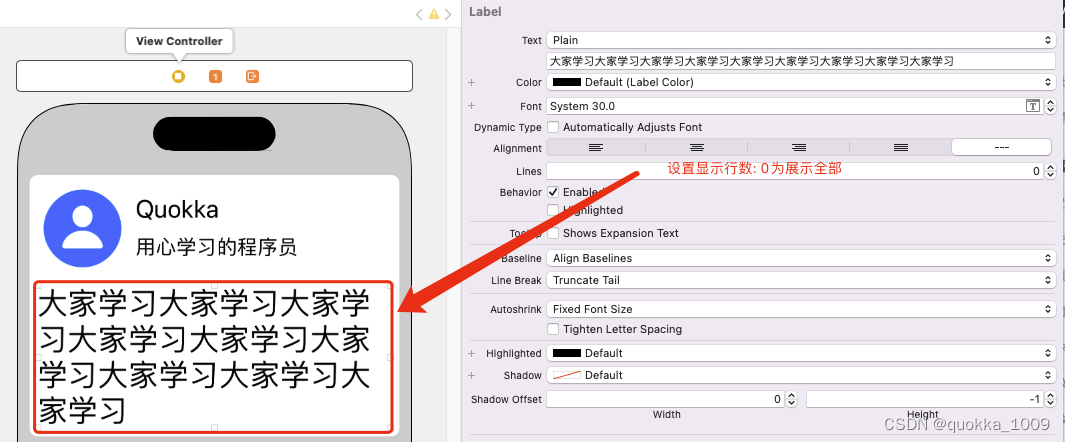
UILabel 标签
行数展示
赋值文本
self.UILabel对象.text = “设置文本”
UITextField
弹起软键盘
textField.becomeFirstResponder()
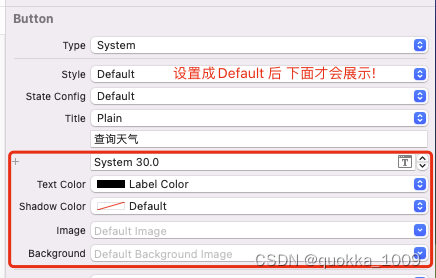
UIButton 按钮
注意事项
快捷键 Command = 按照内容大小进行布局

无法设置Button文字大小,和字体颜色
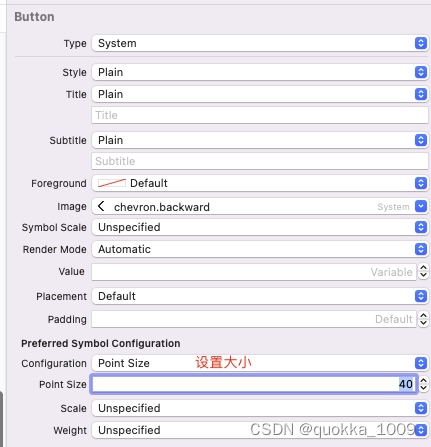
设置 内容大小
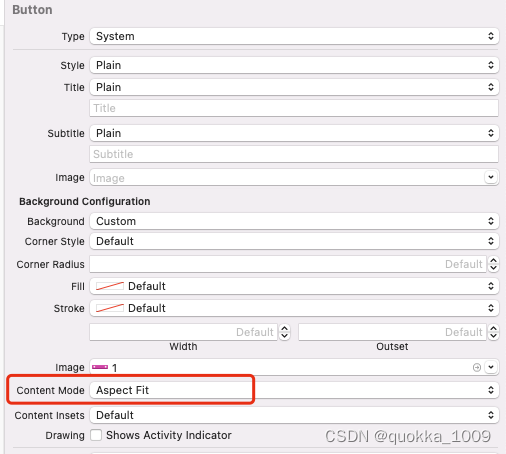
按钮设置背景图案

根据空间最大的完整展示背景图片内容
设置当前按钮为点击状态
cellButton.isSelected = true
删除选中后按钮背景色
cellButton.tintColor = .clear
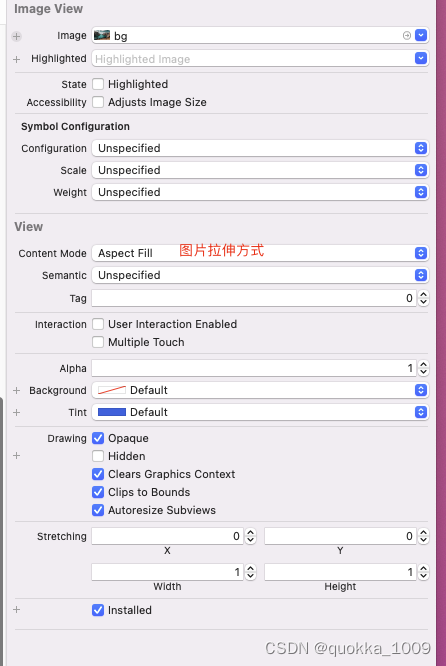
UIImageView 图片
图片拉伸方式
navigationItem
设置导航栏图标大小
navigationItem.rightBarButtonItem?.image = UIImage(systemName: "plus.circle.fill", withConfiguration: UIImage.SymbolConfiguration(pointSize: 22))
赋值图片
self.UIImageView对象.image = UIImage(named: “图片名称”)
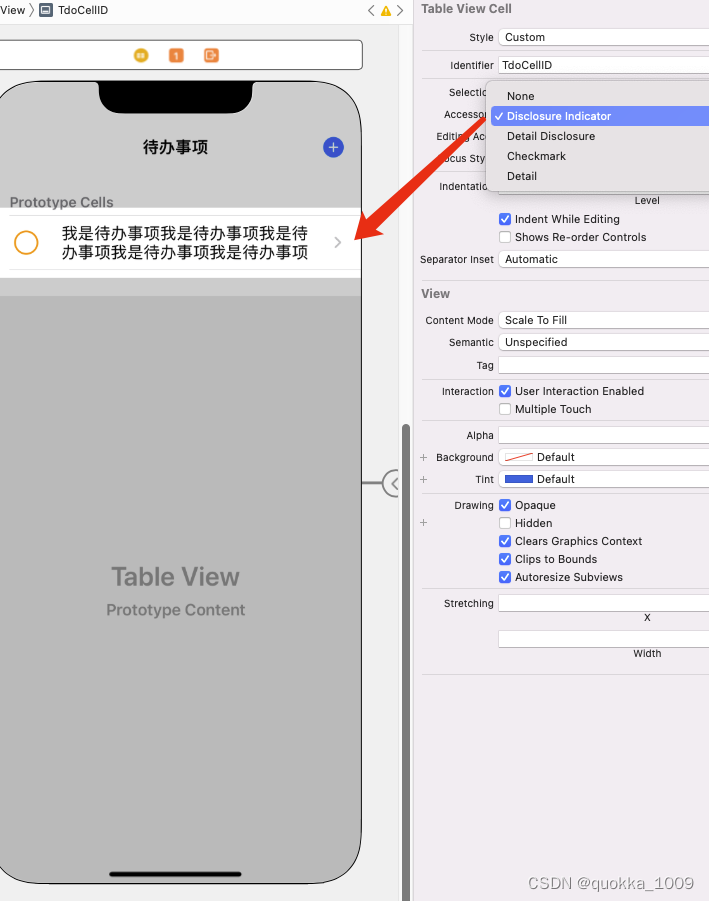
Table 表格
添加右侧箭头
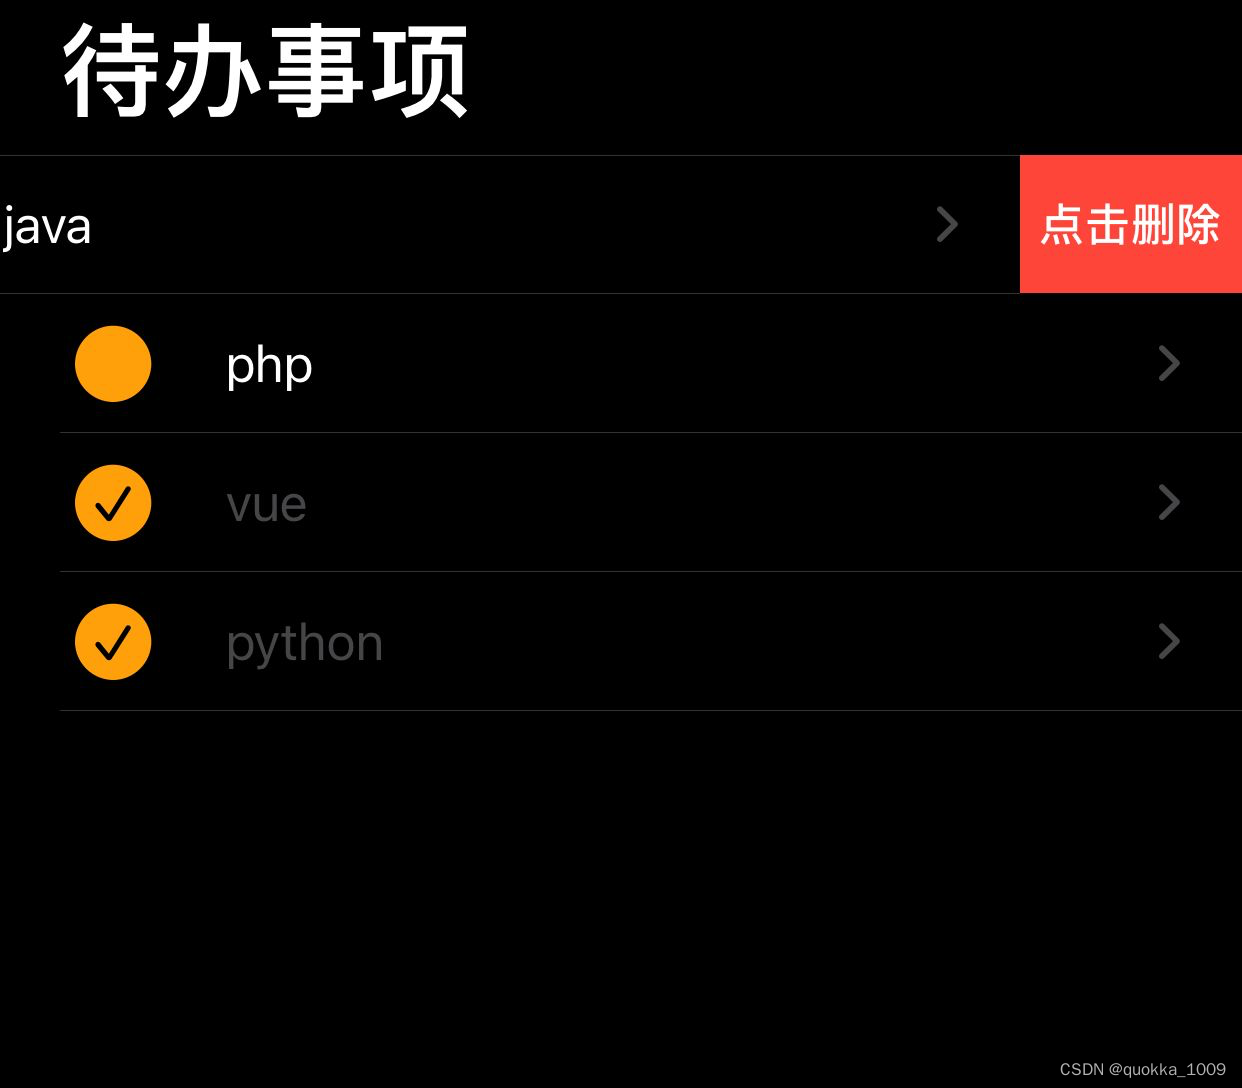
滑动删除
    // Override to support editing the table view.
    override func tableView(_ tableView: UITableView, commit editingStyle: UITableViewCell.EditingStyle, forRowAt indexPath: IndexPath) {
        if editingStyle == .delete {
            // Delete the row from the data source
            //  删除该行
            todos.remove(at: indexPath.row)

            tableView.deleteRows(at: [indexPath], with: .fade)
        } else if editingStyle == .insert {
            // Create a new instance of the appropriate class, insert it into the array, and add a new row to the table view
        }
    }

    //  重写滑动删除文字
    override func tableView(_ tableView: UITableView, titleForDeleteConfirmationButtonForRowAt indexPath: IndexPath) -> String? {
        return "点击删除"
    }
Text View
多行文本输入框
判断是否为非空
//    判断是否为非空
if !todoTextView.text.trimmingCharacters(in: .whitespacesAndNewlines).isEmpty{
   		print("内容非空")
      	print(todoTextView.text)
}
光标定位 聚焦
todoTextView.becomeFirstResponder()
text内容变化时调用改方法
class AVC: UITableViewController {

    @IBOutlet weak var todoTextView: UITextView!

	override func viewDidLoad() {
        super.viewDidLoad()

        //  也可以在视图上操作
        todoTextView.delegate = self
	}
}

extension AVC: UITextViewDelegate{
    // text内容变化时调用改方法
    func textViewDidChange(_ textView: UITextView){
        //  让tableview 重新布局(带动画), 会根据storyboard上定的约束换行或减行
        //  老版本方法
        //  tableView.beginUpdates()
        //  tableView.endUpdates()

        //  新版本方法
        tableView.performBatchUpdates{}
    }
}
Tab Bar Controller 底部标签栏
添加页面
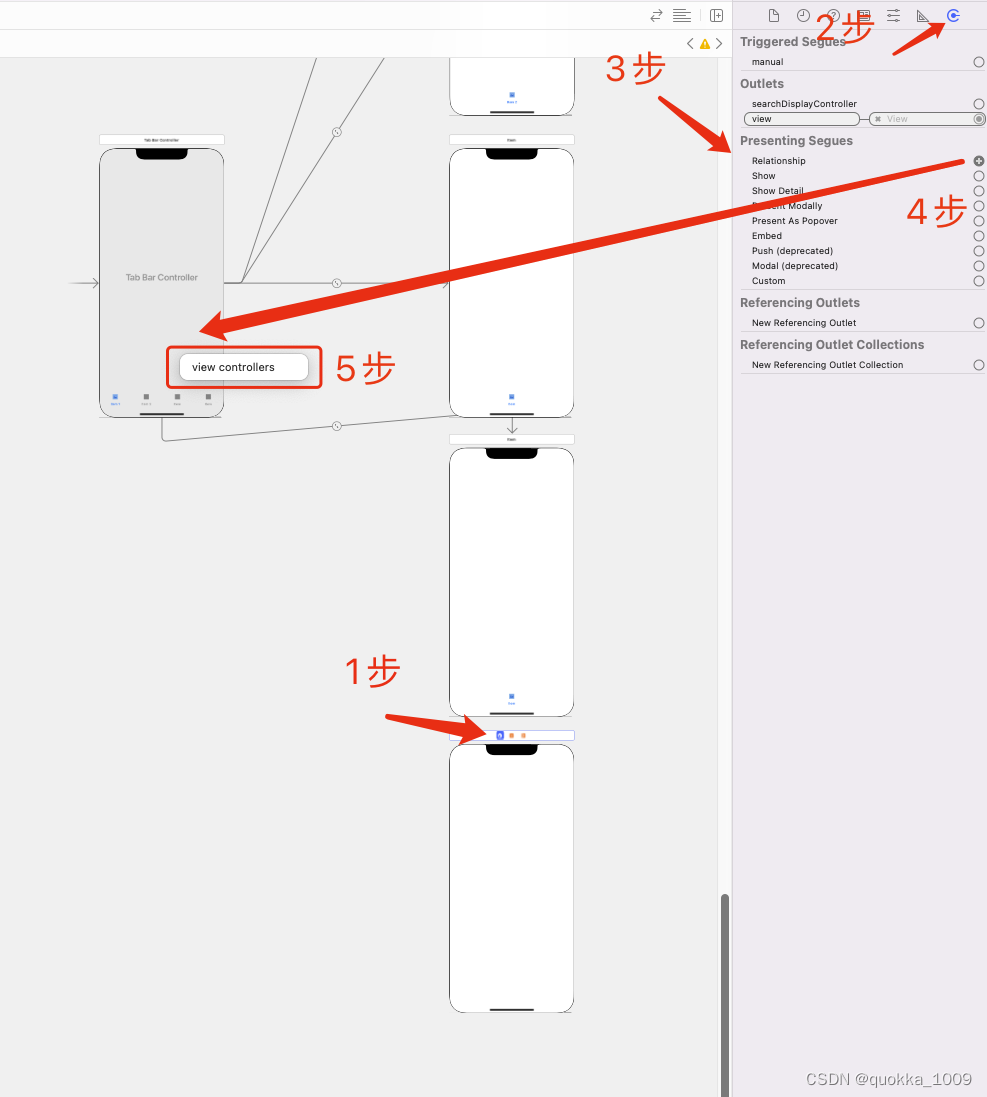
方法一: 按住ctrl 拖拽到指定页面 选择 view controllers
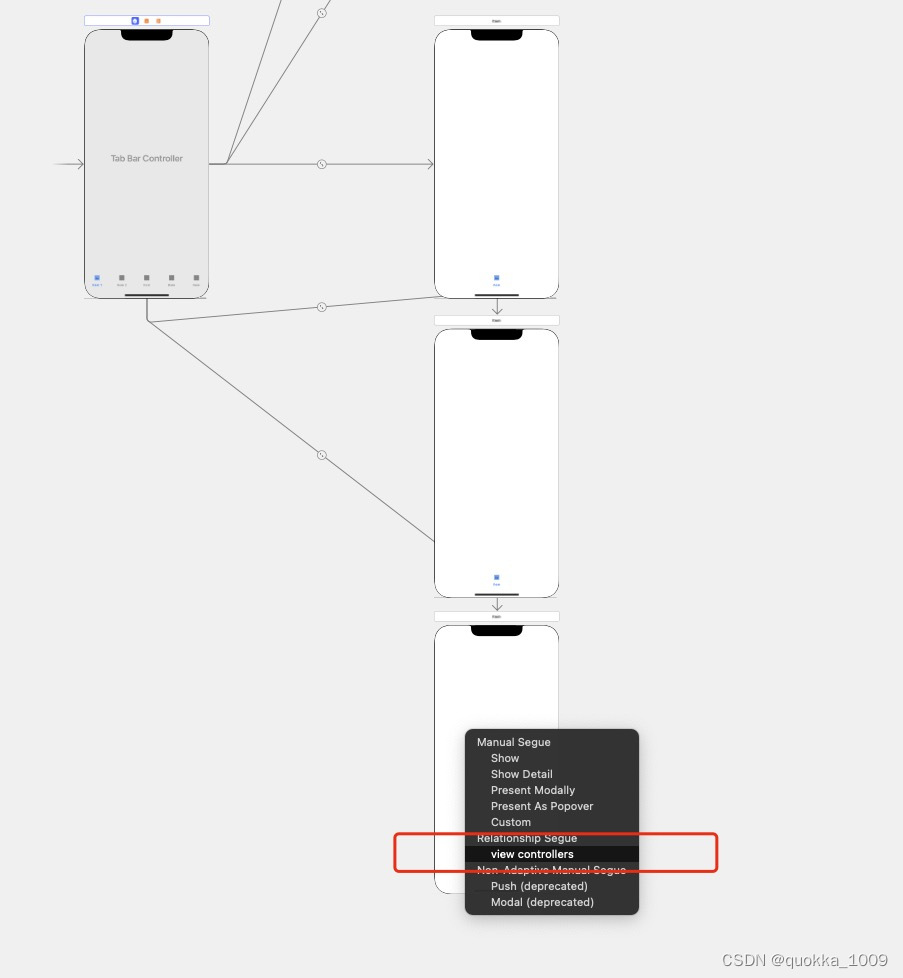
方法二: 按步骤选择view controllers
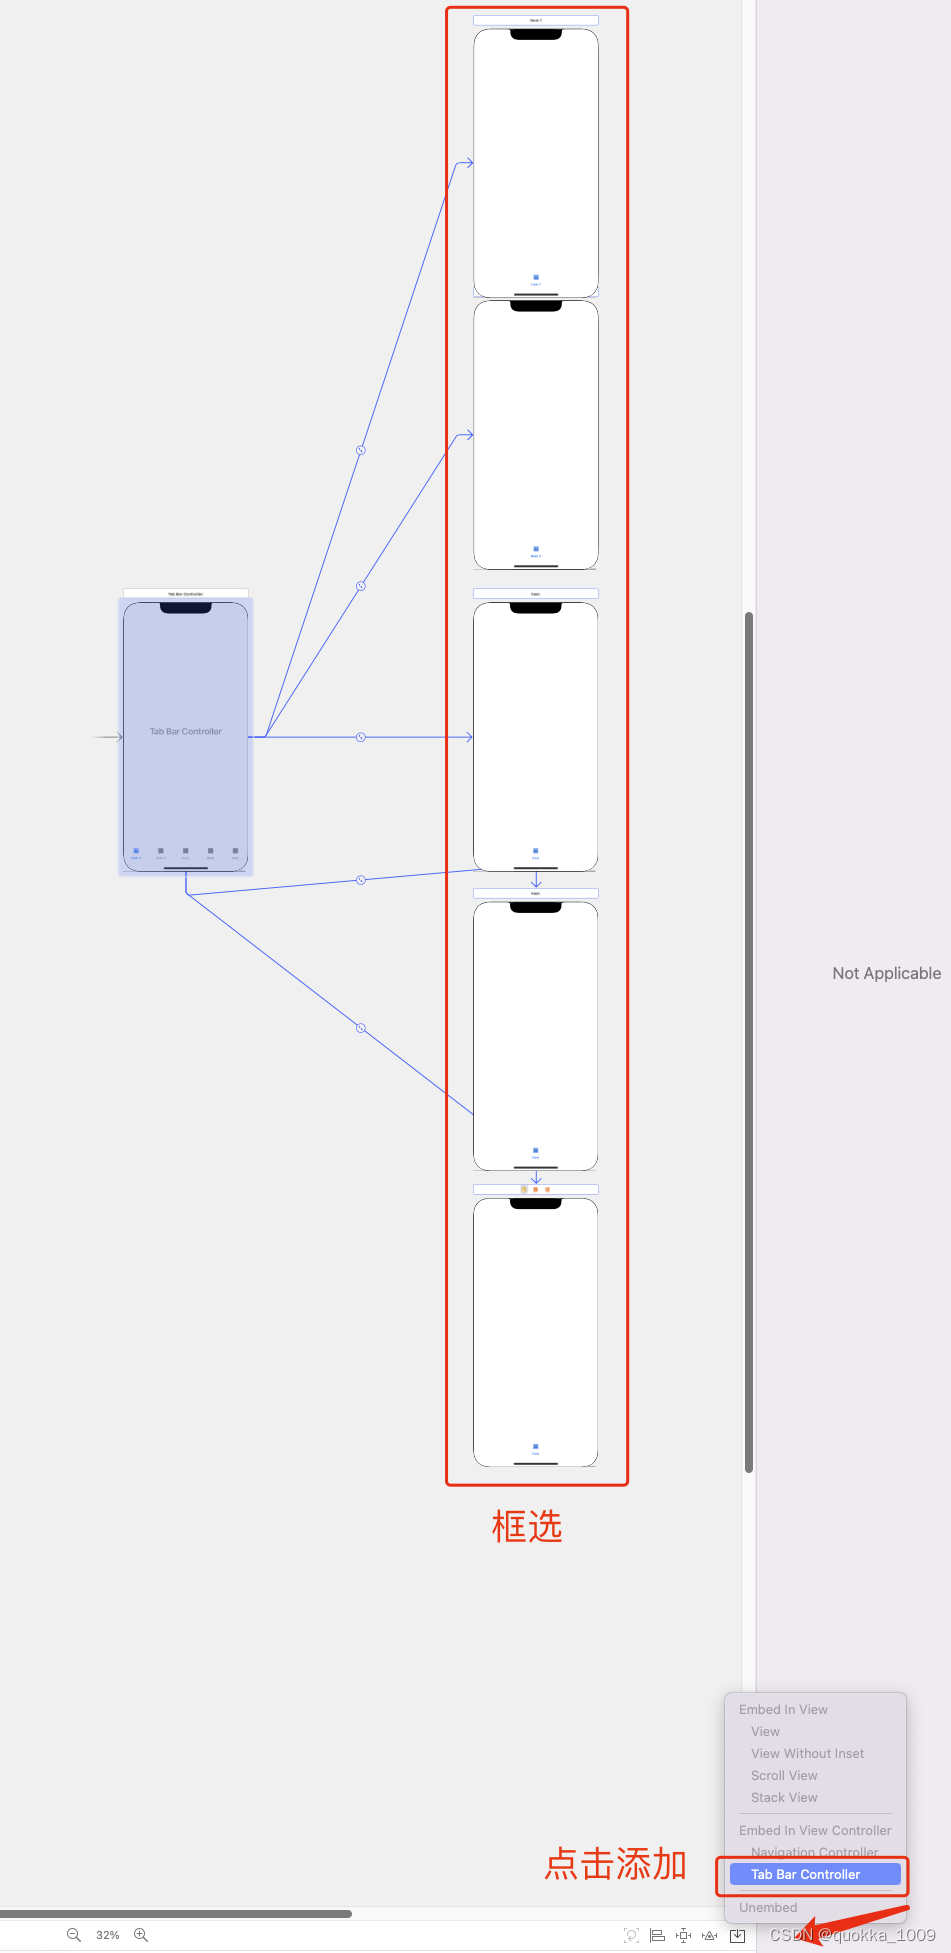
方法三: 批量添加
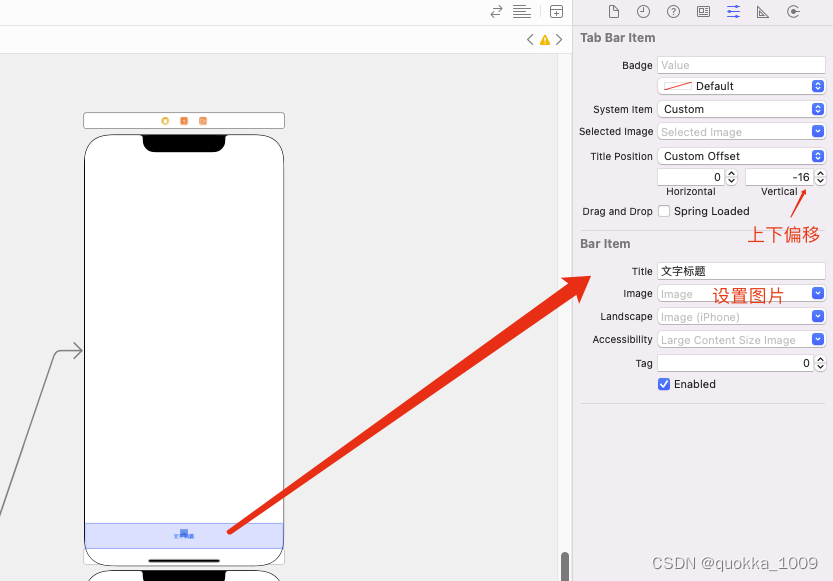
Tab Bar Item

本地存储
获取沙盒地址
print(NSHomeDirectory())
UserDefaults.standard.set(“内容”, forkey: “名字”)
// 要存储的实体类需要实现 Encodable, Decodable 合为 Codable
struct Todo: Codable {
	var name: String
	var checked: Bool
}

do {
	// 编码后进行存储
	let data = try JSONEncoder().encode(todos)
	UserDefaults.standard.set(data, forkey: "todos")
} catch {
	print("编码错误:", error)
}


//	拿取数据
if let data = UserDefaults.standard.data(forKey: "todos") {
	if let todos = try? JSONDecoder().decode([Todo].self, from: data) {
		self.todos = todos
	} else {
		print("解码失败")
	}
}
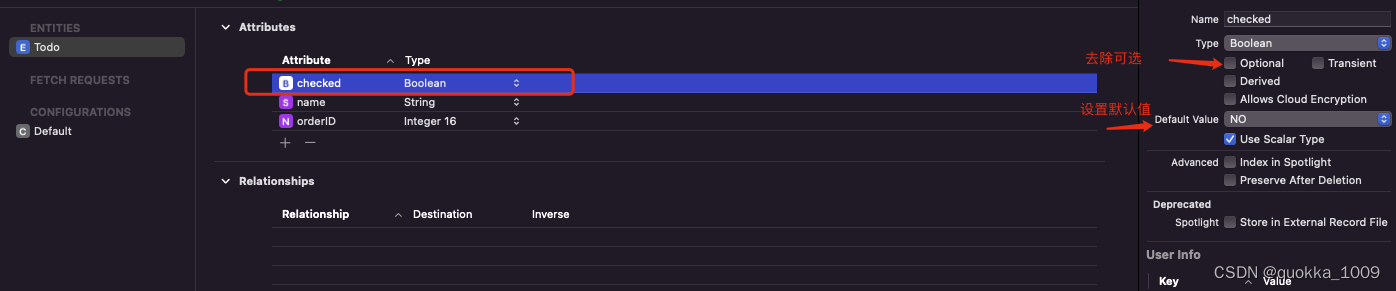
CoreData
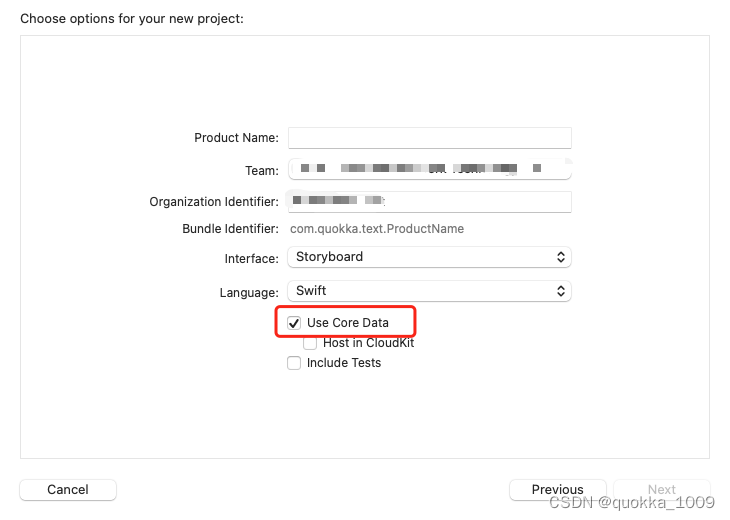
创建实体类

// 获取 app委托
let appDelegate = (UIApplication.shared.delegate as! AppDelegate)
// 获取 app上下文
let context = appDelegate.persistentContainer.viewContext

// 创建对象
let todo = Todo(context: context)
todo.name = "name"
todo.checked = false
// 保存
appDelegate.saveContext()

// 删除数据
context.delete(todos[indexPath.row])
// 保存
appDelegate.saveContext()

//修改数据
todos[row].name = "name"
// 保存
appDelegate.saveContext()

// 读取数据
if let todos = try? context.fetch(Todo.fetchRequest()){
	self.todos = todos
}else {
	print("从SQLite去数据失败)
}
代码区
通用
App的生命周期-AppDelegate和SceneDelegate
AppDelegate
import UIKit
import CoreData

//包含App的部分生命周期函数(钩子函数),也有其余函数(如推送)
@main
class AppDelegate: UIResponder, UIApplicationDelegate {

    func application(_ application: UIApplication, didFinishLaunchingWithOptions launchOptions: [UIApplication.LaunchOptionsKey: Any]?) -> Bool {
        // Override point for customization after application launch.
        print("App启动")
        return true
    }

    // MARK: UISceneSession Lifecycle
    //iOS的App只有一个场景(只有一个窗口)
    func application(_ application: UIApplication, configurationForConnecting connectingSceneSession: UISceneSession, options: UIScene.ConnectionOptions) -> UISceneConfiguration {
        // Called when a new scene session is being created.
        // Use this method to select a configuration to create the new scene with.
        print("即将创建一个窗口时.在此可配置一个可视窗口")
        return UISceneConfiguration(name: "Default Configuration", sessionRole: connectingSceneSession.role)
    }

    func application(_ application: UIApplication, didDiscardSceneSessions sceneSessions: Set<UISceneSession>) {
        // Called when the user discards a scene session.
        // If any sessions were discarded while the application was not running, this will be called shortly after application:didFinishLaunchingWithOptions.
        // Use this method to release any resources that were specific to the discarded scenes, as they will not return.
        print("用户关闭了某个窗口")
    }

    // MARK: - Core Data stack

    lazy var persistentContainer: NSPersistentContainer = {
        /*
         The persistent container for the application. This implementation
         creates and returns a container, having loaded the store for the
         application to it. This property is optional since there are legitimate
         error conditions that could cause the creation of the store to fail.
        */
        let container = NSPersistentContainer(name: "Todos")
        container.loadPersistentStores(completionHandler: { (storeDescription, error) in
            if let error = error as NSError? {
                // Replace this implementation with code to handle the error appropriately.
                // fatalError() causes the application to generate a crash log and terminate. You should not use this function in a shipping application, although it may be useful during development.

                /*
                 Typical reasons for an error here include:
                 * The parent directory does not exist, cannot be created, or disallows writing.
                 * The persistent store is not accessible, due to permissions or data protection when the device is locked.
                 * The device is out of space.
                 * The store could not be migrated to the current model version.
                 Check the error message to determine what the actual problem was.
                 */
                fatalError("Unresolved error \(error), \(error.userInfo)")
            }
        })
        return container
    }()
}
SceneDelegate
import UIKit

//包含App的UI方面的生命周期函数,也有其余函数(如从别的App跳转回来时)
class SceneDelegate: UIResponder, UIWindowSceneDelegate {

    var window: UIWindow?

    func scene(_ scene: UIScene, willConnectTo session: UISceneSession, options connectionOptions: UIScene.ConnectionOptions) {
        // Use this method to optionally configure and attach the UIWindow `window` to the provided UIWindowScene `scene`.
        // If using a storyboard, the `window` property will automatically be initialized and attached to the scene.
        // This delegate does not imply the connecting scene or session are new (see `application:configurationForConnectingSceneSession` instead).
        print("若使用IB,则自动创建可视窗口;若不使用IB,则可在此利用window属性(可视窗口),然后用代码设定App的首页vc")
        guard let _ = (scene as? UIWindowScene) else { return }
    }

    func sceneDidDisconnect(_ scene: UIScene) {
        // Called as the scene is being released by the system.
        // This occurs shortly after the scene enters the background, or when its session is discarded.
        // Release any resources associated with this scene that can be re-created the next time the scene connects.
        // The scene may re-connect later, as its session was not necessarily discarded (see `application:didDiscardSceneSessions` instead).
        print("窗口/App已经断开连接(1.关闭App时调用,2.退到后台后不久调用)")
    }

    //App主要有三种状态:被关闭,在前台,在后台

    //下面两个方法对应的范围更广,如App关闭时,用户点击推送横幅后打开App,也会调用sceneDidBecomeActive,此时可清楚右上角角标
    func sceneDidBecomeActive(_ scene: UIScene) {
        // Called when the scene has moved from an inactive state to an active state.
        // Use this method to restart any tasks that were paused (or not yet started) when the scene was inactive.
        print("窗口/App从非活跃-->活跃(已经被激活)")
    }
    func sceneWillResignActive(_ scene: UIScene) {
        // Called when the scene will move from an active state to an inactive state.
        // This may occur due to temporary interruptions (ex. an incoming phone call).
        print("窗口/App从活跃-->非活跃(即将被挂起)")
    }

    func sceneWillEnterForeground(_ scene: UIScene) {
        // Called as the scene transitions from the background to the foreground.
        // Use this method to undo the changes made on entering the background.
        print("窗口/App从后台-->前台(即将回到前台)")
    }
    func sceneDidEnterBackground(_ scene: UIScene) {
        // Called as the scene transitions from the foreground to the background.
        // Use this method to save data, release shared resources, and store enough scene-specific state information
        // to restore the scene back to its current state.
        print("窗口/App从前台-->后台(已经进入后台)")

        // Save changes in the application's managed object context when the application transitions to the background.
        (UIApplication.shared.delegate as? AppDelegate)?.saveContext()
    }
}
    // 页面即将出现的时候
    override func viewWillAppear(_ animated: Bool) {
        <#code#>
    }
    // 页面已经出现了
    override func viewDidAppear(_ animated: Bool) {
        <#code#>
    }
    // 页面即将关闭的时候
    override func viewWillDisappear(_ animated: Bool) {
        <#code#>
    }
    // 页面已经关闭
    override func viewDidDisappear(_ animated: Bool) {
        <#code#>
    }
类
区别
class 需要创建初始化构造器
struct 自动创建初始化构造器; 可以不初始化默认值
// 类
class Todo{
    var name = ""
}

// 结构体
// 可以默认生成初始化构造器
struct Todo{
    var name : String
}
去除空格换行, 并且判空
if !cityTextField.text!.trimmingCharacters(in: .whitespacesAndNewlines).isEmpty{
      delegate?.didChangCity(city: cityTextField.text!)
  }
类型转换
转String
let x = xx
let x = "\(xx)"
let x = String(xx)
转Int
let x = Int(1.9)  		<= 1 去除小数点后
let x = round(1.9)		<= 2 四舍五入
转Double
let x = Double(1)
类型转换
class A{}
class B:A{}

let a=A()
let b=B()

b as A			<= 向上转型
a as! B 		<= 向下转型 转型失败报错
a as? B 		<= 向下转型 转型失败为null
数据去反 true 为 false
.toggle()
alert 弹出框
            //  title: "标题", message: "内容", preferredStyle: 样式
            let alert = UIAlertController(title: "标题", message: "内容....", preferredStyle: .alert)
            // 点击按钮 (需要多个点击按钮就添加一个 addAction)
            alert.addAction(
                UIAlertAction(
                    title:"确认按钮",
                    style: .default,
                    //  闭包
                    handler: { _ in
                        NSLog("The \"OK\" alert occured.")
                    }
                )
            )
            alert.addAction(
                UIAlertAction(
                    title: "取消按钮",
                    style: .destructive,
                    //  闭包
                    handler: { _ in
                        NSLog("The \"NO\" alert occured.")
                    }
                )
            )
            // 弹出配置好的alert 对象, animated: 动画效果
            self.present(
                alert,
                animated: true,
                completion: {
                    NSLog("按钮点击后的回调函数!")
                }
            )
播放声音
    // 要是成员变量, 若是局部变量,还没播放完毕,就会和方法一起销毁
    var player : AVAudioPlayer!

    @IBAction func play(_ sender: UIButton) {

        //获取文件路径
        let url = Bundle.main.url(forResource: "note\(sender.tag)", withExtension: "wav")!

        do{
            // 配置音频文件路径
            player = try AVAudioPlayer(contentsOf: url )
            //  播放文件声音
            player.play()
        }catch{
            print(error)
        }
    }
摇一摇
    // 摇一摇后 调用
    override func motionEnded(_ motion: UIEvent.EventSubtype, with event: UIEvent?) {
        print("摇一摇后 调用")
    }
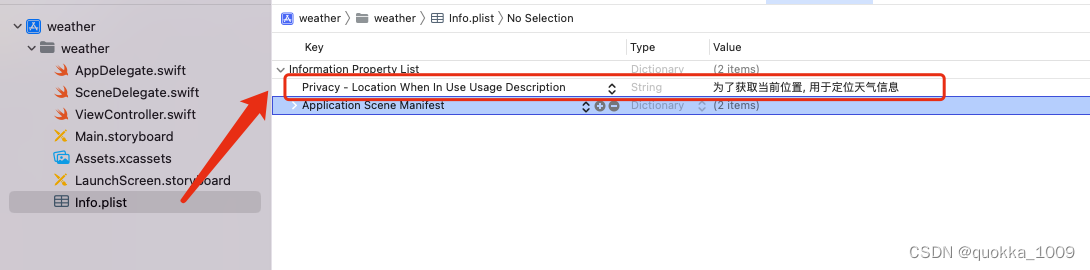
获取当前位置
1: Info.plist 添加声明 Privacy - Location When In Use Usage Description
2.代码获取位置示例
//
//  ViewController.swift
//  weather
//

import UIKit
import CoreLocation

//  添加协议 CLLocationManagerDelegate
class ViewController: UIViewController, CLLocationManagerDelegate {

    //  位置管理器
    let locationManager = CLLocationManager()

    override func viewDidLoad() {
        super.viewDidLoad()

        // 请求授权获取当前位置
        locationManager.requestWhenInUseAuthorization()

         // 当前类信息 挂载给 目标  Delegate
        locationManager.delegate = self

        //  获取当前位置
        //  kCLLocationAccuracyBestForNavigation: 使用额外的传感器数据来促进导航应用程序的最高精度。
        //  kCLLocationAccuracyBest: 可用的最佳精度水平。
        //  kCLLocationAccuracyNearestTenMeters: 精确到距离预定目标十米以内。
        //  kCLLocationAccuracyHundredMeters: 精确到百米以内。
        //  kCLLocationAccuracyKilometer: 精确到最近的一公里。
        //  kCLLocationAccuracyThreeKilometers: 精确到最近的3公里。
        //  kCLLocationAccuracyReduced: 当应用程序没有被授权获得完整的精确位置数据时,使用的精确级别。
        locationManager.desiredAccuracy = kCLLocationAccuracyThreeKilometers
        //  请求当前位置
        locationManager.requestLocation()

    }


    func locationManager(_ manager: CLLocationManager, didUpdateLocations locations: [CLLocation]) {
        //  获取经度
        let lon = locations[0].coordinate.longitude
        //  获取纬度
        let lat = locations[0].coordinate.latitude

        print(lon)
        print(lat)
    }
    func locationManager(_ manager: CLLocationManager, didFailWithError error: Error) {
        print("位置获取失败...")
    }

}


 1008
1008


 被折叠的 条评论
为什么被折叠?
被折叠的 条评论
为什么被折叠?
 到【灌水乐园】发言


