


AJAX 入门
AJAX 概念和 axios 使用
AJAX 概念
- AJAX 是 异步 的 JavaScript 和 XML(Asynchronous JavaScript And XML)
- AJAX 使用
XMLHttpRequest对象与服务器通信 - AJAX 可使用 JSON、XML、HTML、text 文本等格式发送和接受数据
- AJAX 是浏览器与服务器进行数据通信的技术,异步可以在不重新刷新页面的情况下与服务器通信
AJAX 使用
- 先使用
axios库,与服务器进行数据通信
基于XMLHttpRequest封装,代码简单,月下载量在 14亿 次。Vue、React 项目中都会用到 - 再学习
XMLHttpRequest对象的使用,了解AJAX底层原理
axios 使用
- 语法
1.引入axios.js:https://cdn.jsdelivr.net/npm/axios/dist/axios.min.js
2.使用axios函数
①传入配置对象
②再用.then回调函数接收结果,并做后续处理axios({ url: '目标资源地址' }).then((result) => { // 对服务器返回的数据做后续处理 }) - 示例
<head>
    <meta charset="UTF-8">
    <meta http-equiv="X-UA-Compatible" content="IE=edge">
    <meta name="viewport" content="width=device-width, initial-scale=1.0">
    <title>01.AJAX概念和axios使用</title>
</head>

<body>
    <!--
        axios库地址: https://cdn.jsdelivr.net/npm/axios/dist/axios.min.js
        省份数据地址: http://hmajax.itheima.net/api/province'
    -->
    <p class="my-p"></p>
    <script src="https://cdn.jsdelivr.net/npm/axios/dist/axios.min.js"></script>
    <script>
        axios({
            url: 'http://hmajax.itheima.net/api/province'
        }).then(result => {
            console.log(result)
            console.log(result.data.list)
            console.log(result.data.list.join('<br>'))
            document.querySelector('.my-p').innerHTML = result.data.list.join('<br>')
        })
    </script>
</body>
认识 URL
URL 概念
- URL(Uniform Resource Locator,统一资源定位符)是因特网上标准的资源的地址,用于访问网络上的资源
URL 组成
- 协议 + 域名 + 资源路径
http://hmajax.itheima.net/api/province
hmajax.itheima.net:域名
api/province:资源路径 - 协议
http:超文本传输协议,规定浏览器和服务器之间传输数据的格式 - 域名
标记服务器在互联网中方位 - 资源路径
标记资源在服务器下的具体位置
URL 查询参数
URL 查询参数
- 浏览器提供给服务器的额外信息,让服务器返回浏览器想要的数据
- 语法
http://xxxx.com/xxx/xxx?参数名1=值1&参数名2=值2
axios 查询参数
- 语法
使用axios提供的params选项。axios 在运行时把参数名、值,拼接到 url?参数名=axios({ url: '目标资源地址', params: { 参数名: 值 } }).then(result => { // 对服务器返回的数据做后续处理 }) - 示例
<head>
  <meta charset="UTF-8">
  <meta http-equiv="X-UA-Compatible" content="IE=edge">
  <meta name="viewport" content="width=device-width, initial-scale=1.0">
  <title>03.查询参数</title>
</head>

<body>
  <!--
    城市列表: http://hmajax.itheima.net/api/city
    参数名: pname
    值: 省份名字
  -->
  <p></p>
  <script src="https://cdn.jsdelivr.net/npm/axios/dist/axios.min.js"></script>
  <script>
    axios({
      url: 'http://hmajax.itheima.net/api/city',
      params: {
        pname: '陕西省'
      }
    }).then(result => {
      console.log(result.data.list)
      document.querySelector('p').innerHTML = result.data.list.join('<br>')
    })
  </script>
</body>
案例 - 地区查询
- 代码
<head>
  <meta charset="UTF-8">
  <meta http-equiv="X-UA-Compatible" content="IE=edge">
  <meta name="viewport" content="width=device-width, initial-scale=1.0">
  <title>案例_地区查询</title>
  <link rel="stylesheet" href="https://cdn.jsdelivr.net/npm/bootstrap@5.1.3/dist/css/bootstrap.min.css">
  <style>
    :root {
      font-size: 15px;
    }
    body {
      padding-top: 15px;
    }
  </style>
</head>

<body>
  <div class="container">
    <form id="editForm" class="row">
      <!-- 输入省份名字 -->
      <div class="mb-3 col">
        <label class="form-label">省份名字</label>
        <input type="text" value="北京" name="province" class="form-control province" placeholder="请输入省份名称" />
      </div>
      <!-- 输入城市名字 -->
      <div class="mb-3 col">
        <label class="form-label">城市名字</label>
        <input type="text" value="北京市" name="city" class="form-control city" placeholder="请输入城市名称" />
      </div>
    </form>
    <button type="button" class="btn btn-primary sel-btn">查询</button>
    <br><br>
    <p>地区列表: </p>
    <ul class="list-group">
      <!-- 示例地区 -->
      <li class="list-group-item">东城区</li>
    </ul>
  </div>

  <script src="https://cdn.jsdelivr.net/npm/axios/dist/axios.min.js"></script>

  <!-- <script>
    document.querySelector('.sel-btn').addEventListener('click', () => {  // 法一
      let pName = document.querySelector('.province').value;
      let cName = document.querySelector('.city').value;
      axios({
        url: 'http://hmajax.itheima.net/api/area',
        params: {
          pname: pName,
          cname: cName
        }
      }).then(result => {
        let list = result.data.list
        console.log(list)
        let theLi = list.map(areaName => `<li class="list-group-item">${areaName}</li>`).join('')
        console.log(theLi)
        document.querySelector('.list-group').innerHTML = theLi
      })
    })
  </script> -->

  <script>
    document.querySelector('.sel-btn').addEventListener('click', () => {  // 法二
      let pname = document.querySelector('.province').value;
      let cname = document.querySelector('.city').value;
      axios({
        url: 'http://hmajax.itheima.net/api/area',
        params: {
          pname,  // 若属性名和值相同,则可简写
          cname
        }
      }).then(result => {
        let list = result.data.list
        console.log(list)
        let theLi = list.map(areaName => `<li class="list-group-item">${areaName}</li>`).join('')
        console.log(theLi)
        document.querySelector('.list-group').innerHTML = theLi
      })
    })
  </script>
</body>
常用请求方法和数据提交
常用请求方法
- 请求方法【不区分大小写】
GET:获取数据【默认】
POST:提交数据
PUT:修改数据(全部)
DELETE:删除数据
PATCH:修改数据(部分)
axios 请求配置
- 代码
axios({
  url: '目标资源地址',
  method: '请求方法',
  data: {
    参数名: 值
  }
}).then((result) => {
  // 对服务器返回的数据做后续处理
})
axios 核心配置
- 查询
axios({ url: '目标资源地址', method: 'GET', params: { 参数名: 值 } }) - 提交
axios({
  url: '目标资源地址',
  method: 'POST',
  data: {  // axios 内部将 object 转为 json
    参数名: 值
  }
})
案例 - 注册账号
- 代码
<head>
  <meta charset="UTF-8">
  <meta http-equiv="X-UA-Compatible" content="IE=edge">
  <meta name="viewport" content="width=device-width, initial-scale=1.0">
  <title>常用请求方法和数据提交</title>
</head>

<body>
  <button class="btn">注册用户</button>
  <script src="https://cdn.jsdelivr.net/npm/axios/dist/axios.min.js"></script>
  <script>
    document.querySelector('.btn').addEventListener('click', () => {
      axios({
        url: 'http://hmajax.itheima.net/api/register',
        method: 'POST',
        data: {
          username: 'itheima007',
          password: '7654321'
        }
      })
    })
  </script>
</body>
axios 错误处理
- 代码
<head>
  <meta charset="UTF-8">
  <meta http-equiv="X-UA-Compatible" content="IE=edge">
  <meta name="viewport" content="width=device-width, initial-scale=1.0">
  <title>axios错误处理</title>
</head>

<body>
  <button class="btn">注册用户</button>
  <script src="https://cdn.jsdelivr.net/npm/axios/dist/axios.min.js"></script>
  <script>
    document.querySelector('.btn').addEventListener('click', () => {
      axios({
        url: 'http://hmajax.itheima.net/api/register',
        method: 'post',
        data: {
          username: 'itheima007',
          password: '7654321'
        }
      }).then(result => {  // 成功
        console.log(result)
      }).catch(error => {  // 失败
        console.log(error)
        alert(error.response.data.message)
      })
    })
  </script>
</body>
HTTP协议 - 报文
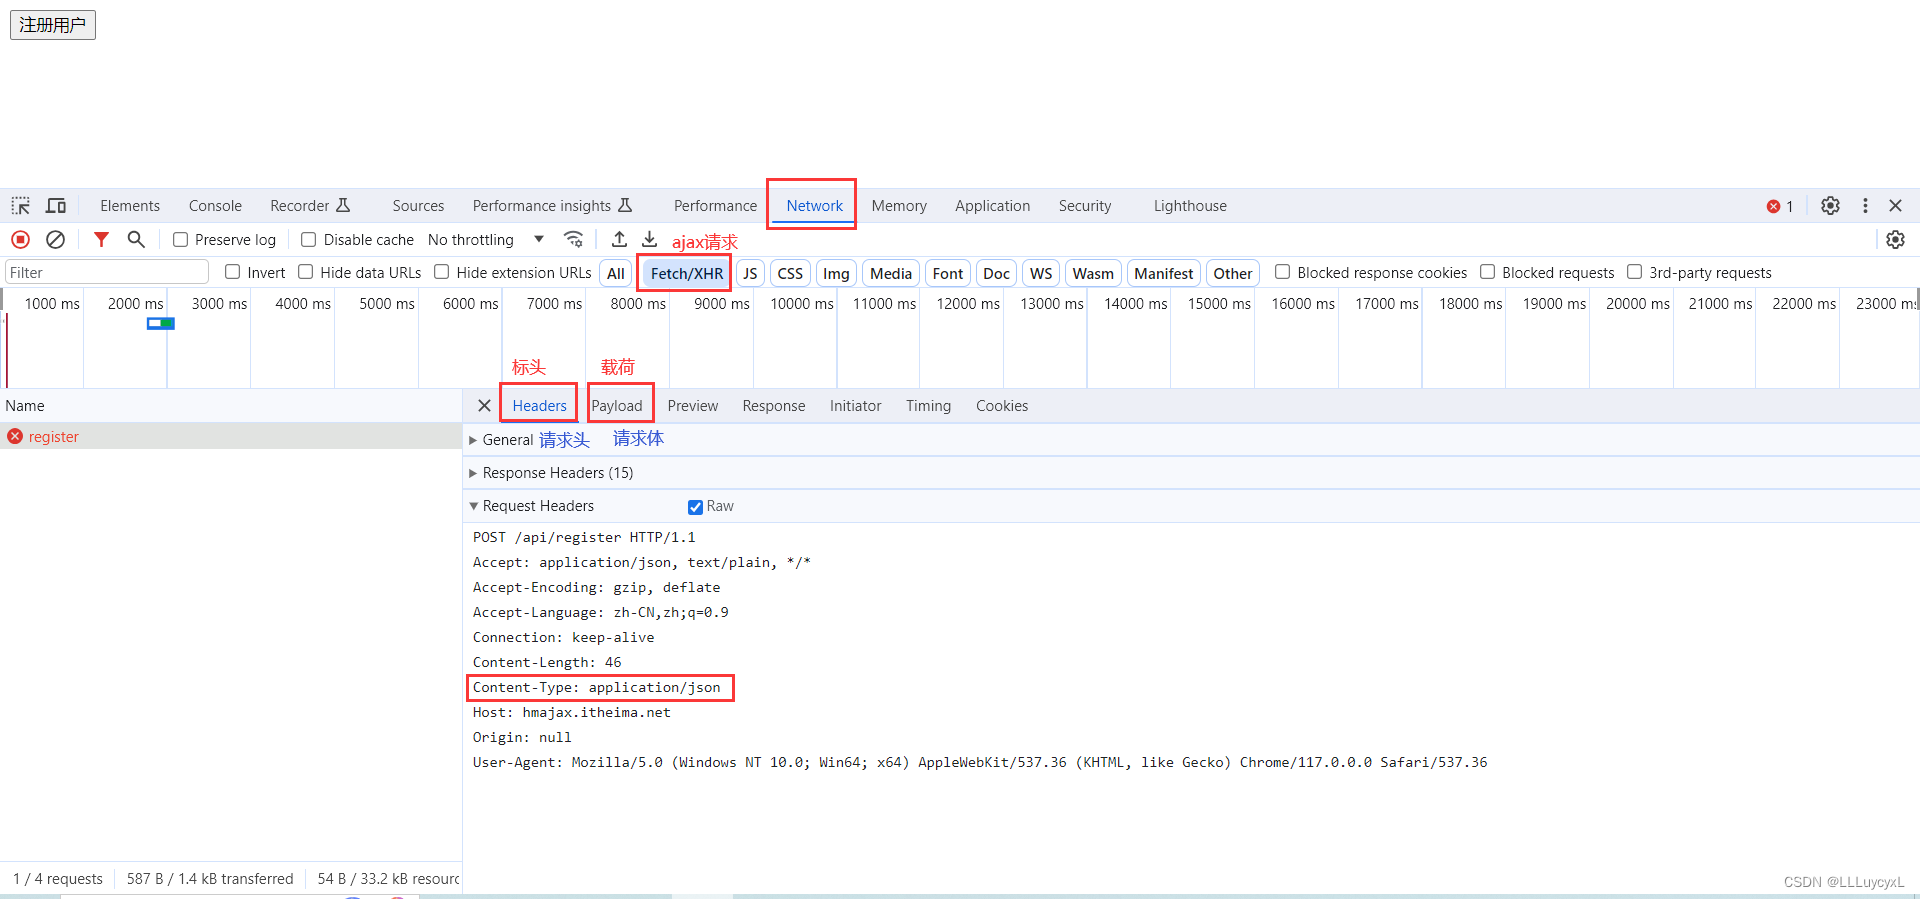
HTTP 协议-请求报文
- HTTP 协议:规定浏览器发送及服务器返回内容的格式
- 请求报文:浏览器按照 HTTP 协议要求的格式,发送给服务器的内容
- 请求报文格式:
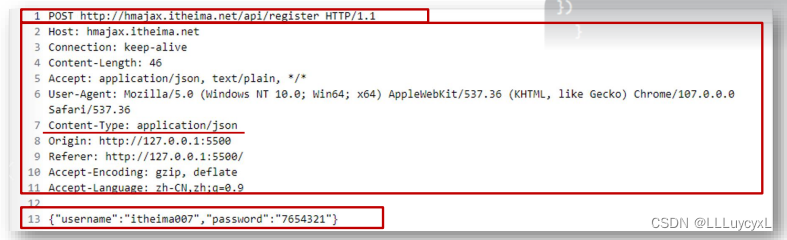
① 请求行:请求方法 + URL + 协议
② 请求头:键值对格式,如:Content-Type
③ 空行:分隔请求头、发送给服务器的资源
④ 请求体:发送的资源 - 通过 Chrome 查看请求报文
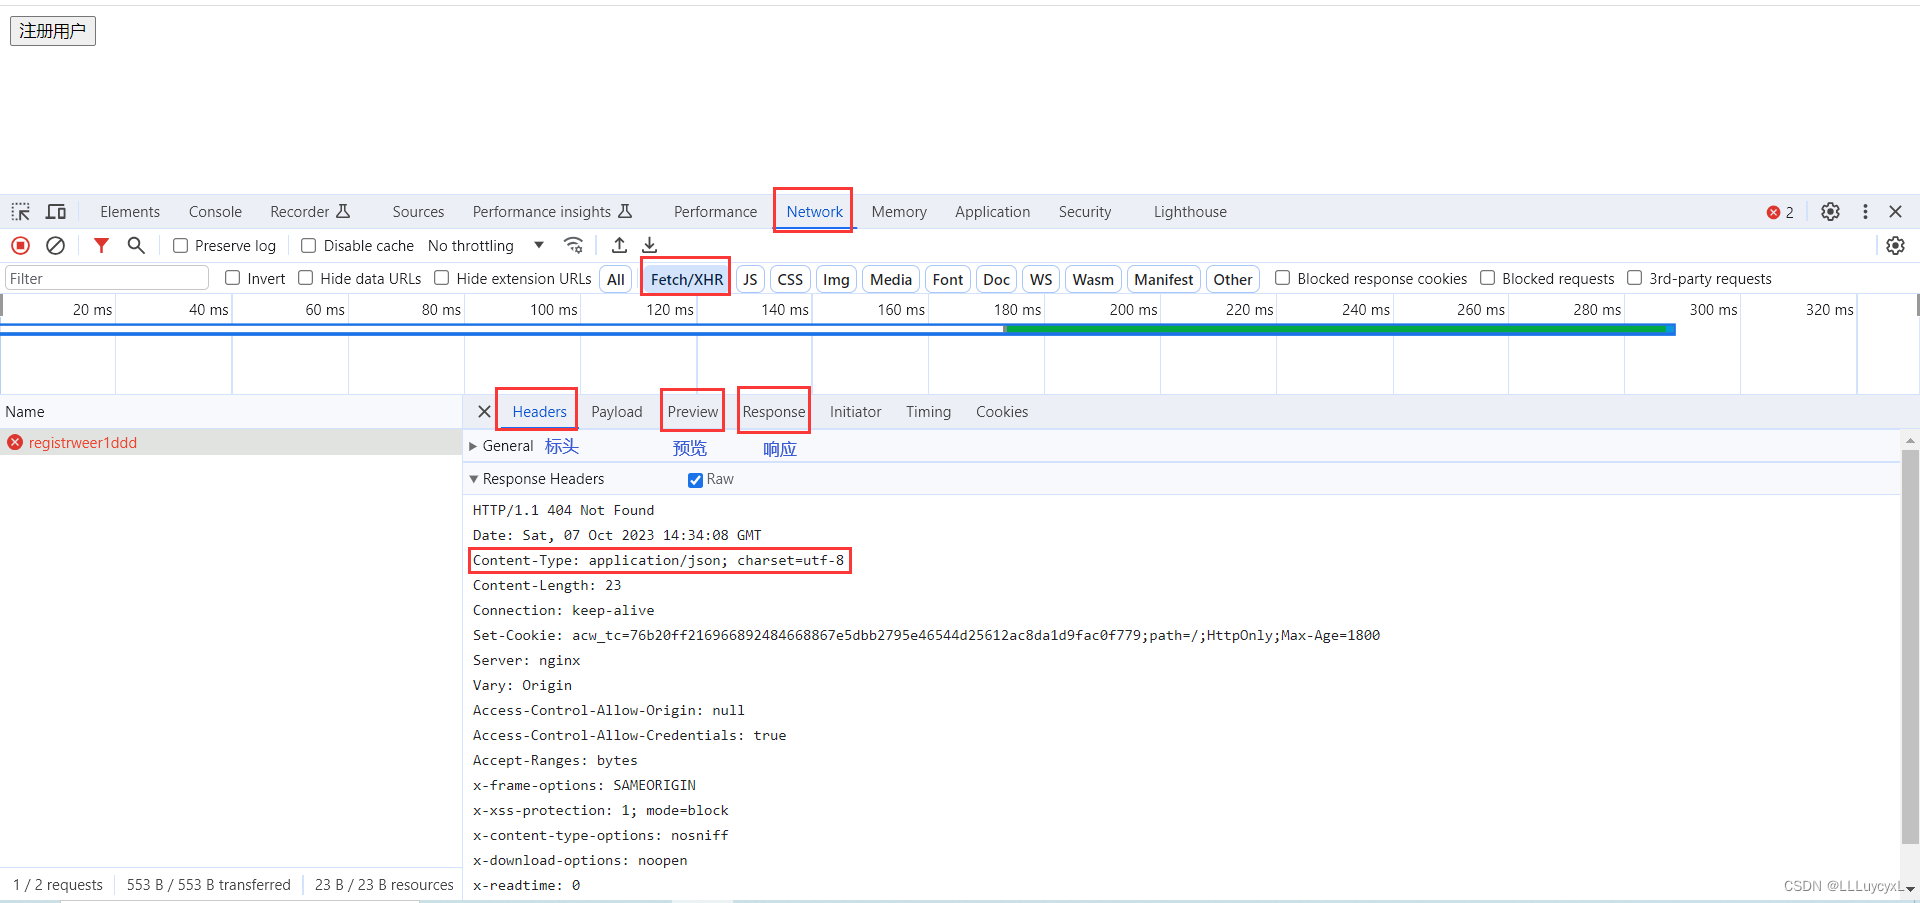
HTTP 协议-响应报文
- HTTP 协议:规定浏览器发送及服务器返回内容的格式
- 响应报文:服务器按照 HTTP 协议要求的格式,发送给浏览器的内容
- 响应报文格式:
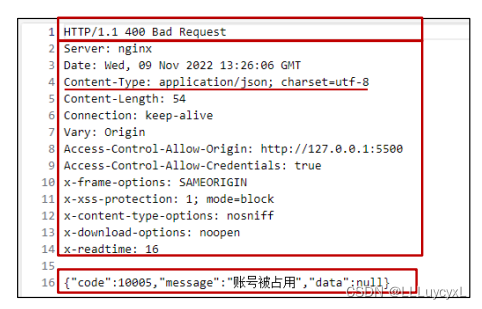
① 响应行(状态行):协议 + HTTP 响应状态码 + 状态信息
② 响应头:键值对格式,如:Content-Type
③ 空行:分隔响应头、服务器返回的资源
④ 响应体:返回的资源 - HTTP 响应状态码
1xx:信息
2xx:成功
3xx:重定向消息
4xx:客户端错误
5xx:服务端错误 - 通过 Chrome 查看响应报文
接口文档
- 接口文档:由后端提供的描述接口的文章
- 接口:使用 AJAX 和服务器通讯时,使用的 URL、请求方法、参数
- 黑马模拟接口文档:
https://apifox.com/apidoc/shared-1b0dd84f-faa8-435d-b355-5a8a329e34a8
form-serialize 插件
- 作用
快速收集表单元素的值 - 步骤
1.引入插件
2.准备form和表单元素的name属性
3.使用serialize函数,传入form表单和配置对象 serialize( form, { hash: true, empty: true })
1.form:表单对象,获取哪个表单的数据
①表单元素设置name属性,值会作为对象的属性名
②建议name属性的值,最好和接口文档参数名一致
2.hash、empty:配置对象
①hash:设置获取数据结构
true:JS对象【推荐】【一般请求体里提交给服务器】
false: 查询字符串
②empty 设置是否获取空值
true: 获取空值【推荐】【数据结构和标签结构一致】
false:不获取空值- 代码
<head>
  <meta charset="UTF-8">
  <meta http-equiv="X-UA-Compatible" content="IE=edge">
  <meta name="viewport" content="width=device-width, initial-scale=1.0">
  <title>form-serialize插件使用</title>
</head>

<body>
  <form action="javascript:;" class="example-form">
    <input type="text" name="username">
    <br>
    <input type="text" name="password">
    <br>
    <input type="button" class="btn" value="提交">
  </form>

  <script src="./lib/form-serialize.js"></script>

  <script>
    document.querySelector('.btn').addEventListener('click', () => {
      const form = document.querySelector('.example-form')
      const data = serialize(form, { hash: true, empty: true })
      console.log(data)
    })
  </script>
</body>
案例 - 用户登录
- 代码
<head>
  <meta charset="UTF-8">
  <meta http-equiv="X-UA-Compatible" content="IE=edge">
  <meta name="viewport" content="width=device-width, initial-scale=1.0">
  <title>案例_登录</title>
  <link rel="stylesheet" href="https://cdn.jsdelivr.net/npm/bootstrap@5.2.2/dist/css/bootstrap.min.css">
  <style>
    html,
    body {
      background-color: #EDF0F5;
      width: 100%;
      height: 100%;
      display: flex;
      justify-content: center;
      align-items: center;
    }
    .container {
      width: 520px;
      height: 540px;
      background-color: #fff;
      padding: 60px;
      box-sizing: border-box;
    }
    .container h3 {
      font-weight: 900;
    }
  </style>
  <style>
    .form_wrap {
      color: #8B929D !important;
    }
    .form-text {
      color: #8B929D !important;
    }
  </style>
  <style>
    .alert {
      transition: .5s;
      opacity: 0;
    }
    .alert.show {
      opacity: 1;
    }
  </style>
</head>

<body>
  <div class="container">
    <h3>欢迎-登录</h3>

    <div class="alert alert-success" role="alert">
      提示消息
    </div>

    <div class="form_wrap">
      <form class="login-form">
        <div class="mb-3">
          <label for="username" class="form-label">账号名</label>
          <input type="text" class="form-control username"  name="username">
        </div>
        <div class="mb-3">
          <label for="password" class="form-label">密码</label>
          <input type="password" class="form-control password" name="password">
        </div>
        <button type="button" class="btn btn-primary btn-login"> 登 录 </button>
      </form>
    </div>
  </div>

  <script src="https://cdn.jsdelivr.net/npm/axios/dist/axios.min.js"></script>
  <script src="./lib/form-serialize.js"></script>

  <script>
    const myAlert = document.querySelector('.alert')

    function alertFn(msg, isSuccess) {
      myAlert.classList.add('show')
      myAlert.innerText = msg
      const bgStyle = isSuccess ? 'alert-success' : 'alert-danger'
      myAlert.classList.add(bgStyle)
      setTimeout(() => {
        myAlert.classList.remove('show')
        myAlert.classList.remove(bgStyle)
      }, 2000)
    }

    document.querySelector('.btn-login').addEventListener('click', () => {
      // const username = document.querySelector('.username').value  // 法一
      // const password = document.querySelector('.password').value
      const form = document.querySelector('.login-form')  // 法二
      const data = serialize(form, { hash: true, empty: true })
      const { username, password } = data  // ES6 对象解构
      console.log(username, password)  // itheima007 7654321

      if (username.length < 8) {
        alertFn('用户名必须大于等于8位', false)
        return
      }
      if (password.length < 6) {
        alertFn('密码必须大于等于6位', false)
        return
      }

      axios({
        url: 'http://hmajax.itheima.net/api/login',
        method: 'POST',
        data: {
          username,
          password
        }
      }).then(result => {
        alertFn(result.data.message, true)
        console.log(result.data.message)  // 登陆成功
      }).catch(error => {
        alertFn(error.response.data.message, false)
        console.log(error.response.data.message)
      })
    })
  </script>
</body>
作业
问答机器人
- 代码
<head>
  <meta charset="UTF-8">
  <meta http-equiv="X-UA-Compatible" content="IE=edge">
  <meta name="viewport" content="width=device-width, initial-scale=1.0">
  <title>01.聊天机器人</title>
  <!-- 字体图标 -->
  <link rel="stylesheet" href="https://at.alicdn.com/t/c/font_3736758_vxpb728fcyh.css">
  <!-- 初始化样式 -->
  <link rel="stylesheet" href="https://cdn.jsdelivr.net/npm/reset.css@2.0.2/reset.min.css">
  <!-- 公共 -->
  <style>
    * {
      box-sizing: border-box;
    }
    html,
    body {
      width: 100%;
      height: 100%;
      overflow: hidden;
    }
    .container {
      width: 100%;
      height: 100%;
      background-color: #f5f4f4;
      position: relative;
      display: flex;
      flex-direction: column;
    }
  </style>
  <!-- 头部 -->
  <style>
    .top {
      width: 100%;
      height: 44px;
      padding: 15px 7px 12px 21px;
      background-color: #f5f4f4;
      display: flex;
      justify-content: space-between;
      position: fixed;
      top: 0;
      left: 0;
    }
  </style>
  <!-- 好友名字 -->
  <style>
    .friend_name {
      width: 100%;
      height: 44px;
      padding: 14px 19px 14px;
      background-color: #f5f4f4;
      text-align: center;
      position: fixed;
      top: 44px;
      left: 0;
    }
    .friend_name img {
      width: 10px;
      height: 16px;
      position: absolute;
      left: 19px;
    }
  </style>
  <!-- 聊天区域 -->
  <style>
    .chat {
      width: 100%;
      padding: 88px 20px 99px;
      flex: 1;
      overflow-y: scroll;
    }
    /* 隐藏滚动条 */
    .chat::-webkit-scrollbar {
      display: none;
    }
    .chat ul {
      padding-top: 20px;
    }
    .chat img {
      width: 35px;
      height: 35px;
      border-radius: 50%;
    }
    .chat li {
      display: flex;
      align-items: top;
    }
    .chat li~li {
      /* 除了第一个li, 选择所有的兄弟li标签 */
      margin-top: 20px;
    }
    .chat .right {
      display: flex;
      justify-content: flex-end;
    }
    .left span {
      margin-left: 10px;
      border-radius: 1px 10px 1px 10px;
      display: inline-block;
      padding: 12px 16px;
      background-image: linear-gradient(180deg, #B1E393 0%, #50D287 100%);
      box-shadow: 2px 2px 10px 0px rgba(201, 201, 201, 0.1);
      color: #FFFFFF;
    }
    .right span {
      margin-right: 10px;
      border-radius: 1px 10px 1px 10px;
      display: inline-block;
      padding: 12px 16px;
      background: #FFFFFF;
      border: 1px solid rgba(247, 247, 247, 1);
      color: #000000;
    }
  </style>
  <!-- 底部区域(发送消息) -->
  <style>
    .bottom_div {
      width: 100%;
      height: 89px;
      position: fixed;
      left: 0;
      bottom: 0;
      background: #FFFFFF;
      box-shadow: 0px -5px 7px 0px rgba(168, 168, 168, 0.05);
      border-radius: 25px 25px 0px 0px;
      padding: 15px 15px 0px 15px;
    }
    .send_box {
      display: flex;
    }
    .send_box img {
      width: 34px;
      height: 34px;
    }
    .input_bg {
      height: 35px;
      background: #f3f3f3;
      border-radius: 50px;
      padding-left: 17px;
      flex: 1;
      margin-right: 15px;
      display: flex;
    }
    .input_bg input {
      border: 0;
      outline: 0;
      background-color: transparent;
      display: inline-block;
      width: 100%;
    }
    /* 修改输入框默认占位文字
       webkit内核, firefox18-, firfox19+, 其他
    */
    .input_bg input::-webkit-input-placeholder,
    .input_bg input:-moz-placeholder,
    .input_bg input::-moz-placeholder,
    .input_bg input:-ms-input-placeholder {
      font-family: PingFangSC-Regular;
      font-size: 26px;
      color: #C7C7C7;
      letter-spacing: 0;
      font-weight: 400;
    }
    .black_border {
      margin-top: 10px;
      height: 34px;
      text-align: center;
    }
    .black_border span {
      display: inline-block;
      background-color: #000;
      width: 105px;
      height: 4px;
      border-radius: 50px;
    }
  </style>
  <!-- PC端单独适配成移动大小 -->
  <style>
    /* PC端居中显示手机 */
    @media screen and (min-width: 1200px) {
      .container {
        width: 375px;
        margin: 0 auto;
        border: 1px solid black;
        /* 让fixed固定定位标签参照当前标签 */
        transform: translate(0px);
      }
    }
  </style>
</head>

<body>
  <div class="container">
    <div class="top">
      <span>9:41</span>
      <div class="icon">
        <i class="iconfont icon-xinhao"></i>
        <i class="iconfont icon-xinhao1"></i>
        <i class="iconfont icon-electricity-full"></i>
      </div>
    </div>
    <div class="friend_name">
      <img src="./assets/arrow-left.png" alt="">
      <span>使劲夸夸</span>
    </div>
    <div class="chat">
      <ul class="chat_list">
        <li class="left">
          <img src="./assets/you.png" alt="">
          <span>小宝贝</span>
        </li>
        <li class="right">
          <span>干啥</span>
          <img src="./assets/me.png" alt="">
        </li>
      </ul>
    </div>
    <!-- 底部固定 -->
    <div class="bottom_div">
      <!-- 发送消息 -->
      <div class="send_box">
        <div class="input_bg">
          <input class="chat_input" type="text" placeholder="说点什么吧">
        </div>
        <img class="send_img" src="./assets/send.png" alt="">
      </div>
      <!-- 底部黑条 -->
      <div class="black_border">
        <span></span>
      </div>
    </div>
  </div>

  <script src="https://cdn.jsdelivr.net/npm/axios/dist/axios.min.js"></script>
  <script>
    let chatDiv = document.querySelector('.chat')
    let chatUL = document.querySelector('.chat_list')
    let sendInput = document.querySelector('.chat_input')

    let chatFn = () => {
      let sendText = sendInput.value
      chatUL.innerHTML += `<li class="right">
          <span>${sendText}</span>
          <img src="./assets/me.png" alt="">
        </li>`
      sendInput.value = ''
      chatDiv.scrollTop = chatDiv.scrollHeight  // 让滚动条始终在底部
      axios({
        url: 'http://hmajax.itheima.net/api/robot',
        params: {
          spoken: sendText
        }
      }).then(result => {
        chatUL.innerHTML += `<li class="left">
          <img src="./assets/you.png" alt="">
          <span>${result.data.data.info.text}</span>
        </li>`
        chatDiv.scrollTop = chatDiv.scrollHeight  // 让滚动条始终在底部
      })
    }

    document.querySelector('.send_img').addEventListener('click', chatFn)
    document.querySelector('.chat_input').addEventListener('keyup', e => {
      if (e.keyCode === 13) {  // Enter
        chatFn()
      }
    })
  </script>
</body>
面试题
GET 和 POST 请求方法的区别
- GET 和 POST 请求方式无区别,本质都是一次 HTTP 请求( TCP 链接)
而 HTTP 请求报文中包含请求行、请求头、请求体,可在相应位置携带值给服务器 - GET 或 HEAD 请求方式,浏览器会忽略请求体
但不代表 GET / HEAD 方式无法发送请求体,使用 apifox 等接口调试工具可携带请求体 - 区别:
- 浏览器回退时,GET 不会重新提交,POST 会重新提交表单
- GET 会被浏览器主动缓存,POST 不会
- url 上传查询参数和请求体传参的区别【实际上不是 GET 和 POST 区别】
① url 只能进行 url 编码,而请求体里支持多种编码格式
② url 上的参数会保留在浏览器历史记录里,而请求体不会被保留,除非用代码设置
原生 AJAX 的原理
- axios库是对原生Ajax的XMLHttpRequest相关语法的封装
- AJAX 原理是 XMLHttpRequest 相关语法
箭头函数和 function 函数区别
- 箭头函数常用做回调函数使用,无自己的 this,无 arguments 对象,不能被 new 调用
一个页面从输入 URL 到页面加载显示完成,发生了什么
- 浏览器查找域名对应的 IP 地址
(DNS 查询:浏览器缓存 -> 系统缓存 -> 路由器缓存 -> ISPDNS 缓存 -> 根域名服务器) - 浏览器向 Web 服务器发送一个 HTTP 请求(TCP 三次握手)
- 若服务器设置了重定向,服务器 301 重定向
(从 HTTP://example.com 重定向到 HTTP://www.example.com) - 浏览器跟踪重定向地址,请求另一个带 www 的网址
- 服务器处理请求(通过路由读取资源)
- 服务器返回一个 HTTP 响应(报头中把 Content-type 设置为 ‘text/html’)
- 浏览器进 DOM 树构建
- 浏览器发送请求获取嵌在 HTML 中的资源(如图片、音频、视频、CSS、JS 等)
- 浏览器显示完成页面
- 浏览器发送异步请求
事件委托
- 利用了事件冒泡的机制,在较上层位置的元素上添加一个事件监听函数,来管理该元素及其所有子孙元素上的某一类的所有事件
- 适用场景
绑定大量事件时 - 优点
① 减少事件注册数量,节省内存占⽤
② 新增⼦元素时,⽆需再次事件绑定。故适合动态添加元素
(vue解析模板时,会对新创建的元素额外进行绑定)<ul id="list"> <li>111</li> <li>222</li> <li>333</li> <li>444</li> <li>555</li> </ul> <script type="text/javascript"> var list = document.getElementById('list'); // 为⽗元素绑定事件,委托管理它的所有⼦元素li的点击事件 list.onclick = function (event) { var currentTarget = event.target; if (currentTarget.tagName.toLowerCase() === 'li') { alert(currentTarget.innerText) } } </script>


 610
610


 被折叠的 条评论
为什么被折叠?
被折叠的 条评论
为什么被折叠?
 到【灌水乐园】发言


