


作用:根据数据库中表自动生成实体类,dao层和xml映射文件完成简单的增删改查。
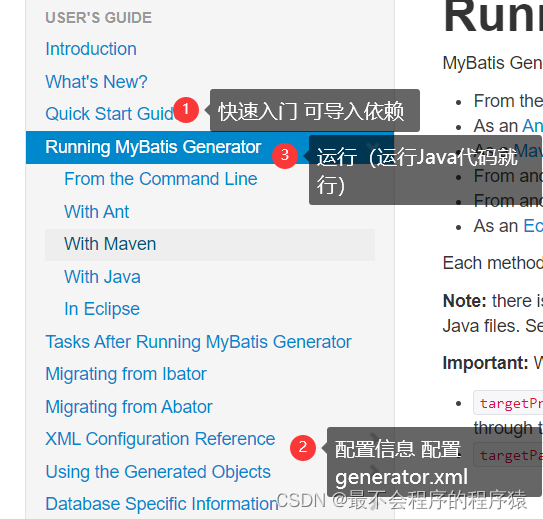
官网:http://mybatis.org/generator/
实例:完成两张表的自动化创建实体类,dao层,mapper层
前置条件
第一张表:tbl_user
/*
 Navicat Premium Data Transfer

 Source Server         : Michinaish
 Source Server Type    : MySQL
 Source Server Version : 80011
 Source Host           : localhost:3306
 Source Schema         : mybatis

 Target Server Type    : MySQL
 Target Server Version : 80011
 File Encoding         : 65001

 Date: 06/06/2022 19:27:10
*/

SET NAMES utf8mb4;
SET FOREIGN_KEY_CHECKS = 0;

-- ----------------------------
-- Table structure for tbl_user
-- ----------------------------
DROP TABLE IF EXISTS `tbl_user`;
CREATE TABLE `tbl_user`  (
  `id` int(20) NOT NULL AUTO_INCREMENT COMMENT '主键ID',
  `name` varchar(30) CHARACTER SET utf8 COLLATE utf8_general_ci NULL DEFAULT NULL COMMENT '姓名',
  `email` varchar(50) CHARACTER SET utf8 COLLATE utf8_general_ci NULL DEFAULT NULL COMMENT '邮箱',
  PRIMARY KEY (`id`) USING BTREE
) ENGINE = InnoDB AUTO_INCREMENT = 12 CHARACTER SET = utf8 COLLATE = utf8_general_ci ROW_FORMAT = Dynamic;

-- ----------------------------
-- Records of tbl_user
-- ----------------------------
INSERT INTO `tbl_user` VALUES (2, 'zs', 'zs@China.com');
INSERT INTO `tbl_user` VALUES (4, 'ls', 'ls@China.com');
INSERT INTO `tbl_user` VALUES (5, 'ww', 'ww@China.com');
INSERT INTO `tbl_user` VALUES (8, 'll', 'll@China.com');
INSERT INTO `tbl_user` VALUES (9, 'mary', 'mary@China.com');
INSERT INTO `tbl_user` VALUES (10, 'kangkang', 'kk@China.com');
INSERT INTO `tbl_user` VALUES (11, 'kangkang', 'kk@China.com');
INSERT INTO `tbl_user` VALUES (12, 'mary', 'mary@America.com');

SET FOREIGN_KEY_CHECKS = 1;
第二张表:tb_stu
/*
 Navicat Premium Data Transfer

 Source Server         : Michinaish
 Source Server Type    : MySQL
 Source Server Version : 80011
 Source Host           : localhost:3306
 Source Schema         : mybatis

 Target Server Type    : MySQL
 Target Server Version : 80011
 File Encoding         : 65001

 Date: 06/06/2022 19:28:13
*/

SET NAMES utf8mb4;
SET FOREIGN_KEY_CHECKS = 0;

-- ----------------------------
-- Table structure for tb_stu
-- ----------------------------
DROP TABLE IF EXISTS `tb_stu`;
CREATE TABLE `tb_stu`  (
  `stu_id` int(11) NOT NULL AUTO_INCREMENT,
  `stu_name` varchar(255) CHARACTER SET utf8mb4 COLLATE utf8mb4_0900_ai_ci NULL DEFAULT NULL,
  `stu_age` int(255) NULL DEFAULT NULL,
  `stu_sex` varchar(255) CHARACTER SET utf8mb4 COLLATE utf8mb4_0900_ai_ci NULL DEFAULT NULL,
  `cid` int(11) NULL DEFAULT NULL,
  PRIMARY KEY (`stu_id`) USING BTREE
) ENGINE = InnoDB CHARACTER SET = utf8mb4 COLLATE = utf8mb4_0900_ai_ci ROW_FORMAT = Dynamic;

-- ----------------------------
-- Records of tb_stu
-- ----------------------------
INSERT INTO `tb_stu` VALUES (1, '张三', 18, '男', 1);
INSERT INTO `tb_stu` VALUES (2, '李四', 19, '女', 2);
INSERT INTO `tb_stu` VALUES (3, '田七', 20, '男', 3);
INSERT INTO `tb_stu` VALUES (5, '赵六', 0, '女', 3);
INSERT INTO `tb_stu` VALUES (6, '赵六', 0, '女', 1);
INSERT INTO `tb_stu` VALUES (8, '赵六', 0, '女', 2);
SET FOREIGN_KEY_CHECKS = 1;
使用步骤
第一步:(1)引入mybatis-generator的依赖jar包。
<dependency>
            <groupId>repMaven.org.mybatis.generator</groupId>
            <artifactId>mybatis-generator-core</artifactId>
            <version>1.4.0</version>
</dependency>
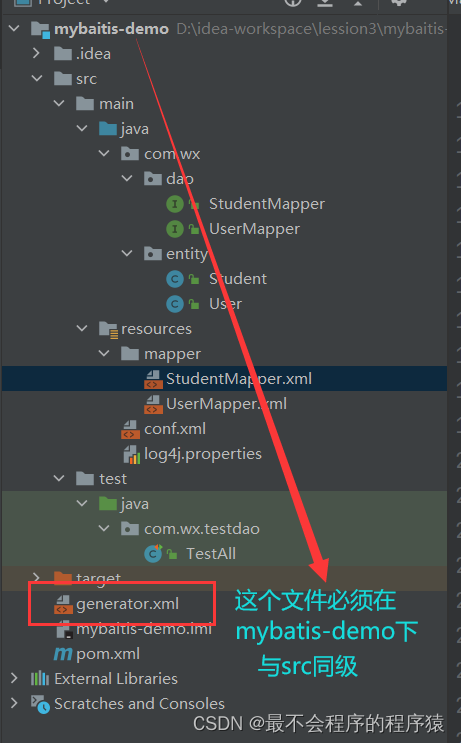
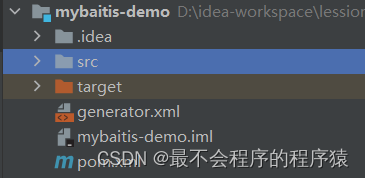
第二步:配置文件 generator.xml
注意:
<?xml version="1.0" encoding="UTF-8"?>
<!DOCTYPE generatorConfiguration
PUBLIC "-//mybatis.org//DTD MyBatis Generator Configuration 1.0//EN"
"http://mybatis.org/dtd/mybatis-generator-config_1_0.dtd">
<generatorConfiguration>
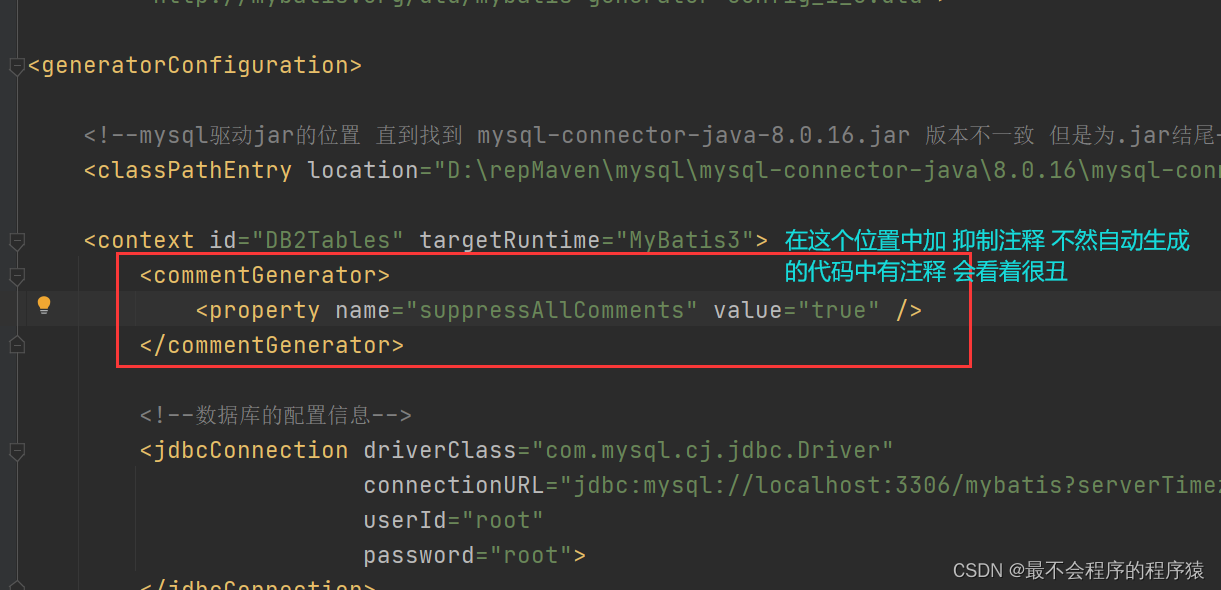
<!--mysql驱动jar的位置 直到找到 mysql-connector-java-8.0.16.jar 版本不一致 但是为.jar结尾-->
<classPathEntry location="D:\repMaven\mysql\mysql-connector-java\8.0.16\mysql-connector-java-8.0.16.jar" />
<context id="DB2Tables" targetRuntime="MyBatis3">
<!--数据库的配置信息-->
<jdbcConnection driverClass="com.mysql.cj.jdbc.Driver"
connectionURL="jdbc:mysql://localhost:3306/mybatis?serverTimezone=Asia/Shanghai"
userId="root"
password="root">
</jdbcConnection>
<!--Java实体类的配置信息
targetPackage:目标包 实体类的位置是在java下
targetProject:目标工程 src下 java之前
-->
<javaModelGenerator targetPackage="com.wx.entity" targetProject=".\src\main\java">
<property name="enableSubPackages" value="true" />
<property name="trimStrings" value="true" />
</javaModelGenerator>
<!--映射文件的配置信息-->
<sqlMapGenerator targetPackage="mapper" targetProject=".\src\main\resources">
<property name="enableSubPackages" value="true" />
</sqlMapGenerator>
<!--dao层的配置信息-->
<javaClientGenerator type="XMLMAPPER" targetPackage="com.wx.dao" targetProject=".\src\main\java">
<property name="enableSubPackages" value="true" />
</javaClientGenerator>
<!--
schema:数据库名
tableName:表名
domainObjectName:实体类名
这四个一般为false 不然回生成复杂的增删改查操作
enableSelectByExample="false" 是否生成复杂的查询操作
enableCountByExample="false"
enableDeleteByExample="false"
enableUpdateByExample="false">
-->
<table schema="mybatis" tableName="tbl_user" domainObjectName="User"
enableSelectByExample="false"
enableCountByExample="false"
enableDeleteByExample="false"
enableUpdateByExample="false">
<property name="useActualColumnNames" value="true"/>
<generatedKey column="ID" sqlStatement="DB2" identity="true" />
<columnOverride column="DATE_FIELD" property="startDate" />
<ignoreColumn column="FRED" />
<columnOverride column="LONG_VARCHAR_FIELD" jdbcType="VARCHAR" />
</table>
<table schema="mybatis" tableName="tb_stu" domainObjectName="Student"
enableSelectByExample="false"
enableCountByExample="false"
enableDeleteByExample="false"
enableUpdateByExample="false">
<property name="useActualColumnNames" value="true"/>
<generatedKey column="ID" sqlStatement="DB2" identity="true" />
<columnOverride column="DATE_FIELD" property="startDate" />
<ignoreColumn column="FRED" />
<columnOverride column="LONG_VARCHAR_FIELD" jdbcType="VARCHAR" />
</table>
</context>
</generatorConfiguration>
第三步:在单元测试中或者在main函数中运行配置文件 生成实体层 dao层 mapper层
    @Test
    public void test01() throws Exception{
        List<String> warnings = new ArrayList<String>();
        boolean overwrite = true;
        File configFile = new File("generator.xml");
        ConfigurationParser cp = new ConfigurationParser(warnings);
        Configuration config = cp.parseConfiguration(configFile);
        DefaultShellCallback callback = new DefaultShellCallback(overwrite);
        MyBatisGenerator myBatisGenerator = new MyBatisGenerator(config, callback, warnings);
        myBatisGenerator.generate(null);
    }
注意 生成的实体层 dao层 mapper层会有注释 这时候可以使用如下代码消除注释
		//抑制注释
        <commentGenerator>
            <property name="suppressAllComments" value="true" />
        </commentGenerator>
整体结构图为: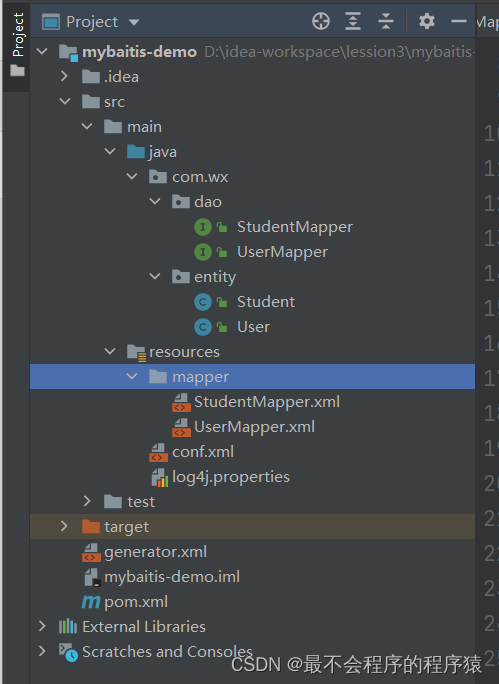
优化:自动生成的实体类名字和自己的数据库中表中列名一致 在idea中看着非常别扭
比如Student实体类

优化的地方
(1)重新写Student实体类中的属性
通过lombok简化代码书写
@Data
@NoArgsConstructor
@AllArgsConstructor
public class Student {
    private Integer stuId;
    private String stuName;
    private Integer stuAge;
    private String stuSex;
    private Integer cid;
}
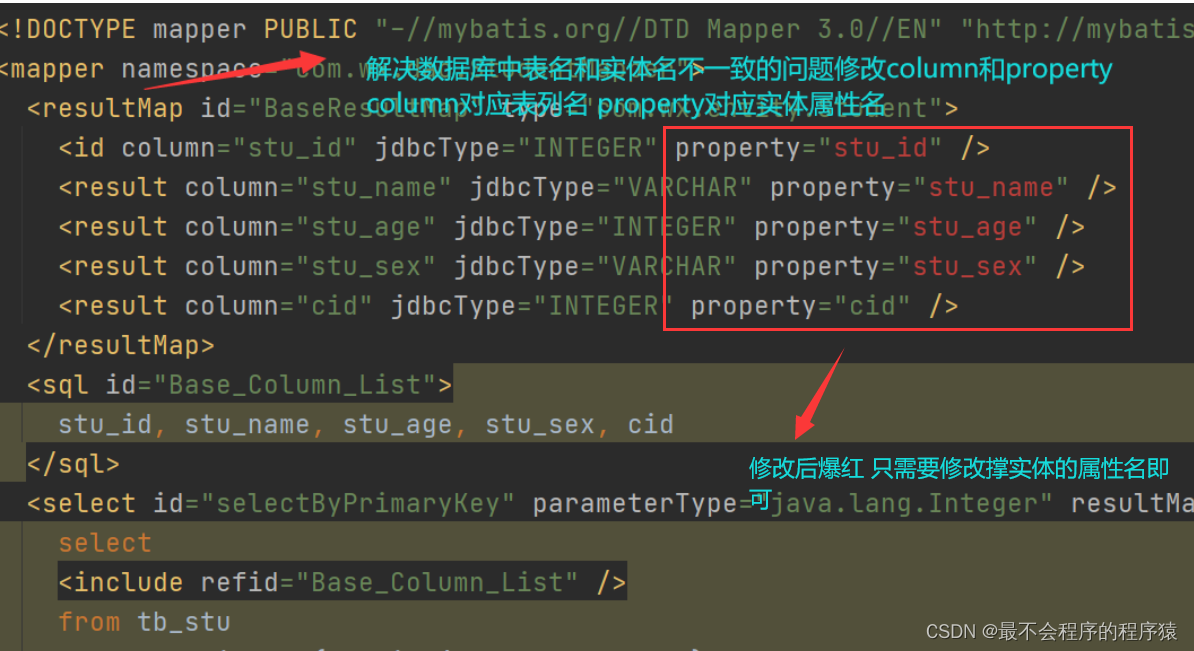 修改后为:
修改后为:

测试自动生成的代码
    /*通过主键删除某个学生对象*/
    @Test
    public void testStudentFindAll() throws Exception{
        Reader rd = Resources.getResourceAsReader("conf.xml");
        SqlSessionFactory factory = new SqlSessionFactoryBuilder().build(rd);
        SqlSession session = factory.openSession();
        StudentMapper sm = session.getMapper(StudentMapper.class);
        int row = sm.deleteByPrimaryKey(8);
        System.out.println(row);
        session.commit();
        session.close();
    }
运行图:

其余的代码自行测试即可


 6918
6918


 被折叠的 条评论
为什么被折叠?
被折叠的 条评论
为什么被折叠?
 到【灌水乐园】发言


