


知识准备
高德定位文档链接
通过阅读上面的文档,得到如下JavaScript代码:
mapObj = new AMap.Map('iCenter');
mapObj.plugin('AMap.Geolocation', function () {
    geolocation = new AMap.Geolocation({
        enableHighAccuracy: true,//是否使用高精度定位,默认:true
        timeout: 10000,          //超过10秒后停止定位,默认:无穷大
        maximumAge: 0,           //定位结果缓存0毫秒,默认:0
        convert: true,           //自动偏移坐标,偏移后的坐标为高德坐标,默认:true
        showButton: true,        //显示定位按钮,默认:true
        buttonPosition: 'LB',    //定位按钮停靠位置,默认:'LB',左下角
        buttonOffset: new AMap.Pixel(10, 20),//定位按钮与设置的停靠位置的偏移量,默认:Pixel(10, 20)
        showMarker: true,        //定位成功后在定位到的位置显示点标记,默认:true
        showCircle: true,        //定位成功后用圆圈表示定位精度范围,默认:true
        panToLocation: true,     //定位成功后将定位到的位置作为地图中心点,默认:true
        zoomToAccuracy:true      //定位成功后调整地图视野范围使定位位置及精度范围视野内可见,默认:false
    });
    mapObj.addControl(geolocation);
    geolocation.getCurrentPosition();
    AMap.event.addListener(geolocation, 'complete', onComplete);//返回定位信息
    AMap.event.addListener(geolocation, 'error', onError);      //返回定位出错信息
});
获取AMap对象
那么上面的AMap是怎么来的呢?
在你的项目中创建一个名为amap.js的文件,文件内容如下:
export default async  function MapLoader () {
    return new Promise((resolve, reject) => {
        if (window.aMap) {
            resolve(window.AMap)
        } else {
            const url = 'https://webapi.amap.com/maps?v=1.4.15&key=你的key&callback=onLoad';  // 申请个人 key
            const script = document.createElement('script')
            script.charset = 'utf-8'
            script.src = url
            script.onerror = reject
            document.head.appendChild(script)
            window.onLoad = () => {
                resolve(window.AMap)
            }
    }
})}
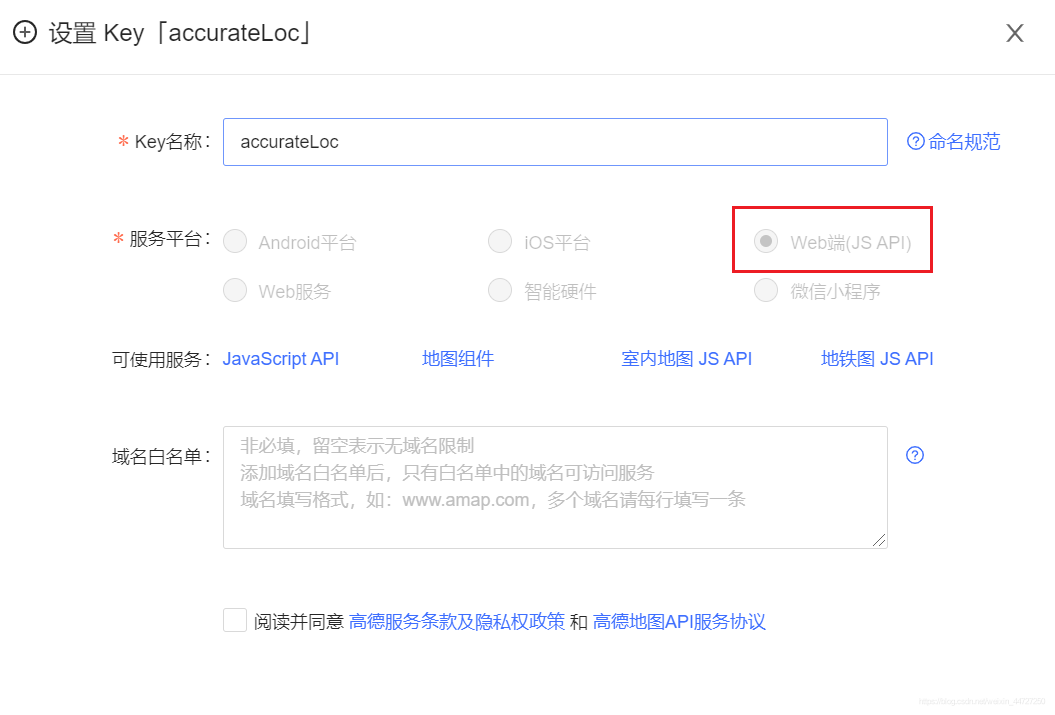
获取key值
你的key值可以在高德官网申请,具体过程请百度。下图是你在添加应用时应该注意的地方。
编写vue中代码
接着,在Home.vue文件中导入amap.js文件(vue里使用的是TypeScript语法):
import MapLoader from "../amap.js"
let AMap
private formattedAddress = '';
loadMap(){
MapLoader().then(aMap => {
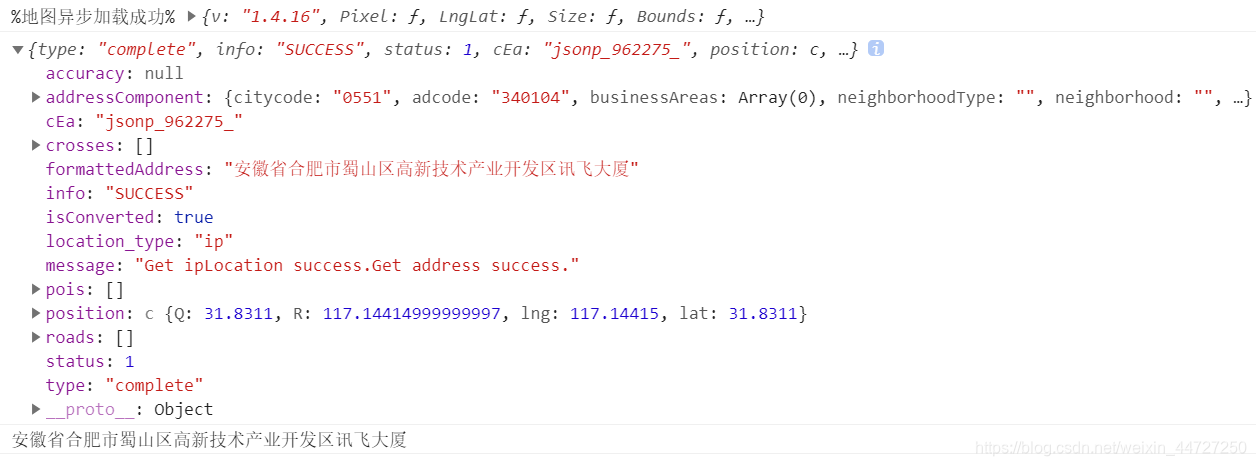
console.log('%地图异步加载成功%',aMap);
AMap = aMap;
setTimeout(() => {
this.initmap();
},1000);
});
}
initmap(){
const that = this;
const map = new AMap.Map('Gamap', {
resizeEnable: true,
});
AMap.plugin('AMap.Geolocation', function () {
const geolocation = new AMap.Geolocation({
enableHighAccuracy: true, // 是否使用高精度定位,默认:true
timeout: 10000, // 超过10秒后停止定位,默认:无穷大
maximumAge: 0, // 定位结果缓存0毫秒,默认:0
convert: false, // 自动偏移坐标,偏移后的坐标为高德坐标,默认:true
showButton: true, // 显示定位按钮,默认:true
buttonPosition: 'RB', // 定位按钮停靠位置,默认:'LB',左下角
buttonOffset: new AMap.Pixel(10, 20), // 定位按钮与设置的停靠位置的偏移量,默认:Pixel(10, 20)
showMarker: true, // 定位成功后在定位到的位置显示点标记,默认:true
showCircle: false, // 定位成功后用圆圈表示定位精度范围,默认:true
panToLocation: true, // 定位成功后将定位到的位置作为地图中心点,默认:true
zoomToAccuracy: false // 定位成功后调整地图视野范围使定位位置及精度范围视野内可见,默认:false
})
map.addControl(geolocation);
geolocation.getCurrentPosition(function (status, result) {
console.log(result);
console.log(result.formattedAddress);
const position = result.position;
if (status === 'complete') {
if (result.info === 'SUCCESS'){
that.formattedAddress = result.formattedAddress;
}
} else {
console.log('定位失败');
}
})
})
}
created(){
this.loadMap();
}
结果展示
在浏览器的console截图:
跳坑之法
在调试过程中你可能会遇到的坑的解决办法。
在tsconfig.json中的compilerOptions.strict改为false;
在.eslintrc.js中的rules添加一句"@typescript-eslint/no-this-alias": ["off"]。
vue调试小技巧
在要调试语句的上一行添加如下一行代码
debugger


 4354
4354

 被折叠的 条评论
为什么被折叠?
被折叠的 条评论
为什么被折叠?
 到【灌水乐园】发言


