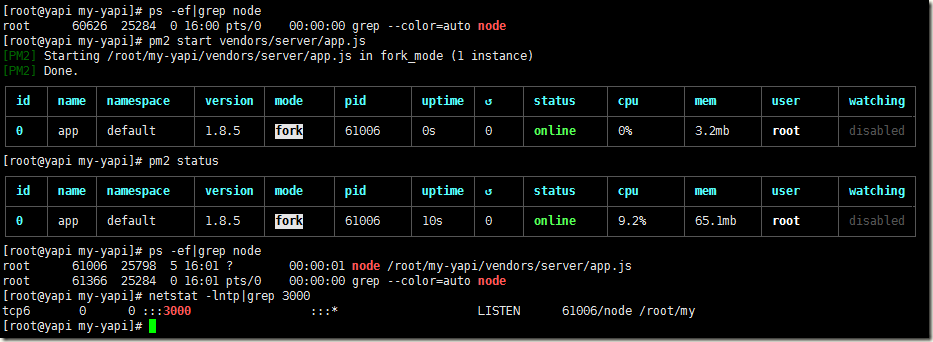
pm2 list #查看所用已启动项目
pm2 restart XXX #重启
pm2 stop XXX #停止
pm2 delete XXX #删除
pm2 monit #监视每个node进程的CPU和内存的使用情况
pm2 logs #显示所有进程日志
pm2 stop all #停止所有进程
pm2 restart all #重启所有进程
pm2 reload all #0秒停机重载进程 (用于 NETWORKED 进程)
pm2 stop 0 #停止指定的进程
pm2 restart 0 #重启指定的进程
pm2 startup #产生 init 脚本 保持进程活着
pm2 web #运行健壮的 computer API endpoint (http://localhost:9615)
pm2 delete 0 #杀死指定的进程
pm2 delete all #杀死全部进程
运行进程的不同方式:
pm2 start app.js -i max #根据有效CPU数目启动最大进程数目
pm2 start app.js -i 3 #启动3个进程
pm2 start app.js -x #用fork模式启动 app.js 而不是使用 cluster
pm2 start app.js -x -- -a 23 #用fork模式启动 app.js 并且传递参数 (-a 23)
pm2 start app.js --name serverone #启动一个进程并把它命名为 serverone
pm2 stop serverone #停止 serverone 进程
pm2 start app.json #启动进程, 在 app.json里设置选项
pm2 start app.js -i max -- -a 23 #在--之后给 app.js 传递参数
pm2 start app.js -i max -e err.log -o out.log #启动并生成一个配置文件
二、部署mongodb
(1)mongodb简介
1)MongoDB是一种NoSQL数据库,可将数据存储在具有灵活模式的类JSON文档中
2)MongoDB由C++编写, MongoDB可以运行在Windows、unix、OSX、Solaris系统上,支持32位和64位应用,提供多种编程语言的驱动程序
3)Mongodb是一种开源的文档型数据库,是专为可扩展性,高性能和高可用性而设计的数据库,是非关系型数据库中功能最丰富,最像关系型数据库的,它支持的数据结构非常松散,是类似 json 的 bjson 格式,因此可以存储比较复杂的数据类型。
4)MongoDB的(来自于英文单词“了Humongous”,中文含义为“庞大”)是可以应用于各种规模的企业,各个行业以及各类应用程序的开源数据库。作为一个适用于敏捷开发的数据库,MongoDB的的数据模式可以随着应用程序的发展而灵活地更新。
5)Mongodb最大的特点就是支持的查询语言非常强大,其语法类似于面向对象的查询语言,几乎可以实现类似关系数据库单表查询的大部分功能,而且还支持对数据建立索引。模式自由不需要定义 schema。
6)MongoDB 以一种叫做 BSON(二进制JSON)的存储形式将数据作为文档存储。具有相似结构的文档通常被整理成集合。可以把这些集合看成类似于关系数据库中的表:文档和行相似,字段和列相似。

(2)mongodb数据结构
2.1、json
1)JSON(JavaScript Object Notation) 是一种轻量级的数据交换格式。 JSON采用完全独立于语言的文本格式,但是也使用了类似于C语言家族的习惯(包括C、C++、C#、Java、JavaScript、Perl、Python等)。这些特性使JSON成为理想的数据交换语言。 易于人阅读和编写,同时也易于机器解析和生成(一般用于提升网络传输速率)。
2)JSON简单说就是JavaScript中的对象和数组,通过对象和数组可以表示各种复杂的结构。
3)对象:对象在js中表示为“{}”括起来的内容,数据结构为{key:value,key:value,...}的键值对的结构,在面向对象的语言中,key为对象的属性,value为对应的属性值,所以很容易理解,取值方法为 对象.key 获取属性值,这个属性值的类型可以是 数字、字符串、数组、对象几种。
4)例如: {"FirstName":"jason","LastName":"wcchang","email":aa@aa}
5)取值方式和所有语言中一样,使用索引获取,字段值的类型可以是 数字、字符串、数组、对象几种。
2.2、bson
(3)mongodb安装部署
3.1、系统准备
1)redhat或cnetos6.2以上系统
2)系统开发包完整
3)ip地址和hosts文件解析正常
4)iptables防火墙&SElinux关闭
5)关闭大页内存机制
关闭大页内存:在vi /etc/rc.local最后添加如下代码
|
01
02
03
04
05
06
07
08
09
10
11
12
13
14
15
16
17
18
19
20
|
if test -f /sys/kernel/mm/transparent_hugepage/enabled; then
echo never > /sys/kernel/mm/transparent_hugepage/enabled
fi
if test -f /sys/kernel/mm/transparent_hugepage/defrag; then
echo never > /sys/kernel/mm/transparent_hugepage/defrag
fi
#临时关闭
echo never > /sys/kernel/mm/transparent_hugepage/enabled
echo never > /sys/kernel/mm/transparent_hugepage/defrag
#其他系统关闭参照官方文档
#为什么要关闭大页内存?
https://docs.mongodb.com/manual/tutorial/transparent-huge-pages/
Transparent Huge Pages (THP) is a Linux memory management system
that reduces the overhead of Translation Lookaside Buffer (TLB)
lookups on machines with large amounts of memory by using larger memory pages.
However, database workloads often perform poorly with THP,
because they tend to have sparse rather than contiguous memory access patterns.
You should disable THP on Linux machines to ensure best performance with MongoDB.
|
修改文件描述符限制:
|
01
02
|
vim /etc/security/limits.conf
#* - nofile 65535 #注释即可,reboot重启生效
|
3.2、mongodb安装
1)创建用户
|
01
02
|
[root@mongo ~]# useradd mongod
[root@mongo ~]# echo 123456|passwd --stdin mongod
|
2)创建mongodb所需目录结构
|
01
|
[root@mongo ~]# mkdir -p /mongodb/{bin,conf,log,data}
|
3)上传并解压软件到指定位置
|
01
02
03
04
05
06
07
08
09
|
[root@mongo ~]# mkdir /server/tools -p
[root@mongo ~]# mv mongodb-linux-x86_64-rhel70-v3.6-latest.gz /server/tools/
[root@mongo ~]# ll /server/tools/
total 117936
-rw-r--r-- 1 root root 120764476 Mar 14 2019 mongodb-linux-x86_64-rhel70-v3.6-latest.gz
#解压并目录bin下程序到/mongodb/bin
[root@mongo tools]# tar xf mongodb-linux-x86_64-rhel70-v3.6-latest.gz
[root@mongo tools]# cp -a mongodb-linux-x86_64-rhel70-3.6.11-14-g48d999c/bin/* /mongodb/bin/
|
4)设置目录权限
|
01
02
03
04
05
06
07
|
[root@mongo tools]# chown -R mongod:mongod /mongodb
[root@mongo tools]# ll /mongodb
total 0
drwxr-xr-x 2 mongod mongod 248 Oct 4 13:58 bin
drwxr-xr-x 2 mongod mongod 6 Oct 4 13:54 conf
drwxr-xr-x 2 mongod mongod 6 Oct 4 13:54 data
drwxr-xr-x 2 mongod mongod 6 Oct 4 13:54 log
|
5)设置用户环境变量
|
01
02
03
04
05
|
#切换到mongod用户
[root@mongo tools]# su - mongod
[mongod@mongo ~]$ vim .bash_profile
export PATH=/mongodb/bin:$PATH
[mongod@mongo ~]$ source .bash_profile
|
6)启动mongodb
|
01
02
03
04
05
06
07
08
|
[mongod@mongo ~]$ su - mongod #使用普通用户启动
[mongod@mongo ~]$ mongod --dbpath=/mongodb/data --logpath=/mongodb/log/mongodb.log --port=27017 --logappend --fork
#参数说明
--dbpath #指定数据文件目录
--logpath #指定日志文件目录
--logappend #日志追加
--fork #后台运行
|
常用参数:
$ mongod --help
--dbpath:数据存放路径
--logpath:日志文件路径
--logappend:日志输出方式
--port:启用端口号
--fork:在后台运行
--auth:是否需要验证权限登录(用户名和密码)
--bind_ip:限制访问的ip
7)登录mongodb
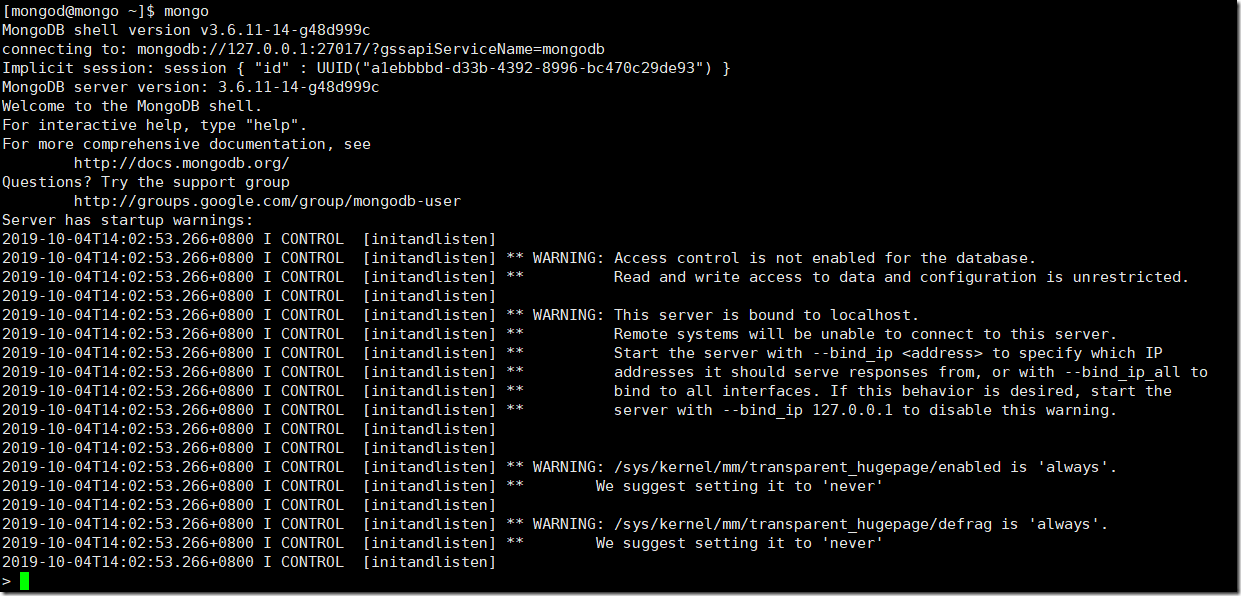
报警解决:连接之后会有warning,需要修改(使用root用户)
①关闭大页内存
②修改文件描述符
8)编辑配置文件
方式一:不推荐
vim /mongodb/conf/mongodb.conf
logpath=/mongodb/log/mongodb.log
dbpath=/mongodb/data
port=27017
logappend=true
fork=true
方式二:使用yaml模式
#(YAML模式:)
--
NOTE:
YAML does not support tab characters for indentation: use spaces instead.
--系统日志有关
systemLog:
destination: file
path: "/mongodb/log/mongodb.log" --日志位置
logAppend: true --日志以追加模式记录
--数据存储有关
storage:
journal:
enabled: true
dbPath: "/mongodb/data" --数据路径的位置
-- 进程控制
processManagement:
fork: true --后台守护进程
pidFilePath: <string> --pid文件的位置,一般不用配置,可以去掉这行,自动生成到data中
--网络配置有关
net:
bindIp: <ip> -- 监听地址,如果不配置这行是监听在0.0.0.0
port: <port> -- 端口号,默认不配置端口号,是27017
-- 安全验证有关配置
security:
authorization: enabled --是否打开用户名密码验证
------------------以下是复制集与分片集群有关----------------------
replication:
oplogSizeMB: <NUM>
replSetName: "<REPSETNAME>"
secondaryIndexPrefetch: "all"
sharding:
clusterRole: <string>
archiveMovedChunks: <boolean>
---for mongos only
replication:
localPingThresholdMs: <int>
sharding:
configDB: <string>
---
.........
示例:
|
01
02
03
04
05
06
07
08
09
10
11
12
13
14
15
16
17
18
19
|
vim /mongodb/conf/mongo.conf
systemLog:
destination: file
path: "/mongodb/log/mongodb.log"
logAppend: true
storage:
journal:
enabled: true
dbPath: "/mongodb/data/"
processManagement:
fork: true
net:
port: 27017
bindIp: 10.0.0.21,127.0.0.1
#重启mongodb
mongod -f /mongodb/conf/mongo.conf --shutdown
mongod -f /mongodb/conf/mongo.conf
|
9)mongodb关闭
|
01
02
03
04
05
06
07
08
09
10
|
#Kill模式
kill -2 PID
kill -4 PID
#内置模式
admin> db.shutdownServer()
或
admin> db.adminCommand({shutdown:1})
或
$ mongod -f mongodb.conf --shutdown
|
(4)常用基本操作
4.1、帮助
|
01
02
03
|
help
KEYWORDS.help
KEYWORDS.[TAB]
|
示例:
> show dbs
admin 0.000GB
config 0.000GB
local 0.000GB
> help
db.help() help on db methods
db.mycoll.help() help on collection methods
sh.help() sharding helpers
rs.help() replica set helpers
help admin administrative help
help connect connecting to a db help
help keys key shortcuts
help misc misc things to know
help mr mapreduce
show dbs show database names
show collections show collections in current database
show users show users in current database
show profile show most recent system.profile entries with time >= 1ms
show logs show the accessible logger names
show log [name] prints out the last segment of log in memory, 'global' is default
use <db_name> set current database
db.foo.find() list objects in collection foo
db.foo.find( { a : 1 } ) list objects in foo where a == 1
it result of the last line evaluated; use to further iterate
DBQuery.shellBatchSize = x set default number of items to display on shell
exit quit the mongo shell
> db.help()
DB methods:
db.adminCommand(nameOrDocument) - switches to 'admin' db, and runs command [just calls db.runCommand(...)]
db.aggregate([pipeline], {options}) - performs a collectionless aggregation on this database; returns a cursor
db.auth(username, password)
db.cloneDatabase(fromhost)
db.commandHelp(name) returns the help for the command
db.copyDatabase(fromdb, todb, fromhost)
db.createCollection(name, {size: ..., capped: ..., max: ...})
db.createView(name, viewOn, [{$operator: {...}}, ...], {viewOptions})
db.createUser(userDocument)
db.currentOp() displays currently executing operations in the db
db.dropDatabase()
db.eval() - deprecated
db.fsyncLock() flush data to disk and lock server for backups
db.fsyncUnlock() unlocks server following a db.fsyncLock()
db.getCollection(cname) same as db['cname'] or db.cname
db.getCollectionInfos([filter]) - returns a list that contains the names and options of the db's collections
db.getCollectionNames()
db.getLastError() - just returns the err msg string
db.getLastErrorObj() - return full status object
db.getLogComponents()
db.getMongo() get the server connection object
db.getMongo().setSlaveOk() allow queries on a replication slave server
db.getName()
db.getPrevError()
db.getProfilingLevel() - deprecated
db.getProfilingStatus() - returns if profiling is on and slow threshold
db.getReplicationInfo()
db.getSiblingDB(name) get the db at the same server as this one
db.getWriteConcern() - returns the write concern used for any operations on this db, inherited from server object if set
db.hostInfo() get details about the server's host
db.isMaster() check replica primary status
db.killOp(opid) kills the current operation in the db
db.listCommands() lists all the db commands
db.loadServerScripts() loads all the scripts in db.system.js
db.logout()
db.printCollectionStats()
db.printReplicationInfo()
db.printShardingStatus()
db.printSlaveReplicationInfo()
db.dropUser(username)
db.repairDatabase()
db.resetError()
db.runCommand(cmdObj) run a database command. if cmdObj is a string, turns it into {cmdObj: 1}
db.serverStatus()
db.setLogLevel(level,<component>)
db.setProfilingLevel(level,slowms) 0=off 1=slow 2=all
db.setWriteConcern(<write concern doc>) - sets the write concern for writes to the db
db.unsetWriteConcern(<write concern doc>) - unsets the write concern for writes to the db
db.setVerboseShell(flag) display extra information in shell output
db.shutdownServer()
db.stats()
db.version() current version of the server
4.2、 常用操作
1)查看当前db版本
|
01
02
|
> db.version()
3.6.11-14-g48d999c
|
2)显示当前数据库
|
01
02
03
04
05
06
07
|
> use test
switched to db test
> db
test
> db.getName()
test
|
3)查询所有数据库
|
01
02
03
04
|
> show dbs
admin 0.000GB
config 0.000GB
local 0.000GB
|
4)切换数据库
|
01
02
|
> use local
switched to db local
|
5)显示当前数据库状态
|
01
02
03
04
05
06
07
08
09
10
11
12
13
14
15
16
17
|
> db.stats()
{
"db" : "test",
"collections" : 0,
"views" : 0,
"objects" : 0,
"avgObjSize" : 0,
"dataSize" : 0,
"storageSize" : 0,
"numExtents" : 0,
"indexes" : 0,
"indexSize" : 0,
"fileSize" : 0,
"fsUsedSize" : 0,
"fsTotalSize" : 0,
"ok" : 1
}
|
6)查看当前数据库的连接机器地址
|
01
02
|
> db.getMongo()
connection to 127.0.0.1:27017
|
7)指定数据库进行连接
|
01
02
|
#默认连接本机test数据库
$mongo 192.168.1.24/admin
|
(5)数据库对象操作
5.1、库的操作
1)创建数据库
当use的时候,系统就会自动创建一个数据库。如果use之后没有创建任何集合。系统就会删除这个数据库。
2)删除数据库
|
01
02
03
04
|
> use test
switched to db test
> db.dropDatabase()
{ "ok" : 1 }
|
5.2、集合操作
1)创建collection
|
01
02
03
04
05
06
07
08
09
10
11
12
13
14
15
16
17
18
19
20
21
|
#方法一:
admin> use app
switched to db app
app> db.createCollection('a')
{ "ok" : 1 }
app> db.createCollection('b')
{ "ok" : 1 }
> show collections #查看当前数据库下的所有集合
a b
#或
> db.getCollectionNames()
[ "a", "b" ]
#方法2:当插入一个文档的时候,一个集合就会自动创建。
use oldboy
db.test.insert({name:"zhangsan"})
db.stu.insert({id:101,name:"zhangsan",age:20,gender:"m"})
show tables;
db.stu.insert({id:102,name:"lisi"})
db.stu.insert({a:"b",c:"d"})
db.stu.insert({a:1,c:2})
|
2)集合数据查看
|
01
02
03
04
05
06
07
08
09
|
> db.stu.find({}).pretty()
db.stu.find({id:101}).pretty();
{
"_id" : ObjectId("5b470168cfdebc16a5a82a97"),
"id" : 101,
"name" : "zhangsan",
"age" : 20,
"gender" : "m"
}
|
3)集合删除
|
01
02
03
04
|
app> use app
switched to db app
app> db.log.drop() #删除集合
|
4)集合重命名
|
01
02
03
04
05
06
07
|
#把log改名为log1
app> db.log.renameCollection("log1")
{ "ok" : 1 }
app> show collections
a b c
log1
app
|
5)批量插入数据
|
01
02
|
for(i=0;i<10000;i++){db.log.insert({"uid":i,"name":"mongodb","age":6,"date":new
Date()})}
|
5.3、数据查询
|
01
02
03
04
05
06
07
08
09
10
11
12
13
14
15
16
17
18
19
20
21
|
#查询集合中的记录数
app> db.log.find() #查询所有记录
#注:默认每页显示20条记录,当显示不下的的情况下,可以用it迭代命令查询下一页数据。
#设置每页显示数据的大小:
> DBQuery.shellBatchSize=50; #每页显示50条记录
app> db.log.findOne() #查看第1条记录
app> db.log.count() #查询总的记录数
#删除集合中的记录数
app> db.log.remove({}) #删除集合中所有记录
> db.log.distinct("name") #查询去掉当前集合中某列的重复数据
#查看集合存储信息
app> db.log.stats()
app> db.log.dataSize() #集合中数据的原始大小
app> db.log.totalIndexSize() #集合中索引数据的原始大小
app> db.log.totalSize() #集合中索引+数据压缩存储之后的大小 *****
app> db.log.storageSize() #集合中数据压缩存储的大小
|
(6)用户管理
用户管理注意事项:
验证库,建立用户时use到的库,在使用用户时,要加上验证库才能登陆。
对于管理员用户,必须在admin下创建.
1. 建用户时,use到的库,就是此用户的验证库
2. 登录时,必须明确指定验证库才能登录
3. 通常,管理员用的验证库是admin,普通用户的验证库一般是所管理的库设置为验证库
4. 如果直接登录到数据库,不进行use,默认的验证库是test,不是我们生产建议的.
6.1、创建用户语法
|
01
02
03
04
05
06
07
08
09
10
11
12
13
14
15
16
17
18
19
20
21
22
23
24
25
|
use admin
mongo 10.0.0.53/admin
db.createUser
{
user: "<name>",
pwd: "<cleartext password>",
roles: [
{ role: "<role>",
db: "<database>" } | "<role>",
...
]
}
#基本语法说明:
user:用户名
pwd:密码
roles:
role:角色名
db:作用对象
role:root, readWrite,read
#验证数据库:
mongo -u test -p 123 10.0.0.53/test
|
6.2、创建超级管理员
创建超级管理员:管理所有数据库(必须use admin再去创建)
#创建超级管理员用户
$ mongo
use admin
db.createUser(
{
user: "root",
pwd: "root123",
roles: [ { role: "root", db: "admin" } ]
}
)
#验证用户
db.auth('root','root123')
#配置文件中,加入以下配置
security:
authorization: enabled
#重启mongodb
mongod -f /mongodb/conf/mongo.conf --shutdown
mongod -f /mongodb/conf/mongo.conf
#登录验证
mongo -uroot -proot123 admin #本地登录
mongo -uroot -proot123 10.0.0.51/admin #远程登录
mongo -uroot -proot123 10.0.0.51 --authenticationDatabase admin #远程登录
注意:当登录时,没加验证库会拒绝连接:
[mongod@db03 mongodb]$ mongo -uroot -proot123 10.0.0.53:27017 #没加验证库
MongoDB shell version v3.6.11-23-g0522785
connecting to: mongodb://10.0.0.53:27017/test?gssapiServiceName=mongodb
2019-03-26T18:05:40.965+0800 E QUERY [thread1] Error: Authentication failed. :
connect@src/mongo/shell/mongo.js:263:13
@(connect):1:6
exception: connect failed
#查看创建的用户
use admin
db.system.users.find().pretty()
> use admin
switched to db admin
> show tables;
system.users
system.version
> db.system.users.find().pretty()
{
"_id" : "admin.root",
"user" : "root",
"db" : "admin",
"credentials" : {
"SCRAM-SHA-1" : {
"iterationCount" : 10000,
"salt" : "cVRF1OIfGhvSblkXirFCtg==",
"storedKey" : "FN3Qb6P2x0zHN7MfWGT8FQHLxhs=",
"serverKey" : "QlWMqMi2eFdht+EUgGLLeZD2nYc="
}
},
"roles" : [
{
"role" : "root",
"db" : "admin"
}
]
}
6.3、创建库管理用户
mongo -uroot -proot123 admin #登录超级用户
use app #切换到验证库
db.createUser(
{
user: "admin",
pwd: "admin",
roles: [ { role: "dbAdmin", db: "app" } ]
}
)
db.auth('admin','admin') #验证创建的用户(返回1说明创建成功)
登录测试
mongo -uadmin -padmin 10.0.0.53/app
6.4、创建普通用户
1)创建对app数据库,读、写权限的用户app01
| 01 02 03 04 05 06 07 08 09 10 11 12 13 14 15 16 17 18 19 20 21 22 23 24 25 26 27 28 29 30 31 32 33 34 35 36 37 38 39 40 41 42 43 44 45 46 47 48 49 50 51 52 | 1、超级管理员用户登陆
mongo -uroot -proot123 admin
2、选择一个验证库
use app
3、创建用户
db.createUser(
{
user: "app01",
pwd: "app01",
roles: [ { role: "readWrite" , db: "app" } ]
}
)
#操作过程:
> use app
switched to db app
> db.createUser(
... {
... user: "app01",
... pwd: "app01",
... roles: [ { role: "readWrite" , db: "app" } ]
... }
... )
Successfully added user: {
"user" : "app01",
"roles" : [
{
"role" : "readWrite",
"db" : "app"
}
]
}
用户登录:
mongo -uapp01 -papp01 app
[mongod@db03 mongodb]$ mongo -uapp01 -papp01 10.0.0.53 #没加验证库会报错
MongoDB shell version v3.6.11-23-g0522785
connecting to: mongodb://10.0.0.53:27017/test?gssapiServiceName=mongodb
2019-03-26T18:17:53.568+0800 E QUERY [thread1] Error: Authentication failed. :
connect@src/mongo/shell/mongo.js:263:13
@(connect):1:6
exception: connect failed
[mongod@db03 mongodb]$ mongo -uapp01 -papp01 10.0.0.53/app #加验证库后能正常登录
MongoDB shell version v3.6.11-23-g0522785
connecting to: mongodb://10.0.0.53:27017/app?gssapiServiceName=mongodb
Implicit session: session { "id" : UUID("5df59a22-334d-41e0-a3ff-364b236cdef0") }
MongoDB server version: 3.6.11-23-g0522785
|
2)创建app数据库读写权限的用户并对test数据库具有读权限
mongo -uroot -proot123 10.0.0.53/admin
use app
db.createUser(
{
user: "app03",
pwd: "app03",
roles: [ { role: "readWrite", db: "app" },
{ role: "read", db: "test" }
]
}
)
6.5、 查询用户信息
|
01
02
|
mongo -uroot -proot123 10.0.0.53/admin
db.system.users.find().pretty()
|
6.6、删除用户
|
01
02
03
04
|
#root身份登录,use到验证库
mongo -uroot -proot123 10.0.0.53/admin
use app
db.dropUser("admin")
|
实例:
#1、关闭大叶内存
[root@yapi ~]# echo never > /sys/kernel/mm/transparent_hugepage/enabled
[root@yapi ~]# echo never > /sys/kernel/mm/transparent_hugepage/defrag
#2、修改文件描述符
[root@yapi ~]# vim /etc/security/limits.conf
#* - nofile 65535 #注释即可,reboot重启生效
#3、创建用户
[root@yapi ~]# useradd mongod
[root@yapi ~]# echo 123456|passwd --stdin mongod
#4、创建mongodb所需目录结构
[root@yapi ~]# mkdir -p /mongodb/{bin,conf,log,data}
#5、上传并解压软件到指定位置
[root@yapi ~]# mkdir /server/tools -p
[root@yapi ~]# mv mongodb-linux-x86_64-rhel70-v3.6-latest.gz /server/tools/
[root@yapi ~]# ll /server/tools/
total 117936
-rw-r--r-- 1 root root 120764476 Dec 6 15:19 mongodb-linux-x86_64-rhel70-v3.6-latest.gz
[root@yapi ~]# cd /server/tools/
[root@yapi tools]# tar xf mongodb-linux-x86_64-rhel70-v3.6-latest.gz
[root@yapi tools]# cp -a mongodb-linux-x86_64-rhel70-3.6.11-14-g48d999c/bin/* /mongodb/bin/
#6、设置目录权限
[root@yapi tools]# chown -R mongod:mongod /mongodb
[root@yapi tools]# ll /mongodb
total 0
drwxr-xr-x 2 mongod mongod 248 Dec 6 15:27 bin
drwxr-xr-x 2 mongod mongod 6 Dec 6 15:24 conf
drwxr-xr-x 2 mongod mongod 6 Dec 6 15:24 data
drwxr-xr-x 2 mongod mongod 6 Dec 6 15:24 log
#7、设置用户环境变量
[root@yapi tools]# su - mongod
[mongod@yapi ~]$ vim .bash_profile
export PATH=/mongodb/bin:$PATH
[mongod@yapi ~]$ source .bash_profile
#8、启动mongodb(切换到mongod)
[mongod@yapi ~]$ mongod --dbpath=/mongodb/data --logpath=/mongodb/log/mongodb.log --port=27017 --logappend --fork
about to fork child process, waiting until server is ready for connections.
forked process: 40637
child process started successfully, parent exiting
#9、登录mongodb
[mongod@yapi ~]$ mongo
MongoDB shell version v3.6.11-14-g48d999c
connecting to: mongodb://127.0.0.1:27017/?gssapiServiceName=mongodb
Implicit session: session { "id" : UUID("a00b73d1-cb47-45f2-a915-086e20a90768") }
MongoDB server version: 3.6.11-14-g48d999c
Welcome to the MongoDB shell.
For interactive help, type "help".
For more comprehensive documentation, see
http://docs.mongodb.org/
Questions? Try the support group
http://groups.google.com/group/mongodb-user
Server has startup warnings:
2019-12-06T15:31:59.318+0800 I CONTROL [initandlisten]
2019-12-06T15:31:59.318+0800 I CONTROL [initandlisten] ** WARNING: Access control is not enabled for the database.
2019-12-06T15:31:59.318+0800 I CONTROL [initandlisten] ** Read and write access to data and configuration is unrestricted.
2019-12-06T15:31:59.318+0800 I CONTROL [initandlisten]
2019-12-06T15:31:59.318+0800 I CONTROL [initandlisten] ** WARNING: This server is bound to localhost.
2019-12-06T15:31:59.318+0800 I CONTROL [initandlisten] ** Remote systems will be unable to connect to this server.
2019-12-06T15:31:59.318+0800 I CONTROL [initandlisten] ** Start the server with --bind_ip <address> to specify which IP
2019-12-06T15:31:59.318+0800 I CONTROL [initandlisten] ** addresses it should serve responses from, or with --bind_ip_all to
2019-12-06T15:31:59.318+0800 I CONTROL [initandlisten] ** bind to all interfaces. If this behavior is desired, start the
2019-12-06T15:31:59.318+0800 I CONTROL [initandlisten] ** server with --bind_ip 127.0.0.1 to disable this warning.
2019-12-06T15:31:59.318+0800 I CONTROL [initandlisten]
> show dbs
admin 0.000GB
config 0.000GB
local 0.000G
#10、编辑配置文件
[mongod@yapi ~]$ vim /mongodb/conf/mongo.conf
systemLog:
destination: file
path: "/mongodb/log/mongodb.log"
logAppend: true
storage:
journal:
enabled: true
dbPath: "/mongodb/data/"
processManagement:
fork: true
net:
port: 27017
bindIp: 192.168.11.11,127.0.0.1
#11、重启mongodb
[mongod@yapi ~]$ mongod -f /mongodb/conf/mongo.conf --shutdown
killing process with pid: 40637
[mongod@yapi ~]$ mongod -f /mongodb/conf/mongo.conf
about to fork child process, waiting until server is ready for connections.
forked process: 42694
child process started successfully, parent exiting


 214
214


 被折叠的 条评论
为什么被折叠?
被折叠的 条评论
为什么被折叠?
 到【灌水乐园】发言


