


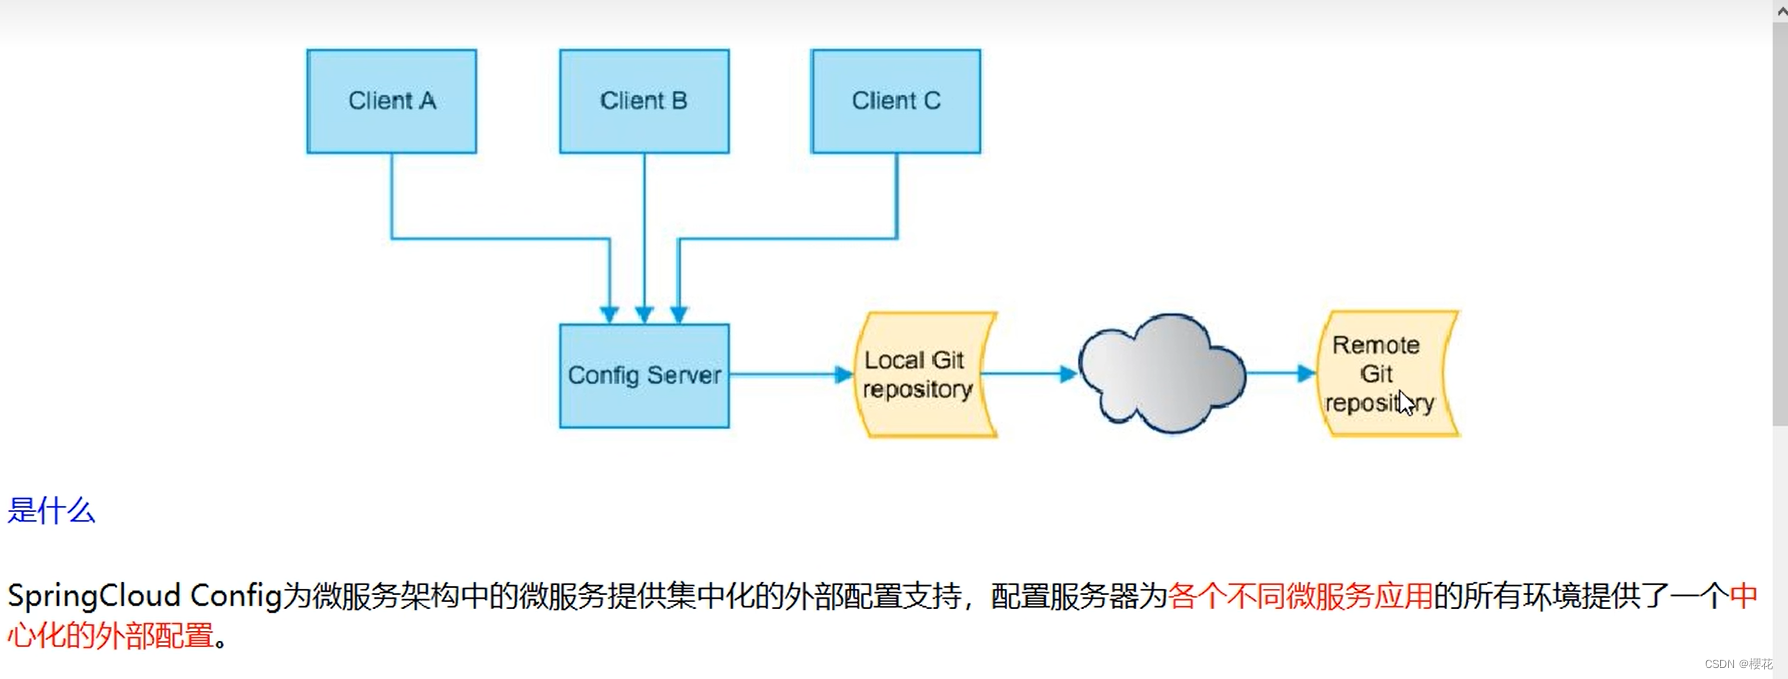
简介


Config配置总控中心搭建
用你自己的账号在GitHub上新建一个名为springcloud-config的新Repository。
由上一步获得刚新建的git地址 : git@github.com:yyx0113/springcloud-config.git
本地硬盘目录上新建gitee仓库并clone。
- 工作目录为 D:\workspace\yyx\springcloudConfig
- git clone git@github.com:yyx0113/springcloud-config.git
此时在工作目录会创建名为springcloud-config的文件夹。
在springcloud-config的文件夹中创建三个配置文件,随后git add .,git commit -m “files”, git push -u origin master等一系列上传操作上传到springcloud-config的新Repository。
- config-dev.yml
config:
  info: "master branch,springcloud-config/config-dev.yml version=7"
- config-prod.yml
config:
  info: "master branch,springcloud-config/config-prod.yml version=1"
- config-test.yml
config:
  info: "master branch,springcloud-config/config-test.yml version=1"
1. 新建Module模块cloud-config-center-3344,它即为Cloud的配置中心模块CloudConfig Center
2. pom.xml
<?xml version="1.0" encoding="UTF-8"?>
<project xmlns="http://maven.apache.org/POM/4.0.0"
         xmlns:xsi="http://www.w3.org/2001/XMLSchema-instance"
         xsi:schemaLocation="http://maven.apache.org/POM/4.0.0 http://maven.apache.org/xsd/maven-4.0.0.xsd">
    <modelVersion>4.0.0</modelVersion>
    <parent>
        <groupId>com.atguigu.springcloud</groupId>
        <artifactId>cloud2020</artifactId>
        <version>1.0-SNAPSHOT</version>
    </parent>

    <artifactId>cloud-config-center-3344</artifactId>

    <dependencies>
        <!--添加消息总线RabbitMQ支持-->
        <dependency>
            <groupId>org.springframework.cloud</groupId>
            <artifactId>spring-cloud-starter-bus-amqp</artifactId>
        </dependency>
        <dependency>
            <groupId>org.springframework.cloud</groupId>
            <artifactId>spring-cloud-config-server</artifactId>
        </dependency>
        <dependency>
            <groupId>org.springframework.cloud</groupId>
            <artifactId>spring-cloud-starter-netflix-eureka-client</artifactId>
        </dependency>
        <dependency>
            <groupId>org.springframework.boot</groupId>
            <artifactId>spring-boot-starter-web</artifactId>
        </dependency>

        <dependency>
            <groupId>org.springframework.boot</groupId>
            <artifactId>spring-boot-starter-actuator</artifactId>
        </dependency>
        <dependency>
            <groupId>org.springframework.boot</groupId>
            <artifactId>spring-boot-devtools</artifactId>
            <scope>runtime</scope>
            <optional>true</optional>
        </dependency>
        <dependency>
            <groupId>org.projectlombok</groupId>
            <artifactId>lombok</artifactId>
            <optional>true</optional>
        </dependency>
        <dependency>
            <groupId>org.springframework.boot</groupId>
            <artifactId>spring-boot-starter-test</artifactId>
            <scope>test</scope>
        </dependency>
    </dependencies>

</project>
3. application.yml
server:
  port: 3344

spring:
  application:
    name:  cloud-config-center #注册进Eureka服务器的微服务名
  cloud:
    config:
      server:
        git:
          uri: git@github.com:yyx0113/springcloud-config.git #GitHub上面的git仓库地址
          # 搜索目录
          search-paths:
            - springcloud-config   # 仓库名称
      # 读取分支
      label: master

#服务注册到eureka地址
eureka:
  client:
    service-url:
      defaultZone: http://localhost:7001/eureka
4. 主启动类
package com.atguigu.springcloud;

import org.springframework.boot.SpringApplication;
import org.springframework.boot.autoconfigure.SpringBootApplication;
import org.springframework.cloud.config.server.EnableConfigServer;
import org.springframework.cloud.netflix.eureka.EnableEurekaClient;

@SpringBootApplication
// @EnableConfigServer 注册中心服务器端注解
@EnableConfigServer
public class ConfigCenterMain3344 {
    public static void main(String[] args) {
        SpringApplication.run(ConfigCenterMain3344.class, args);
    }
}
5. windows下修改hosts文件,增加映射
127.0.0.1 config-3344.com
6. 测试通过Config微服务是否可以从GitHub上获取配置内容
-
启动ConfigCenterMain3344
-
浏览器防问 - http://config-3344.com:3344/master/config-dev.yml
-
页面返回结果:

配置读取规则
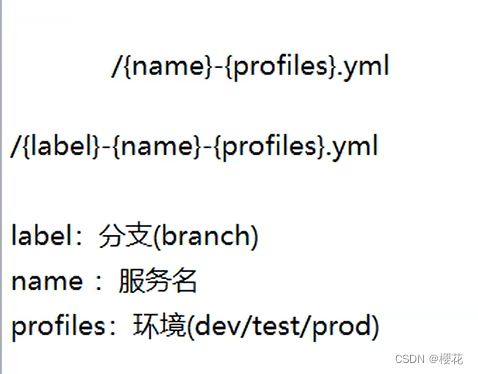
- /{label}/{application}-{profile}.yml(推荐)


- /{application}-{profile}.yml
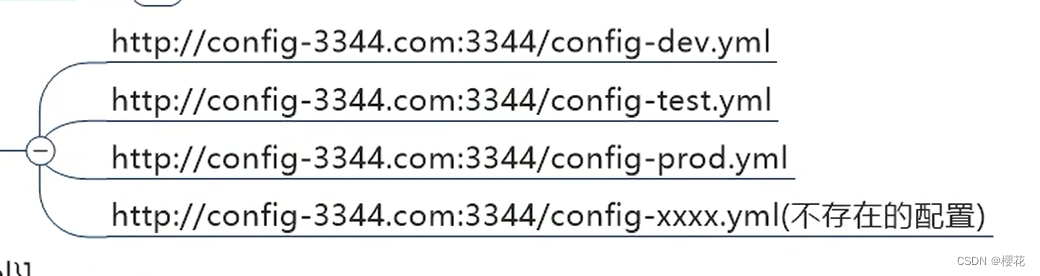
- /{application}/{profile}[/{label}]
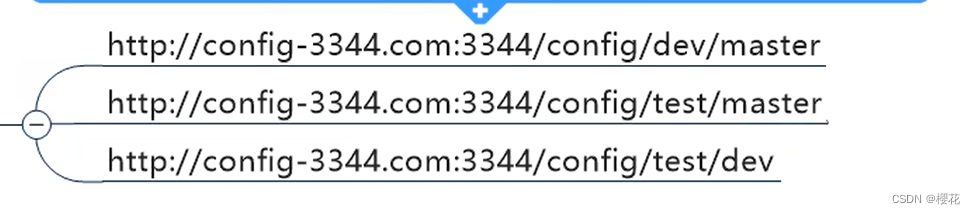
- 重要配置细节总结
Config客户端配置与测试
1. 新建cloud-config-client-3355
2. pom.xml
<?xml version="1.0" encoding="UTF-8"?>
<project xmlns="http://maven.apache.org/POM/4.0.0"
         xmlns:xsi="http://www.w3.org/2001/XMLSchema-instance"
         xsi:schemaLocation="http://maven.apache.org/POM/4.0.0 http://maven.apache.org/xsd/maven-4.0.0.xsd">
    <modelVersion>4.0.0</modelVersion>
    <parent>
        <groupId>com.atguigu.springcloud</groupId>
        <artifactId>cloud2020</artifactId>
        <version>1.0-SNAPSHOT</version>
    </parent>

    <artifactId>cloud-config-client-3355</artifactId>

    <dependencies>
        <!--添加消息总线RabbitMQ支持-->
        <dependency>
            <groupId>org.springframework.cloud</groupId>
            <artifactId>spring-cloud-starter-bus-amqp</artifactId>
        </dependency>
        <dependency>
            <groupId>org.springframework.cloud</groupId>
            <artifactId>spring-cloud-starter-config</artifactId>
        </dependency>
        <dependency>
            <groupId>org.springframework.cloud</groupId>
            <artifactId>spring-cloud-starter-netflix-eureka-client</artifactId>
        </dependency>
        <dependency>
            <groupId>org.springframework.boot</groupId>
            <artifactId>spring-boot-starter-web</artifactId>
        </dependency>
        <dependency>
            <groupId>org.springframework.boot</groupId>
            <artifactId>spring-boot-starter-actuator</artifactId>
        </dependency>

        <dependency>
            <groupId>org.springframework.boot</groupId>
            <artifactId>spring-boot-devtools</artifactId>
            <scope>runtime</scope>
            <optional>true</optional>
        </dependency>
        <dependency>
            <groupId>org.projectlombok</groupId>
            <artifactId>lombok</artifactId>
            <optional>true</optional>
        </dependency>
        <dependency>
            <groupId>org.springframework.boot</groupId>
            <artifactId>spring-boot-starter-test</artifactId>
            <scope>test</scope>
        </dependency>
    </dependencies>

</project>
bootstrap.yml
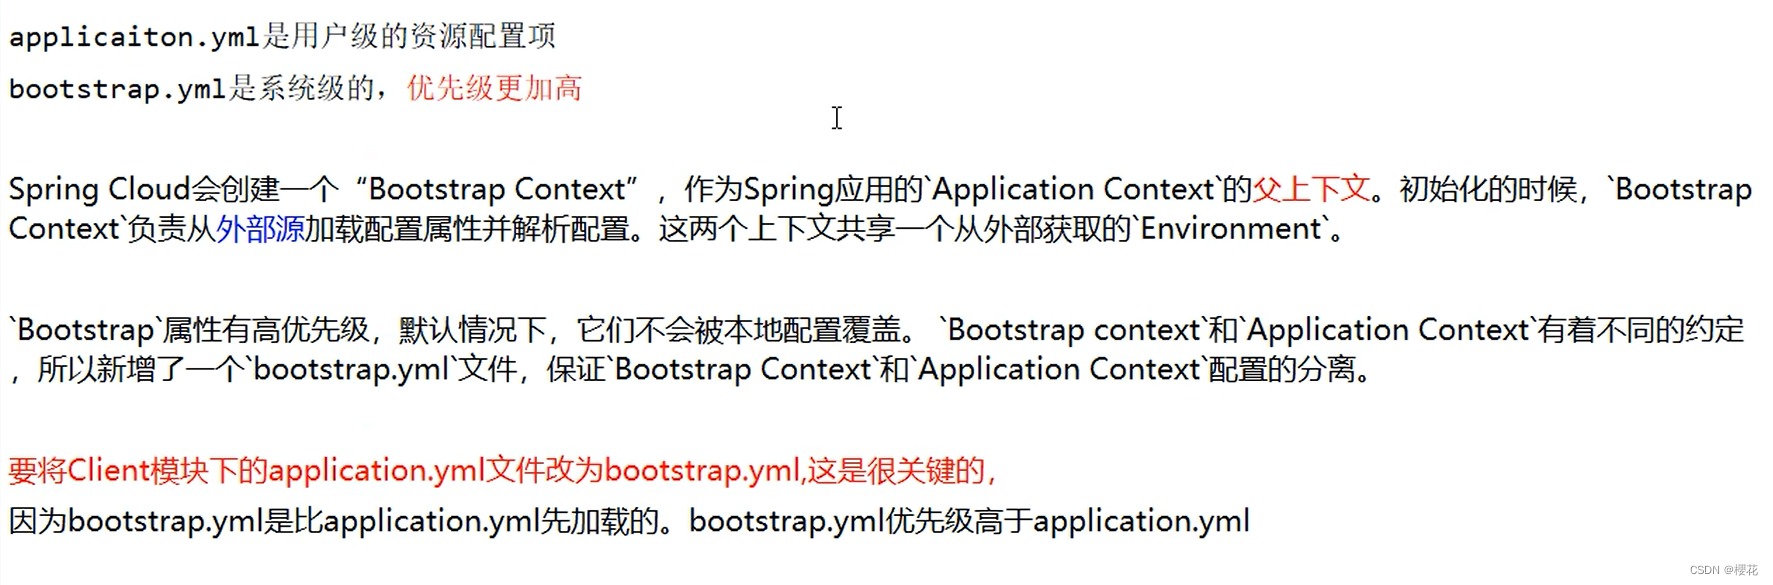
3. bootstrap.yml

server:
  port: 3355

spring:
  application:
    name: config-client
  cloud:
    #Config客户端配置
    config:
      label: master #分支名称
      name: config #配置文件名称
      profile: dev #读取后缀名称   上述3个综合:master分支上config-dev.yml的配置文件被读取http://config-3344.com:3344/master/config-dev.yml
      uri: http://localhost:3344 #配置中心地址k


#服务注册到eureka地址
eureka:
  client:
    service-url:
      defaultZone: http://localhost:7001/eureka
4. 修改config-dev.yml配置并提交到GitHub中,比如加个变量age或者版本号version
5. 主启动
package com.atguigu.springcloud;

import org.springframework.boot.SpringApplication;
import org.springframework.boot.autoconfigure.SpringBootApplication;
import org.springframework.cloud.netflix.eureka.EnableEurekaClient;

@SpringBootApplication
@EnableEurekaClient
public class ConfigClientMain3355 {
    public static void main(String[] args) {
        SpringApplication.run(ConfigClientMain3355.class, args);
    }
}
6. 业务类,创建类 controller.ConfigClientController
7. 测试
-
启动Config配置中心3344微服务并自测
- http://config-3344.com:3344/master/config-prod.yml
- http://config-3344.com:3344/master/config-dev.yml
-
启动3355作为Client准备访问
- http://localhost:3355/configlnfo

Config动态刷新之手动版

1. 修改端口3355模块, pom.xml 引入actuator监控
<dependency>
    <groupId>org.springframework.boot</groupId>
    <artifactId>spring-boot-starter-actuator</artifactId>
</dependency>
2. 修改 bootstrap.yml,添加暴露监控端口配置:
# 暴露监控端点
management:
  endpoints:
    web:
      exposure:
        include: "*"
3. 业务类Controller 添加 @RefreshScope 注解
4. 测试
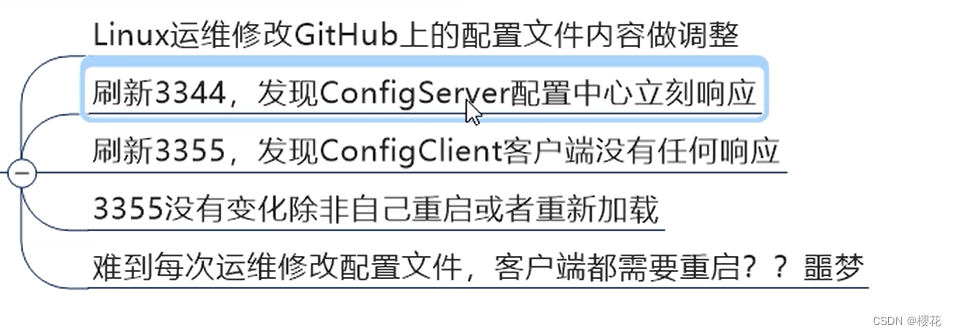
此时修改github配置文件内容 -> 访问3344 -> 访问3355
http://localhost:3355/configInfo
3355改变没有??? 没有,还需一步
How
需要运维人员发送Post请求刷新3355
curl -X POST "http://localhost:3355/actuator/refresh"
再次测试
http://localhost:3355/configInfo
3355改变没有??? 改了。
成功实现了客户端3355刷新到最新配置内容,避免了服务重启
想想还有什么问题?
- 假如有多个微服务客户端3355/3366/3377
- 每个微服务都要执行—次post请求,手动刷新?
- 可否广播,一次通知,处处生效?
- 我们想大范围的自动刷新,求方法


 531
531


 被折叠的 条评论
为什么被折叠?
被折叠的 条评论
为什么被折叠?
 到【灌水乐园】发言


